

Getting Started with Salesforce
Prerequisites
- A Salesforce account.
- An Engini account.
- For the OAuth2 (Engini managed package) method only: a Salesforce user who can install a package in your Salesforce org. See Install the Engini package.
Authentication methods
You can connect Engini to Salesforce in three ways. You pick one in the Authentication Method field when you add the connection.- OAuth2 (Engini managed package) - The default and the best choice for most users. You sign in with your Salesforce user. You don’t create or copy any keys. It needs the Engini package in your Salesforce org.
- Custom OAuth 2.0 - You sign in through your own Salesforce app, not Engini’s. You enter the app’s Consumer Key and Consumer Secret in Engini. It doesn’t need the Engini package. Use it if your company wants to control the app itself.
- OAuth2 (Legacy Connected App) - Works with any Salesforce org and needs no installation.
Install the Engini package
You need this step only for the OAuth2 (Engini managed package) method. The package adds the Engini app to your Salesforce org. Your workflows still run in Engini, not in Salesforce.- In Engini, start a new Salesforce connection and select OAuth2 (Engini managed package) in Authentication Method.
- Click the Install guide link under the field. Salesforce opens its login page.
- Log in to Salesforce with a user who can install packages. If you work in a sandbox, use the sandbox login page, test.salesforce.com.
- Salesforce shows the install page for the EnginiPackage. Follow the Salesforce prompts to install it.
- When the installation ends, Salesforce shows the page Activate Your Engini Integration.
- Go back to Engini and finish the connection as described in Add a connection to Salesforce in Engini.
Add a connection to Salesforce in Engini
- Enter your Engini account at https://app.engini.io.
-
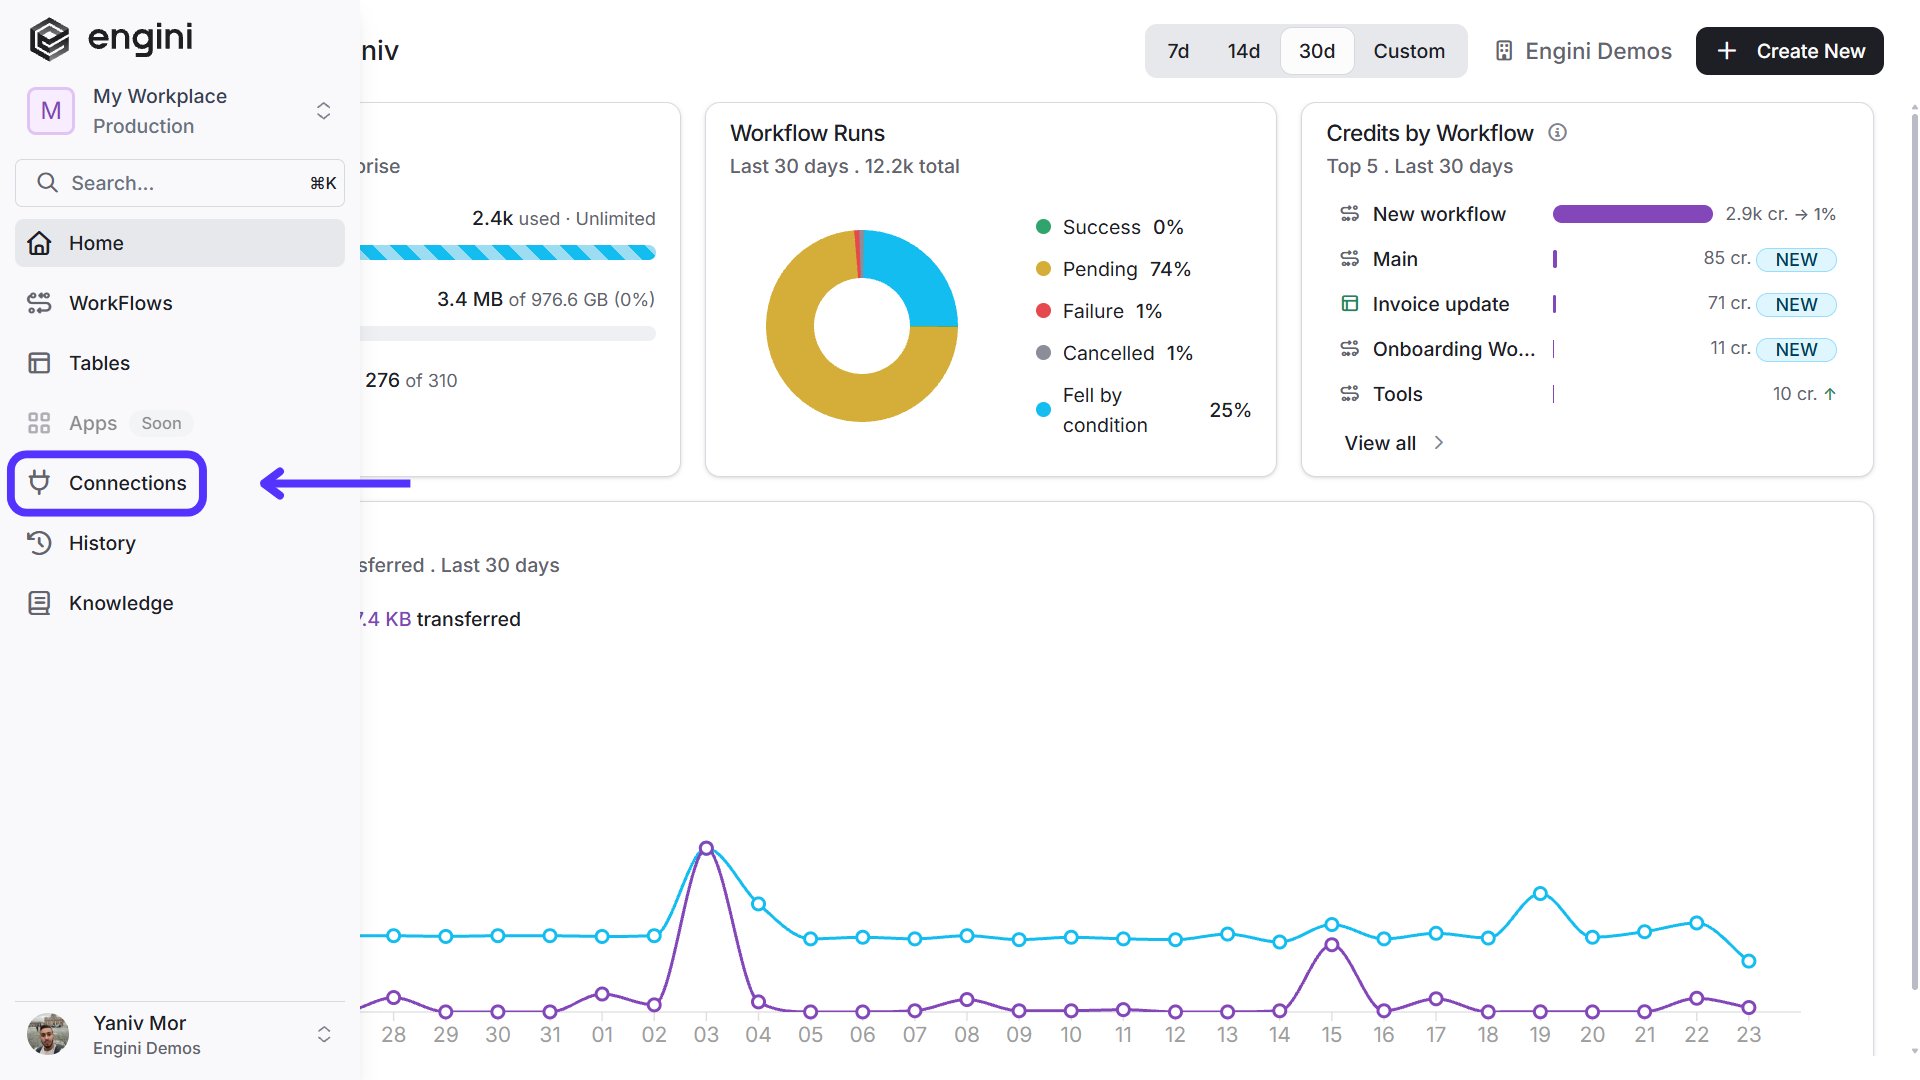
Navigate to Connections page by clicking on the Connections on the left sidebar or by clicking here.
-
Click on the Add connection option located at the topbar.

-
Choose Salesforce option from the available applications.

- Enter the following details in the “Edit Connection” form and press Save:
OAuth2 (Engini managed package)
This method uses Engini’s own Salesforce app. You don’t need a Client Id or a Client Secret. You only sign in with your Salesforce user. Install the Engini package first. See Install the Engini package.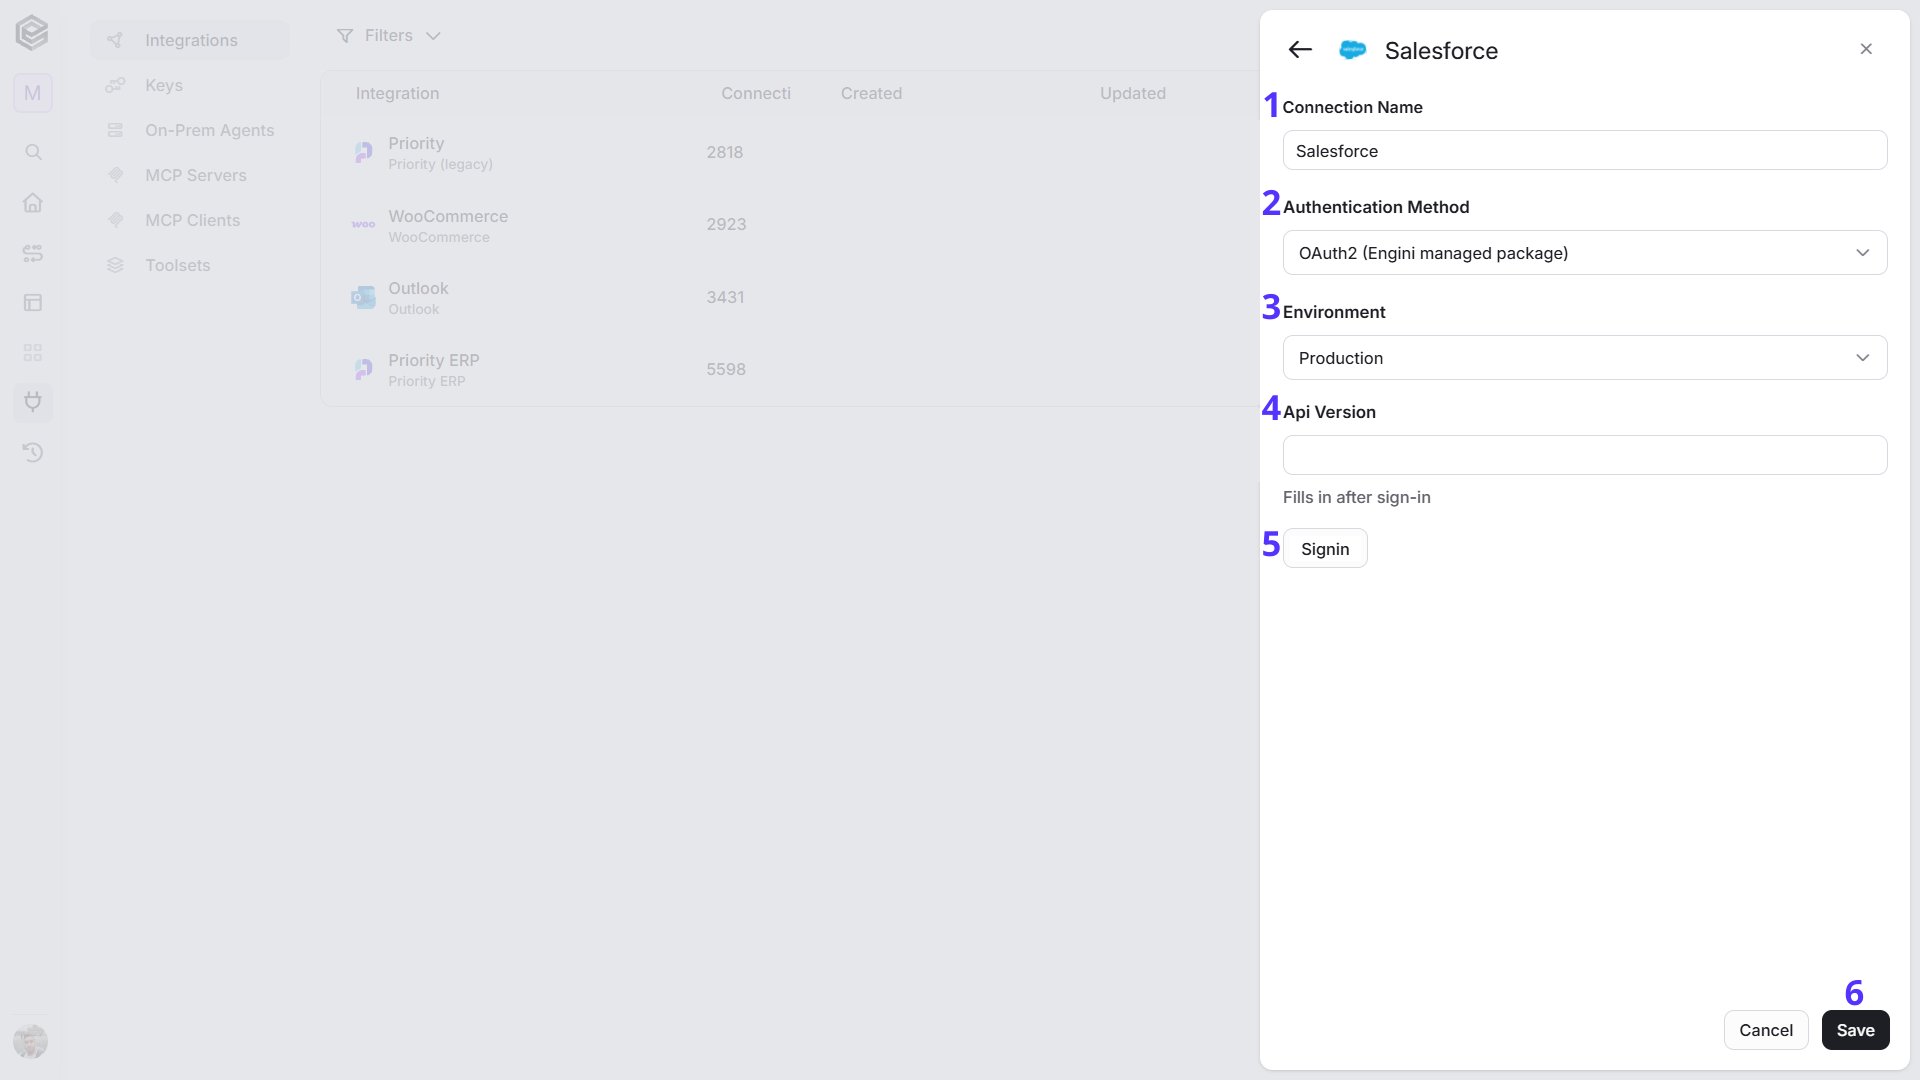
- Connection Name - Enter a unique and descriptive name for this connection. It helps you find the connection later.
- Authentication Method - Select OAuth2 (Engini managed package). This is the default.
- Environment - Select Production for your live Salesforce org, or Sandbox for a test org. The default is Production.
- Api Version - Required. This field is empty until you sign in (see Signin below). After you sign in, Engini fills it with the API versions of your Salesforce org. Select the highest version.
- Signin - Click Signin. Salesforce opens a consent screen. Log in and approve the access. Engini saves the sign-in details for you, encrypted.
- Save - Click Save to save the connection.
Custom OAuth 2.0
This method uses your own Salesforce app, not Engini’s, so you don’t need to install the Engini package. You must enter the Consumer Key and the Consumer Secret of that app. If you don’t have an app yet, create one first. See Create your own Salesforce app.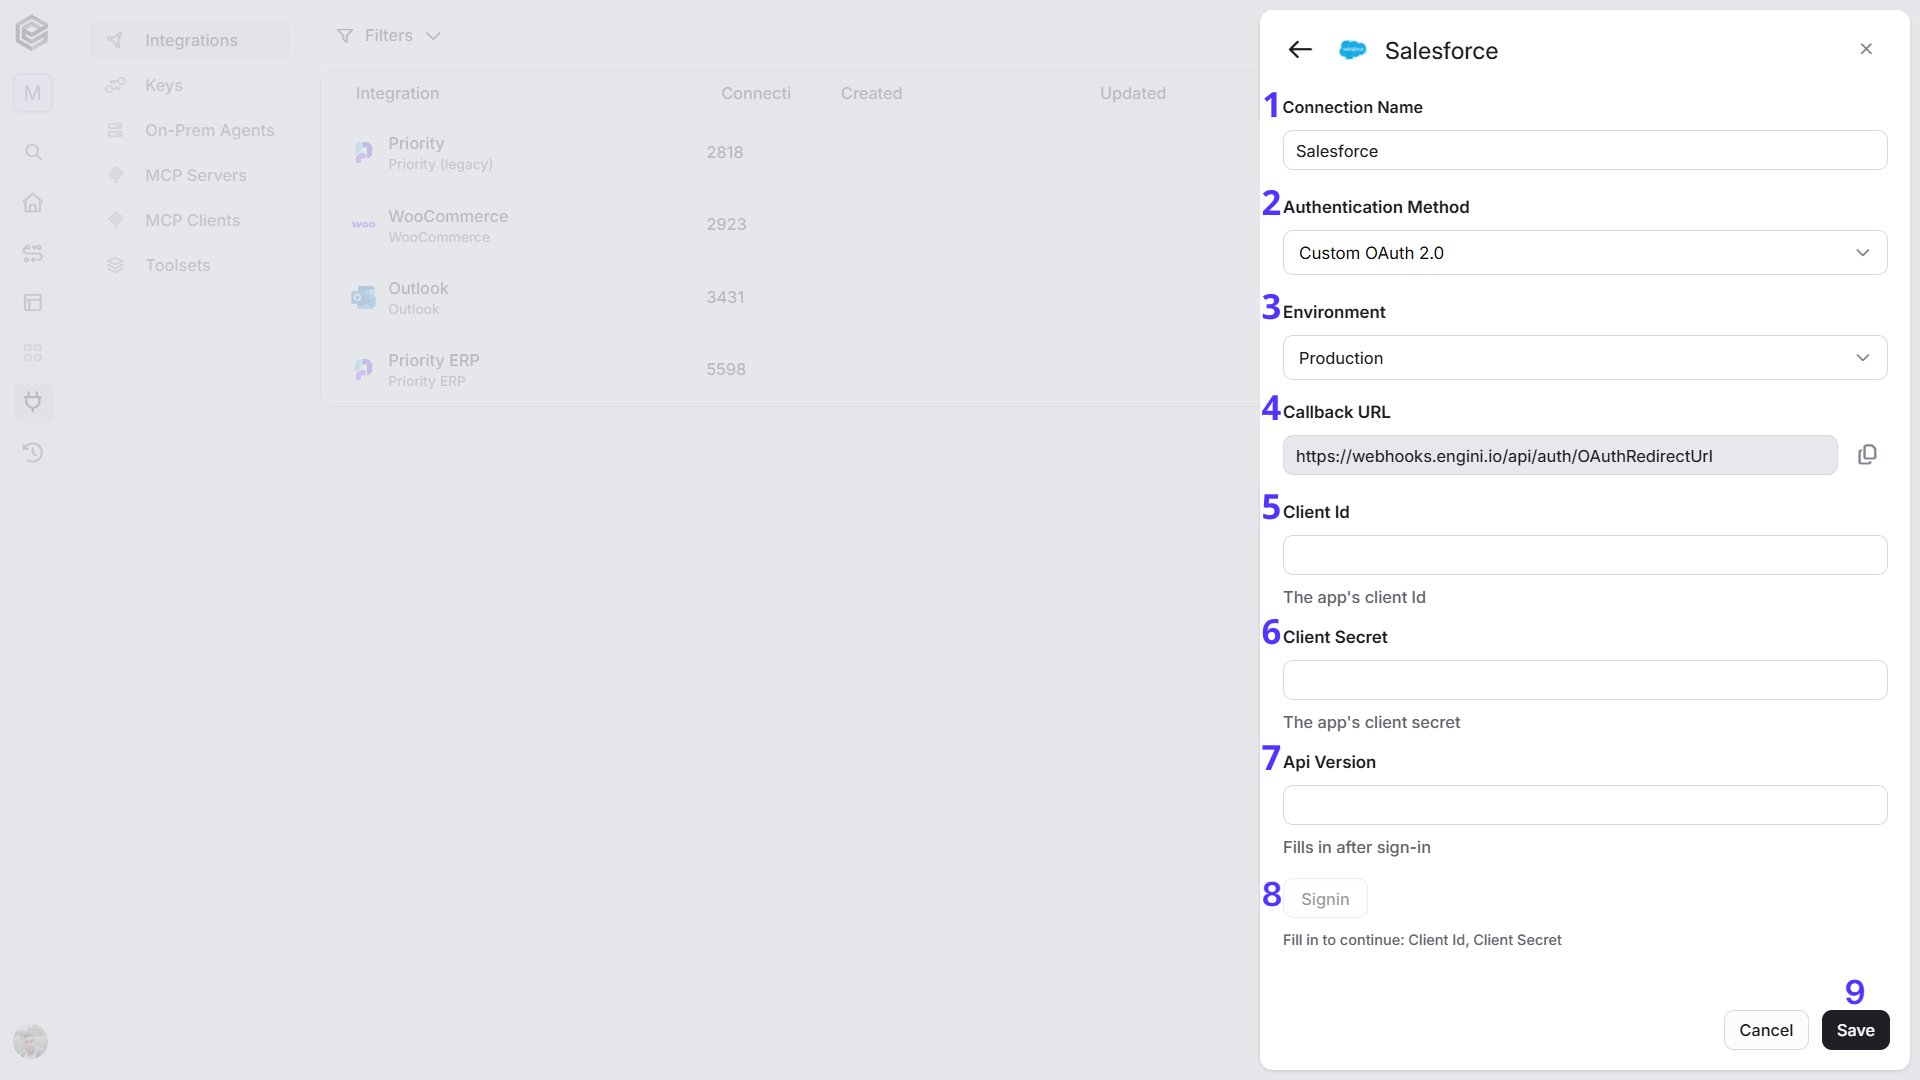
- Connection Name - Enter a unique and descriptive name for this connection.
- Authentication Method - Select Custom OAuth 2.0.
- Environment - Select Production or Sandbox. The default is Production. Use the same type of org where you created your app.
- Callback URL - A read-only field that shows the address Salesforce sends you back to after you sign in (
https://webhooks.engini.io/api/auth/OAuthRedirectUrl). Click the copy button next to it, then add this address as the Callback URL in your Salesforce app. Do this before you click Signin, so that the sign-in works. - Client Id - Enter the Consumer Key of your Salesforce app.
- Client Secret - Enter the Consumer Secret of your Salesforce app.
- Api Version - Required. This field is empty until you sign in (see Signin below). After you sign in, Engini fills it with the API versions of your Salesforce org. Select the highest version.
- Signin - This button stays greyed out (“Fill in to continue: Client Id, Client Secret”) until you fill in the Client Id and Client Secret. Then click Signin. Log in to Salesforce and approve the access for your app. Engini saves the sign-in details for you.
- Save - Click Save to save the connection.
Create your own Salesforce app
You need a Salesforce user who can create apps in your org.- In Salesforce, open Setup and create a new app - an External Client App or a Connected App.
- Give the app a name and a contact email.
- In the app’s OAuth settings, set the Callback URL to
https://webhooks.engini.io/api/auth/OAuthRedirectUrl. This is the address the Callback URL field in the Engini connection form shows. - Enable the OAuth scopes for basic information, API access and refresh token.
- Save the app.
- Open the app and copy its Consumer Key and Consumer Secret. Salesforce may ask you to verify your identity before it shows the secret.
- Enter them in the Client Id and Client Secret fields in Engini.
OAuth2 (Legacy Connected App)
This method works with any Salesforce org and needs no package installation. You sign in with your Salesforce user.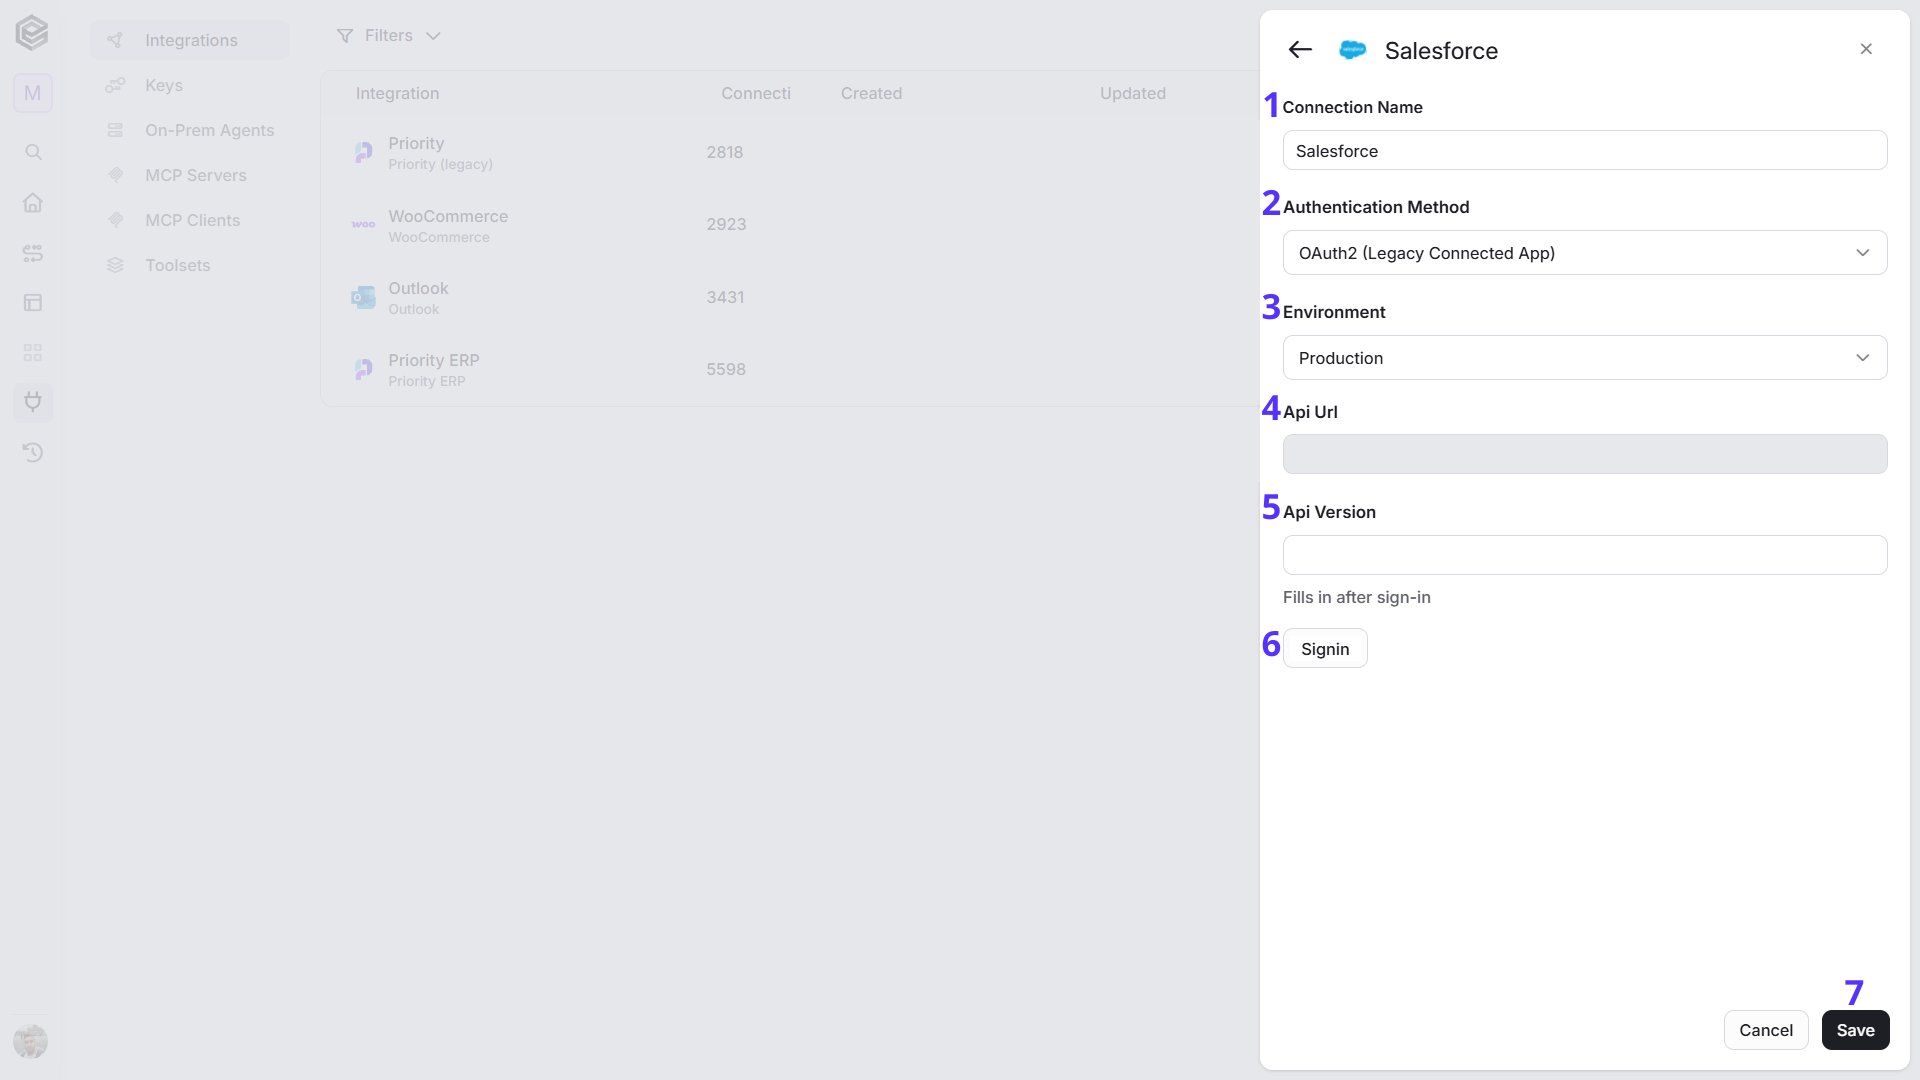
- Connection Name - Enter a unique and descriptive name for this connection.
- Authentication Method - Select OAuth2 (Legacy Connected App).
- Environment - Select Production for your live Salesforce org, or Sandbox for a test org. The default is Production.
- Api Url - This field is read-only. It holds the Salesforce address that Engini sends requests to, and it is filled in for you after you sign in.
- Api Version - Required. This field is empty until you sign in (see Signin below). After you sign in, Engini fills it with the API versions of your Salesforce org. Select the highest version.
- Signin - Click Signin. Salesforce opens a consent screen. Log in and approve the access. Engini saves the sign-in details for you, encrypted.
- Save - Click Save to save the connection.
Licensing and blocked connections
When the Engini package is installed, Engini creates a license for your Salesforce organization. The license starts on the install date and is valid for 14 days. Uninstalling the package does not delete or expire the license. The license is checked when you save a connection that uses OAuth2 (Engini managed package). If there is no license for your Salesforce organization, or it has expired, the connection is blocked: the connection panel shows Connection is blocked: No License or Connection is blocked: License Expired, and a workflow step that uses the connection stops with the error “Activity connection is blocked”. Once a valid license exists, saving the connection again removes the block.Triggers
Engini has five triggers for Salesforce. Four of the triggers are schedule triggers (check for created records, check for updated records, check for new jobs and check for updated jobs) and one of them is automated trigger (outbound Message Webhook).Check for created records
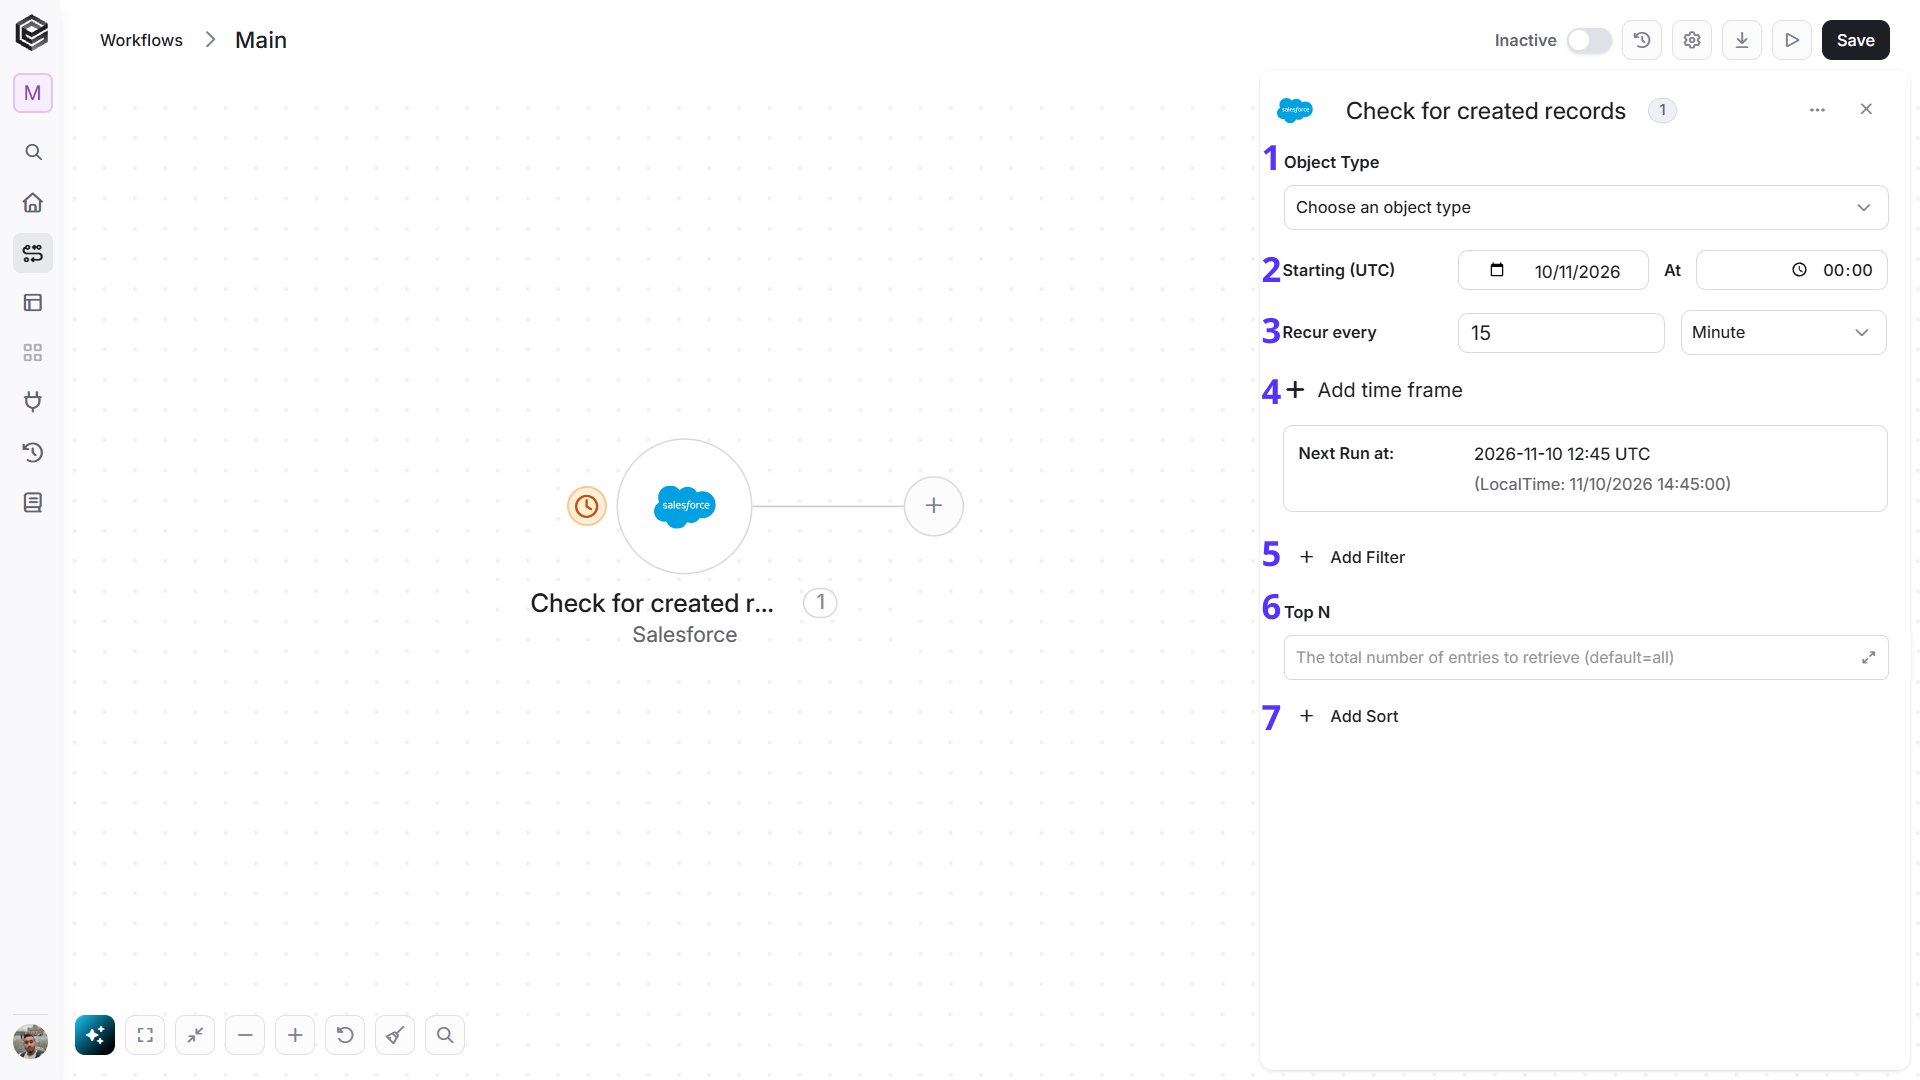
- Object Type - Select the type of object you want to check if a new record has been created.
- Starting (UTC) - Choose the date and time for this workflow to start working. For the selected day time the workflow will run according to the selected frequency.
- Recur every - Select the time interval. The minimum time interval is 15 minutes. You’ll see the date and time for the next run according to UTC time and your local time.
-
Add time frame - You can specify a time frame during which the trigger will operate.
- Click on “Add time frame” button.
- Select a specific time frame to activate the trigger. For example, every 15 minutes from 8 AM to 5 PM.
- Add Filter - Click Add Filter to define conditions that narrow down the data list and return only the relevant items. To learn more about using filters, click here.
- Top N - You can set the maximum number of records Engini will return for the object you chose (default = all records).
- Add Sort - Click Add Sort to organize the data list by a selected field in ascending or descending order. To learn more about sorting data, click here.
Check for updated records
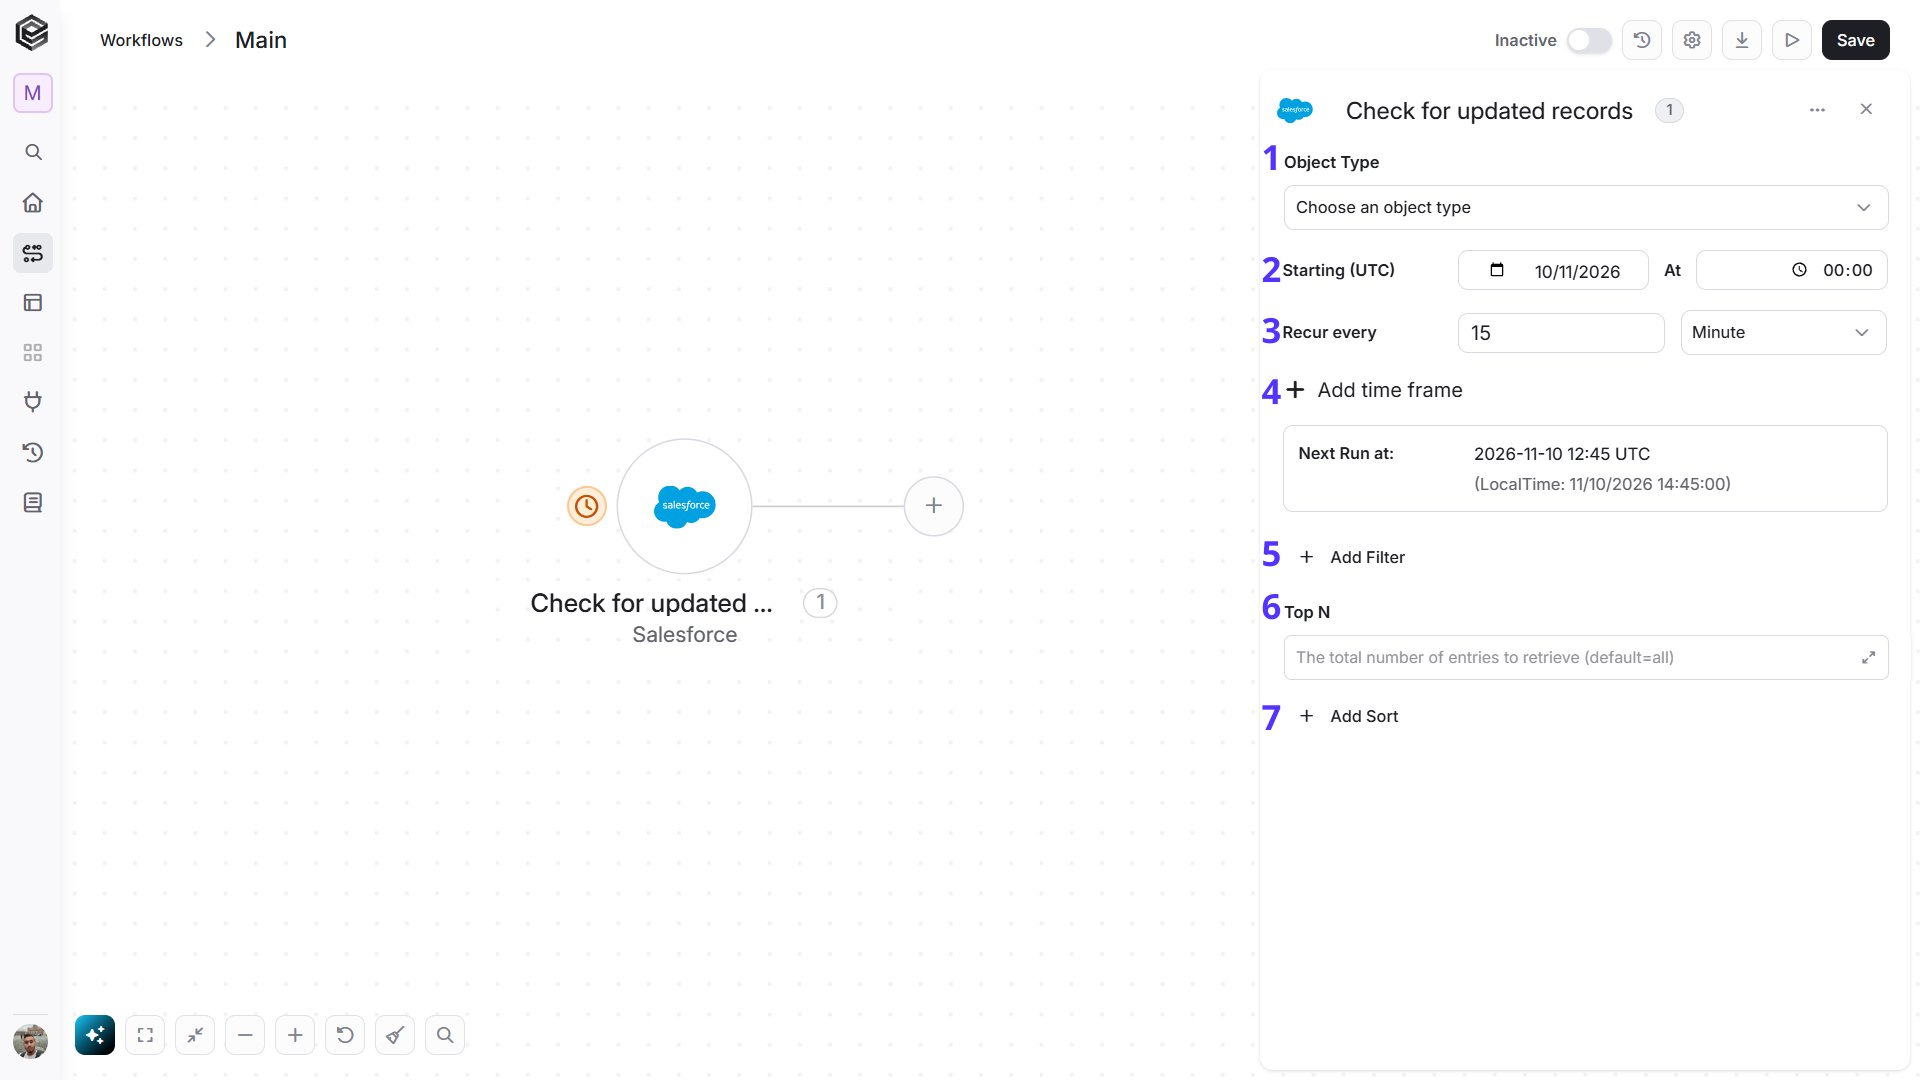
- Object Type - Select the type of object you want to check if a record has been updated.
- Starting (UTC) - Choose the date and time for this workflow to start working. For the selected day time the workflow will run according to the selected frequency.
- Recur every - Select the time interval. The minimum time interval is 15 minutes. You’ll see the date and time for the next run according to UTC time and your local time.
-
Add time frame - You can specify a time frame during which the trigger will operate.
- Click on “Add time frame” button.
- Select a specific time frame to activate the trigger. For example, every 15 minutes from 8 AM to 5 PM.
- Add Filter - Click Add Filter to define conditions that narrow down the data list and return only the relevant items. To learn more about using filters, click here.
- Top N - You can set the maximum number of records Engini will return for the object you chose (default = all records).
- Add Sort - Click Add Sort to organize the data list by a selected field in ascending or descending order. To learn more about sorting data, click here.
Check for New Jobs
Starts the workflow when a new bulk job is created in your Salesforce org.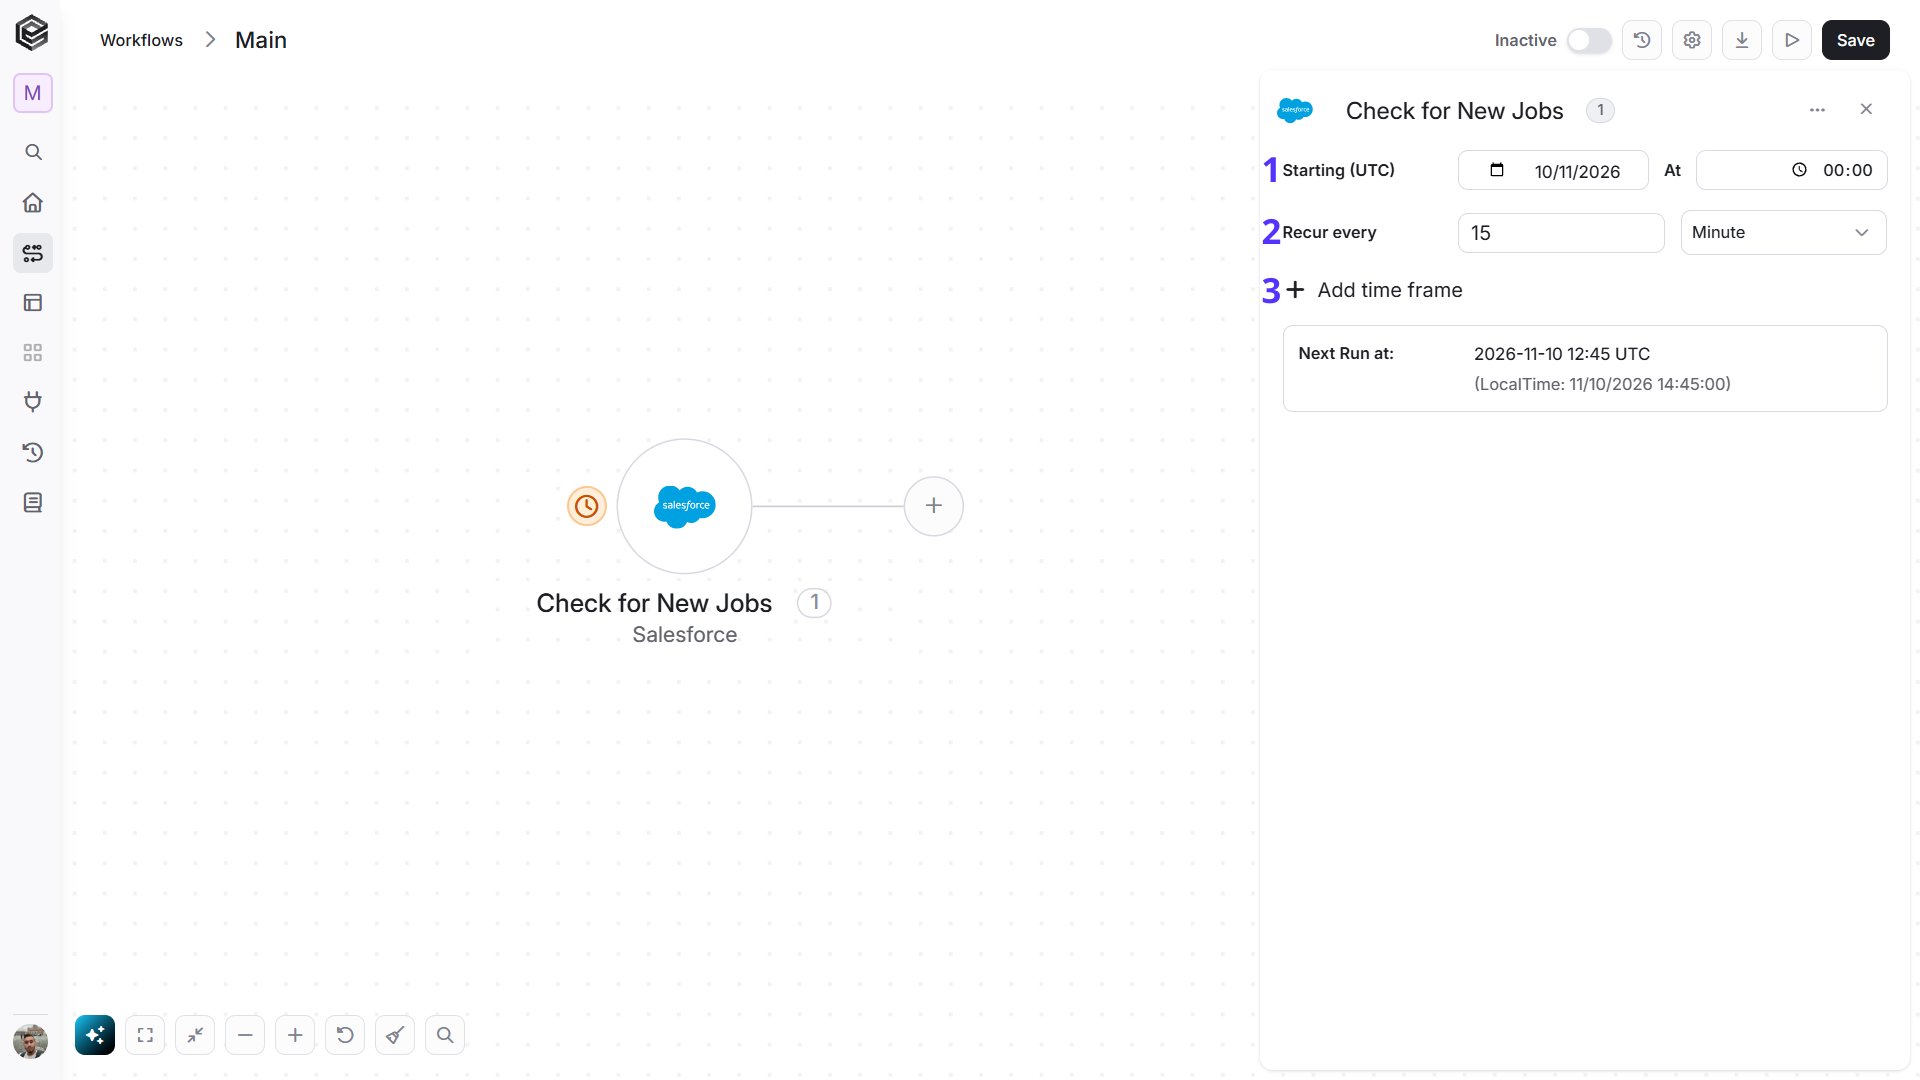
- Starting (UTC) - Choose the date and time for this workflow to start working. For the selected day time the workflow will run according to the selected frequency.
- Recur every - Select the time interval. The minimum time interval is 15 minutes. You’ll see the date and time for the next run according to UTC time and your local time.
- Add time frame - You can specify a time frame during which the trigger will operate.
- Click on “Add time frame” button.
- Select a specific time frame to activate the trigger. For example, every 15 minutes from 8 AM to 5 PM.
Check for Updated Jobs
Starts the workflow when a bulk job in your Salesforce org is updated.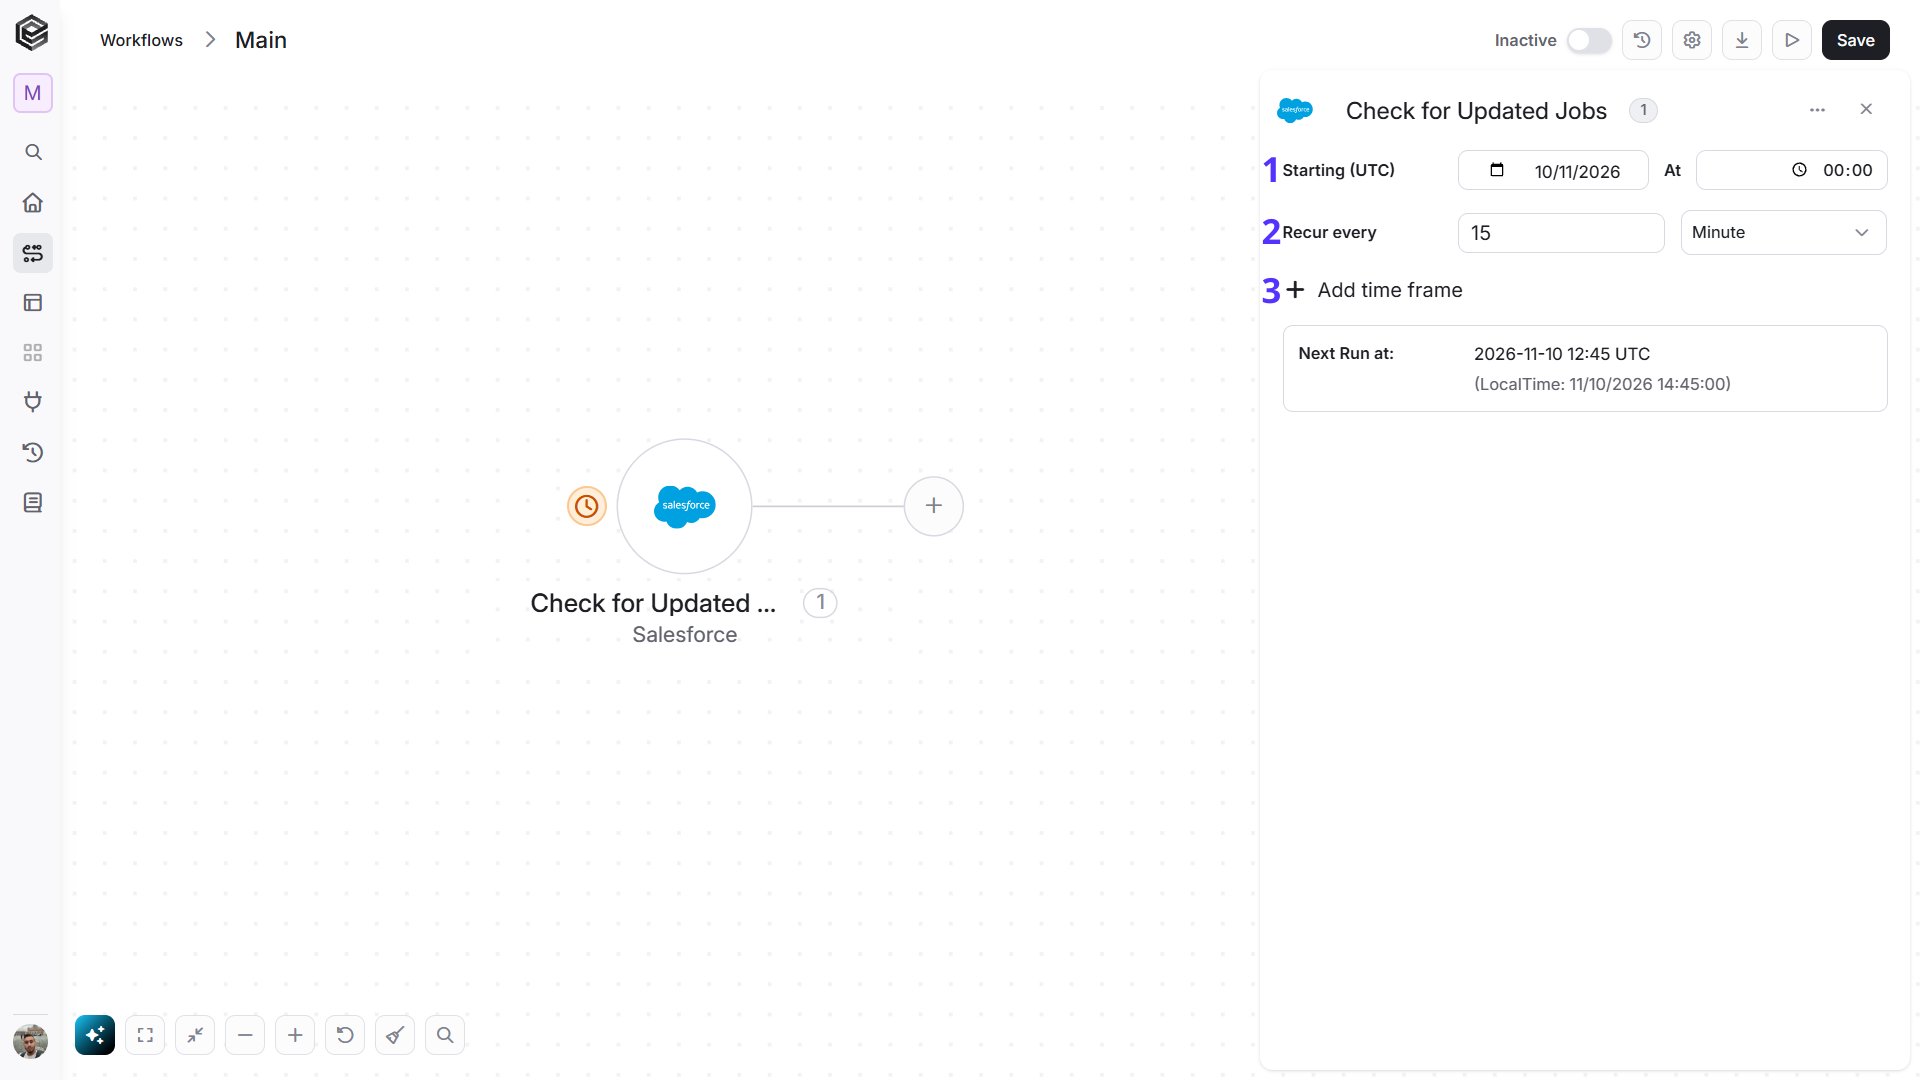
- Starting (UTC) - Choose the date and time for this workflow to start working. For the selected day time the workflow will run according to the selected frequency.
- Recur every - Select the time interval. The minimum time interval is 15 minutes. You’ll see the date and time for the next run according to UTC time and your local time.
- Add time frame - You can specify a time frame during which the trigger will operate.
- Click on “Add time frame” button.
- Select a specific time frame to activate the trigger. For example, every 15 minutes from 8 AM to 5 PM.
Outbound Message Webhook
Starts the workflow when Salesforce sends an Outbound Message to Engini. Engini creates the webhook URL for you. Copy it into the Outbound Message settings in Salesforce, so Salesforce knows where to send its data. The data arrives in the structure Salesforce uses for outbound messages, so you can use it in the next steps of the workflow.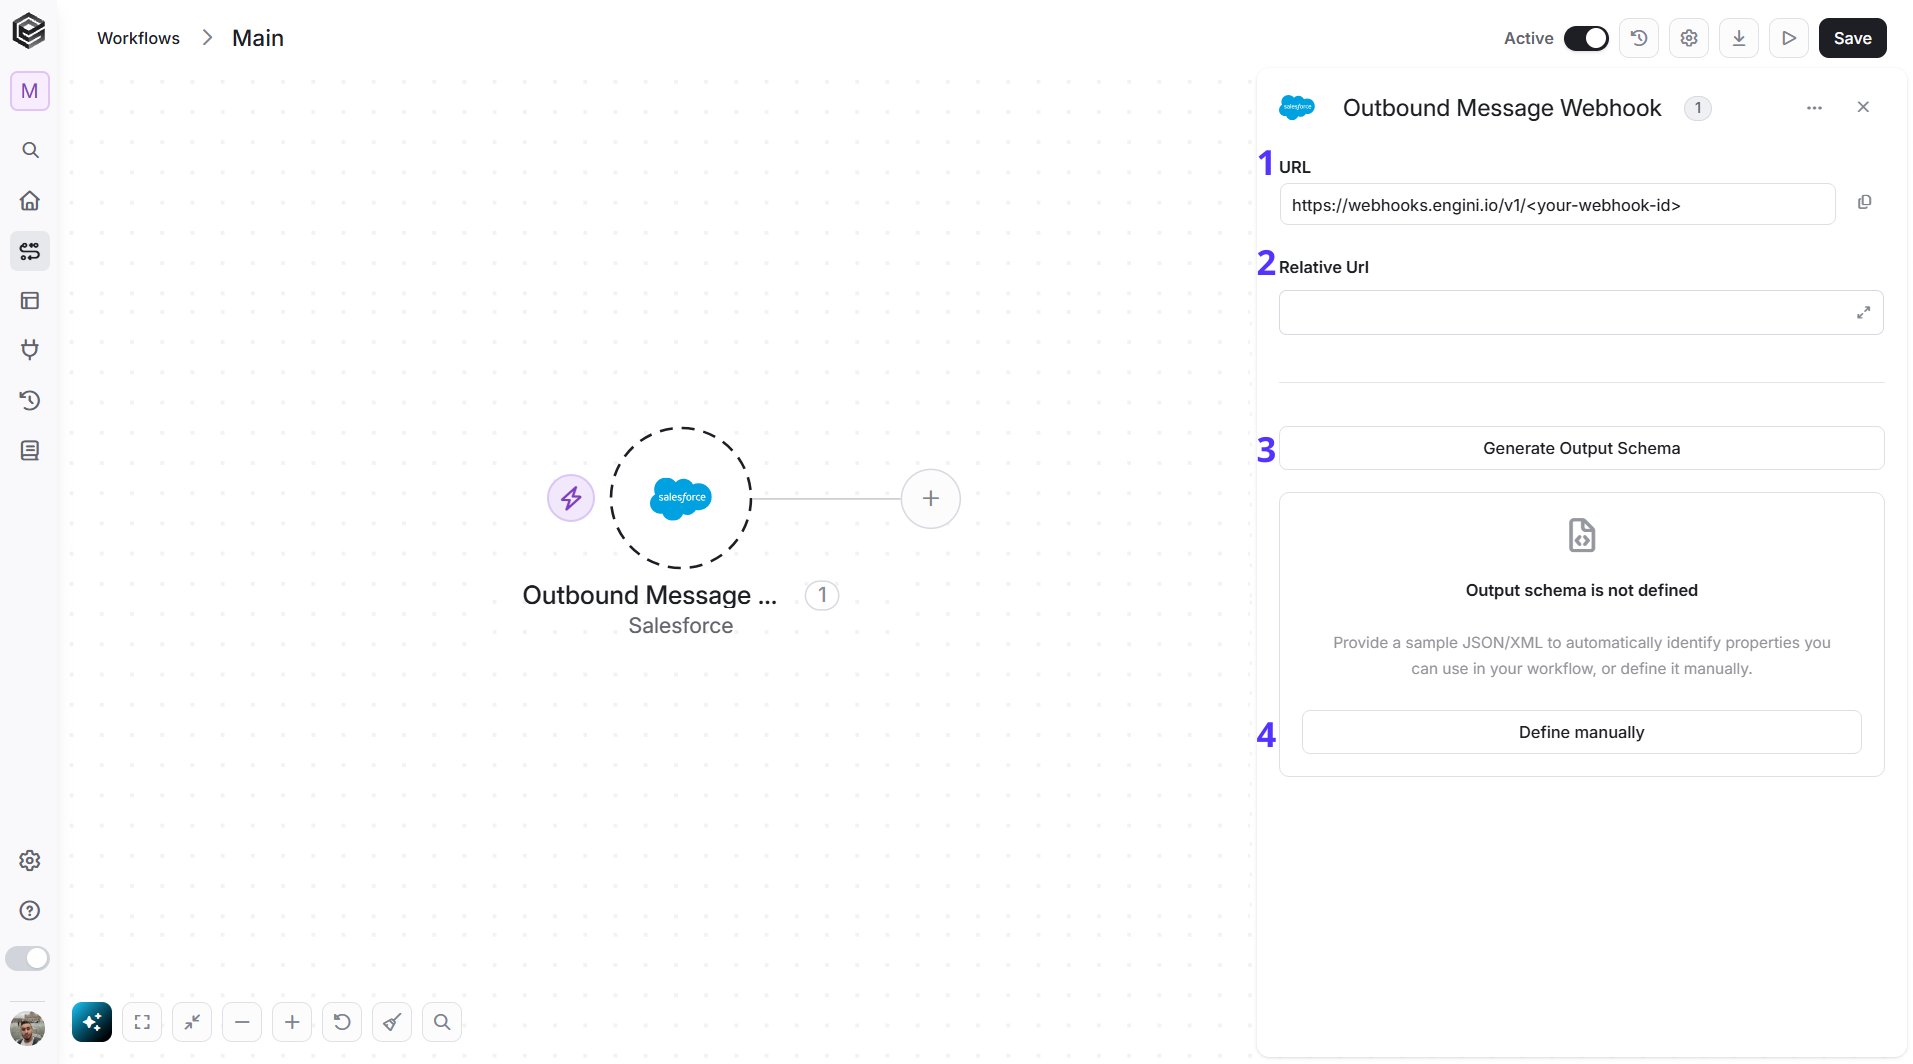
- URL - The webhook URL Engini creates for this trigger. Copy it into the Outbound Message settings in Salesforce.
- Relative Url - Optional. A path added to the end of the webhook URL. To learn more, see Webhook Trigger.
- Generate Output Schema - Provide a sample JSON or XML of the data Salesforce sends, and Engini identifies the properties you can use in your workflow.
- Define manually - Define the output schema yourself instead of generating it from a sample.
Actions
Bulk Create Records
Creates many records of the same object type at once from CSV data, using the Salesforce Bulk API. Engini creates the job, uploads your data and closes the job, so Salesforce starts processing it. The action returns the job Id and its state. To see which rows were created and which failed, use Get Bulk Job Results with that job Id.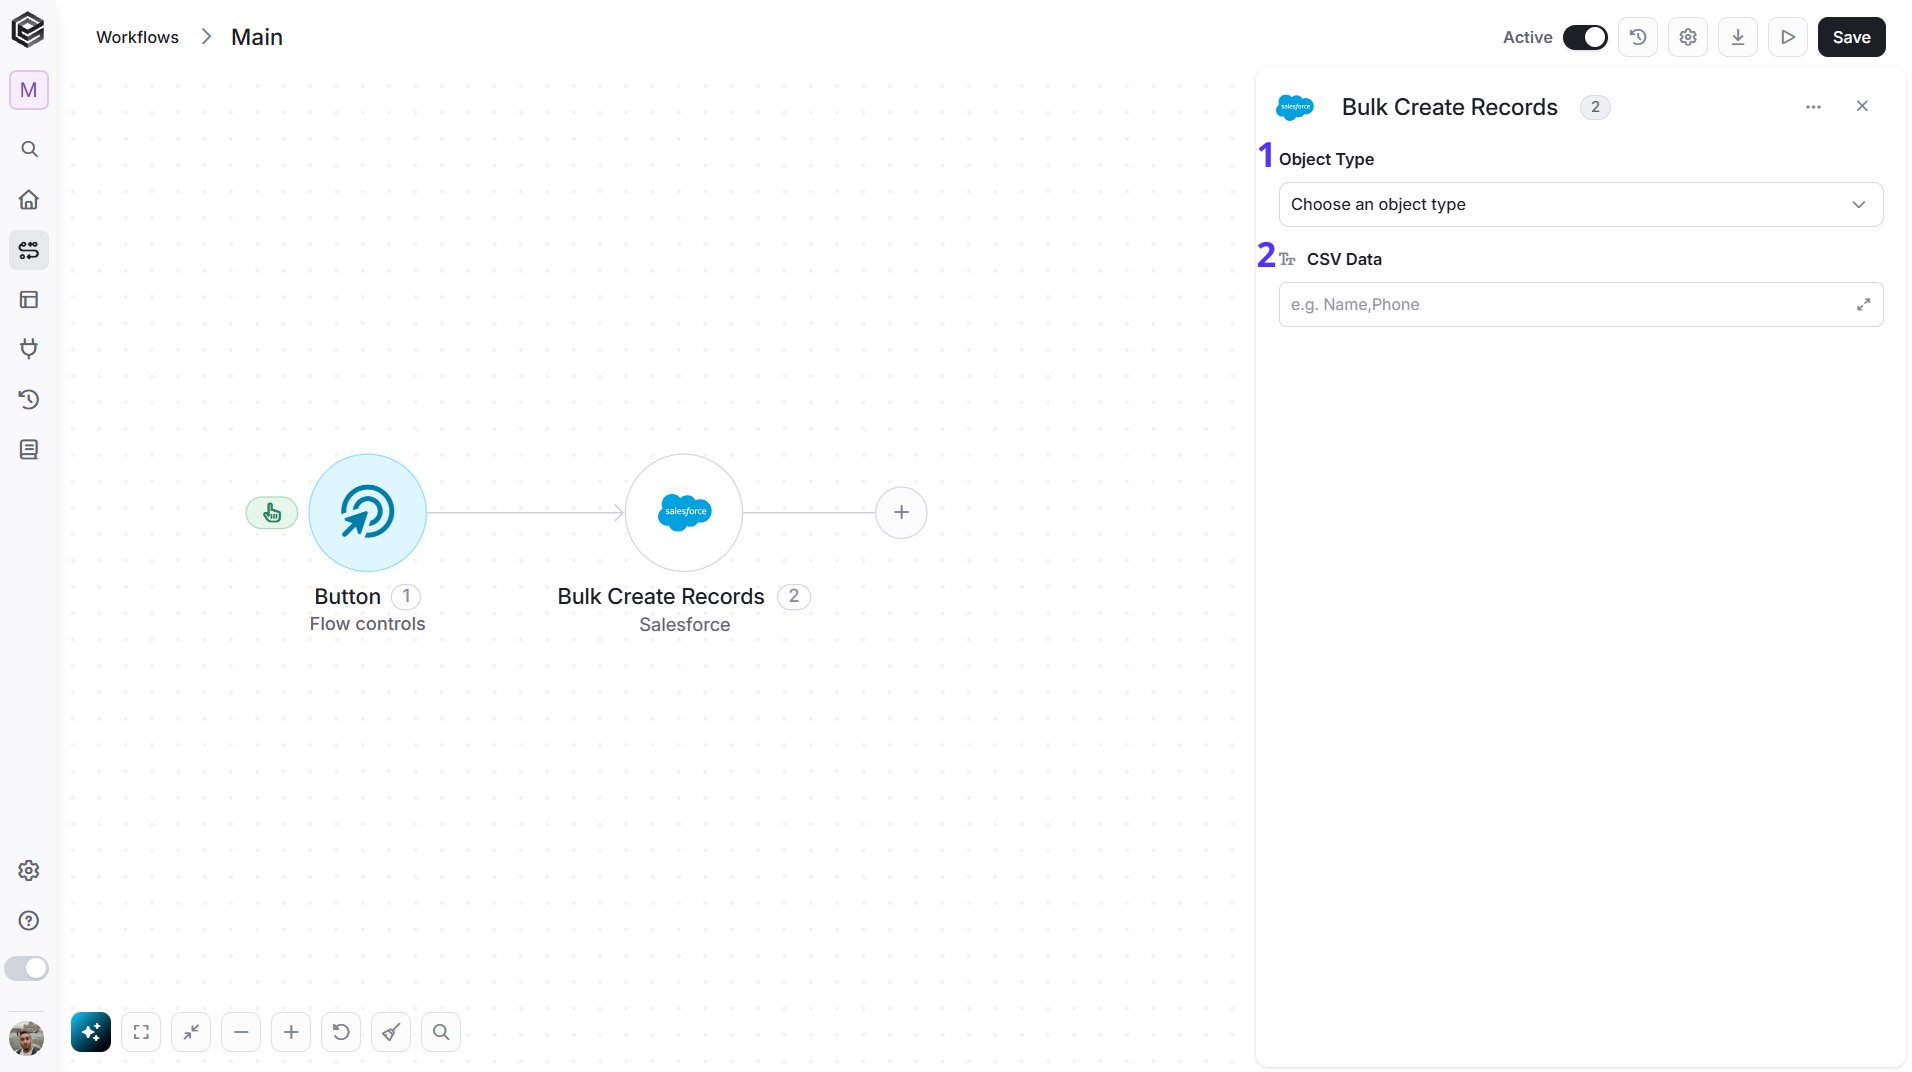
- Object Type - Select the type of record you want to create, for example Account or Contact. You can choose it from the list or map it from a previous step.
- CSV Data - Enter the records as CSV text. The first line holds the Salesforce field names and every next line is one record. For example,
Name,Phoneon the first line andAcme,555-0100on the second. You can map the CSV text from a previous step.
Create Record
Creates a new record of the selected object type in Salesforce.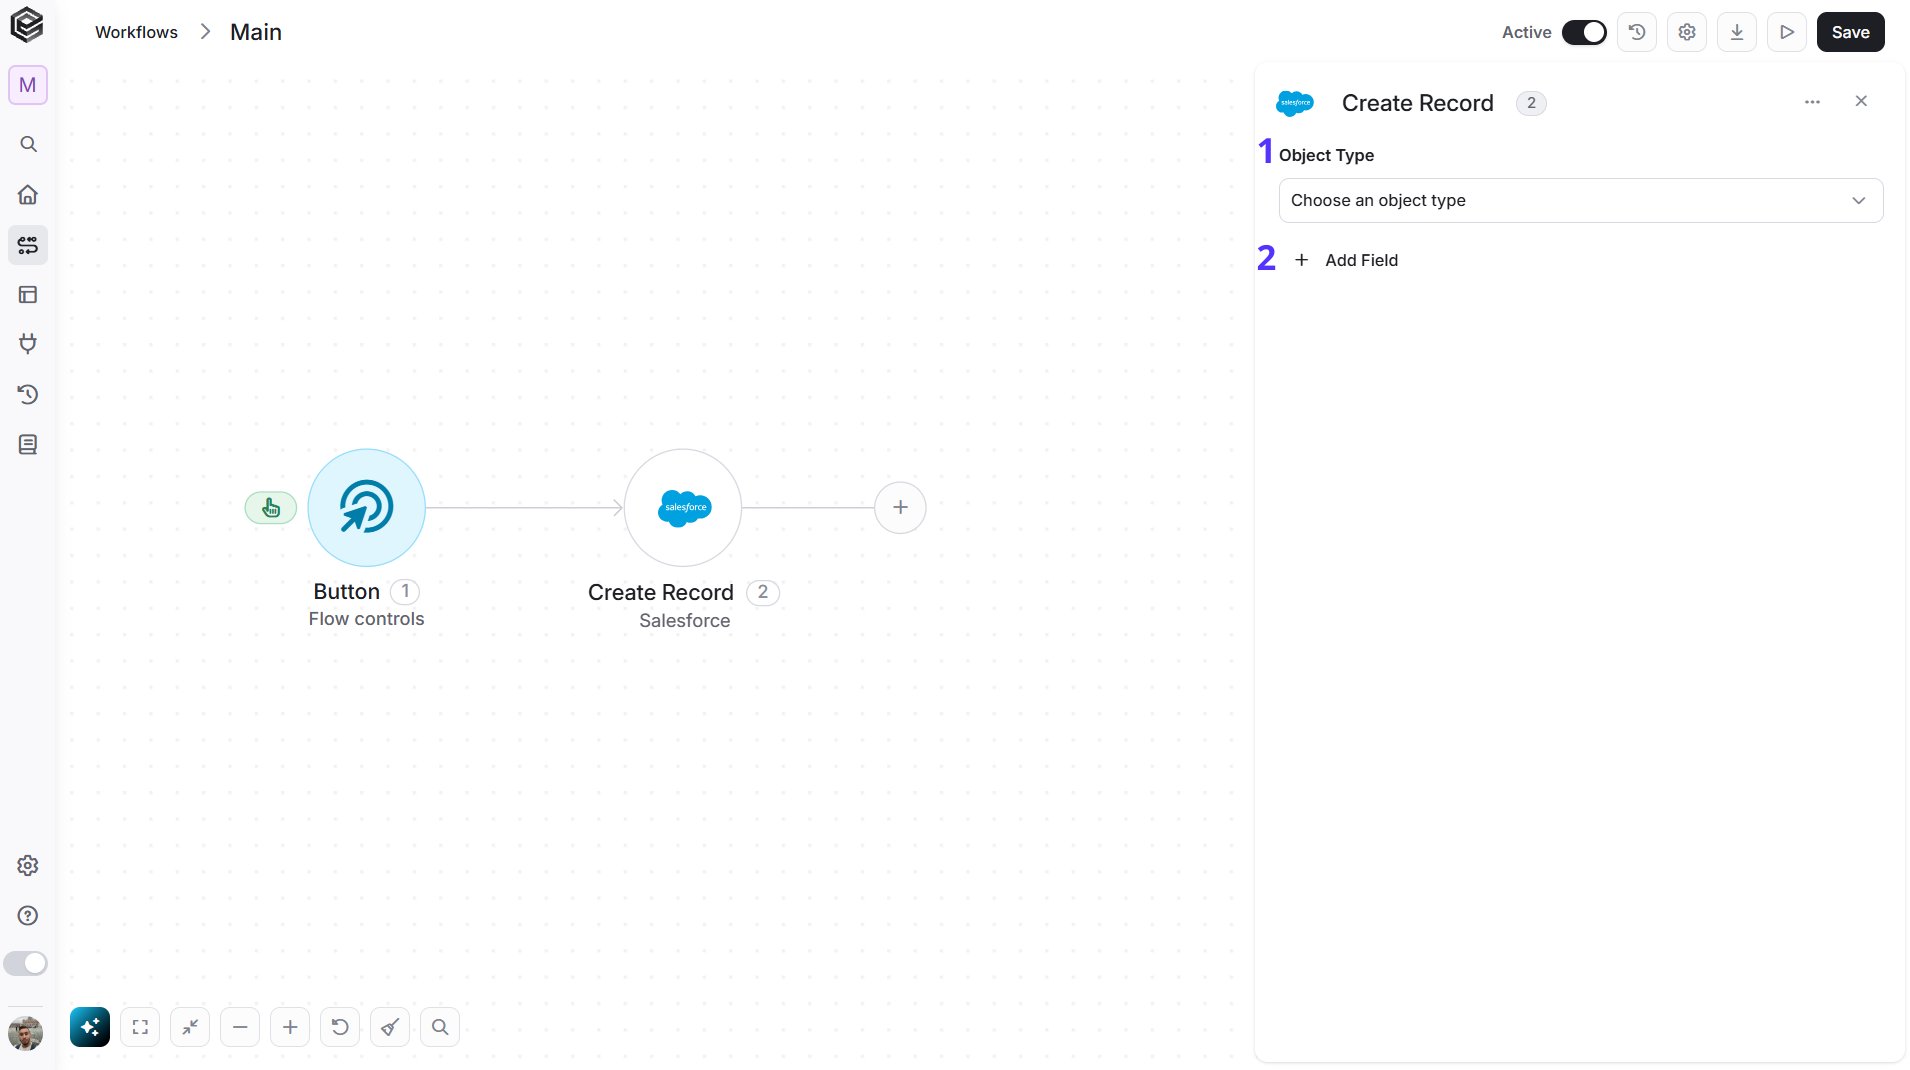
- Object Type - Select the type of record you want to create, for example Account, Contact or Lead. After you select it, the fields of that object that you must fill in appear below. For example, when you select Account, the field Account Name appears, where you enter the name of the new account.
- Add Field - Click Add Field to add other fields of the selected object and fill them in. To learn more about adding fields, click here.
Delete Record
Deletes a record from Salesforce.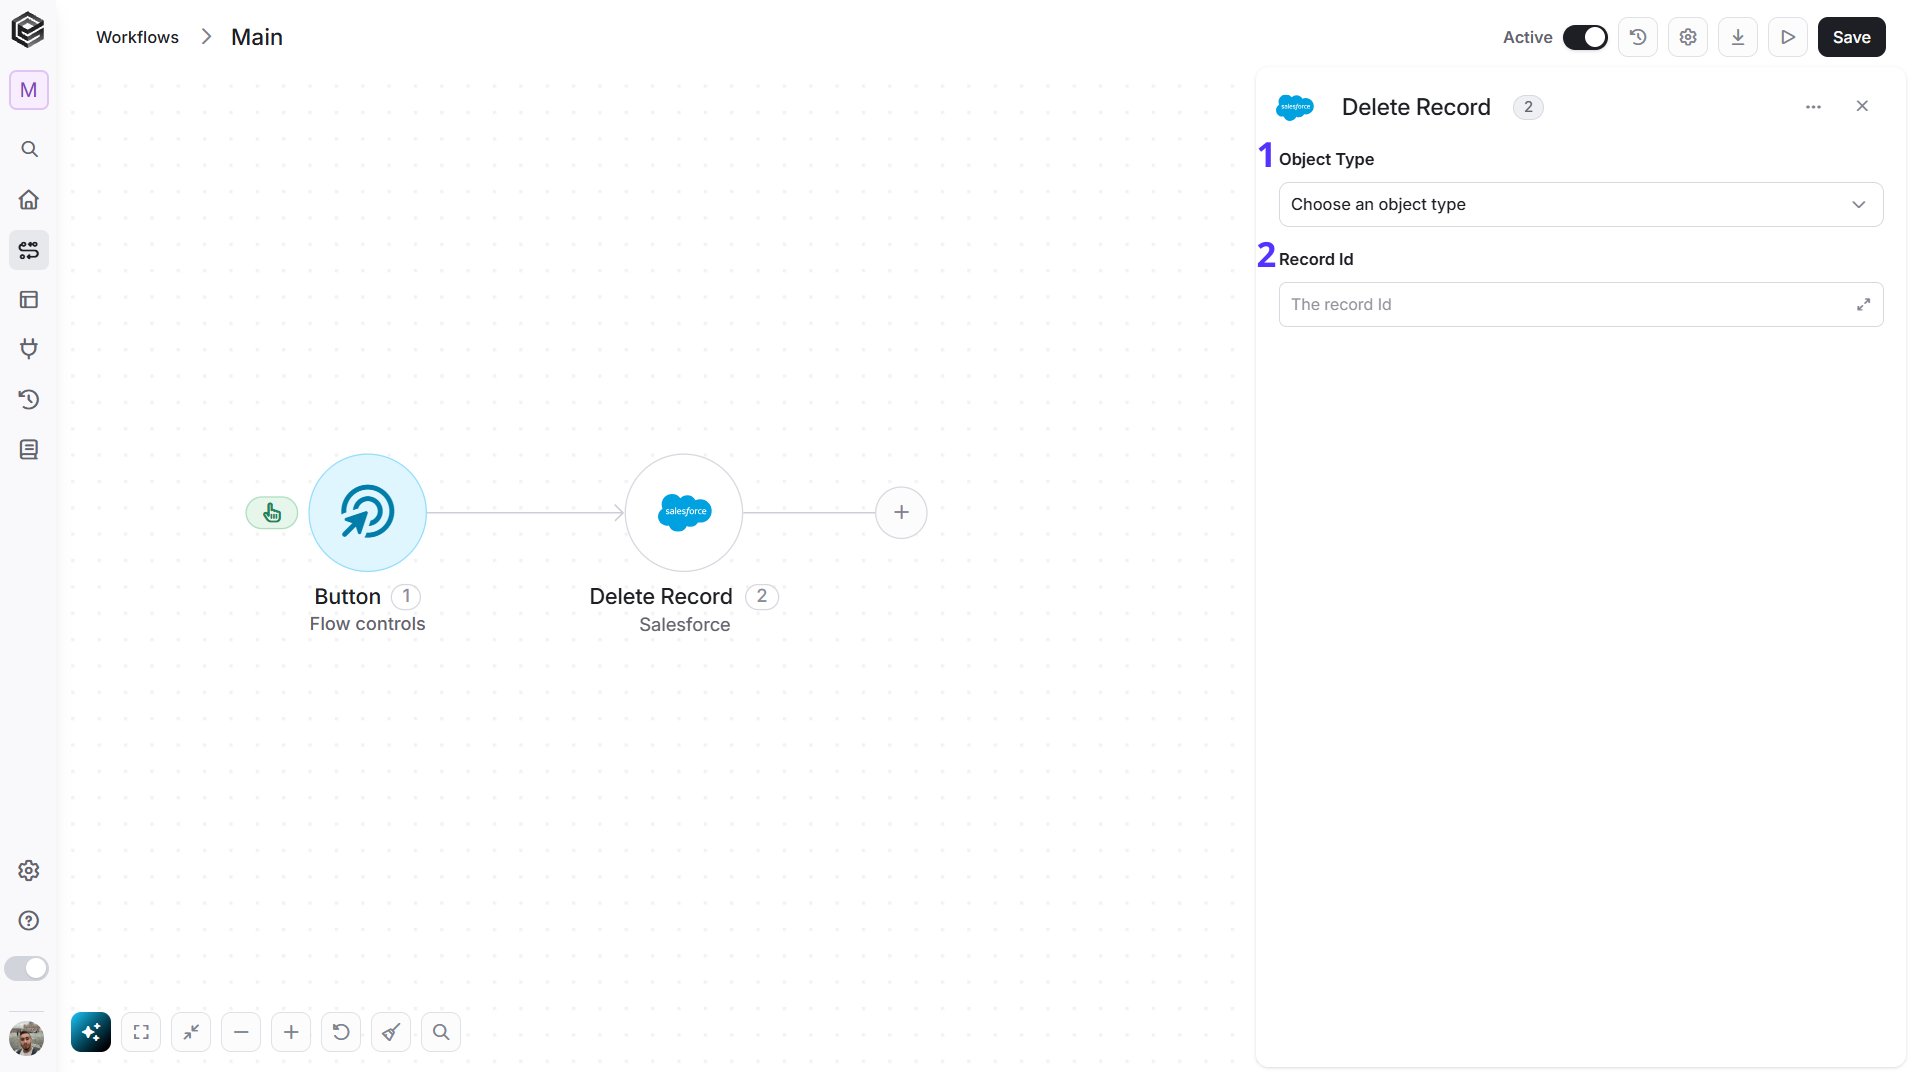
- Object Type - Select the type of record you want to delete, for example Account or Contact.
- Record Id - Enter the Id of the record you want to delete. You can map it from a previous step or copy it from the record’s page in Salesforce. For example: 001XXXXXXXXXXXXXXX.
Download Attachment/Document
Downloads the file of an Attachment or a Document record from Salesforce, so you can use it in the next steps of the workflow.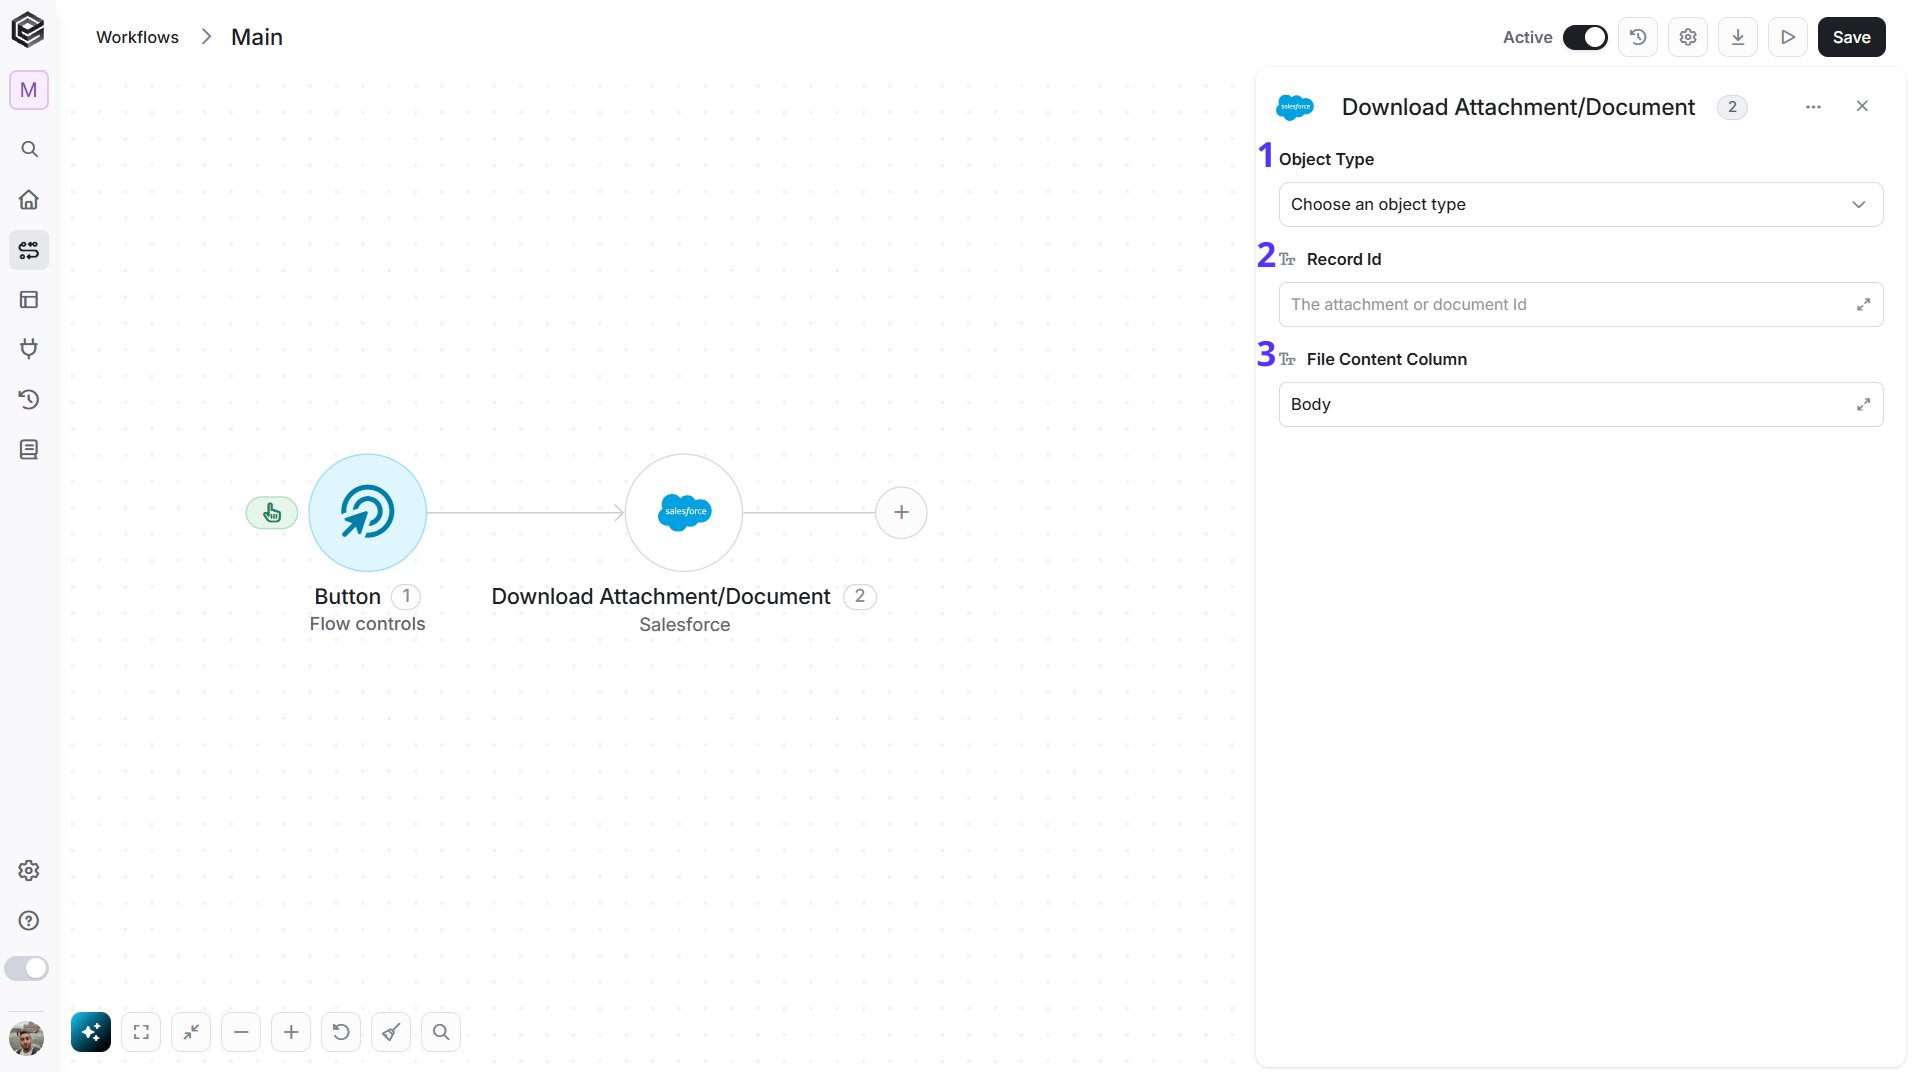
- Object Type - Select the type of record that holds the file, usually Attachment or Document.
- Record Id - Enter the Id of the Attachment or Document record. You can map it from a previous step, such as Get Records, or copy it from Salesforce.
- File Content Column - Enter the name of the field that holds the file. The default is Body, which is correct for Attachment and Document records. Change it only if you download a file from another type of object that keeps its file in a different field.
Get Bulk Job Results
Gets the rows of a bulk job as CSV text, so you can see which records Salesforce created, which failed and which it did not process.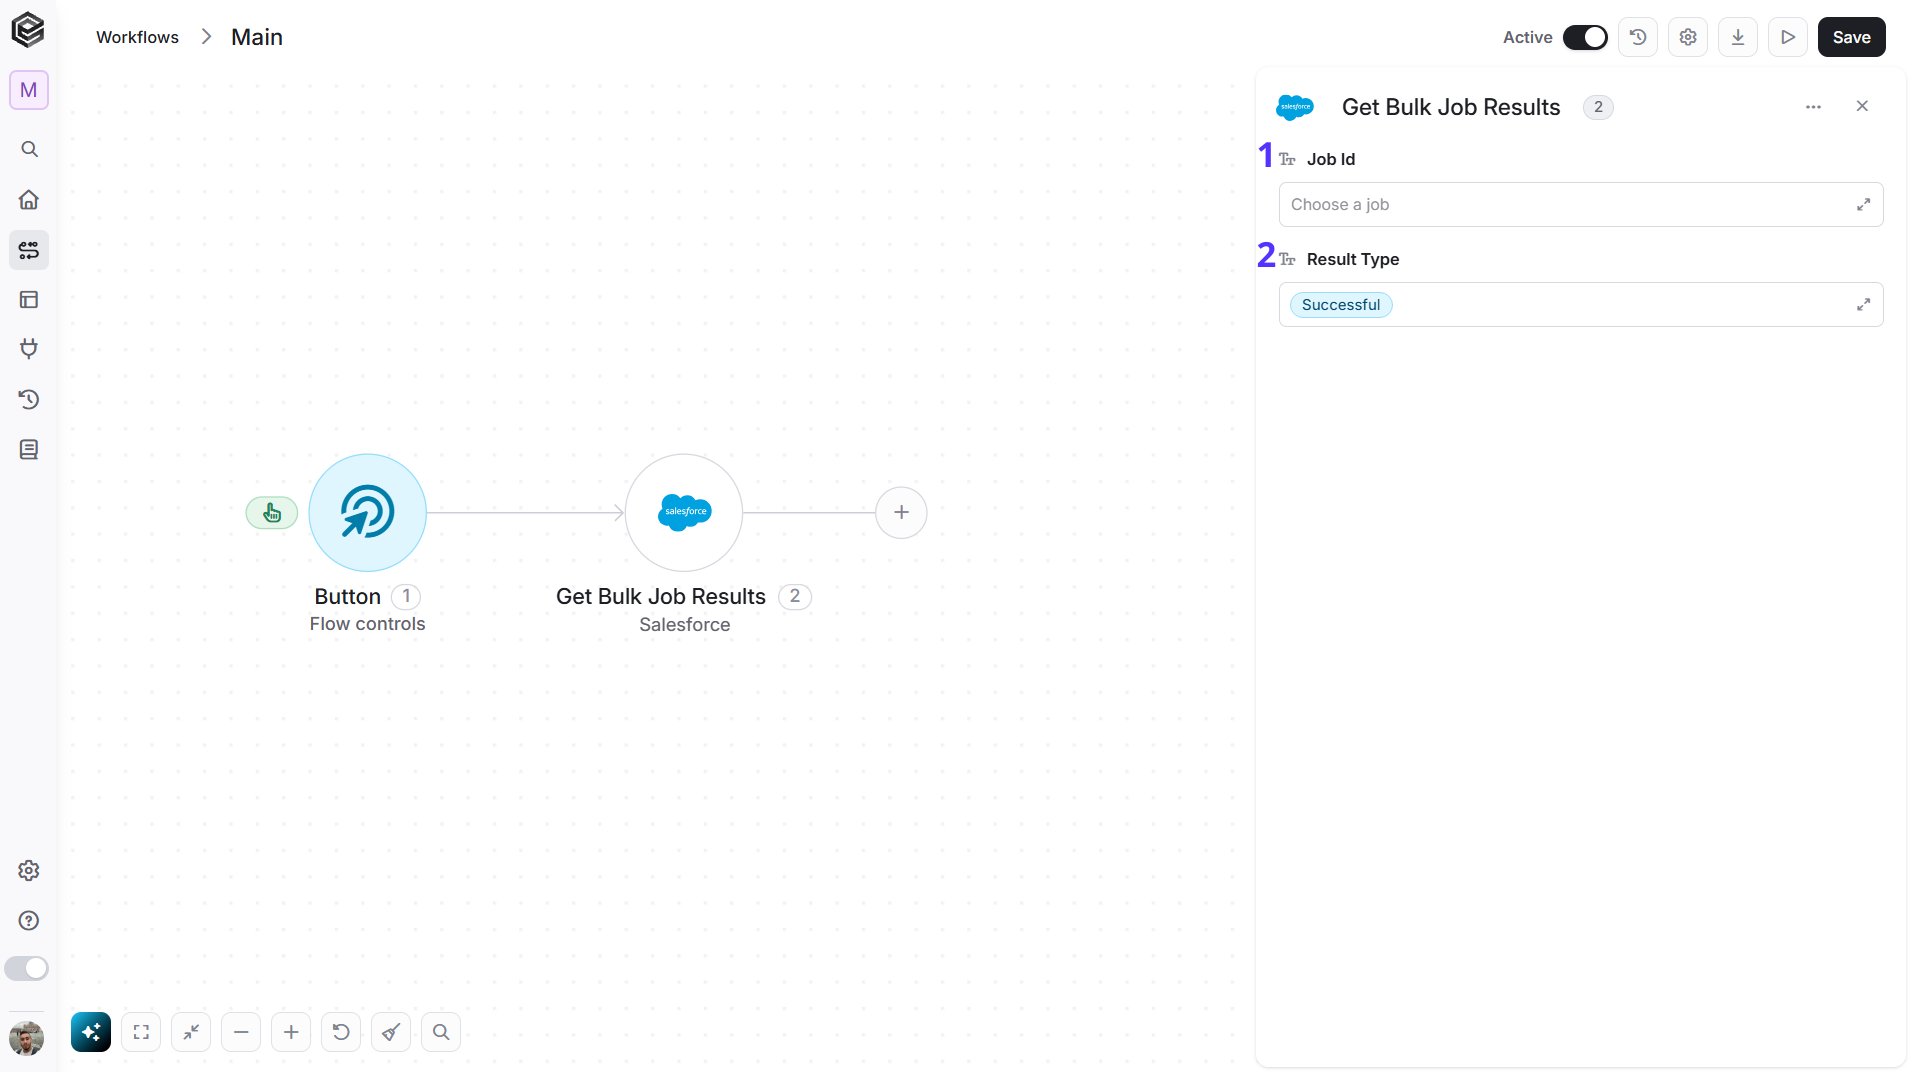
- Job Id - Choose the bulk job from the list, or map its Id from a previous step, such as Bulk Create Records or Get Jobs. For example: 750XXXXXXXXXXXXXXX.
- Result Type - Select the kind of rows you want to get. The default is Successful: the rows Salesforce created, with the Salesforce Id of each one. Select Failed to get the rows that failed, with the error of each row, or Unprocessed to get the rows Salesforce did not process.
Get Jobs
Gets the bulk jobs in your Salesforce org, with the object, operation, state and record counts of each job.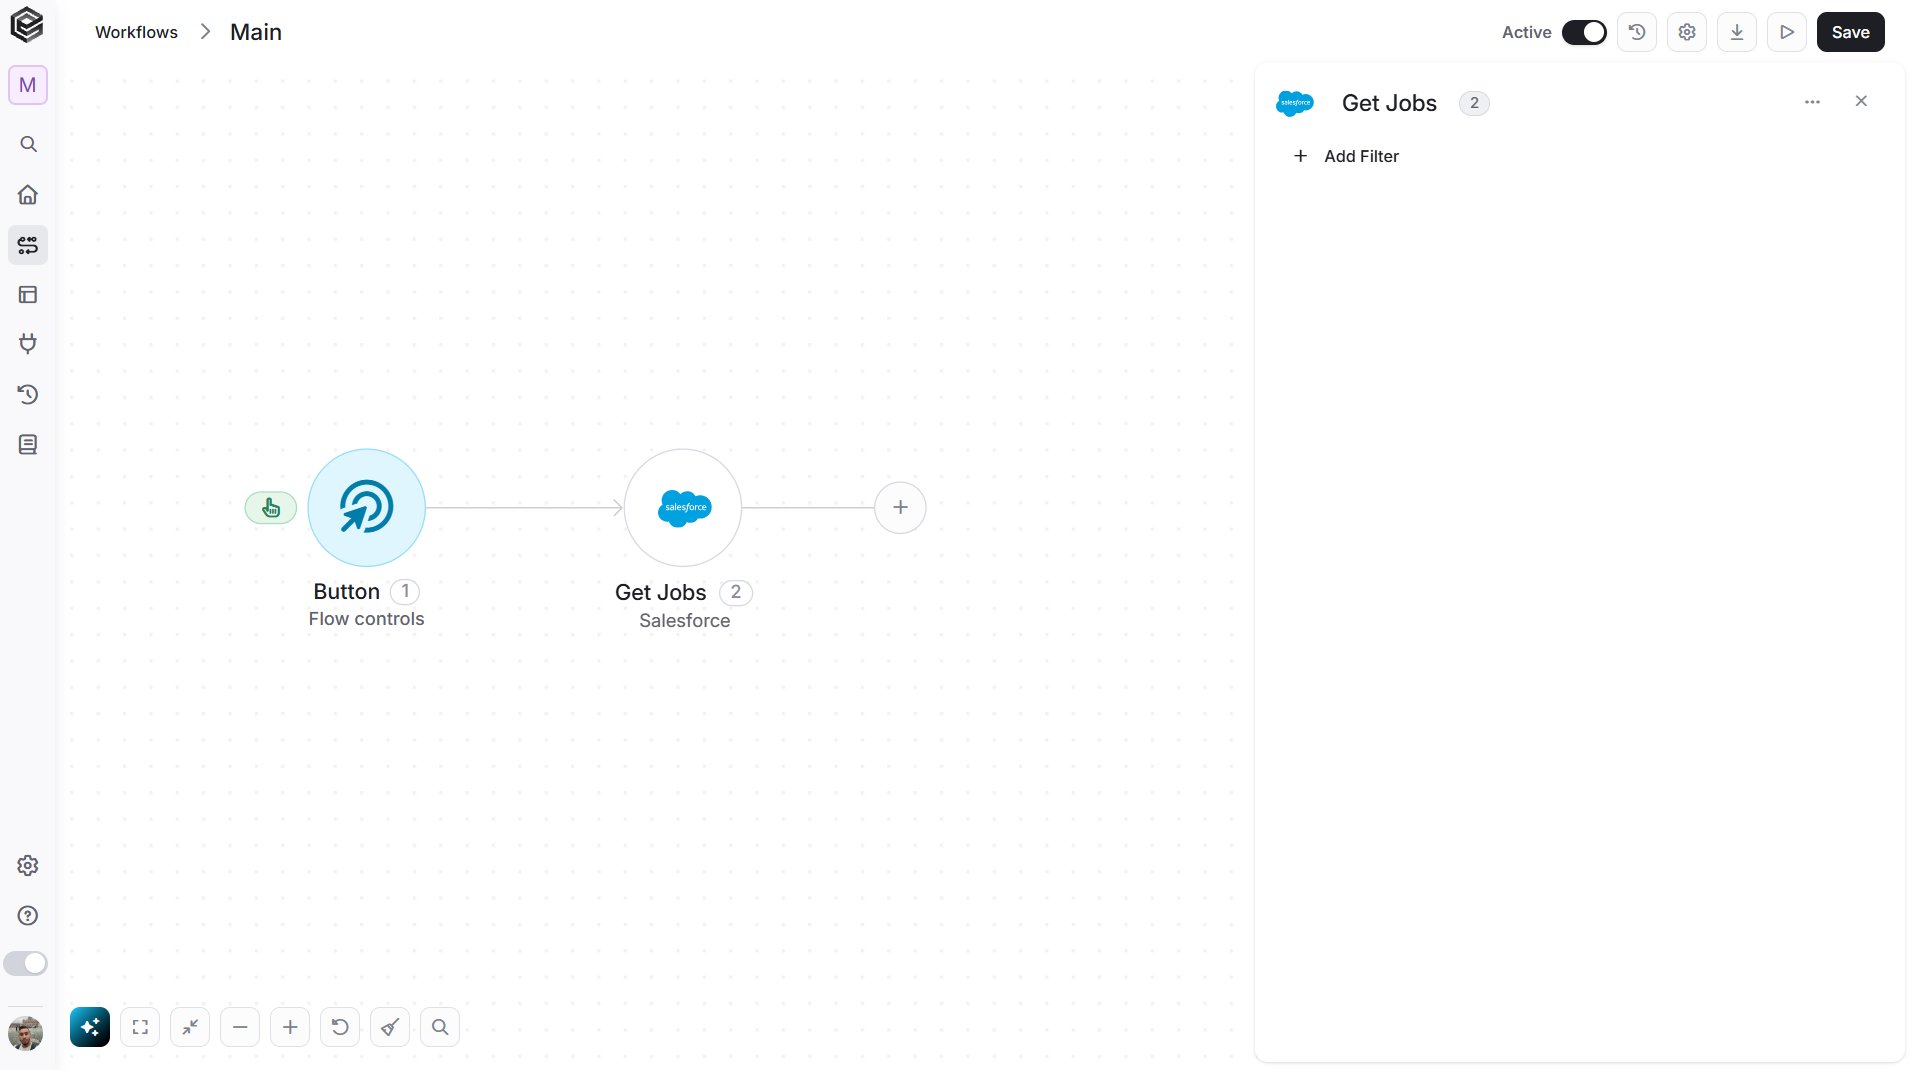
- Add Filter - Click Add Filter to return only the jobs that match your conditions, for example jobs of a certain Job Type or Concurrency Mode. To learn more about filters, click here.
Get Objects
Gets the list of object types in your Salesforce org, such as Account, Contact and your custom objects. You can limit and filter the list.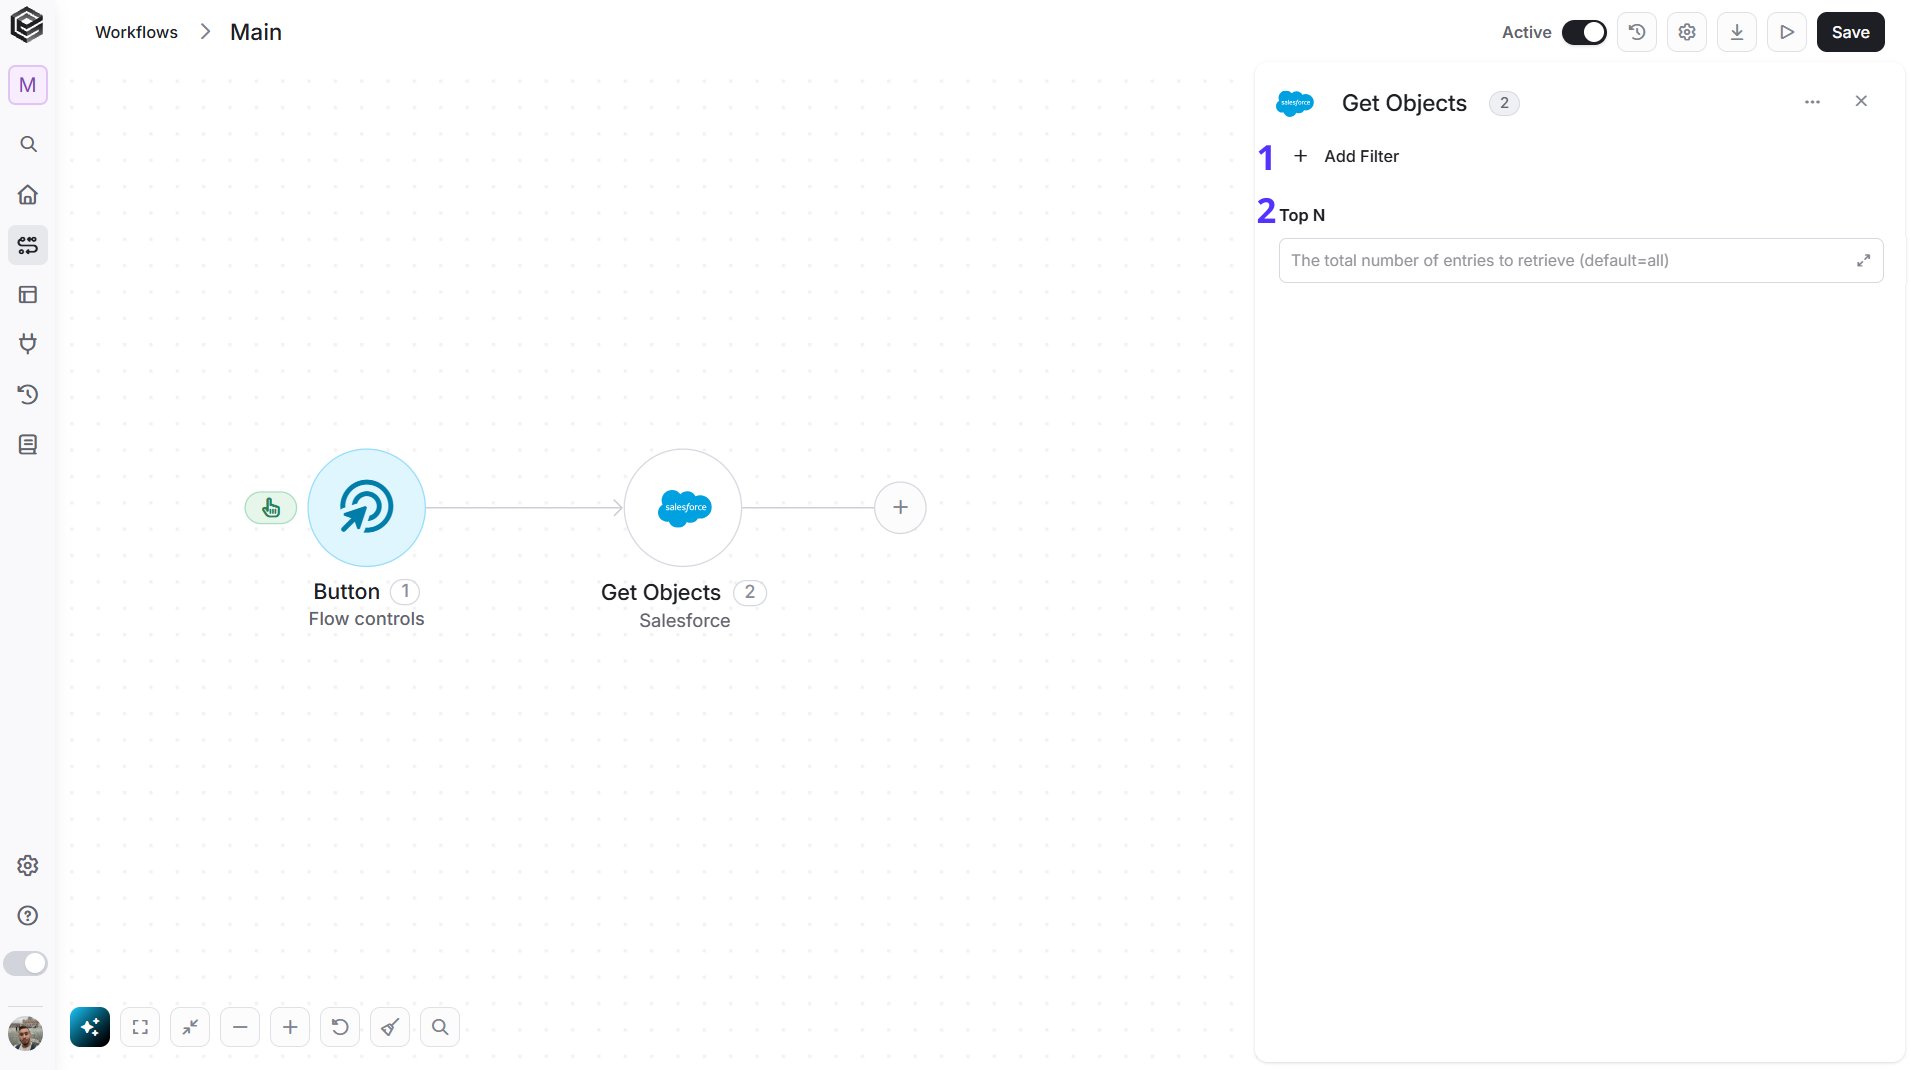
- Add Filter - Click Add Filter to return only the object types that match your conditions, for example by Name or Description. To learn more about filters, click here.
- Top N - Enter the maximum number of object types Engini returns, for example 50. If you leave it empty, Engini returns all of them.
Get Record
Gets one record, with its field values, so you can use them in the next steps of the workflow.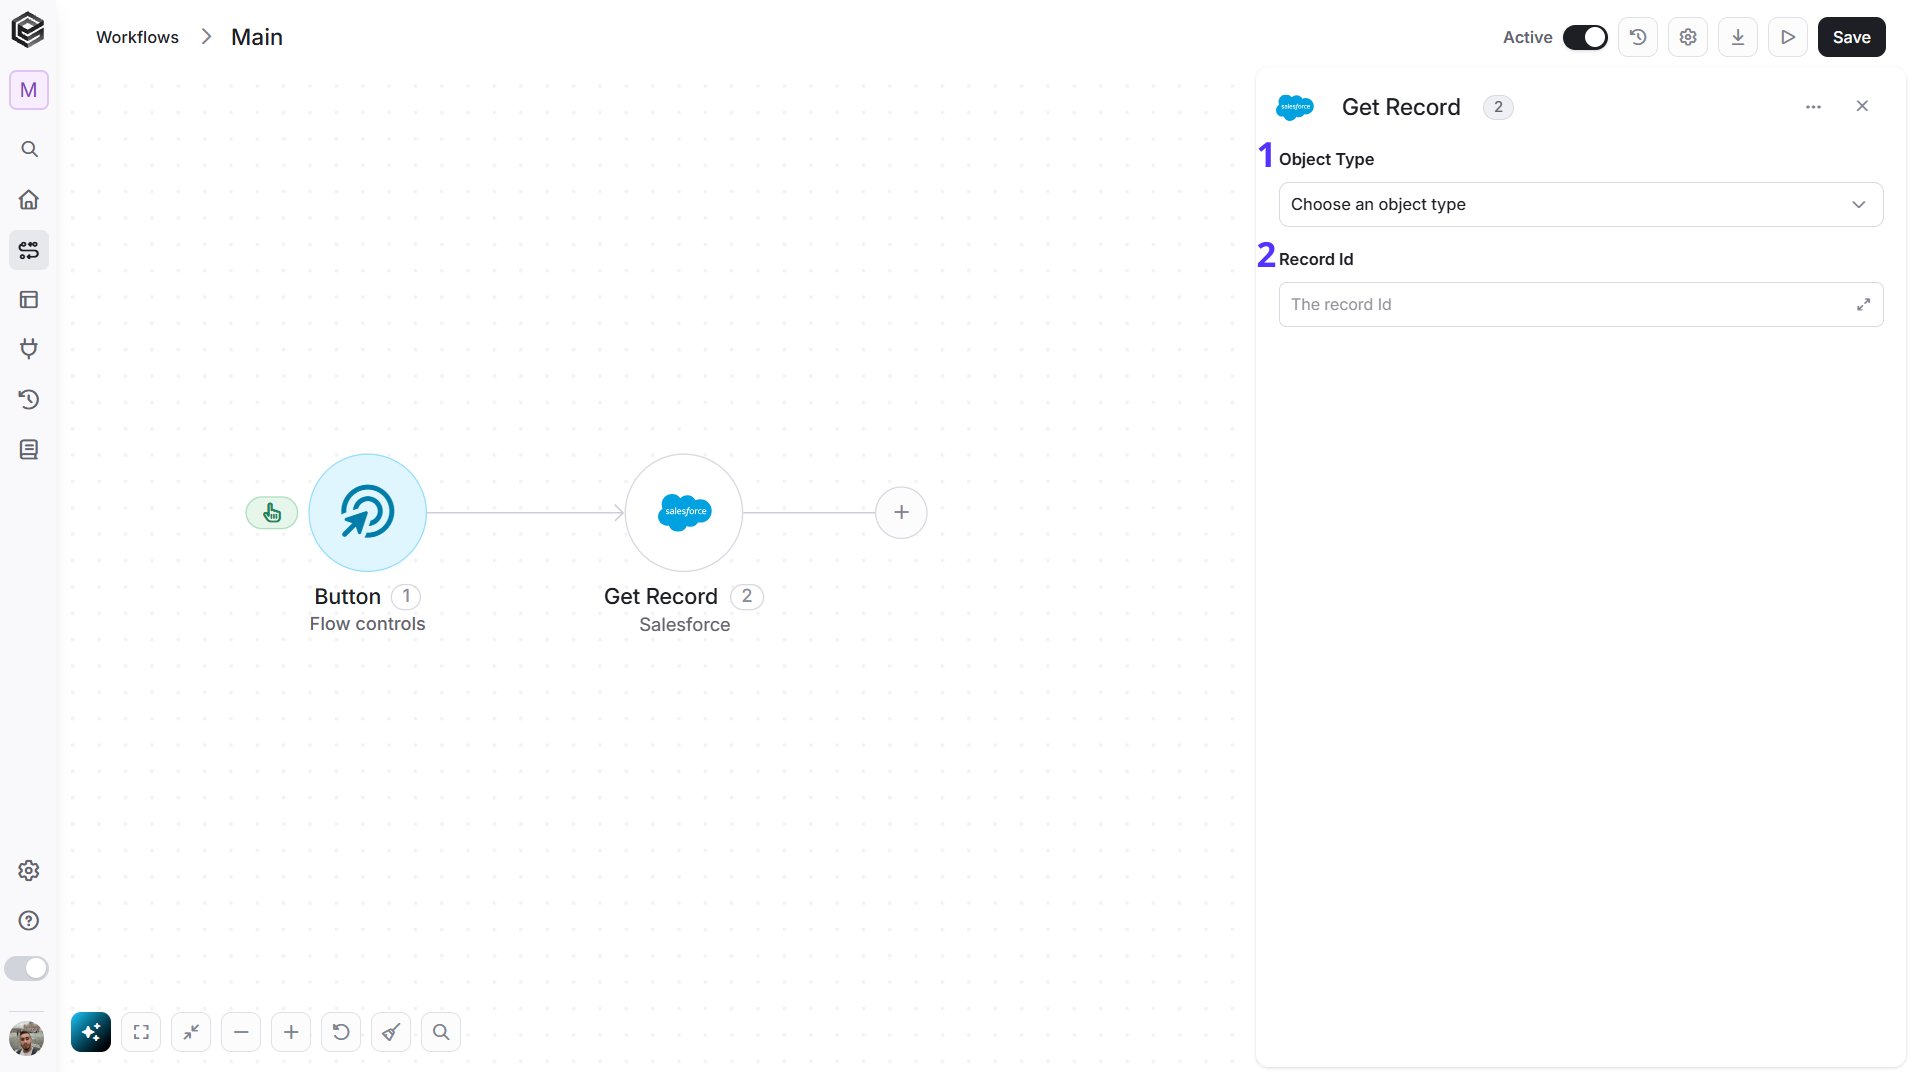
- Object Type - Select the type of record you want to get, for example Account or Contact.
- Record Id - Enter the Id of the record you want to get. You can map it from a previous step or copy it from the record’s page in Salesforce. For example: 001XXXXXXXXXXXXXXX.
Get Records
Gets several records of the selected object type. You can limit, filter and sort the list.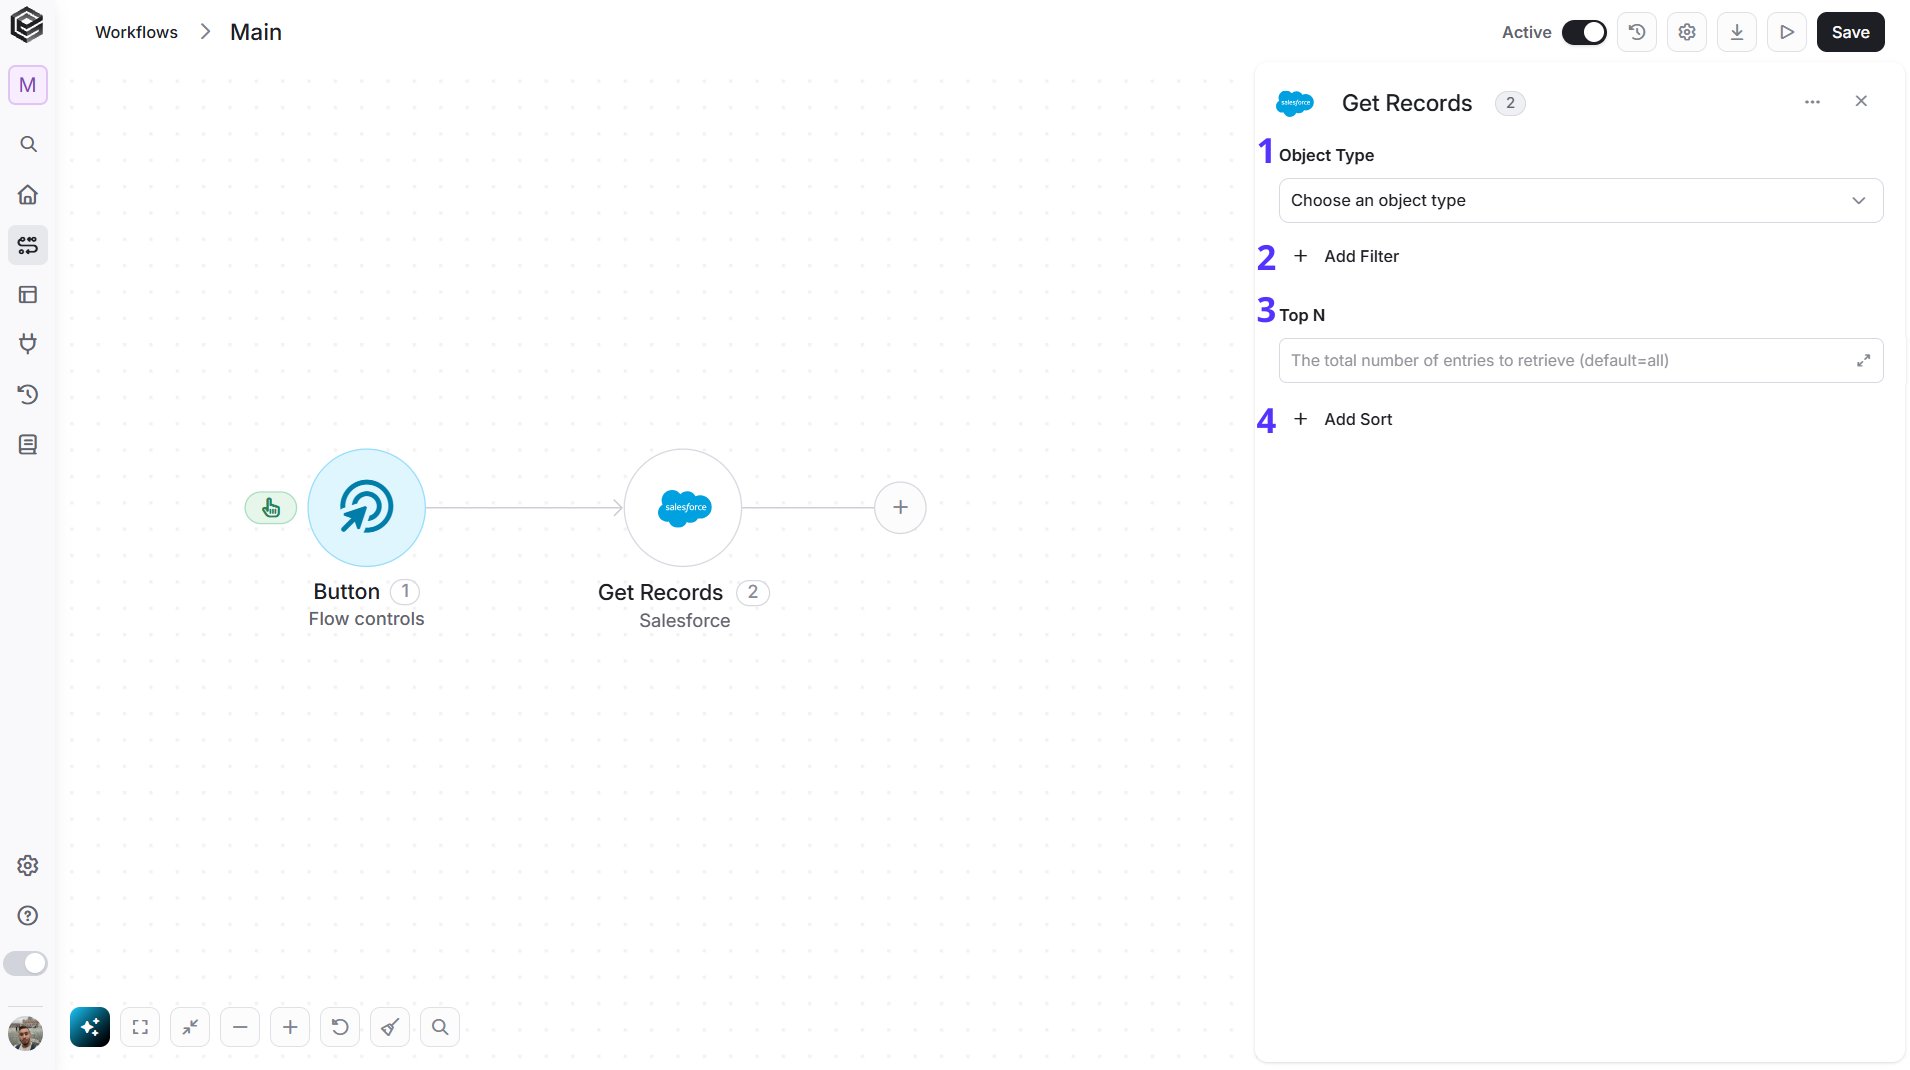
- Object Type - Select the type of record you want to get, for example Account or Contact.
- Add Filter - Click Add Filter to return only the records that match your conditions. To learn more about filters, click here.
- Top N - Enter the maximum number of records Engini returns, for example 100. If you leave it empty, Engini returns all the records.
- Add Sort - Click Add Sort to order the records by a field, in ascending or descending order. To learn more about sorting, click here.
Update Record
Changes the fields of an existing record.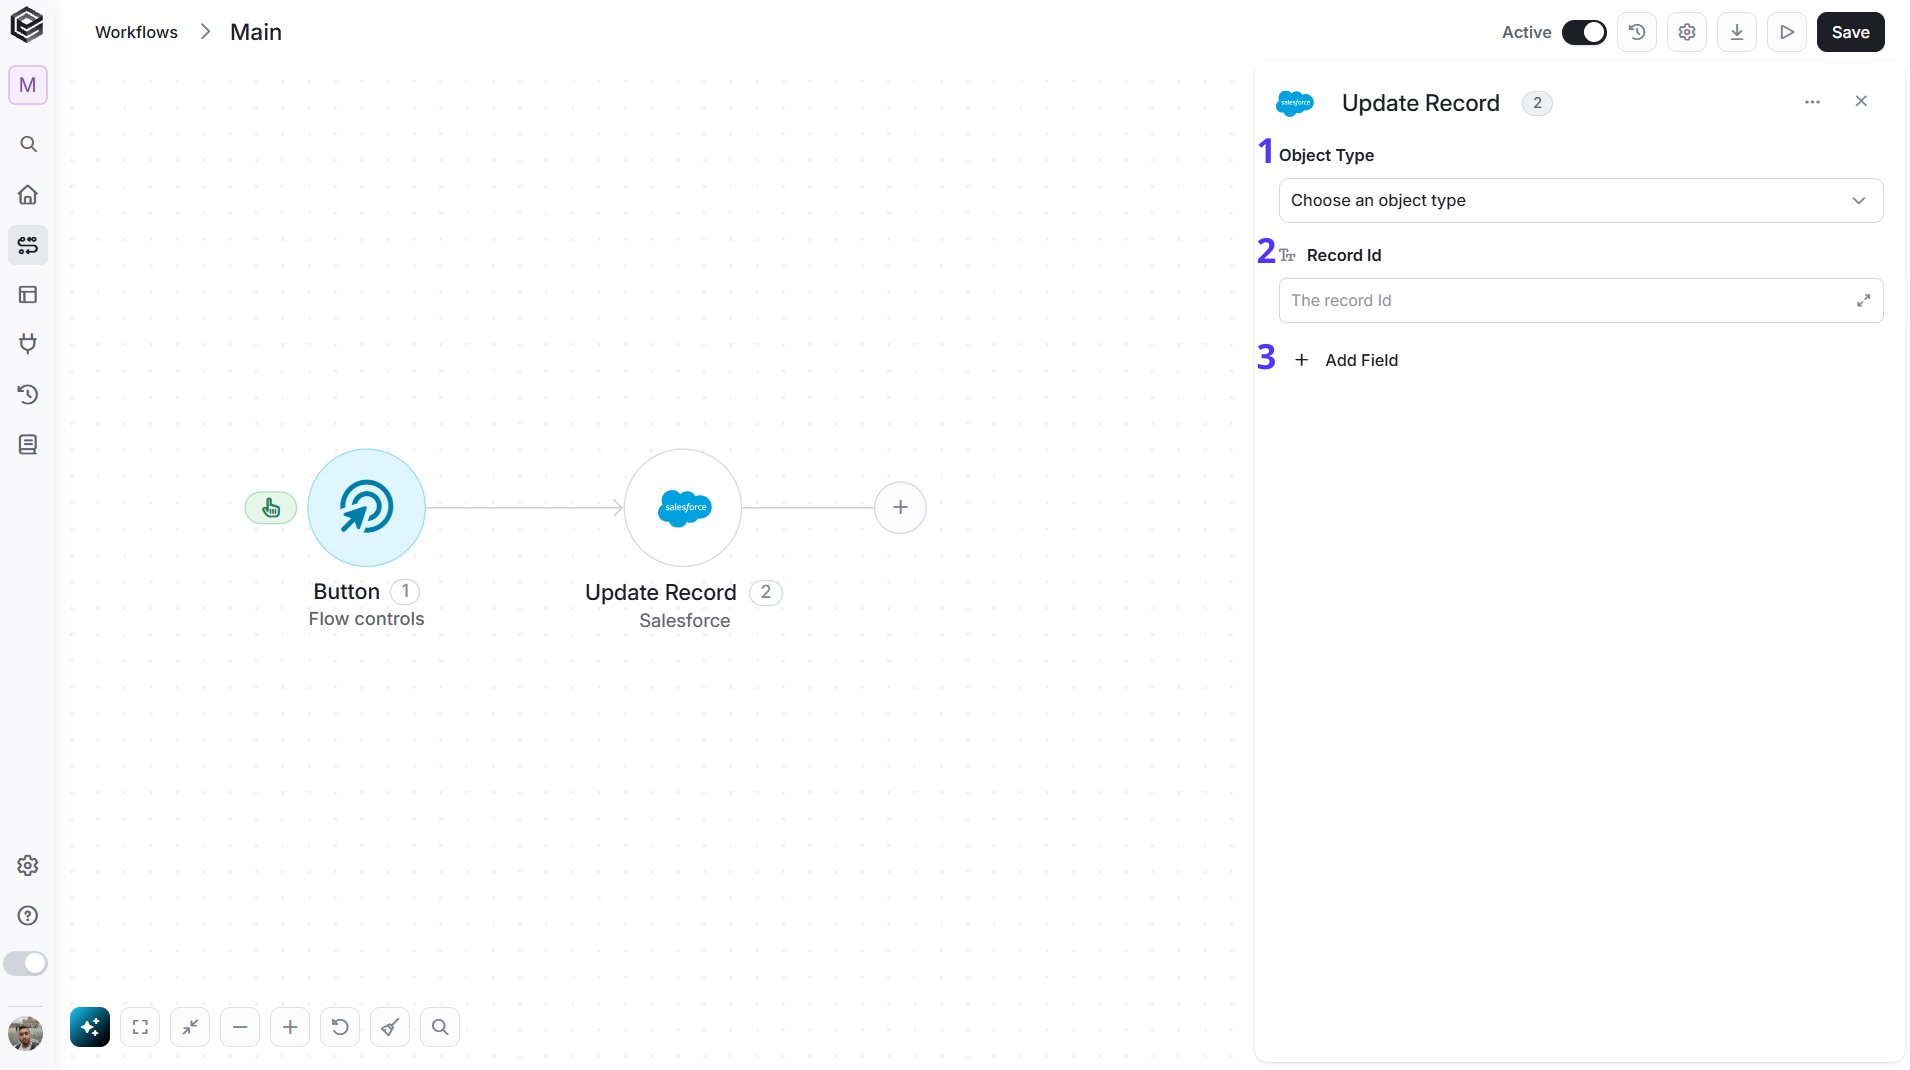
- Object Type - Select the type of record you want to update, for example Account or Contact.
- Record Id - Enter the Id of the record you want to update. You can map it from a previous step, such as Create Record or Get Records, or copy it from the record’s page in Salesforce. For example: 001XXXXXXXXXXXXXXX.
- Add Field - Click Add Field to choose the fields you want to change and enter their new values. Fields you don’t add stay as they are. To learn more about adding fields, click here.
Upsert Record (Create or Update)
Creates a record, or updates it if it already exists. Salesforce looks for a record whose external Id field has the value you give. If it finds one, it updates that record. If it finds none, it creates a new record. The action returns the Id of the record and whether it was created.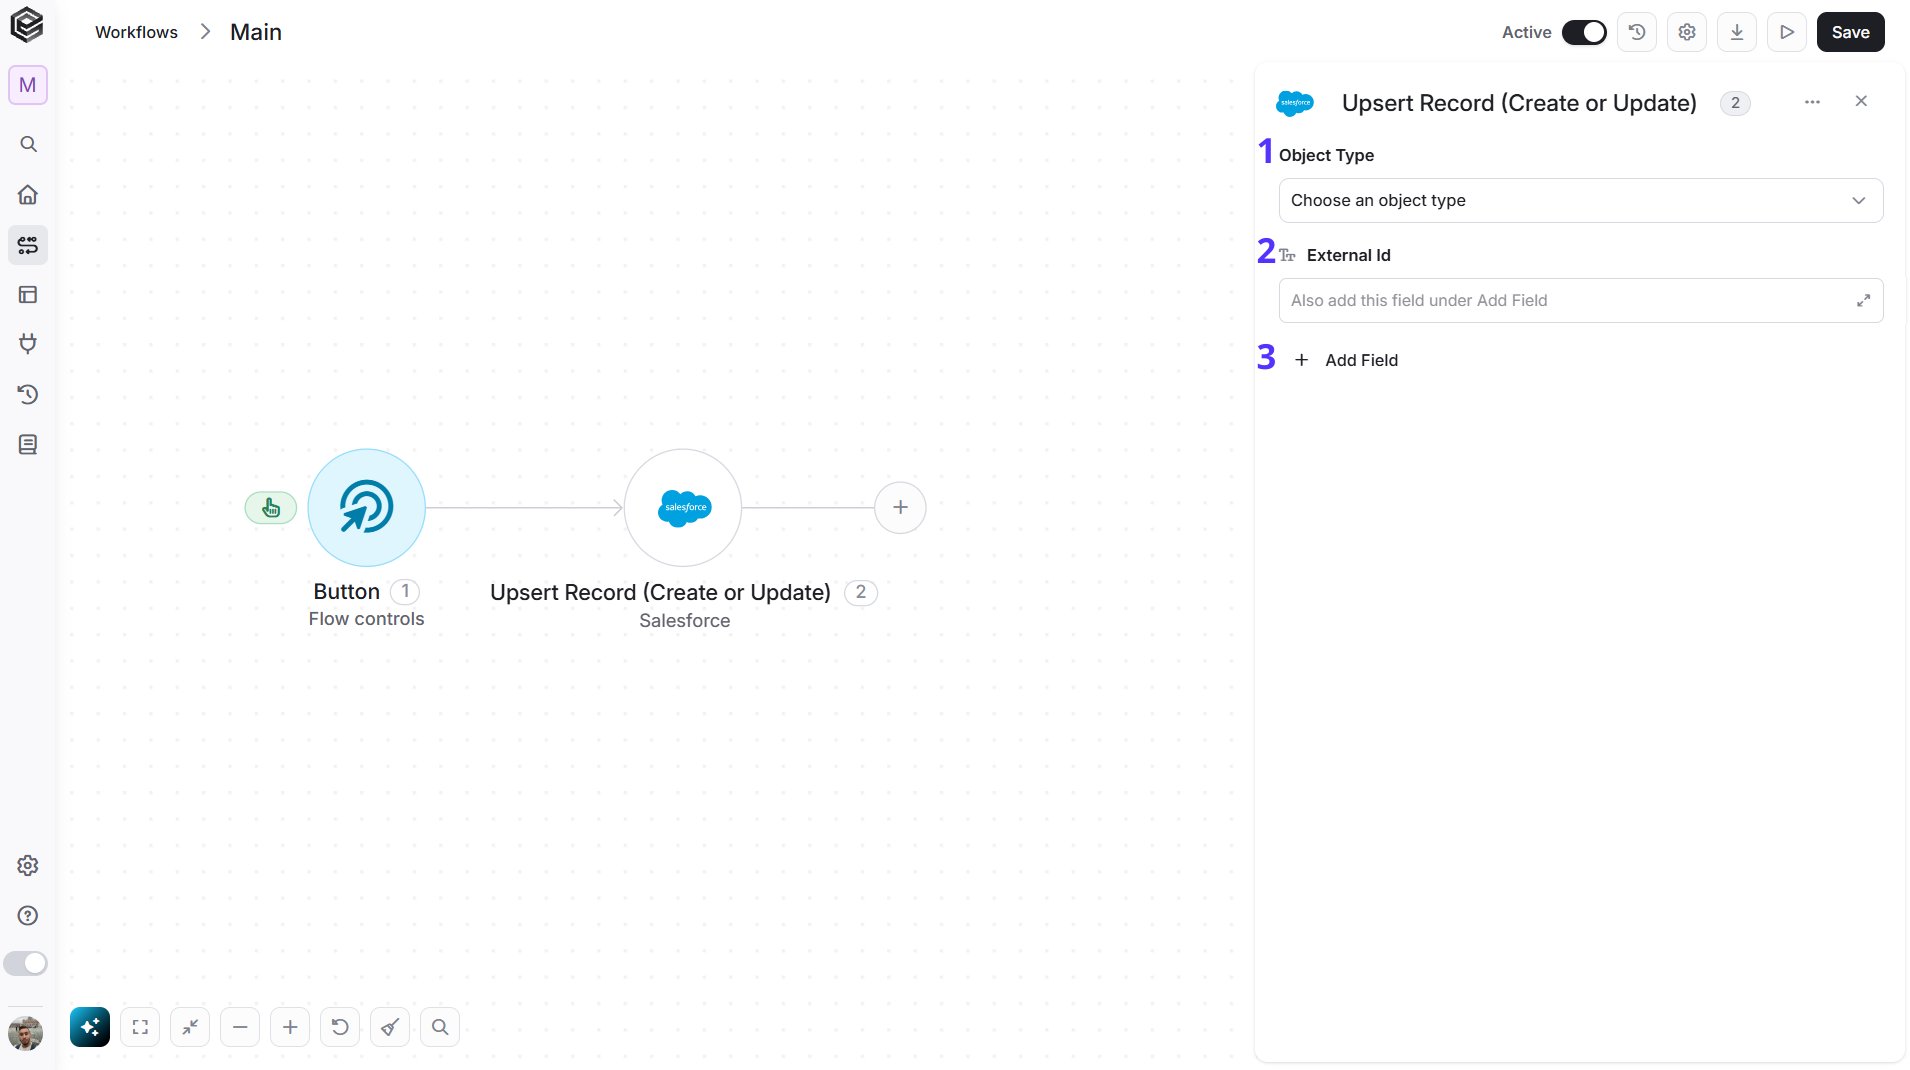
- Object Type - Select the type of record, for example Account or Contact.
- External Id - Choose the external Id field that Salesforce uses to find the record. It depends on the Object Type you selected. For example: Customer_Number__c. The field you choose here must also be added in Add Field with its value, because that value decides whether Salesforce creates or updates the record.
- Add Field - Click Add Field to choose the fields of the record and enter their values. Add the external Id field you chose in step 2 and give it the value to look for, for example 12345. If a record has this value, Salesforce updates it. If no record has it, Salesforce creates a new record with this value. To learn more about adding fields, click here.
Send API Request
This activity allows you to send a custom API request directly to Salesforce’s API.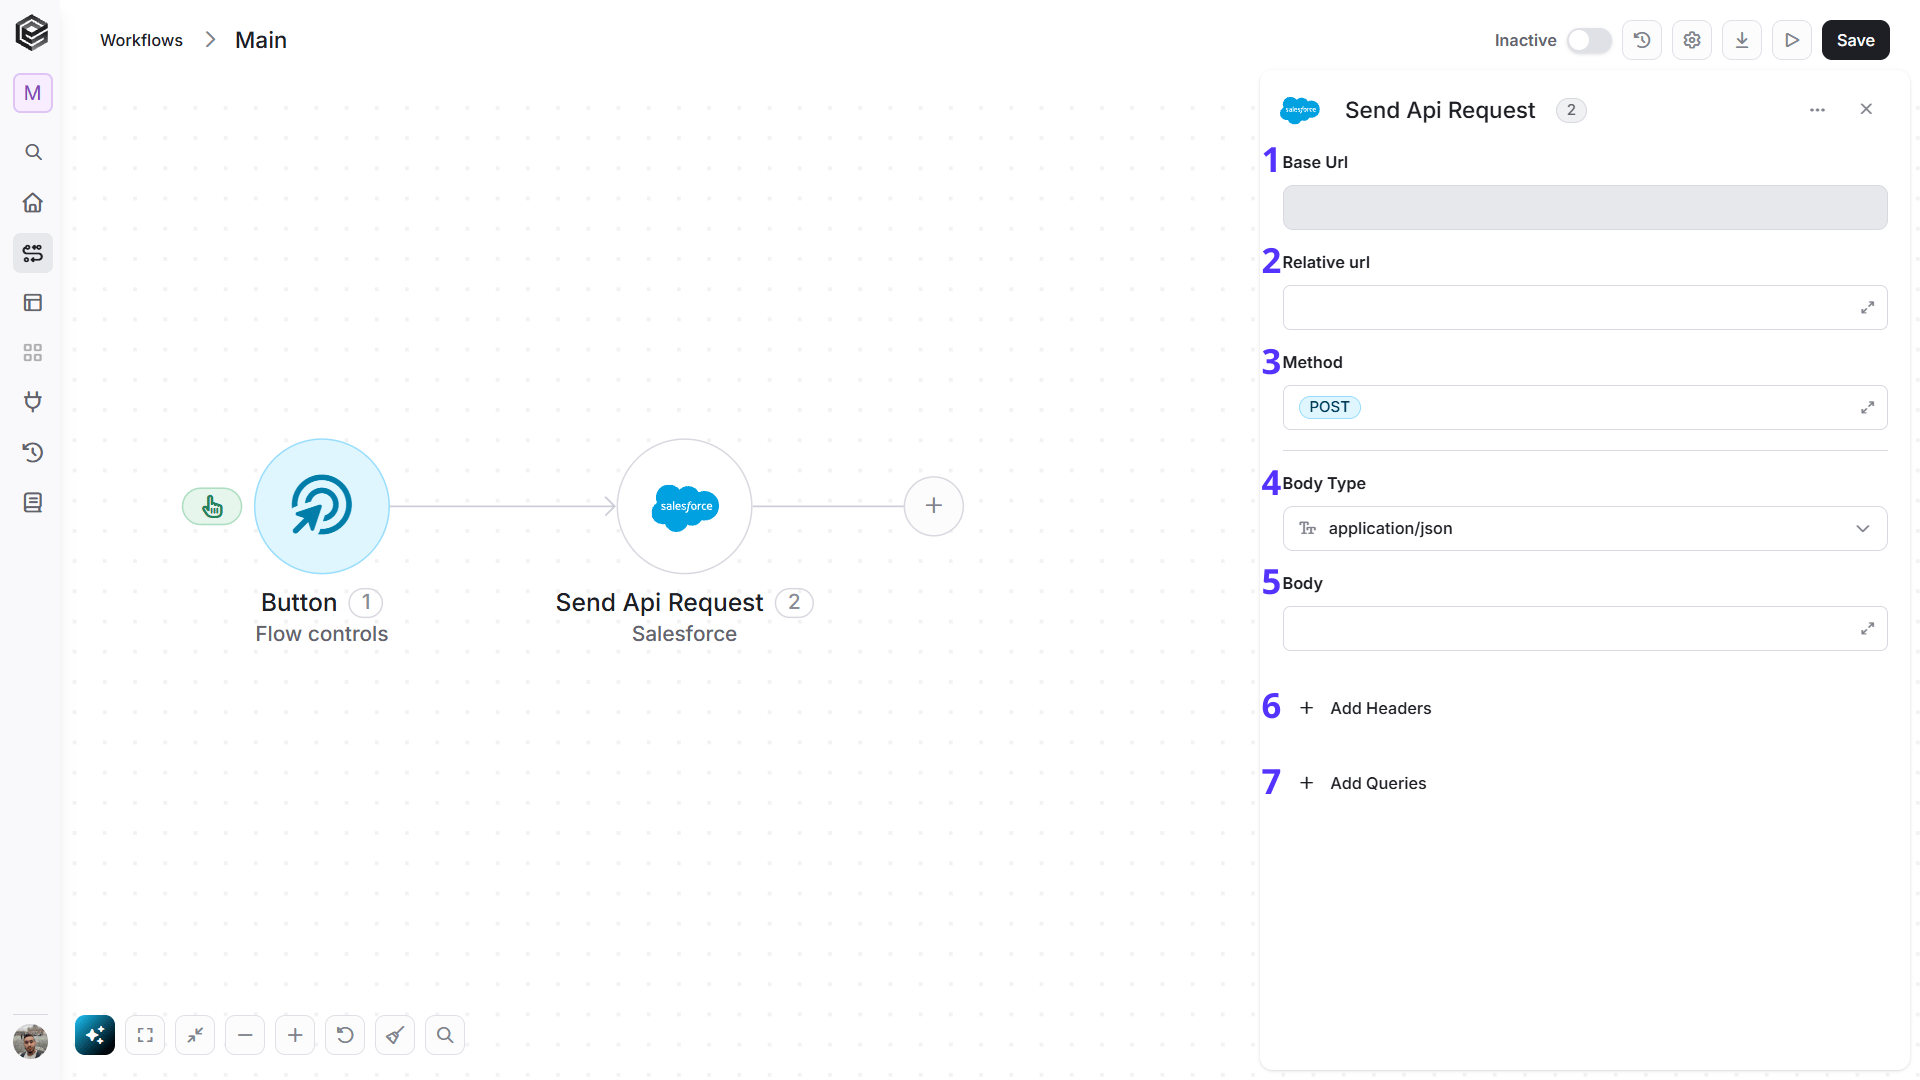
- Base Url - The root URL of the Salesforce API. It is filled in from your Salesforce connection and can’t be edited here.
- Relative url - Enter the path that Engini adds to the end of the Base Url, for example
/sobjects/Account. It selects the Salesforce resource you want to call. - Method - Select the HTTP method of the request, such as GET, POST, PUT, PATCH or DELETE. The default is POST.
- Body Type - Defines the format of the data in the body of your request. The default, application/json, means the body contains a JSON-formatted payload.
- application/json – Sends the request body in JSON format. Commonly used by REST APIs.
- custom – Allows you to define a custom body format by manually setting the Content-Type header. Add a
Content-Typerow in Add Headers with the media type you need (for exampleapplication/xml). With any other Body Type, a Content-Type you type in Add Headers is not sent; Engini sets it from the Body Type, and the run history shows it underheadersnotsent. - application/x-www-form-urlencoded – Sends the body as URL-encoded key-value pairs, commonly used in form submissions.
- file – Sends a file as the request body.
- multipart/form-data – Sends form data that may include both text fields and files.
- text/html – Sends the request body as HTML content.
- text/plain – Sends the request body as plain text.
- text/xml – Sends the request body in XML format.
- Body - Enter the data you send to Salesforce, in the format you chose in Body Type. For example, a JSON object with the fields of a new record.
- Add Headers - Click Add Headers to send extra headers with the request. You don’t need an Authorization header, because Engini adds the sign-in details of your connection.
- Add Queries - Click Add Queries to add query parameters to the request address, for example
qwith a SOQL query when you call the query endpoint.