

- Create, update, delete, and get one or more files
- Create, update, delete, and get one or more folders
Getting Started with OneDrive
Prerequisites
- A Microsoft account.
Add a connection to OneDrive in Engini
- Enter to your Engini account at https://app.engini.io.
-
Navigate to Connections page by clicking on the Connections on the left sidebar or by clicking here.

-
Click on the “New Integration” option located at the top bar.

-
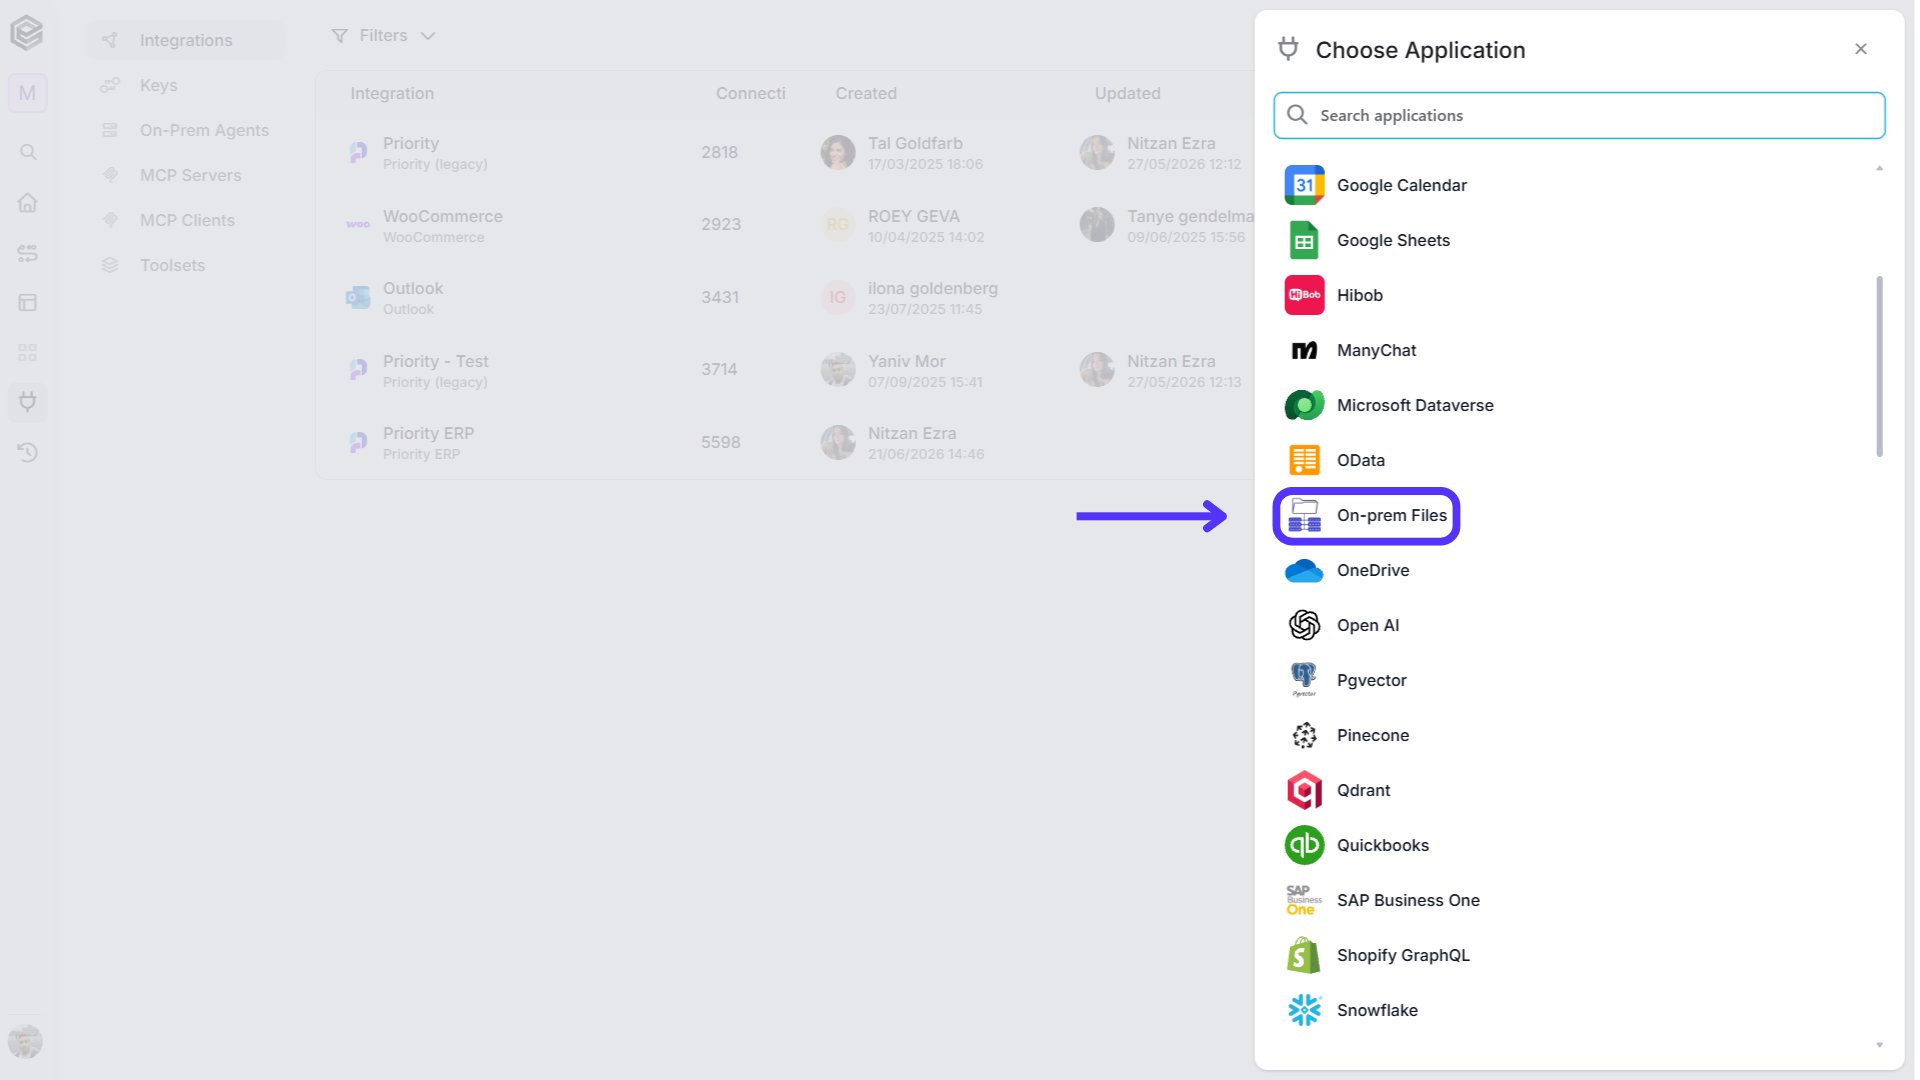
Choose the OneDrive option from the available applications.
-
Enter the following details in the “New Integration” form and press Save:

- Connection Name - Enter a unique and descriptive name for this connection. This name will help you easily identify and manage your OneDrive.
- Refresh Token - A token used to obtain a new access token when the current one expires.
- Sign in with Microsotf - Click on the “Microsoft Signin” button. Sign into your Microsoft account.
- Save Settings - Click on the save button to save the connection.
Triggers
The triggers monitor the folder, listening for files and folders created or updated in the connected OneDrive folder, based on the defined scheduled intervals.
Check for File/Folder Created/Updated

- Files or Folders - Select from the dropdown list the type of content you want the trigger to monitor. You can choose between: “Files and Folders”, “Files only”, or “Folders only”.
- OneDrive Location - Select the location of the content you want the trigger to monitor. You can choose between: “Groups’ Drive”, “My Drive”, “Shared With Me”, or “Site’s Drive”.
- Group/Site Id - Enter the Group/Site Id where you want to monitor for new/updated files or folders.
- Drive Id - Enter the Drive Id where you want to monitor for new/updated files or folders.
- Folder Id - Enter the Folder Id you want to monitor for new/updated files or folders.
- Query – Search by file or folder name (not required)
- Starting (UTC) - Select the start date and time for the scheduled trigger.
- Recur every - Choose the time interval for triggering and checking emails. The minimum time interval is 15 minutes.
-
Add time frame

- Click on the “Add time frames” button.
- Select the specific time frame during which you want your workflow to be executed. Simply select the start time and end time that best align with your scheduling preferences.
- Press the “Add time frame” button for adding more time frames.
Actions
Add Permission to File/Folder (Send Invitation)
This activity permits recipients to write, read, or both files or folders by invitation.
- Location - Select the location of the file or folder. You can choose between: “Groups’ Drive”, “My Drive”, or “Site’s Drive”.
- Group/Site Id - Enter the Group/Site where you want to give permission.
- Drive Id - Enter the drive where you want to give permissions for the file or folder.
- File/Folder Id - Enter the file/folder Id you give permissions on.
- Recipients - Select the recipients to whom permissions will be given to the file or folder.
- Role - Select the roles you want to promote to the recipients.
- Require SignIn – Determines whether the recipient must sign in to their account in order to access the file or folder.
- Send Invitation – Controls whether a sharing invitation (email with a link) is sent to the recipient when the permission is added.
Append to Recipients Array
In this activity, you can add other recipients to the list of recipients. Appending to an array variable allows you to dynamically add new values to the end of the array without changing the size or structure of the array.
- Variable - Select the variable from the dropdown list you want to append to the recipients array.
- Add Field - Click Add Field to add and populate additional fields for the selected activity. To learn more about managing activity data, click here.
Append to Roles Array
In this activity you can add other roles to the list of roles. Appending to an array variable allows you to dynamically add new values to the end of the array without changing the size or structure of the array.
- Variable - Select the variable from the dropdown list you want to append to the recipients array.
- Add Field - Click Add Field to add and populate additional fields for the selected activity. To learn more about managing activity data, click here.
Copy File/Folder
In this activity you can copy a file or folder and place them into another folder.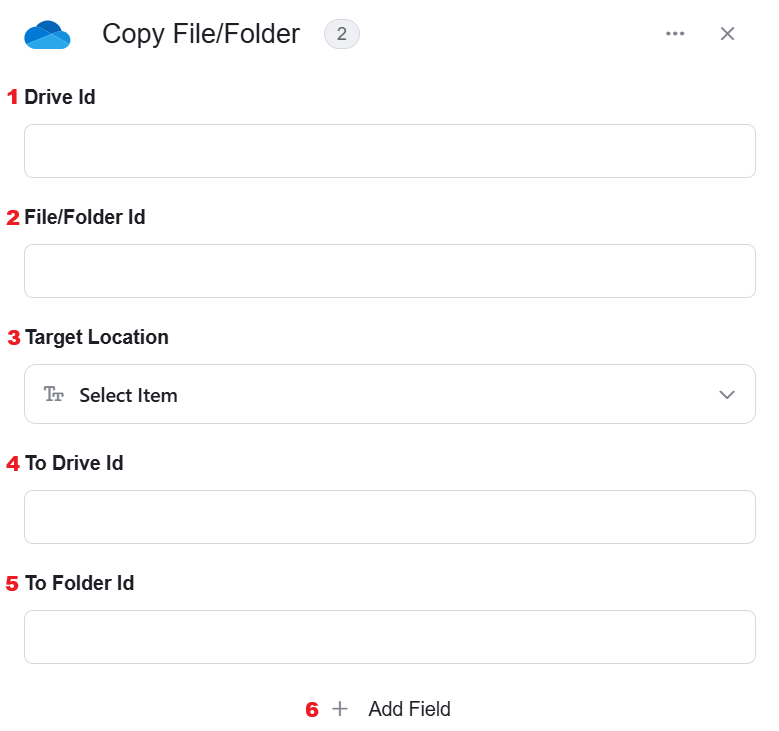
- Drive Id - Enter the Drive where you want to copy the file or folder.
- File/Folder Id - Enter the file/folder you want to copy.
- Target location - Select the location where the file/folder will be copied. You can choose between: “Groups’ Drive”, “My Drive”, or “Site’s Drive”.
- To Drive Id - Select the Drive where the file/folder will be copied.
- To Folder Id - Enter the folder where the file/folder will be copied.
- Add Field - Click Add Field to add and populate additional fields for the selected activity. To learn more about managing activity data, click here.
Create Folder
This activity creates a new folder in OneDrive.
- Location - Select the location of the new folder. You can choose between: “Groups’ Drive”, “My Drive”, or “Site’s Drive”.
- Folder name - Enter the name of the new folder.
Create Share Link
This activity creates a new shared link in OneDrive.
- Location - Select the location of the new share link. you can choose between: “Groups’ Drive”, “My Drive”, or “Site’s Drive”.
- Type - Select the type of the new share link. you can choose between: “Edit”, “Embed”, or “View”.
- Edit – anyone with this link can edit this file/folder.
- Embed – URL that allows access to the file/folder stored in OneDrive, which can be incorporated into other platforms or documents.
- View – anyone with this link can view this file/folder.
- Add Field - Click Add Field to add and populate additional fields for the selected activity. To learn more about managing activity data, click here.
Delete File/Folder
This activity deletes files or folders from OneDrive.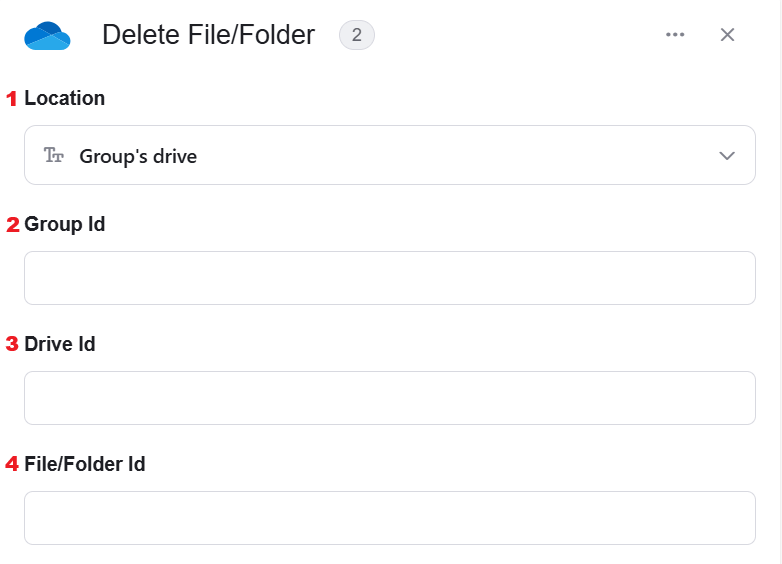
- Location - Select the location of the file/folder you want to delete. You can choose between: “Groups’ Drive”, “My Drive”, or “Site’s Drive”.
- Group/Site Id - Select the Group/Site where the file/folder you want to delete.
- Drive Id - Select the Drive where the file/folder will be deleted.
- File/Folder Id - Select the file/folder you want to delete.
Delete File/Folder Permission
This activity deletes permission from the file/folder from OneDrive.
- Location - Select the location of the file/folder you want. You can choose between: “Groups’ Drive”, “My Drive”, or “Site’s Drive”.
- Group/Site Id - Select the Group/Site where the file/folder you want.
- Drive Id - Select the Drive where the file/folder.
- File/Folder Id - Select the file/folder you want.
- Permission Id - Select the permission you want to delete.
Download File
This activity allows you to download a file from OneDrive.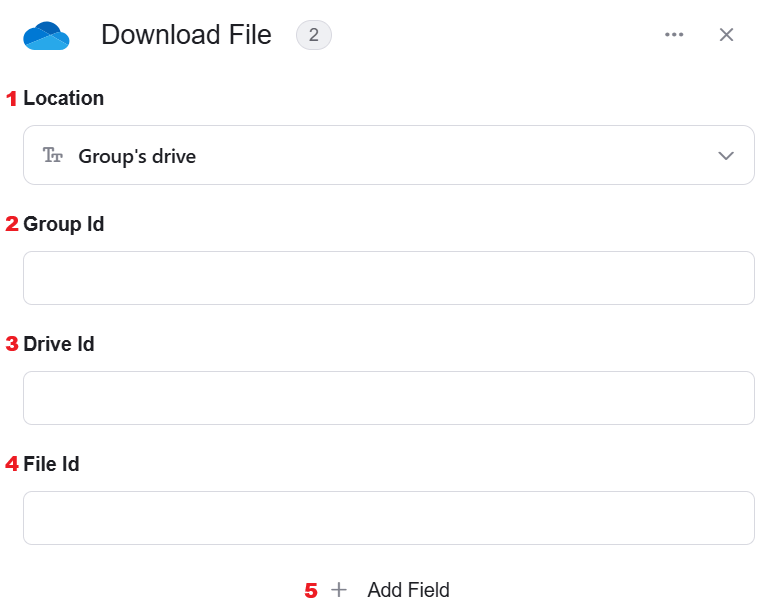
- Location - Select the location of the file you want to download. You can choose between: “Groups’ Drive”, “My Drive”, or “Site’s Drive”.
- Group Id - Select the Group/Site where the file you want.
- Drive Id - Select the Drive where is the file.
- File Id - Select the file/folder you want.
- Add Field - Click Add Field to add and populate additional fields for the selected activity. To learn more about managing activity data, click here.
Get Drives
This activity allows you to get drives from OneDrive.
- OneDrive Location - Select the location of the file you want to download. You can choose between: “Groups’ Drive”, “My Drive”, or “Site’s Drive”.
- Group Id - Select the Group/Site where the file you want.
Get File/Folder Info
This activity allows you to get information on files/folders from OneDrive.
- Location - Select the location of the file/folder you want. You can choose between: “Groups’ Drive”, “My Drive”, or “Site’s Drive”.
- Group Id - Select the Group/Site where the file/folder you want.
- Drive Id - Select the Drive where the file/folder is.
- File/Folder Id - Select the file/folder you want.
Get Files/Folders
This activity allows you to get files/folders from OneDrive.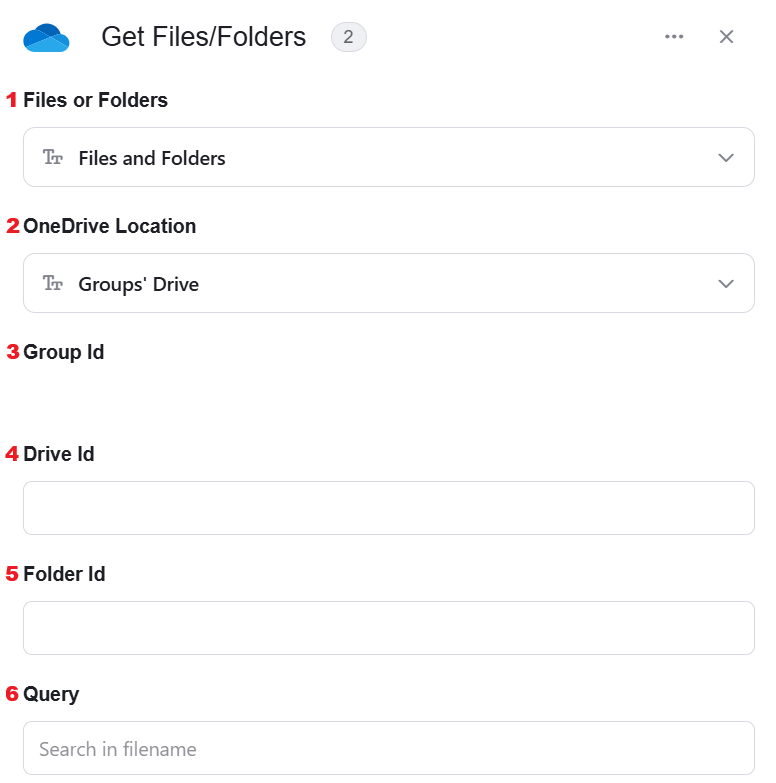
- Files or Folders - Select the type of content you want to get. You can choose between: “Files and Folders”, “Files only”, or “Folders only”.
- OneDrive Location - Select the location of the content you want to get. You can choose between: “Groups’ Drive”, “My Drive”, “Shared With Me”, or “Site’s Drive”.
- Group Id - Enter the Group/Site Id you want the content from them.
- Drive Id - Enter the Drive Id you want the content from them.
- Folder Id - Enter the Folder Id you want the content from them.
- Query – Search by file or folder name (not required).
Get Permissions
This activity allows you to get permissions of files/folders from OneDrive.
- Location - Select the location of the file/folder you want the permissions of. You can choose between: “Groups’ Drive”, “My Drive”, or “Site’s Drive”.
- Group Id - Select the Group/Site where the file/folder you want the permissions of.
- Drive Id - Select the Drive where the file/folder the permissions of.
- File/Folder Id - Select the file/folder you want the permissions of.
Get User Drive
This activity allows you to get the user of OneDrive.
Initialize Recipients Array
This activity allows you to initialize the recipients array.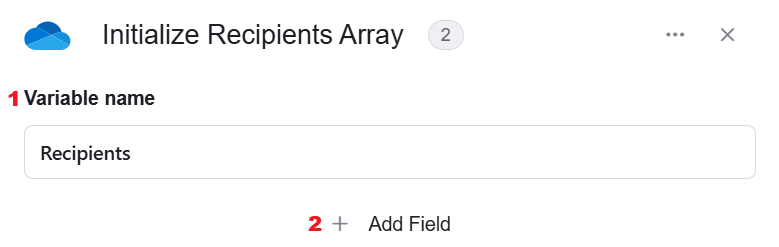
- Variable Name - Enter the name of the variable that will hold the initialized object array. This name will be used throughout the workflow whenever you refer to this object array.
- Add Field - Click Add Field to add and populate additional fields for the selected activity. To learn more about managing activity data, click here.
Initialize Roles Array
This activity allows you to initialize the roles array.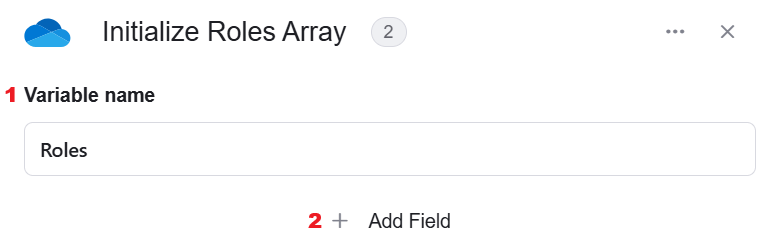
- Variable Name - Enter the name of the variable that will hold the initialized object array. This name will be used throughout the workflow whenever you refer to this object array.
- Add Field - Click Add Field to add and populate additional fields for the selected activity. To learn more about managing activity data, click here.
Move File/Folder
This activity allows you to move files/folders in OneDrive.
- Drive Id - Enter the Drive from where you want to move the file or folder.
- File/Folder Id - Enter the file/ folder Id you want to move the file or folder.
- Target location - Select from the dropdown list the location where the file/folder will be moved. You can choose between: “Groups’ Drive”, “My Drive”, or “Site’s Drive”.
- To Group Id – Select the Microsoft 365 Group that owns the destination drive.
- To Drive Id - Select the Drive where the file/folder will be moved.
- To Folder Id - Enter the folder where the file/folder will be moved.
- Add Field - Click Add Field to add and populate additional fields for the selected activity. To learn more about managing activity data, click here.
Rename File/Folder
This activity allows you to rename files/folders in OneDrive.
- Files or Folders - Select the type of content you want to get. You can choose between: “File” or “Folder”.
- Location - Select the location of the content you want to rename. You can choose between: “Groups’ Drive”, “My Drive”, “Shared With Me”, or “Site’s Drive”.
- Group Id - Enter the Group/Site Id where the content you want to rename is.
- Drive Id - Enter the Drive Id where the content you want to rename is.
- File/Folder Id - Enter the File/Folder Id you want to rename.
- New name - Enter the new name of the File/Folder.
Update File/Folder Permission

- Location - Select the location where you to upload the file. You can choose between: “Groups’ Drive”, “My Drive”, “Shared With Me”, or “Site’s Drive”.
- Permission Id – The unique ID of the existing permission that you want to update (for example, a specific user’s or group’s access to the file or folder).
- Add Field - Click Add Field to add and populate additional fields for the selected activity. To learn more about managing activity data, click here.
Upload File
This activity allows you to upload files/folders in OneDrive.
- Location - Select the location where you to upload the file. You can choose between: “Groups’ Drive”, “My Drive”, “Shared With Me”, or “Site’s Drive”.
- Group Id - Enter the Group/Site Id where you want to upload the file.
- Drive Id - Enter the Drive Id where you want to upload the file.
- Folder Id - Enter the Folder where you want to upload the file.
- File name - Enter the name of the File you want to upload.
- Content - Enter the File you want to upload in base64 string.
- Add Field - Click Add Field to add and populate additional fields for the selected activity. To learn more about managing activity data, click here.