

Getting Started with MS SQL
Prerequisites
- A MS SQL account
Add a connection to MS SQL in Engini
The MS SQL connector uses basic authentication to authenticate with SQL Server.- Enter your Engini account at https://app.engini.io.
-
Navigate to Connections page by clicking on the Connections on the left sidebar or by clicking here.

-
Click on the “New Integration” option located at the top bar.

-
Choose MS SQL option from the available applications.
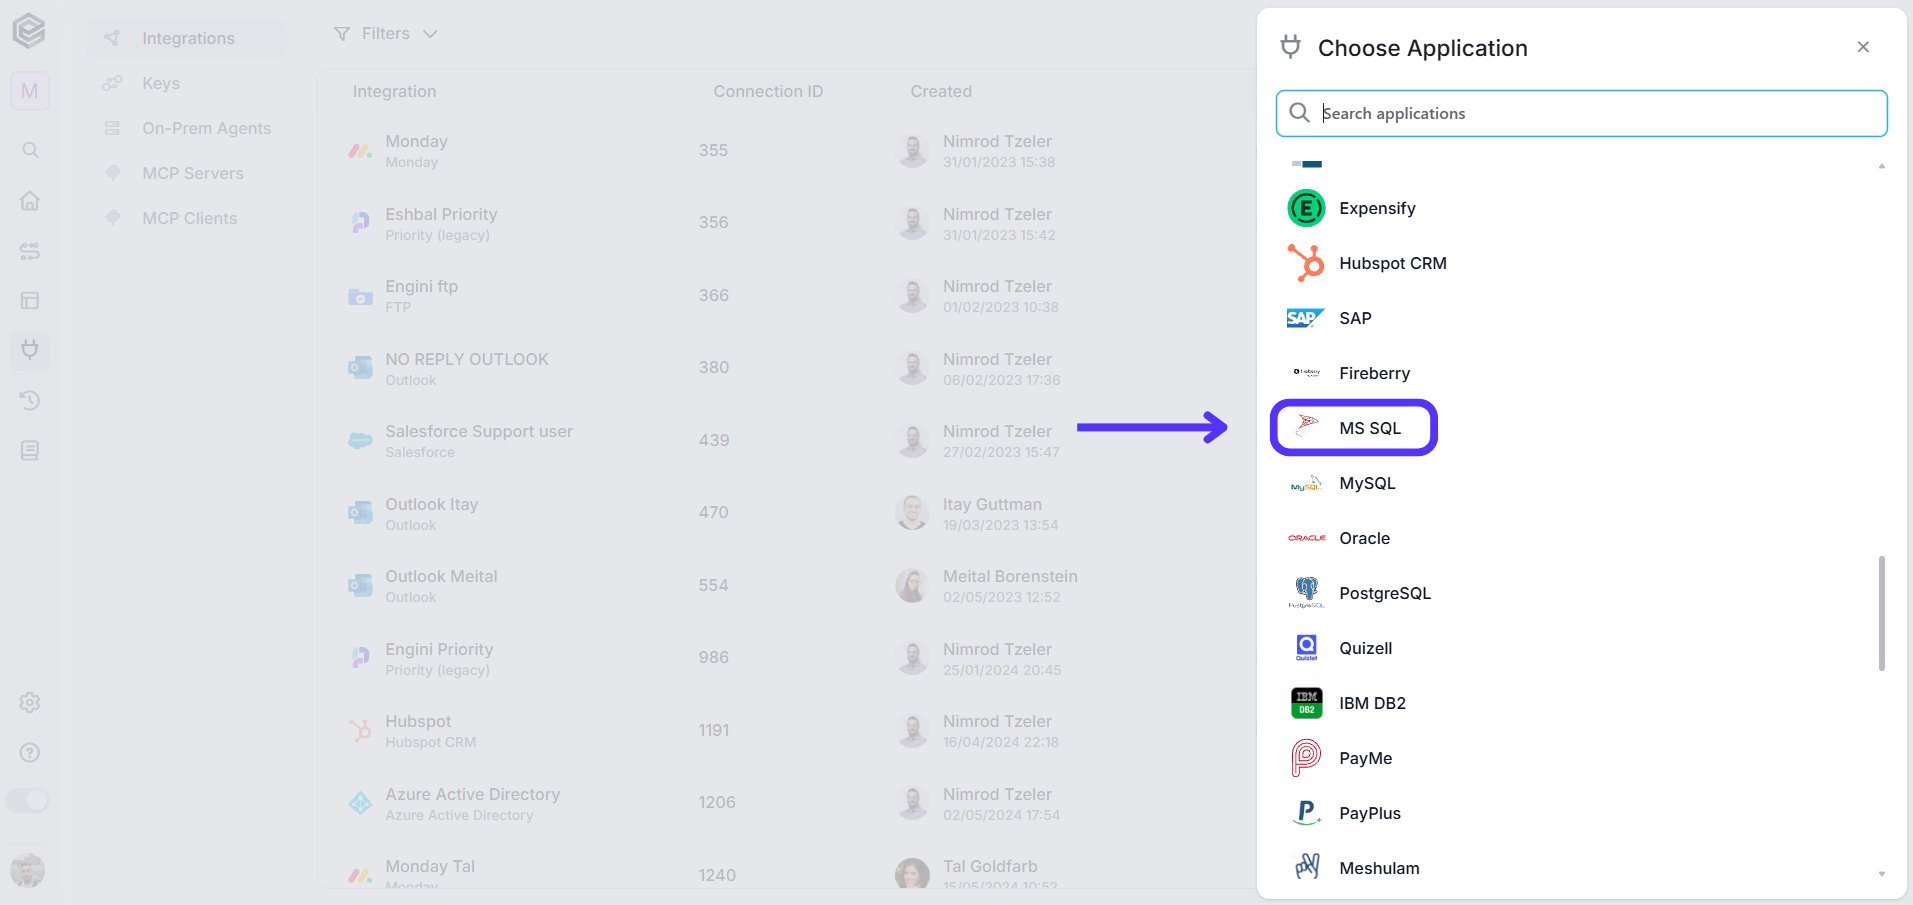
-
Enter the following details in the “New Integration” form and press Save:
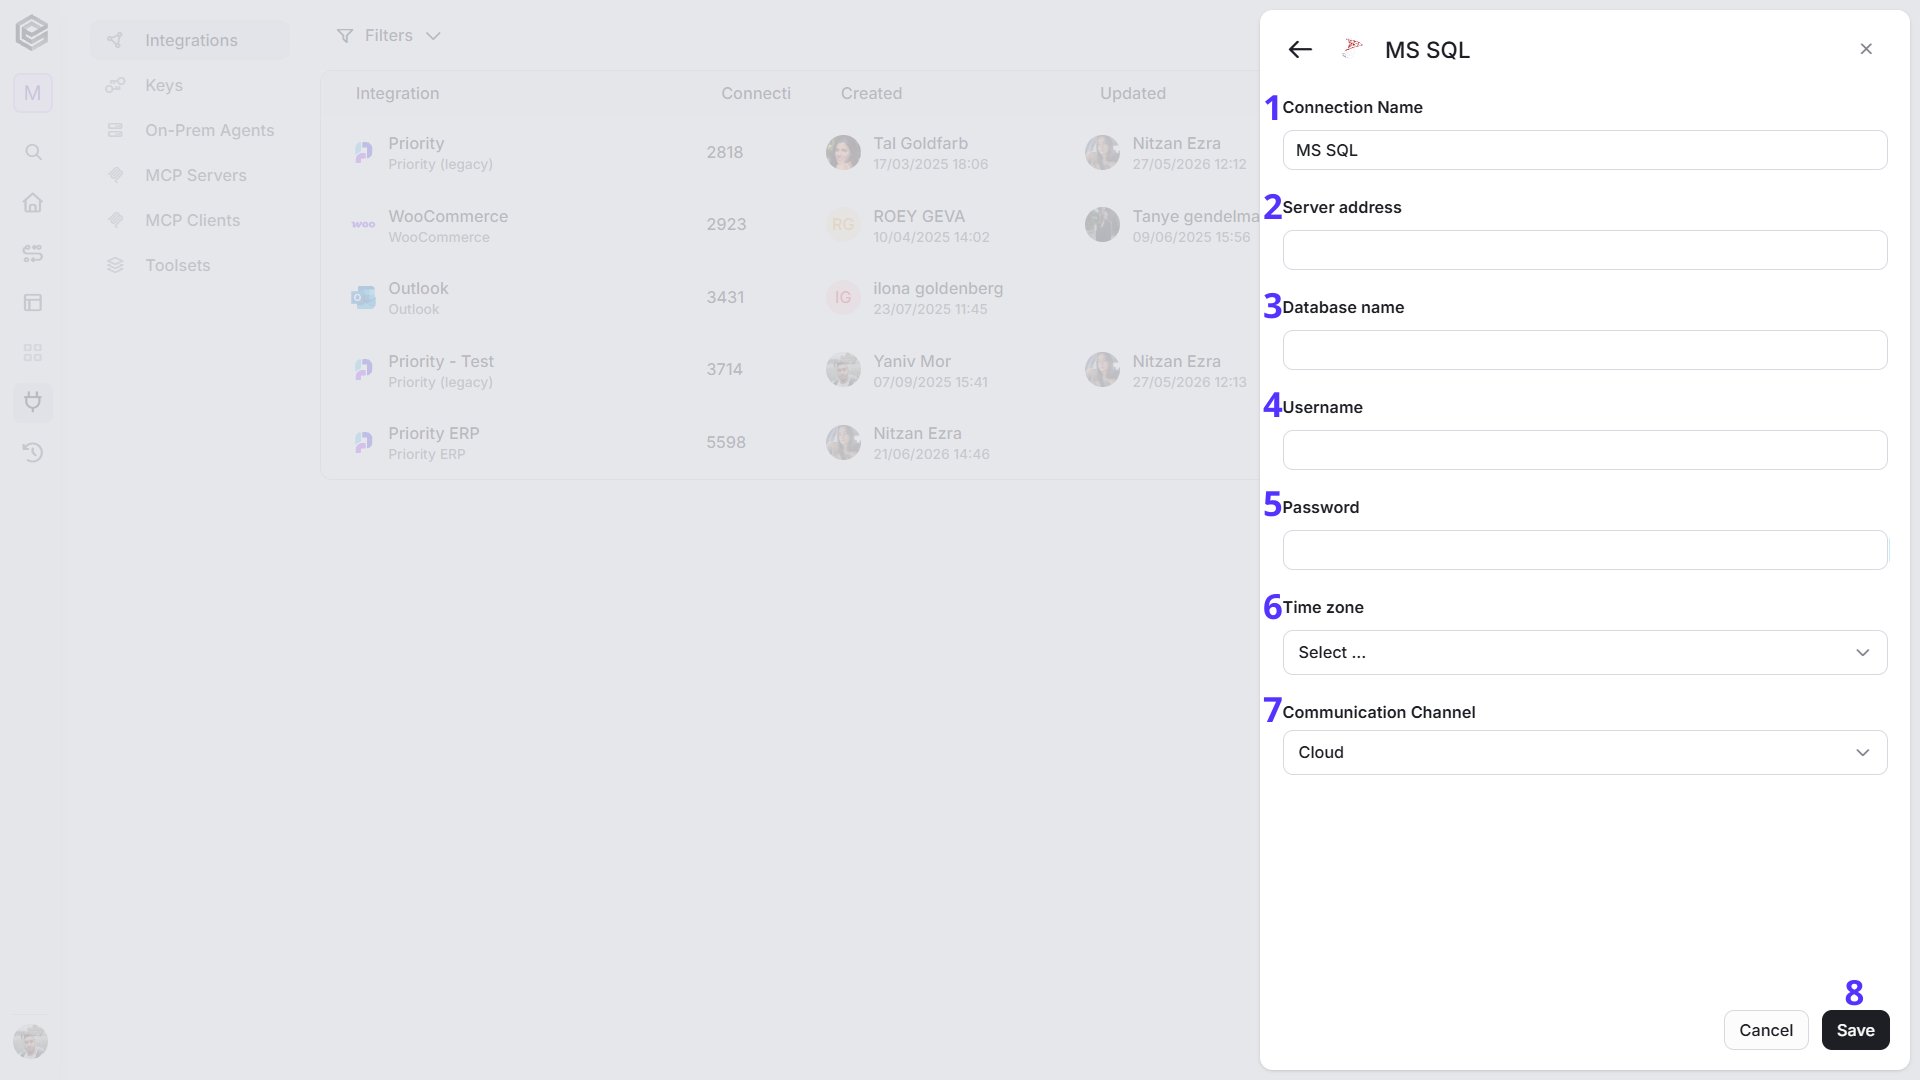
- Connection name - Enter a unique and descriptive name for this connection. This name will help you identify and manage the connection in your Engini account. “MS SQL” by default.
- Server address - Specify the address or hostname of your MS SQL server. This is the location where your database is hosted.
- Database name - Provide the name of the specific database within the MS SQL server that you want to connect to.
- Username - Enter the username associated with your MS SQL database. This username should have the necessary permissions to access and interact with the database.
- Password - Enter the corresponding password for the provided username. Make sure the password is accurate to establish a secure connection.
- Time Zone - Select the time zone of your SQL Server environment. This ensures that all date and time values (timestamps, schedules, logs) are handled correctly. For all the options, click here.
-
Communication Channel - Choose the appropriate connection type based on your setup:
- Cloud - If you are connecting to a database hosted in a cloud environment, select “Cloud”.
- OPA - If your database is on-premises and you are using an On-Premises Agent (OPA) for the connection, select “OPA”. In this case, an additional field will appear: On-Prem Agent- Choose the specific On-Premises Agent that you want to use for this connection if you have multiple agents configured.
- Save Settings - After clicking “save”, a window will prompt you to select Database Objects from available Tables/Views/Stored Procedures.
- You can select the databases you want to use by marking the corresponding checkboxes of the tables/view/Stored Procedures you intend to utilize. Subsequently, you can perform various activities within your workflow and access the data stored within these selected tables/views/Stored Procedures.
Actions
Create Record
Creates a new record in a Microsoft SQL Server table by specifying the target table and providing the field values to insert.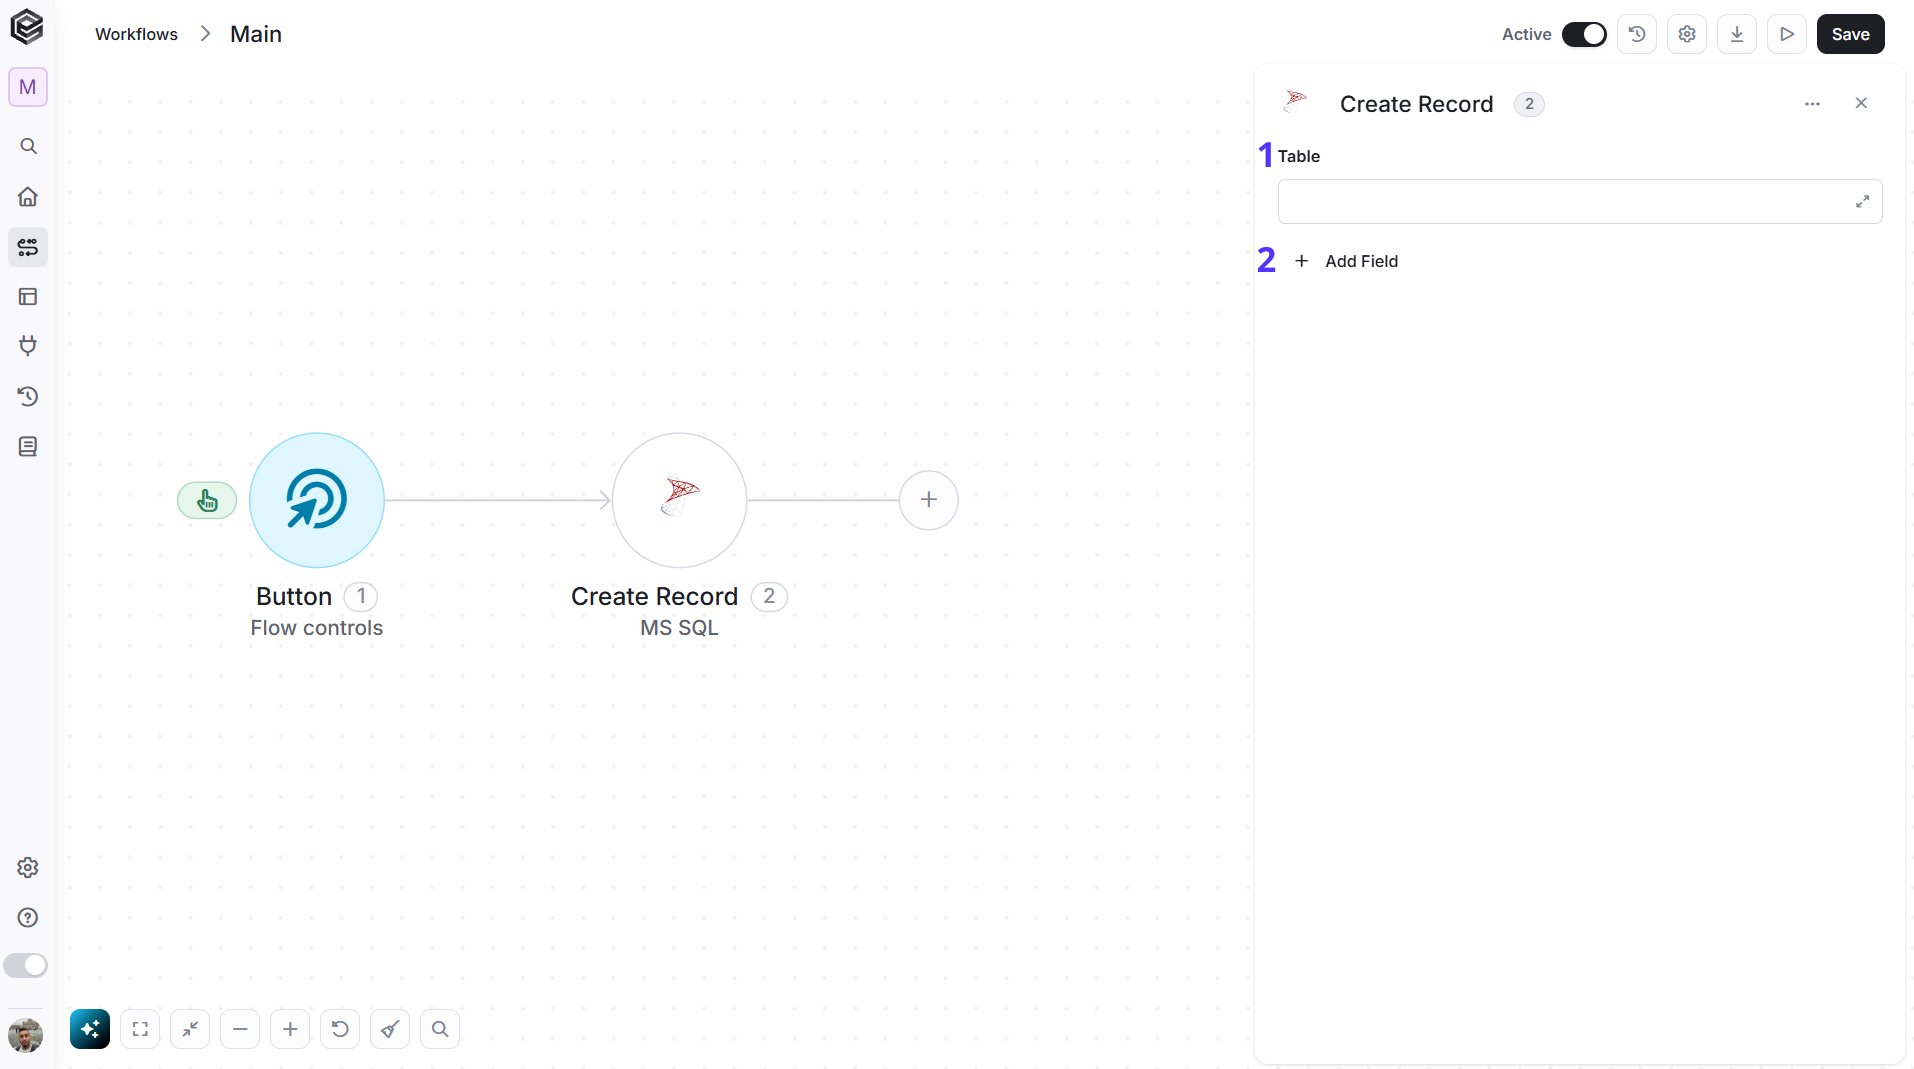
- Table
- Click on the empty field and the tooltip will pop up showing all the tables you can use.
- All available tables will be accessible and you can select the specific table for the new record you create.
- Add Field - Click Add Field to add and populate additional fields for the selected activity. To learn more about managing activity data, click here.
Get Records
Get Records from a specified SQL table/view.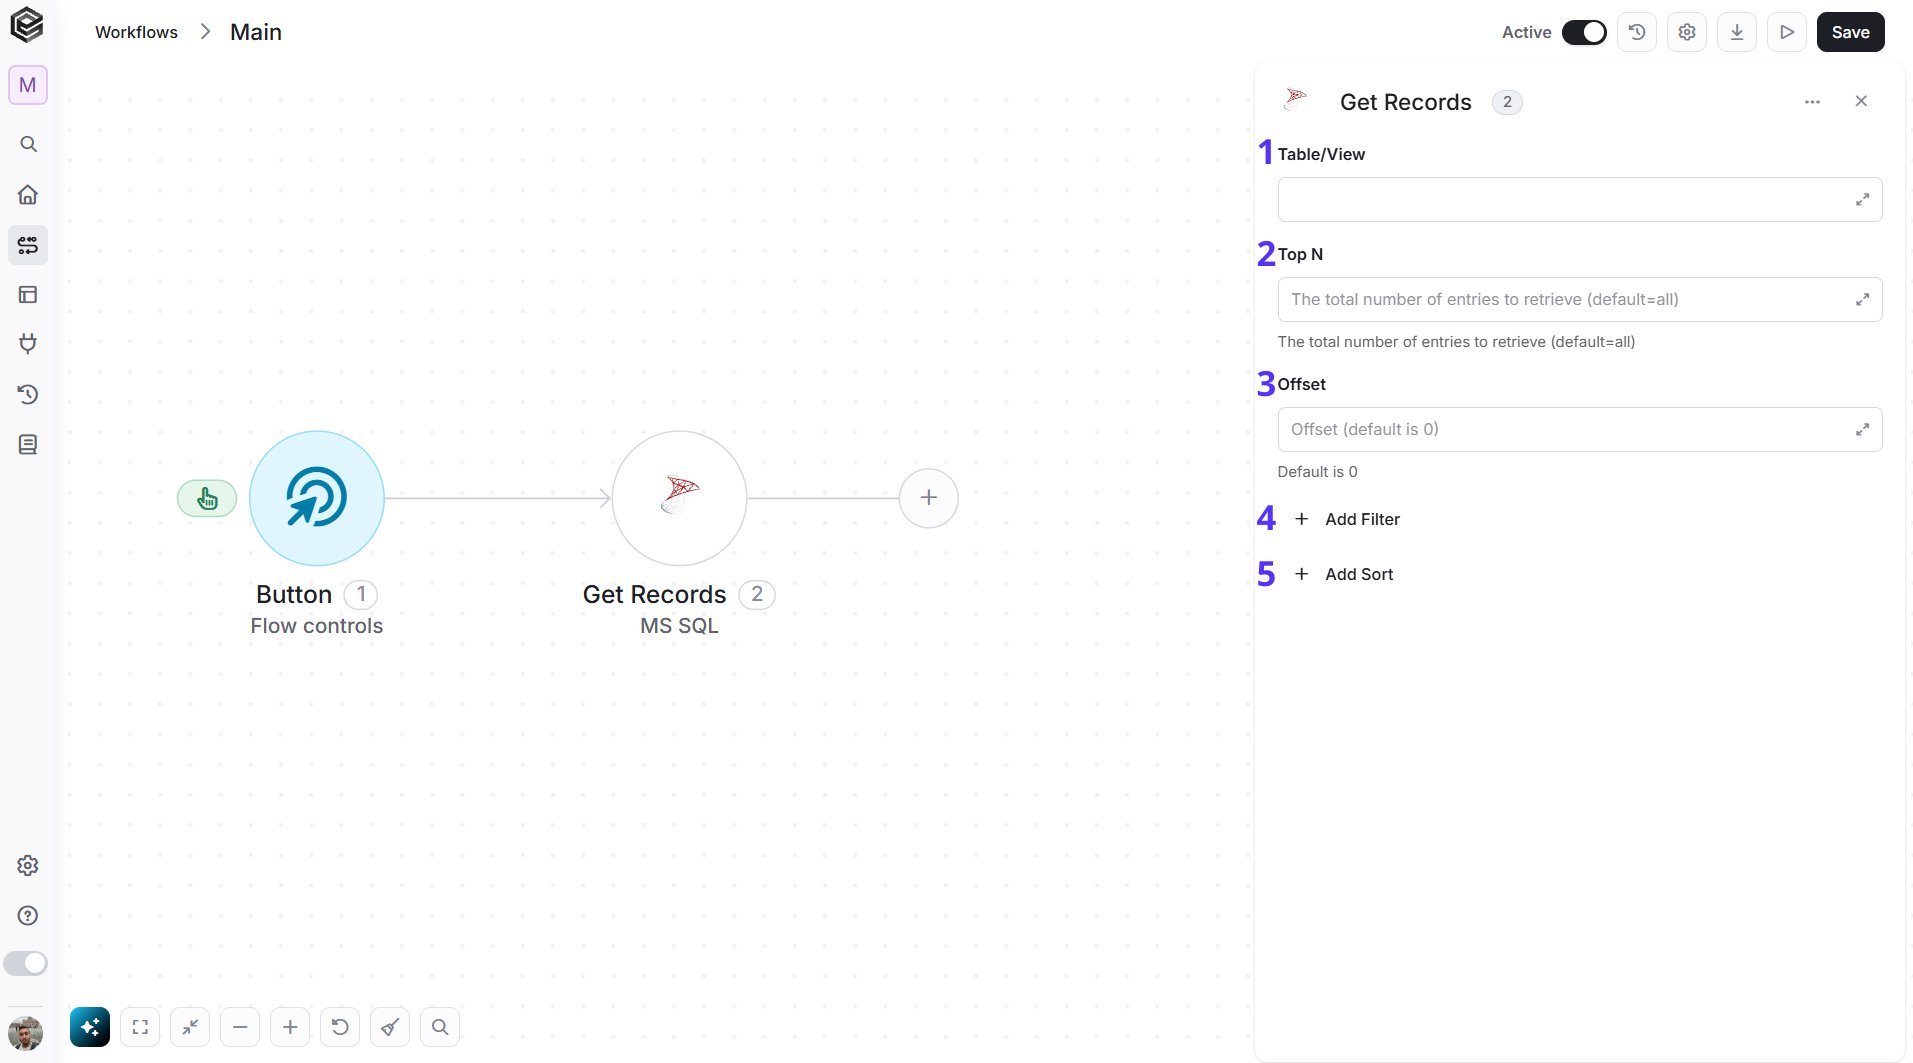
- Table/View
- Click on the empty field and the tooltip will pop up showing all the Tables/Views you can use.
- All available tables/views will be accessible and you can select the specific tables/views of the records you want to get.
- Top N - You can set the number of rows you want to retrieve from the table or view. This parameter limits the result set to the specified number of records, with the default being 100.
- If you set Top N = 1, a single record will be returned instead of an array. If no record is found, the action will fail, allowing you to implement an IF condition within the workflow. This can be useful for processes where the existence of a record determines the next steps in the workflow.
- Offset - If you want to skip a certain number of rows before retrieving data, you can set the offset value. The default is 0, meaning no rows are skipped.
- Add Filter - Click Add Filter to define conditions that narrow down the data list and return only the relevant items. To learn more about using filters, click here.
- Add Sort - Click Add Sort to organize the data list by a selected field in ascending or descending order. To learn more about sorting data, click here.
Update Record
Updates an existing record in a Microsoft SQL Server table by specifying the target table and providing the field values to update.
- Table
- Click on the empty field and the tooltip will pop up showing all the tables you can use.
- All available tables will be accessible and you can select the specific table of the record you want to update.
- Add Field - Click Add Field to add and populate additional fields for the selected activity. To learn more about managing activity data, click here.
Update Records
Updates multiple records in a Microsoft SQL Server table by specifying the target table, applying filters to identify the records, and providing the field values to update.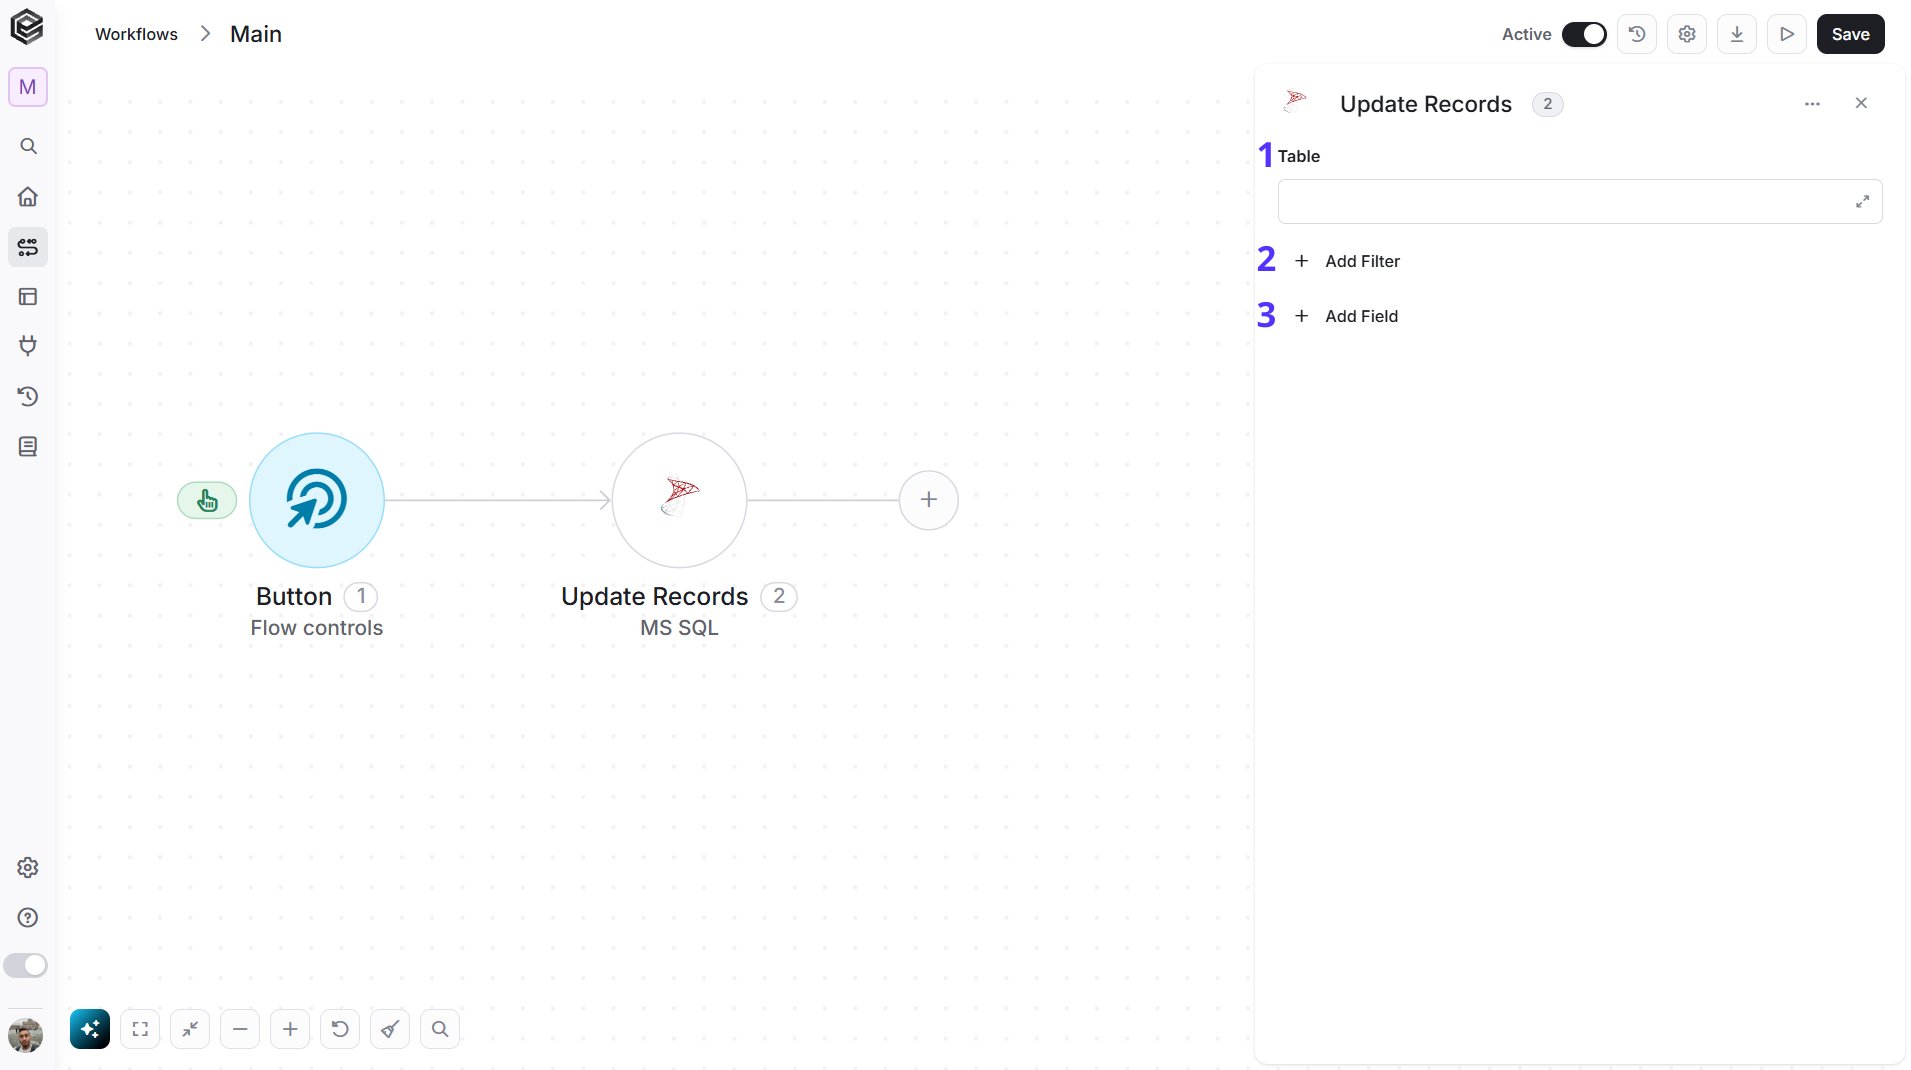
- Table
- Click on the empty field and the tooltip will pop up showing all the tables you can use.
- All available tables will be accessible and you can select the specific table of the records you want to update.
- Add Field - Click Add Field to add and populate additional fields for the selected activity. To learn more about managing activity data, click here.
- Add Filter - Click Add Filter to define conditions that narrow down the data list and return only the relevant items. To learn more about using filters, click here.
Delete Records
Deletes records from a Microsoft SQL Server table by specifying the target table and applying filters to identify the records to remove.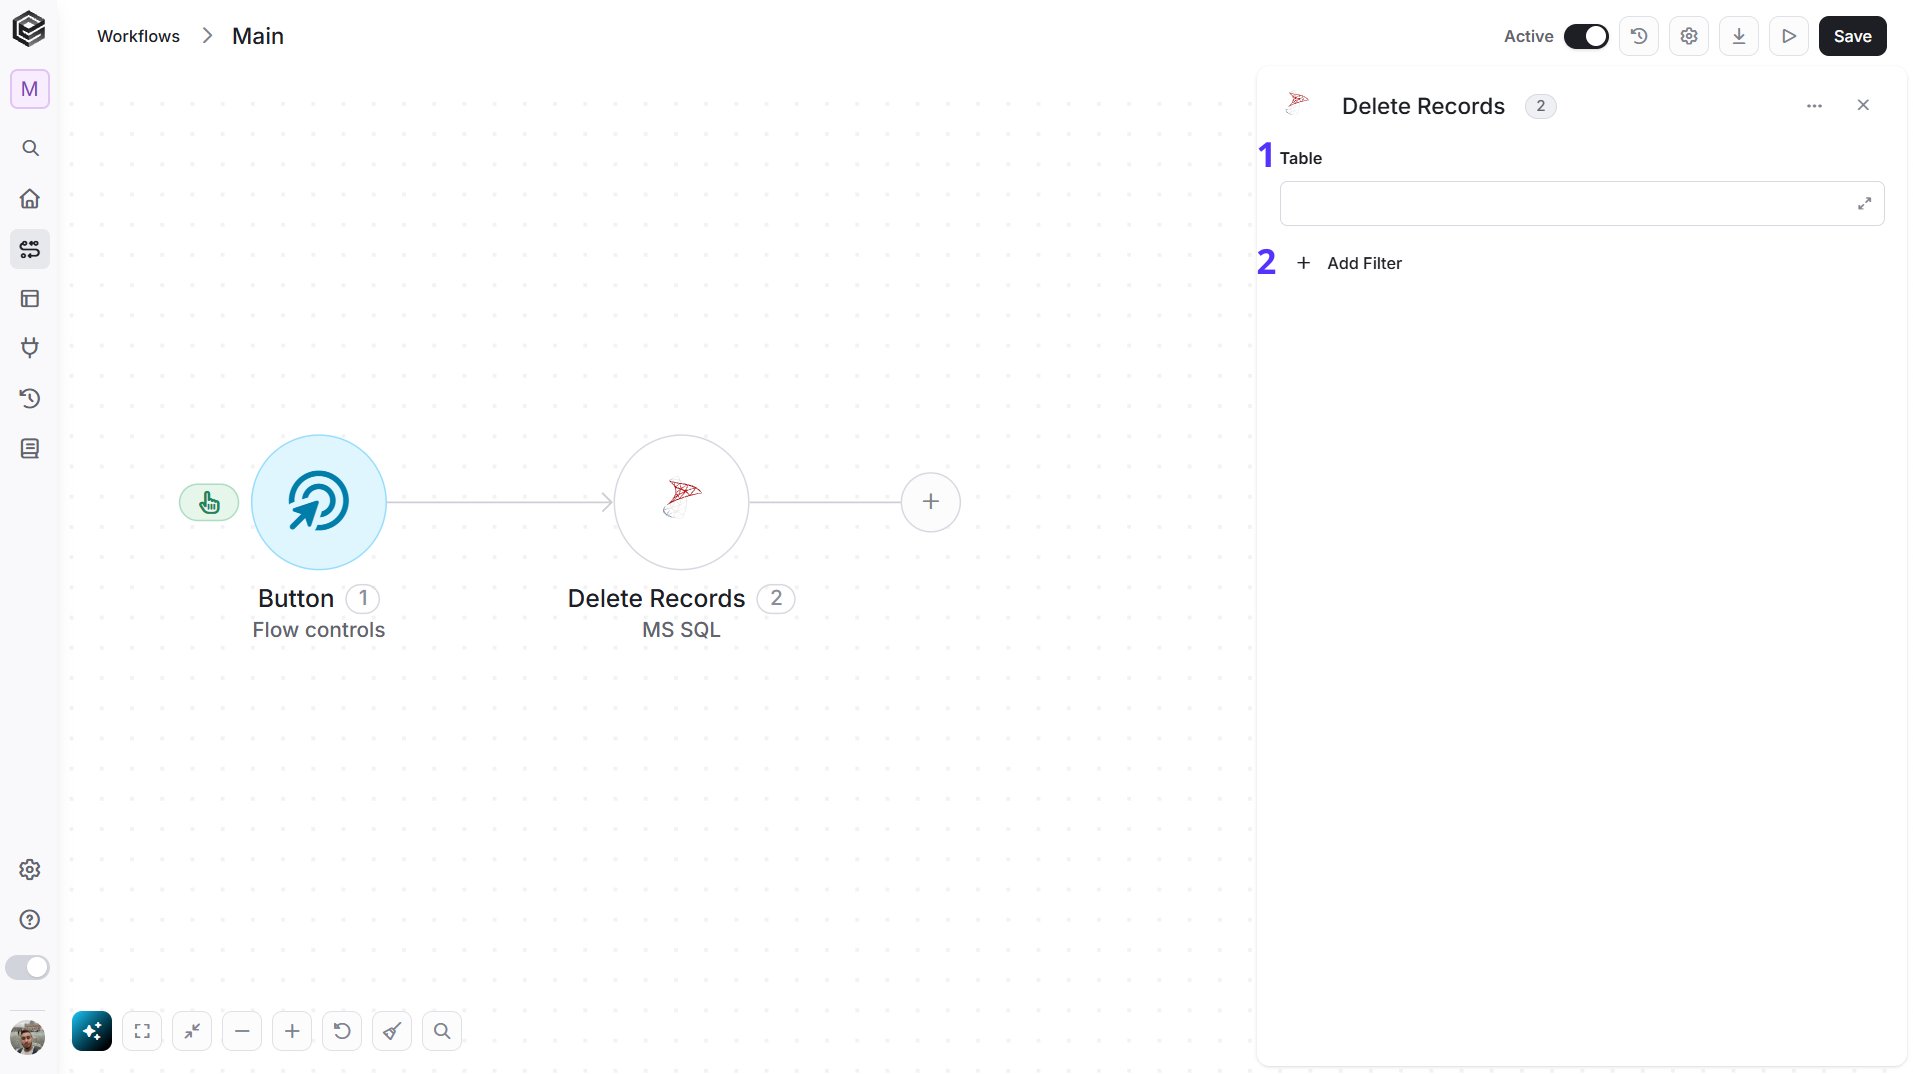
- Table
- Click on the empty field and the tooltip will pop up showing all the tables you can use.
- All available tables will be accessible and you can select the specific table of the record(s) you want to delete.
- Add Filter - Click Add Filter to define conditions that narrow down the data list and return only the relevant items. To learn more about using filters, click here.
Create Batch of Records
This activity iterates over a selected data list and for each record in the data list create records for a designated SQL table corresponding to the specified data list.
- Data List - Click on the empty field next to the data list label and the tooltip will popup showing only previous activities than contains data lists from which you can choose. Choose a data list to iterate on.
- Table
- Click on the empty field and the tooltip will pop up showing all the tables you can use.
- All available tables will be accessible and you can select the specific table for the new records you create.
- Add Field - Click Add Field to add and populate additional fields for the selected activity. To learn more about managing activity data, click here.
Get Records Batch
This activity iterates over a selected data list and for each record in the data list retrieves records from a designated SQL table corresponding to the specified data list.
- Data List - Click on the empty field next to the data list label and the tooltip will popup showing only previous activities than contains data lists from which you can choose. Choose a data list to iterate on.
- Table
- Click on the empty field and the tooltip will pop up showing all the tables you can use.
- All available tables will be accessible and you can select the specific table of the record(s) you want to get.
- Top N - You can set the number of rows you want to retrieve from the table or view. This parameter limits the result set to the specified number of records, with the default being 100.
- If you set Top N = 1, a single record will be returned instead of an array. If no record is found, the action will fail, allowing you to implement an IF condition within the workflow. This can be useful for processes where the existence of a record determines the next steps in the workflow.
- Add Filter - Click Add Filter to define conditions that narrow down the data list and return only the relevant items. To learn more about using filters, click here.
- Add Sort - Click Add Sort to organize the data list by a selected field in ascending or descending order. To learn more about sorting data, click here.
Update Batch of Records
This activity iterates over a selected data list and for each record in the data list updates records from a designated SQL table corresponding to the specified data list.
- Data List - Click on the empty field next to the data list label and the tooltip will popup showing only previous activities than contains data lists from which you can choose. Choose a data list to iterate on.
- Table
- Click on the empty field and the tooltip will pop up showing all the tables you can use.
- All available tables will be accessible and you can select the specific table of the record(s) you want to update.
- Add Filter - Click Add Filter to define conditions that narrow down the data list and return only the relevant items. To learn more about using filters, click here.
- Add Field - Click Add Field to add and populate additional fields for the selected activity. To learn more about managing activity data, click here.
Execute Customized SQL
The “Execute Customized SQL” activity is an activity that allows you to interact with a MS SQL system by running custom SQL queries or commands within your workflow.
- SQL - In the SQL text field, you can write and enter your own SQL queries, which are structured commands that define what you want to do with the data in the MS SQL system. These queries can include operations like data retrieval, modification, or database management.
Execute Procedure
The “Execute Procedure” activity is an activity that allows you to interact with a MS SQL system by running stored procedures within your workflow.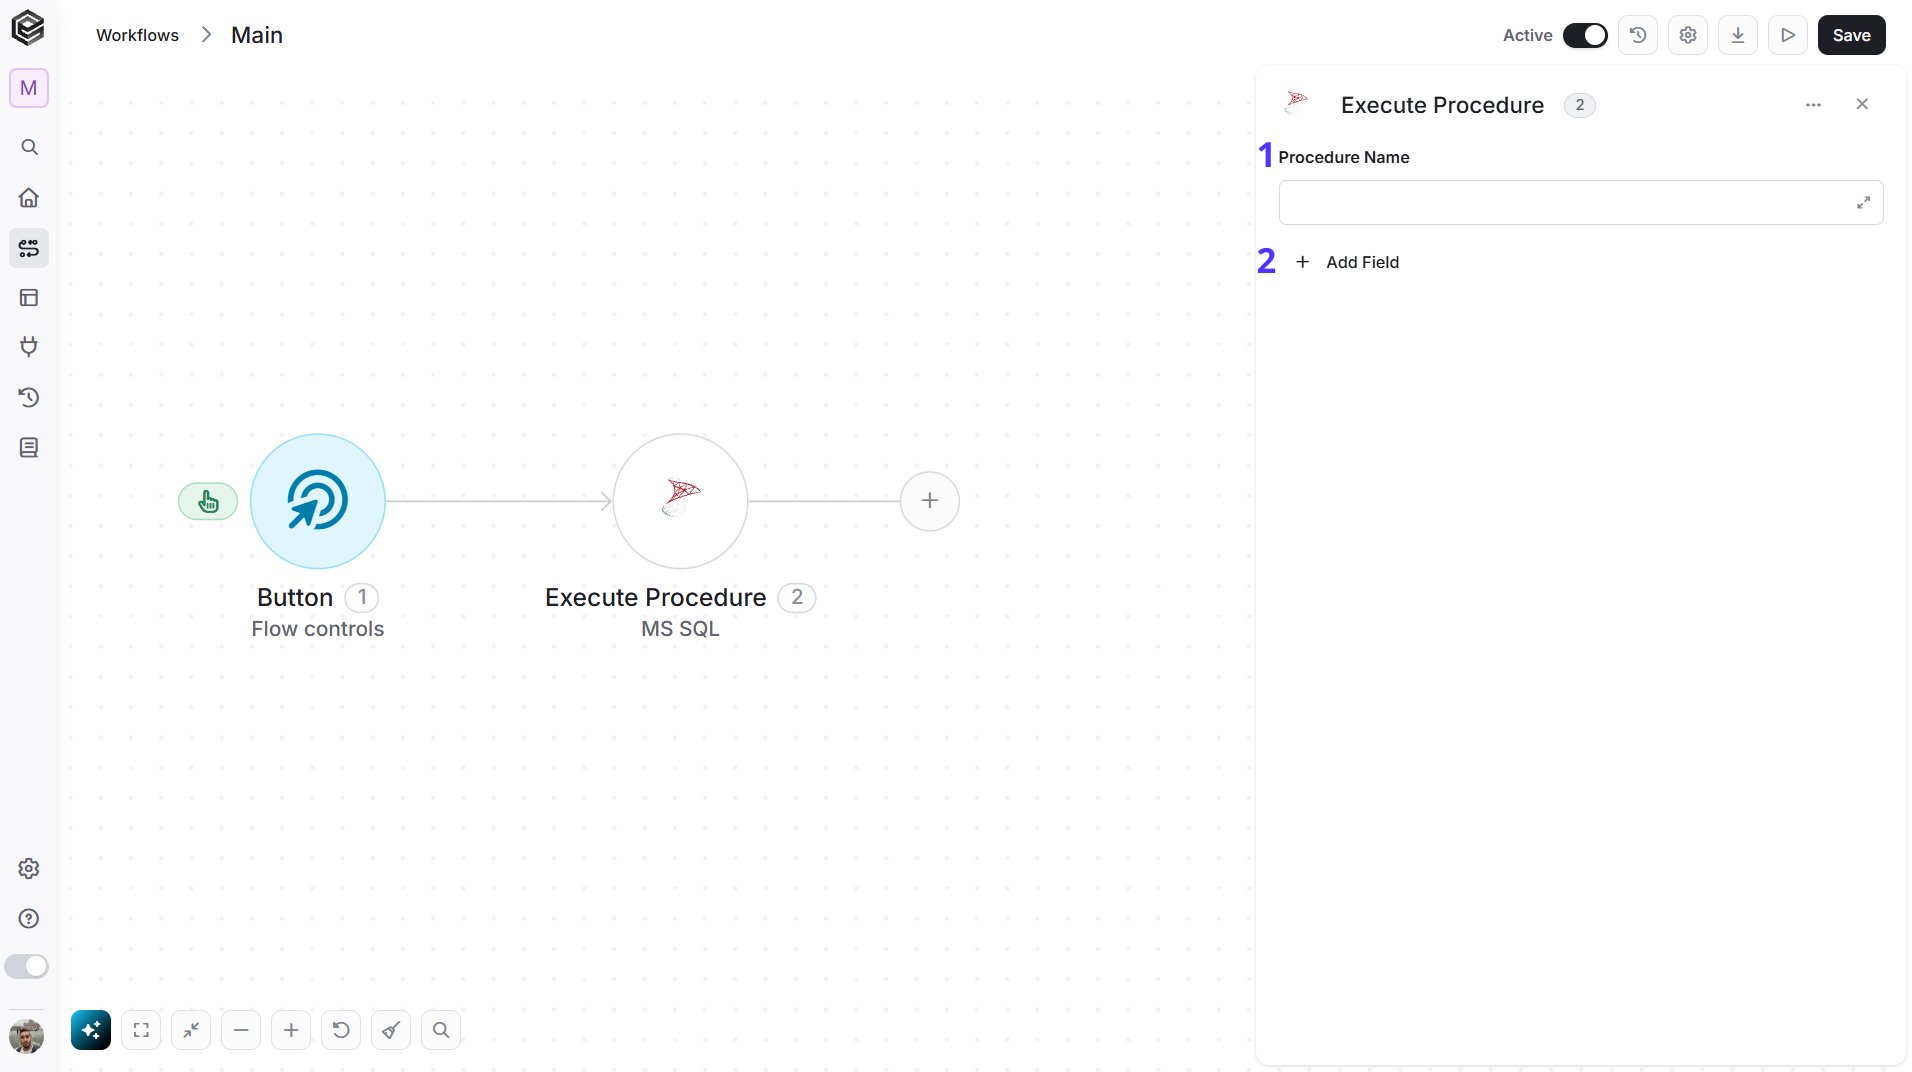
- Procedure Name - You need to specify the name of a stored procedure that exists within your MS SQL database. A stored procedure is a pre-defined, reusable set of SQL commands that are stored in the database and can be executed on demand.
- Add Field - Click Add Field to add and populate additional fields for the selected activity. To learn more about managing activity data, click here.