

Prerequisites
Users are required to have an account for at least one of the following tools: Claude, Cursor, or Windsurf.MCP Server
Connecting Engini to MCP Server
- Enter your Engini account at https://app.engini.io.
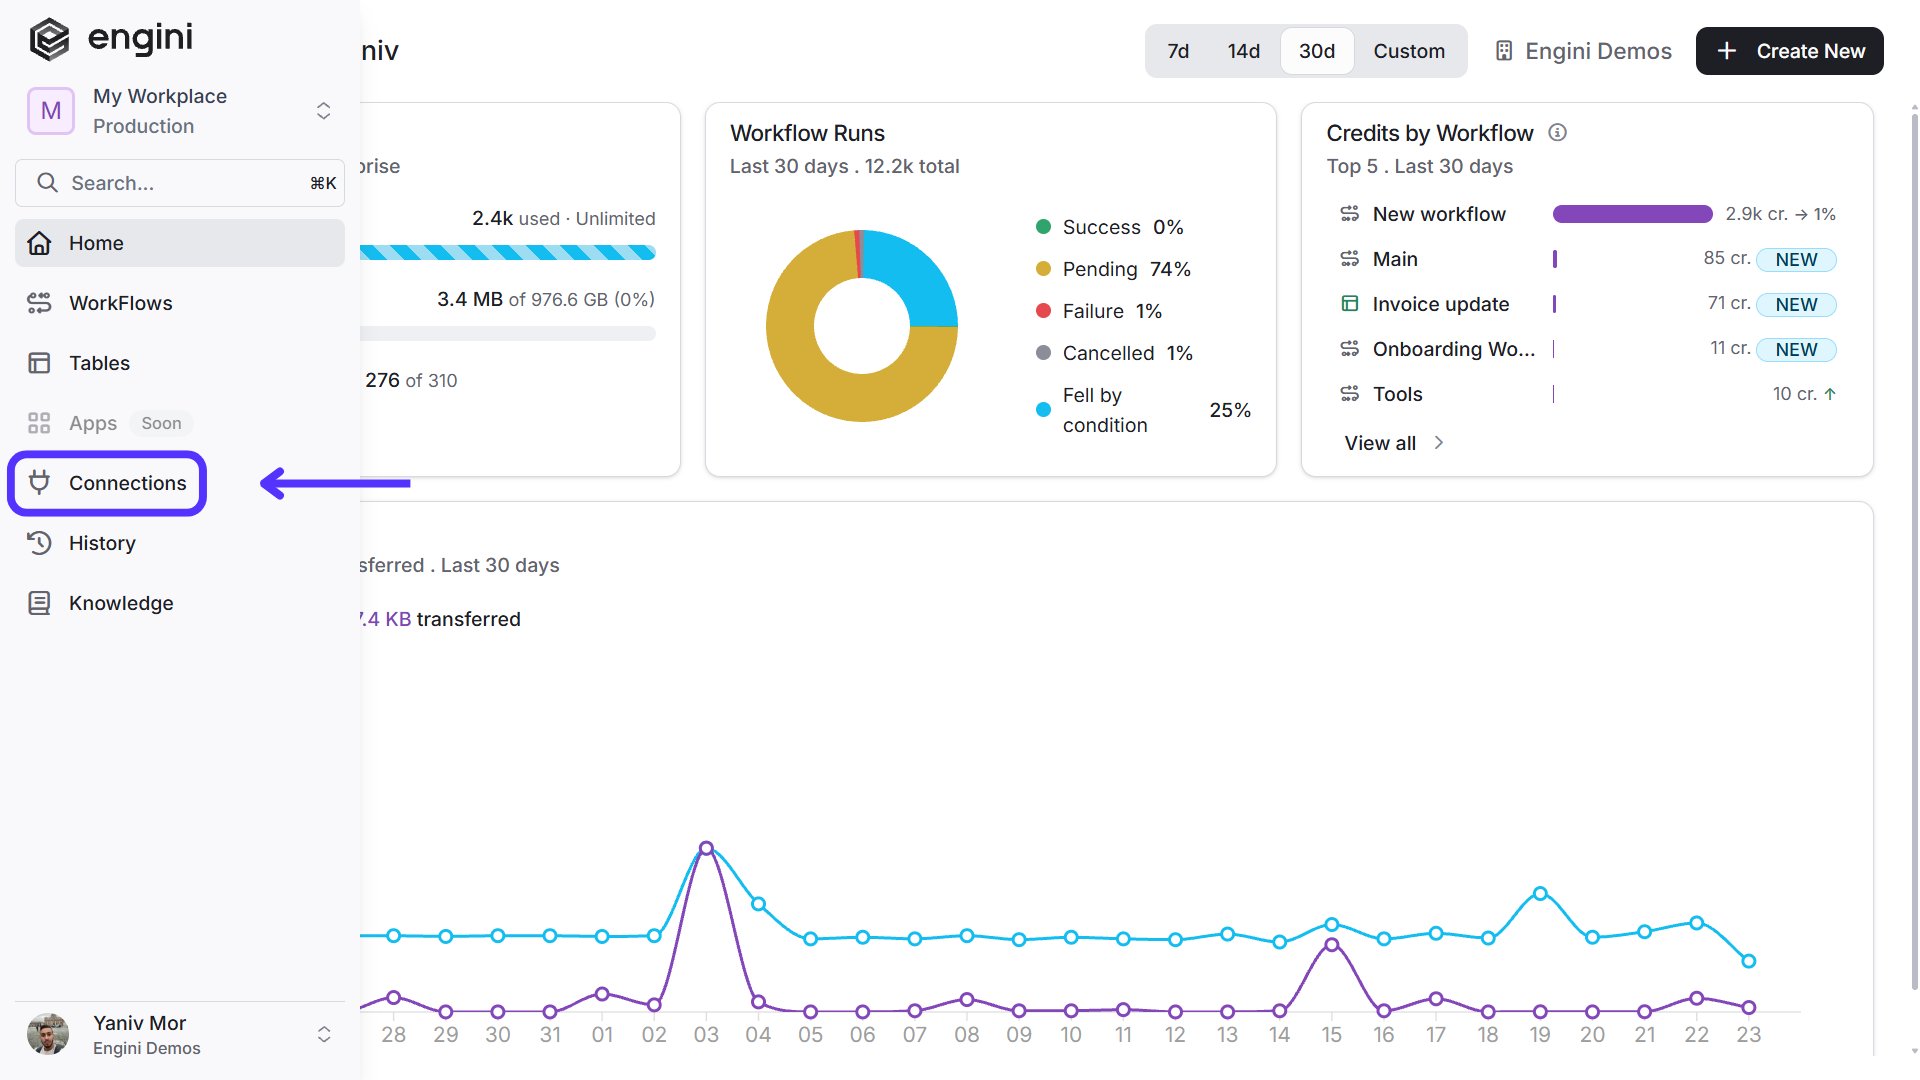
- Navigate to Connections page, more information here.
-
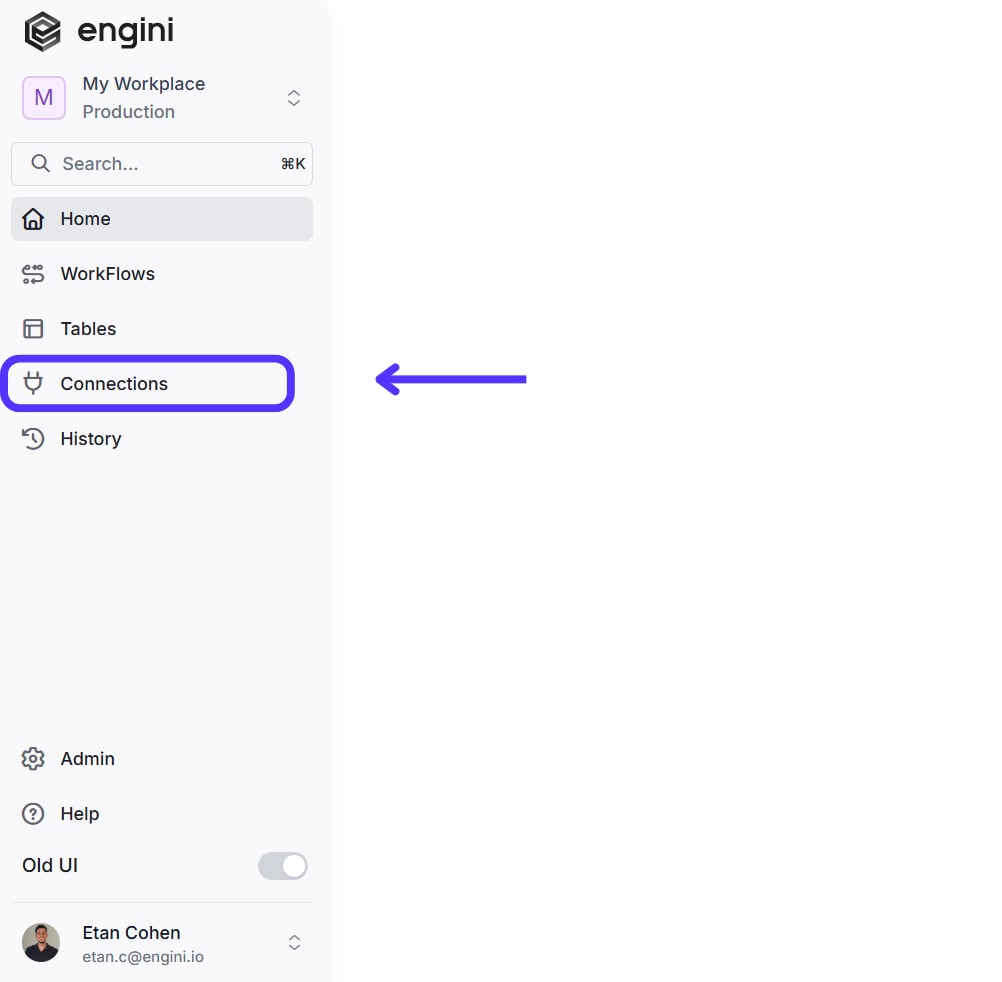
Click on Connections on the right side bar.
-
Click on MCP Servers.

-
Click on the “New MCP” option located at the top bar.

- After clicking on “New MCP” the following window will open on “Configuration” page.
Configuration
This tab is used to define and set up the MCP Server, including its name, integrations, and connected workflows.
- Server Name- A unique identifier for your MCP connection within Engini.
- Click on this field to get a link to our detailed guide for MCP servers.
- Server URL- This is a unique, automatically generated endpoint link created by the platform. Click the copy icon on the right side of the field to save this URL to your clipboard. You will need to paste this URL into your external AI clients so they know where to connect.
-
Add Integration – Used to connect a new integration to the MCP Server. Click on “Create New Integration” to add a system that hasn’t been connected to Engini yet.

-
You can choose one of the existing connections from the list.
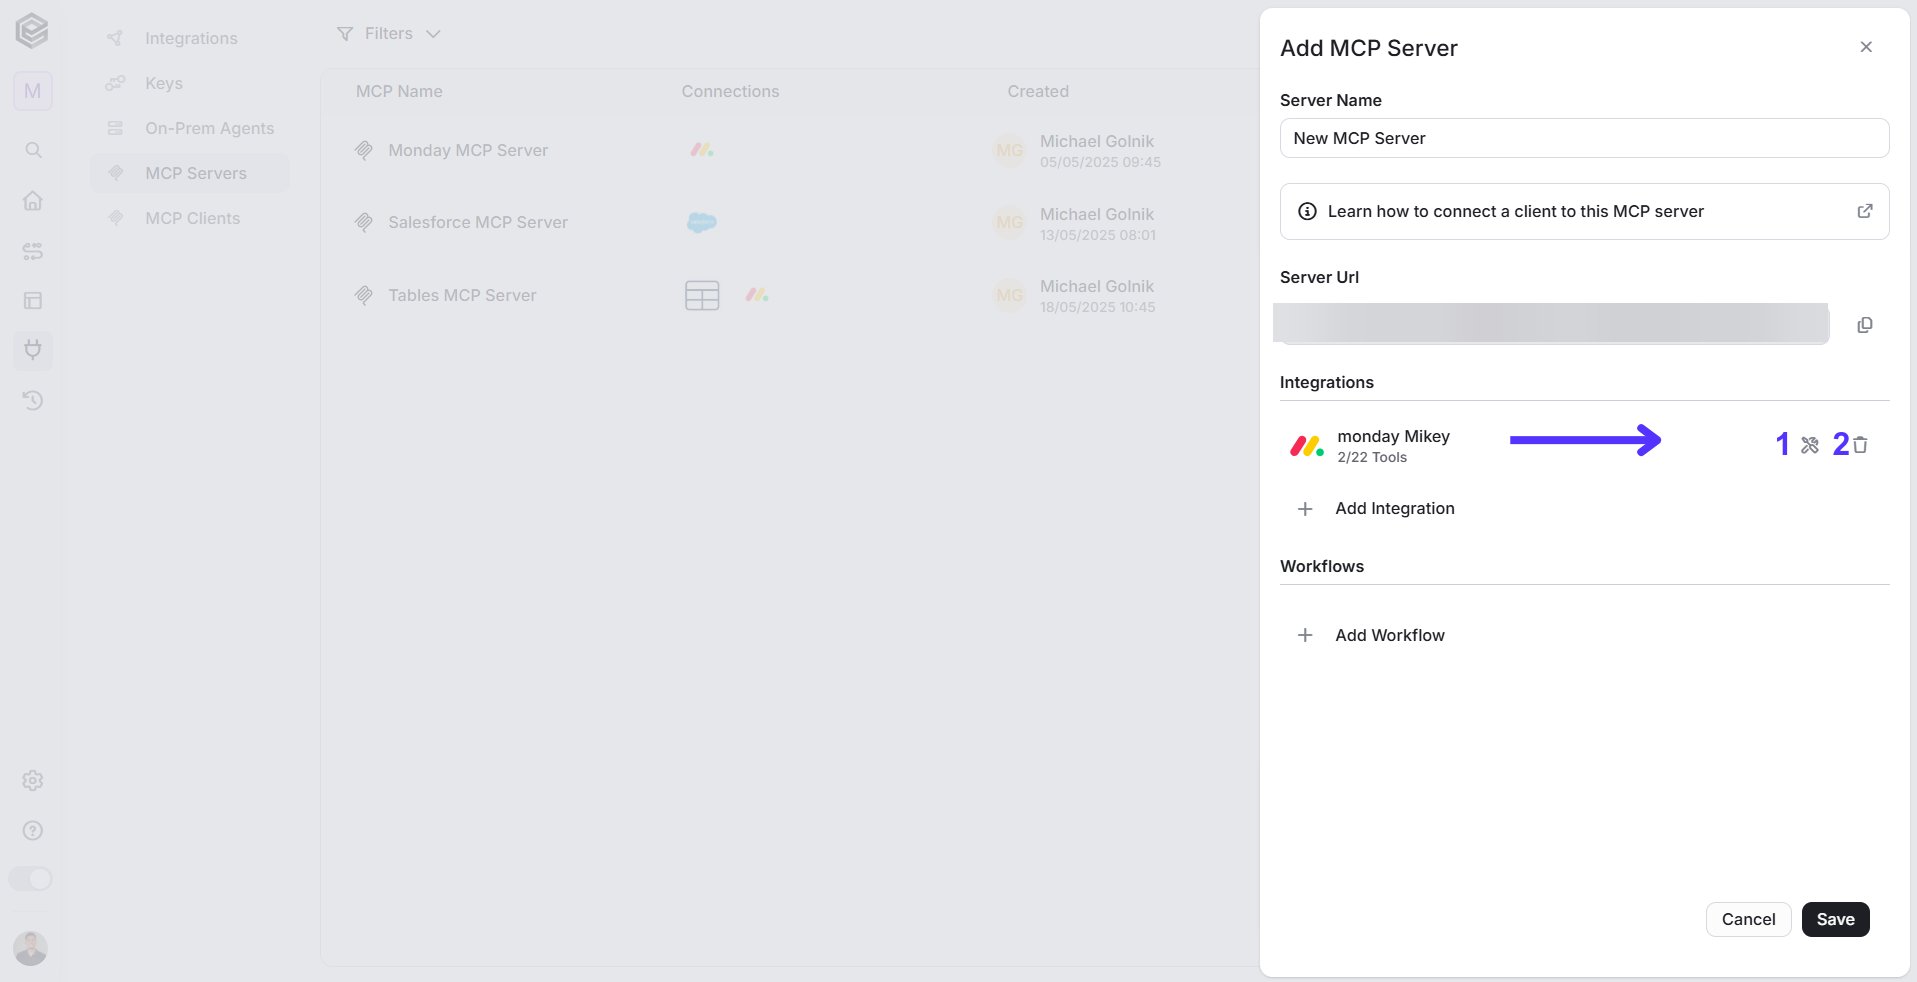
- Integration Tool- Clicking this icon opens the Integration Tools modal window. Here, you can select or deselect specific actions from the list (such as ‘Monday Create Item’ or ‘Monday Get Users’).
- Remove- Clicking this icon completely detaches the integration from this MCP Server.
-
You can choose one of the existing connections from the list.
-
Add Workflow – Used to attach an existing workflow to the MCP Server. When clicking “Add Workflow”, a list of all available workflows that can be assigned to the MCP Server is displayed, allowing you to select and associate the relevant one.

- Save MCP Server – Saves all configuration changes made to the server.
Client Setup
The field displays three available MCPs: Claude and ChatGPT. Each one has a dedicated guide explaining what to enter in the MCP configuration based on the one you selected. Click on one of the available options to view the installation instructions. Note: Each tool has its own guide for navigating to the relevant settings, but the steps for what needs to be copied from Engini into the tool are the same.Claude Desktop
This guide provides the setup instructions for Claude desktop. The setup process is divided into sections for clarity and ease of use. Note: Authorization Token can be found in the User Profile page.- Install Node.js and Claude Desktop.
-
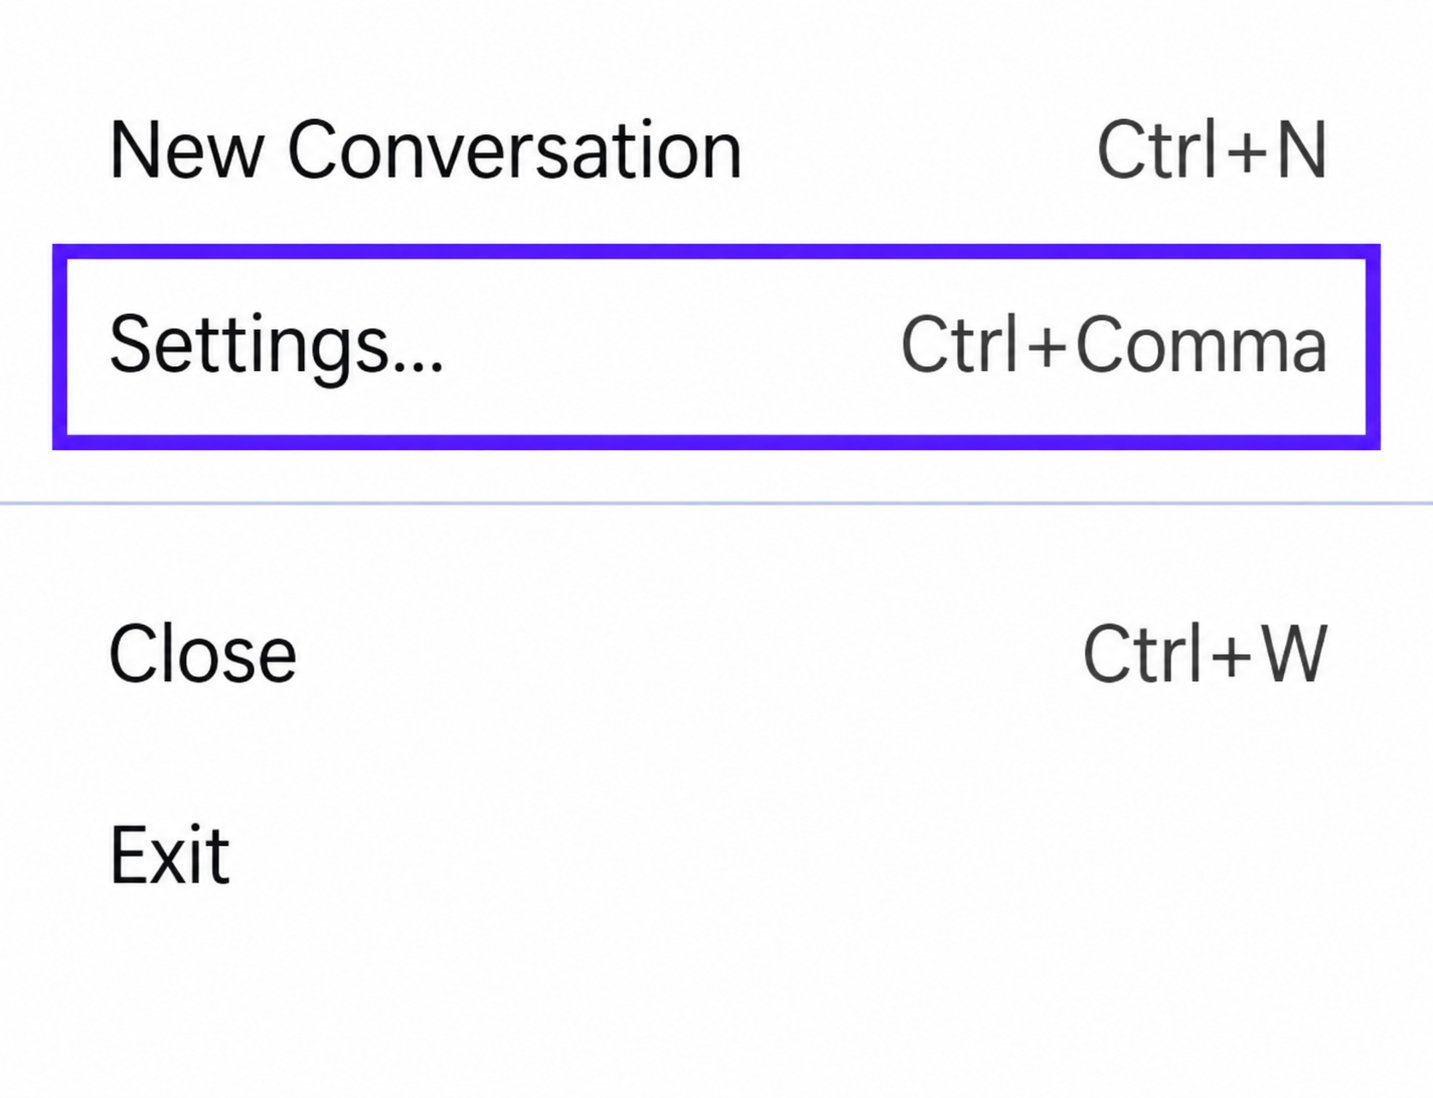
Open Settings - Click the menu and select Settings > Developer
-
Open Settings
- A new window will pop up.
-
Open Settings
-
Configure MCP - Click Edit Config

-
Paste the configuration below.
{
“mcpServers”: {
“EnginiServer”: {
“command”: “npx”,
“args”: [
“-y”,
“mcp-remote”,
“https://mcp.engini.io/MGExMTkYtcMDVjNS00MTdjLTg1NWUtN2VhZTEzNmJIMTM4/sse”,
“—header”,
“Authorization:${AUTH_HEADER}”
],
“env”: {
“AUTH_HEADER”: “Bearer (Token is not defined, Generate new Token in the user profile)”
}
}
}
}
-
The following window will open, choose the following file.

- Copy what is written in Server configuration (from the previous step)
- Save the file.
-
The following window will open, choose the following file.
-
Paste the configuration below.
{
“mcpServers”: {
“EnginiServer”: {
“command”: “npx”,
“args”: [
“-y”,
“mcp-remote”,
“https://mcp.engini.io/MGExMTkYtcMDVjNS00MTdjLTg1NWUtN2VhZTEzNmJIMTM4/sse”,
“—header”,
“Authorization:${AUTH_HEADER}”
],
“env”: {
“AUTH_HEADER”: “Bearer (Token is not defined, Generate new Token in the user profile)”
}
}
}
}
- Save and Restart - Save the config and restart Claude Desktop.
Configure AI Clients
- Before configuring OAuth Clients, make sure you have:
- Access to the Engini Admin panel.
- An existing MCP Server configured in Engini.
- A paid account.
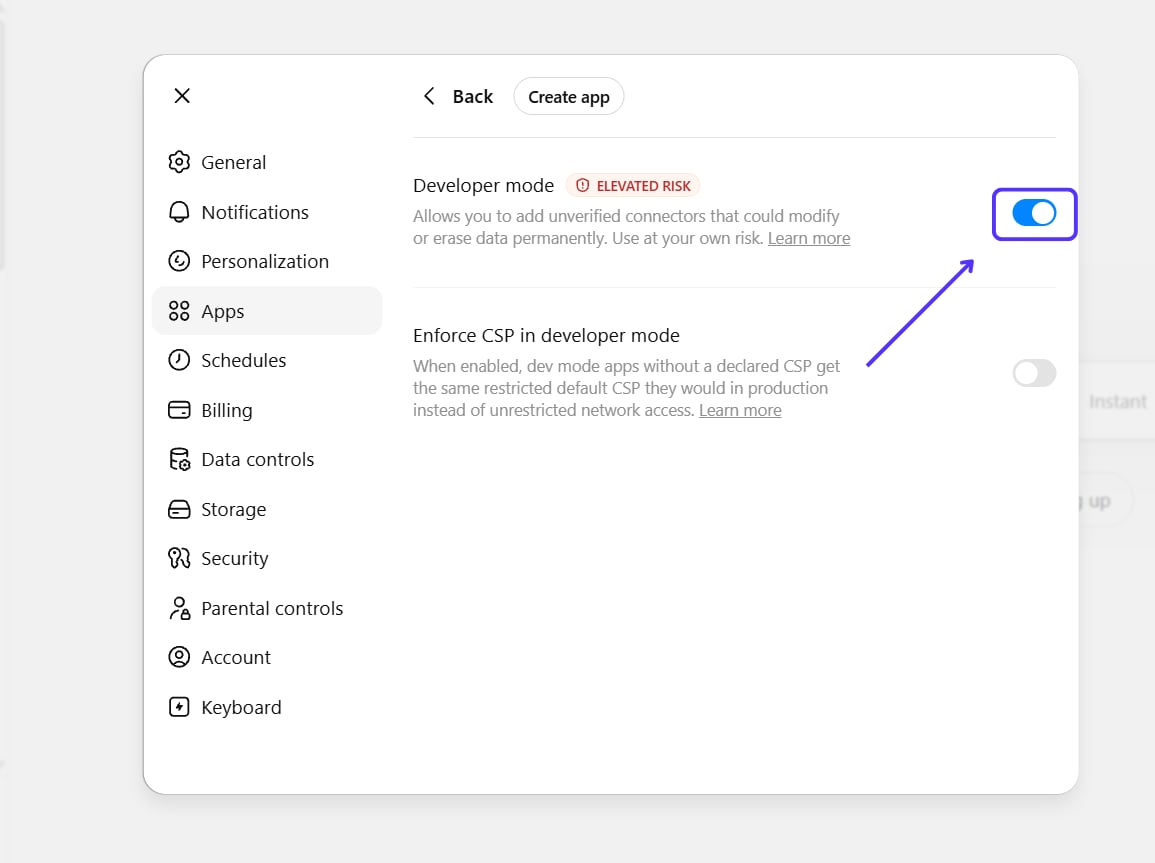
- Developer Mode enabled in Apps settings.
- Copy the MCP Server URL from Engini.
- Create an OAuth Client in Engini. For more infotmation click here.
-
Navigate to Admin

- Navigate to OAuth Clients
-
Add new OAuth Client
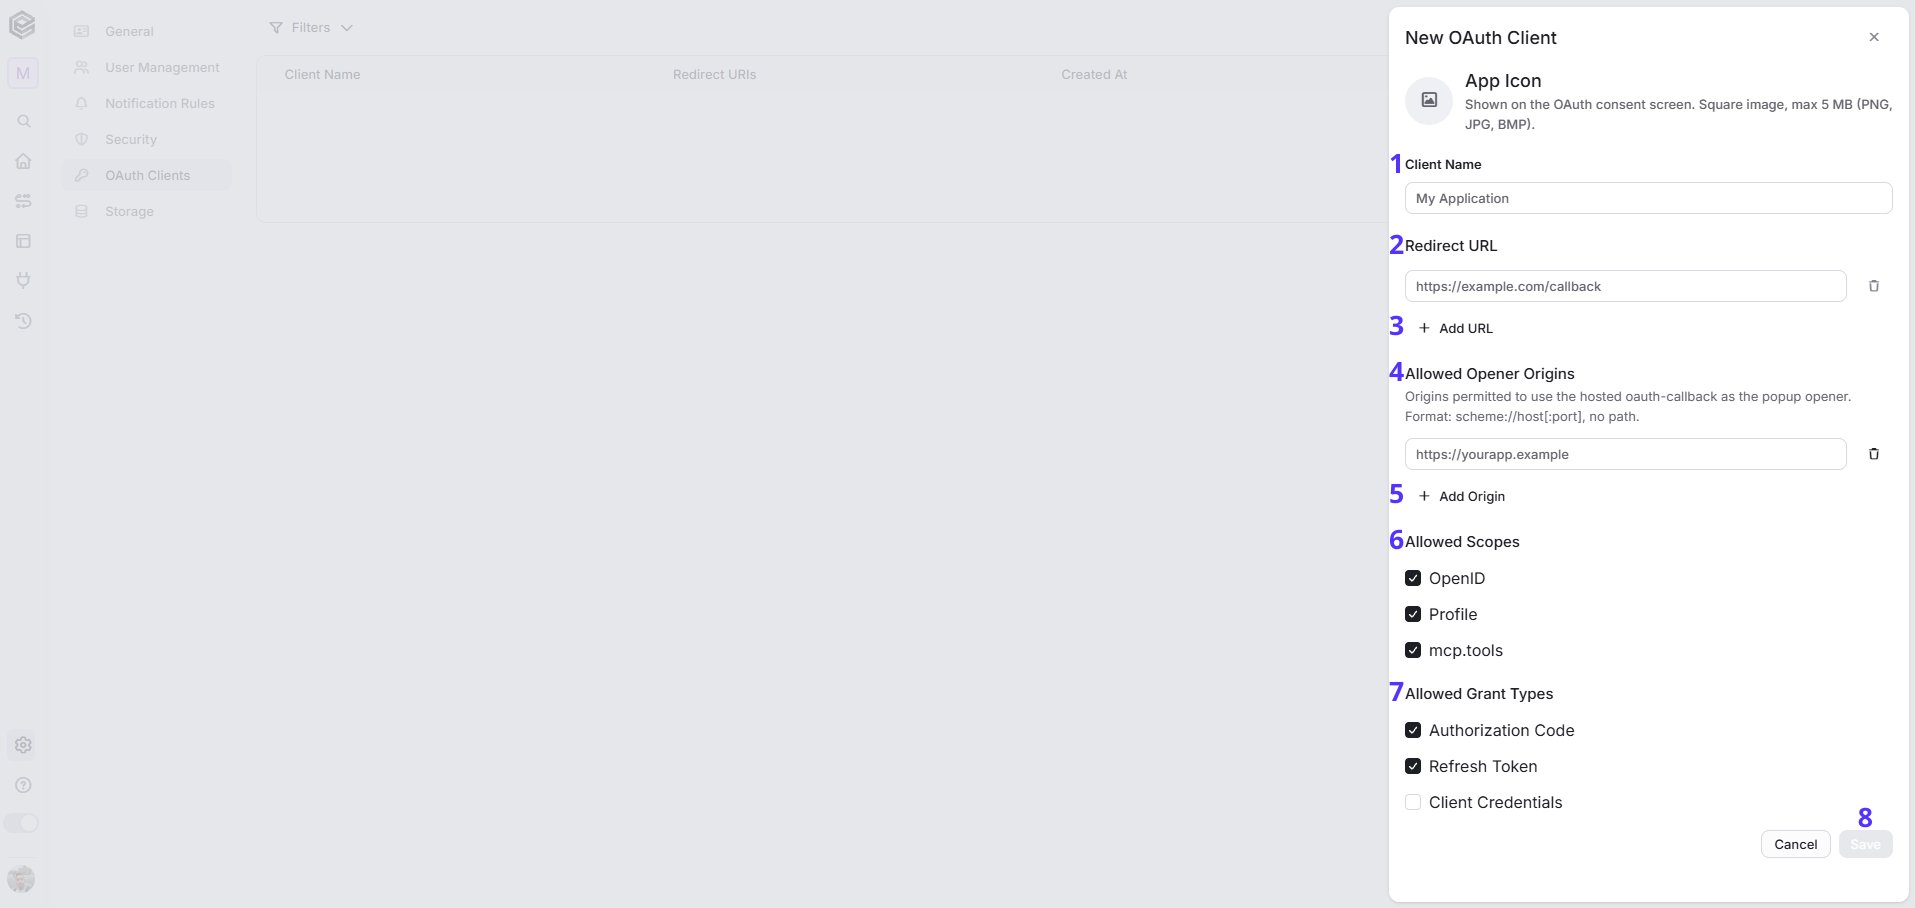
- Client Name - Enter a name for your OAuth application. This name will be displayed to users during the authorization process and helps identify the application requesting access.
- Redirect URL - Enter the callback URL provided by ChatGPT, Claude, Cursor, Windsurf, or any other MCP client. After a successful authorization, users will be redirected to this URL along with the authorization response.
- Add URL - Click Add URL to add additional Redirect URLs if your application needs to support multiple environments (for example: development, staging, and production).
- Allowed Opener Origins - Specify which origins are allowed to open and communicate with the hosted OAuth callback popup. The format must be scheme://host[:port] without any path (for example: https://app.example.com). This field is optional and can be left empty if not required.
- Add Origin - Click Add Origin to add additional allowed origins when multiple applications or environments need permission to use the OAuth callback popup.
-
Allowed Scopes - Select the permissions that can be requested by OAuth clients. It is recommended to enable all available scopes required by MCP clients, including:
- OpenID - Allows user authentication.
- Profile - Allows access to basic user profile information.
- mcp.tools - Allows access to MCP tools and capabilities.
-
Allowed Grant Types - Select the OAuth flows that clients are permitted to use:
- Authorization Code - Required for standard OAuth user authentication.
- Refresh Token - Allows clients to refresh expired access tokens without requiring the user to log in again.
- Client Credentials - Used for machine-to-machine authentication. Leave this disabled unless specifically required.
- Save - Click Save to create the OAuth client and generate the client credentials. These credentials will be used later when configuring the MCP client connection.
ChatGPT
This guide explains how to connect an Engini MCP Server to ChatGPT using OAuth authentication.-
Create an App in ChatGPT
- Open ChatGPT.
- Navigate to: Settings → Apps.
-
Click on Create App. Make sure Developer mode is enabled (Inside Advanced Settings)
-
Enter the following
- App Icon - Optional. You can upload an icon for your application or skip this step.
- Name - Enter your application name.
- Description - Enter a short description of the application.
- Connection - Paste the MCP Server URL copied from Engini.
- Authentication - Select OAuth.
-
Advanced OAuth Settings - Click this option to continue the OAuth configuration.
- A new window will open, please copy the redirect URL to your OAuth client settings.
- Click on save.
- Now you got your client id and client secret, copy it. Note: The Client Secret is displayed only once.
- Paste it into your app configuration.
- I Understand and Want to Continue - Check the box to continue.
- Read the Guide - Optional.
- Server URL - Skip this step. No changes are required.
- Create - Click on the button.
-
Signin to Your Engini Account - You will be redirected to Engini.

- Choose the relevant account where the MCP Server is configured.
-
Authorize - Review the account and permission details, then click Authorize to grant ChatGPT access to your Engini account and complete the connection process.

- Now you can see on ChatGPT that you are connected. Notice, you can see here your tools.
Claude
This guide explains how to connect an Engini MCP Server to Claude using OAuth authentication.- First inside Configure AI Clients enter Claude’s fixed OAuth callback URL in this field https://claude.ai/api/mcp/auth_callback. This URL is required for Claude to complete the OAuth authentication flow with your Engini MCP Server.
-
Connect Engini to Claude
- Open Claude app.
-
Navigate to Customize.

-
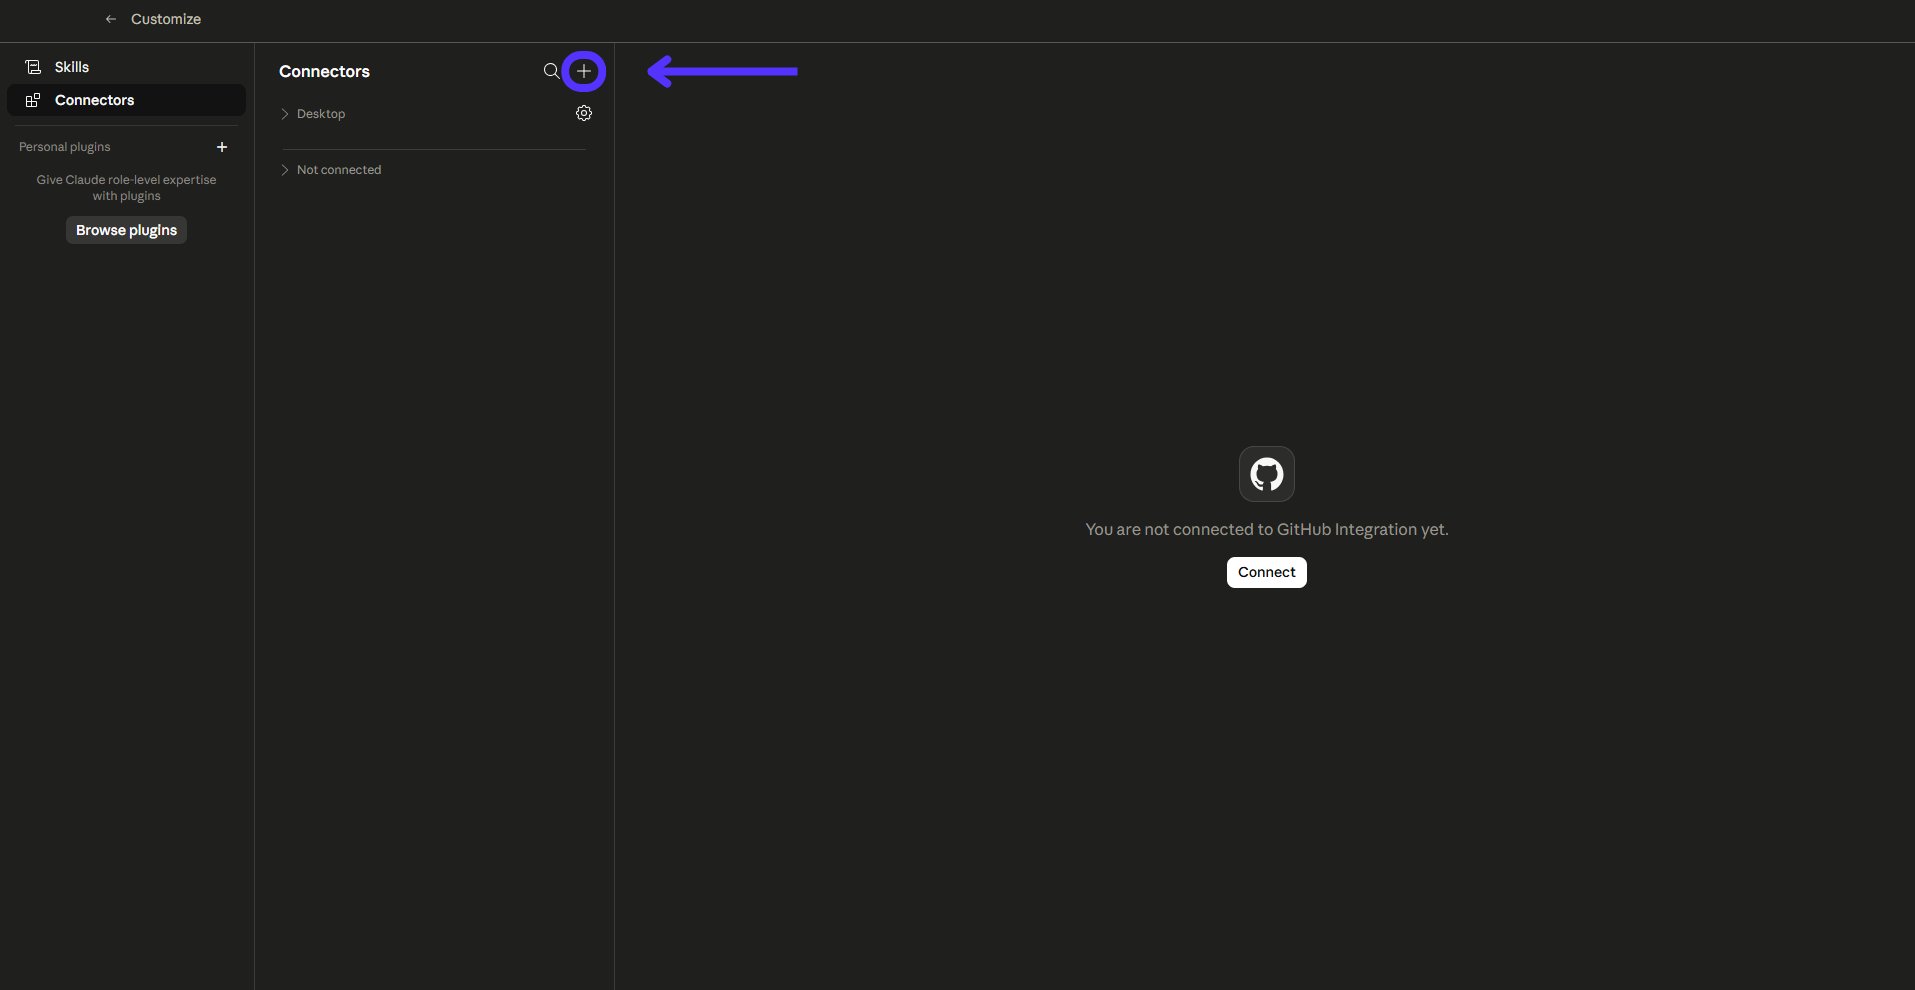
Click Connect your apps.

-
Click on + sign.
-
Click Add custom connector.

-
Enter the following:

- Name - Enter a name for the connector. This name will be displayed in Claude and helps identify the MCP Server connection.
- Remote MCP Server URL - Paste the MCP Server URL copied from Engini. For more information click here.
-
Advanced Settings - Expand this section and enter the OAuth Client ID and OAuth Client Secret copied from Engini.
- OAuth Client ID - Enter the Client ID generated in the OAuth Client configuration in Engini.
- OAuth Client Secret - Enter the Client Secret generated in the OAuth Client configuration in Engini.
- Add - Click Add to create the connector and continue with the authentication process.
-
Signin to Your Engini Account - You will be redirected to Engini.
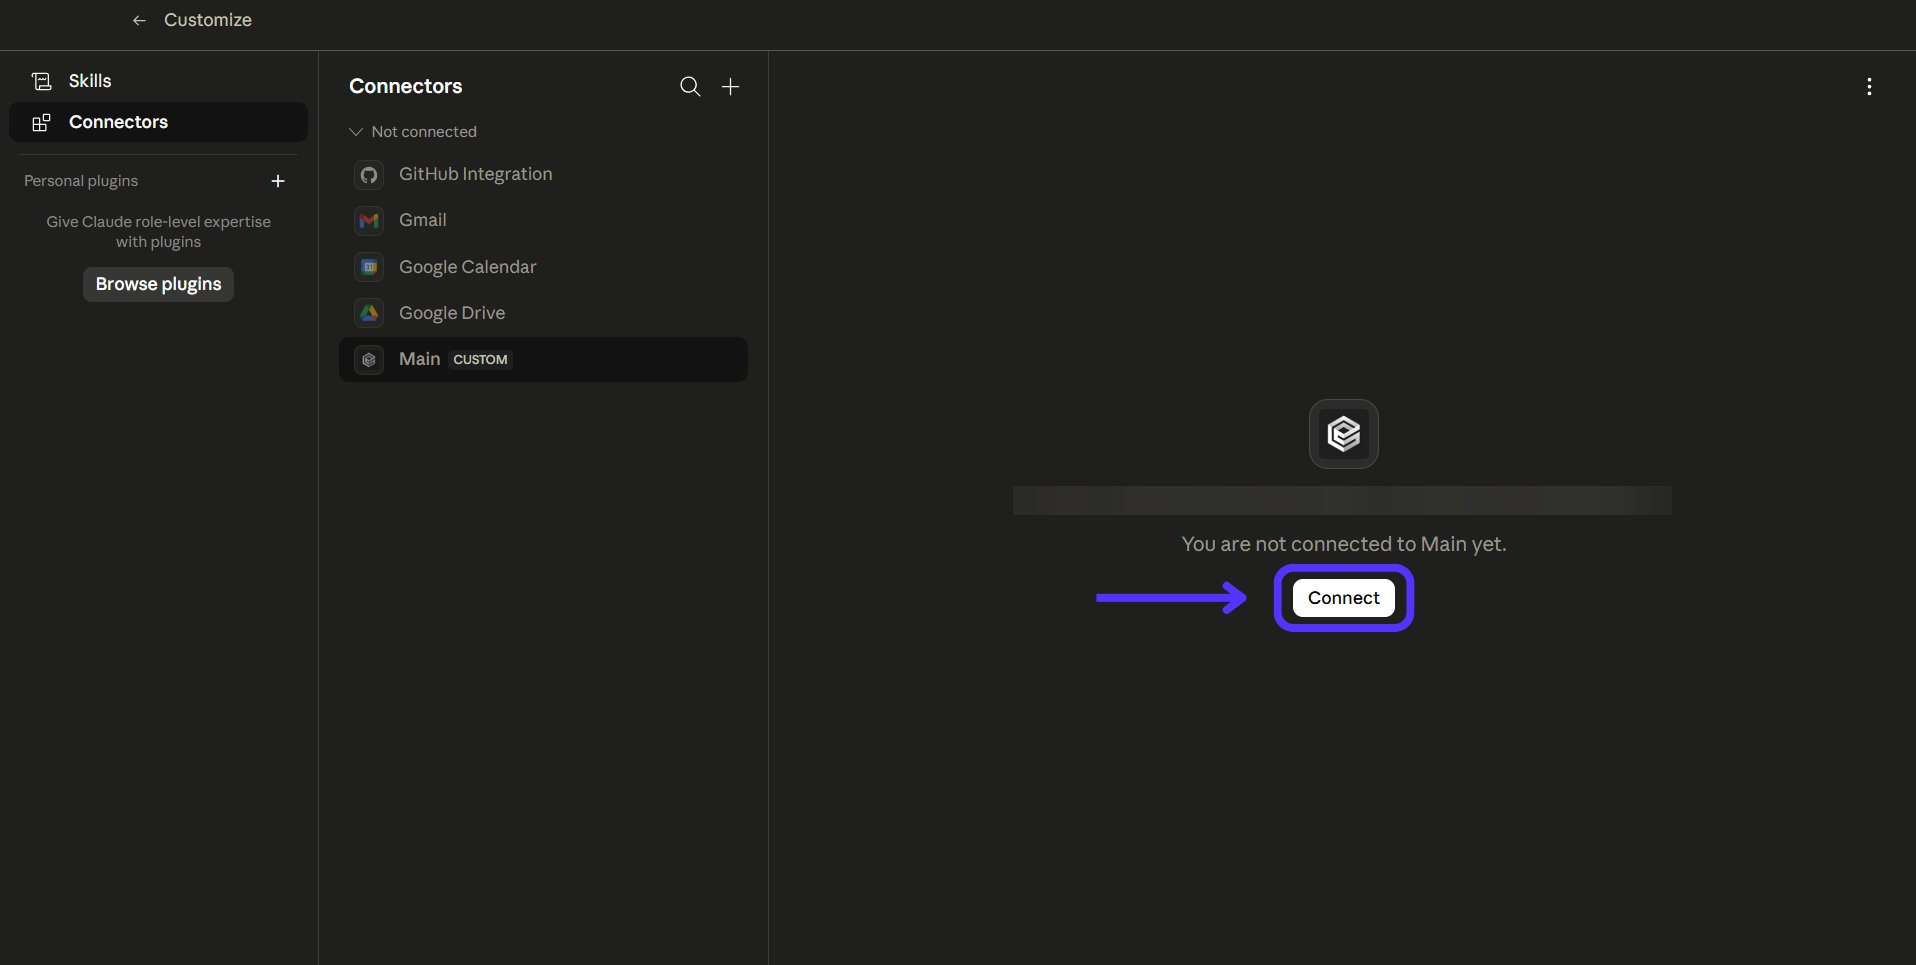
- Choose the relevant account where the MCP Server is configured.
-
Authorize - Review the account and permission details, then click Authorize to grant Claude access to your Engini account and complete the connection process.
- Now you can see on Claude that you are connected. Notice, you can see here your tools.
Sort
Use the sorting options to organize the MCP Servers list according to the information you want to display first. To change the sorting, click the relevant column name. The MCP Name column can be sorted alphabetically. For the Created and Updated columns, clicking the column name opens additional sorting options based on either the user’s name or the date.
- MCP Name - Sorts the MCP Servers alphabetically by name.
- A – Z – Displays MCP Server names in alphabetical order.
- Z – A – Displays MCP Server names in reverse alphabetical order.
- Created - Sorts the MCP Servers according to the user who created them or the date they were created.
- A – Z – Sorts alphabetically by the creator’s name.
- Z – A – Sorts in reverse alphabetical order by the creator’s name.
- Oldest first – Displays MCP Servers with the oldest creation date first.
- Newest first – Displays MCP Servers with the newest creation date first.
- Updated - Sorts the MCP Servers according to the user who last updated them or the date they were last updated.
- A – Z – Sorts alphabetically by the name of the last user who updated the MCP Server.
- Z – A – Sorts in reverse alphabetical order by the name of the last user who updated the MCP Server.
- Oldest first – Displays MCP Servers with the oldest update date first.
- Newest first – Displays MCP Servers with the newest update date first.
MCP Client
Connecting Engini to MCP Client
- Enter your Engini account at https://app.engini.io.
- Navigate to Connections page, more information here.
-
Click on Connections on the right side bar.
-
Click on MCP Clients.

-
Click on the “New MCP” option located at the top bar.
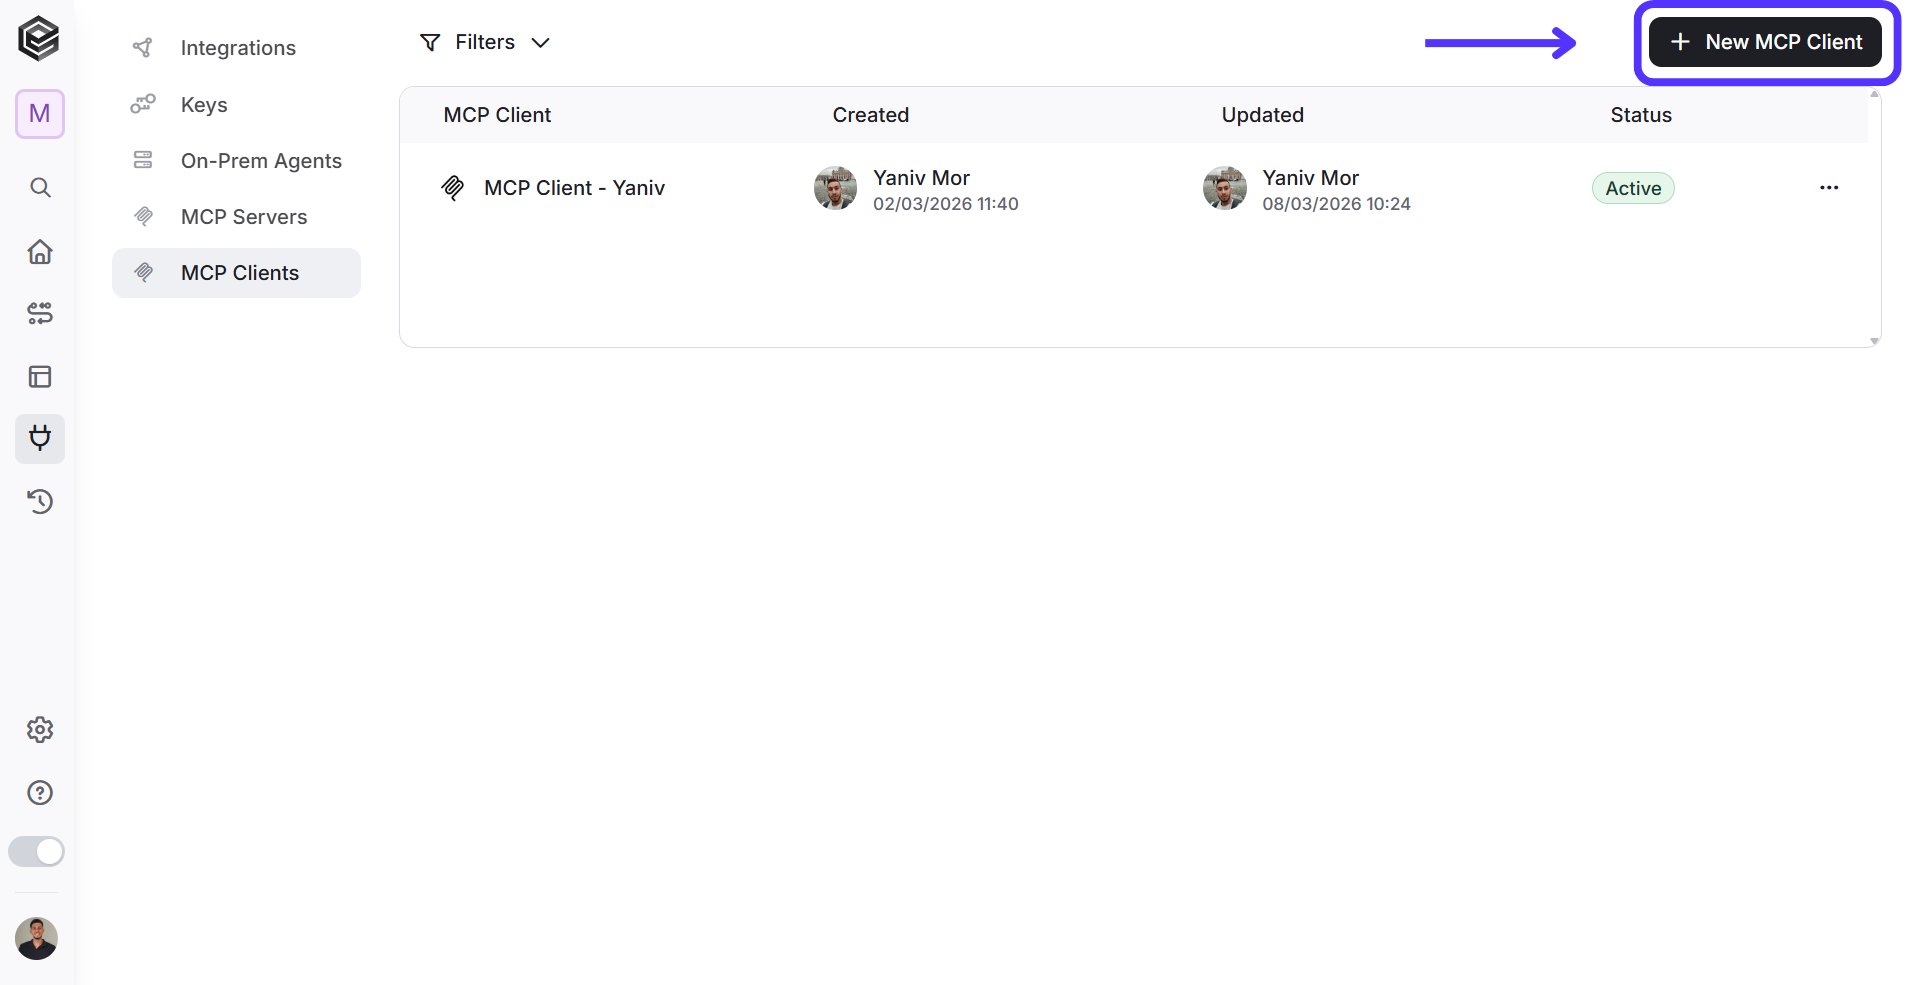
- Continue to the connection settings.
Configuration
This tab is used to define and set up the MCP Client, including its name, integrations, and connected workflows.
-
Connection Name - Enter a unique identifier for the connection within Engini. This name is used to categorize and manage the specific MCP integration in your workspace.
- Base URL - The endpoint address of the remote MCP server. This URL acts as the entry point for the client to discover and interact with the server’s tools and resources.
-
Authorization Type - The authentication method required by the remote server to grant access.

- No Auth - Connection is established without providing credentials.
- Bearer Token - An encrypted string provided by the service provider to verify your identity and permissions.
- Custom Header - Allows you to define specific, non-standard header keys and values required by the server for authorization.
-
Transport - The communication protocol used to exchange data between the client and the server.

- SSE (Server-Sent Events) - A standard allowing servers to push real-time updates to the client over a single HTTP connection.
- Stream - A persistent connection using Server-Sent Events (SSE) that allows for real-time, asynchronous data delivery from the server to the client.
- Save Settings - Click this button to store the configuration and initialize the connection to the remote MCP server.
Sort
Use the sorting options to organize the MCP Clients list according to the information you want to display first. To change the sorting, click the relevant column name. The MCP Client column can be sorted alphabetically. For the Created and Updated columns, clicking the column name opens additional sorting options based on either the user’s name or the date.
- MCP Client - Sorts the MCP Clients alphabetically by name.
- A – Z – Displays MCP Client names in alphabetical order.
- Z – A – Displays MCP Client names in reverse alphabetical order.
- Created - Sorts the MCP Clients according to the user who created them or the date they were created.
- A – Z – Sorts alphabetically by the creator’s name.
- Z – A – Sorts in reverse alphabetical order by the creator’s name.
- Oldest first – Displays MCP Clients with the oldest creation date first.
- Newest first – Displays MCP Clients with the newest creation date first.
- Updated - Sorts the MCP Clients according to the user who last updated them or the date they were last updated.
- A – Z – Sorts alphabetically by the name of the last user who updated the MCP Client.
- Z – A – Sorts in reverse alphabetical order by the name of the last user who updated the MCP Client.
- Oldest first – Displays MCP Clients with the oldest update date first.
- Newest first – Displays MCP Clients with the newest update date first.