Engini’s tables serve as the central repository for consolidating all pertinent information and facilitating essential work processes. While the table structure is adaptable to accommodate the specific requirements of each team or organization, it consists of fundamental components, which will be elaborated upon in the documentation.
Create your table
You can add one or more tables to the same workbook by clicking on ‘New Table’ and changing the name of the table from ‘New Table1’. For more details of Workbooks.- Create button - Click Create if you are ready to create the table.
Create Columns
-
To add Column, simply click on the + sign in the far right of the table’s column section.

-
Choose the column type you want from the dropdown menu.
You will be able to view various types of columns later in the guide.

- Name the column.
- Fill the rows with current data.
-
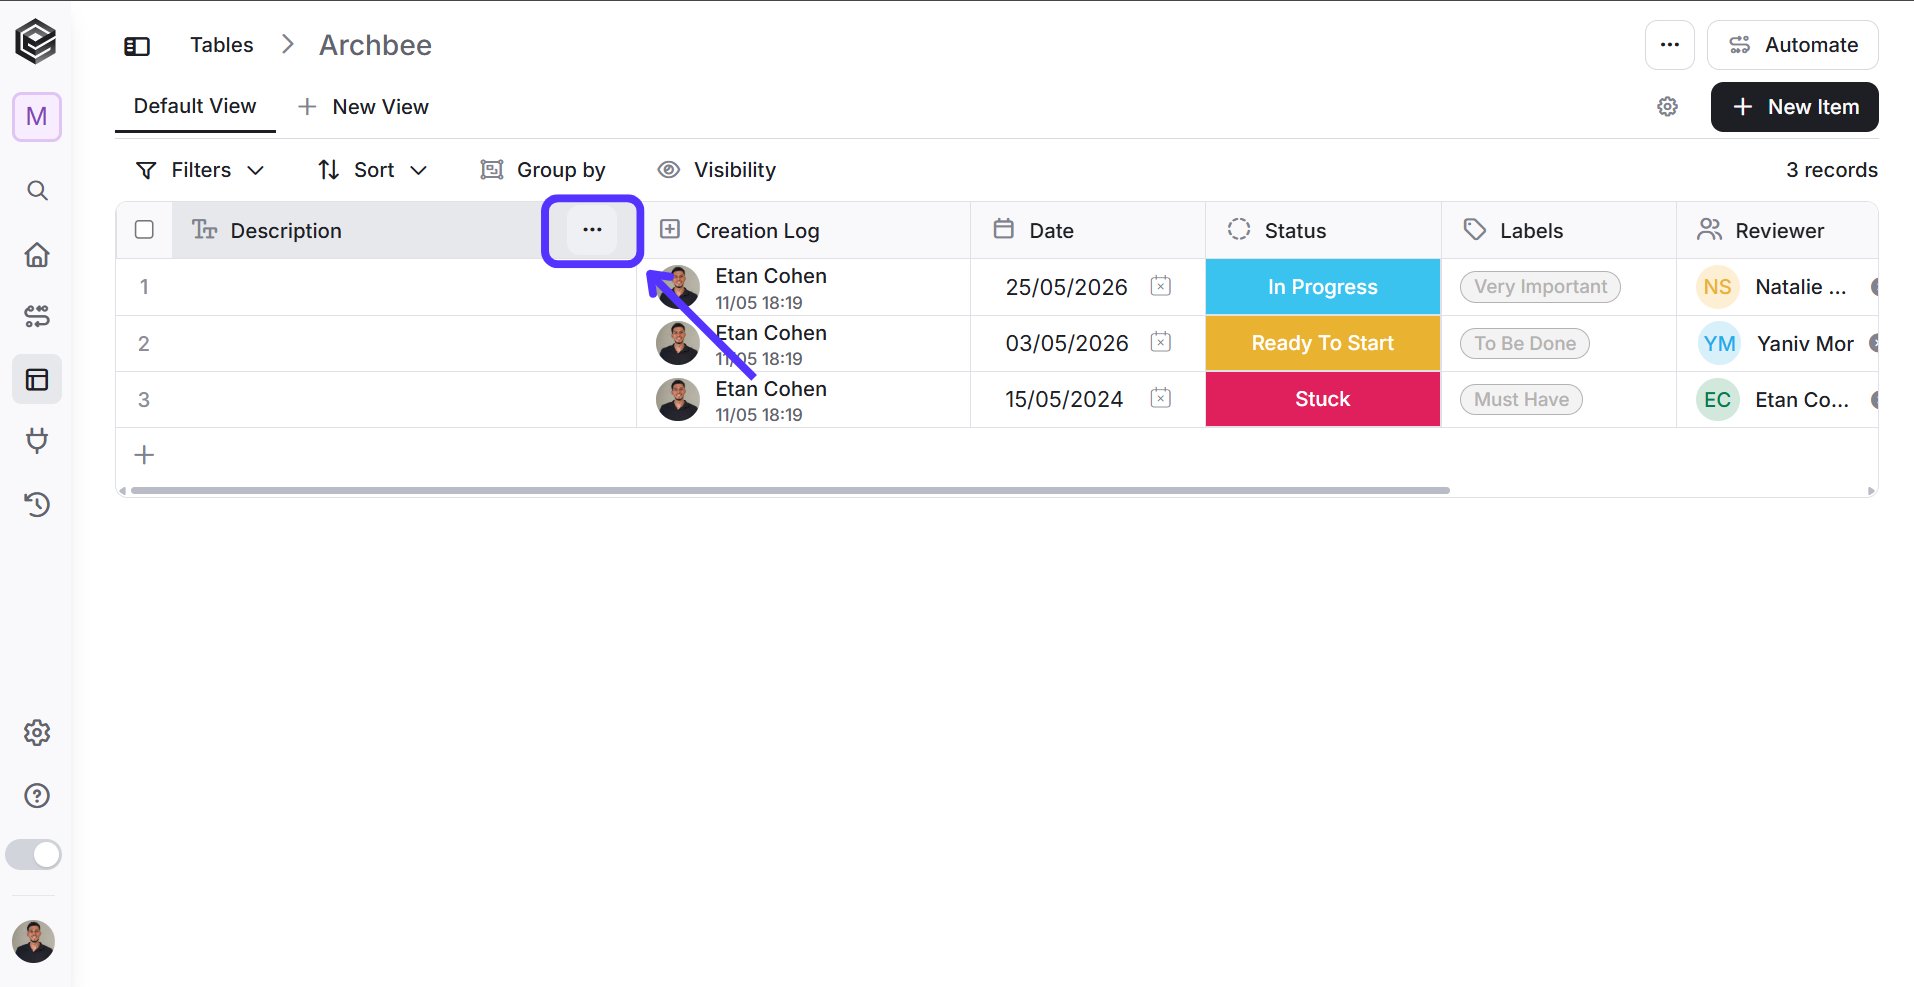
In order to do actions in a specific column, open an existing column menu in the right side of the column by clicking on the three dots (deferent field types may have other options).
Manage Fields
The Manage Fields panel shows all the fields (columns) of the table in one list, so you can add, rename, duplicate and delete fields without scrolling across the table.-
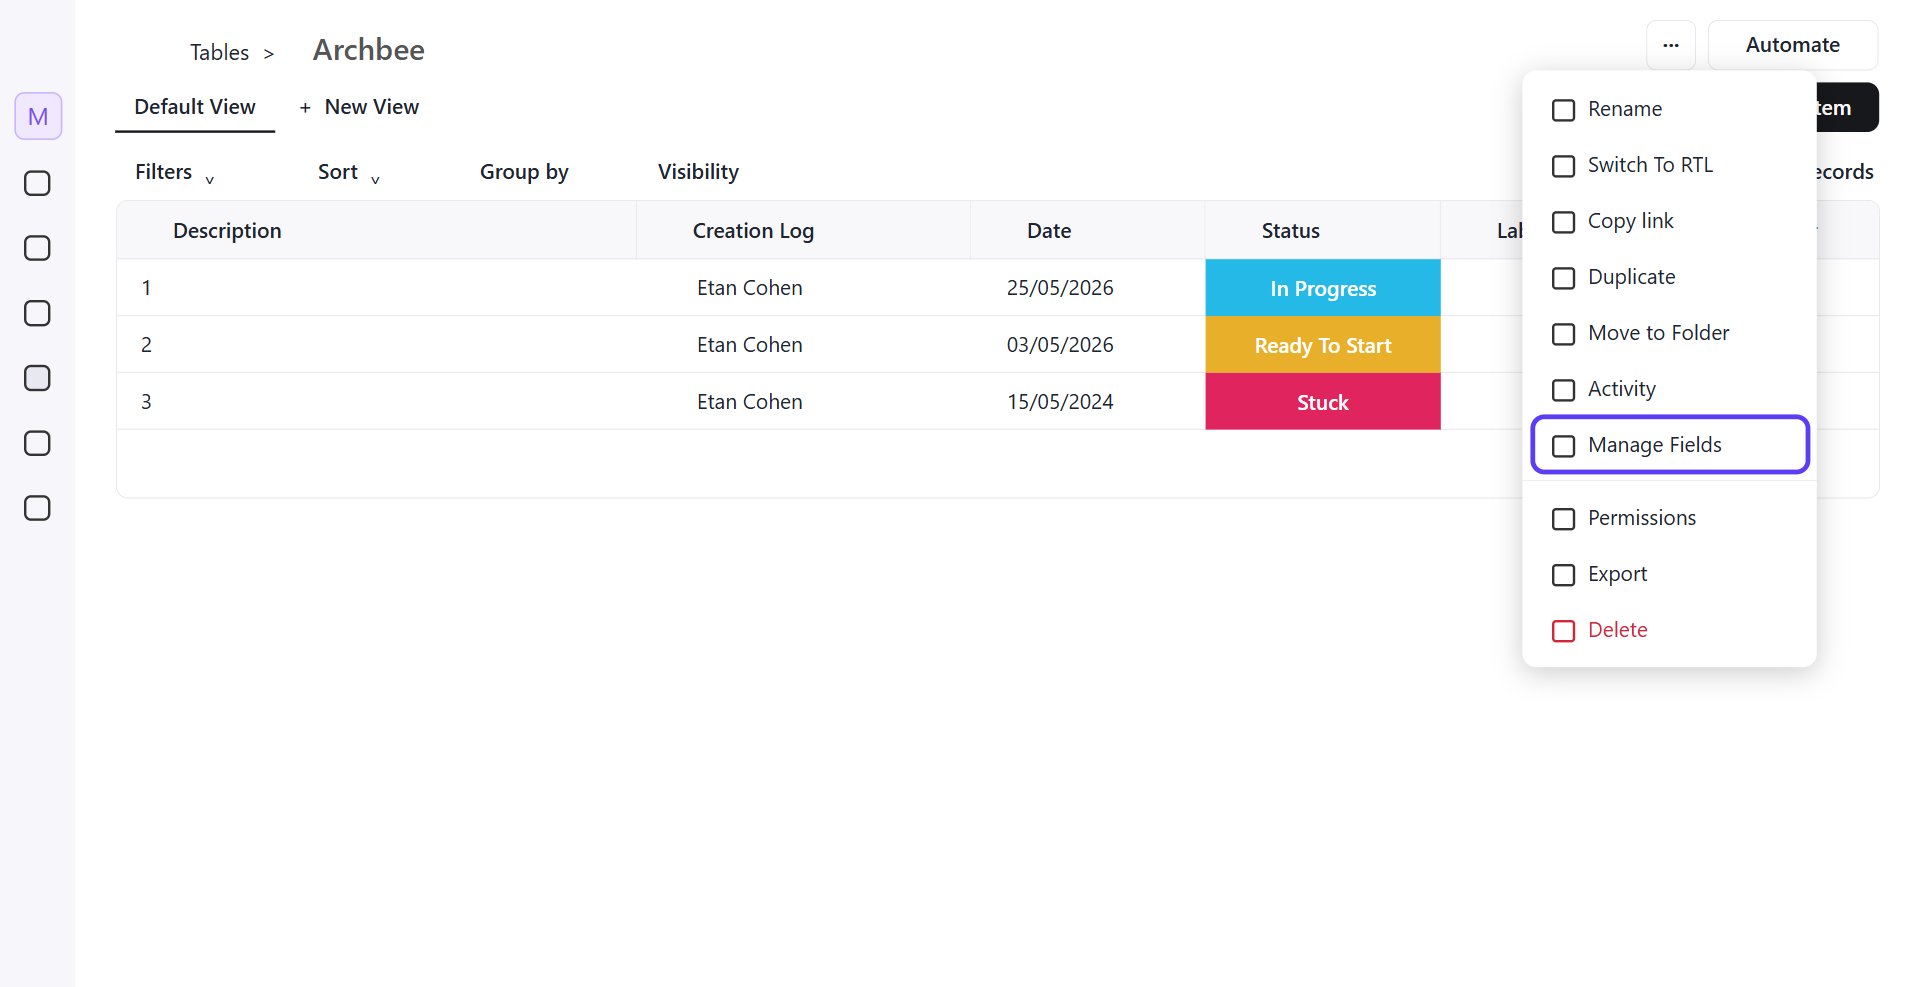
Click the three-dot menu in the upper-right corner of the table and select Manage Fields.
-
The Manage Fields panel opens on the right, on top of the table. It lists every field of the table in the order they appear in the table.

- Field name - The field type icon and the field name. Click the name to rename the field, then click Save.
- Three dots - Opens the field menu (see below).
- Add Property - Adds a new field to the table.
Add a Field
- Click Add Property.
- Type the name of the field.
-
Choose the field type from the list.
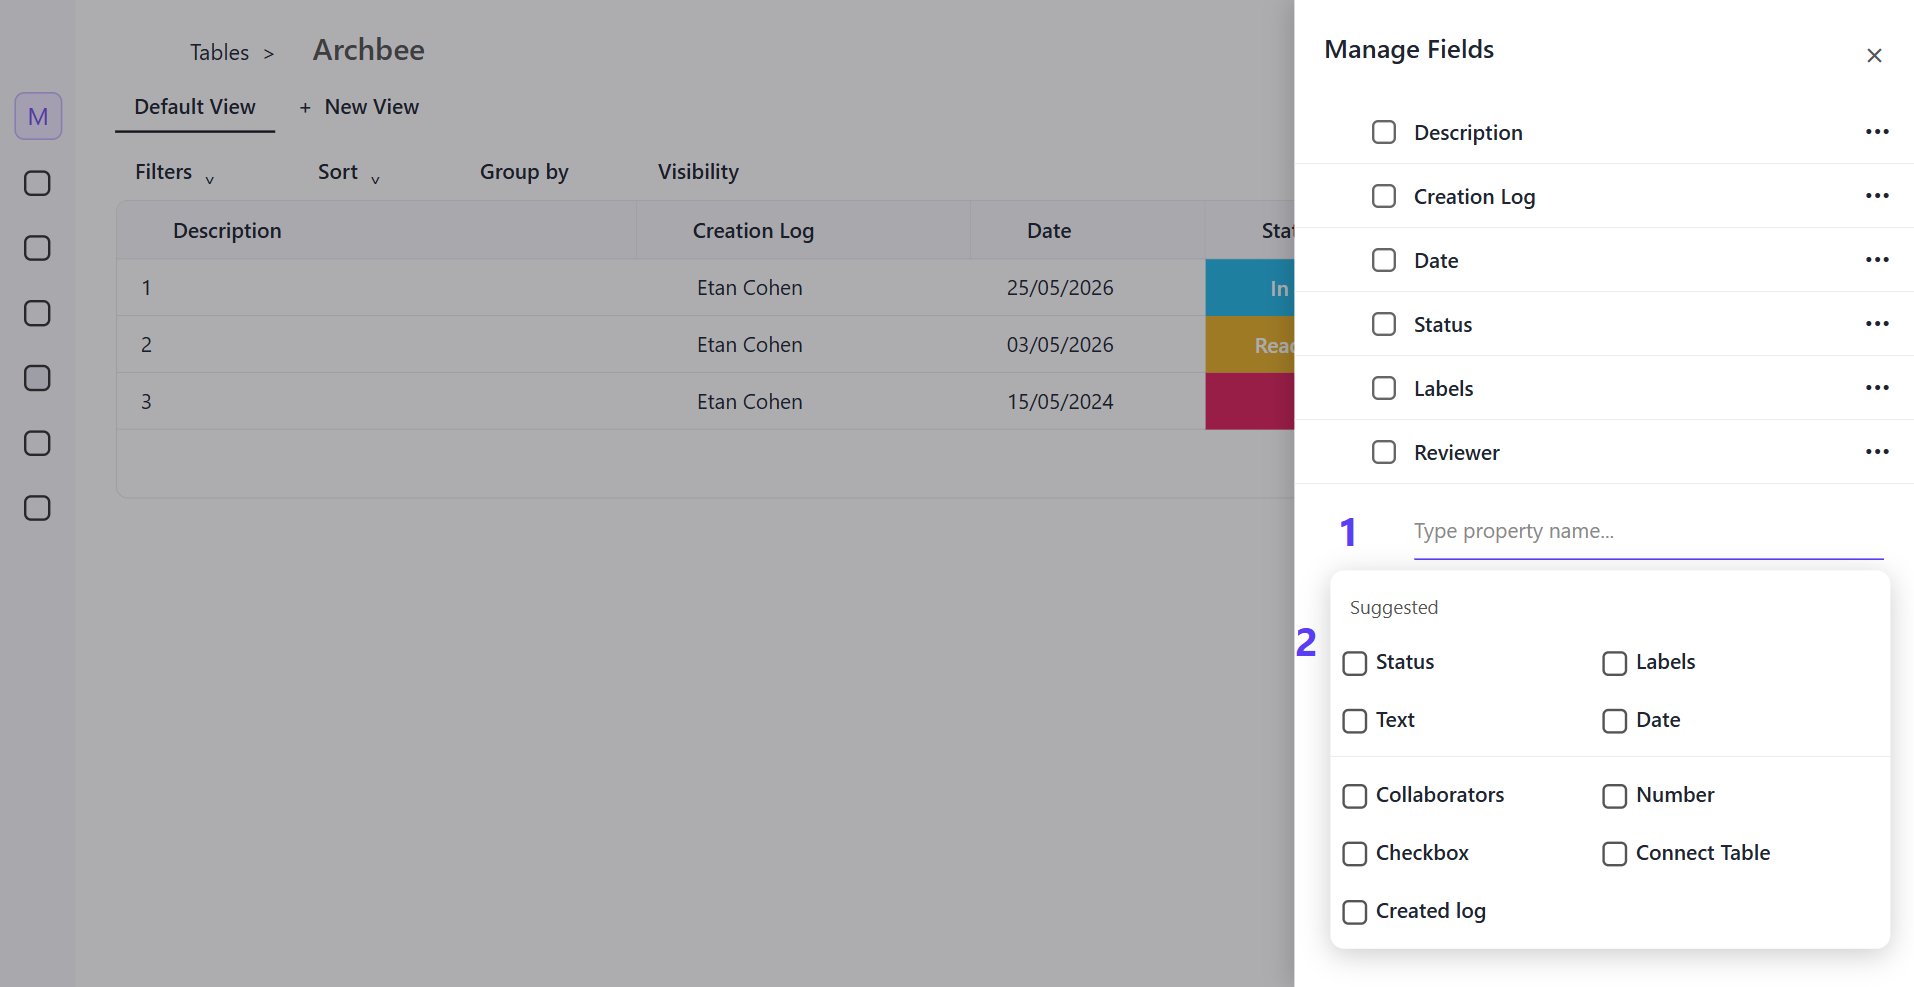
- Property name - The name of the new field.
- Field type - The type of the new field, such as Status, Labels, Text, Date, Collaborators, Number, Checkbox or Connect Table.
Duplicate or Delete a Field
Click the three dots at the end of a field row to open the field menu.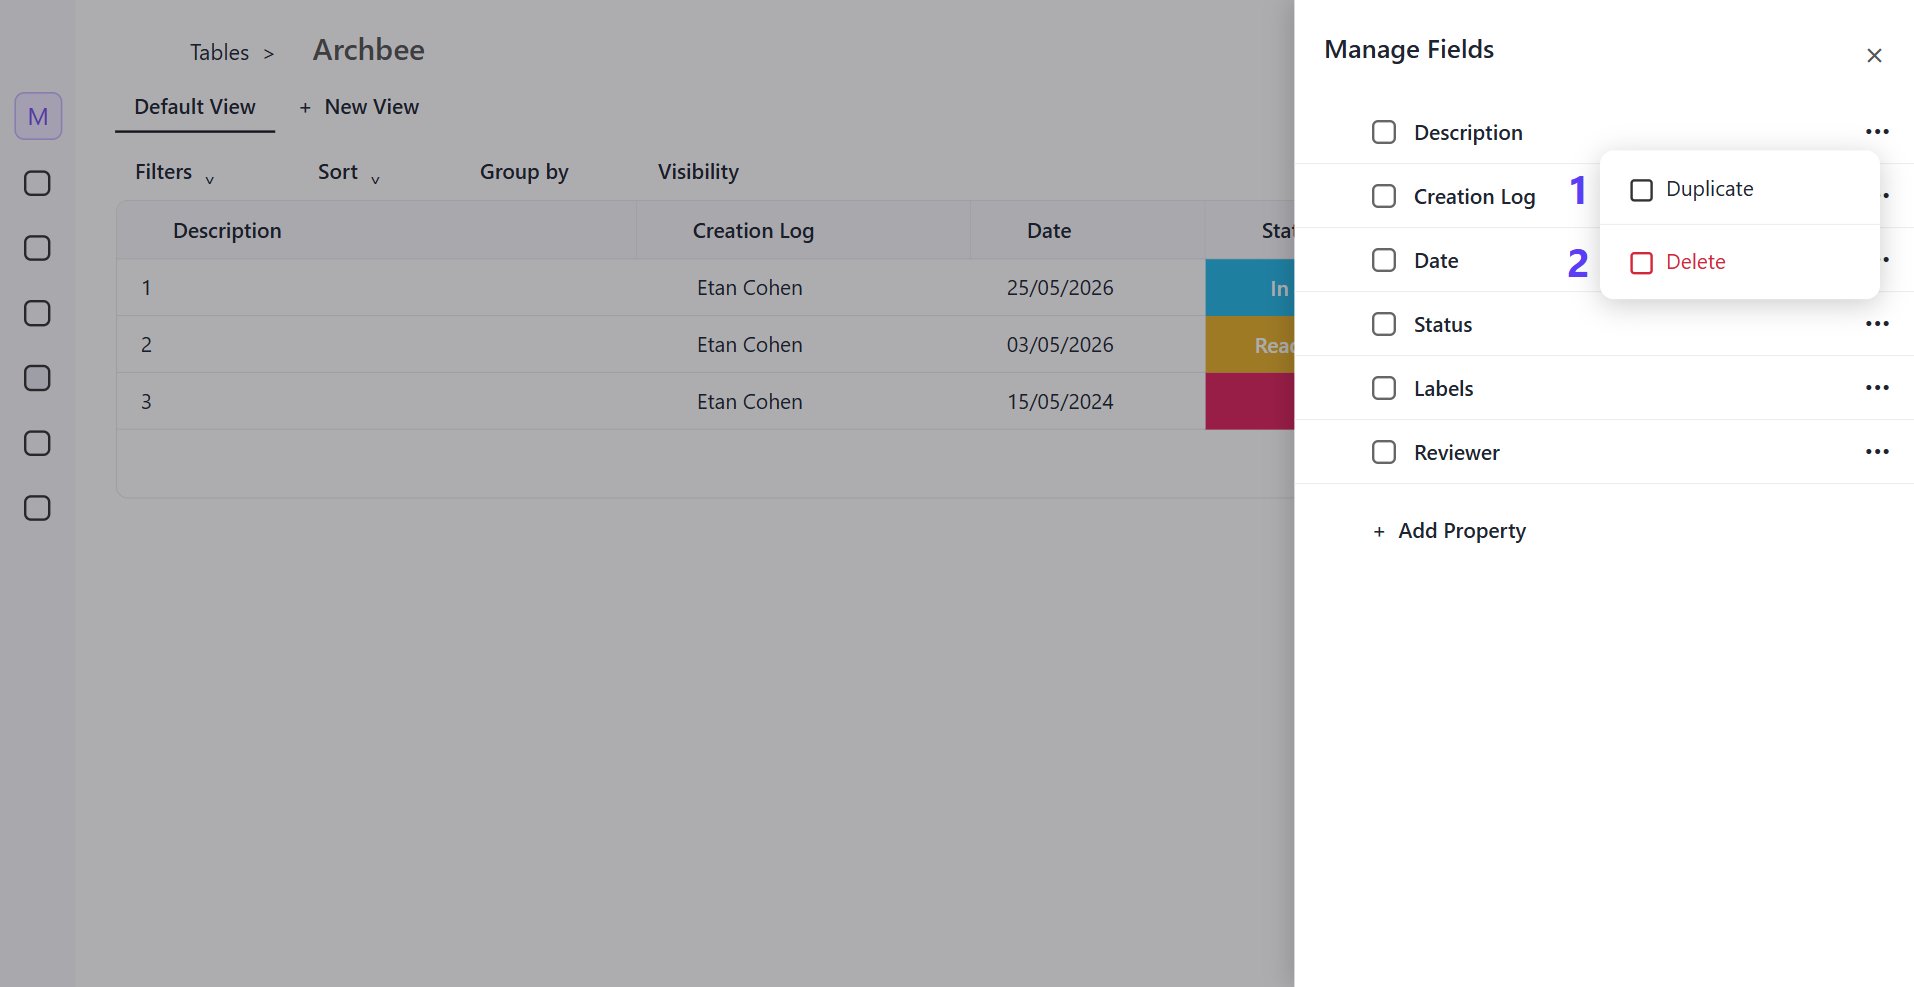
- Duplicate - Creates a new field from the existing one.
- Delete - Removes the field from the table.
- The copy is added at the end of the table and gets the same name as the original. Click its name in the Manage Fields panel to rename it.
- The same menu is available from the three dots in each column header of the table.
- You cannot delete the last field in a table.
- Deleting a Connect Table field also deletes its Lookup fields.
- Some fields have fewer options: Lookup fields have no three-dot menu, and a log field such as Creation Log cannot be duplicated, and Delete only hides it.
- Adding, renaming, duplicating and deleting fields requires permission to manage the table’s fields.
Filters
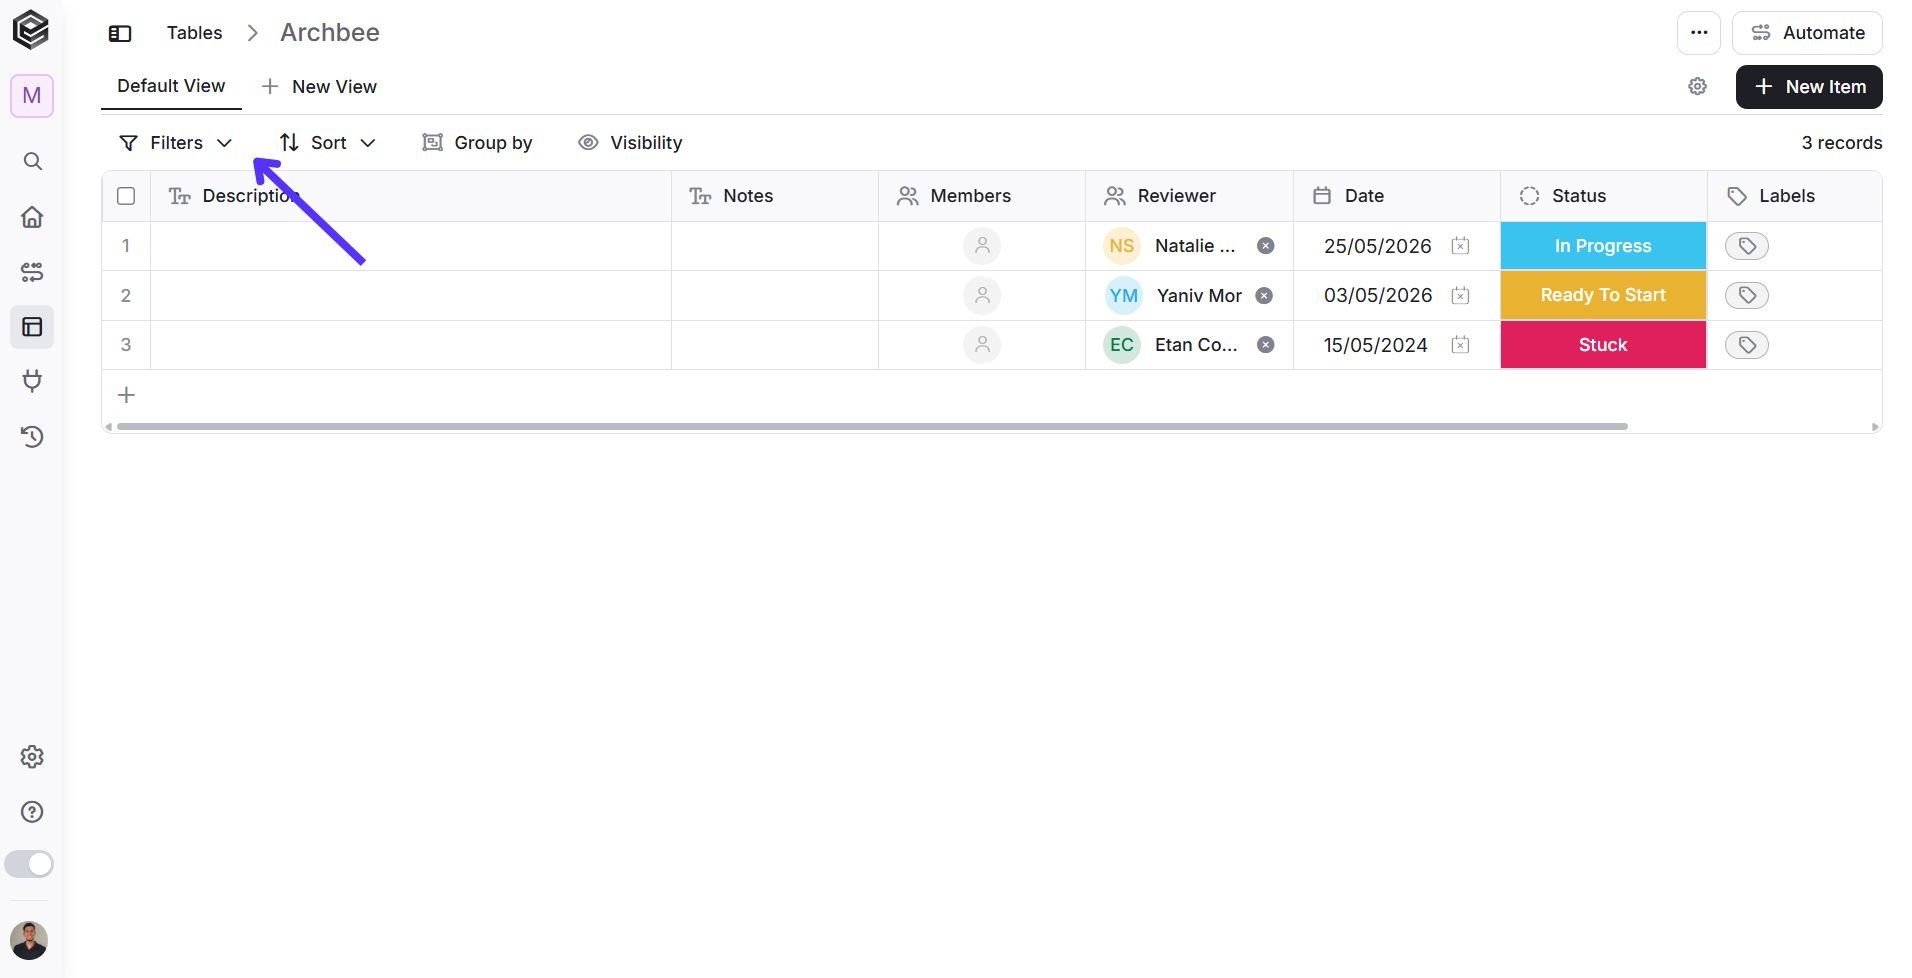
Take your table customization up a notch with a filter. This feature lets you show off specific info in your table, tailored to your display needs.-
Click on ‘Filters’.
-
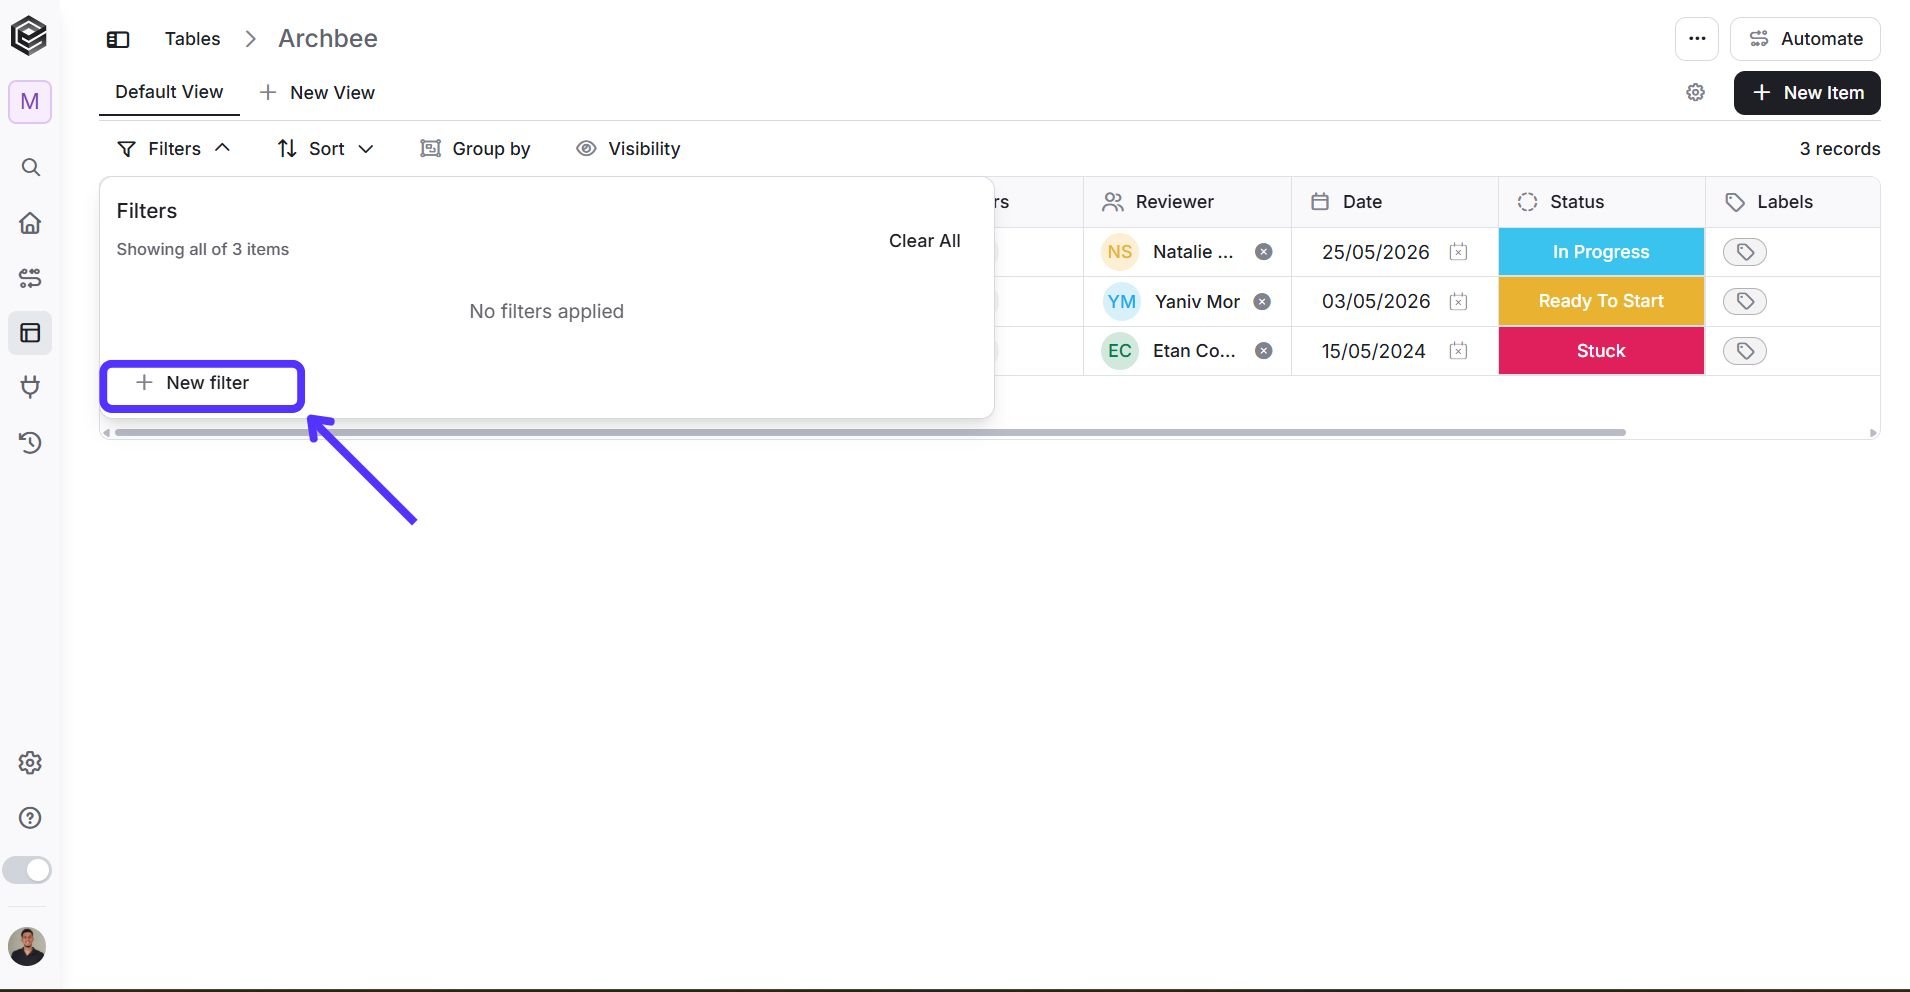
To filter click on “New filter”:
-
Press Select and choose the column you want to filter.

-
Use this section to define and apply filters in order to display only the relevant data.

- Field selector - Choose the field (column) you want to filter by.
- Condition selector - Select the condition or operator to apply to the chosen field.
- Value input - Enter or select the value that will be used for filtering based on the selected condition.
- Delete filter - Removes the current filter from the list.
- New filter - Adds an additional filter so you can combine multiple conditions.
People Filter
The People Filter provides several conditions for filtering records based on users assigned to a People field.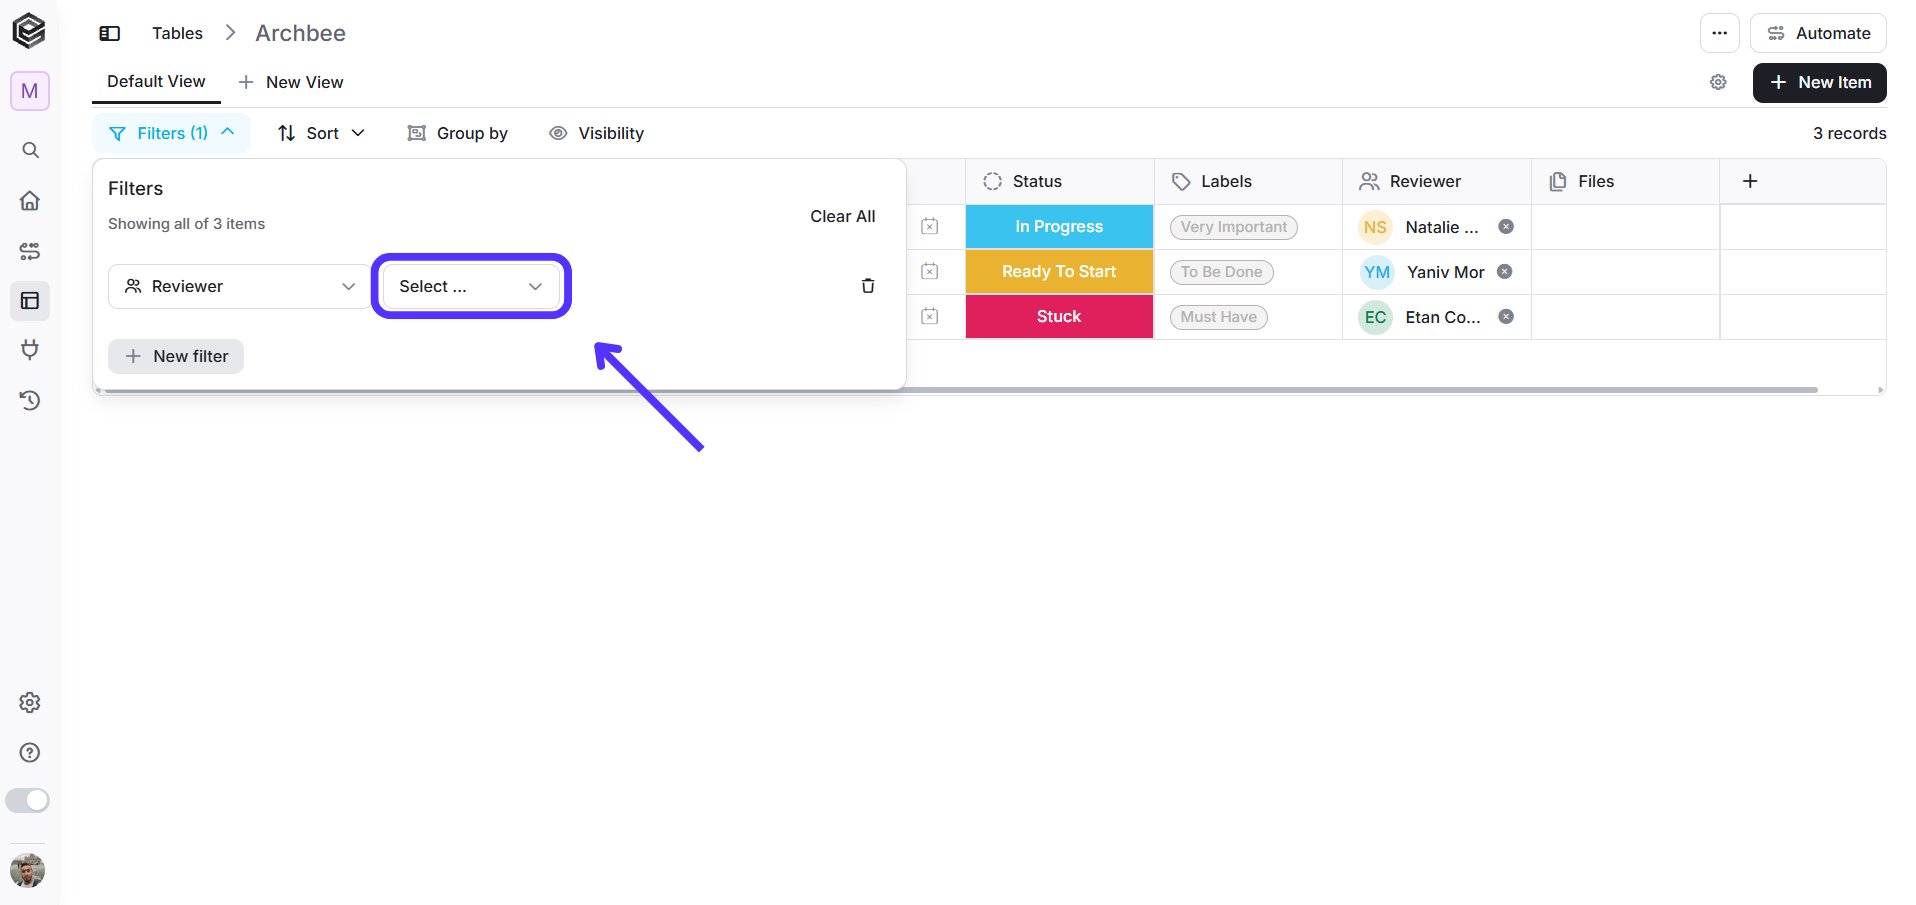
- Is Equal - Shows records where the People field matches one specific selected user exactly.
- Is Not Equal - Excludes records where the People field matches the selected user.
- Is Empty - Shows records where no user has been assigned to the People field.
- Is Not Empty - Shows records where at least one user has been assigned to the People field.
Date Filter
The Date Filter has various conditions and we specify them here.
- Is - Shows records that match a specific date exactly (e.g., only items scheduled for December 25th).
- Is Not- Excludes a specific date. It shows every record except for the one day you select.
- Is In The Next- This creates a rolling window for future dates. You enter a specific number and choose the time unit, such as days, weeks, or months. The filter automatically updates every day to show what is coming up relative to the current date.
- Is In The Last- This creates a rolling window for past dates. It is used to track recently modified or completed items. Set a number and a unit to define how far back the filter should look from today.
- Is Between - Filters for a fixed range. You select a start date and an end date from the calendar to see all records within that specific timeframe.
- Is On Or After- Shows records from a specific date forward. This is often used to see everything starting from today.
- Is Before- Shows records that occur before a chosen date. This helps identify older entries or overdue tasks.
- Is Empty- Filters for records where no date has been entered. This is useful for finding items that still need to be scheduled.
- Is Not Empty- Filters for any record that contains a date. This allows you to hide all unscheduled items.
Sort
The Sort option allows you to organize the records in the table based on one or more fields. This helps you view your data in a structured and meaningful order.-
Click on ‘Sort’.

-
To sort click at ‘New Sort’.

-
The Filters panel allows you to refine and display specific records by defining conditions based on selected fields and values.
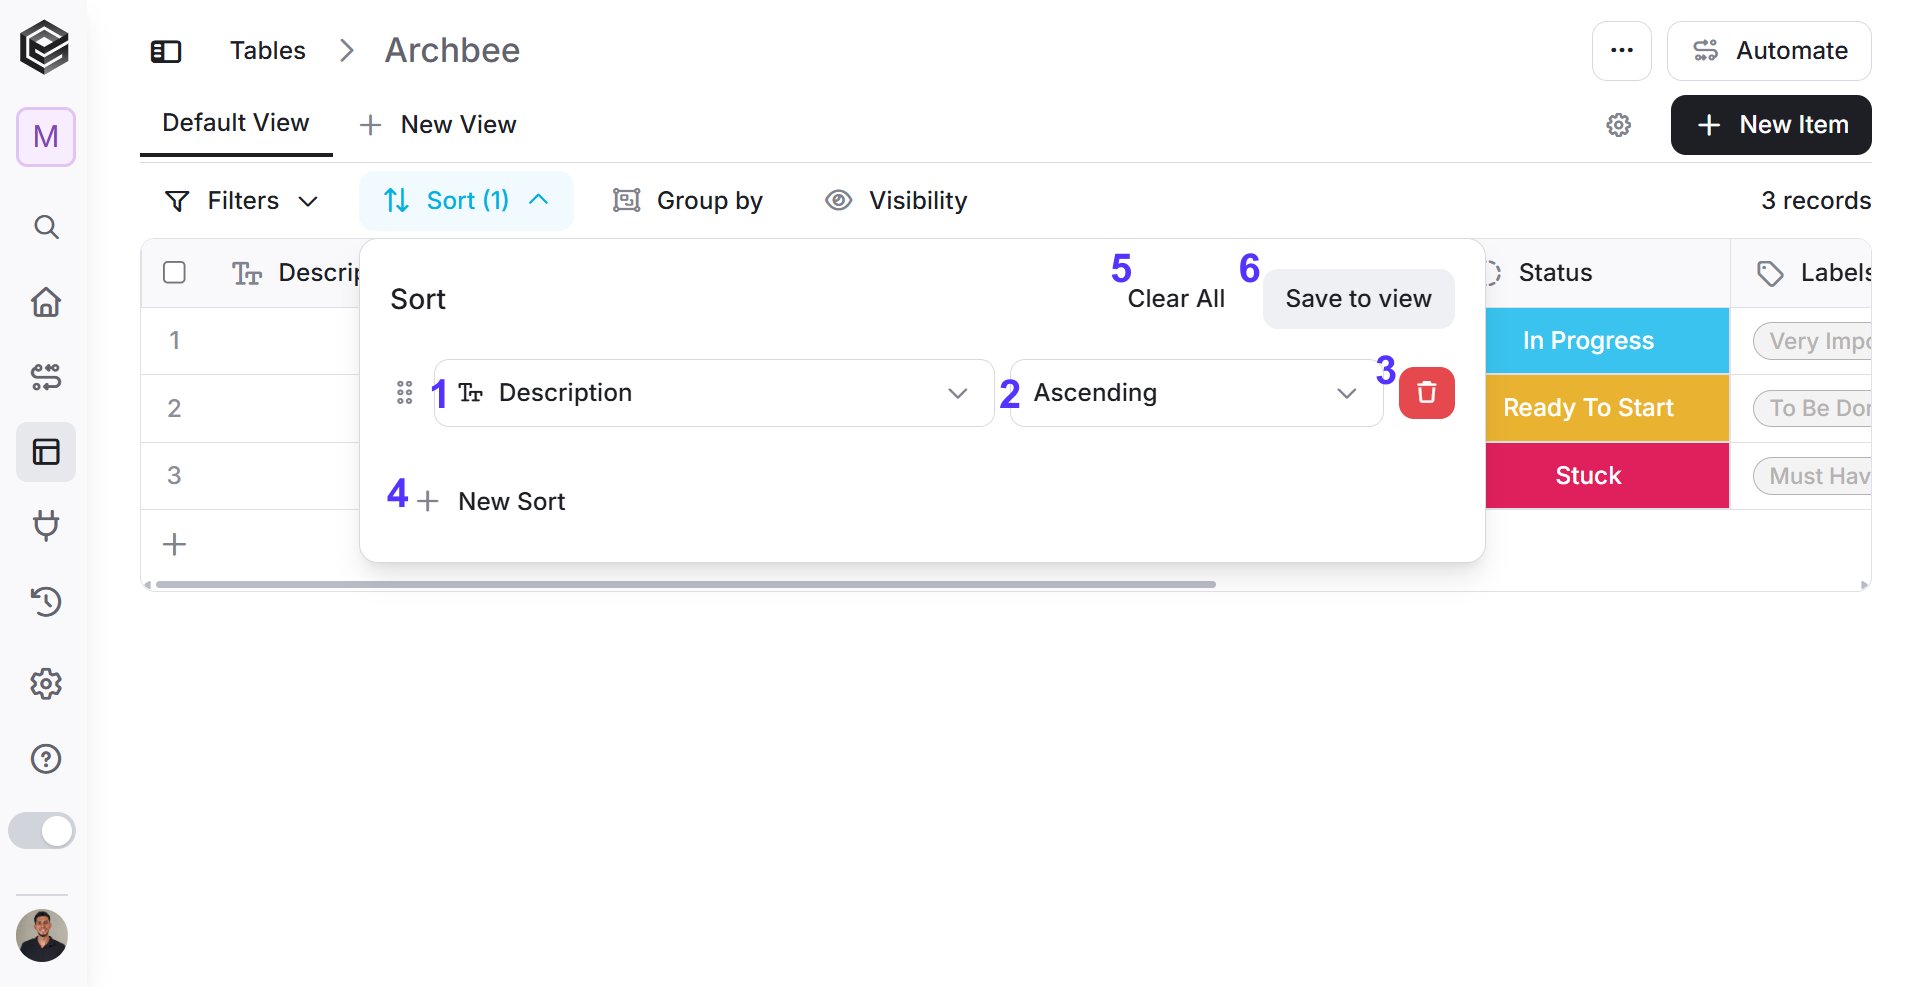
- Field selector - Choose the field (column) you want to sort by.
- Sort direction - Select the order of sorting (Ascending or Descending) to determine how the data will be arranged.
- Delete sort - Removes the current sorting rule from the list.
- New sort - Adds an additional sorting rule so you can sort by multiple fields in a prioritized order.
- Clear All- Delete all the sorts created.
- Apply - Applies all defined sorting rules and updates the displayed data accordingly.
Table Record Drag and Drop
You can manually reorder records in a table using drag and drop. To move a record, click and hold the record without releasing, then drag it to the desired position in the table.

Group By
The Group By option allows you to organize and segment your table records into visual groups based on a specific field. This helps you break down your data into clear, manageable sections for better tracking.
- Click the Group by option in the table toolbar to open the settings menu.
- Use the first dropdown to choose the specific field you want to group your records by (e.g., Status, People, or Connect Table).
- Set the sorting order for your groups (e.g., Ascending or Descending).
- Toggle the “Show empty groups” checkbox to decide whether groups with zero records should remain visible.
- Click the “Save to view” button to apply and lock this layout for the current table view.
Open Record
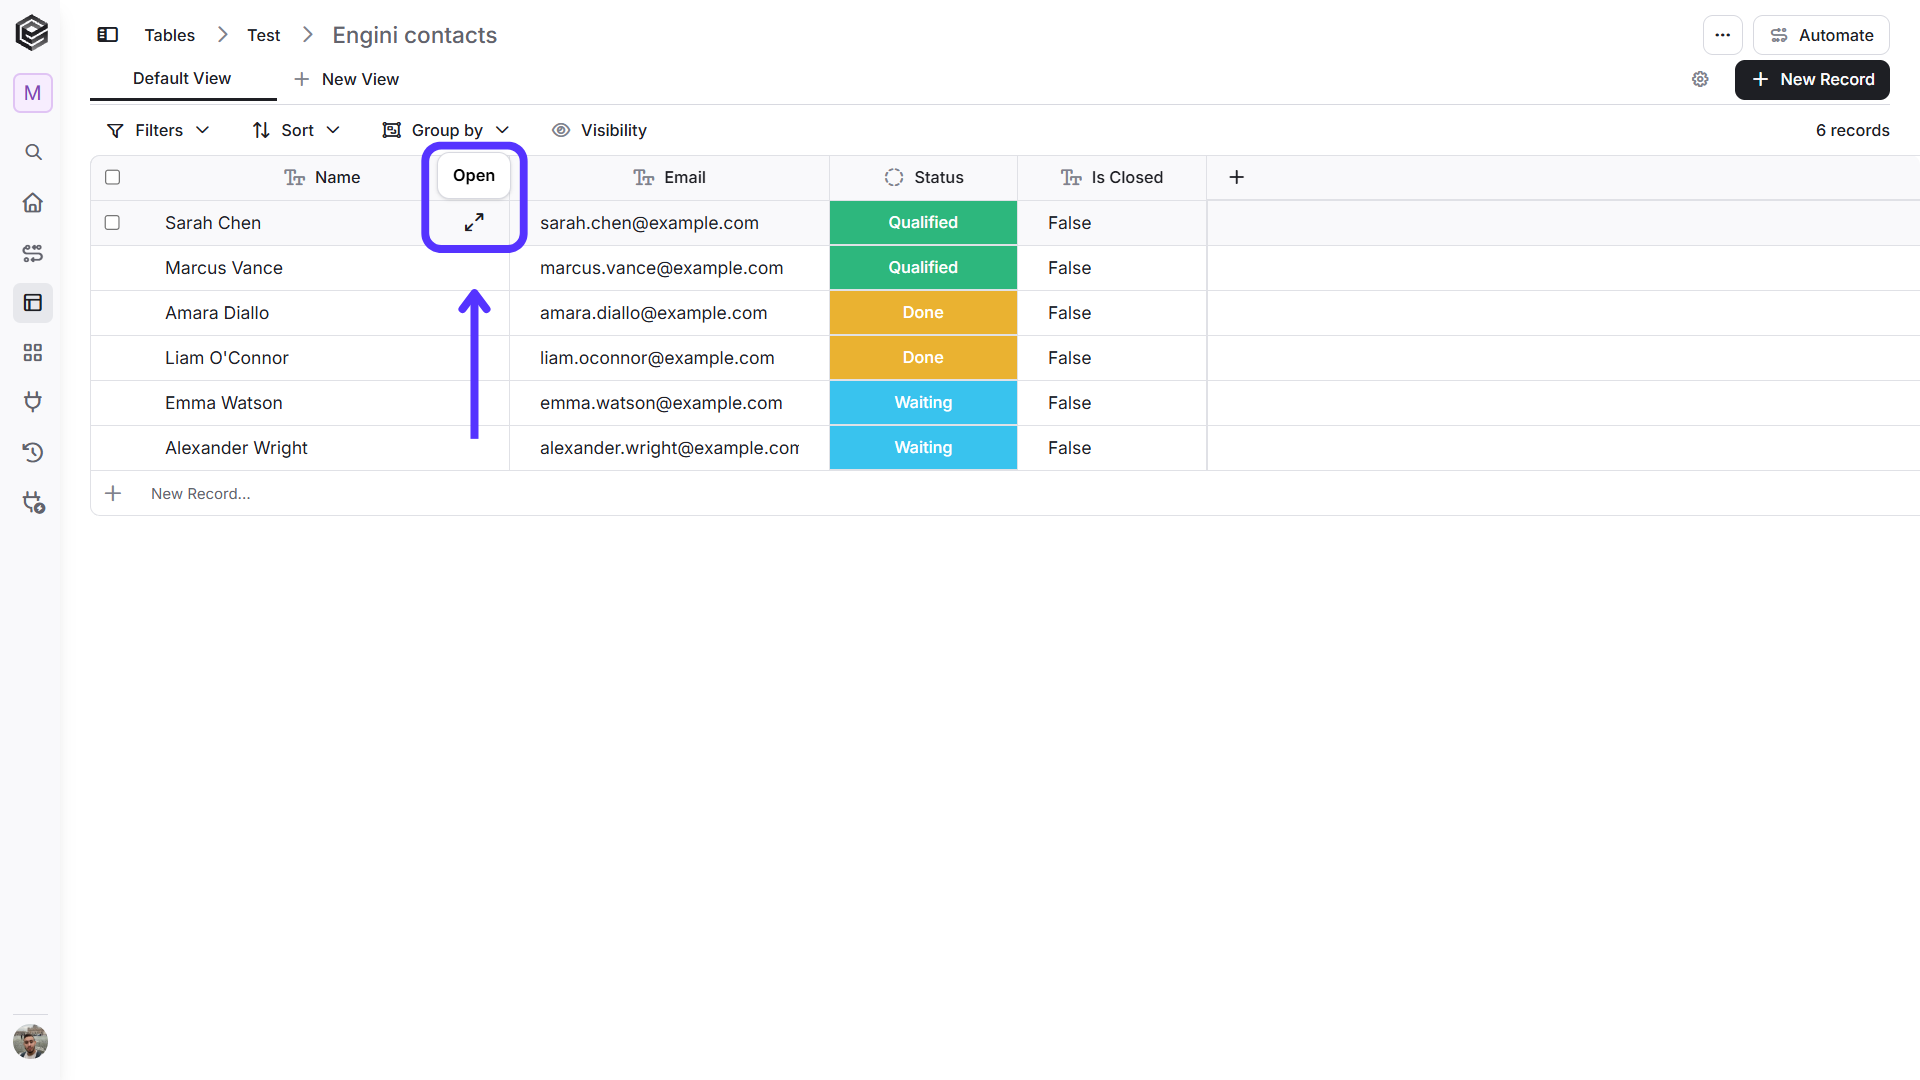
Use the Open button to display the selected record in the side panel for editing and collaboration. Note: You can drag the edge of the Open record panel left or right to resize it according to your needs.
Comments
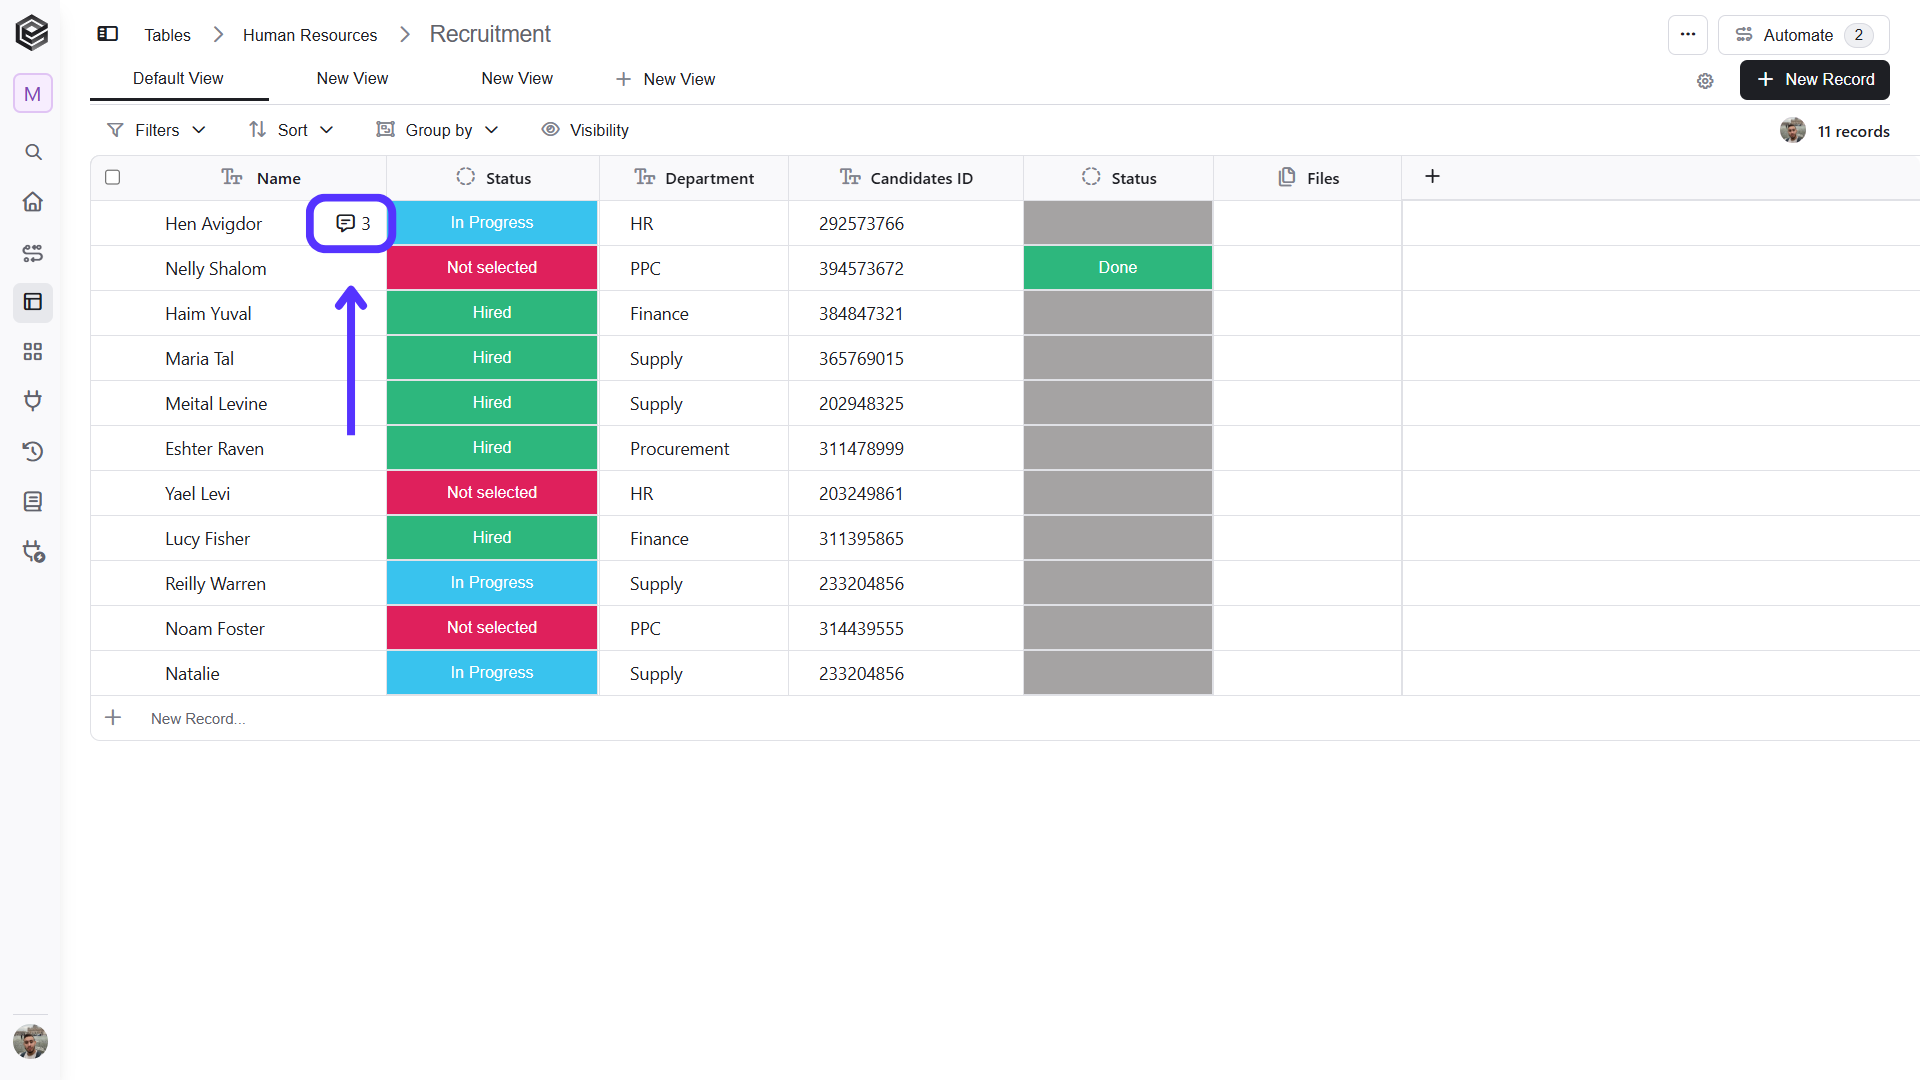
You can add and edit comments on any row in your table to provide additional information, share feedback, or collaborate with teammates.-
Click on the comment icon.
-
A new window will pop up on the right side, click on “Reply”.


-
Write a reply to comment (same options to write a cmment).

- Text editor - Enter and format your message using the toolbar (font style, color, alignment, lists, and more).
- Add / Upload - Allows you to attach or add additional content (such as files or elements) to the message(image)
- Reply (Cancel) - When clicking on “Reply” the window closes without saving any changes.
Comment Options
The Comment Options menu allows users to manage a comment directly from the Comments section. The available options depend on the comment and the user’s permissions.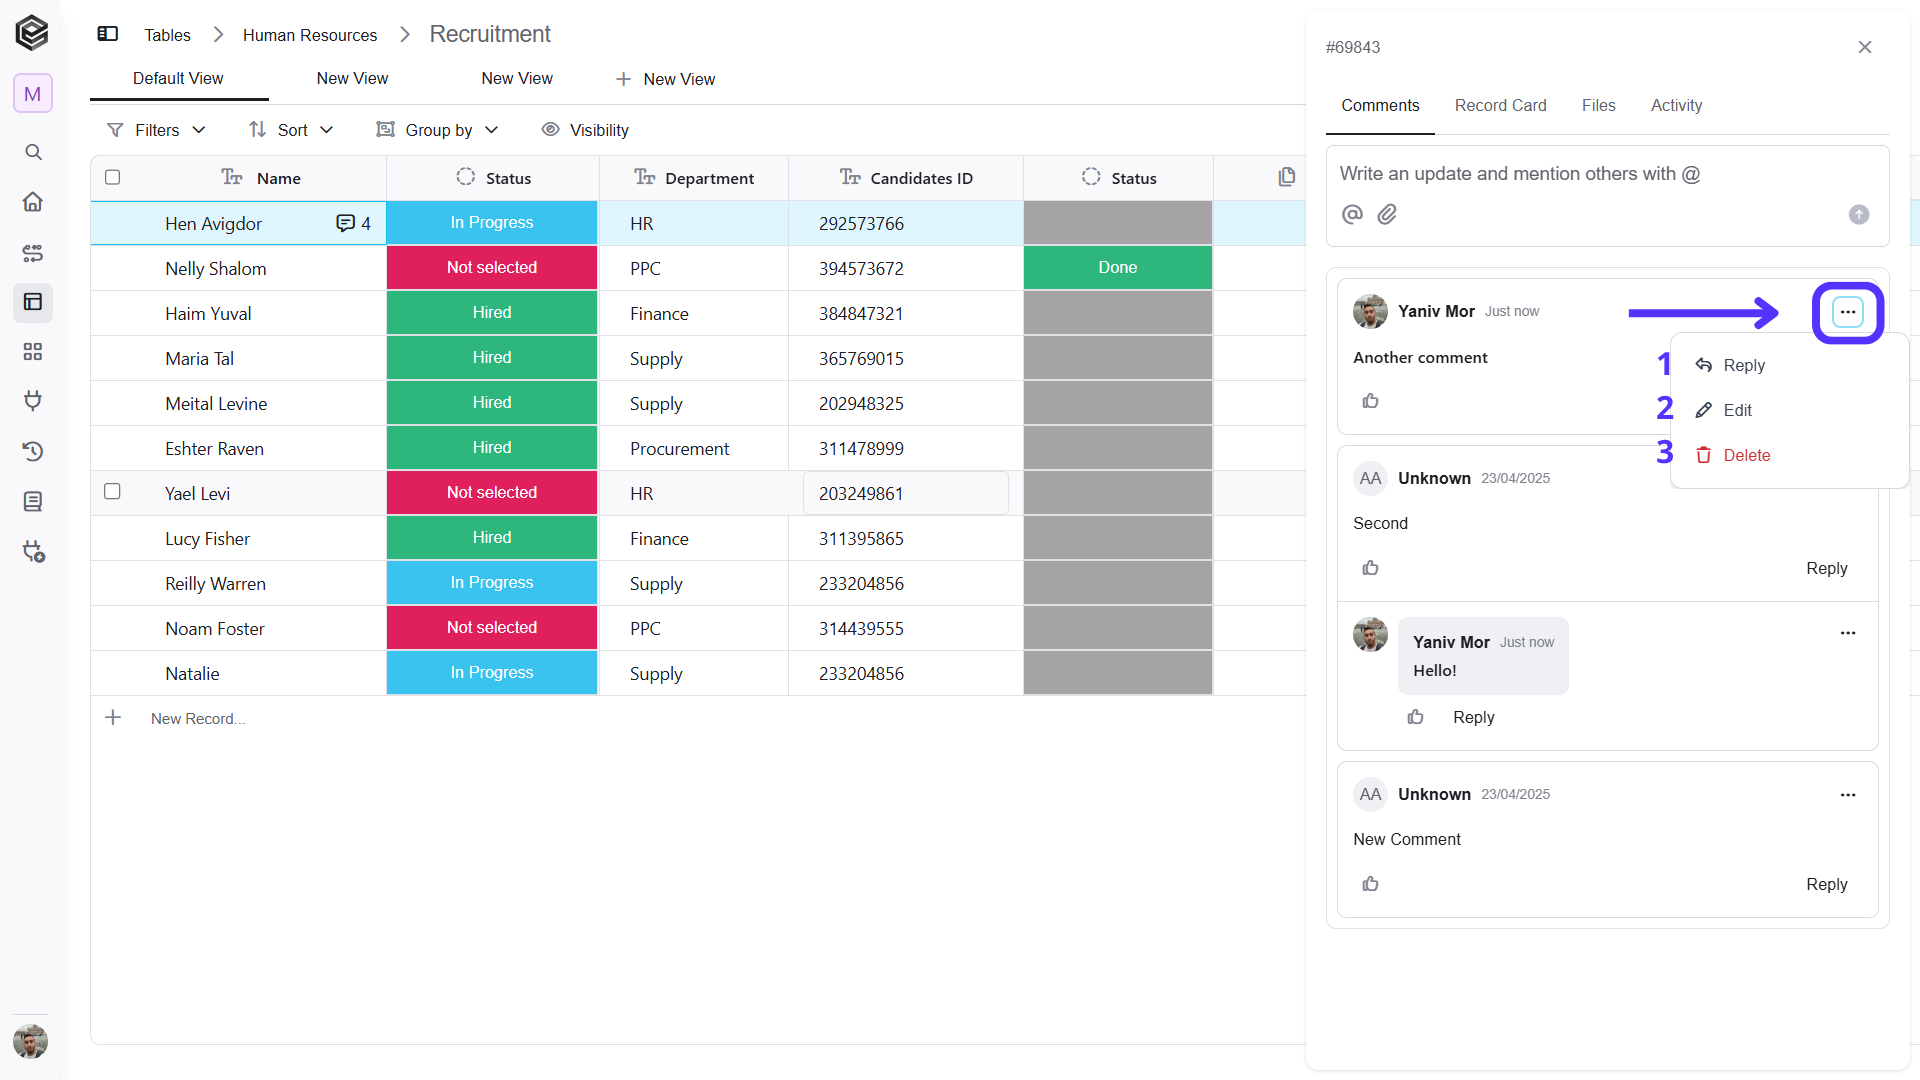
-
Reply – Reply directly to the selected comment and continue the discussion in context.
- Edit – Edit the content of a comment you previously posted.
- Delete – Permanently delete the selected comment.
Record Card
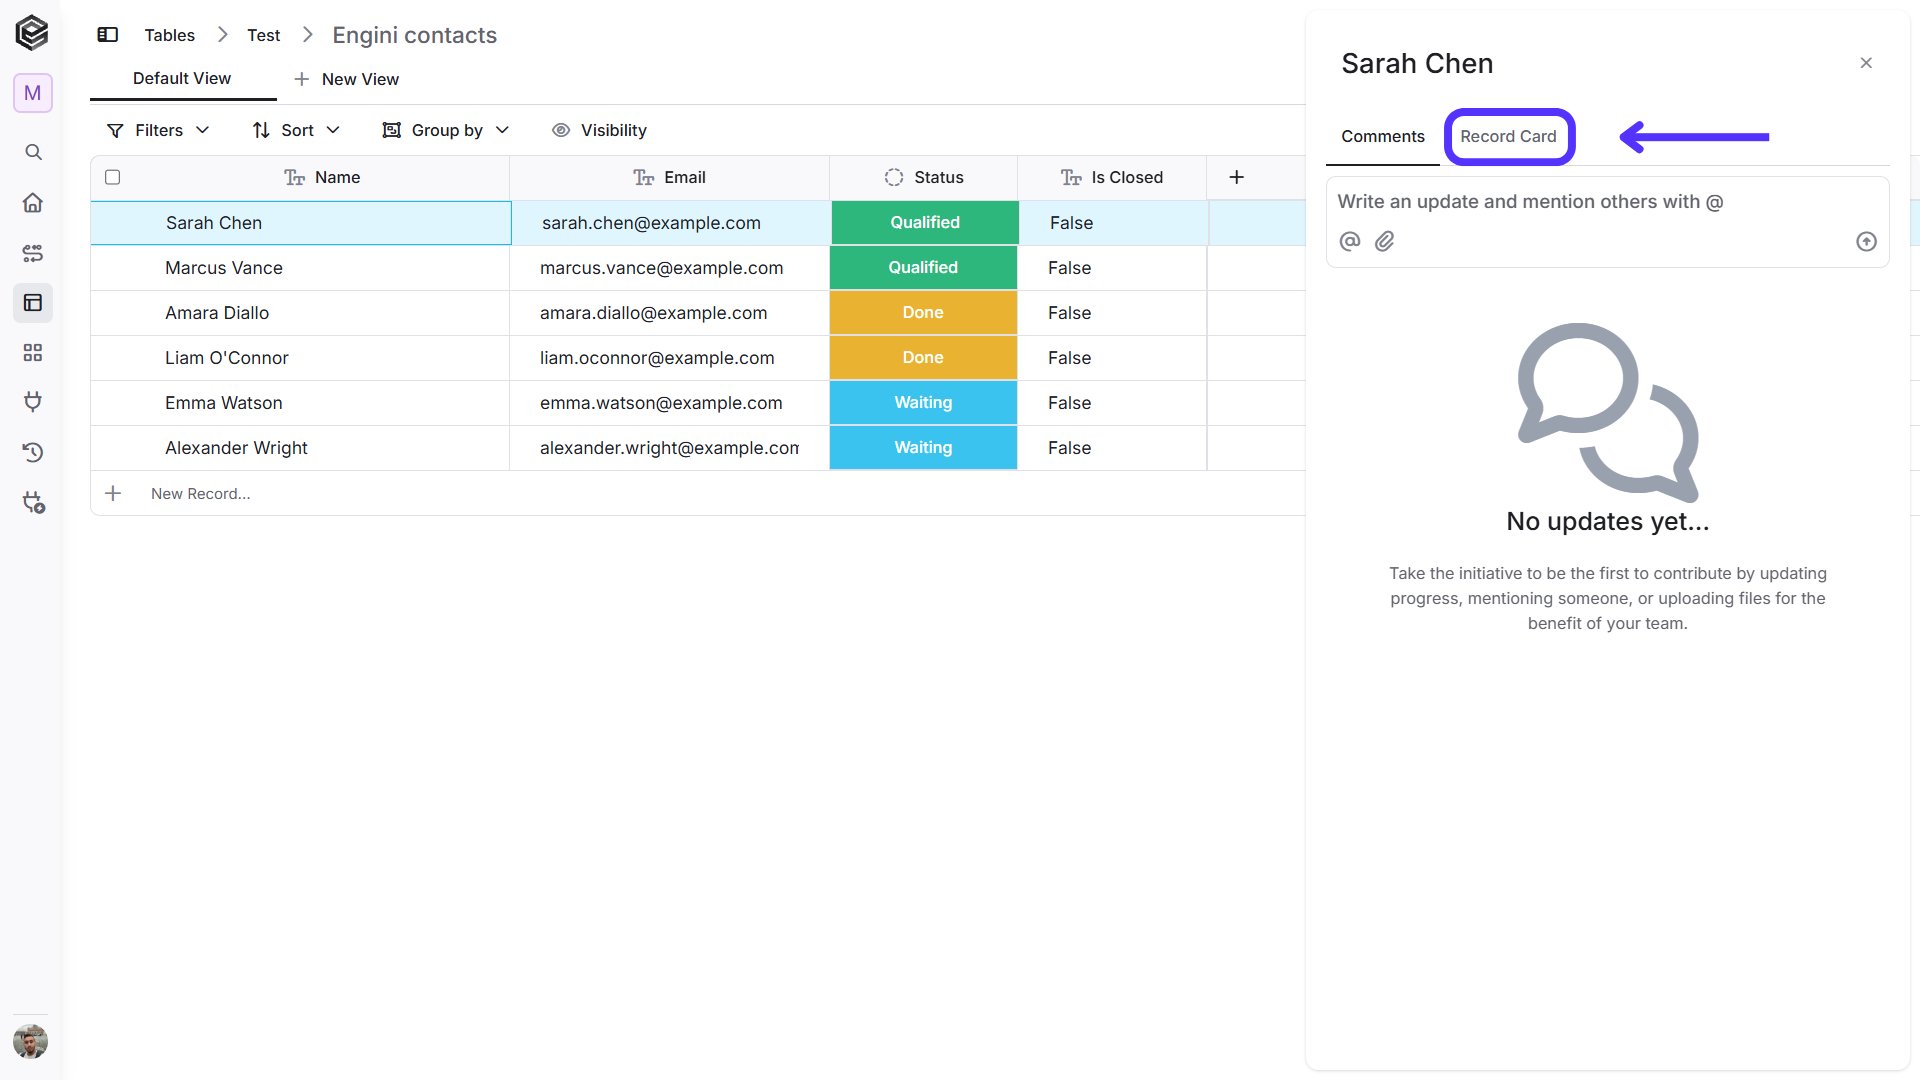
The menu can be opened by clicking the three-dot icon in the upper-right corner of the comment. The Record Card provides a complete overview of a selected record by displaying all of its fields on a single page. It allows you to review and update record information directly from the Record Drawer without navigating between individual columns in the table.-
Click on a record in the table to open its Record Drawer.
-
Select the Record Card tab from the Record Drawer.
-
The Record Card displays all available record fields in one organized view.

-
Click on the field you want to update.
Fields in the Record Card can be updated in the same way as fields in the table view.

-
Enter or select the new value according to the field type. Changes made in the Record Card are applied to the same record in the table. When a field is updated, the relevant notifications and automations are triggered in the same way as when the field is updated directly from the table view.

Files
The Files tab allows users to upload and manage files related to a specific record.
-
Add File - Files can be added by drag and drop or through the Add file button, keeping relevant documents and attachments organized directly within the record.

-
The Add file button allows users to upload files and associate them with the selected record.
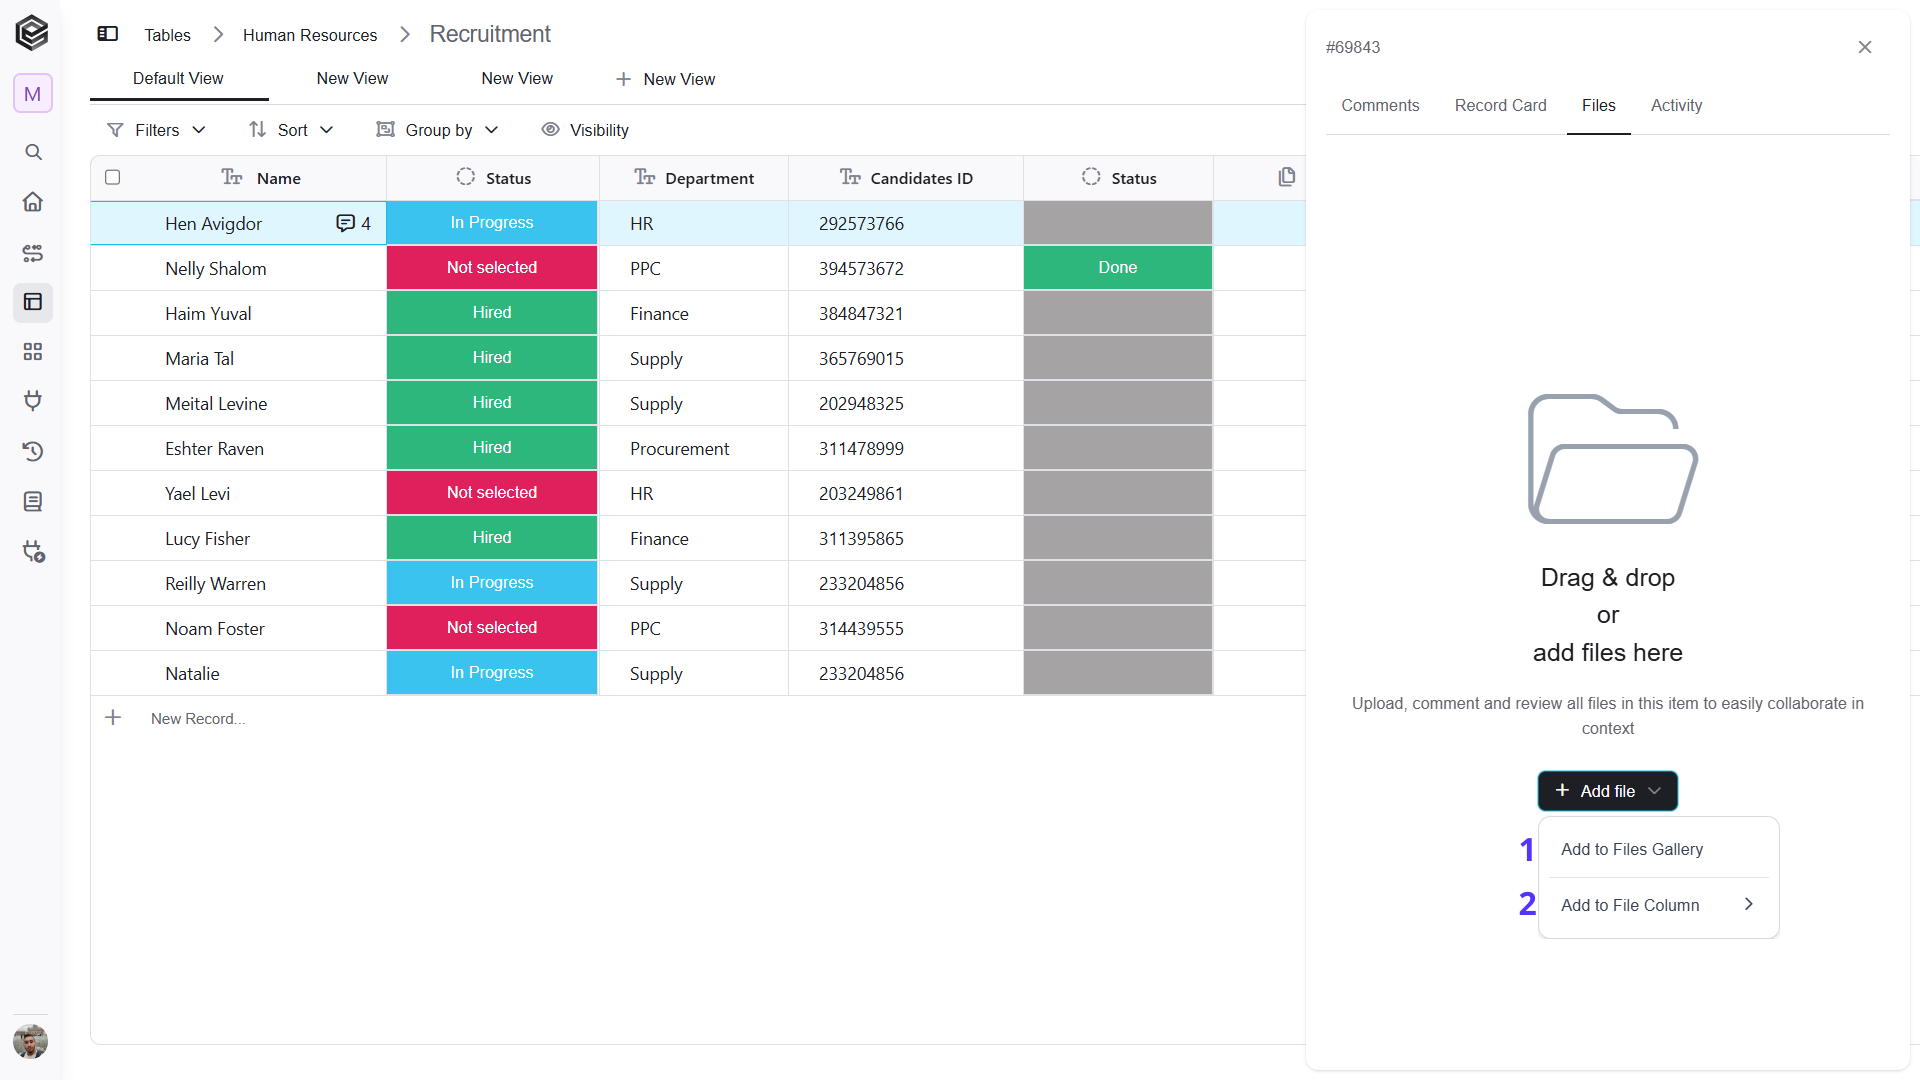
- Add to Files Gallery – Uploads the file directly to the record’s Files tab, where all record-related files can be viewed and managed in one place.
- Add to File Column – Uploads the file to a specific File column in the table. After selecting this option, the user can choose which available File column the file should be added to.
Activity
The Activity tab displays the history of changes and actions performed on a specific record, allowing users to track updates and review previous activity.

- Filters – Filters the activity history to display only relevant actions or changes.
- Refresh – Refreshes the activity list and displays the latest changes made to the record.
- Download – Downloads the record’s activity history.
Views
Views allow you to display the same table data in different ways without creating a new table. Each view can have its own filters, sorting, grouping, and column visibility settings, making it easier to organize the same data for different needs.-
Create a View - Click + New View to create an additional view for the current table.

-
Switch Between Views - Click the name of a view at the top of the table to switch between the available views.

- View Settings - Each view can store its own display configuration, such as filters, sorting, grouping, and visible columns.
Pin and Unpin Views
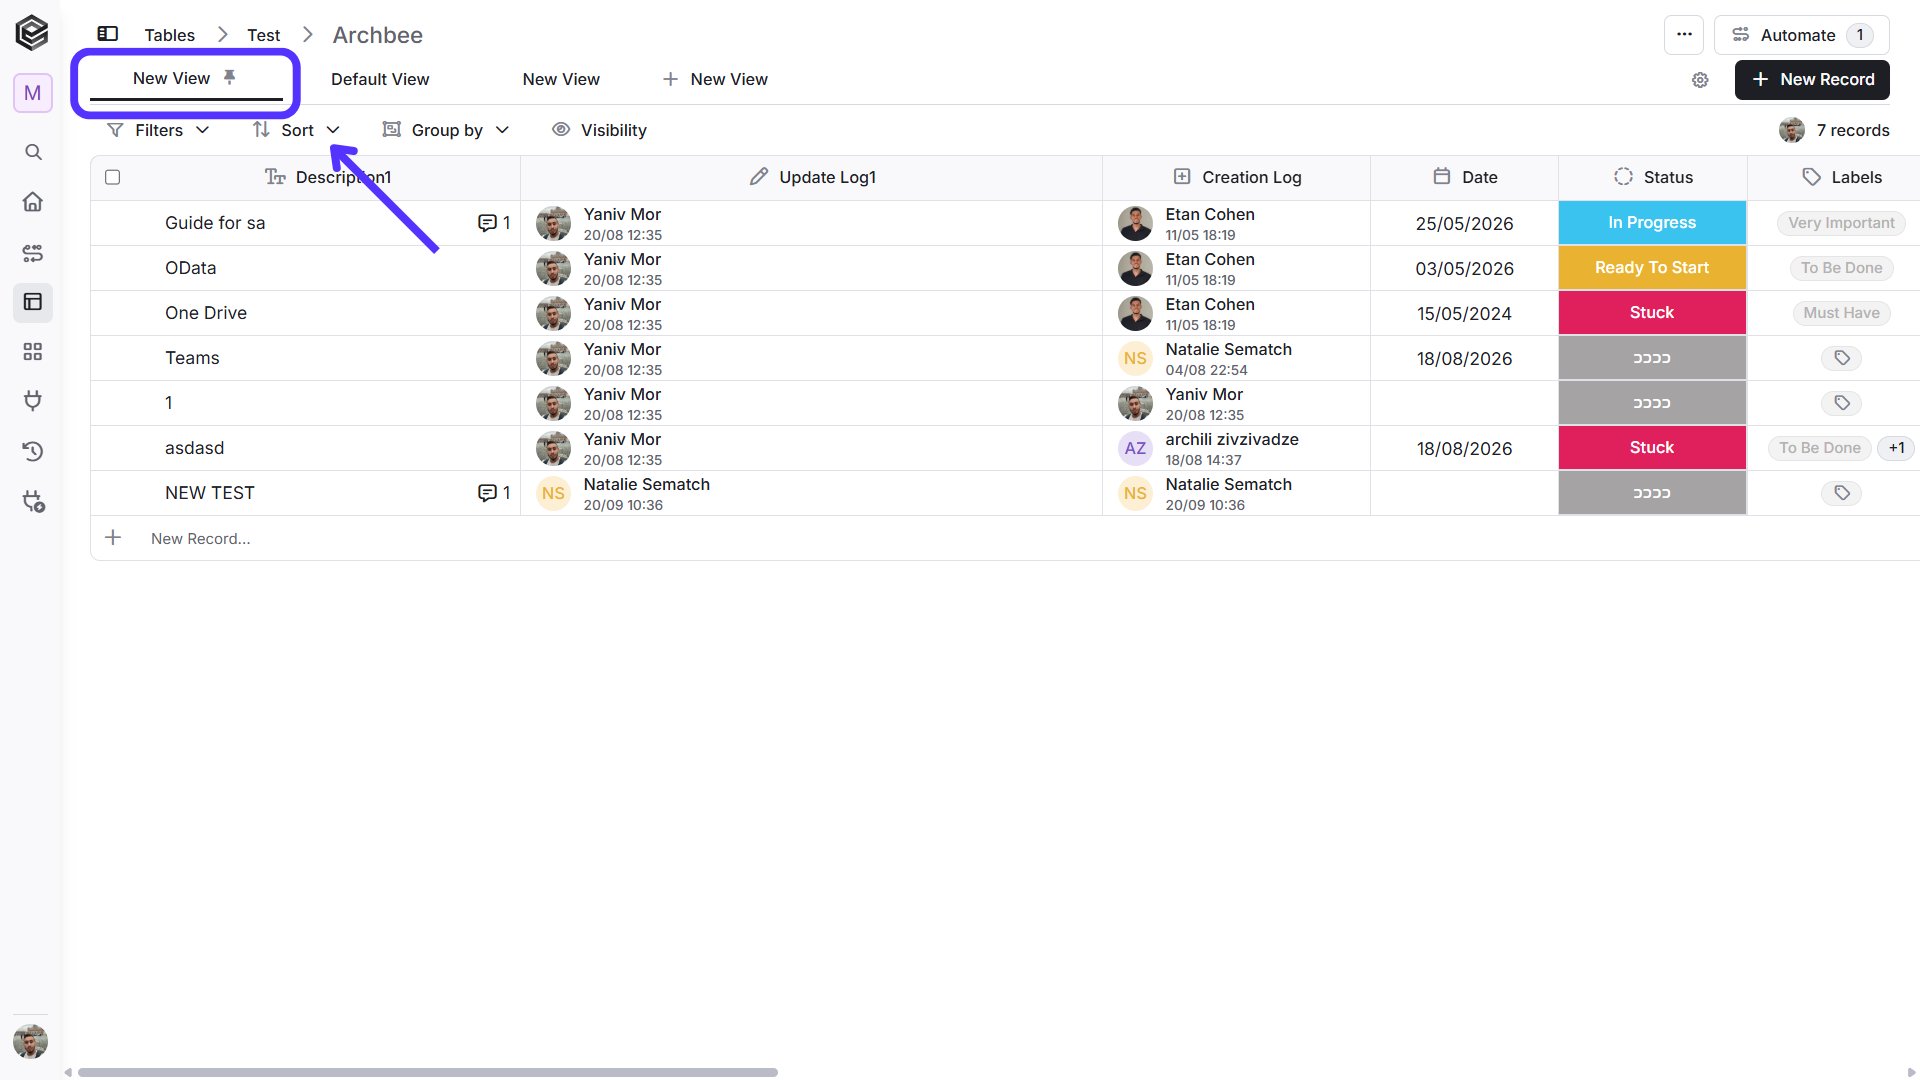
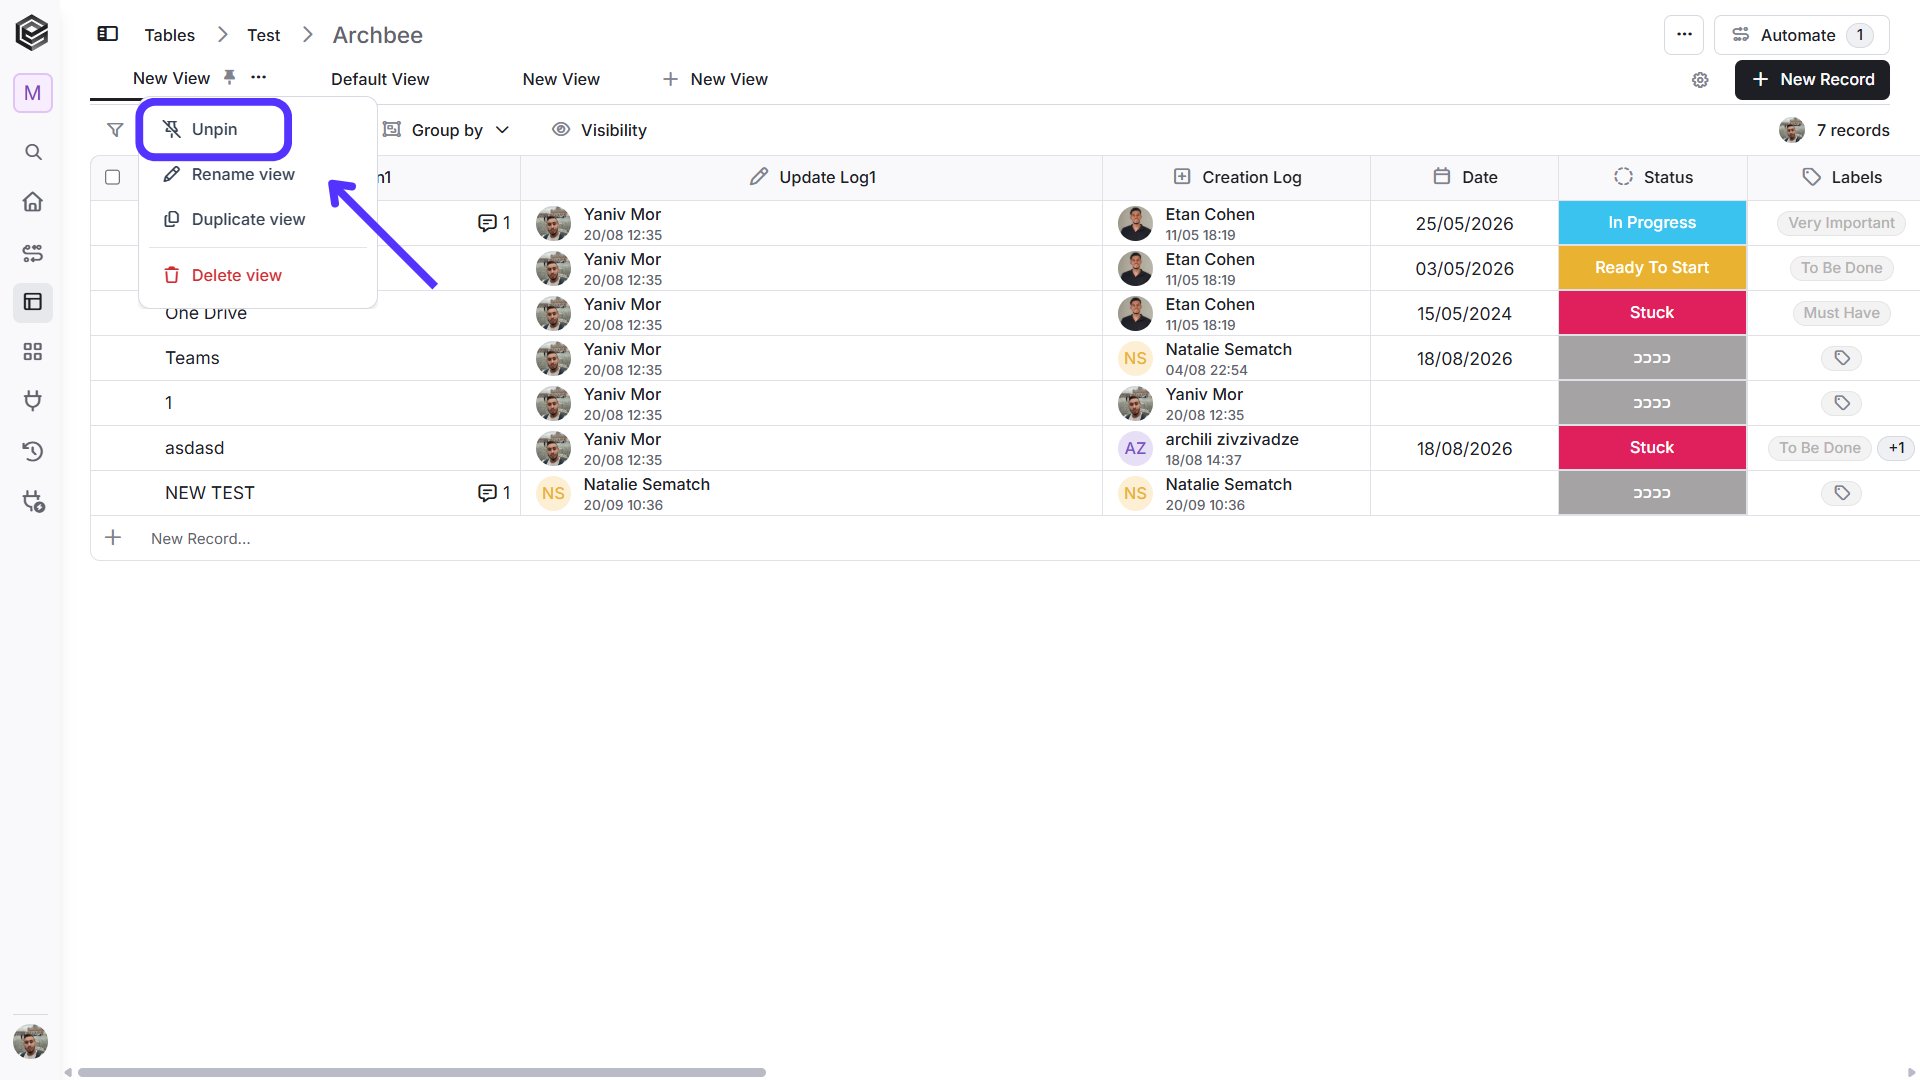
Views can be pinned to the top navigation bar for quick and easy access.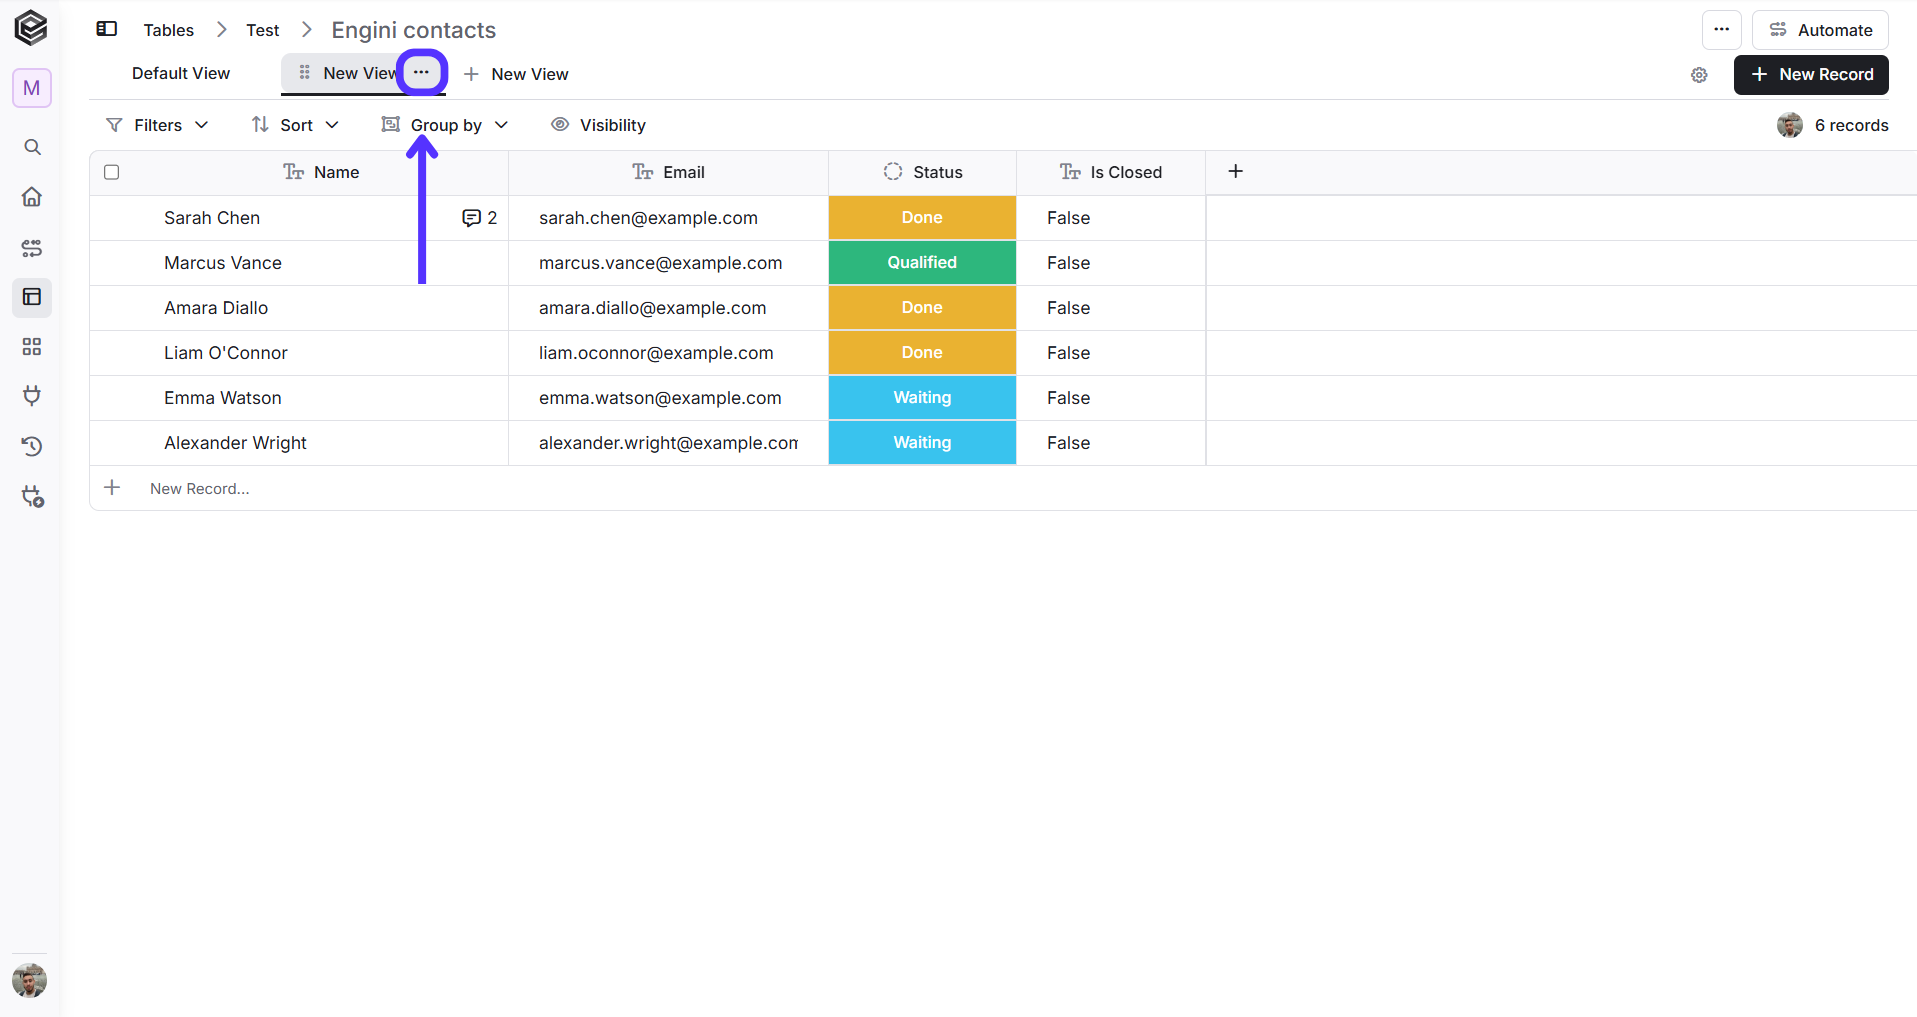
-
Click the three-dot menu next to the view name you want to manage.

- Select Pin from the menu to keep the view visible in the top navigation bar.
Visibility
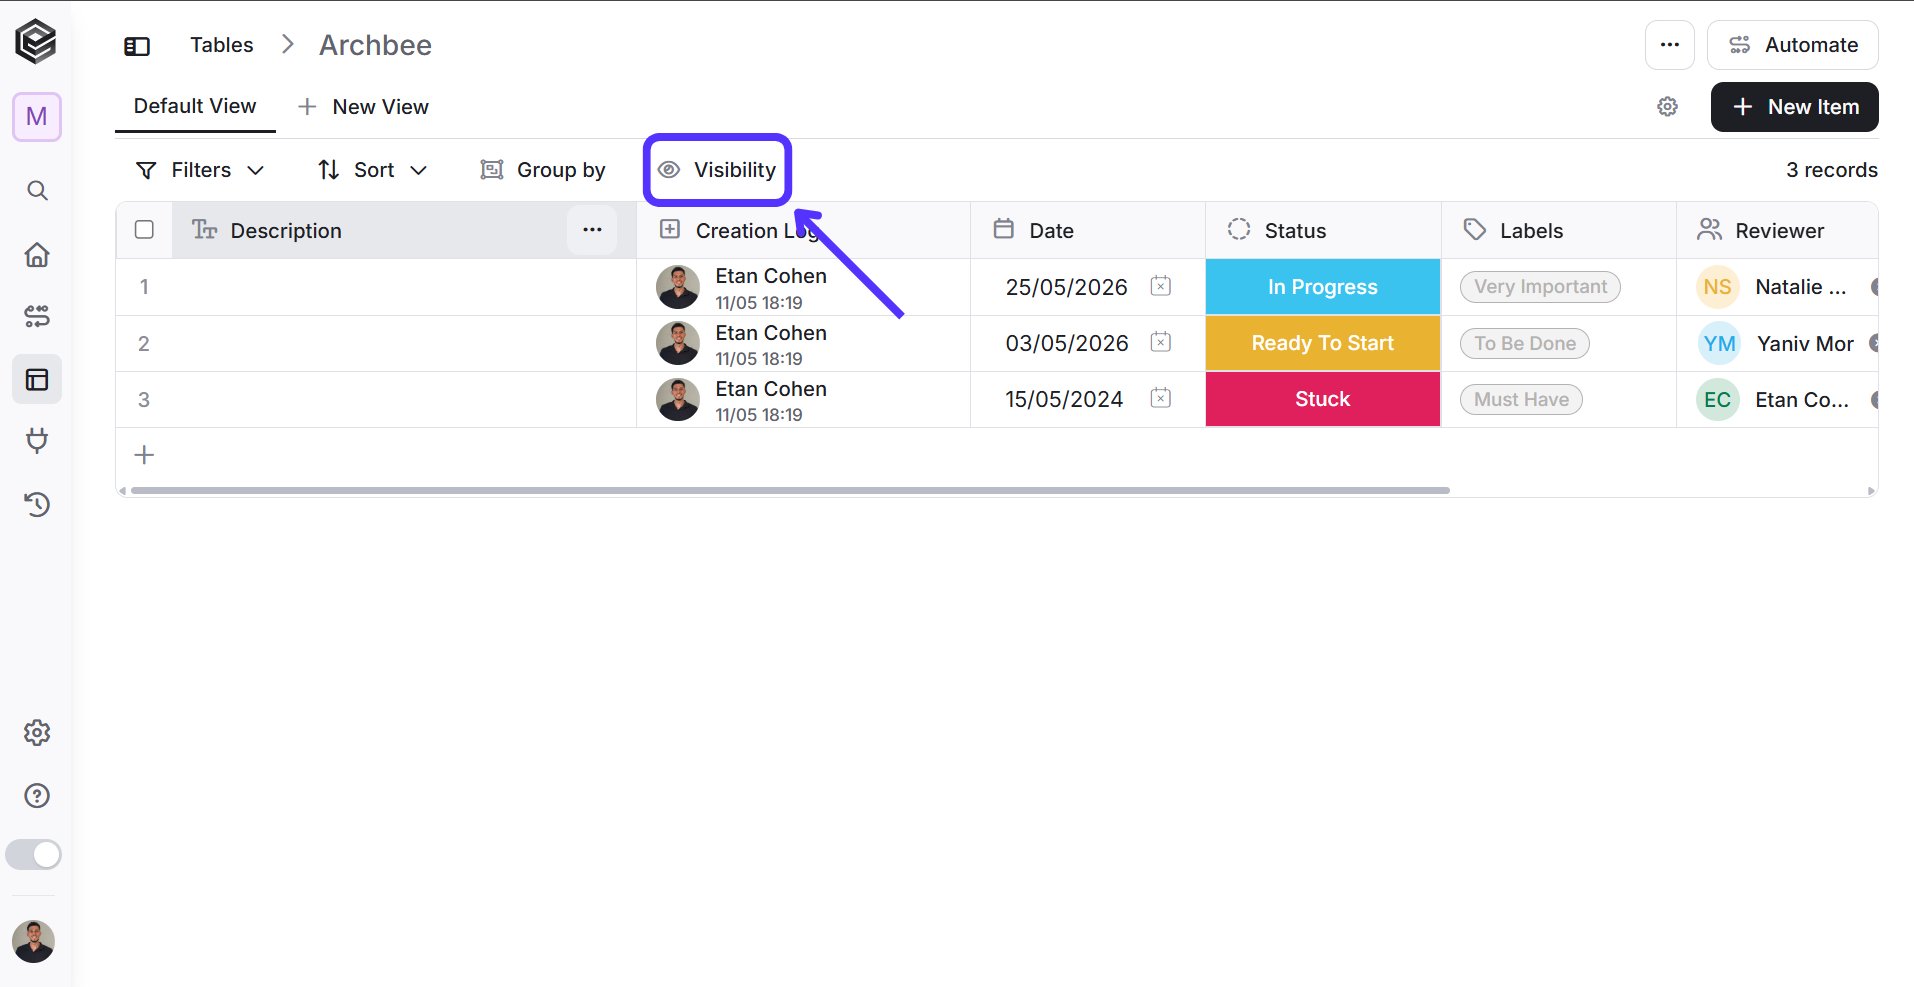
Enhance your data presentation by altering the view of the original table or creating an additional view. We let you filter various column types, like status, labels, text, people, numbers, and more. This approach gives you a new outlook on your data, leading to improved data readability and a better understanding of the most important info you need right now.-
Click on ‘Visibility’:
-
The Columns Visibility panel allows you to control which columns are shown or hidden in the table and customize their order in the current view.
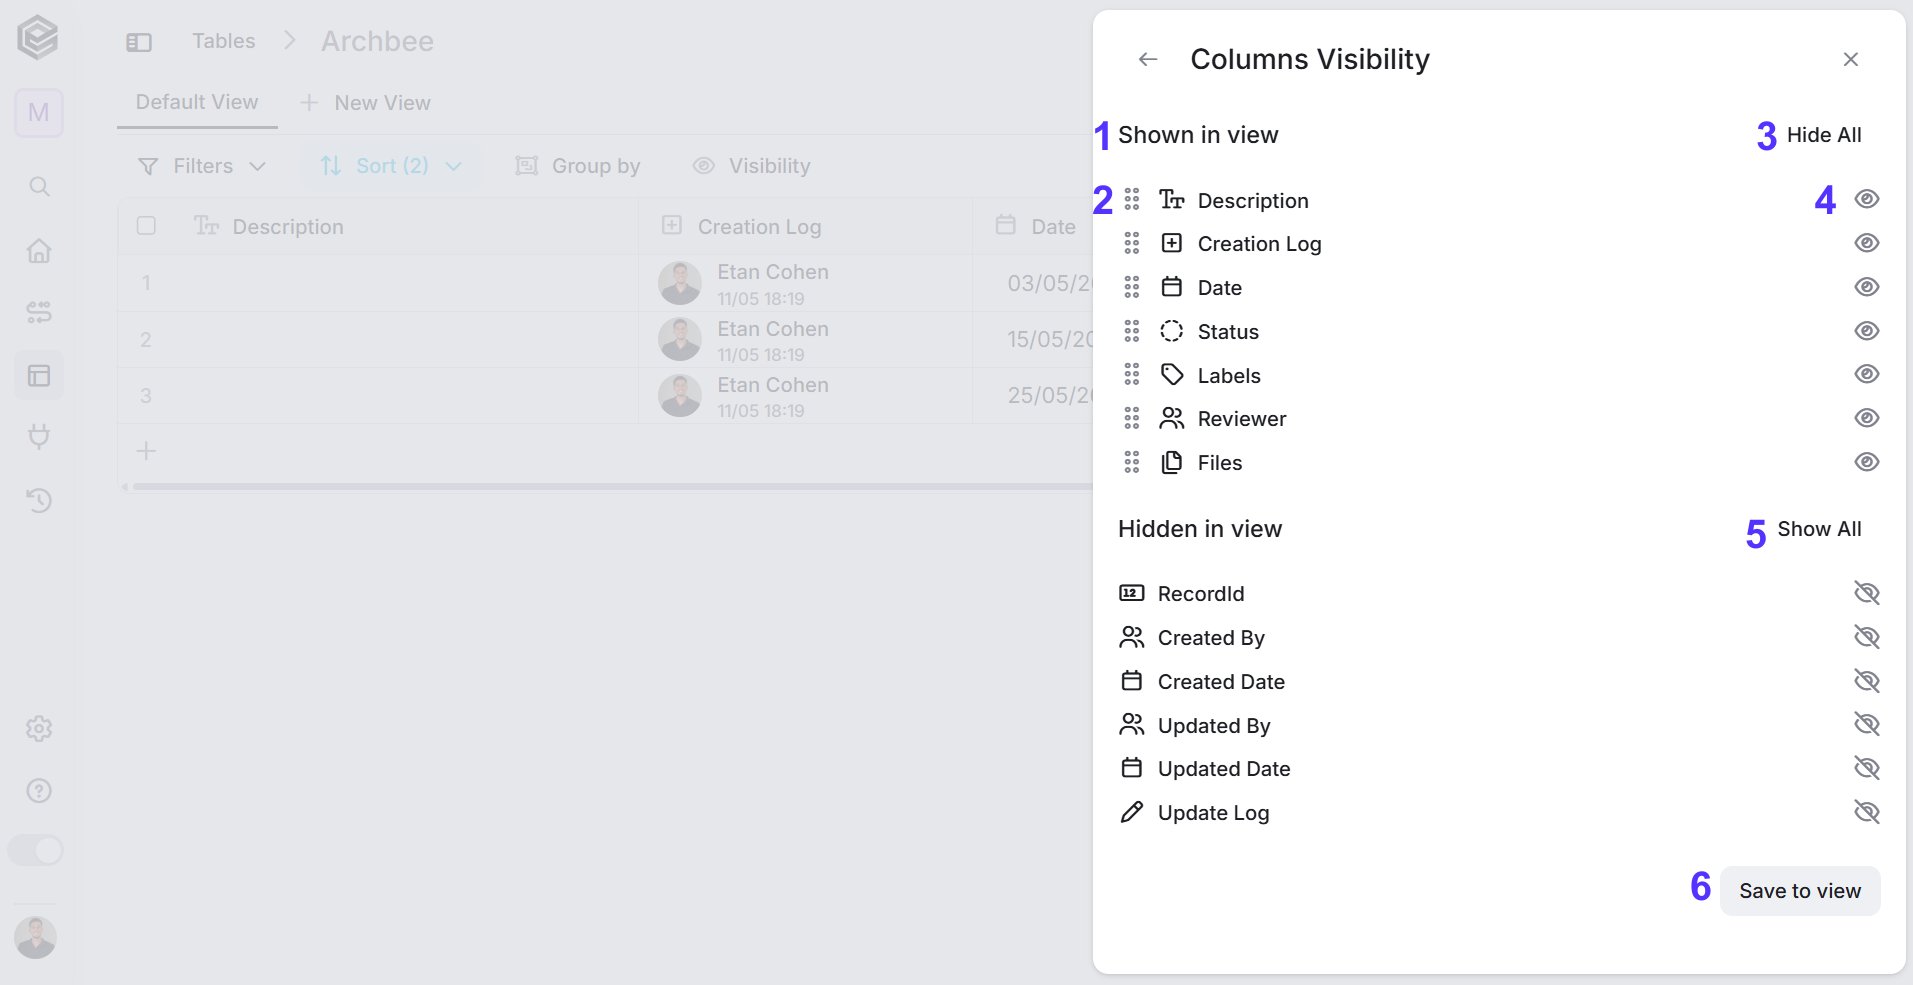
- Shown in view - Displays all columns that are currently visible in the table view.
- Column list / reorder handle - Shows the visible columns and allows you to drag and reorder them to change their position in the table.
- Hide All - Hides all currently visible columns from the view.
- Visibility toggle (eye icon) - Allows you to hide or show a specific column in the view.
- Show All - Displays all hidden columns back in the view.
- Save to view - Saves the current column visibility settings to the selected view. If not saved, the changes will not persist after refreshing the page.
Settings
The table settings menu allows you to manage and configure various aspects of the table. You can access it by clicking the three-dot menu in the top-right corner of the table.
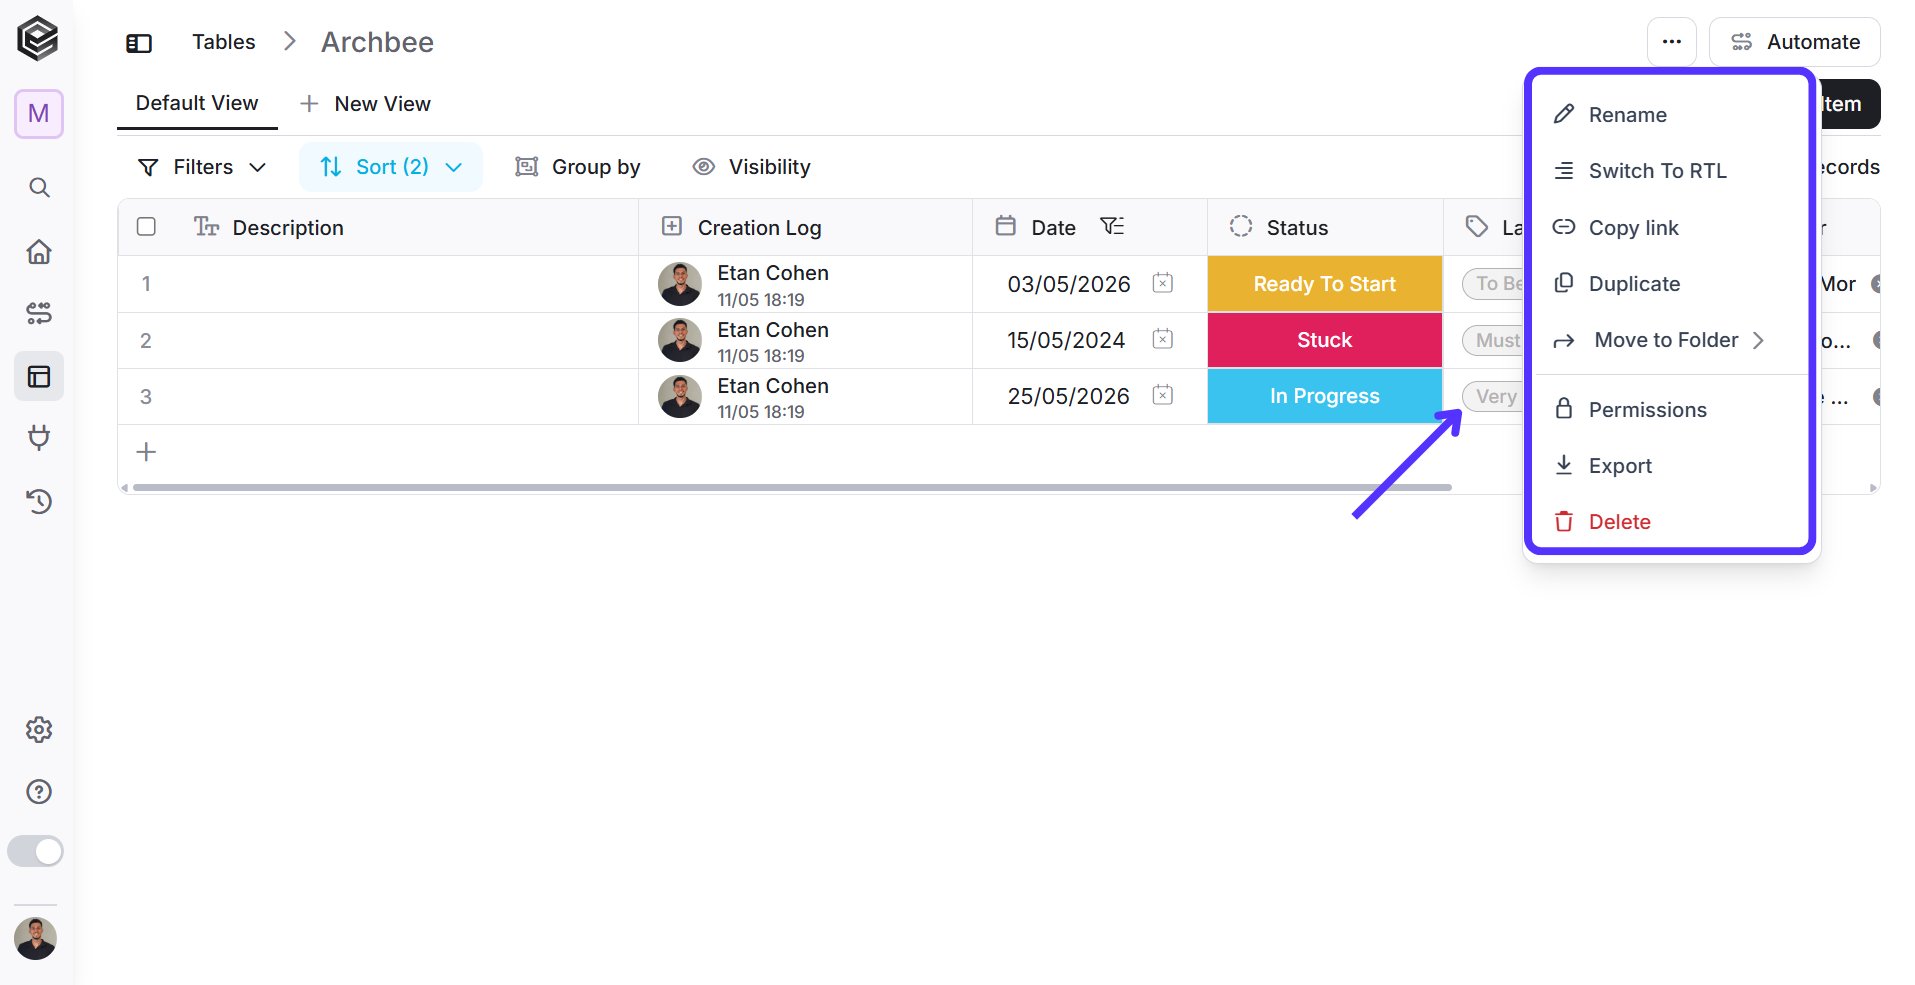
Rename
Change the name of the table.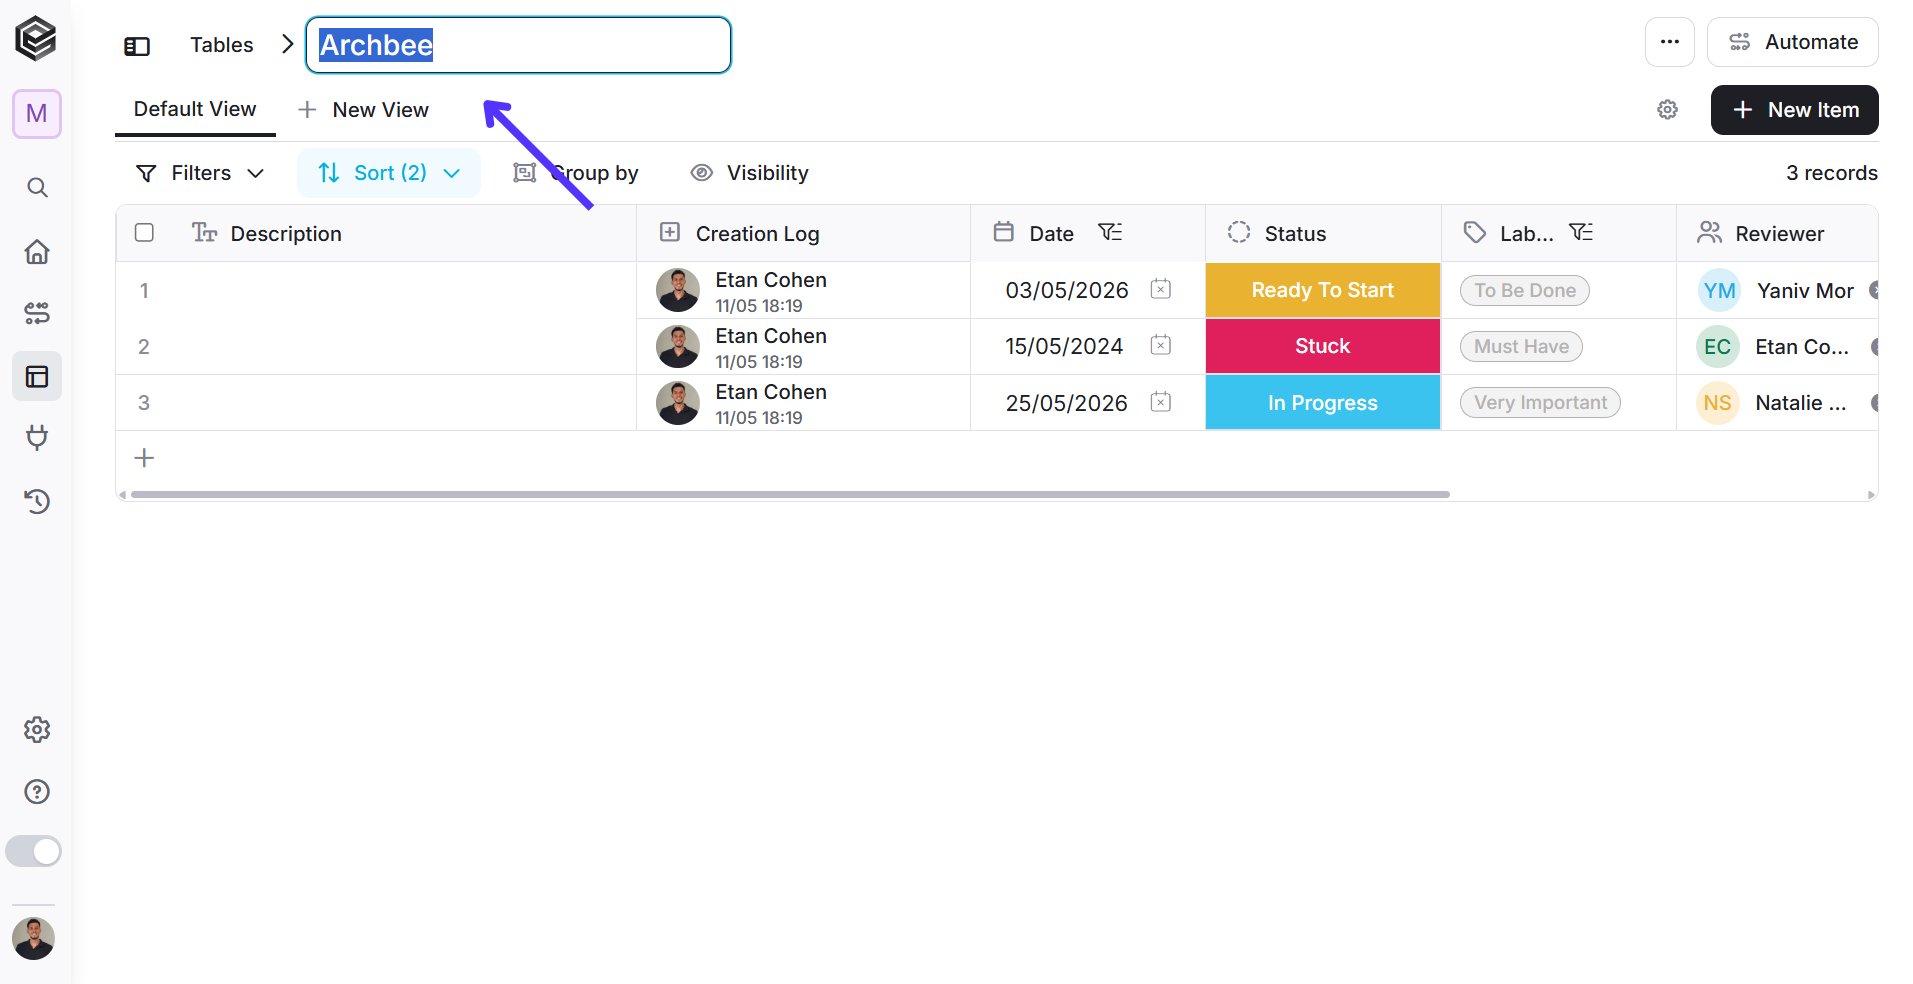
Switch to RTL
Adjust the table layout to a right-to-left orientation.-
LTR (Default)

-
RTL

Copy link
Copy a direct link to the table for easy sharing. When copying the link, a message should appear at the bottom indicating that the link has been copied.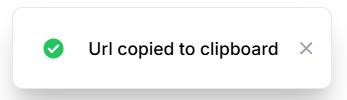
Duplicate
Create a copy of the table with the same structure and data-
The “Table duplicated” message should appear at the bottom.

- The user should be redirected directly to the duplicated table (a table with the same fields as the original, but without any records).
Move to Folder
Move the table to a different folder within the workspace.
- Click on the three dots ••• on the right side of the table you want to move to another workbook.
- Click on ‘Move to Folder’.
-
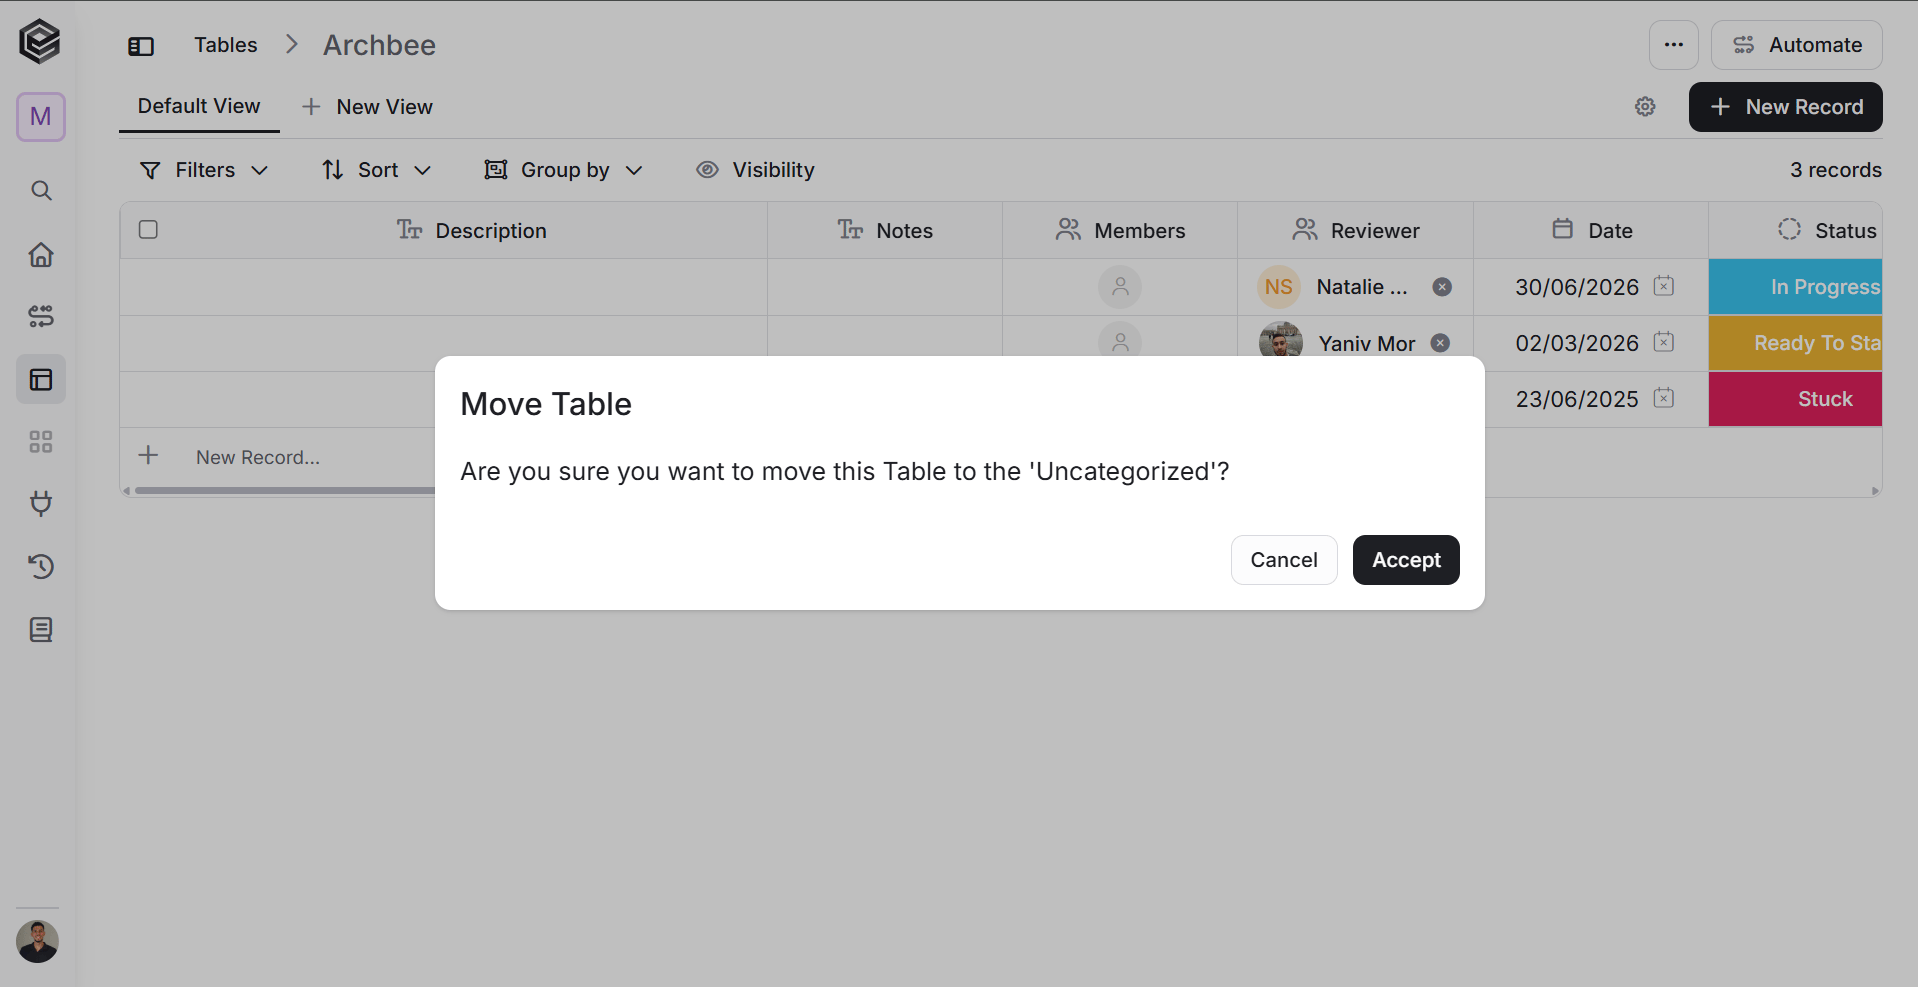
Select the folder you want to move the table to (the current folder is marked with a checkmark, as shown in the image).

-
After selecting a folder, the following message appears, and you need to confirm moving the table to the selected folder.
Activity
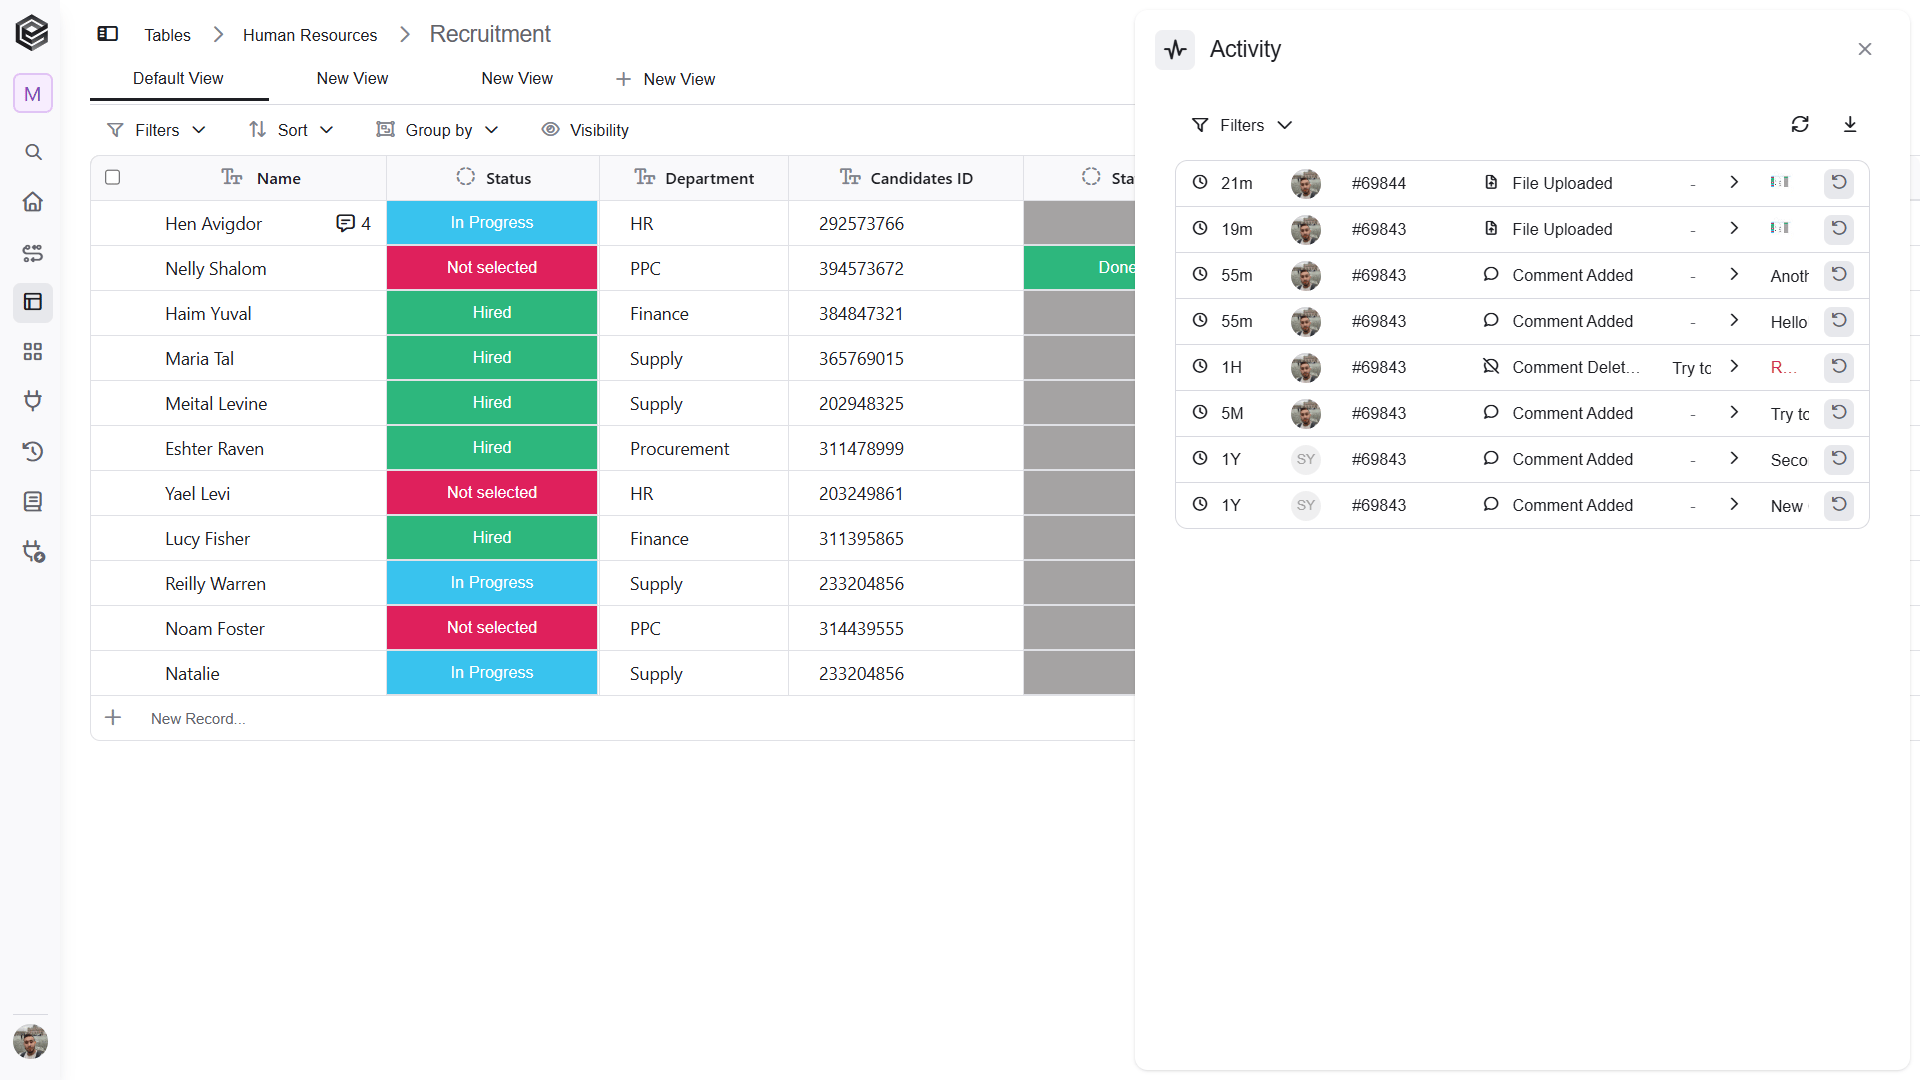
The Activity section displays the history of changes and actions performed across the table, allowing users to review activity for all records in one place.-
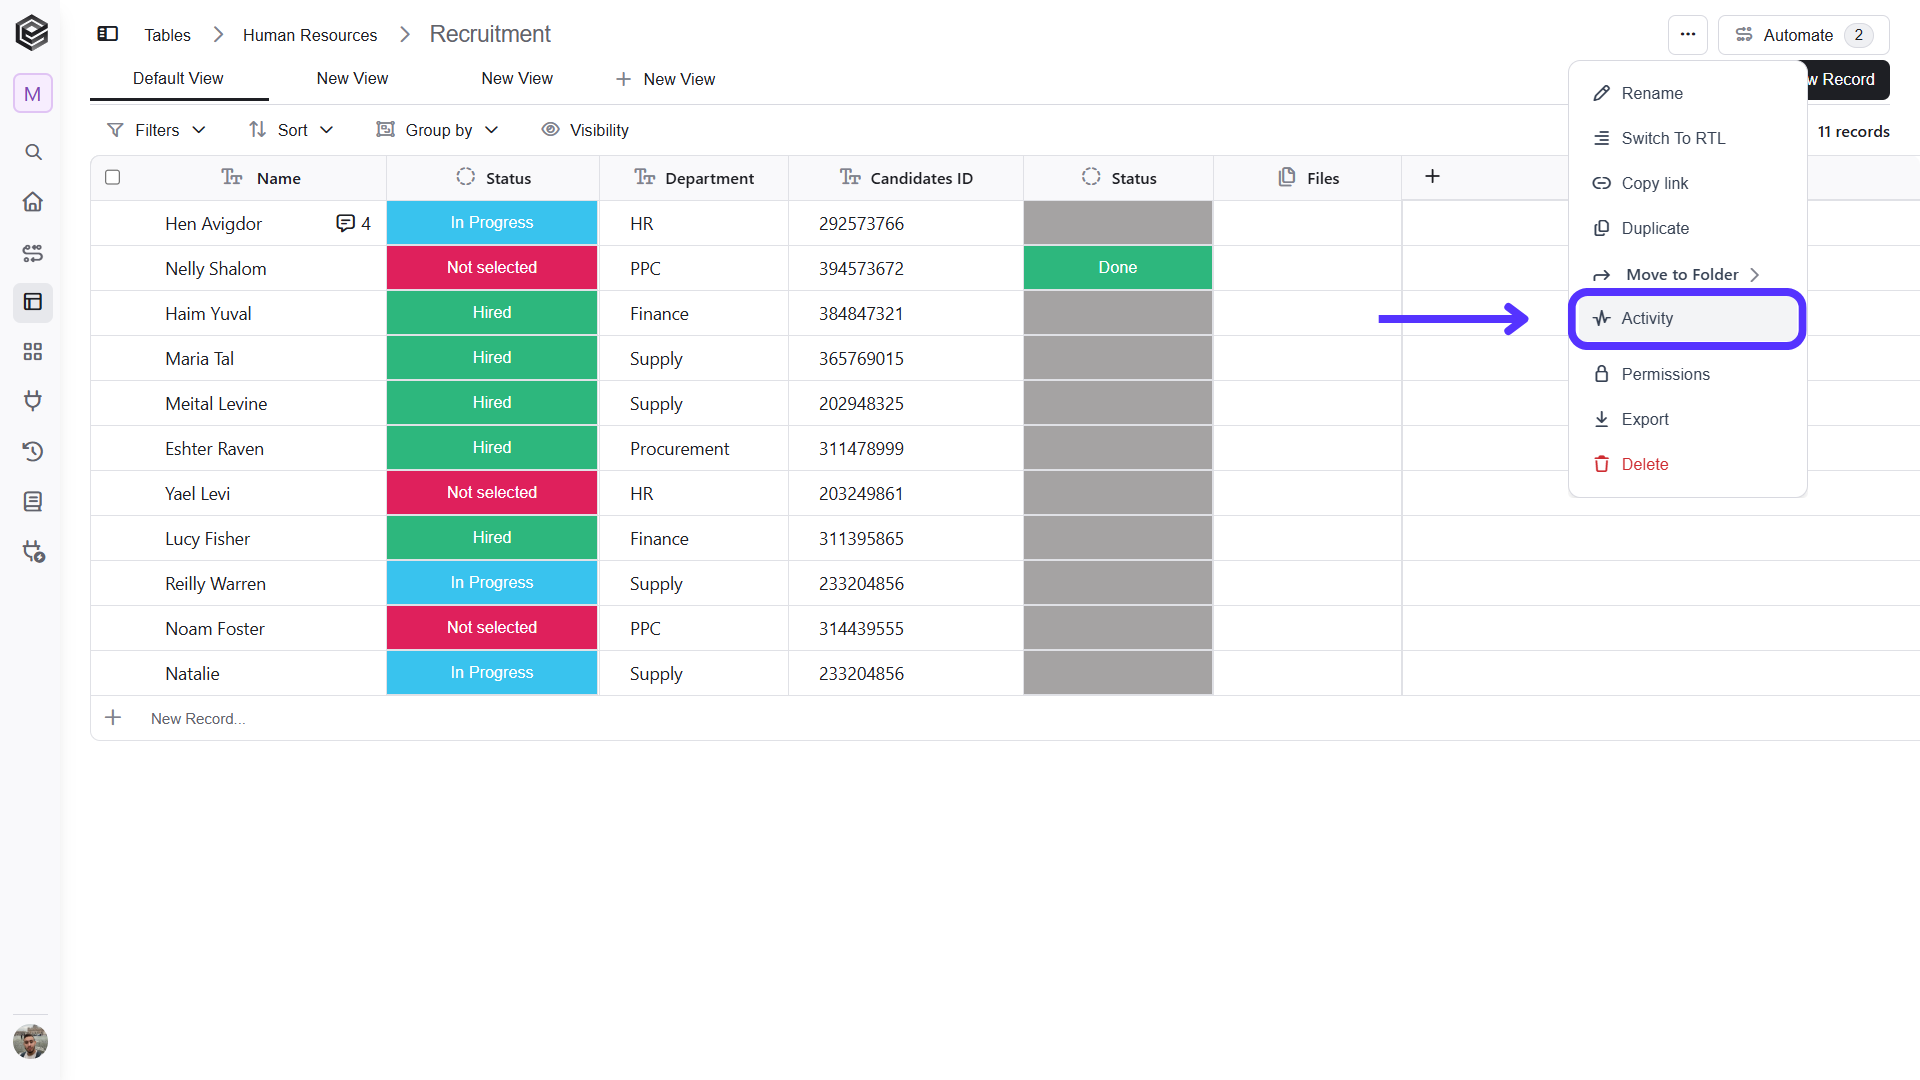
To access the table activity, open the three-dot menu in the upper-right corner of the table.
-
Select Activity from the menu to open the table activity panel.
-
The Activity panel displays recorded actions across the table, including the record involved, the user who performed the action, the activity type, and the related values.
Permissions
Manage access and define who can view or edit the table.Export
Export the table data for external use. (Supported in Excel format only.)Delete
Permanently remove the table.-
After clicking delete, a confirmation message appears to verify the deletion of the table.

Navigating Between Tables
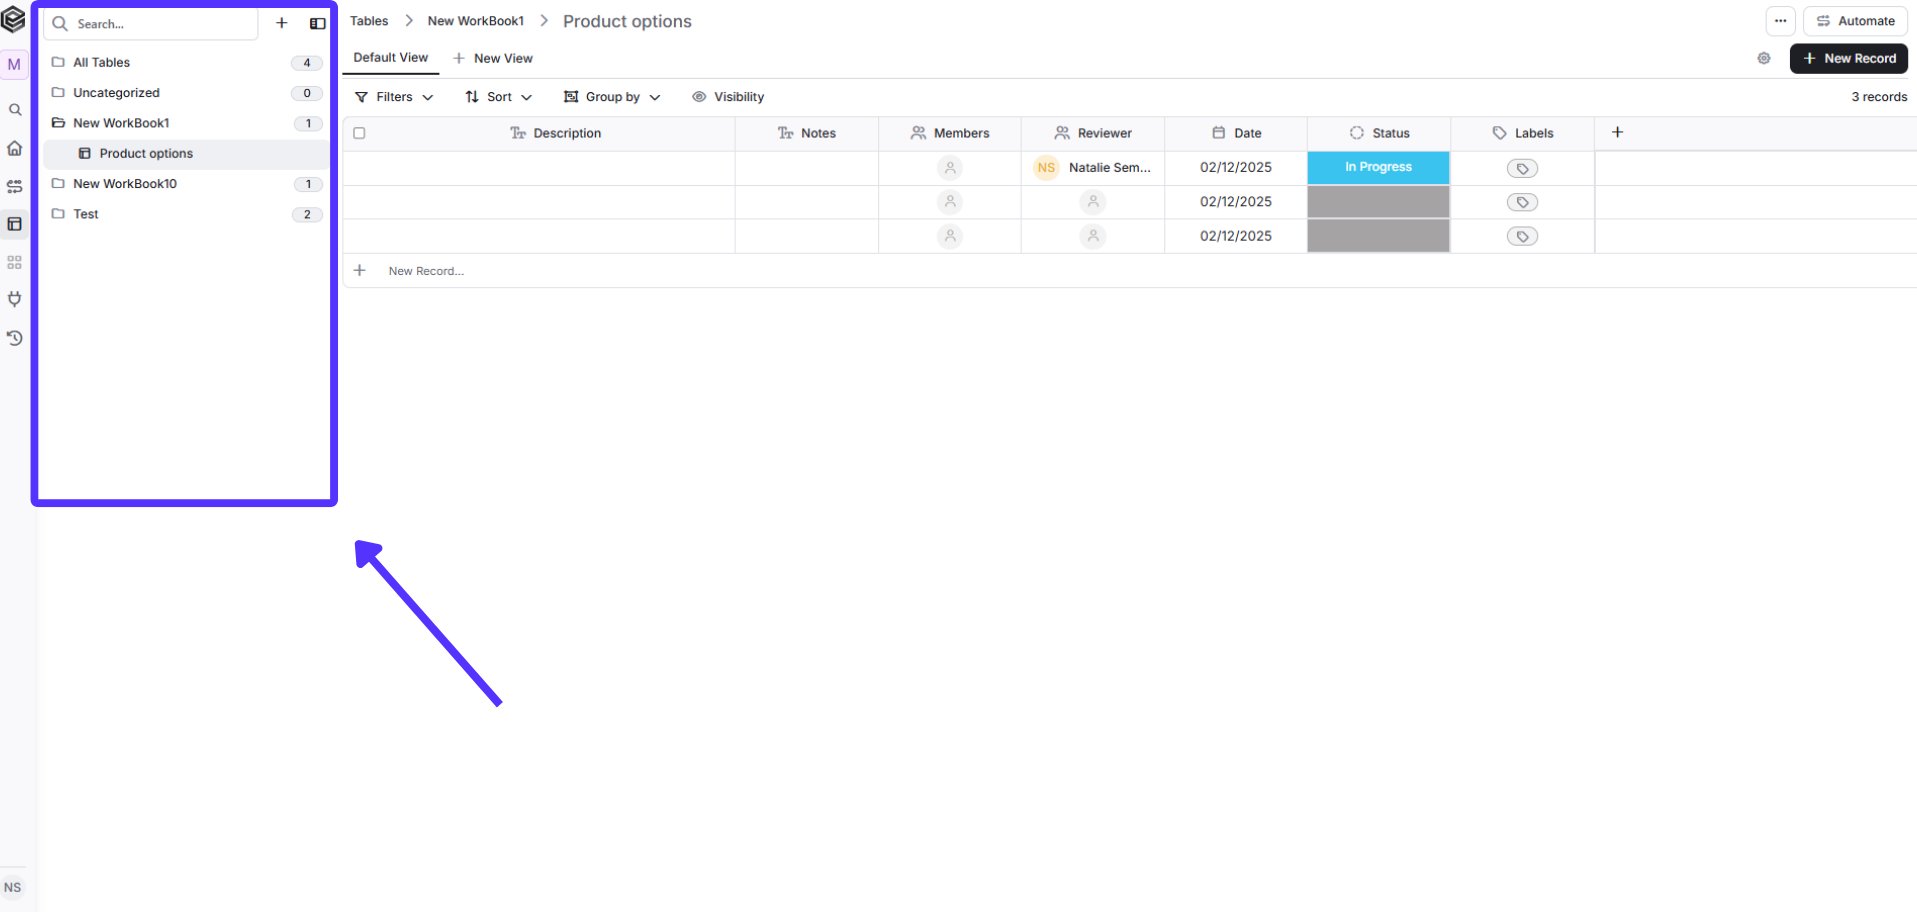
Now, inside any table, you have the option to view your folders and tables and navigate between them without leaving your current workspace.-
Click on “Open Navigation” on the top left side of your table toolbar.

-
Expand folders and click directly on a specific folder or table to be navigated to it instantly or use the search option at the top of the expanded navigation tree to quickly find and jump to a specific table or folder by name.