

Prerequisites
Before you begin, ensure the following connections are established:- Connection between Engini and Priority. Learn how to connect priority to Engini
- Connection between Engini and Expensify. Learn how to connect Expensify to Engini
Add a Schedule Trigger
To get started, add a trigger: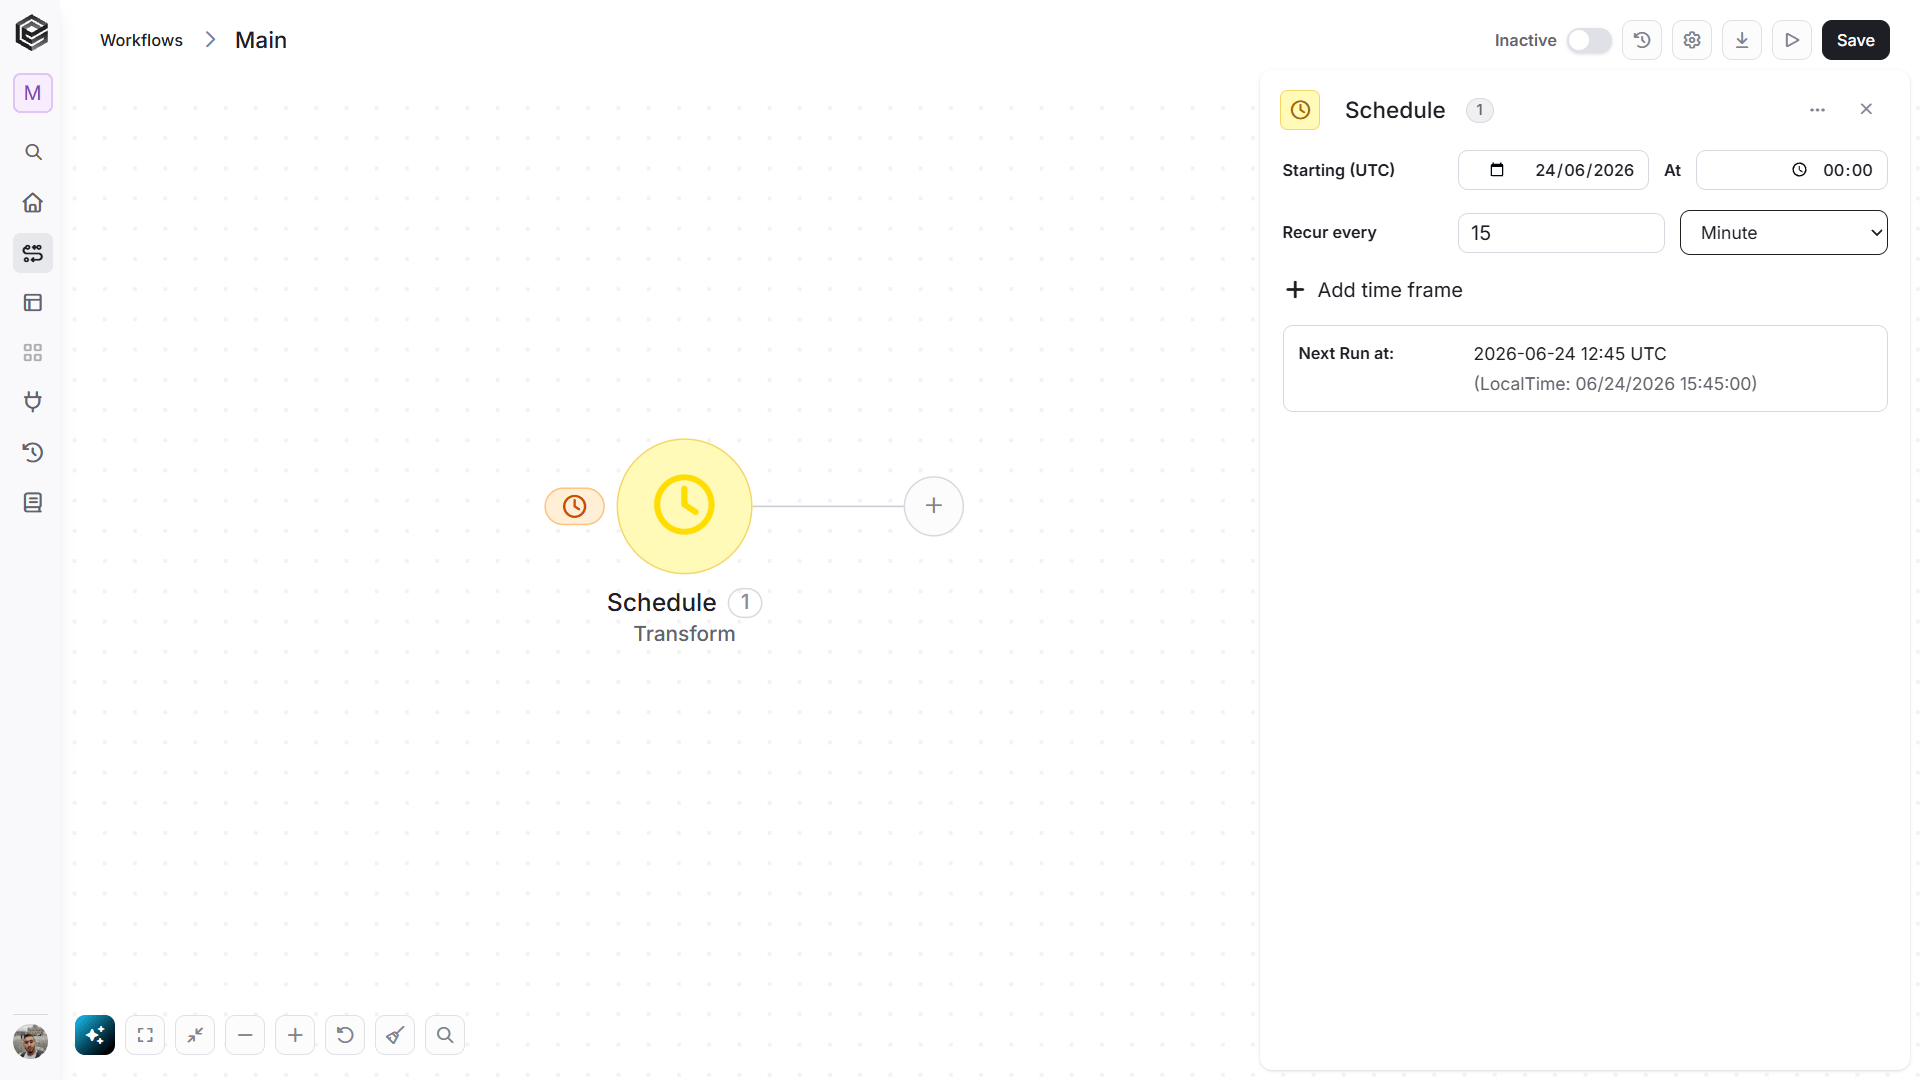
Create Report Template
Next , add Create a report template action of Expensify. Add a new activity and choose “Create Report Template” action of Expensify.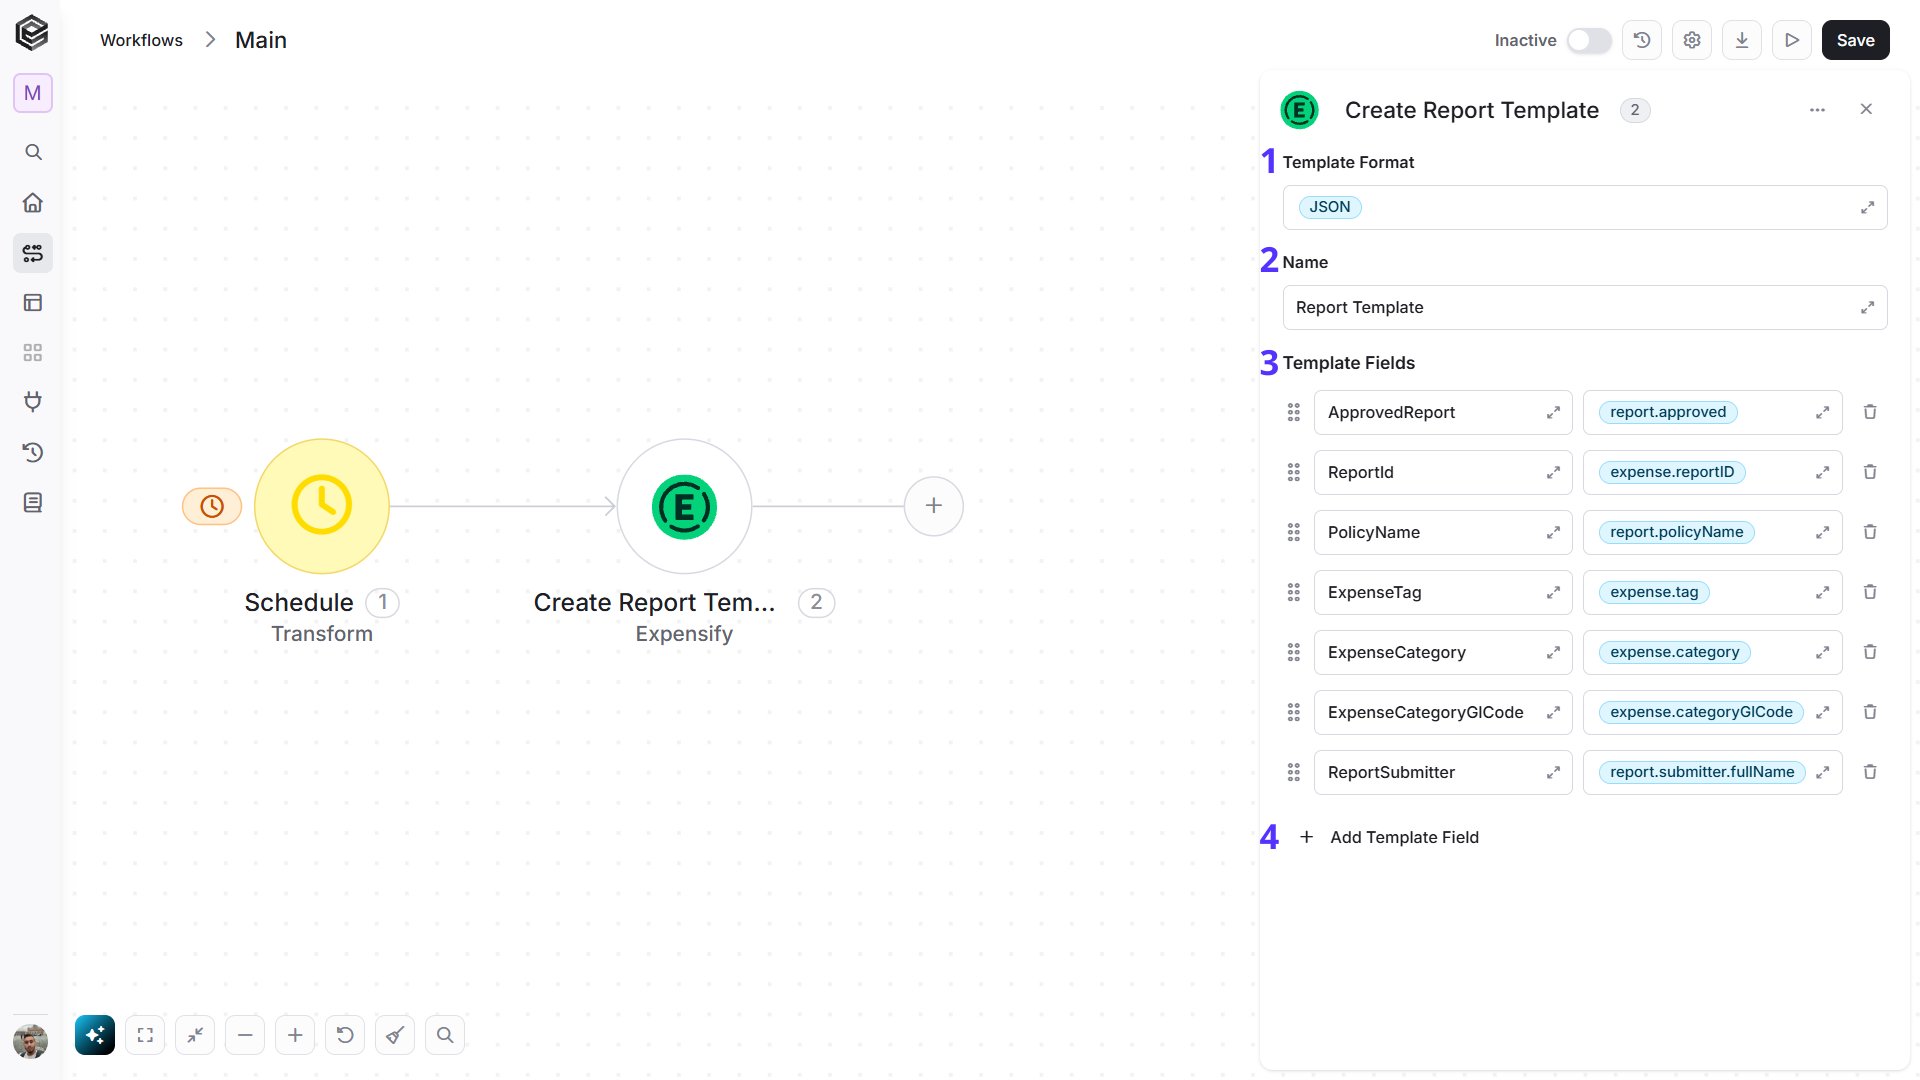
- Template Format - Click on the on the right field of “Template Format ” and choose JSON from the tooltip.
- Name - Click on the the on the right field of “Name” and write “Report Template”.
- Templete Fields - Click on “Add template fields”
- Click on the left side and write the name of the field, for example “ApprovedReport”.
- Click on the right side and choose the values from the tooltip. For example, report.approved.
- Add Template Field - Repeat on steps 1-3 to Add more fields in addition to the fields we already added, if necessary.
Export Report
Export the template of the report you have just created.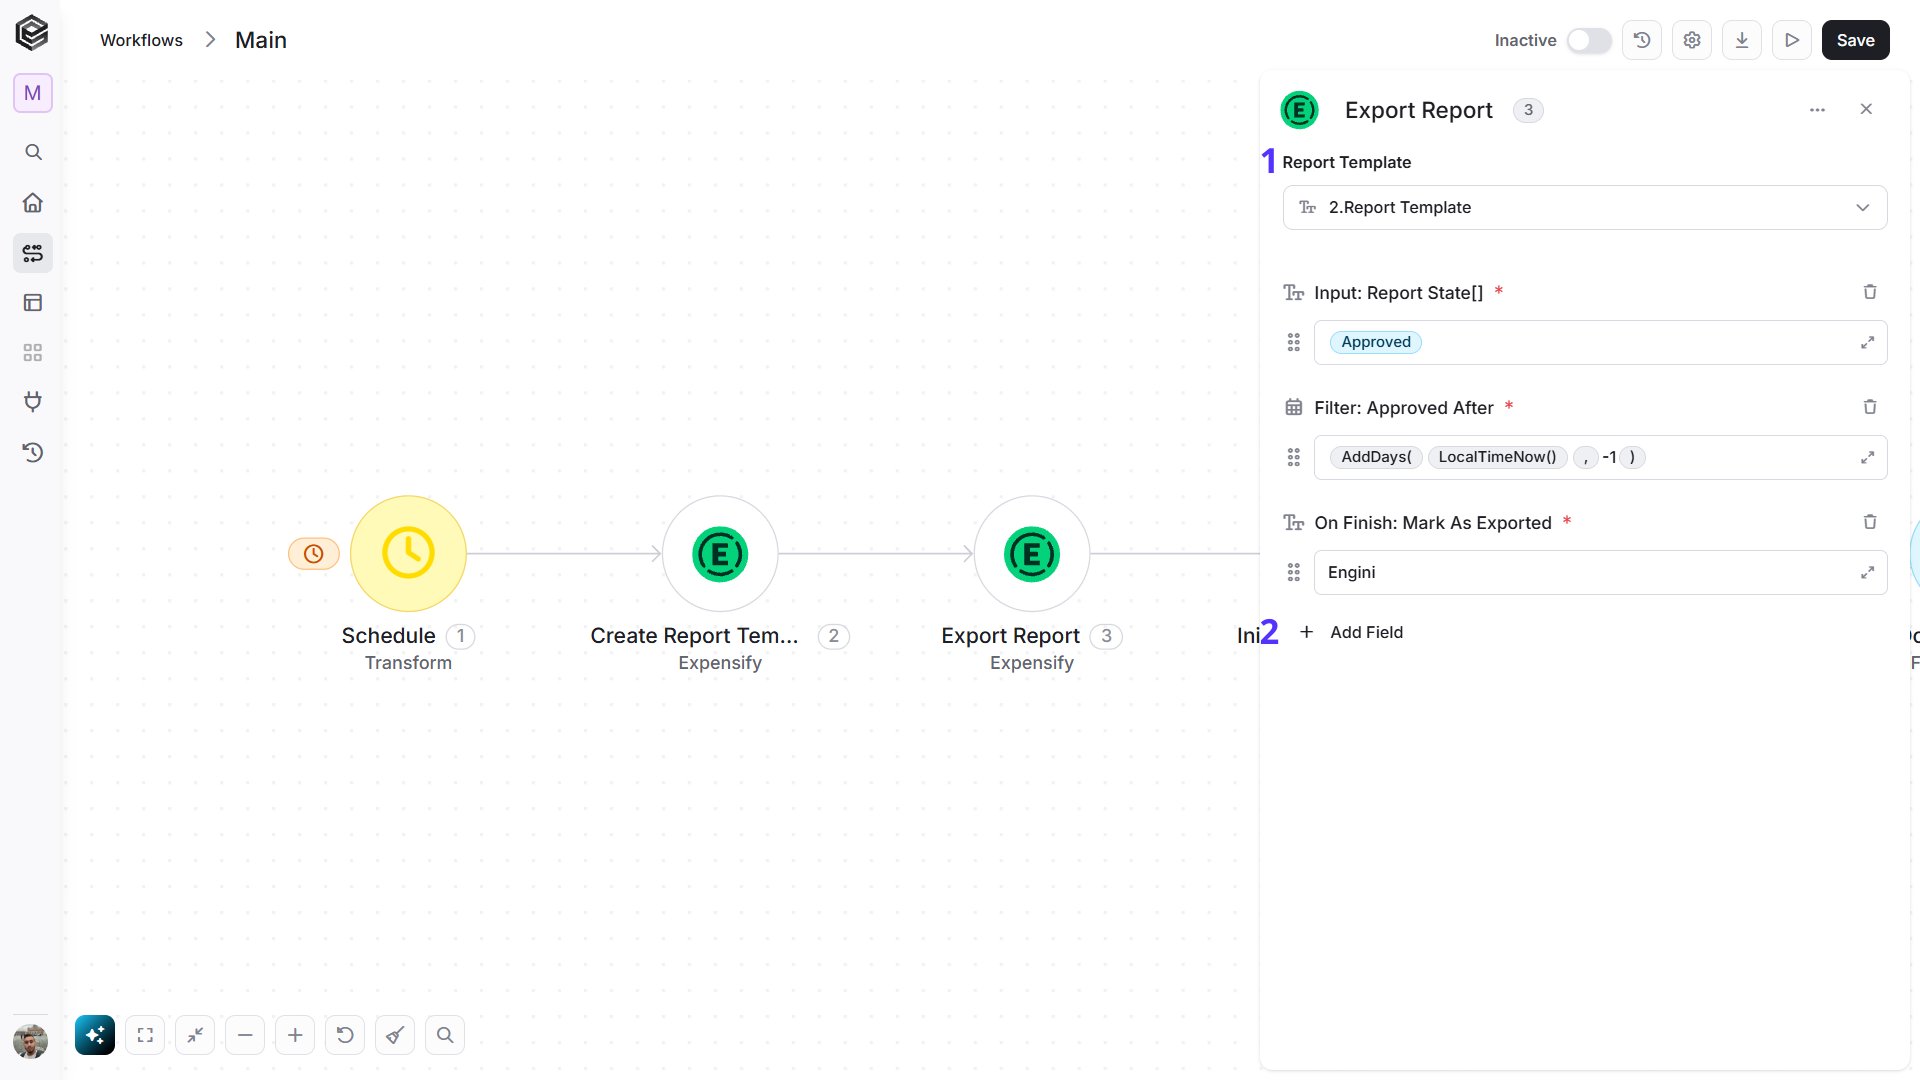
- Report Template - Choose the template you have created.
- Fields - Click on “Add Fields” button to fill the fields.
- On the left field, select from the drop down the field you want to populate.
- Input: Report State[]
- Filter: Approved After
- On Finish: Mark As Exported
- Click on the right field, and the tooltip will pop up showing the options of the values you can choose.
- For the ‘Input: Report State[]’ field:
- click on ‘Approved’ in the field options.
- For ‘Filter: Approved After’:
- Click on the functions
- Choose the AddDays function which which adds or subtracts days.
- Enter on the left side of the comma and choose the LocalTimeNow() function which returns the current date and time in your area.
- On the right side of the comma, enter -1 to get yesterday’s date.
- For ‘On Finish: Mark As Exported’ write ‘Engini’
- For the ‘Input: Report State[]’ field:
- On the left field, select from the drop down the field you want to populate.
Initialize Variable No1
Now, let’s initialize a variable that will later hold the amount of the non reimbursable expenses. Choose “Initialize Variable” action of Engini.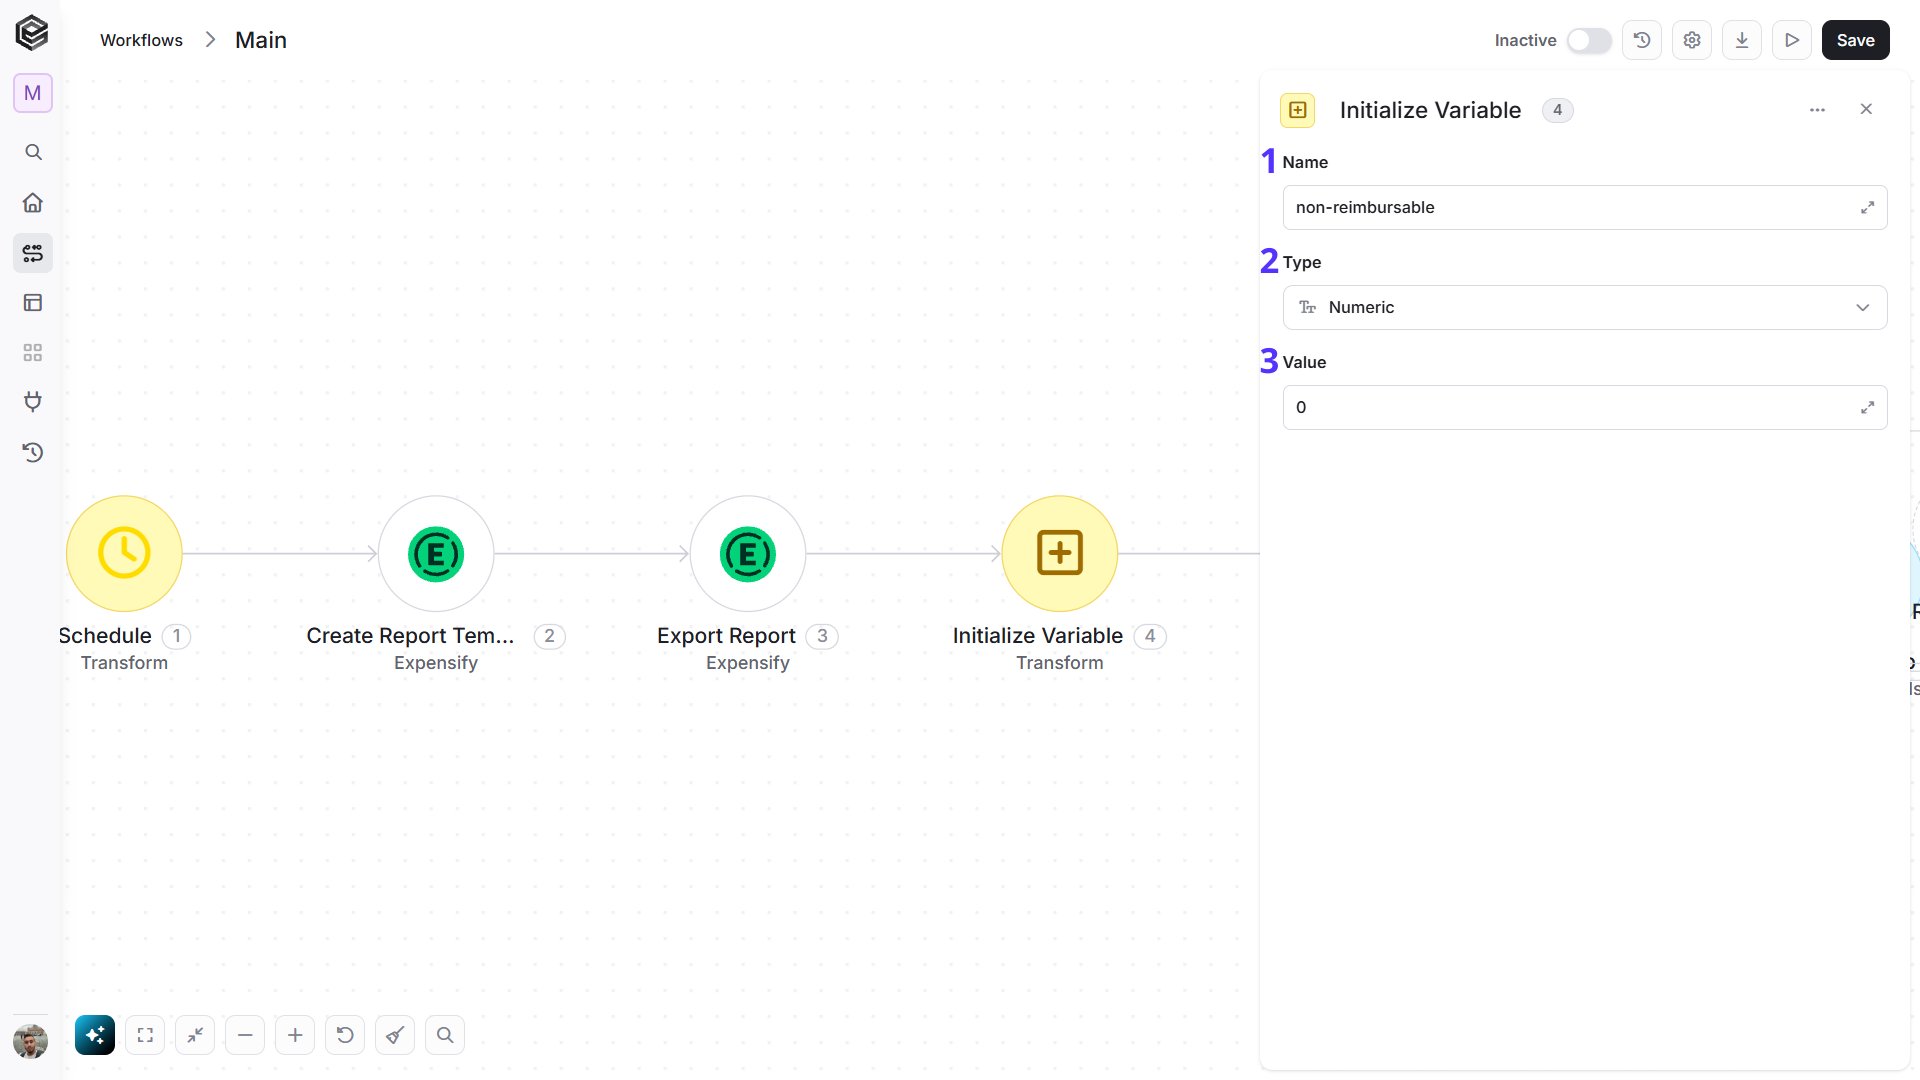
- Name field - Click on the empty field and choose from the tooltip a name for the variable. For example “non-reimbursable”
- Type field - Choose from the drop down the “Numeric” option.
- Value - Choose the initial value Type 0.
Initialize Variable No2
Now, let’s initialize a variable that will later hold the amount of the reimbursable expenses. Choose “Initialize Variable” action of Engini.
- Name field - Click on the empty field and choose from the tooltip a name for the variable. For example “reimbursable”
- Type field - Choose from the drop down the “Numeric” option.
- Value - Choose the initial value Type 0.
For Each Loop
For each exported report, we will interact with Priority. Add a new activity and choose the “For Each Loop” action:
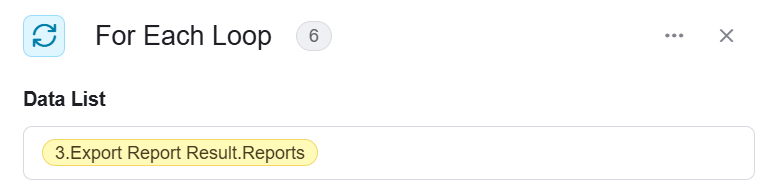
- Data List - Click on the the right field, and the tooltip will pop up showing the options of the values you can choose.
- Choose the export report result and then select the reports value from activity number 3.
Create “יומן תנועות”
Add a new activity and choose the “Create “יומן תנועות”” action of Priority:
- Click on the “Add fields” button to fill the fields in the “יומן תנועות” form.
- On the left field, select from the drop down the field you want to populate in the form.
For this process choose the fields:
- ת.למאזן
- ת.ערך
- ת.אסמכתא
- סוג תנועה
- פרטים
- אסמכתא
- Click on the right field, and the tooltip will pop up showing the options of the values you can choose.
- For “ת.למאזן” Field click on functions and choose the function “LocalTimeNow()”
- For “ת.ערך” Fieldclick on functions and choose the function “LocalTimeNow()”
- For “ת.אסמכתא” Field click on functions and choose the function “LocalTimeNow()”
- For “סוג תנועה” Field enter “M”
- For “פרטים” Field choose ‘Reports’ and then ‘ReportSubmitter’ from activity number 3.
- For “אסמכתא” Field choose ‘Reports’ and then ‘ReportId’ from activity number 3.
Parse JSON/XML
To access all the expense fields, such as the ‘reimbursable’ value, parse the exported report from activity 3.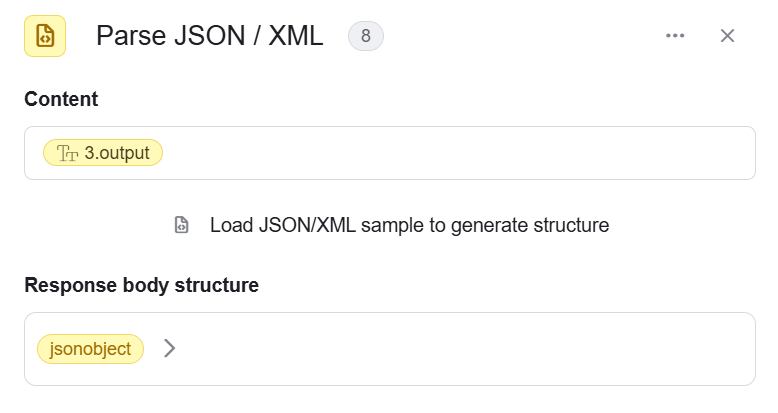
- Click on the the right field of “Content” and the tooltip will pop up showing the options of the values you can choose.
- Choose the export report result from activity 3.
- Click on the “Load Json/Xml sample to generate structure
- Paste sample JSON payload from activity 3.
For Each Loop
Each exported report, can have many expenses. Add a new activity and choose the “For Each Loop” action: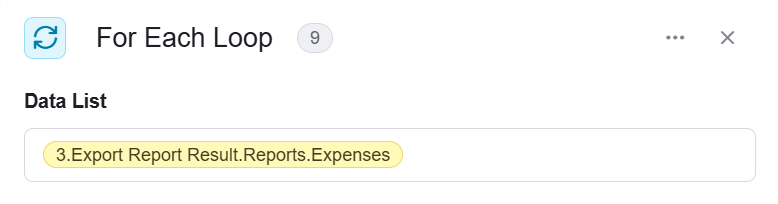
- Click on the the right field, and the tooltip will pop up showing the options of the values you can choose.
- Choose the export report result and then select the expenses value from activity number 3.
Create “פירוט התנועה” (Subform of “יומן תנועות”)
For each expense we will create “פירוט תנועה” in Priority. Add a new activity and choose the “Create “פירוט התנועה” (Subform of “יומן תנועות”)” action of Priority: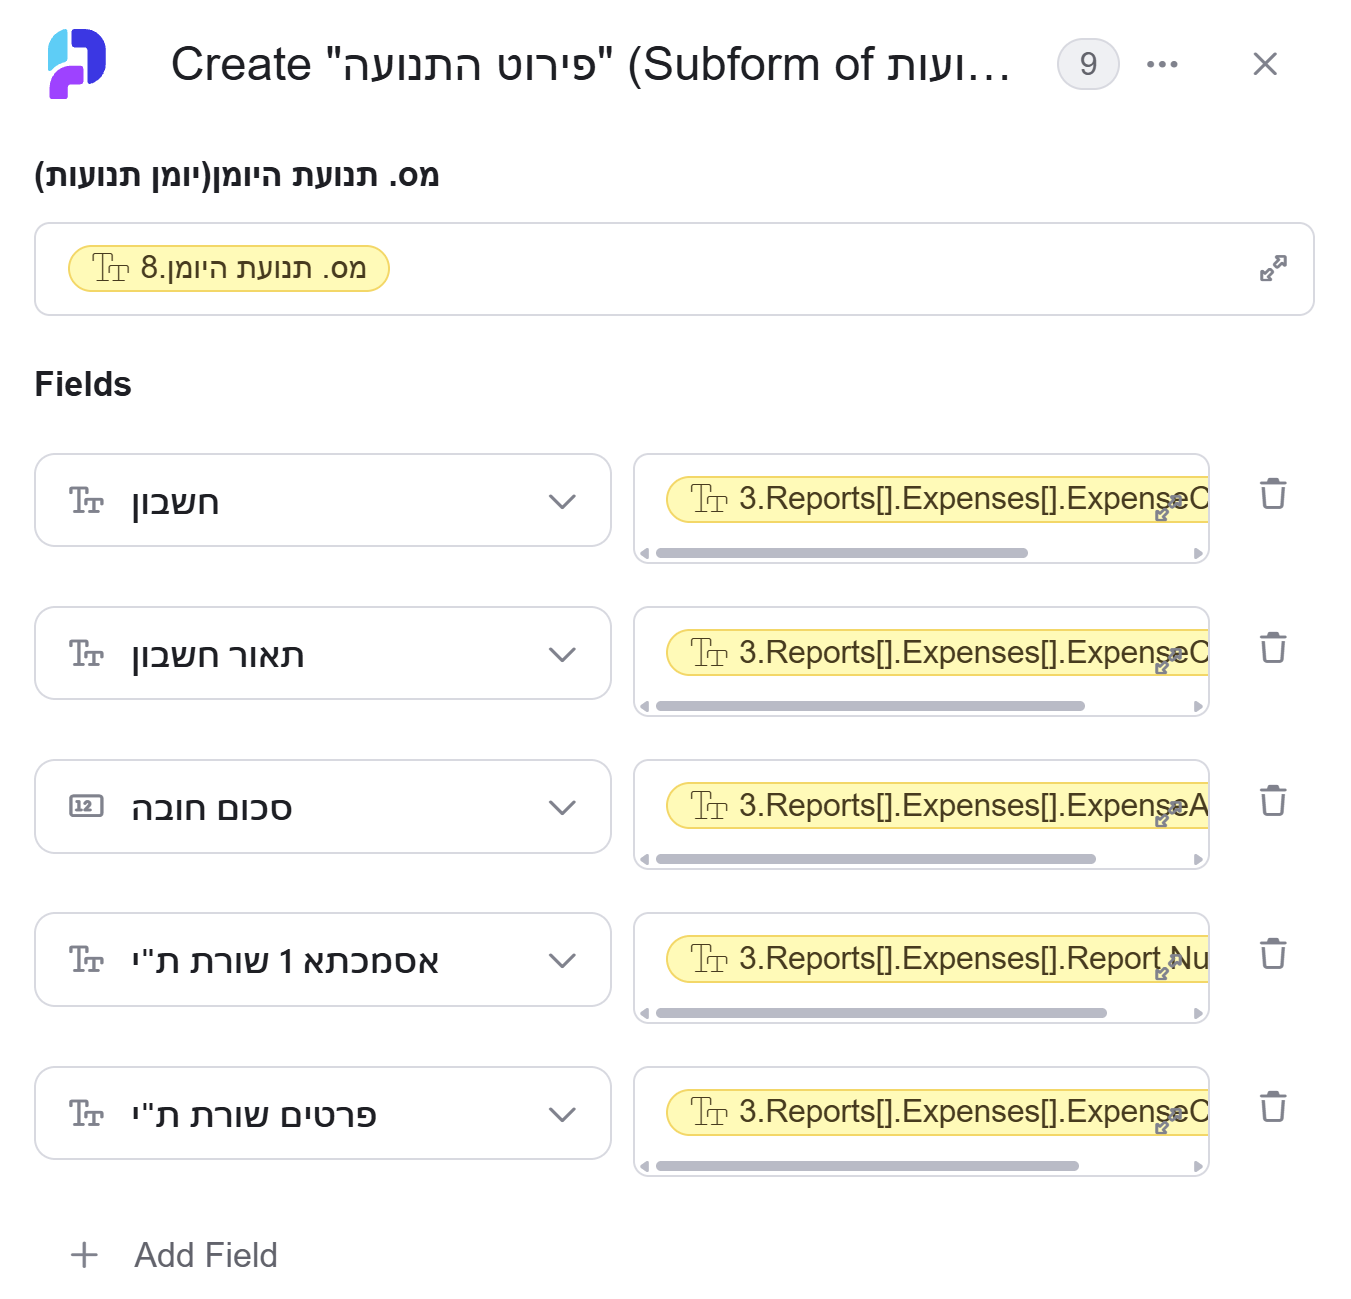
- Click on the empty field next to “מס. תנועת היומן (יומן תנועות)” and a tooltip will pop up showing the options of the value you can choose.
- Choose the “מס. תנועת היומן” value from “Create “יומן תנועות”” activity.
- Click on the “Add fields” button to fill the fields in the “פירוט תנועה” subform.
- On the left field, select from the drop down the field you want to populate in the subform.
For this process choose the fields:
- חשבון
- תאור חשבון
- סכום חובה
- אסמכתא 1 שורת ת”י
- פרטים שורת ת”י
- Click on the right field, and a tooltip will pop up showing the options of the values you can choose.
- For the “חשבון” field choose ‘Reports,’ then ‘Expenses,’ and finally select the “ExpenseCatergotyGICode” value from the Exported Report in activity number 3.
- For the ‘תאור חשבון’ field, choose ‘Reports,’ then ‘Expenses,’ and finally select the ‘ExpenseCategory’ value from the exported report in activity number 3.
- For the “סכום חובה” field choose ‘Reports,’ then ‘Expenses,’ and finally select the “ExpenseAmount” value from the Exported Report in activity number 3.
- For the “אסמכתא 1 שורת ת”י” field choose ‘Reports,’ then ‘Expenses,’ and finally select the “ReportNumber” value from the Exported Report in activity number 3.
- For the “פרטים שורת ת”י” field choose ‘Reports,’ then ‘Expenses,’ and finally select the “ExpenseComment” value from the Exported Report in activity number 3.
For Each Loop
Add a new activity and choose the ‘For Each Loop’ action to specify the amounts for reimbursable and non-reimbursable expenses.
- Click on the the right field, and the tooltip will pop up showing the options of the values you can choose.
- Choose the parsing of the export report and then select the expenses value.
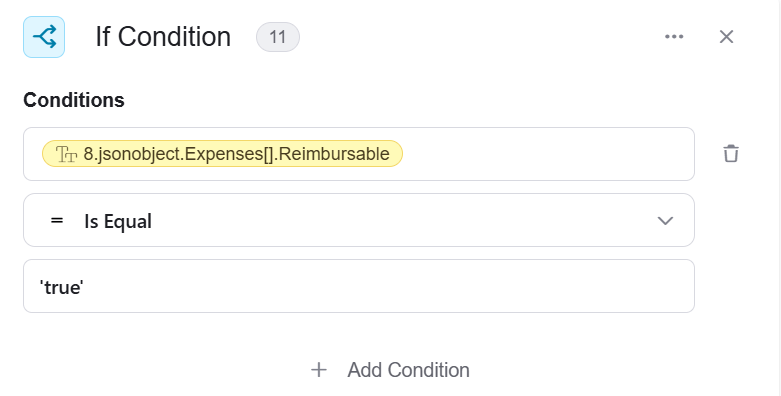
-
Click on “Add Condition”
- Choose the parsing of the export report, then select the ‘expenses’ value and the ‘reimbursable’ property
- Choose “=” condition
- In the right, enter the value ‘true’
-
If the value of reimbursable is ‘true’, we are in “If Yes” section.

- Add a new activity and choose the ‘Set Variable’ action.
- Click on the drop down and choose the name you gave the variable you initialize, reimbursable.
-
Click on the empty field next to the “value”
- Click on the functions
- Choose the Add function
- On the left side, choose the amount field from the pasring
- On the right side, choose the field reimbursable variable
-
If the value of reimbursable is ‘true’, we are in “If No” section.
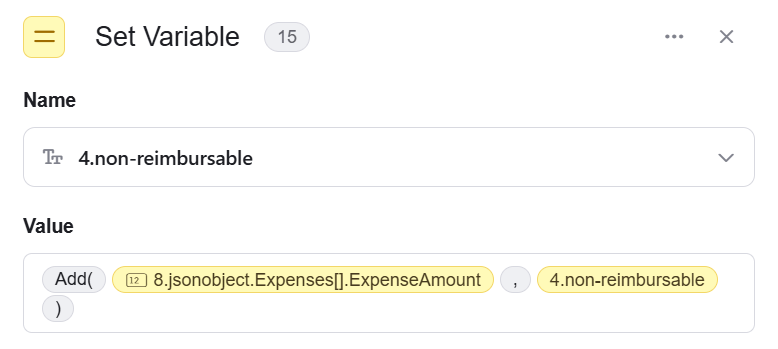
- Add a new activity and choose the ‘Set Variable’ action.
-
Click on the drop down and choose the name you gave the variable you initialize, non-reimbursable.
- Click on the functions
- Choose the Add function
- On the left side, choose the amount field from the pasring
- On the right side, choose the field non-reimbursable variable
Create Report Template (PDF)
Add “Create a report template” action of Expensify. Add a new activity and choose “Create Report Template” action of Expensify.
- Template Format - Click on the on the right field of “Template Format ” and choose PDF from the tooltip.
- Name - Click on the the on the right field of “Name” and write “Report Template”.
- Template Fields - Click on “Add template field
- Click on the left side and write the name of the field, for example “ApprovedReport”.
- Click on the right side and choose the values from the tooltip. For example, report.approved.
- Repeat on steps 4 to Add more fields in addition to the fields we already added, if necessary.
Export Report
Export the template of the report you have just created.- Choose the template you have created- Report Template.
- Click on “Add Fields” button
- On the left field, select from the drop down the field you want to populate.
- Filter: Report IDs[]
- Output: Include Full Page Receipts Pdf
- Click on the right field, and the tooltip will pop up showing the options of the values you can choose.
- For the ‘Filter: Report IDs[]’ field:
- Click on the functions
- Choose the CreateArray function.
- Enter the reportid from the Exported Report.
- For ‘Output: Include Full Page Receipts Pdf’:
- click on ‘True’ in the field options.
- For the ‘Filter: Report IDs[]’ field:
- On the left field, select from the drop down the field you want to populate.
Create “נספחים” (Subform of “יומן תנועות”)
Add a new activity and choose the Create “נספחים” (Subform of “יומן תנועות”) action of Priority:
- מס. תנועת היומן (יומן תנועות) field Click on the empty field and choose from the tooltip the “מס. תנועת היומן ” from Create “יומן תנועות” activity.
- Click on the “Add fields” button to fill the fields in the “נספחים” subform.
- On the left field, select from the drop down the field you want to populate in the table.
For this process choose the fields:
- נתיב קובץ
- שם קובץ
- Click on the right field, and the tooltip will pop up showing the options of the values you can choose.
- For the “נתיב קובץ” field
- Click on the functions
- Choose the concat function which Combines two or more strings, or expression text results into a single string.
- On the left side of the comma enter the first name from the billing from activity 1.
- The first value is “data:”
- For the second value, choose the GetMimeType function, which returns the MIME type of a given file extension, and enter “.pdf”.
- For the third value, enter “;base64,”
- For the fourth value, enter the exported PDF report.
- For the “שם קובץ” field
- Click on the functions
- Choose the concat function which Combines two or more strings, or expression text results into a single string.
- On the left side of the comma enter the reportid of the exported report.
- On the right side of the comma enter “.pdf”.
- For the “נתיב קובץ” field