> ## Documentation Index
> Fetch the complete documentation index at: https://docs.engini.ai/llms.txt
> Use this file to discover all available pages before exploring further.
# Workflow Editor
The workflow editor enables users to create new workflows and modify existing workflows.
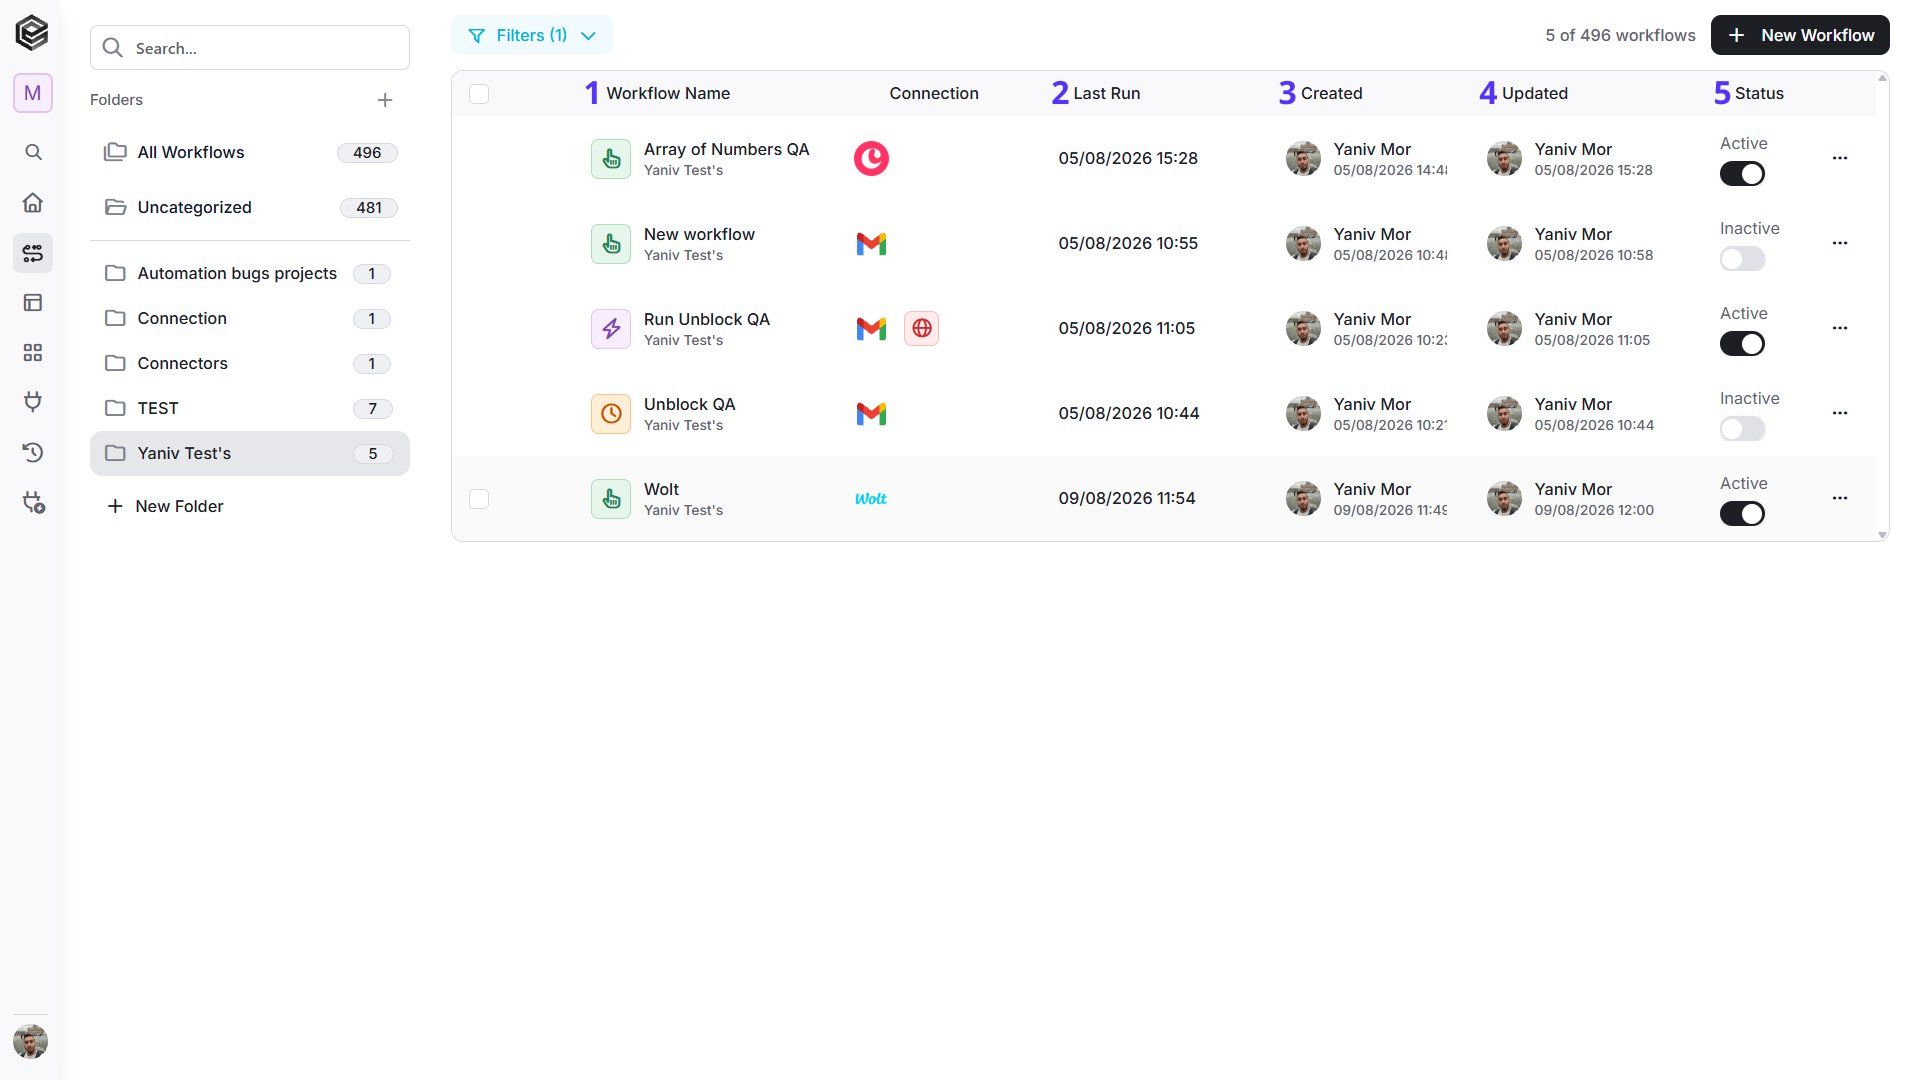
## Understanding the Workflows Table
We can observe that each record represents a workflow.
Each workflow contains the following:
1. *Workflow Name*– The name of the workflow.
2. *Connection* - If there are connections within the workflow, you will see them listed here.
3. *Last run* – The last date and time when the workflow ran.
4. *Created* – The user who created the workflow and date and time when the workflow was created.
5. *Updated* – The last user who updated the workflow and date and time when the workflow was updated.
6. *Status* – Here you can see if the workflow is activated. If active, the color will be black; otherwise, it will be gray.
7. *Edit Workflow*- Explanation down below.
## Edit Workflow page
### First Way
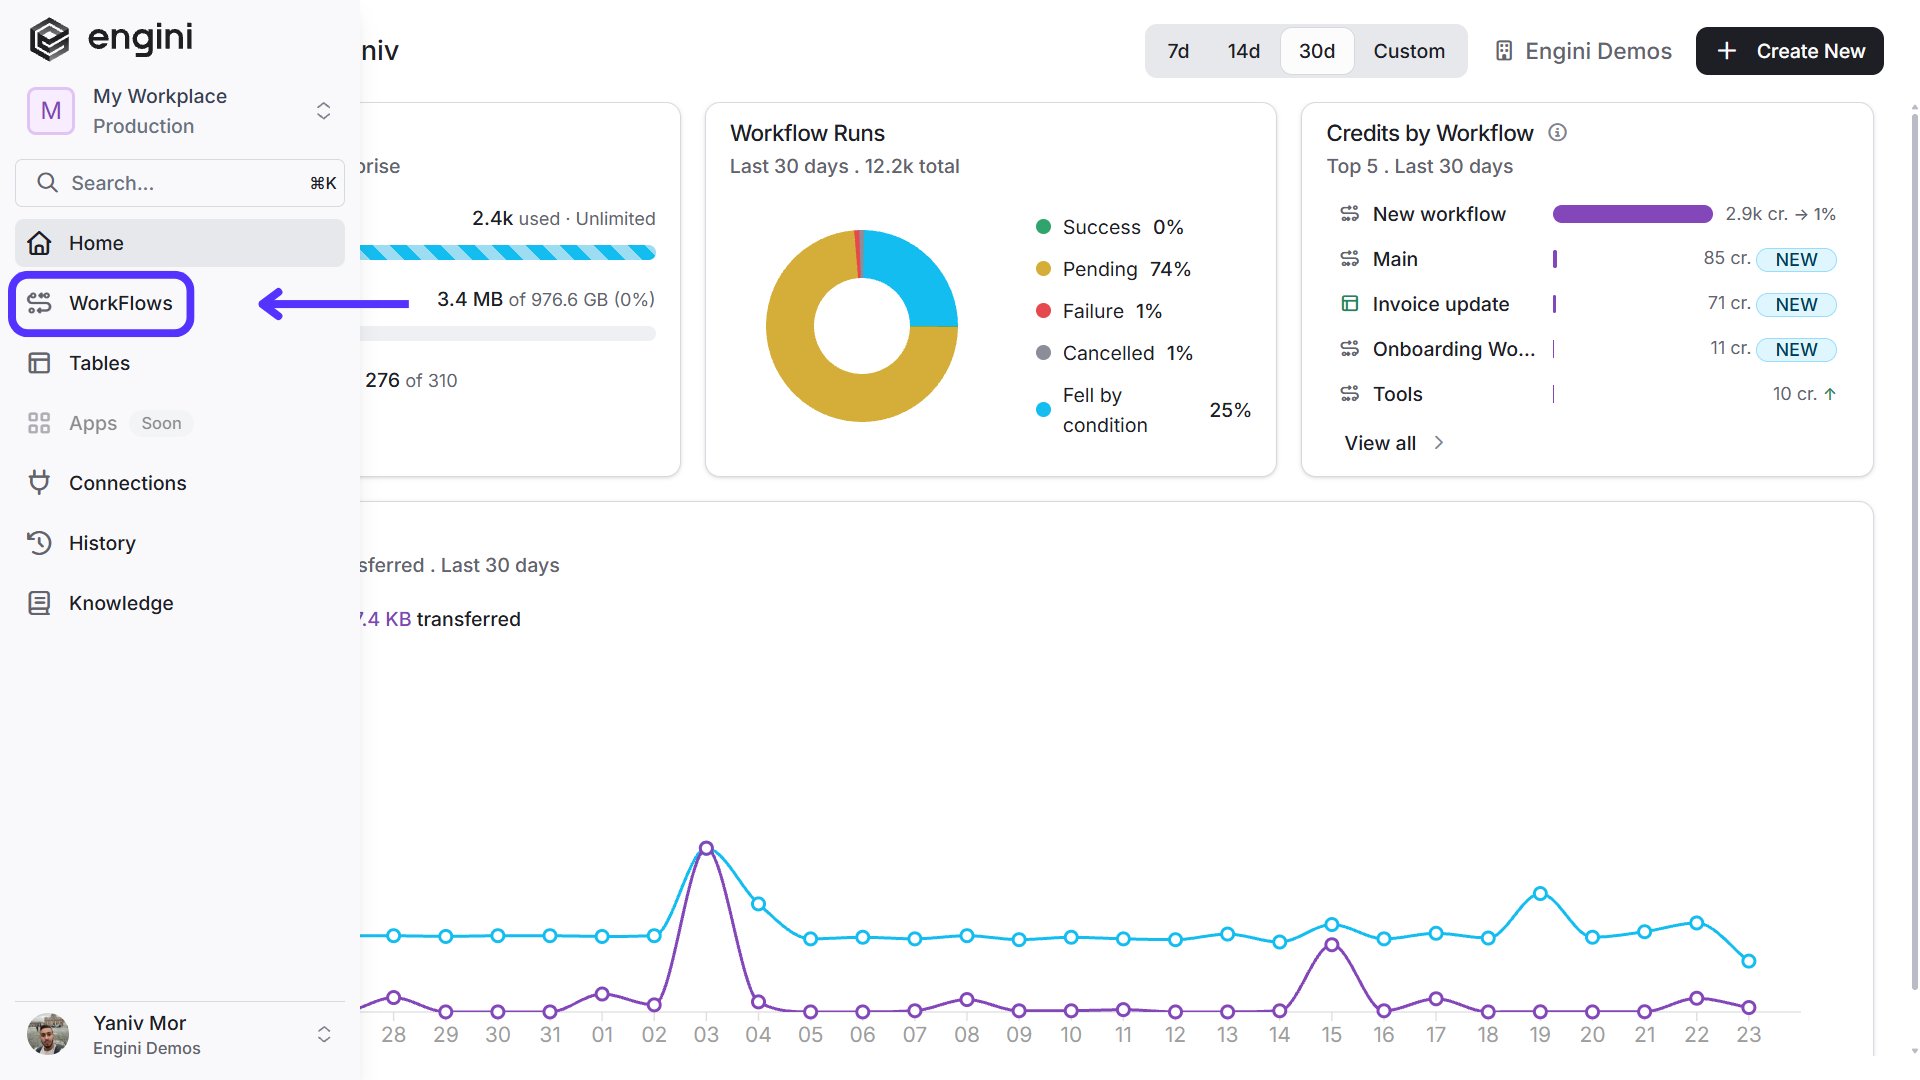
On the sidebar, click on the “WorkFlows” option.
Hover over the workflow you want to edit and click on the 3 points.
Choose what you want to do with that workflow:
1. *Edit-* Opens the workflow canvas directly, allowing you to modify your triggers, activities, logic, and configurations.
2. *Duplicate-* Make an exact copy of your workflow instantly. This is great if you want to test out new changes safely without messing up your original version.
3. *Export-* Download your workflow as a JSON file. Use this to save a backup on your computer or share your workflow with another account.
4. *Settings -* Open up the main configuration panel to rename your workflow, add a description, or adjust its global settings. More explanations down [below.](/help/workflows/workflow-editor#workflow-settings)
5. *Move to Folder –* Choose a folder from your sidebar to drop this workflow into. It’s the easiest way to keep your dashboard clean and organized. More explanations down [below.](/help/workflows/workflow-editor#workflow-folders)
6. *Delete –* Permanently erase the workflow from your account.
### Second Way
On the sidebar, click on the “WorkFlows” option.
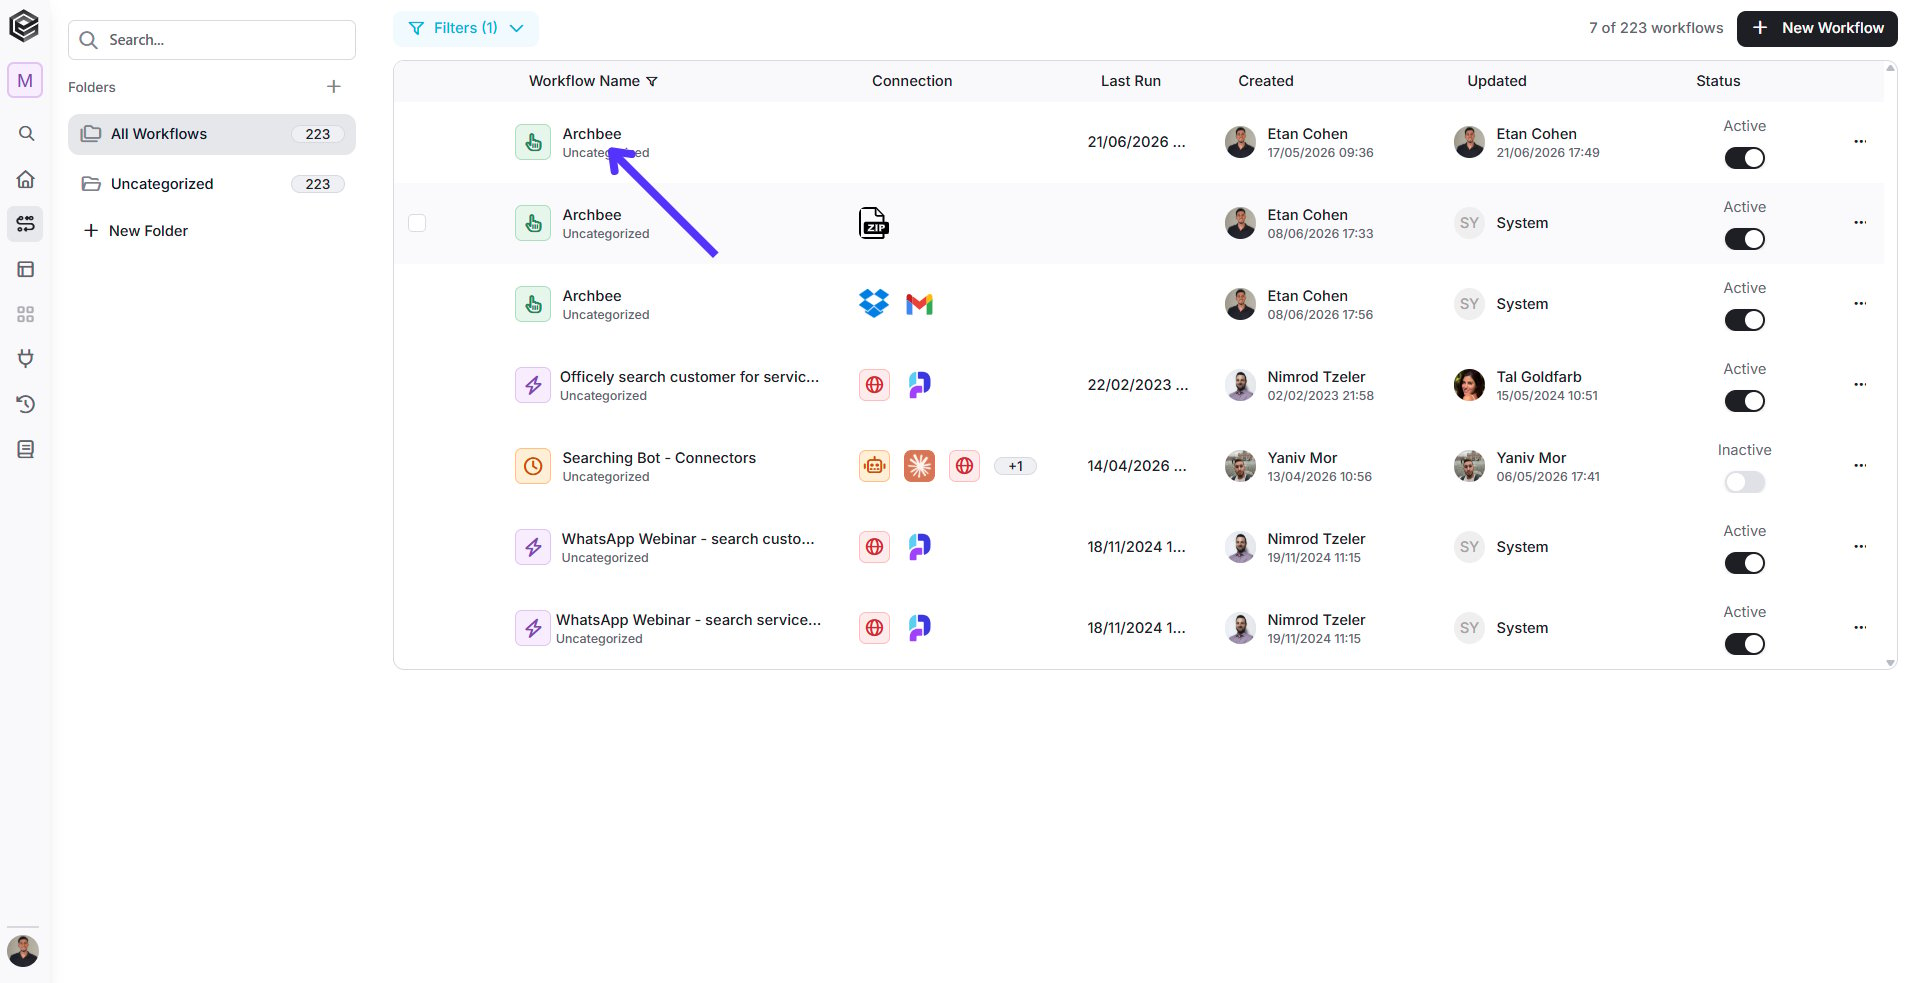
Hover the name of the workflow you want to edit and click on it.
### Third Way
On the sidebar, click on the “History” option.
Search for the workflow name and press on it
Press the Edit button
### Workflow Settings
This section defines the general configuration of the workflow, including its name, description, and connected apps. It also controls execution settings such as concurrency limits and the maximum number of consecutive failures before the workflow stops.
You can access Workflow Settings from inside a specific workflow. In the top bar, click the icon. This will open the workflow’s general configuration panel, where you can manage the name, description, connected apps, and execution settings.
### Info
The Info section allows you to define the workflow’s name and description and view metadata such as creation date, last update, and connected applications.
1. *Name -* Defines the workflow name. It can also be edited directly from within the workflow editor itself.
2. *Description -* Allows you to add a short explanation of what the workflow does for documentation purposes.
3. *Concurrency... -* Determines how many runs of the workflow can execute simultaneously.
4. *Apply Concurrency Limits to Waiting Workflow -* When enabled, concurrency limits will also apply to workflow runs that are in a waiting state.
5. *Consecutive Failures Limit... -* Sets the maximum number of consecutive failed runs allowed before the workflow is automatically stopped. The maximum is 10.
6. *Create* - Displays who created the workflow and when. This information is also visible on the main Workflows home page.
7. *Updated -* Shows who last updated the workflow and the date of the update. This is also available on the [Workflows](https://app.engini.io/workflows) home page.
8. *Connections* - Lists the apps and connections used in the workflow. This information can also be viewed from the [Workflows](https://app.engini.io/workflows) home page.
9. *Save -* Saves any changes made in the [Workflow](https://app.engini.io/workflows) Settings.
### Sort
Use the sorting options to organize the workflows list according to the information you want to display first.
To change the sorting, click the relevant column name. For date-based columns, clicking the column name opens the available sorting options. Name-based columns are initially sorted automatically from *A – Z*, and clicking the column name allows you to switch the sorting direction.
1. *Workflow Name -* Sorts the workflows alphabetically by workflow name. By default, the list is sorted from *A – Z*.
* *A – Z* – Displays workflow names in alphabetical order.
* *Z – A* – Displays workflow names in reverse alphabetical order.
2. *Last Run -* Click the column name to display the available sorting options.
* *Oldest first* – Displays workflows with the oldest last run first.
* *Newest first* – Displays workflows with the newest last run first.
3. *Created -* Click the column name to sort by the creator or creation date.
* *A – Z* – Sorts alphabetically by the creator’s name.
* *Z – A* – Sorts in reverse alphabetical order by the creator’s name.
* *Oldest first* – Displays workflows with the oldest creation date first.
* *Newest first* – Displays workflows with the newest creation date first.
4. *Updated -* Click the column name to sort by the last user who updated the workflow or by the update date.
* *A – Z* – Sorts alphabetically by the name of the last user who updated the workflow.
* *Z – A* – Sorts in reverse alphabetical order by the user’s name.
* *Oldest first* – Displays workflows with the oldest update date first.
* *Newest first* – Displays workflows with the newest update date first.
5. *Status -* Sorts the workflows according to their current status: *Active* or *Inactive*.
* *A – Z* – Displays *Active* workflows first, followed by *Inactive* workflows.
* *Z – A* – Displays *Inactive* workflows first, followed by *Active* workflows.
## Workflow Folders
The left sidebar allows you to organize your dashboard using custom directories. Keeping your workflows grouped into folders makes managing multiple automations a breeze.
1. *All Workflows* – This views your entire workflow library in one master list. The number on the right shows the total count of all workflows created across your entire account.
2. *Uncategorized* – This acts as your default inbox. Any new workflow you create starts here automatically until you choose to move it into a specific folder.
3. *New Folder* – Click this button to create a brand new custom folder. You can give it a name (like 'Production', 'Marketing', or 'Tests folder') to start categorizing your work.
## Add Activity
Engini activities represent individual steps in your workflow. There are two types of activities available:
* *Trigger* – appears only one time in each workflow and always at the top. The trigger is what initiates the workflow run.
* *Action* – there is no limit to the number of actions you can add to your workflow. To add an action, follow the next steps:
* Press the '+' sign that pop up when you get your mouse closer to the line.
1. If you want to add an action between two existing activities, hover over the arrow between the two actions and click on the plus icon that appears.
1. You can choose to add a sequential action that will appear before the lower of the two activities – click on “Add Action”.
2. You can choose to add a parallel activity – click on “add as parallel branch”.
2. If you want to add an action after the last action you added, click on the “next step” button.
* Choose the Engini software and click on the name of the action you want to use.
For more information on the types of actions for each software, see the ["Apps".](/help/apps/agentai)
## Delete Actions
### Delete one action
1. Stand on the action you want to delete.
2. Click on the trash option.
### Delete multiply actions
There is also an option to delete multiple actions simultaneously.
1. *Select the actions -* You can select multiple actions by holding **Ctrl** (on Windows) or **Command ⌘** (on Mac) and clicking on each action you want, similar to selecting multiple files, or by simply clicking and dragging with the mouse to select several actions at once.
* For example, if you select actions 4 and 5, a dashed outline will appear around them to indicate they are selected.
2. *Deleting the actions -* To delete, simply press the delete key on your keyboard after selecting the actions. It is not possible to click the trash icon on a specific action when multiple actions are selected.
**Note:** After deleting actions that are positioned between other actions, you need to manually reconnect the flow to ensure the workflow remains valid.
## Copy to clipboard
1. Stand on the action you want to copy to clipboard.
2. Click on the “Copy to clipboard” option.
3. The action is created disconnected from all other actions. It is now possible to attach the copied action to the rest of the workflow.
## Skip action
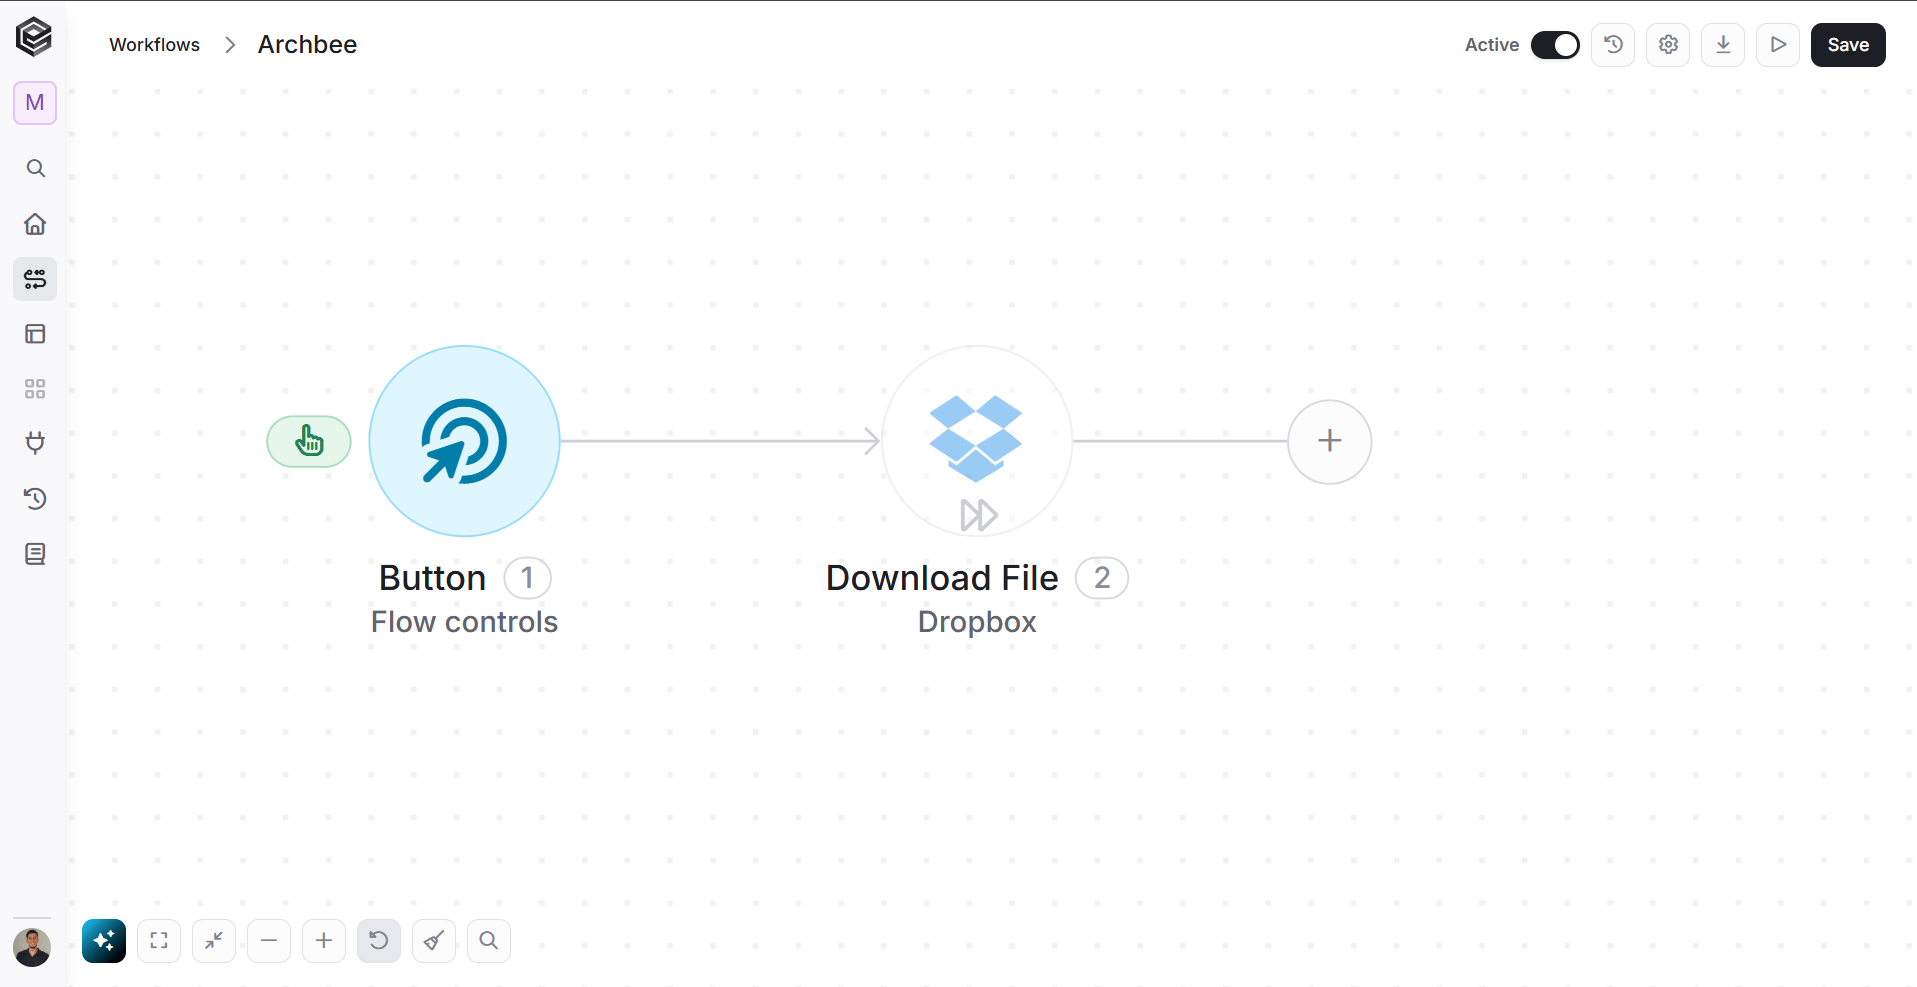
You can choose to skip an action in your workflow. To do so, follow these steps:
1. Stand on the activity you want to skip.
2. Click on the “Skip action” option.
Now the activity in the workflow is a bit blurry. The skip function helps to better understand the building of the automation when there are problems and errors.
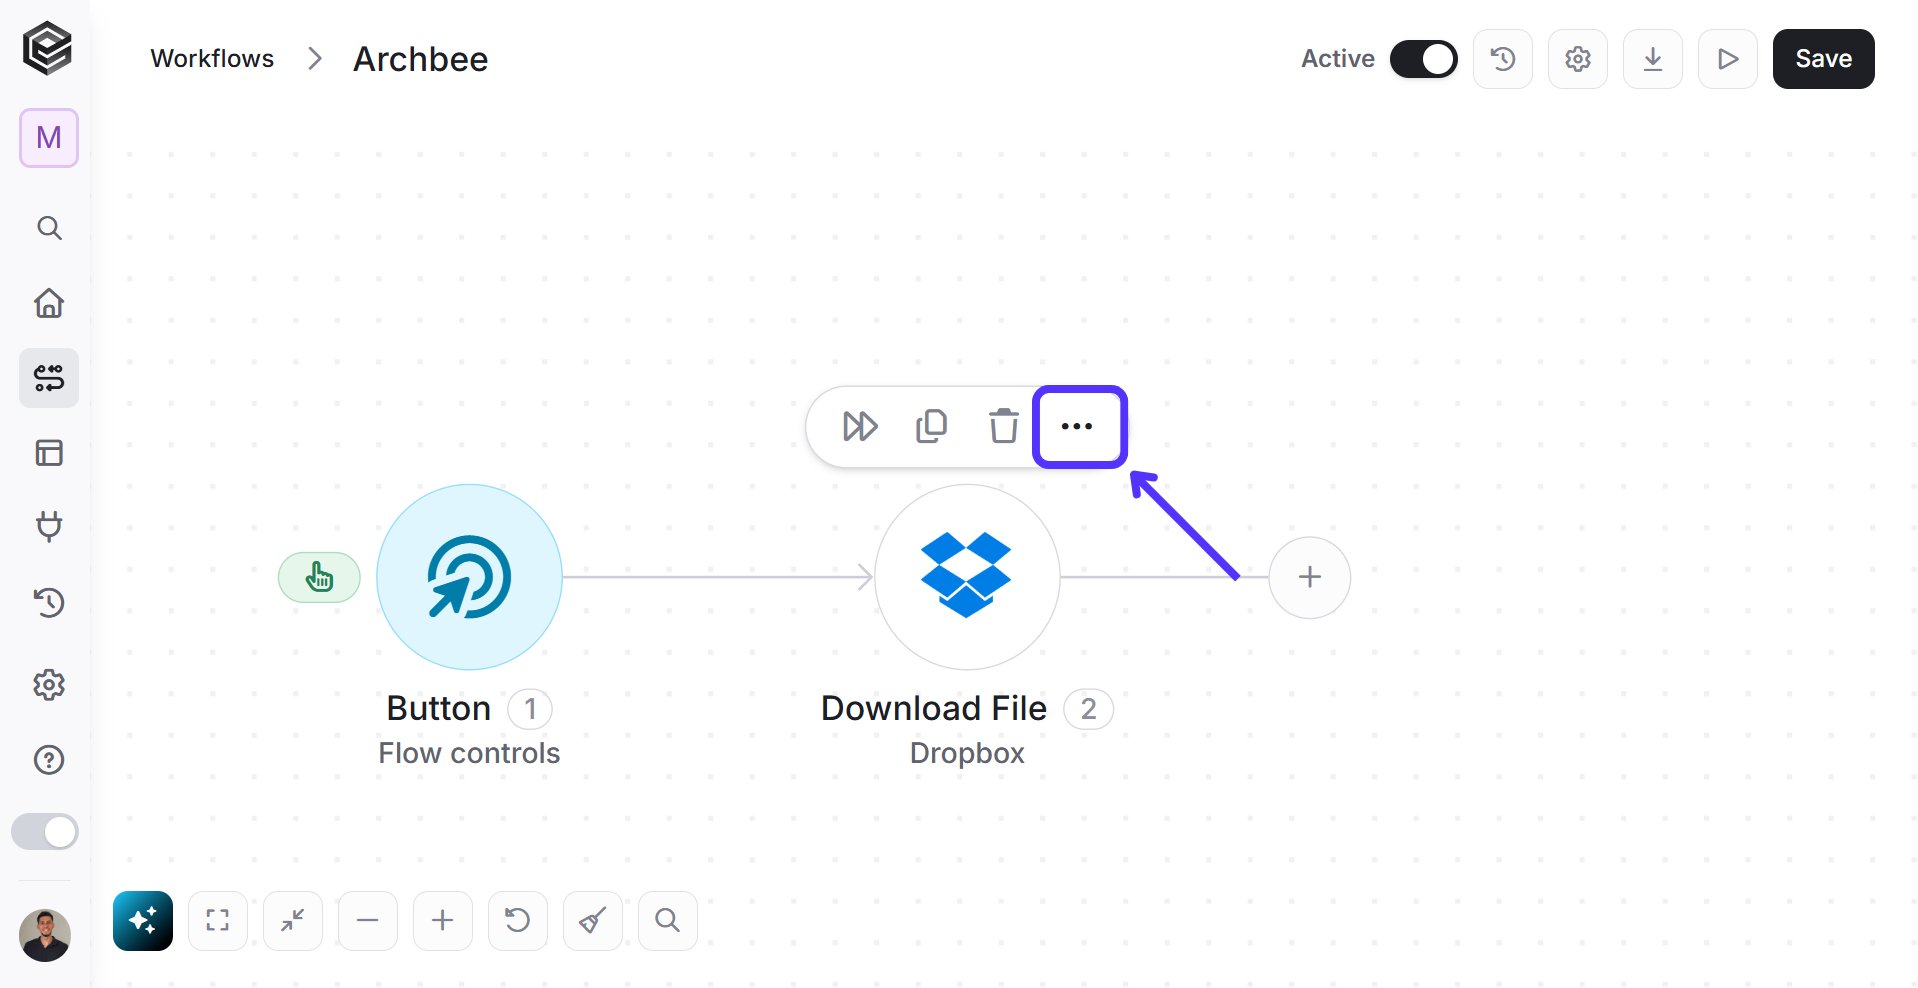
## Rename Activity
1. Click on the three dots on the right side of the activity.
2. Click on the “Rename” option.
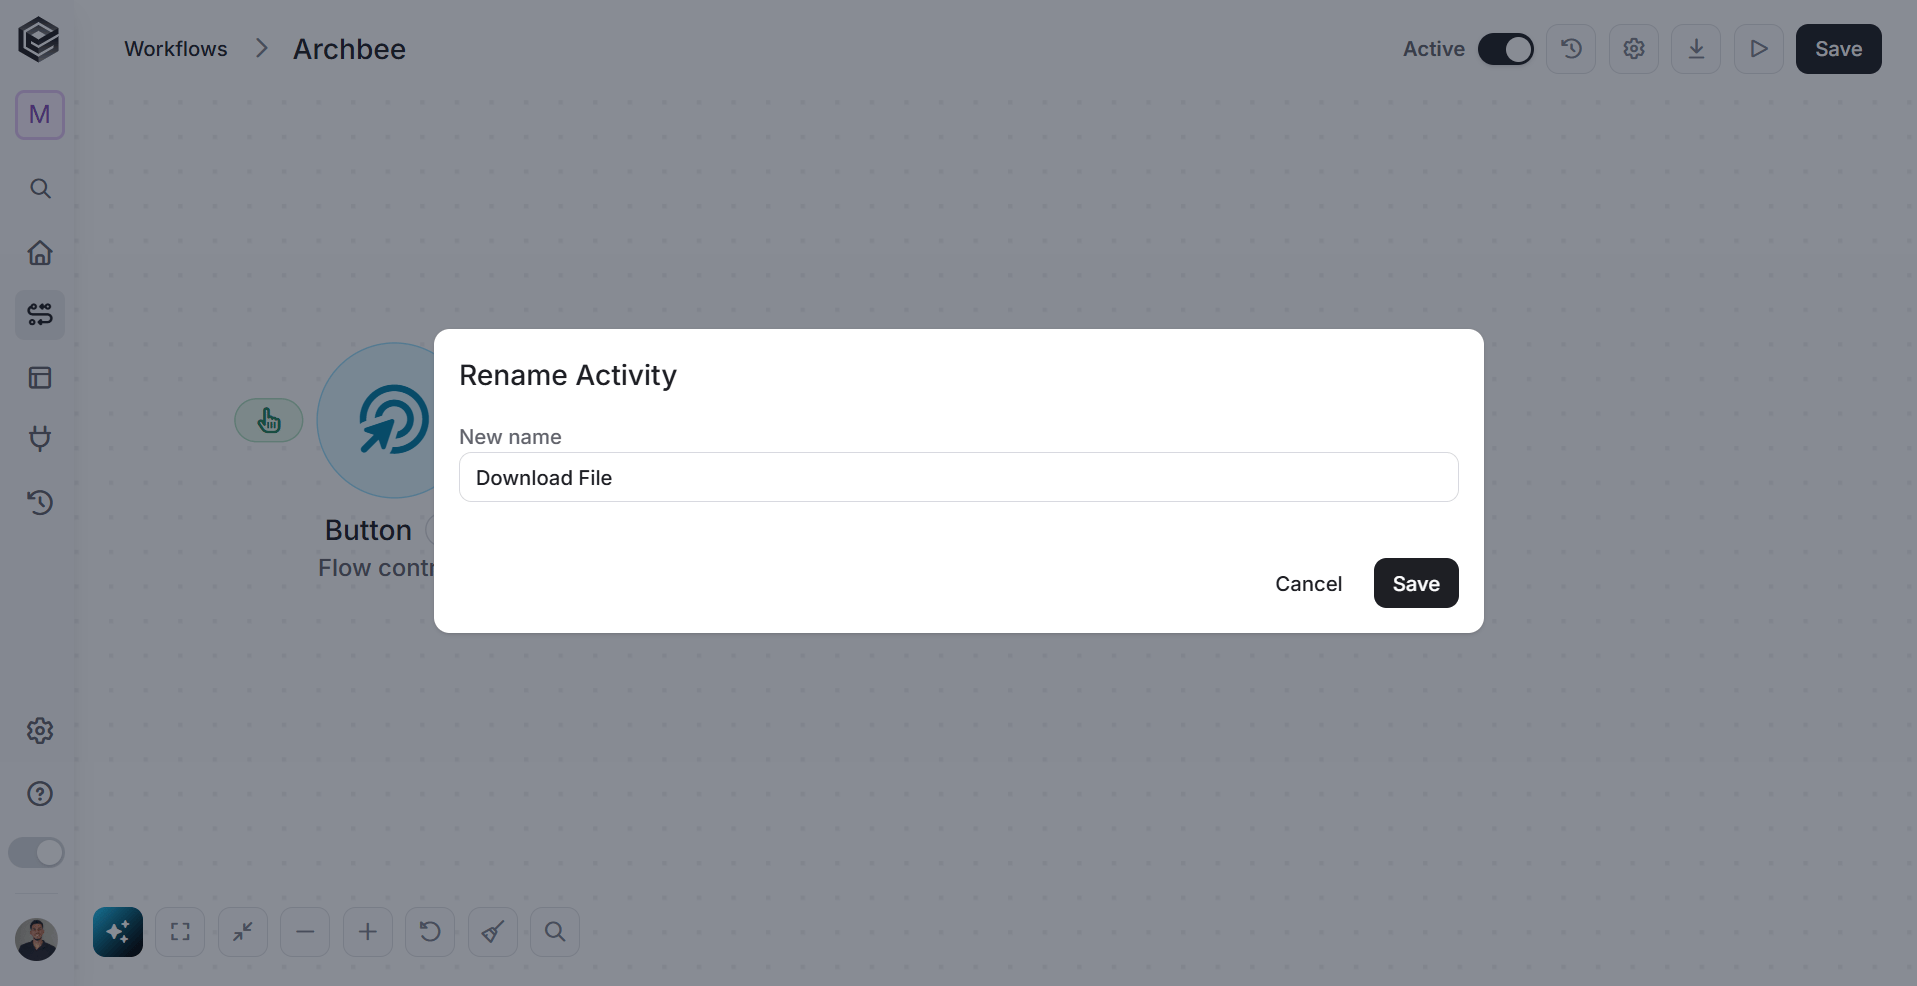
3. The name field will be opened for editing, and you will be able to change the name of the activity.
4. When you finish editing the activity name, click outside of the input field and the name will be saved automatically.
Note that if you won’t save the workflow the name change won’t take effect.
## Refresh the connection
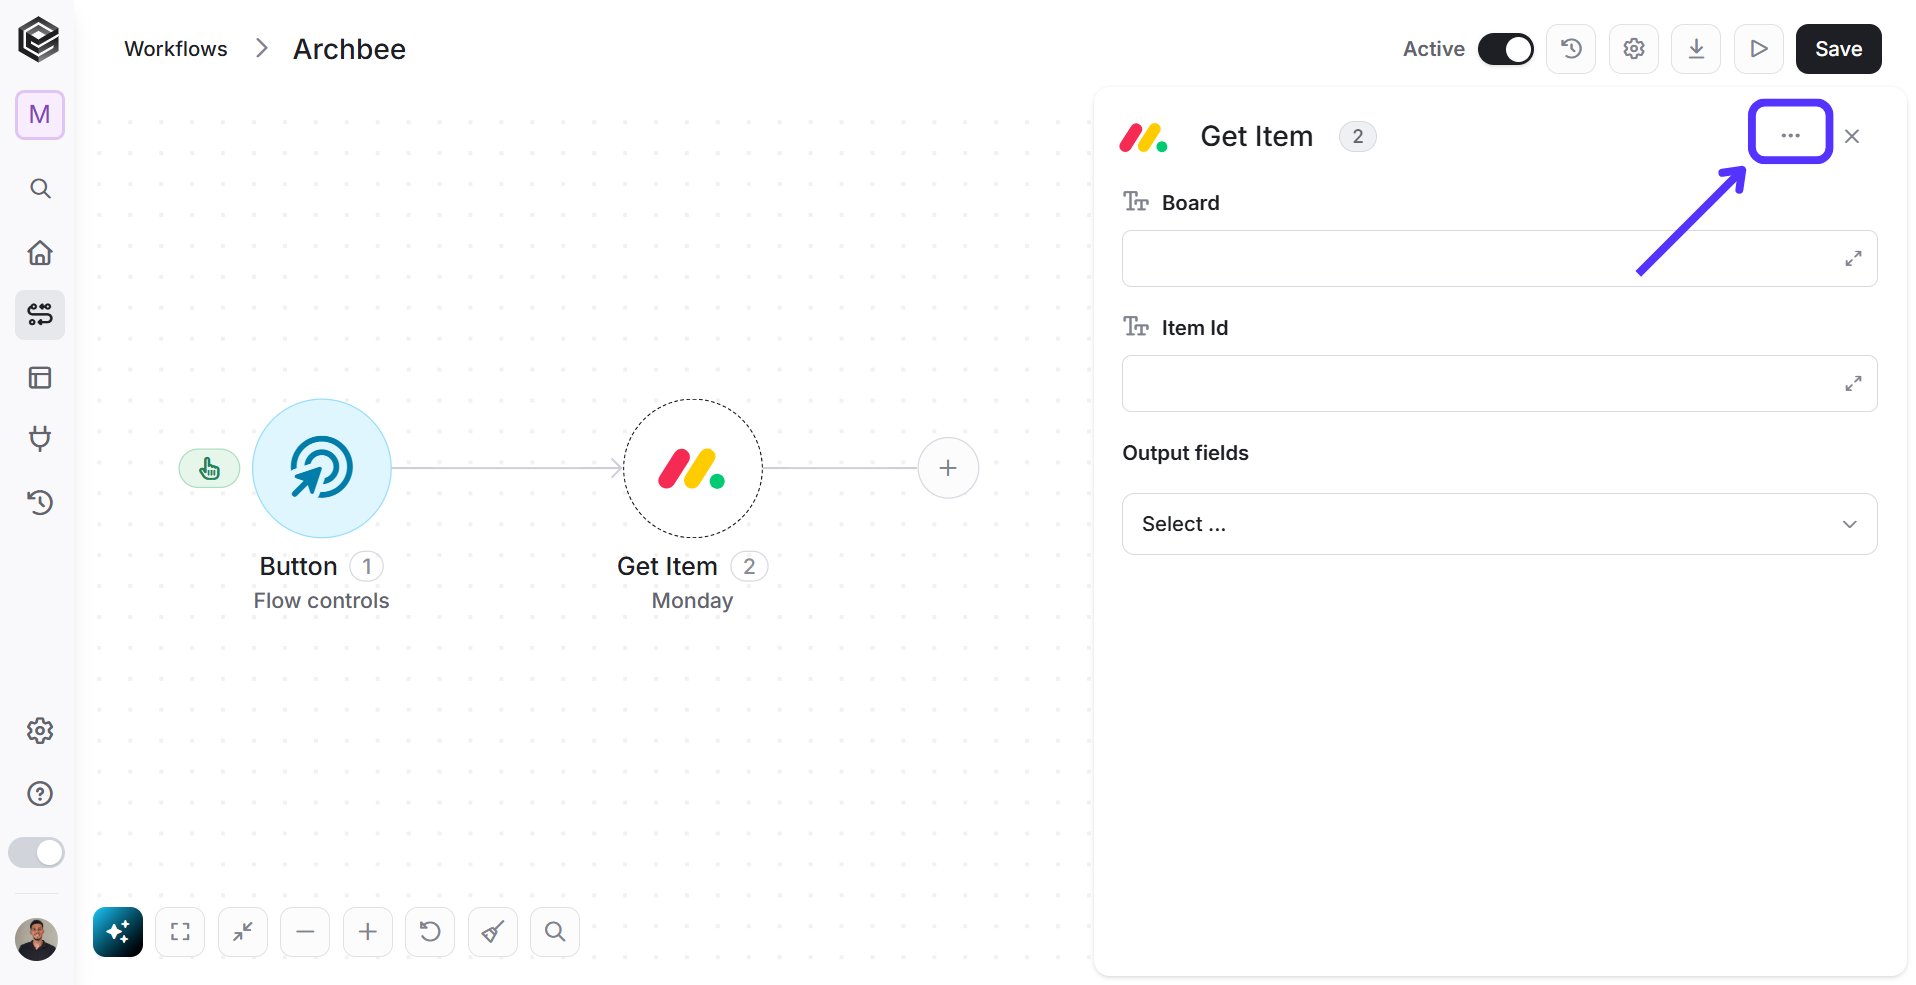
If you updated fields or objects in your software after the activity was created. You can “refresh” the connection, and then you will be able to use the fields or objects you updated.
1. Click on the activity.
2. Click on the three dots on the right side of the activity.
3. Click on the “Refresh” option.
## Configure run after
You can set a activity to run after the previous neighboring activity has succeeded or failed. The action will work only after the success or failure of the action before it. By default, each activity is configured to run after previous neighboring activity has succeeded.
To change the default settings, do the following:
1. Click on the three dots on the right side of the activity.
2. Click on the “Configure run after” option.
3. After clicking on the option, the display of the activity will change and you can define if you want the current activity to work only after the previous activity succeeded, failed or both of them.
4. Click the “Apply” button to return the previous activity view.
### 4 options:
1. *Run Only on Success (Default)*- **Is Successful: check Has Failed :unchecked**
the step executes only if the previous step completes successfully. If the previous step fails, this step is skipped.
2. *Run Only on Failure (Error Handling)* - **Is Successful: unchecked Has Failed :check**
the step executes only if the previous step fails. Use this to trigger fallback actions, log errors, or send failure alerts
3. *Run Always* - **Is Successful: checked Has Failed :checked**
the step executes regardless of the outcome. Whether the preceding action succeeds or fails, the workflow will continue through this step.
4. *Never Run* - **Is Successful: unchecked Has Failed :unchecked**
the step will never execute. This is useful for temporarily pausing or disabling a specific branch of your workflow without deleting the blocks.
## Configure context
The context field is a field that can be populated at runtime. This is a global variable in the workflow that you can populate in different activities throughout your workflow, and the value that will be displayed to the user is the last value that was populated in this variable. The value received in the field can be seen in the history table and thus allow the user to easily identify which run history to open.
1. Click on the three dots on the right side of the activity.
2. Click on the “Configure context” option.
3. After clicking on the option, the display of the activity will change and you can define the context.
4. Click the “Apply” button to return the previous activity view.
## Configure Retry Policy
The **Retry Policy** is a mechanism designed to handle temporary failures by automatically re-executing a specific action before the workflow proceeds to the next steps.
1. Click on the three dots on the right side of the activity.
2. Click on the “Configure Retry Policy” option.
3. Define the following fields:
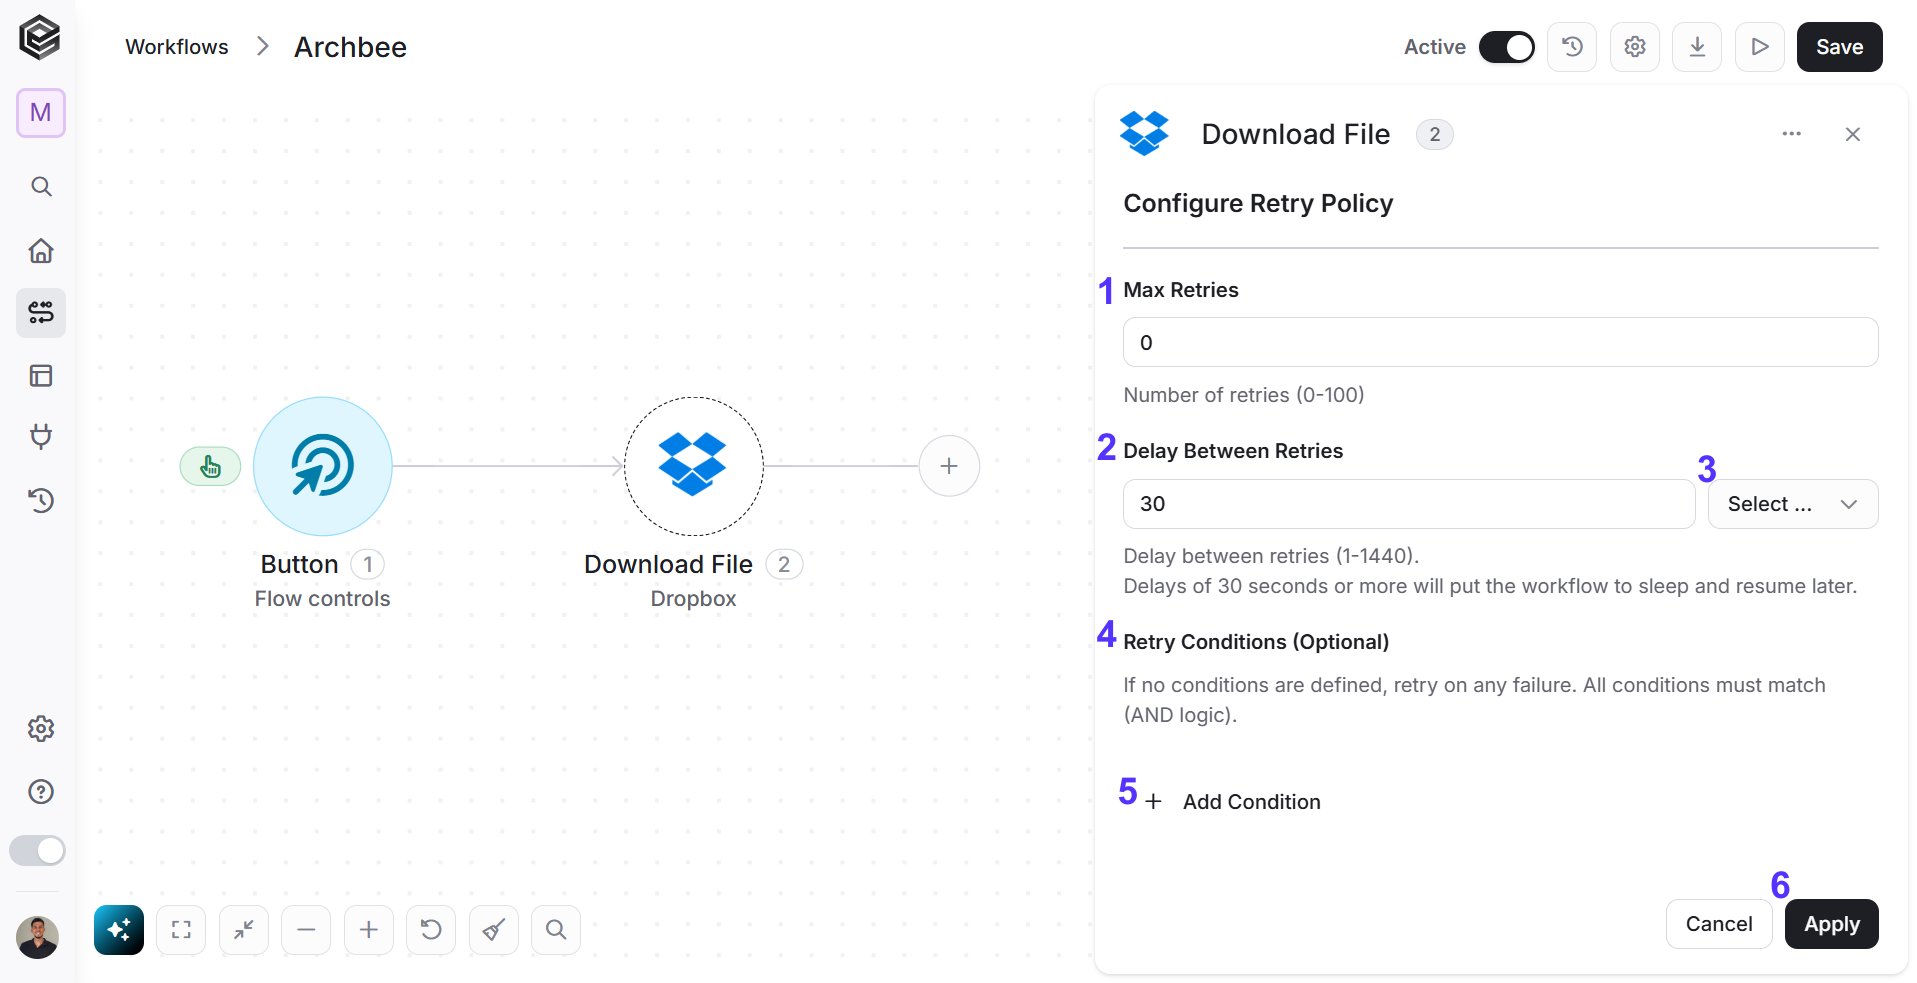
1. *Max Retries -* Sets the number of repeat attempts (0–100) the system performs if the initial action fails. If set to **0**, no retries will occur. If set to **1**, a total of two attempts will be made (the initial run plus one retry) in the event of a failure.
2. *Delay Between Retries -* Defines the waiting period between retries, delays of 30+ seconds put the workflow to sleep until the next try.
3. Time Type- Select the time measurement (Seconds, minutes etc).
4. *Retry Conditions (Optional) -* Specifies particular rules for when a retry should occur, if left blank, the system retries on any failure.
5. *Add Conditions- Insert another conditions to be more precise.*
6. *Apply -* Saves and activates the configured retry logic for this specific action.
## Dynamic Connection
Enable use of several different connections within the same activity.
1. Click on the 3 dots inside the action on the right side of the activity
2. Again inside click on the 3 dots.
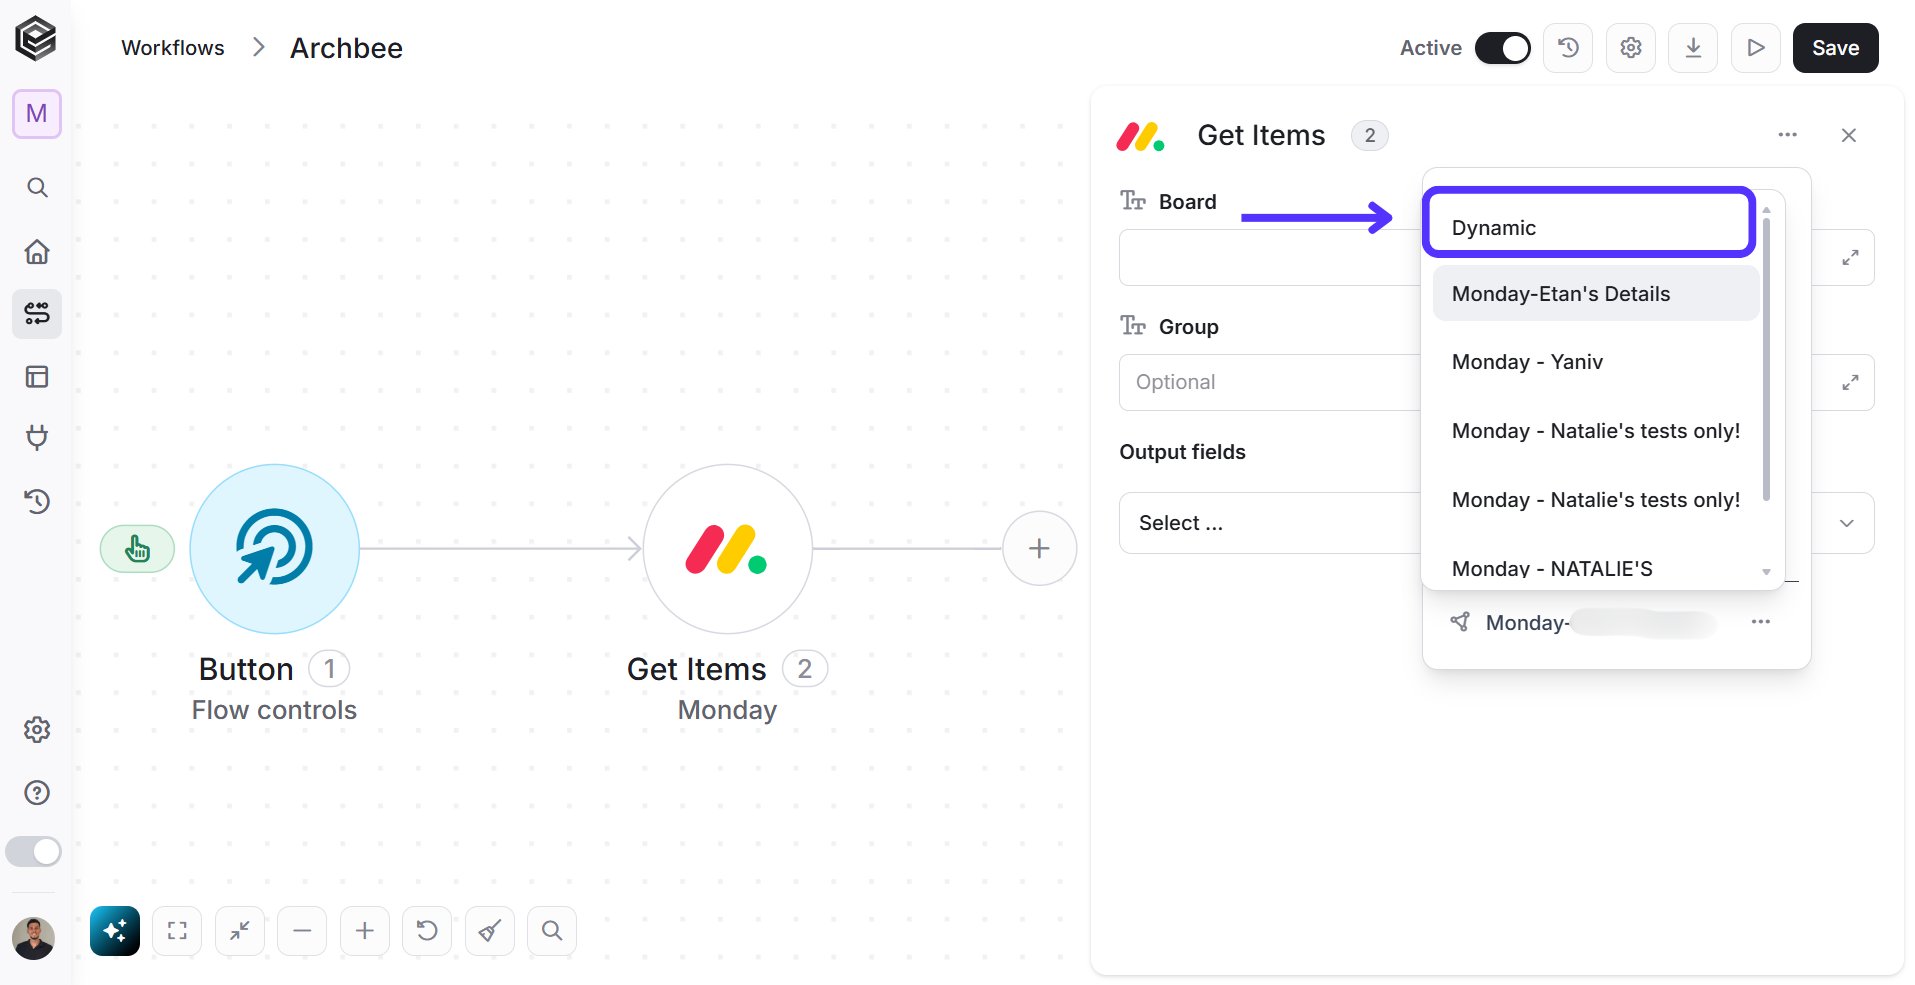
3. Choose "Dynamic":
4. Choose between two types of connection
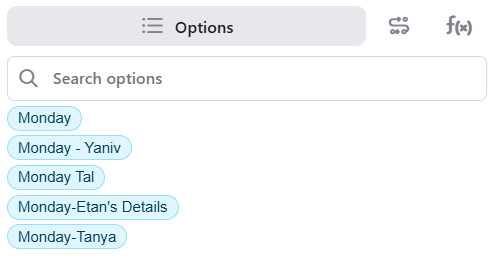
1. *Connection ID -* Click on the empty field near the connection label and select the relevant connections for this activity.
You can define conditions with [functions](/help/tools/enginis-functions)that will choose which connection to use in this activity
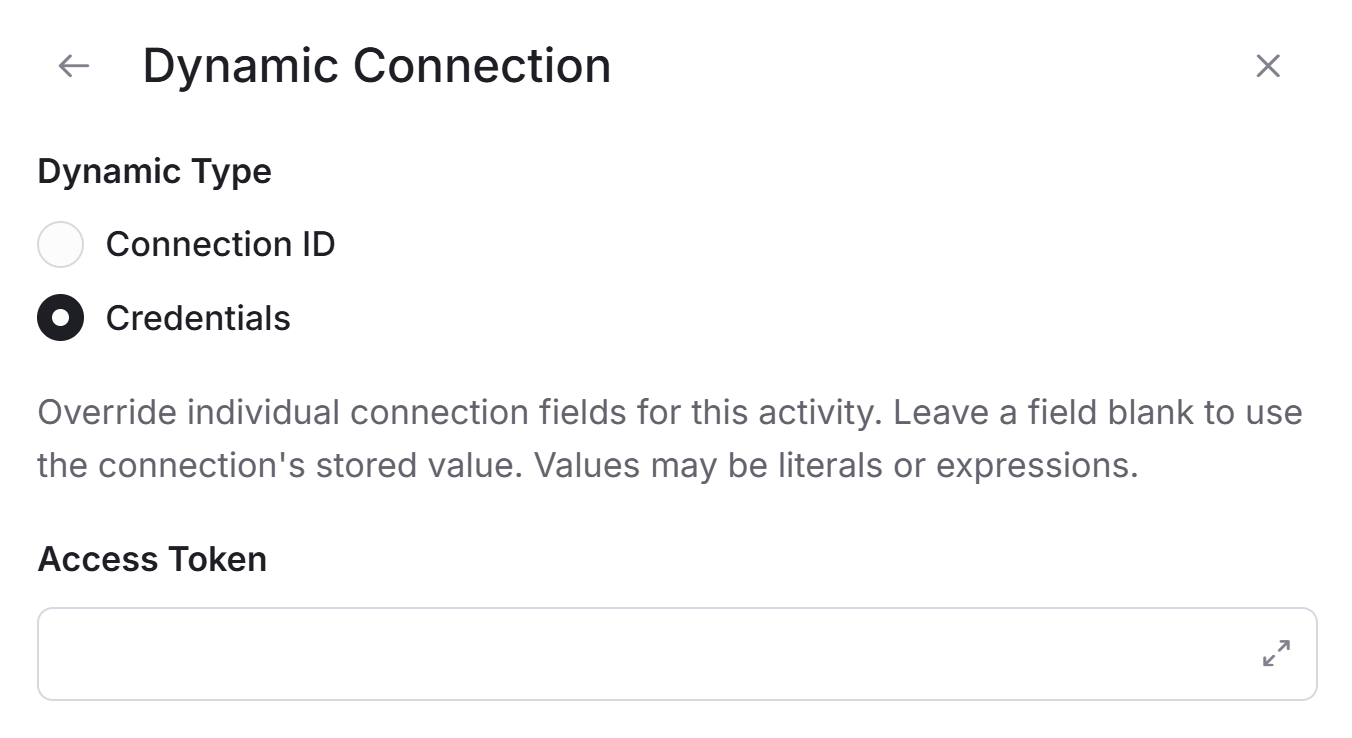
2. *Credentials* - Enter the connection credentials directly for this activity, either by typing a fixed value or by using a dynamic expression. The available fields depend on the selected connector and may include values such as an API key, access token,account ID or other authentication details.
Any value entered here overrides the corresponding value stored in the connection for this activity only.
Leave a field empty to use the value saved in the original connection.
5. Click “Done” to save your selection.
## Managing Activity Data
### Add Fields
Enable use of several different fields according to the use of activity. While the available options change depending on the activity you choose, the concept always stays the same: you are setting up rules to decide when an activity should actually run.
*For example:*
Choose the *Add Field option, a drop down of options will pop up.*
*Choose the field you want to use.*
1. Choose from the drop down the field you want to fill.
2. Click on the empty field to the right of the drop down to be shown the tooltip with all the options you can use to fill the field.
* You can populate the field in one of the following options (Depending on the column type, please refer to the [column types reference](/help/apps/mondaycom)):
* Static value – number / string. when using strings, you need to surround them with single quotes (‘).
* Property value from a previous activity (Using the tooltip that opens when clicking on the field).
* Expression – using [functions](/help/tools/enginis-functions)and/or Previous activity properties and/or static values (Using the tooltip that opens when clicking on the field).
3. Repeat steps 1-3 for all the fields you want to populate.
### Add Filters
Enable use of several different filters according to the use of activity. While the available options change depending on the activity you choose, the concept always stays the same: you are setting up rules to decide when an activity should actually run.
*For example:*
Choose the *Add Filters option, a drop down of options will pop up.*
*Choose the field you want to filter.*
1. Select from the drop down the field you want to add the condition on.
2. Select the condition you want the record to meet.
3. Click on the empty field and the tooltip will pop up showing the options you can choose.
* You can populate the field in one of the following options:
* Static value – number / string. when using strings, you need to surround them with single quotes (‘).
* Property value from a previous activity (Using the tooltip that opens when clicking on the field).
* Expression – using [functions](/help/tools/enginis-functions) and/or Previous activity properties and/or static values (Using the tooltip that opens when clicking on the field).
4. Repeat steps a-d for all the fields you want to populate.
### Add Conditions
Some triggers include an Add Conditions option.
Add Conditions allows you to define rules that determine when the trigger should continue based on the data received or selected.
*For example:*
Choose the Add Conditions option. A dropdown of available condition fields will pop up.
Choose the field you want to apply the condition on.
1. Select from the dropdown the field you want to apply the condition on.
2. Select the condition you want the record to meet.
3. Click on the empty value field. The tooltip will pop up and show the available options.
* You can populate the field in one of the following options:
* Static value – number / string. when using strings, you need to surround them with single quotes (‘).
* Property value from a previous activity (Using the tooltip that opens when clicking on the field).
* Expression – using [functions](/help/tools/enginis-functions) and/or Previous activity properties and/or static values (Using the tooltip that opens when clicking on the field).
4. Repeat these steps for each condition you want to add.
**Note:** The available fields and conditions may change depending on the activity you choose, but the concept stays the same: you select a field, choose the condition it must meet, and define the value to compare against.
In some triggers, the available condition fields depend on the selected Object Type.
In these cases, select the Object Type first. After the object is selected, Engini loads the relevant fields for that specific object, and those fields become available in the Conditions section. If a different Object Type is selected, the available condition fields may change accordingly.
*For example with objects:*
If the activity or trigger includes an Object Type field, select the relevant object first.
Choose the Add Conditions option. A dropdown of available condition fields will pop up.
Choose the field you want to apply the condition on.
1. Select from the dropdown the field you want to apply the condition on.
2. Select the condition you want the record to meet.
3. Click on the empty value field. The tooltip will pop up and show the available options.
* You can populate the field in one of the following options:
* Static value – number / string. when using strings, you need to surround them with single quotes (‘).
* Property value from a previous activity (Using the tooltip that opens when clicking on the field).
* Expression – using [functions](/help/tools/enginis-functions) and/or Previous activity properties and/or static values (Using the tooltip that opens when clicking on the field).
4. Repeat these steps for each condition you want to add.
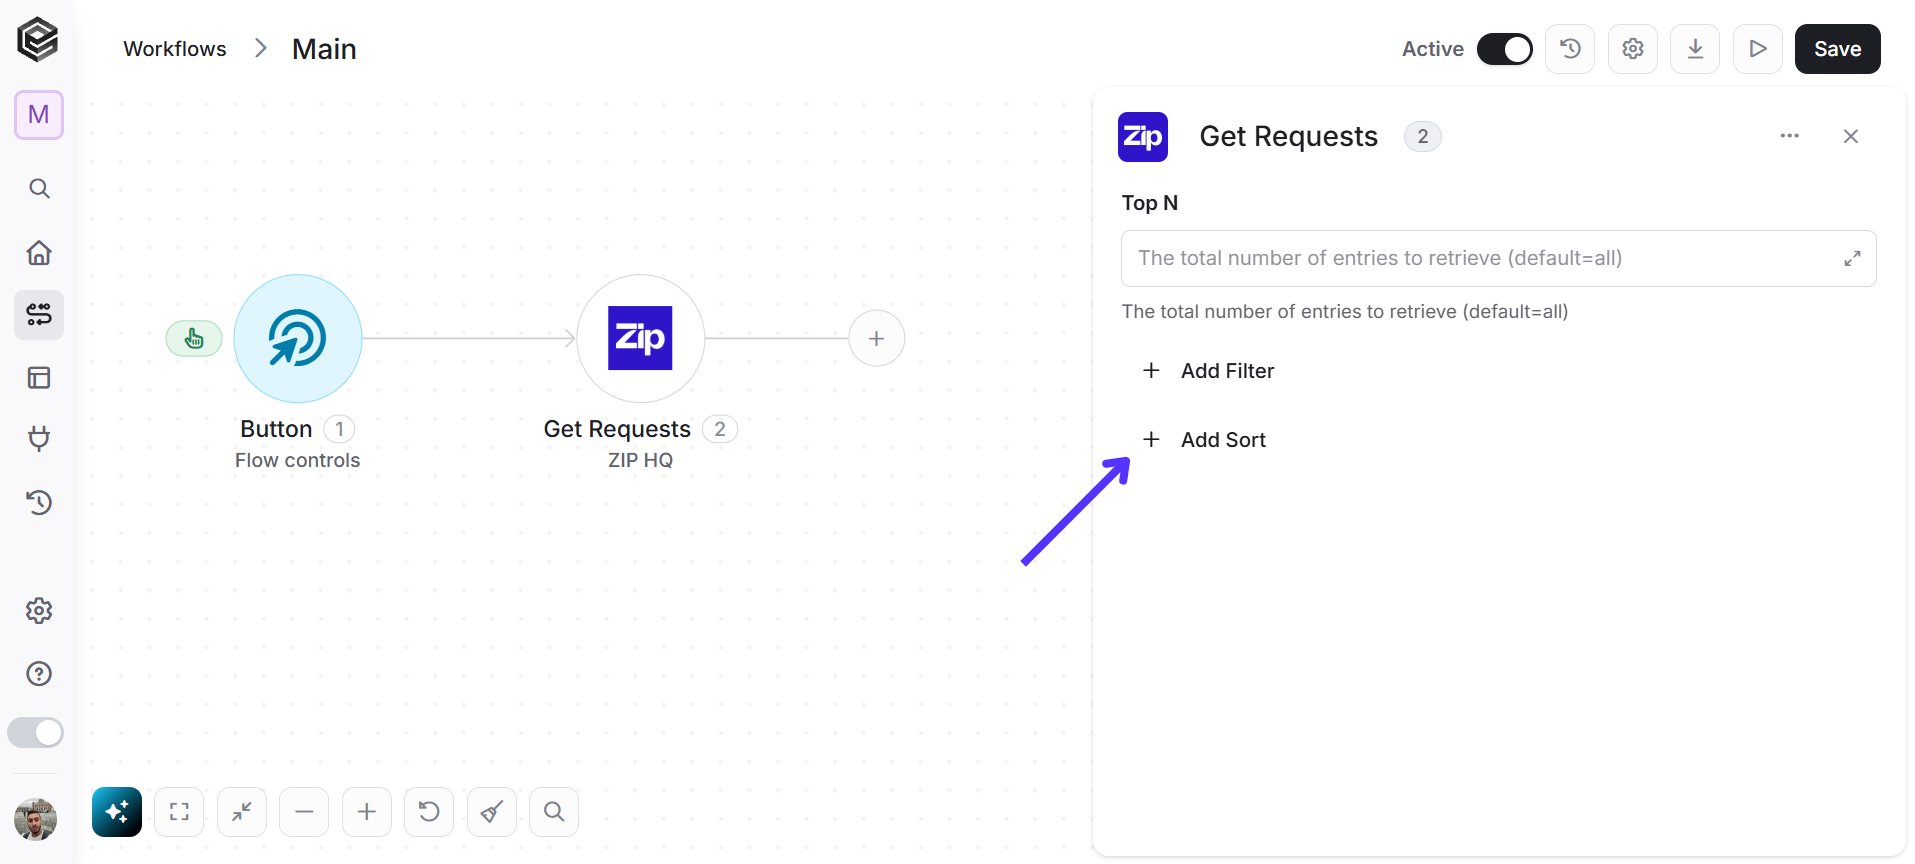
### Add Sorts
Enable use of several different sorting options according to the use of activity. While the available options change depending on the activity you choose, the concept always stays the same: you are defining how the returned records should be ordered.
*For example:*
*Choose the Add Sort option, a drop down of options will pop up.*
*Choose the field you want to sort by.*
1. Select from the drop down the field you want to sort by.
2. Select the sorting direction you want to apply.
* You can choose one of the following options:
3\. Ascending – sorts the records from lowest to highest / A-Z.
4\. Descending – sorts the records from highest to lowest / Z-A.
## Workflow Edit Top Bar
### Save
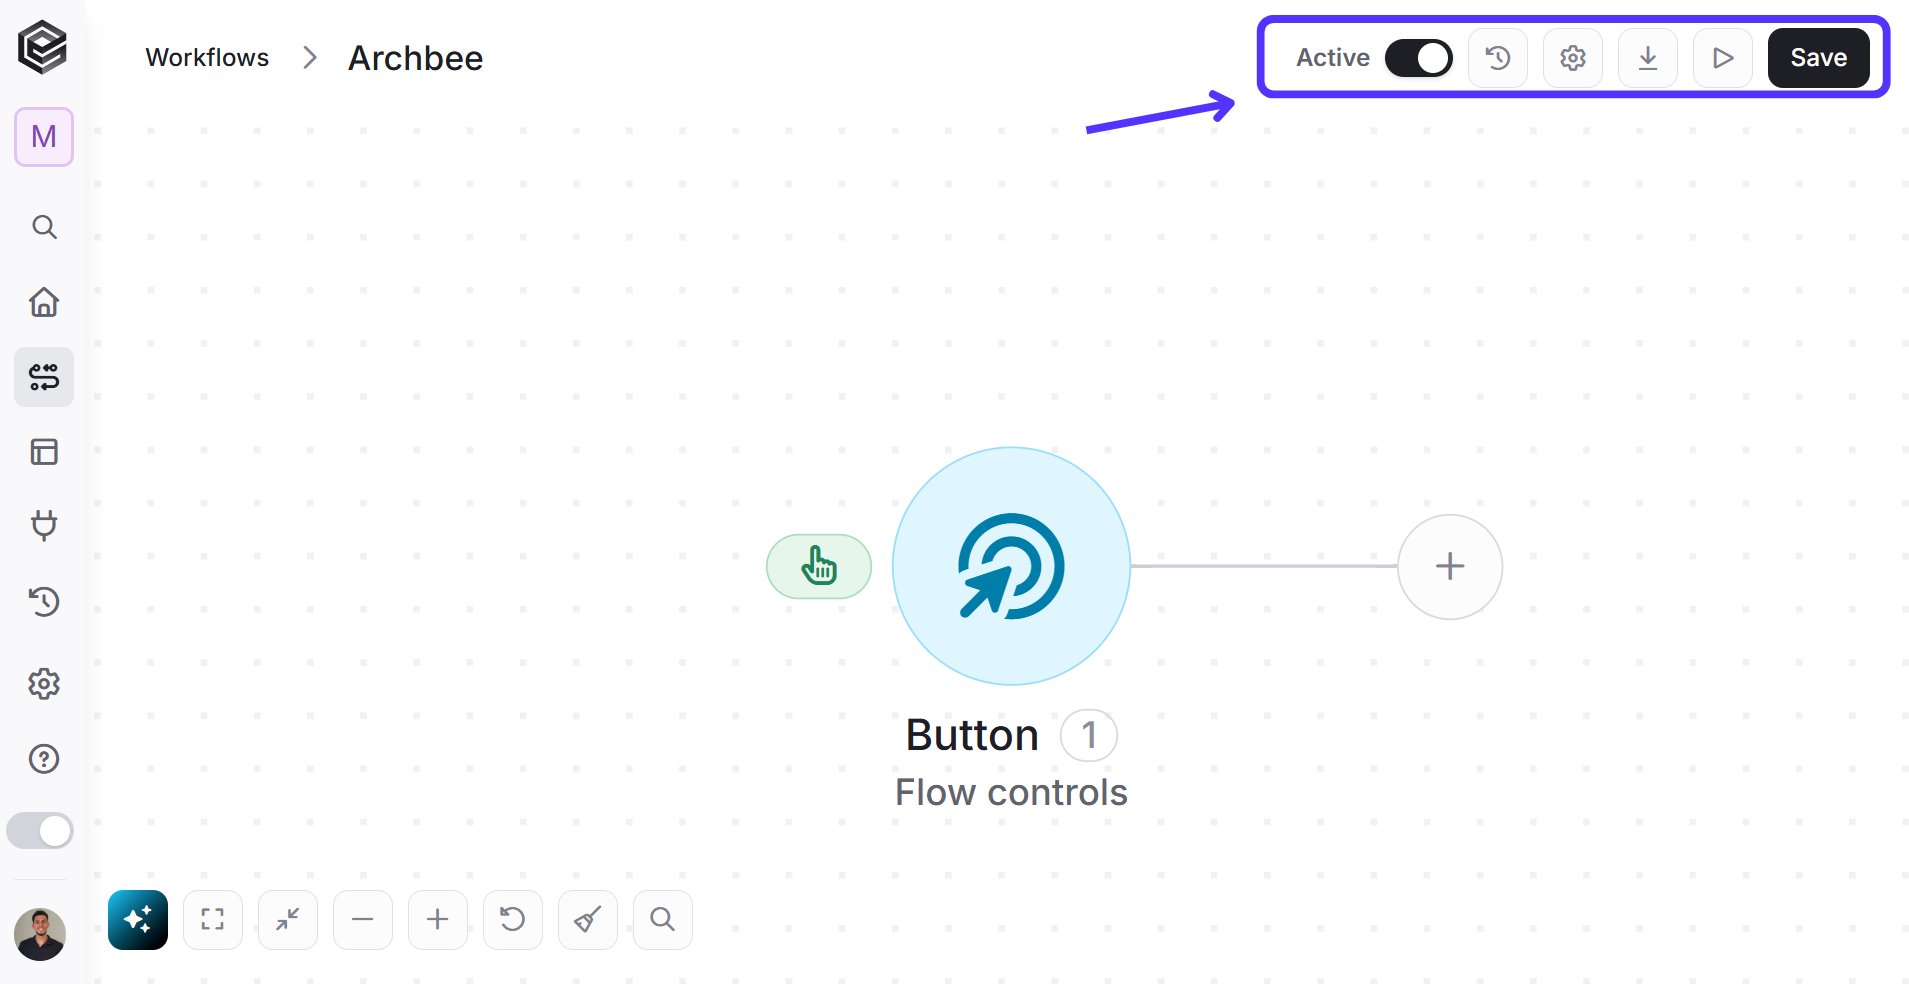
When you’re done editing your workflow, click the save icon to save your progress.
The workflow isn’t saved automatically.
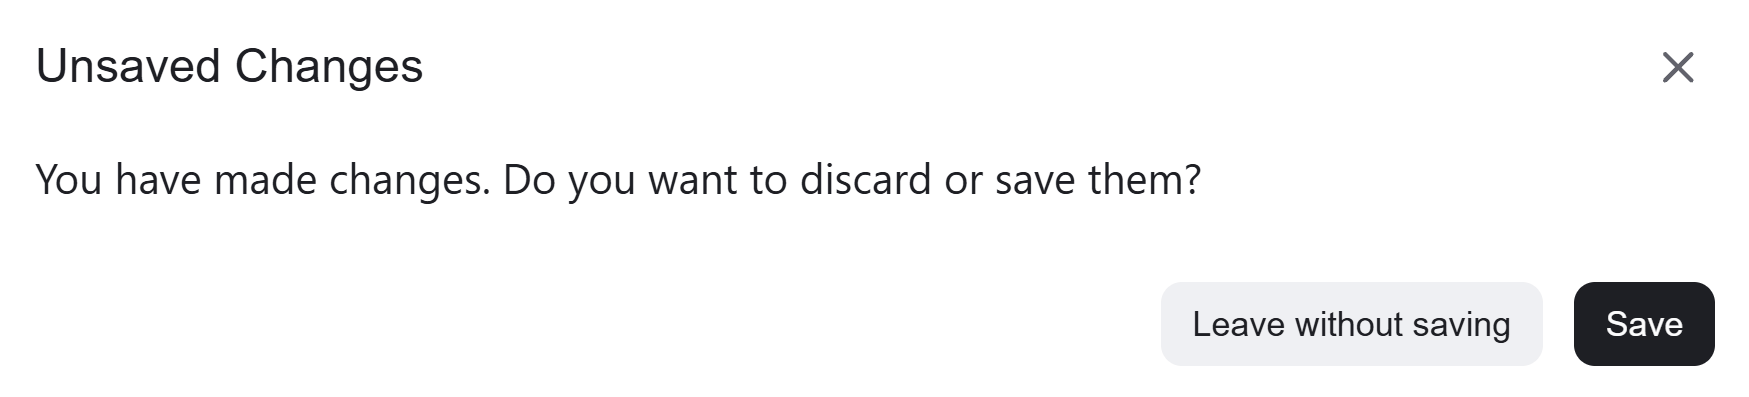
If you have unsaved edits and you try to leave the page, to restore previous version or to run a workflow, Engini will display the Unsaved Changes dialog.
You can then choose from the following options:
* **Leave without saving** to leave without saving
* **Save** to keep your new edits and proceed to the page you wanted to navigate to.
* **X** to dismiss the dialog and remain on the page.
In addition, if you try to access another page without saving your changes in Engini, the system will display the following message:
This is an extra layer of protection to ensure you don’t lose your work unintentionally. You can choose to *leave* the page or remain on the Engini page by clicking *Cancel*.
### Run
Run your workflow to ensure that all components are functioning correctly.
To learn how to run workflow click [here](/help/workflows/run-and-stop-workflow#how-to-run-workflow)
### Export
Allows you to download the workflow configuration file so it can be imported into another environment or used as a backup.
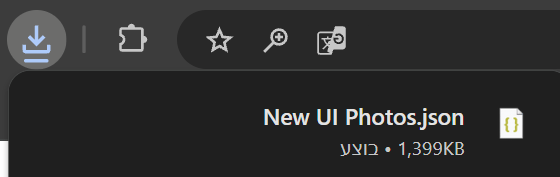
After clicking **Export**, the workflow is downloaded to your computer as a JSON file.
You can then refer to the [Import & Export Workflow](/help/workflows/import-export-workflow) guide (link here) to learn more about how to use it.
### Settings
This section defines the general configuration of the workflow, including its name, description, and connected apps. To learn more click [here.](/help/workflows/workflow-editor#workflow-settings)
### History & Restore
Click on this to see all the history log of this workflow. You can restore a previous version of the workflow too.
If you want to restore to a previous version, follow the next steps:
1. Click on the restore icon located at the top bar.
2. Go to versions.
3. Choose the version you want to restore.
4. Click on "Restore this version".
5. After getting the message below, need to "Save" the workflow to change the version.
**Note:** Previous versions of workflows over 45 days will be automatically removed.
### Workflow status
A workflow in Engini has two types of states: Active or inactive.
Active workflows run when their trigger is activated and also when you run them manually by testing them.
You can switch between the two statuses whenever you want (active workflows can become inactive and vice versa), by clicking the ON/OFF button in the top bar. To save the workflow status you have to save the workflow.
You can also change the workflow status from the details page of the workflow or from the workflow’s table.
## Using values from previous operations
After you add an action, press on the empty field to enter a value. Choose the previous activity from which you want to take a value and press on the arrow next to it.
Choose the value you want to use.
## Webhook metadata
Metadata can be useful for storing additional information about the object in a structured format. If you would like to use the metadata of certain connector:
1. Choose the action of the desired connector.
2. Press on the arrow next to the “Webhook metadata”
3. Choose the the data you need:
* *Url* - The address where the webhook expects to receive HTTP requests, It’s where the data will be sent after trigger.
* *Method* - The HTTP method used for sending data to the webhook endpoint.
* *Headers\[]* - HTTP request headers contain additional information related to the request itself.
* *Query parameters\[]* - key-value pairs, where the key identifies the parameter and the value is the information associated with that parameter.
* *URL parameters\[]* - The additional information appended to a URL that is sent to a web server as part of an HTTP request.
* *Body* - The request body contains data that the client wants to send to the server.
## Workflow Editor Bottom Bar
The bottom toolbar provides quick actions to control the canvas view and workflow behavior:
### Zoom to Fit
Adjusts the canvas view to display the entire workflow within the screen.
### Collapse All
Collapses all actions that contain nested steps (such as If, For Each, or Switch), hiding their internal actions so they are not displayed on the canvas.
* For example, if you have a For Each action with inner actions inside it, clicking this option will hide those internal actions.
A collapse indicator will appear next to the parent action, showing that it contains hidden steps.
**Note:** When all nested actions are collapsed, the button changes to **Expand All**, allowing you to expand and display all internal actions again.
### Zoom Out
Decreases the zoom level to show more of the workflow.
### Zoom In
Increases the zoom level for a closer view of specific actions.
### Undo
Reverts the last change made in the workflow.
### Tidy Up
Automatically arranges the actions on the canvas into a cleaner and more organized layout when the workflow appears messy or misaligned.
* For example, When the workflow becomes messy and actions are not aligned properly, it can be hard to follow the flow and understand the logic.
After using **Tidy Up**, the workflow is automatically rearranged into a clean, structured layout, making it much easier to read and work with.
### Search
Allows you to quickly find actions within the workflow.
### Notes
Opens the list of all the sticky notes in the workflow. For more information click [here](/help/workflows/workflow-editor#sticky-notes).
## Right-Click Actions Menu
You can also right-click anywhere on the canvas to open a quick actions menu.
1. *Add New Node (Tab)* – Quickly add a new action to the workflow. For more information click [here](/help/workflows/create-workflow#add-your-actions).
2. *Select All (Ctrl+A)* – Select all actions on the canvas.
3. *Tidy Up (Alt+T)* – Automatically organize and align the workflow layout For more information click here.
4. *Paste (Ctrl+V)* – Paste copied actions.
5. *Copy (Ctrl+C)* – Copy selected actions.
6. *Delete (Del)* – Delete selected actions. For more information click [here](/help/workflows/workflow-editor#delete-actions).
7. *Add Note (Shift + N)* – Add a sticky note at the pointer. For more information click [here](/help/workflows/workflow-editor#sticky-notes).
**Note:** The **Copy** and **Delete** options are only available when one or more actions are selected, and the **Paste** option appears only after an action has been copied.
## Sticky Notes
Sticky notes let you pin free-text notes anywhere on the workflow canvas, so you can document what a workflow does, flag open questions, or leave context for your teammates. Notes never affect how the workflow runs.
### Add a Note
1. Right-click an empty spot on the canvas and select *Add Note (Shift + N)*. The note appears where you clicked.
2. Or place the pointer where you want the note and press **Shift + N**.
The new note appears with the placeholder text *New note – Double-click or press F2 to edit*. Double-click it, or select it and press **F2**, to replace the text with your own.
**Note:** The note button in the bottom bar does not add notes, it only lists them.
### Edit a Note
1. Double-click the note, or select it and press **F2**, to edit its text.
2. Press **Esc** to leave edit mode.
3. *Text area* – Type your note here.
4. *Style with Markdown* – Opens a short guide to the Markdown syntax.
Notes are formatted with Markdown, which you type by hand. There are no formatting buttons. For example, type `## Title` for a heading, `**text**` for bold, or `- item` for a list. The editor shows a *Style with Markdown* link with a short guide to the syntax.
### Change the Color
Click a note to select it. A small toolbar appears above it.
1. *Colors* – Pick yellow, blue, gray, green, orange or purple.
2. *Trash icon* – Deletes the note.
New notes are yellow by default.
### Resize, Move and Delete
* *Resize* – Drag any corner or edge of the note.
* *Move* – Drag the note by its body to place it anywhere on the canvas.
* *Delete* – Select the note and click the trash icon in its toolbar.
**Note:** Deleting a note does not ask for confirmation. If you delete one by mistake, use **Undo**.
Notes always sit behind the actions on the canvas, so a note never covers a step.
### Notes List
Click the *Notes (N)* button on the right side of the bottom bar, or press **N**, to see all the notes in the workflow. Click a note in the list to jump to it on the canvas. The button shows how many notes the workflow has.
1. *Notes* button – Shows the number of notes in the workflow.
2. *Notes (N)* list – Click a note to jump to it on the canvas.
### Saving and Running
* Notes are saved together with the workflow. Click **Save** to keep your notes, like any other change.
* Notes never affect how the workflow runs.
* Notes are also shown, read-only, in the run history and for users who can't edit the workflow.
* Notes are not included when you export a workflow.
This documentation is built and hosted on [Mintlify](https://mintlify.com), a developer documentation platform.
 We can observe that each record represents a workflow.
Each workflow contains the following:
1. *Workflow Name*– The name of the workflow.
2. *Connection* - If there are connections within the workflow, you will see them listed here.
3. *Last run* – The last date and time when the workflow ran.
4. *Created* – The user who created the workflow and date and time when the workflow was created.
5. *Updated* – The last user who updated the workflow and date and time when the workflow was updated.
6. *Status* – Here you can see if the workflow is activated. If active, the color will be black; otherwise, it will be gray.
7. *Edit Workflow*- Explanation down below.
## Edit Workflow page
### First Way
On the sidebar, click on the “WorkFlows” option.
We can observe that each record represents a workflow.
Each workflow contains the following:
1. *Workflow Name*– The name of the workflow.
2. *Connection* - If there are connections within the workflow, you will see them listed here.
3. *Last run* – The last date and time when the workflow ran.
4. *Created* – The user who created the workflow and date and time when the workflow was created.
5. *Updated* – The last user who updated the workflow and date and time when the workflow was updated.
6. *Status* – Here you can see if the workflow is activated. If active, the color will be black; otherwise, it will be gray.
7. *Edit Workflow*- Explanation down below.
## Edit Workflow page
### First Way
On the sidebar, click on the “WorkFlows” option.
 Hover over the workflow you want to edit and click on the 3 points.
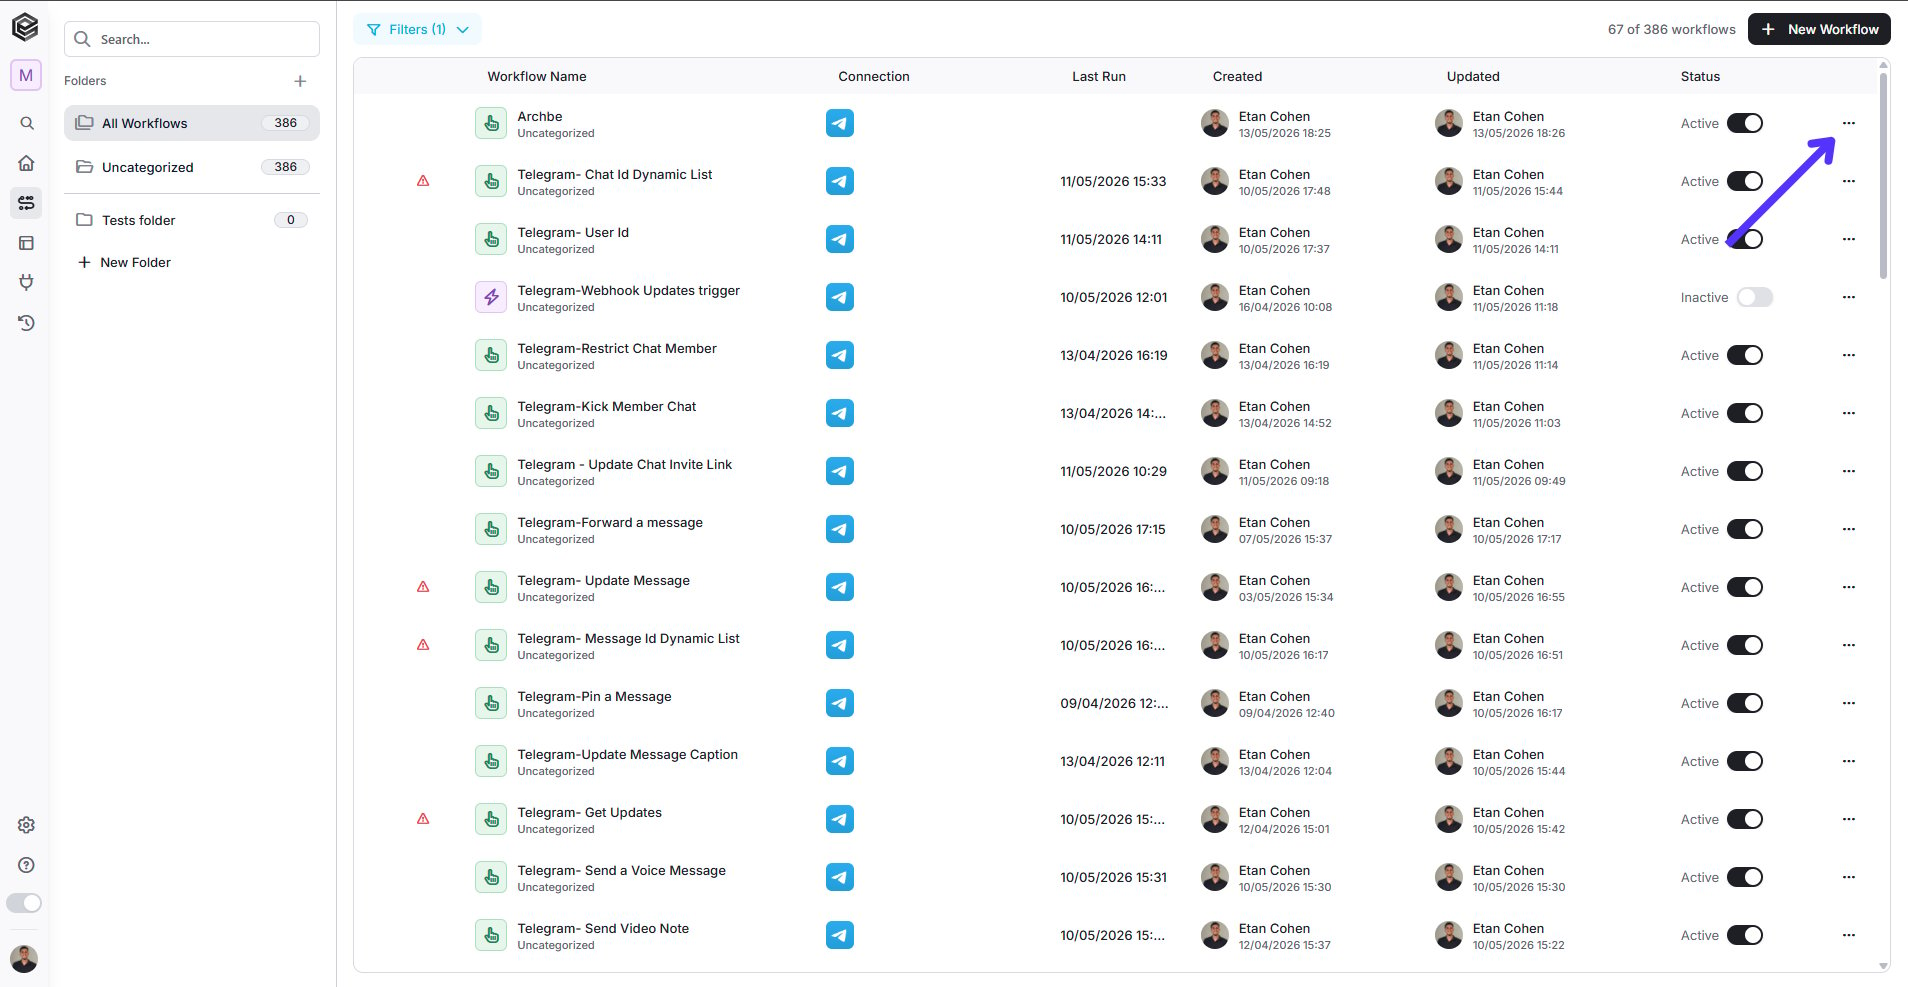 Choose what you want to do with that workflow:
 1. *Edit-* Opens the workflow canvas directly, allowing you to modify your triggers, activities, logic, and configurations.
2. *Duplicate-* Make an exact copy of your workflow instantly. This is great if you want to test out new changes safely without messing up your original version.
3. *Export-* Download your workflow as a JSON file. Use this to save a backup on your computer or share your workflow with another account.
4. *Settings -* Open up the main configuration panel to rename your workflow, add a description, or adjust its global settings. More explanations down [below.](/help/workflows/workflow-editor#workflow-settings)
5. *Move to Folder –* Choose a folder from your sidebar to drop this workflow into. It’s the easiest way to keep your dashboard clean and organized. More explanations down [below.](/help/workflows/workflow-editor#workflow-folders)
6. *Delete –* Permanently erase the workflow from your account.
### Second Way
On the sidebar, click on the “WorkFlows” option.
1. *Edit-* Opens the workflow canvas directly, allowing you to modify your triggers, activities, logic, and configurations.
2. *Duplicate-* Make an exact copy of your workflow instantly. This is great if you want to test out new changes safely without messing up your original version.
3. *Export-* Download your workflow as a JSON file. Use this to save a backup on your computer or share your workflow with another account.
4. *Settings -* Open up the main configuration panel to rename your workflow, add a description, or adjust its global settings. More explanations down [below.](/help/workflows/workflow-editor#workflow-settings)
5. *Move to Folder –* Choose a folder from your sidebar to drop this workflow into. It’s the easiest way to keep your dashboard clean and organized. More explanations down [below.](/help/workflows/workflow-editor#workflow-folders)
6. *Delete –* Permanently erase the workflow from your account.
### Second Way
On the sidebar, click on the “WorkFlows” option.
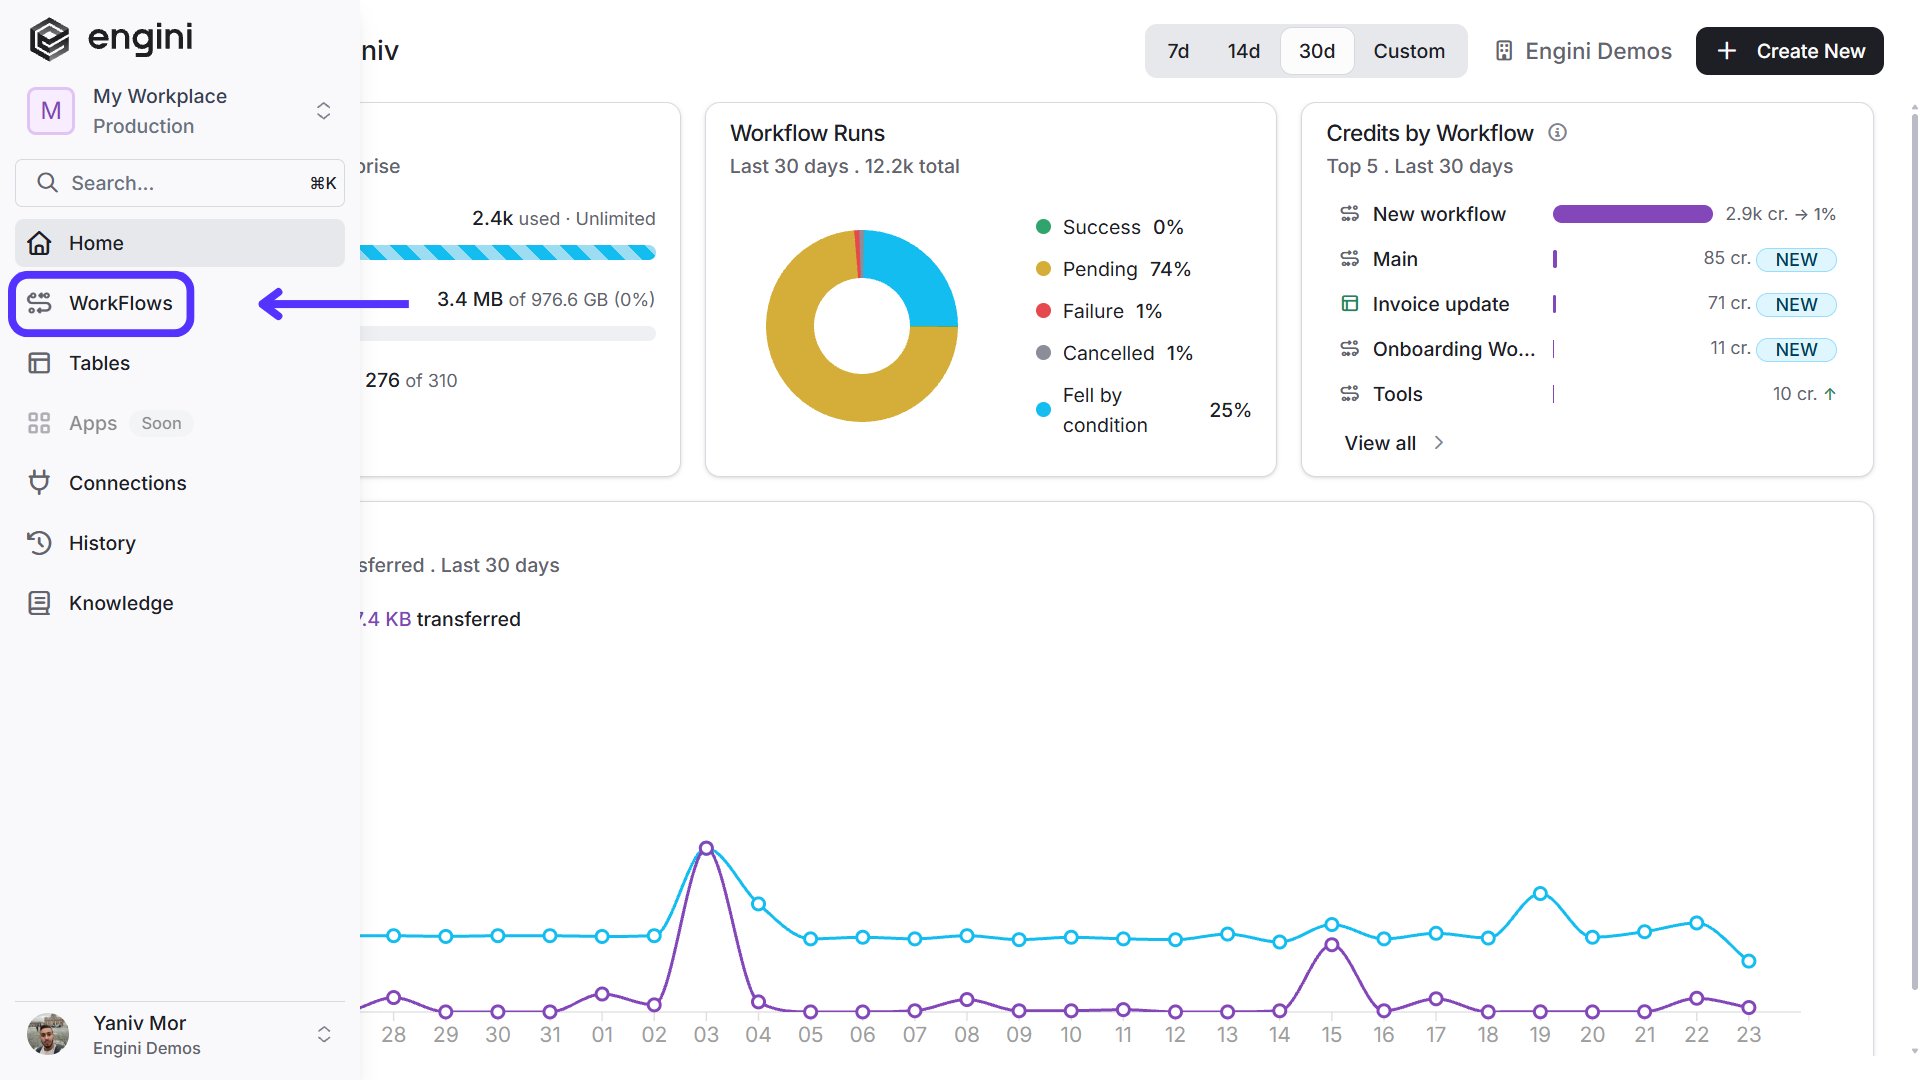 Hover the name of the workflow you want to edit and click on it.
 ### Third Way
On the sidebar, click on the “History” option.
### Third Way
On the sidebar, click on the “History” option.
 Search for the workflow name and press on it
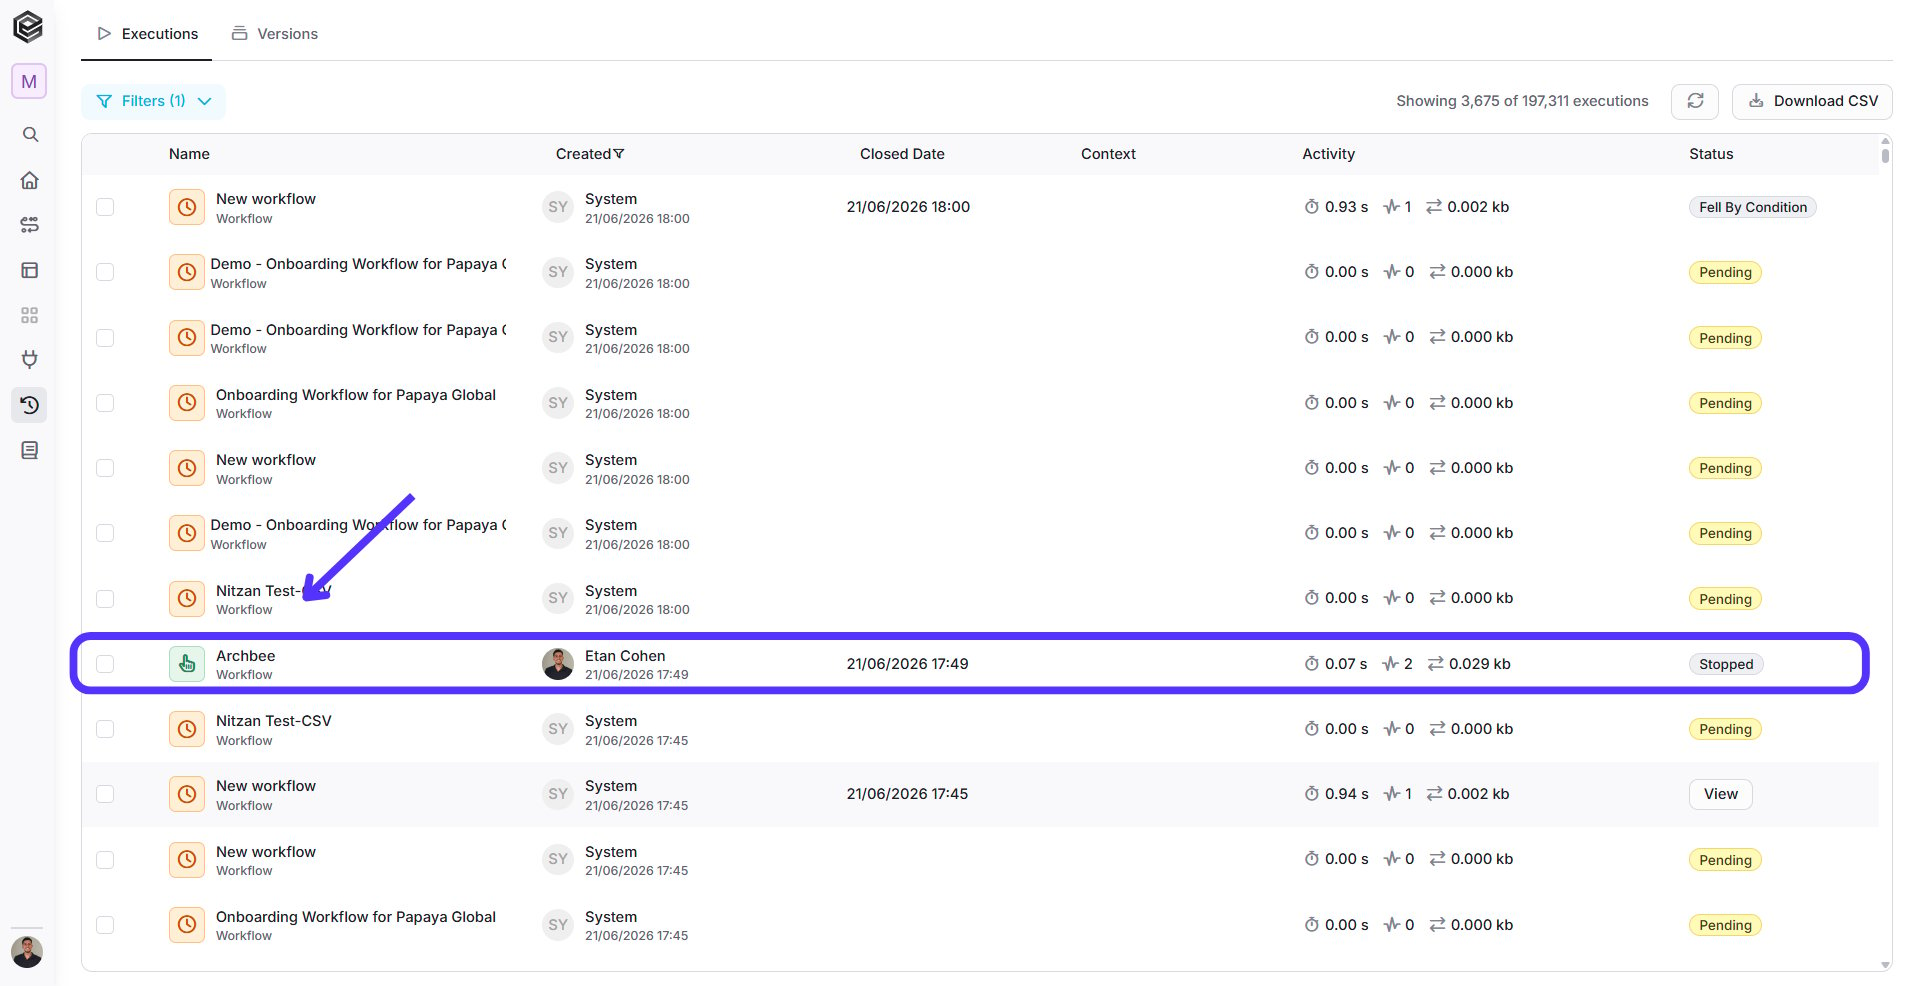 Press the Edit button
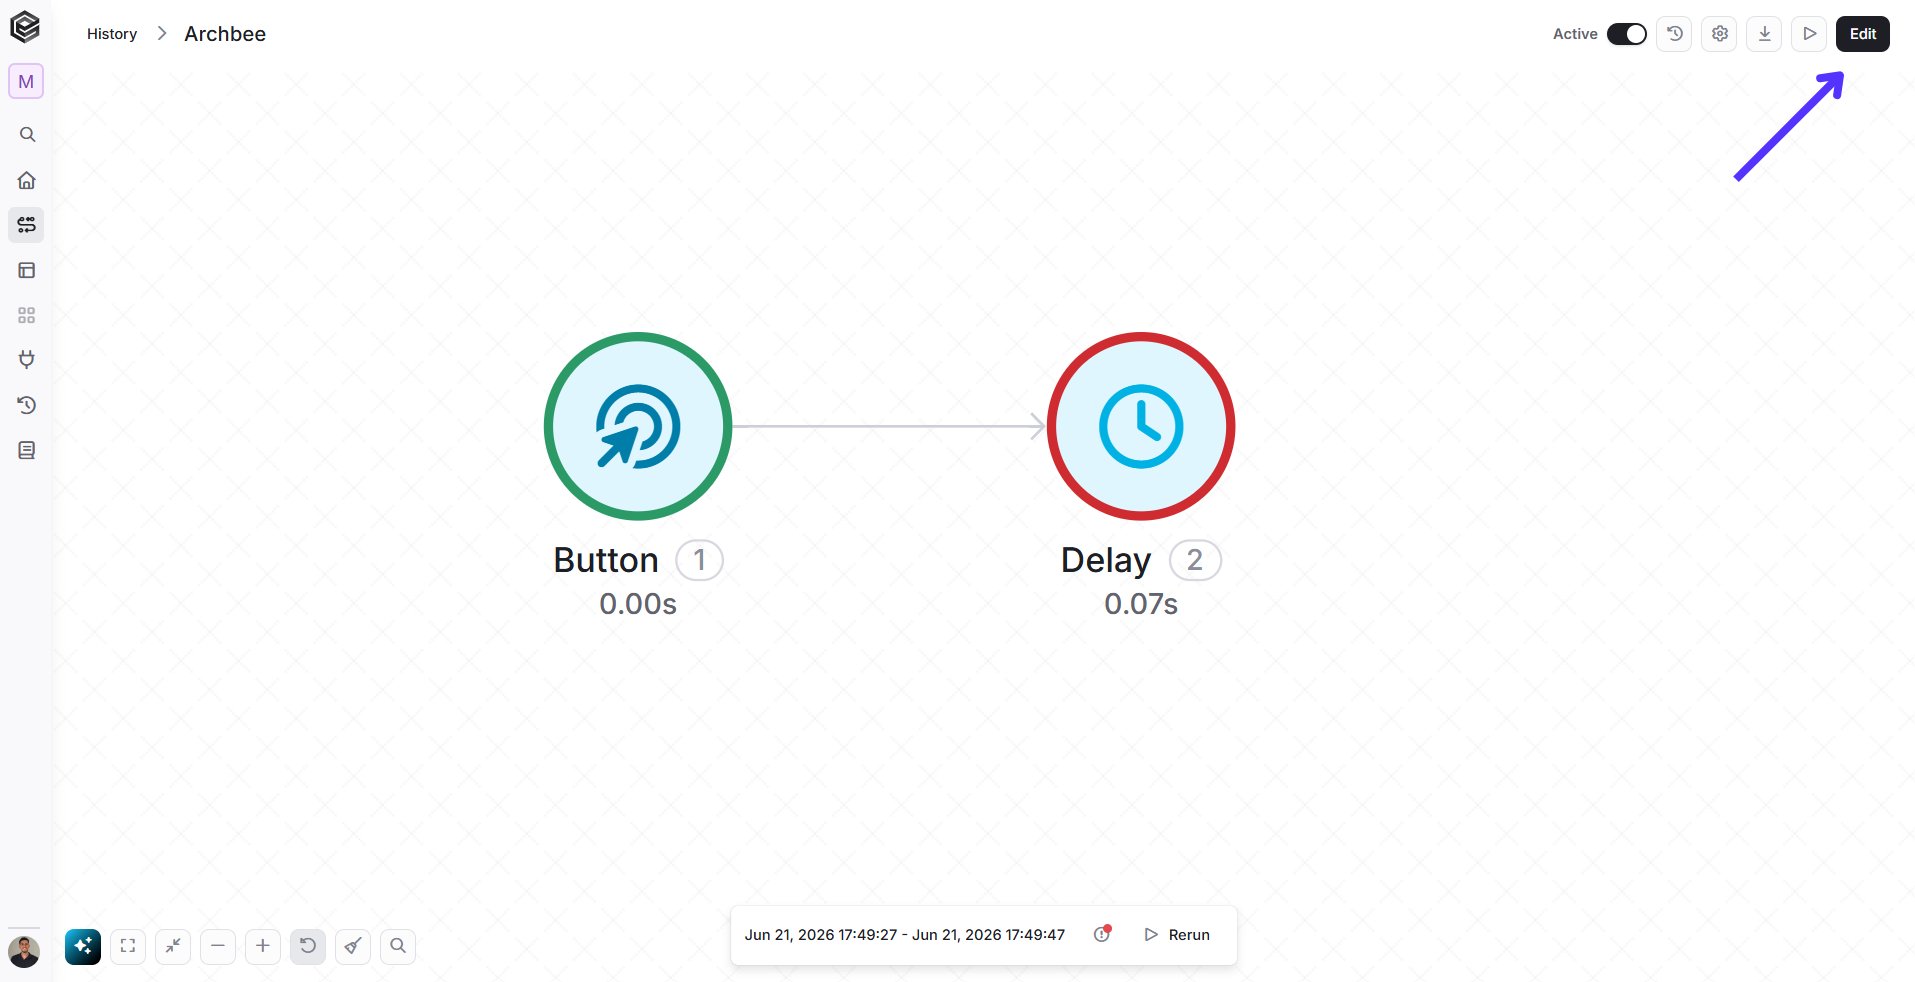 ### Workflow Settings
This section defines the general configuration of the workflow, including its name, description, and connected apps. It also controls execution settings such as concurrency limits and the maximum number of consecutive failures before the workflow stops.
### Workflow Settings
This section defines the general configuration of the workflow, including its name, description, and connected apps. It also controls execution settings such as concurrency limits and the maximum number of consecutive failures before the workflow stops.
 You can access Workflow Settings from inside a specific workflow. In the top bar, click the icon. This will open the workflow’s general configuration panel, where you can manage the name, description, connected apps, and execution settings.
### Info
The Info section allows you to define the workflow’s name and description and view metadata such as creation date, last update, and connected applications.
You can access Workflow Settings from inside a specific workflow. In the top bar, click the icon. This will open the workflow’s general configuration panel, where you can manage the name, description, connected apps, and execution settings.
### Info
The Info section allows you to define the workflow’s name and description and view metadata such as creation date, last update, and connected applications.
 1. *Name -* Defines the workflow name. It can also be edited directly from within the workflow editor itself.
2. *Description -* Allows you to add a short explanation of what the workflow does for documentation purposes.
3. *Concurrency... -* Determines how many runs of the workflow can execute simultaneously.
4. *Apply Concurrency Limits to Waiting Workflow -* When enabled, concurrency limits will also apply to workflow runs that are in a waiting state.
5. *Consecutive Failures Limit... -* Sets the maximum number of consecutive failed runs allowed before the workflow is automatically stopped. The maximum is 10.
6. *Create* - Displays who created the workflow and when. This information is also visible on the main Workflows home page.
7. *Updated -* Shows who last updated the workflow and the date of the update. This is also available on the [Workflows](https://app.engini.io/workflows) home page.
8. *Connections* - Lists the apps and connections used in the workflow. This information can also be viewed from the [Workflows](https://app.engini.io/workflows) home page.
9. *Save -* Saves any changes made in the [Workflow](https://app.engini.io/workflows) Settings.
### Sort
Use the sorting options to organize the workflows list according to the information you want to display first.
To change the sorting, click the relevant column name. For date-based columns, clicking the column name opens the available sorting options. Name-based columns are initially sorted automatically from *A – Z*, and clicking the column name allows you to switch the sorting direction.
1. *Name -* Defines the workflow name. It can also be edited directly from within the workflow editor itself.
2. *Description -* Allows you to add a short explanation of what the workflow does for documentation purposes.
3. *Concurrency... -* Determines how many runs of the workflow can execute simultaneously.
4. *Apply Concurrency Limits to Waiting Workflow -* When enabled, concurrency limits will also apply to workflow runs that are in a waiting state.
5. *Consecutive Failures Limit... -* Sets the maximum number of consecutive failed runs allowed before the workflow is automatically stopped. The maximum is 10.
6. *Create* - Displays who created the workflow and when. This information is also visible on the main Workflows home page.
7. *Updated -* Shows who last updated the workflow and the date of the update. This is also available on the [Workflows](https://app.engini.io/workflows) home page.
8. *Connections* - Lists the apps and connections used in the workflow. This information can also be viewed from the [Workflows](https://app.engini.io/workflows) home page.
9. *Save -* Saves any changes made in the [Workflow](https://app.engini.io/workflows) Settings.
### Sort
Use the sorting options to organize the workflows list according to the information you want to display first.
To change the sorting, click the relevant column name. For date-based columns, clicking the column name opens the available sorting options. Name-based columns are initially sorted automatically from *A – Z*, and clicking the column name allows you to switch the sorting direction.
 1. *Workflow Name -* Sorts the workflows alphabetically by workflow name. By default, the list is sorted from *A – Z*.
* *A – Z* – Displays workflow names in alphabetical order.
* *Z – A* – Displays workflow names in reverse alphabetical order.
2. *Last Run -* Click the column name to display the available sorting options.
* *Oldest first* – Displays workflows with the oldest last run first.
* *Newest first* – Displays workflows with the newest last run first.
3. *Created -* Click the column name to sort by the creator or creation date.
* *A – Z* – Sorts alphabetically by the creator’s name.
* *Z – A* – Sorts in reverse alphabetical order by the creator’s name.
* *Oldest first* – Displays workflows with the oldest creation date first.
* *Newest first* – Displays workflows with the newest creation date first.
4. *Updated -* Click the column name to sort by the last user who updated the workflow or by the update date.
* *A – Z* – Sorts alphabetically by the name of the last user who updated the workflow.
* *Z – A* – Sorts in reverse alphabetical order by the user’s name.
* *Oldest first* – Displays workflows with the oldest update date first.
* *Newest first* – Displays workflows with the newest update date first.
5. *Status -* Sorts the workflows according to their current status: *Active* or *Inactive*.
* *A – Z* – Displays *Active* workflows first, followed by *Inactive* workflows.
* *Z – A* – Displays *Inactive* workflows first, followed by *Active* workflows.
## Workflow Folders
The left sidebar allows you to organize your dashboard using custom directories. Keeping your workflows grouped into folders makes managing multiple automations a breeze.
1. *Workflow Name -* Sorts the workflows alphabetically by workflow name. By default, the list is sorted from *A – Z*.
* *A – Z* – Displays workflow names in alphabetical order.
* *Z – A* – Displays workflow names in reverse alphabetical order.
2. *Last Run -* Click the column name to display the available sorting options.
* *Oldest first* – Displays workflows with the oldest last run first.
* *Newest first* – Displays workflows with the newest last run first.
3. *Created -* Click the column name to sort by the creator or creation date.
* *A – Z* – Sorts alphabetically by the creator’s name.
* *Z – A* – Sorts in reverse alphabetical order by the creator’s name.
* *Oldest first* – Displays workflows with the oldest creation date first.
* *Newest first* – Displays workflows with the newest creation date first.
4. *Updated -* Click the column name to sort by the last user who updated the workflow or by the update date.
* *A – Z* – Sorts alphabetically by the name of the last user who updated the workflow.
* *Z – A* – Sorts in reverse alphabetical order by the user’s name.
* *Oldest first* – Displays workflows with the oldest update date first.
* *Newest first* – Displays workflows with the newest update date first.
5. *Status -* Sorts the workflows according to their current status: *Active* or *Inactive*.
* *A – Z* – Displays *Active* workflows first, followed by *Inactive* workflows.
* *Z – A* – Displays *Inactive* workflows first, followed by *Active* workflows.
## Workflow Folders
The left sidebar allows you to organize your dashboard using custom directories. Keeping your workflows grouped into folders makes managing multiple automations a breeze.
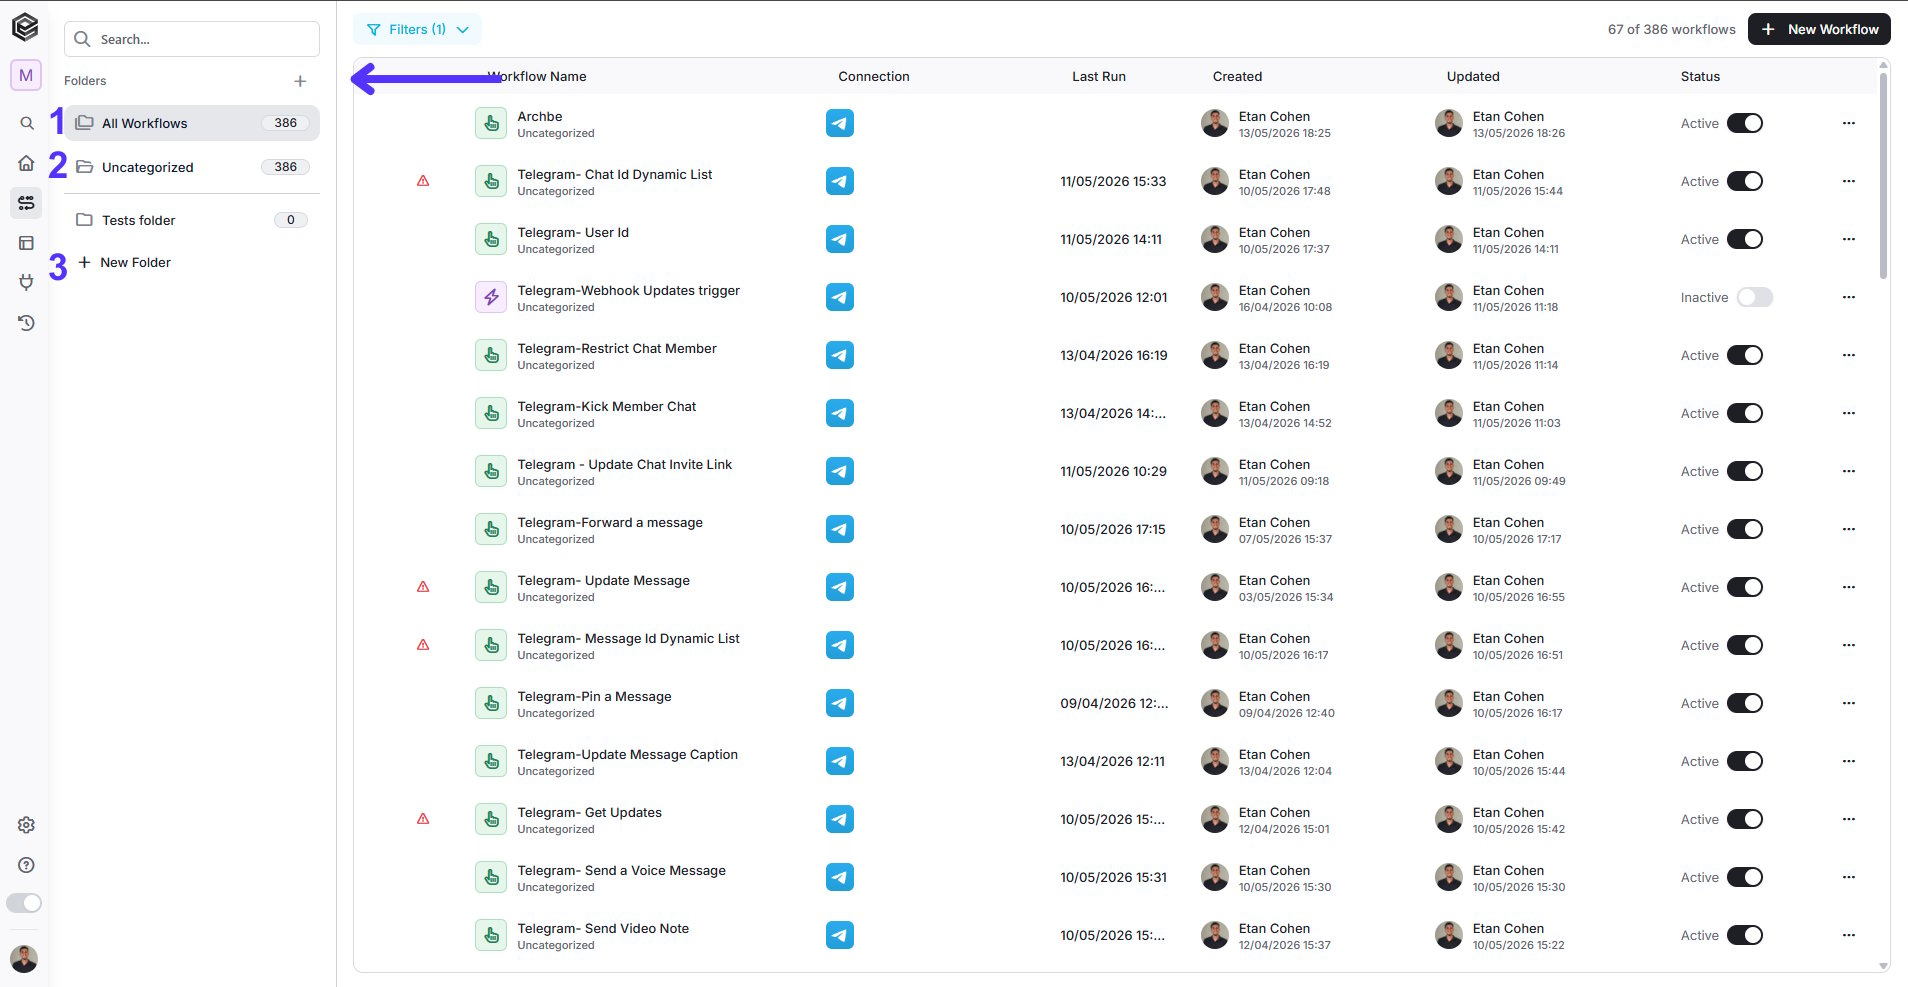 1. *All Workflows* – This views your entire workflow library in one master list. The number on the right shows the total count of all workflows created across your entire account.
2. *Uncategorized* – This acts as your default inbox. Any new workflow you create starts here automatically until you choose to move it into a specific folder.
3. *New Folder* – Click this button to create a brand new custom folder. You can give it a name (like 'Production', 'Marketing', or 'Tests folder') to start categorizing your work.
## Add Activity
Engini activities represent individual steps in your workflow. There are two types of activities available:
* *Trigger* – appears only one time in each workflow and always at the top. The trigger is what initiates the workflow run.
* *Action* – there is no limit to the number of actions you can add to your workflow. To add an action, follow the next steps:
1. *All Workflows* – This views your entire workflow library in one master list. The number on the right shows the total count of all workflows created across your entire account.
2. *Uncategorized* – This acts as your default inbox. Any new workflow you create starts here automatically until you choose to move it into a specific folder.
3. *New Folder* – Click this button to create a brand new custom folder. You can give it a name (like 'Production', 'Marketing', or 'Tests folder') to start categorizing your work.
## Add Activity
Engini activities represent individual steps in your workflow. There are two types of activities available:
* *Trigger* – appears only one time in each workflow and always at the top. The trigger is what initiates the workflow run.
* *Action* – there is no limit to the number of actions you can add to your workflow. To add an action, follow the next steps:
 * Press the '+' sign that pop up when you get your mouse closer to the line.
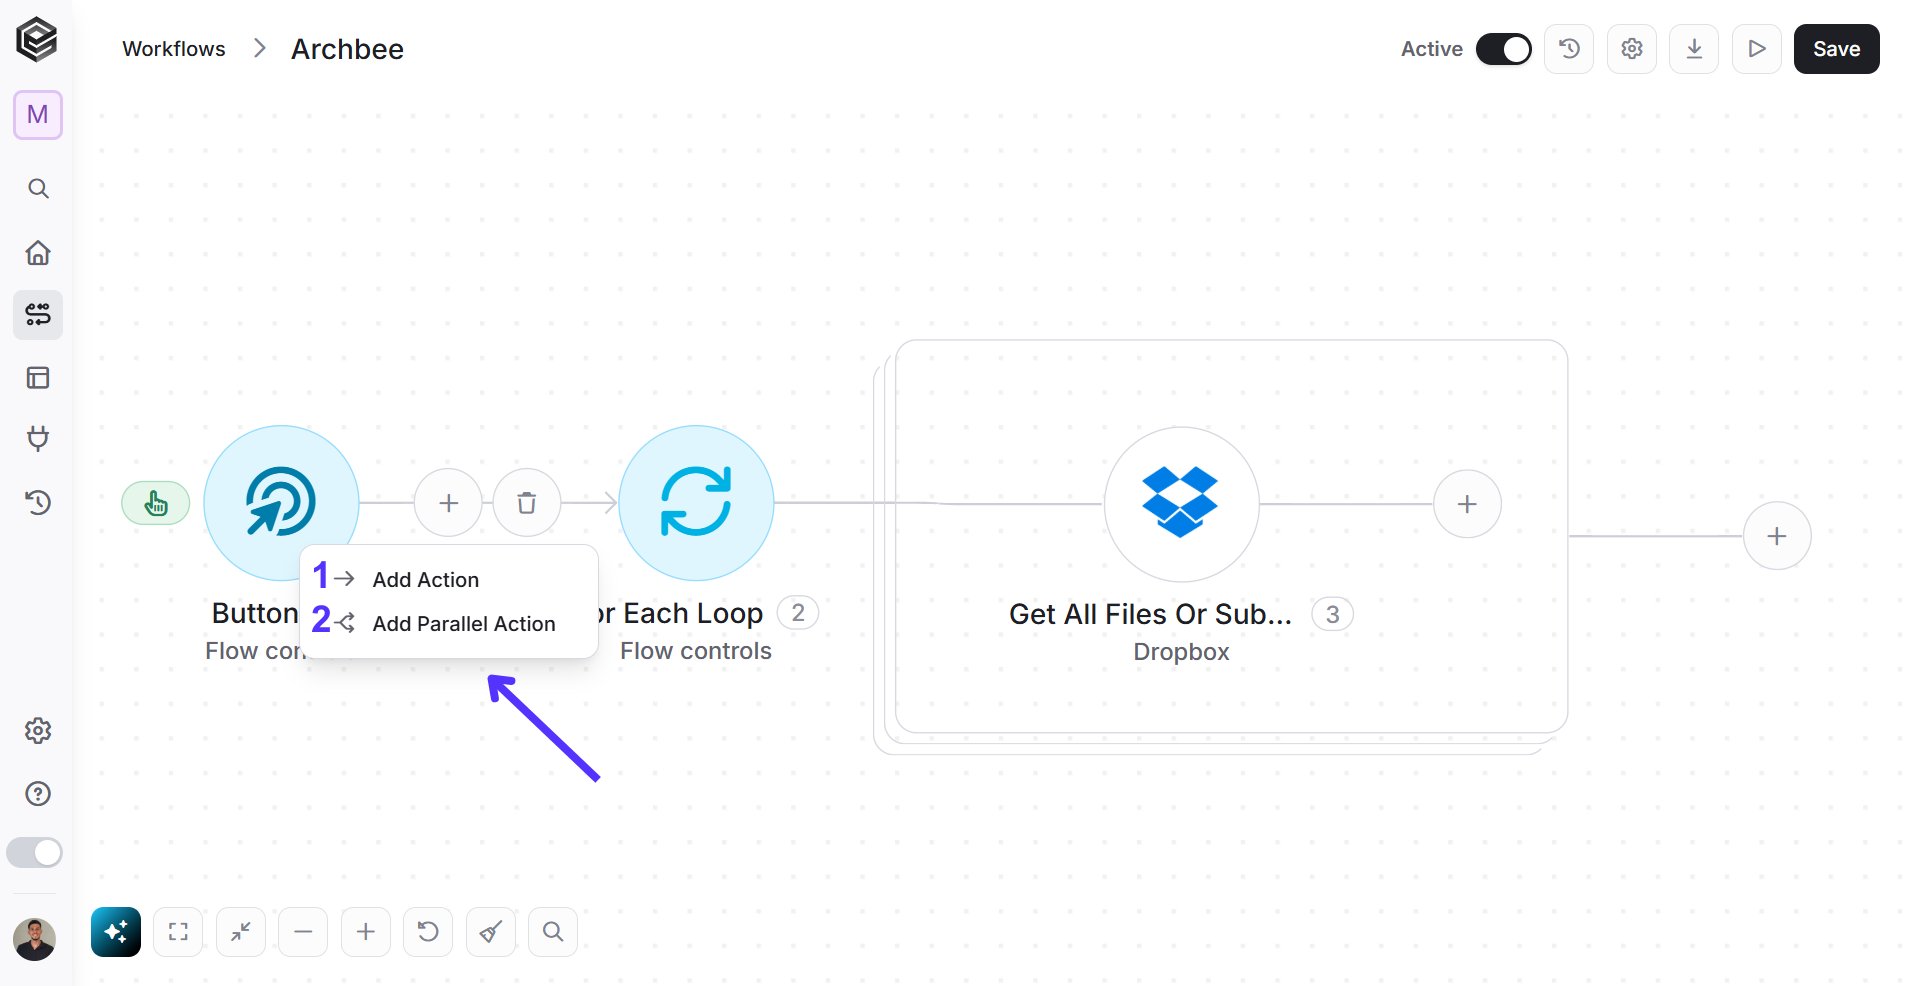 1. If you want to add an action between two existing activities, hover over the arrow between the two actions and click on the plus icon that appears.
1. You can choose to add a sequential action that will appear before the lower of the two activities – click on “Add Action”.
2. You can choose to add a parallel activity – click on “add as parallel branch”.
2. If you want to add an action after the last action you added, click on the “next step” button.
1. If you want to add an action between two existing activities, hover over the arrow between the two actions and click on the plus icon that appears.
1. You can choose to add a sequential action that will appear before the lower of the two activities – click on “Add Action”.
2. You can choose to add a parallel activity – click on “add as parallel branch”.
2. If you want to add an action after the last action you added, click on the “next step” button.
 * Choose the Engini software and click on the name of the action you want to use.
For more information on the types of actions for each software, see the ["Apps".](/help/apps/agentai)
## Delete Actions
### Delete one action
1. Stand on the action you want to delete.
* Choose the Engini software and click on the name of the action you want to use.
For more information on the types of actions for each software, see the ["Apps".](/help/apps/agentai)
## Delete Actions
### Delete one action
1. Stand on the action you want to delete.
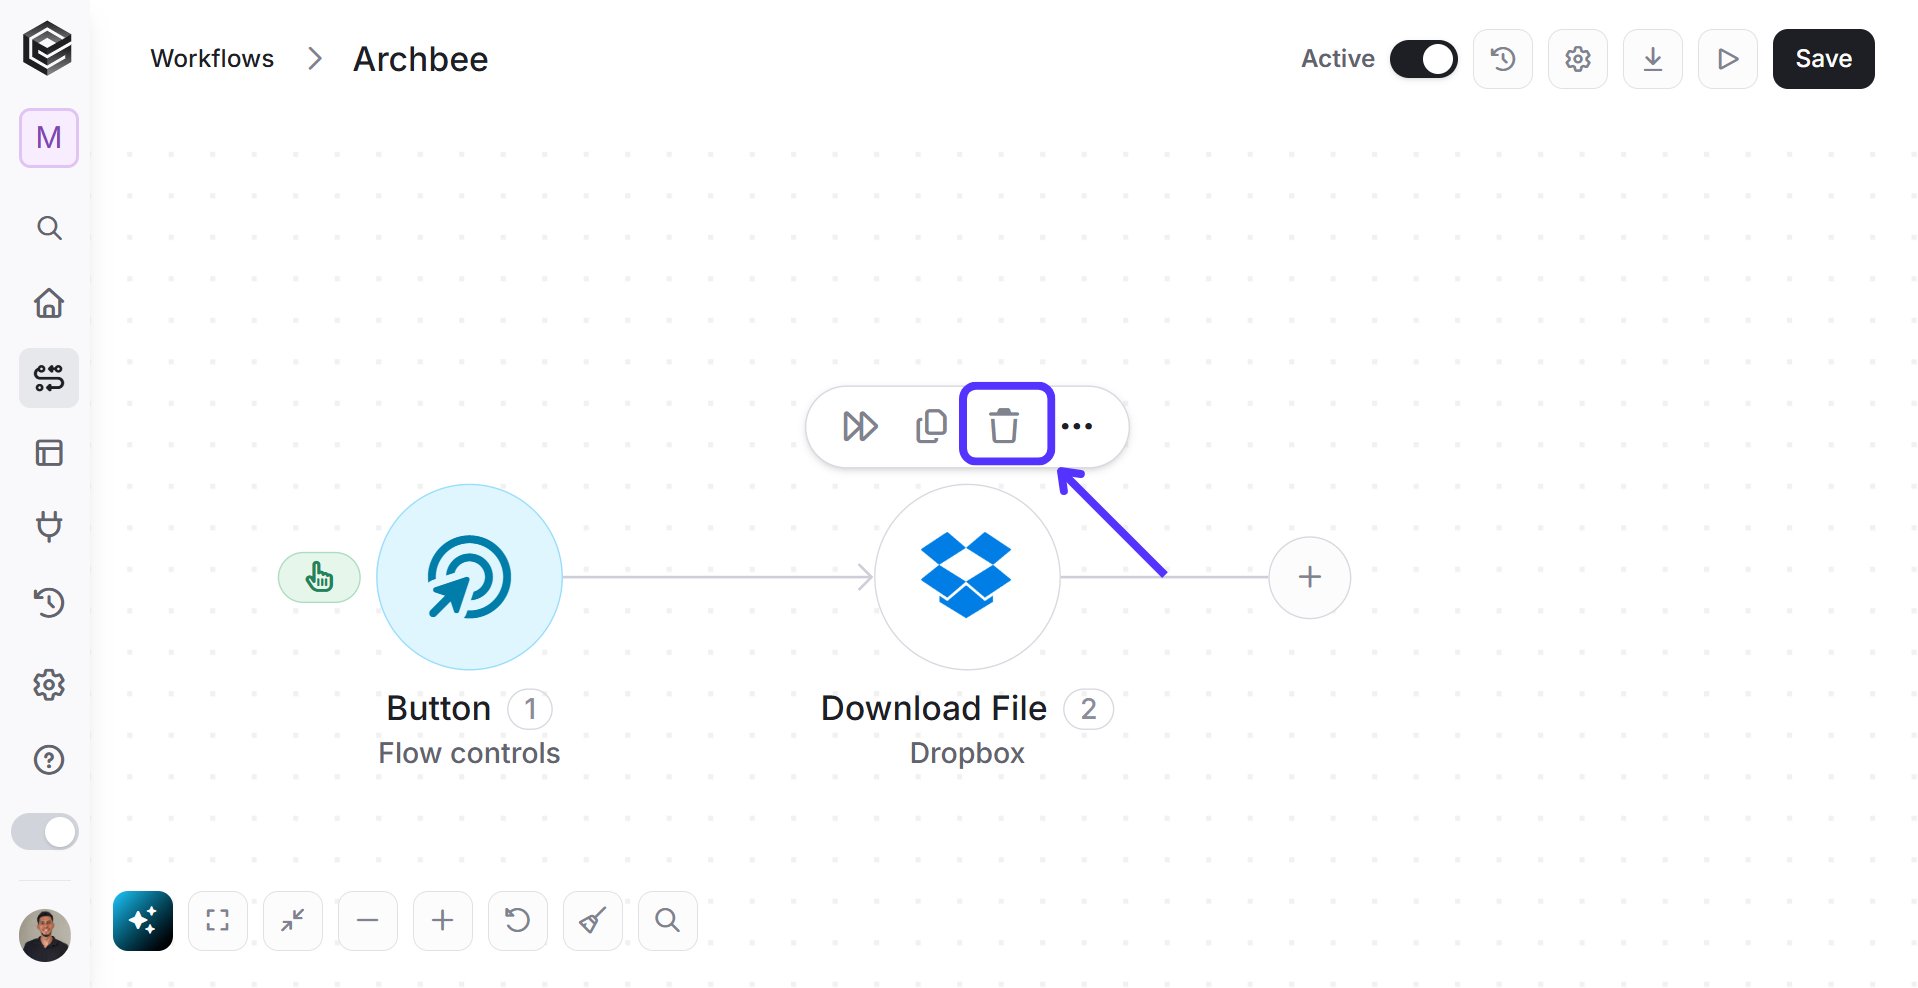 2. Click on the trash option.
### Delete multiply actions
There is also an option to delete multiple actions simultaneously.
2. Click on the trash option.
### Delete multiply actions
There is also an option to delete multiple actions simultaneously.
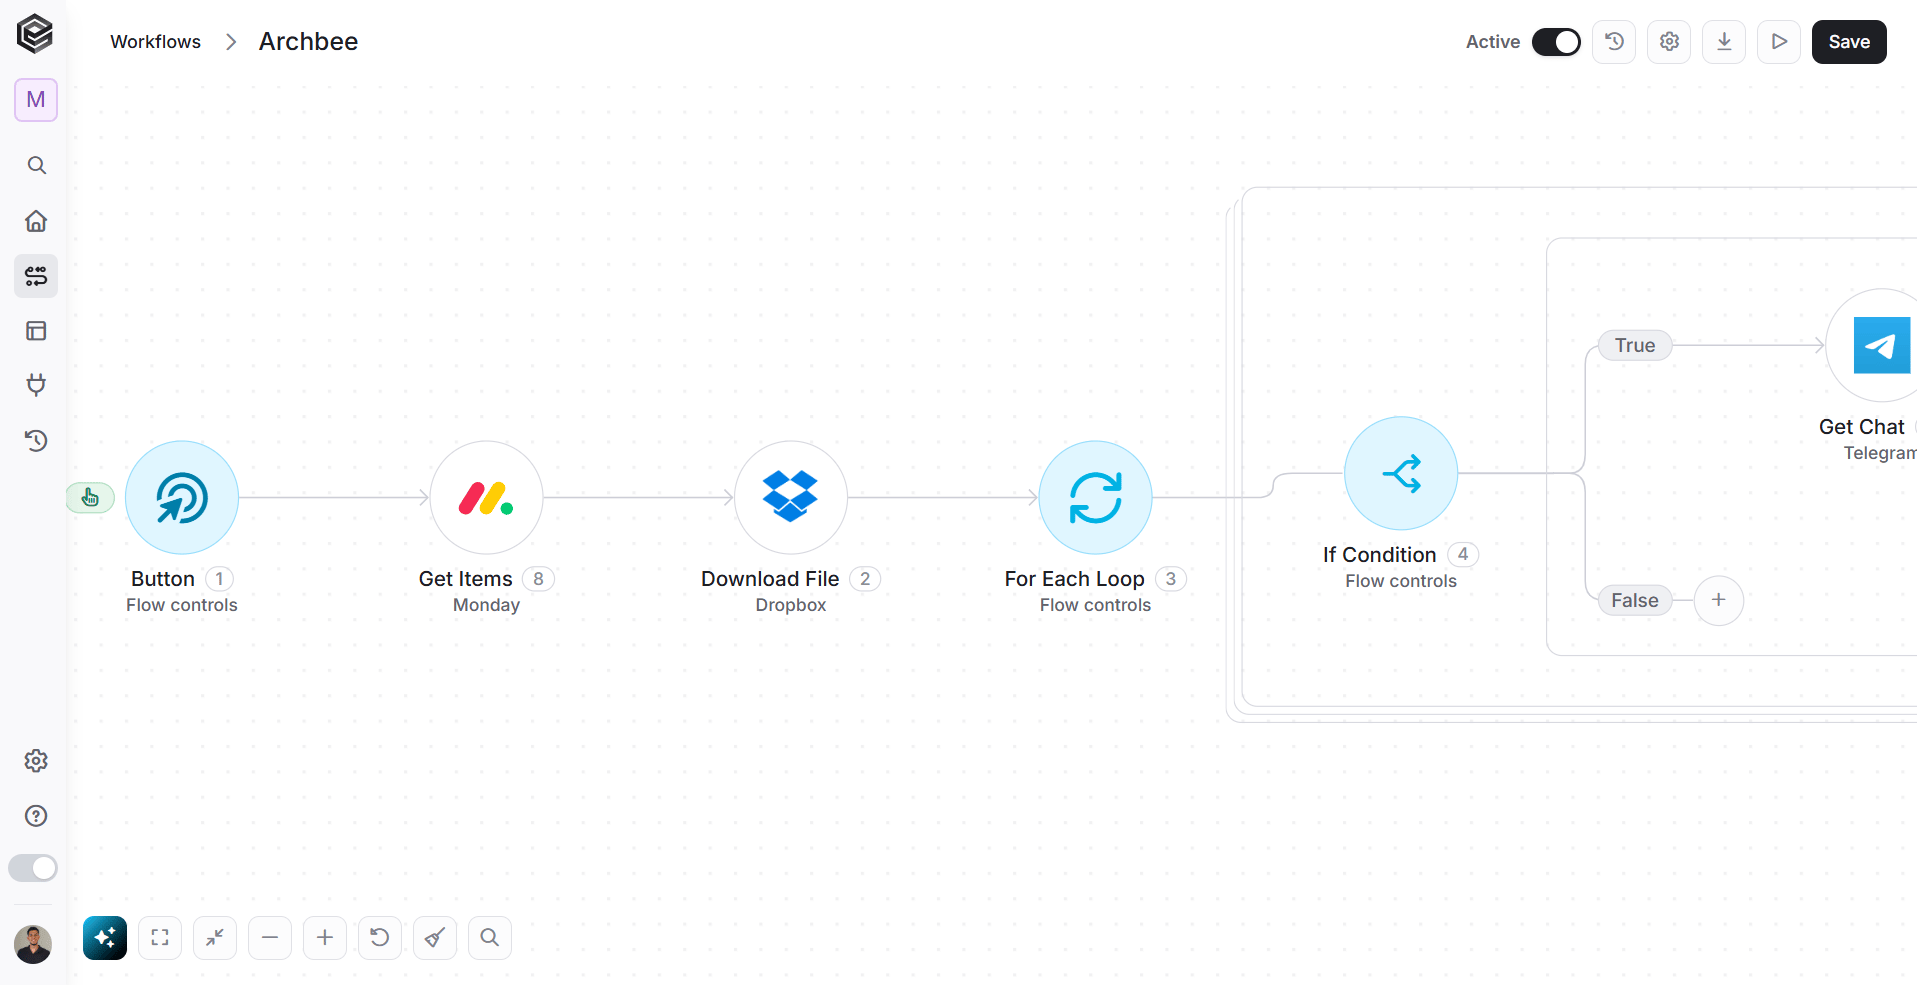 1. *Select the actions -* You can select multiple actions by holding **Ctrl** (on Windows) or **Command ⌘** (on Mac) and clicking on each action you want, similar to selecting multiple files, or by simply clicking and dragging with the mouse to select several actions at once.
* For example, if you select actions 4 and 5, a dashed outline will appear around them to indicate they are selected.
1. *Select the actions -* You can select multiple actions by holding **Ctrl** (on Windows) or **Command ⌘** (on Mac) and clicking on each action you want, similar to selecting multiple files, or by simply clicking and dragging with the mouse to select several actions at once.
* For example, if you select actions 4 and 5, a dashed outline will appear around them to indicate they are selected.
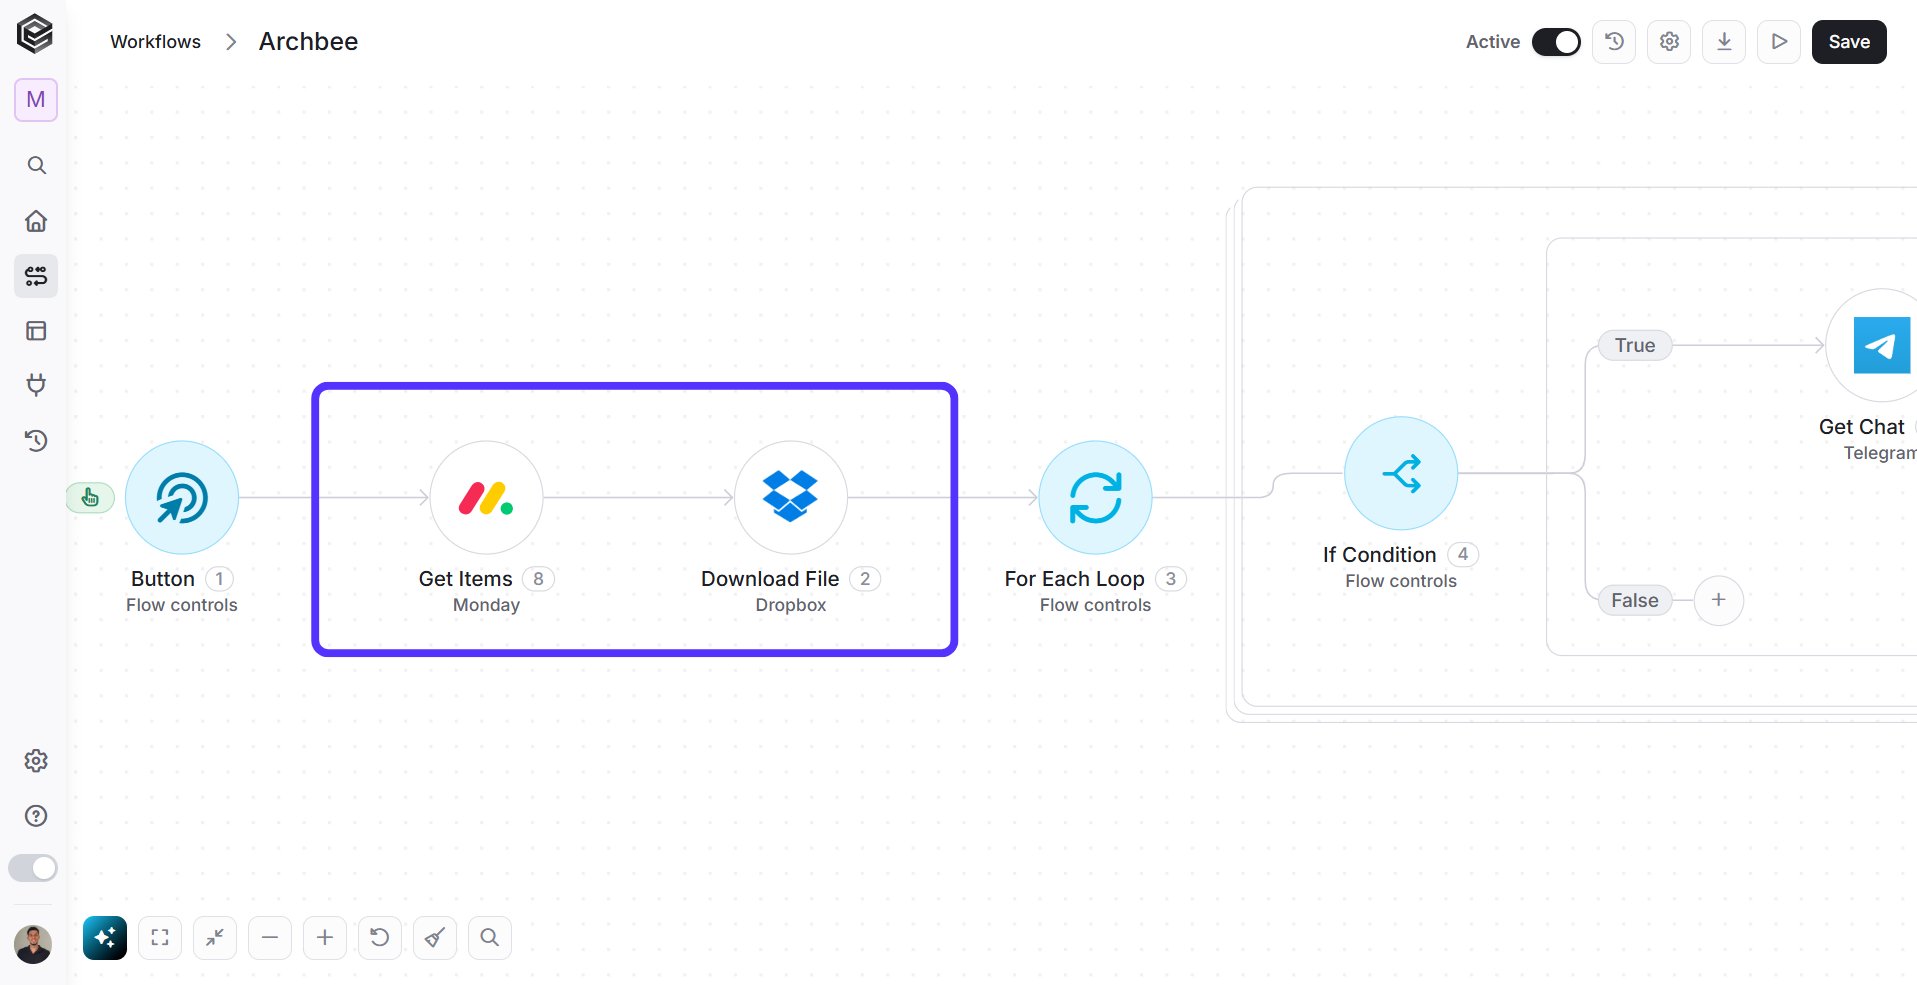 2. *Deleting the actions -* To delete, simply press the delete key on your keyboard after selecting the actions. It is not possible to click the trash icon on a specific action when multiple actions are selected.
**Note:** After deleting actions that are positioned between other actions, you need to manually reconnect the flow to ensure the workflow remains valid.
2. *Deleting the actions -* To delete, simply press the delete key on your keyboard after selecting the actions. It is not possible to click the trash icon on a specific action when multiple actions are selected.
**Note:** After deleting actions that are positioned between other actions, you need to manually reconnect the flow to ensure the workflow remains valid.
 ## Copy to clipboard
1. Stand on the action you want to copy to clipboard.
## Copy to clipboard
1. Stand on the action you want to copy to clipboard.
 2. Click on the “Copy to clipboard” option.
 3. The action is created disconnected from all other actions. It is now possible to attach the copied action to the rest of the workflow.
## Skip action
You can choose to skip an action in your workflow. To do so, follow these steps:
1. Stand on the activity you want to skip.
3. The action is created disconnected from all other actions. It is now possible to attach the copied action to the rest of the workflow.
## Skip action
You can choose to skip an action in your workflow. To do so, follow these steps:
1. Stand on the activity you want to skip.
 2. Click on the “Skip action” option.
Now the activity in the workflow is a bit blurry. The skip function helps to better understand the building of the automation when there are problems and errors.
2. Click on the “Skip action” option.
Now the activity in the workflow is a bit blurry. The skip function helps to better understand the building of the automation when there are problems and errors.
 ## Rename Activity
1. Click on the three dots on the right side of the activity.
## Rename Activity
1. Click on the three dots on the right side of the activity.
 2. Click on the “Rename” option.
 3. The name field will be opened for editing, and you will be able to change the name of the activity.
 4. When you finish editing the activity name, click outside of the input field and the name will be saved automatically.
Note that if you won’t save the workflow the name change won’t take effect.
## Refresh the connection
If you updated fields or objects in your software after the activity was created. You can “refresh” the connection, and then you will be able to use the fields or objects you updated.
1. Click on the activity.
4. When you finish editing the activity name, click outside of the input field and the name will be saved automatically.
Note that if you won’t save the workflow the name change won’t take effect.
## Refresh the connection
If you updated fields or objects in your software after the activity was created. You can “refresh” the connection, and then you will be able to use the fields or objects you updated.
1. Click on the activity.
 2. Click on the three dots on the right side of the activity.
 3. Click on the “Refresh” option.
 ## Configure run after
You can set a activity to run after the previous neighboring activity has succeeded or failed. The action will work only after the success or failure of the action before it. By default, each activity is configured to run after previous neighboring activity has succeeded.
To change the default settings, do the following:
1. Click on the three dots on the right side of the activity.
## Configure run after
You can set a activity to run after the previous neighboring activity has succeeded or failed. The action will work only after the success or failure of the action before it. By default, each activity is configured to run after previous neighboring activity has succeeded.
To change the default settings, do the following:
1. Click on the three dots on the right side of the activity.
 3. After clicking on the option, the display of the activity will change and you can define if you want the current activity to work only after the previous activity succeeded, failed or both of them.
 4. Click the “Apply” button to return the previous activity view.
### 4 options:
1. *Run Only on Success (Default)*- **Is Successful: check Has Failed :unchecked**
the step executes only if the previous step completes successfully. If the previous step fails, this step is skipped.
2. *Run Only on Failure (Error Handling)* - **Is Successful: unchecked Has Failed :check**
the step executes only if the previous step fails. Use this to trigger fallback actions, log errors, or send failure alerts
3. *Run Always* - **Is Successful: checked Has Failed :checked**
the step executes regardless of the outcome. Whether the preceding action succeeds or fails, the workflow will continue through this step.
4. *Never Run* - **Is Successful: unchecked Has Failed :unchecked**
the step will never execute. This is useful for temporarily pausing or disabling a specific branch of your workflow without deleting the blocks.
## Configure context
The context field is a field that can be populated at runtime. This is a global variable in the workflow that you can populate in different activities throughout your workflow, and the value that will be displayed to the user is the last value that was populated in this variable. The value received in the field can be seen in the history table and thus allow the user to easily identify which run history to open.
1. Click on the three dots on the right side of the activity.
4. Click the “Apply” button to return the previous activity view.
### 4 options:
1. *Run Only on Success (Default)*- **Is Successful: check Has Failed :unchecked**
the step executes only if the previous step completes successfully. If the previous step fails, this step is skipped.
2. *Run Only on Failure (Error Handling)* - **Is Successful: unchecked Has Failed :check**
the step executes only if the previous step fails. Use this to trigger fallback actions, log errors, or send failure alerts
3. *Run Always* - **Is Successful: checked Has Failed :checked**
the step executes regardless of the outcome. Whether the preceding action succeeds or fails, the workflow will continue through this step.
4. *Never Run* - **Is Successful: unchecked Has Failed :unchecked**
the step will never execute. This is useful for temporarily pausing or disabling a specific branch of your workflow without deleting the blocks.
## Configure context
The context field is a field that can be populated at runtime. This is a global variable in the workflow that you can populate in different activities throughout your workflow, and the value that will be displayed to the user is the last value that was populated in this variable. The value received in the field can be seen in the history table and thus allow the user to easily identify which run history to open.
1. Click on the three dots on the right side of the activity.
 3. After clicking on the option, the display of the activity will change and you can define the context.
 4. Click the “Apply” button to return the previous activity view.
## Configure Retry Policy
The **Retry Policy** is a mechanism designed to handle temporary failures by automatically re-executing a specific action before the workflow proceeds to the next steps.
1. Click on the three dots on the right side of the activity.
4. Click the “Apply” button to return the previous activity view.
## Configure Retry Policy
The **Retry Policy** is a mechanism designed to handle temporary failures by automatically re-executing a specific action before the workflow proceeds to the next steps.
1. Click on the three dots on the right side of the activity.
 3. Define the following fields:
 1. *Max Retries -* Sets the number of repeat attempts (0–100) the system performs if the initial action fails. If set to **0**, no retries will occur. If set to **1**, a total of two attempts will be made (the initial run plus one retry) in the event of a failure.
2. *Delay Between Retries -* Defines the waiting period between retries, delays of 30+ seconds put the workflow to sleep until the next try.
3. Time Type- Select the time measurement (Seconds, minutes etc).
4. *Retry Conditions (Optional) -* Specifies particular rules for when a retry should occur, if left blank, the system retries on any failure.
5. *Add Conditions- Insert another conditions to be more precise.*
6. *Apply -* Saves and activates the configured retry logic for this specific action.
## Dynamic Connection
Enable use of several different connections within the same activity.
1. Click on the 3 dots inside the action on the right side of the activity
1. *Max Retries -* Sets the number of repeat attempts (0–100) the system performs if the initial action fails. If set to **0**, no retries will occur. If set to **1**, a total of two attempts will be made (the initial run plus one retry) in the event of a failure.
2. *Delay Between Retries -* Defines the waiting period between retries, delays of 30+ seconds put the workflow to sleep until the next try.
3. Time Type- Select the time measurement (Seconds, minutes etc).
4. *Retry Conditions (Optional) -* Specifies particular rules for when a retry should occur, if left blank, the system retries on any failure.
5. *Add Conditions- Insert another conditions to be more precise.*
6. *Apply -* Saves and activates the configured retry logic for this specific action.
## Dynamic Connection
Enable use of several different connections within the same activity.
1. Click on the 3 dots inside the action on the right side of the activity
 3. Choose "Dynamic":
 4. Choose between two types of connection
 1. *Connection ID -* Click on the empty field near the connection label and select the relevant connections for this activity.
 You can define conditions with [functions](/help/tools/enginis-functions)that will choose which connection to use in this activity
2. *Credentials* - Enter the connection credentials directly for this activity, either by typing a fixed value or by using a dynamic expression. The available fields depend on the selected connector and may include values such as an API key, access token,account ID or other authentication details.
You can define conditions with [functions](/help/tools/enginis-functions)that will choose which connection to use in this activity
2. *Credentials* - Enter the connection credentials directly for this activity, either by typing a fixed value or by using a dynamic expression. The available fields depend on the selected connector and may include values such as an API key, access token,account ID or other authentication details.
 Any value entered here overrides the corresponding value stored in the connection for this activity only.
Leave a field empty to use the value saved in the original connection.
5. Click “Done” to save your selection.
## Managing Activity Data
### Add Fields
Enable use of several different fields according to the use of activity. While the available options change depending on the activity you choose, the concept always stays the same: you are setting up rules to decide when an activity should actually run.
*For example:*
Any value entered here overrides the corresponding value stored in the connection for this activity only.
Leave a field empty to use the value saved in the original connection.
5. Click “Done” to save your selection.
## Managing Activity Data
### Add Fields
Enable use of several different fields according to the use of activity. While the available options change depending on the activity you choose, the concept always stays the same: you are setting up rules to decide when an activity should actually run.
*For example:*
 Choose the *Add Field option, a drop down of options will pop up.*
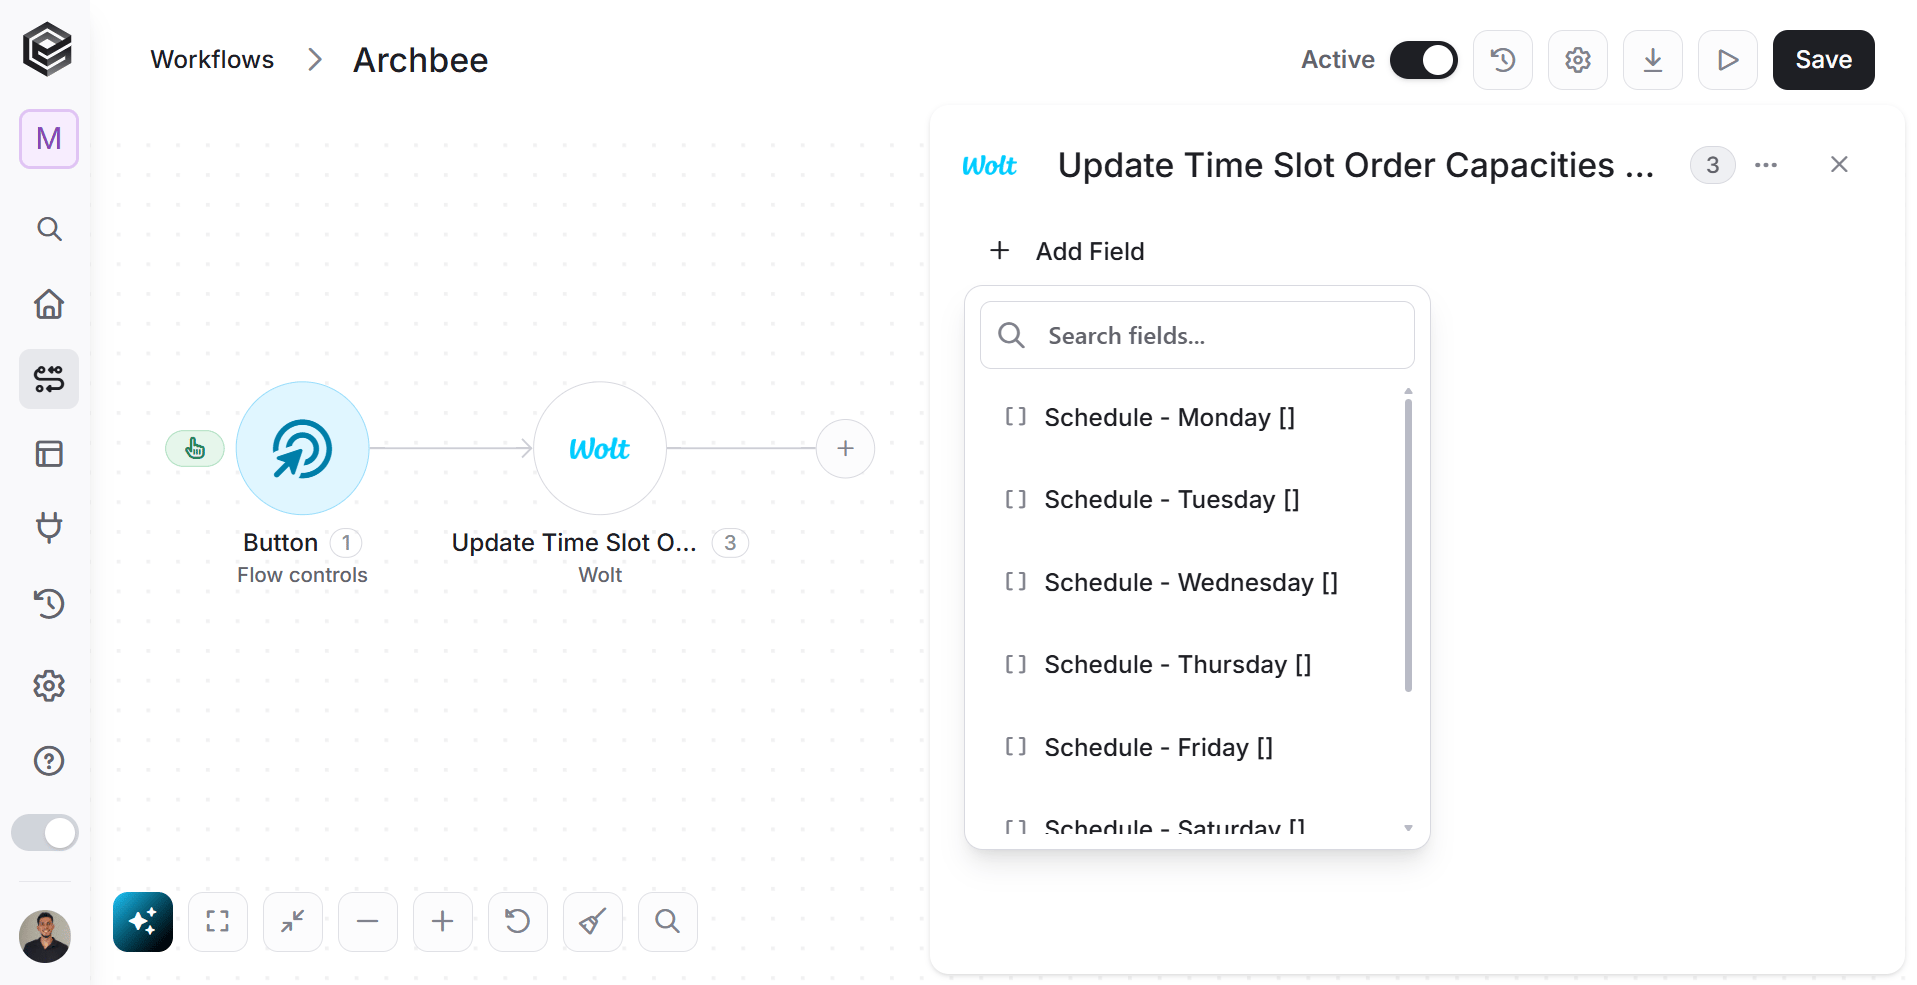 *Choose the field you want to use.*
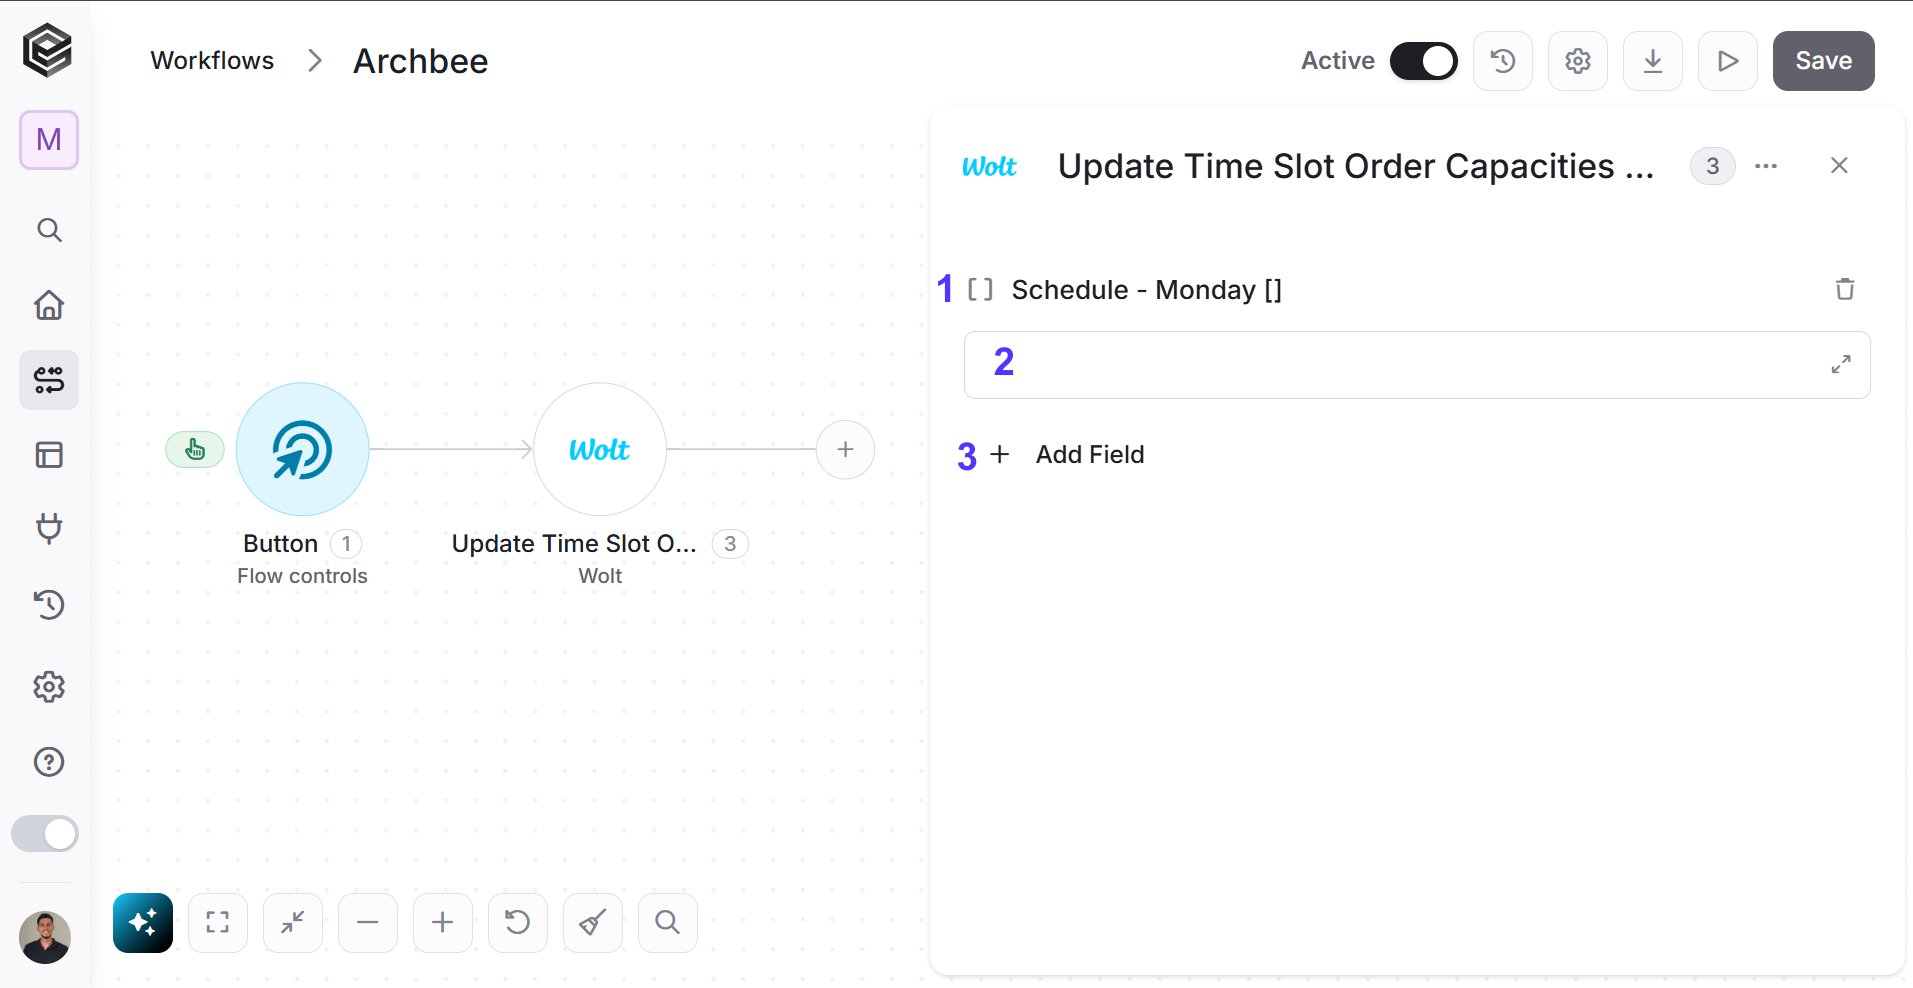 1. Choose from the drop down the field you want to fill.
2. Click on the empty field to the right of the drop down to be shown the tooltip with all the options you can use to fill the field.
* You can populate the field in one of the following options (Depending on the column type, please refer to the [column types reference](/help/apps/mondaycom)):
* Static value – number / string. when using strings, you need to surround them with single quotes (‘).
* Property value from a previous activity (Using the tooltip that opens when clicking on the field).
* Expression – using [functions](/help/tools/enginis-functions)and/or Previous activity properties and/or static values (Using the tooltip that opens when clicking on the field).
3. Repeat steps 1-3 for all the fields you want to populate.
### Add Filters
Enable use of several different filters according to the use of activity. While the available options change depending on the activity you choose, the concept always stays the same: you are setting up rules to decide when an activity should actually run.
*For example:*
1. Choose from the drop down the field you want to fill.
2. Click on the empty field to the right of the drop down to be shown the tooltip with all the options you can use to fill the field.
* You can populate the field in one of the following options (Depending on the column type, please refer to the [column types reference](/help/apps/mondaycom)):
* Static value – number / string. when using strings, you need to surround them with single quotes (‘).
* Property value from a previous activity (Using the tooltip that opens when clicking on the field).
* Expression – using [functions](/help/tools/enginis-functions)and/or Previous activity properties and/or static values (Using the tooltip that opens when clicking on the field).
3. Repeat steps 1-3 for all the fields you want to populate.
### Add Filters
Enable use of several different filters according to the use of activity. While the available options change depending on the activity you choose, the concept always stays the same: you are setting up rules to decide when an activity should actually run.
*For example:*
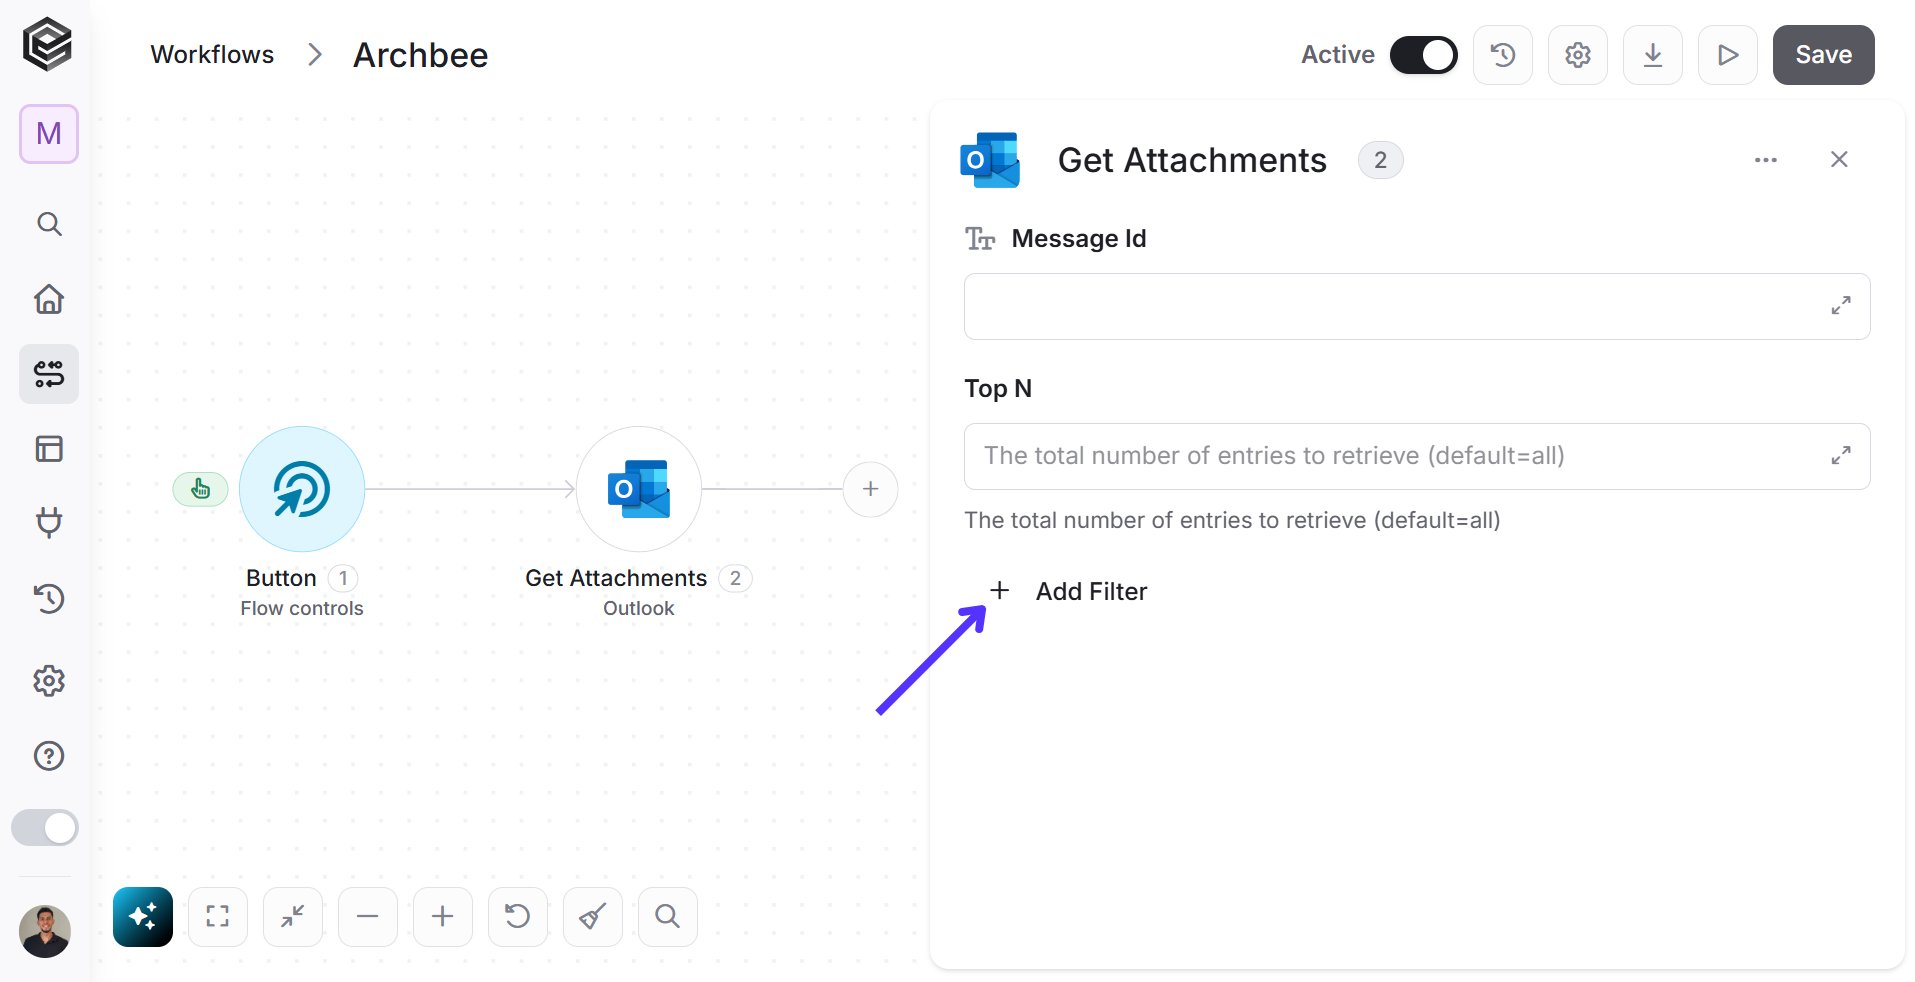 Choose the *Add Filters option, a drop down of options will pop up.*
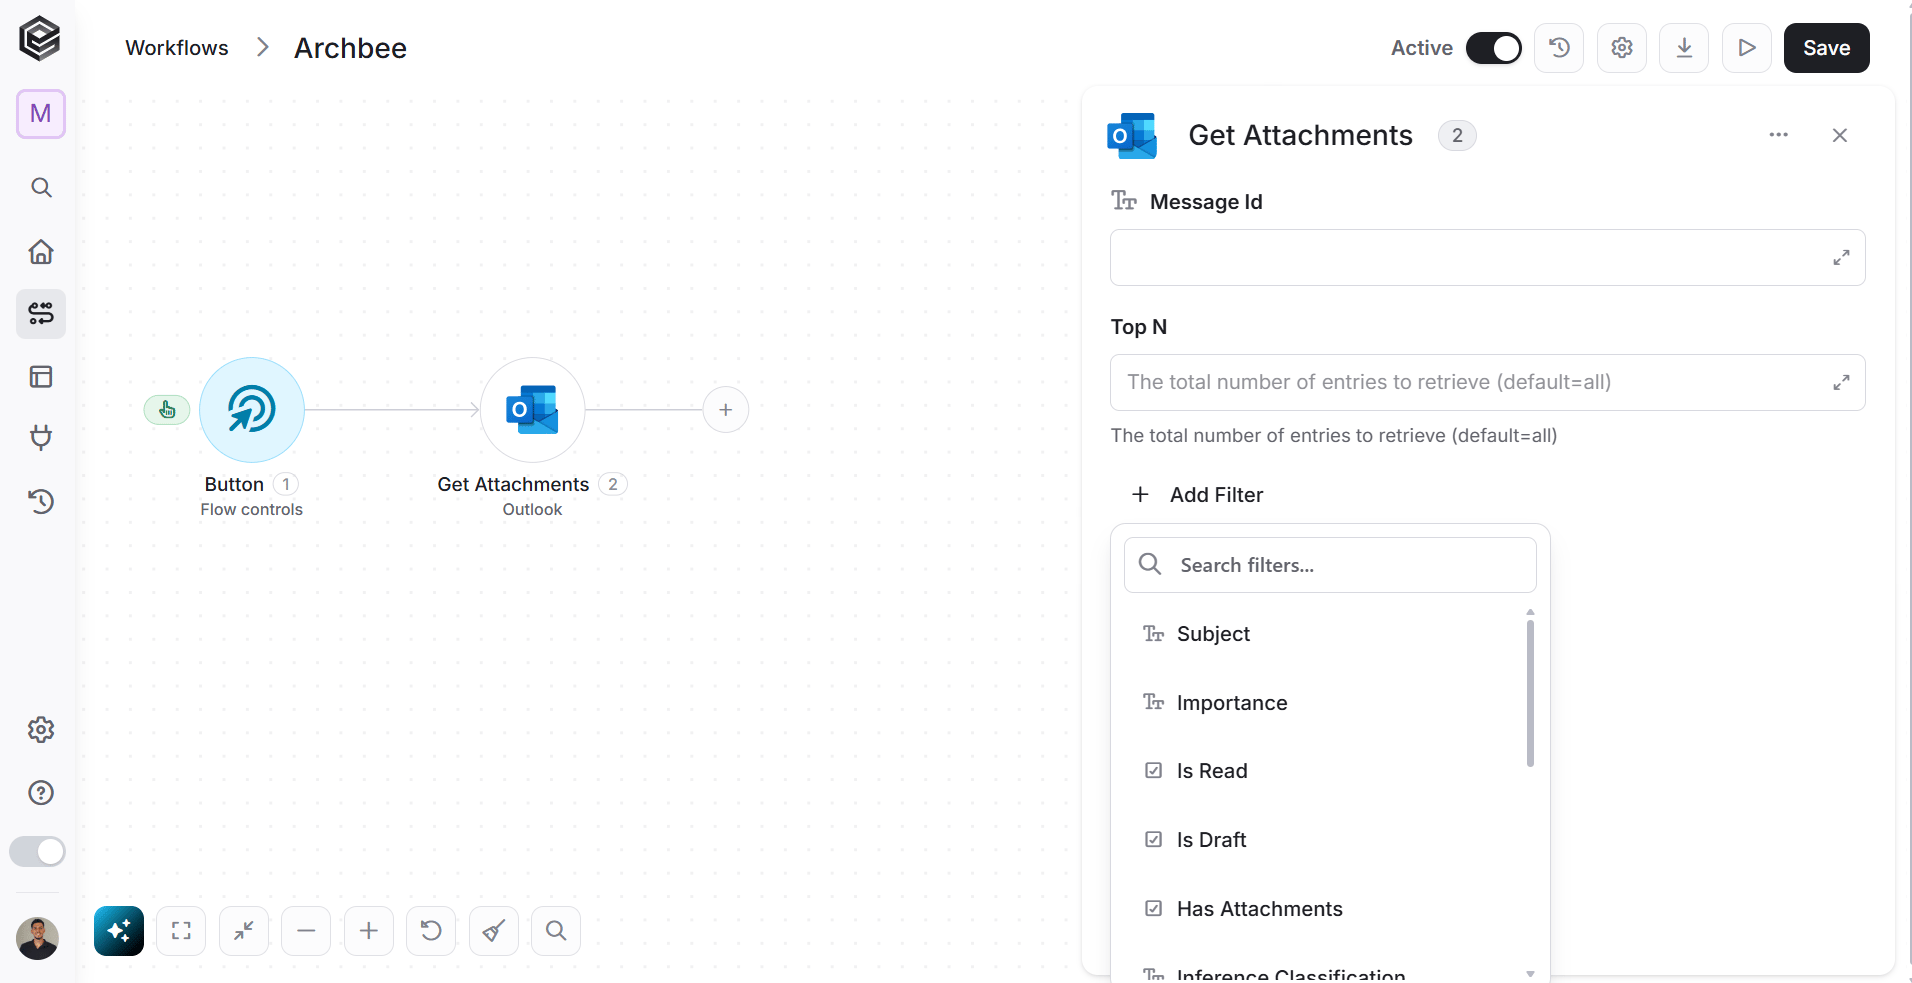 *Choose the field you want to filter.*
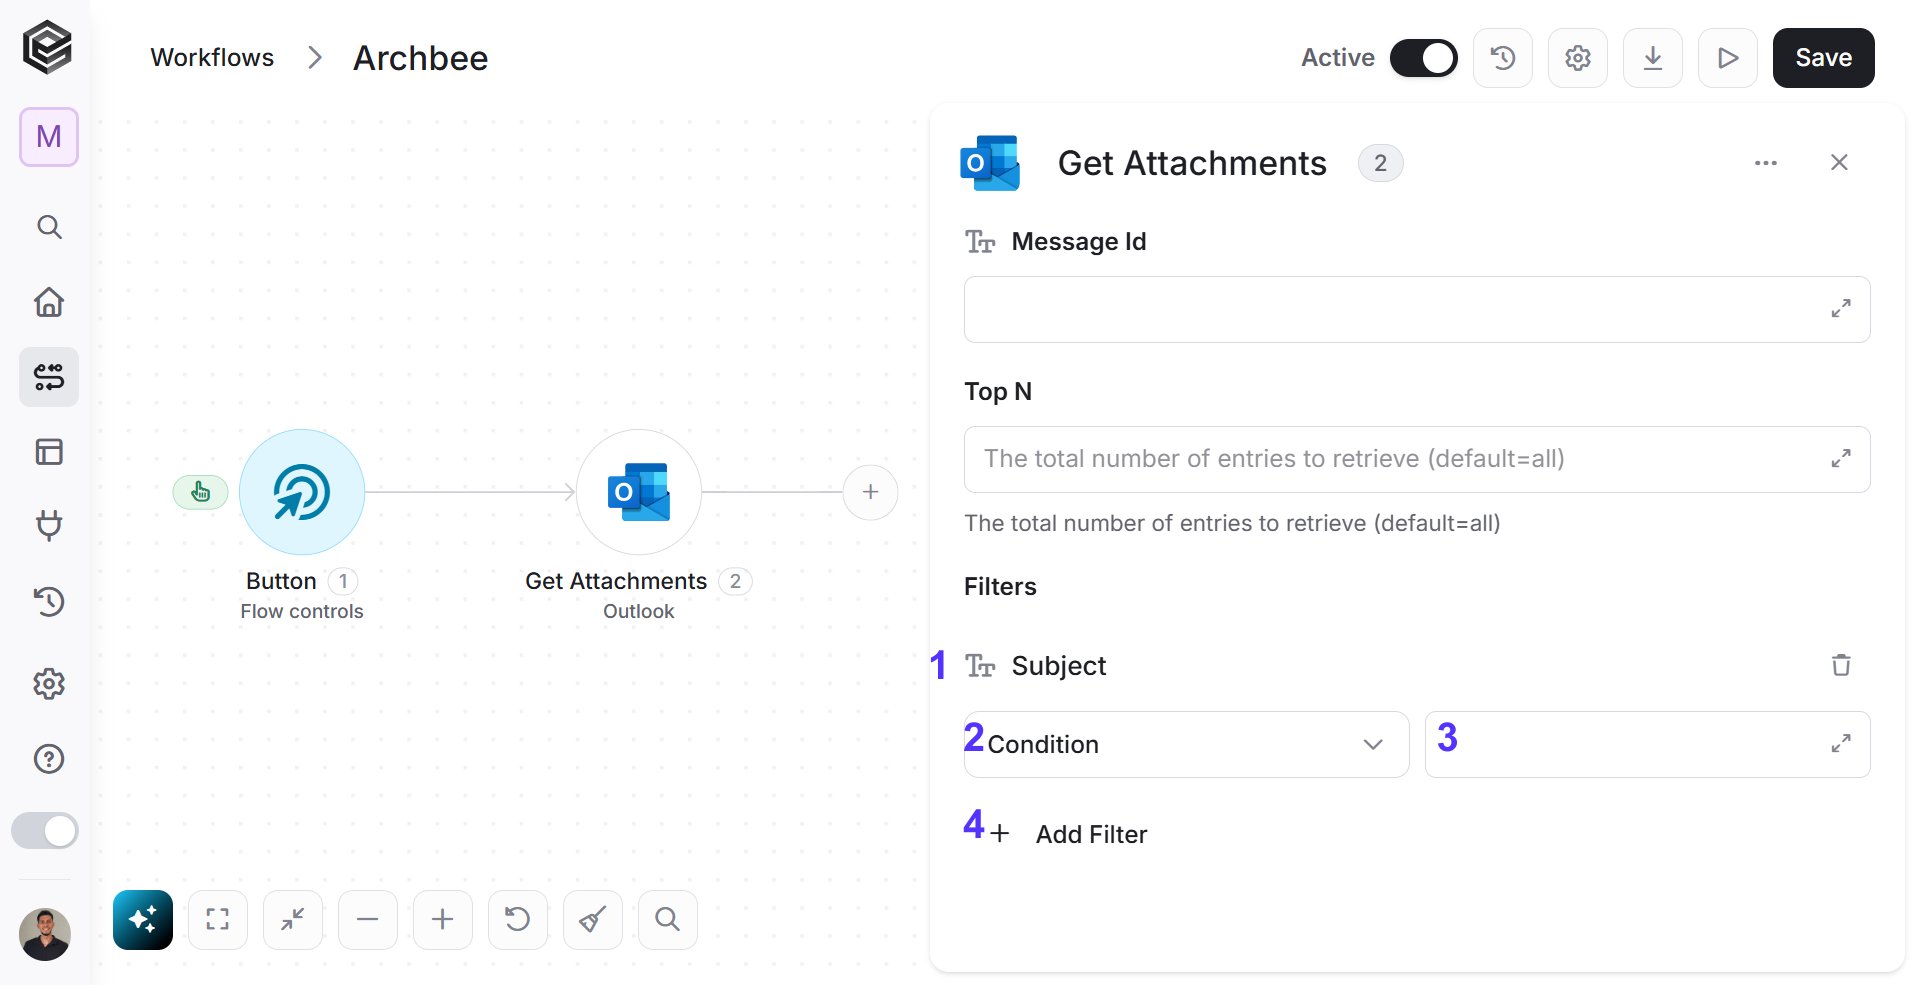 1. Select from the drop down the field you want to add the condition on.
2. Select the condition you want the record to meet.
3. Click on the empty field and the tooltip will pop up showing the options you can choose.
* You can populate the field in one of the following options:
* Static value – number / string. when using strings, you need to surround them with single quotes (‘).
* Property value from a previous activity (Using the tooltip that opens when clicking on the field).
* Expression – using [functions](/help/tools/enginis-functions) and/or Previous activity properties and/or static values (Using the tooltip that opens when clicking on the field).
4. Repeat steps a-d for all the fields you want to populate.
### Add Conditions
Some triggers include an Add Conditions option.
Add Conditions allows you to define rules that determine when the trigger should continue based on the data received or selected.
*For example:*
1. Select from the drop down the field you want to add the condition on.
2. Select the condition you want the record to meet.
3. Click on the empty field and the tooltip will pop up showing the options you can choose.
* You can populate the field in one of the following options:
* Static value – number / string. when using strings, you need to surround them with single quotes (‘).
* Property value from a previous activity (Using the tooltip that opens when clicking on the field).
* Expression – using [functions](/help/tools/enginis-functions) and/or Previous activity properties and/or static values (Using the tooltip that opens when clicking on the field).
4. Repeat steps a-d for all the fields you want to populate.
### Add Conditions
Some triggers include an Add Conditions option.
Add Conditions allows you to define rules that determine when the trigger should continue based on the data received or selected.
*For example:*
 Choose the Add Conditions option. A dropdown of available condition fields will pop up.
 Choose the field you want to apply the condition on.
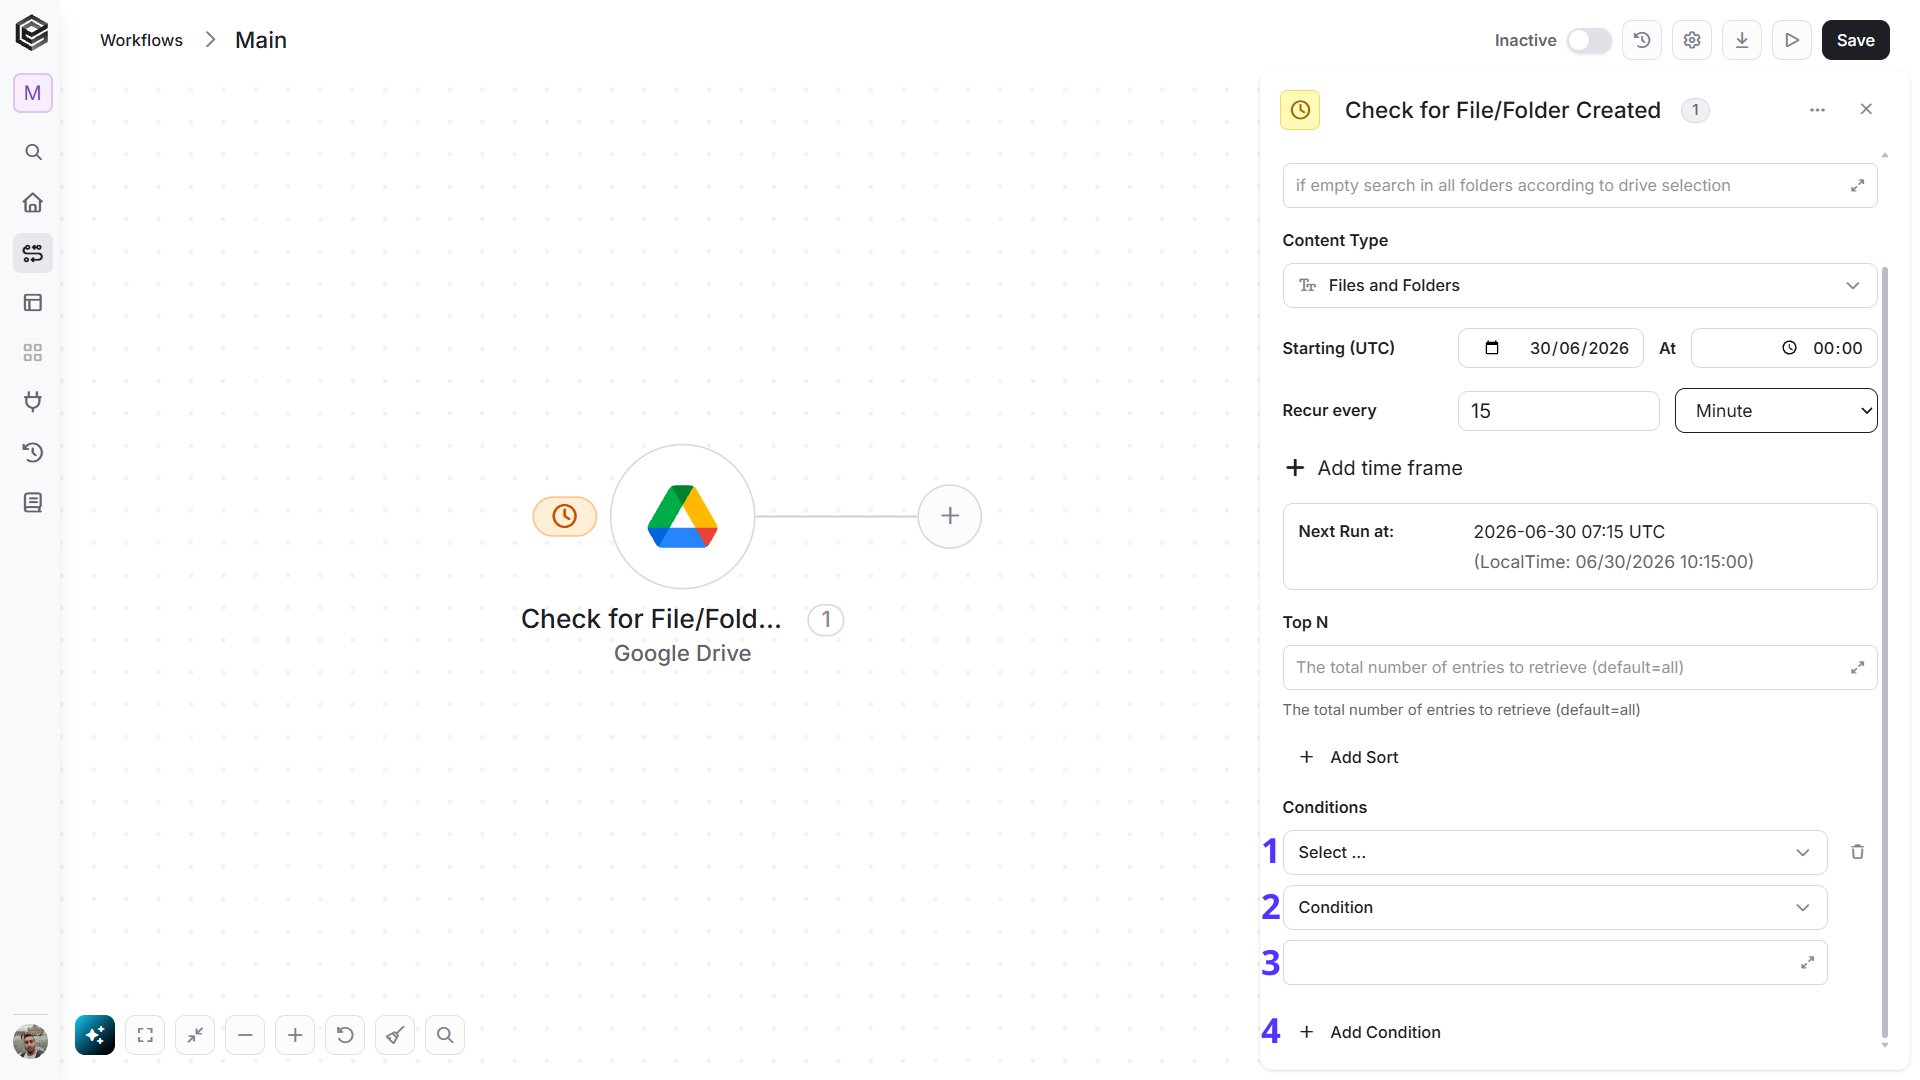 1. Select from the dropdown the field you want to apply the condition on.
2. Select the condition you want the record to meet.
3. Click on the empty value field. The tooltip will pop up and show the available options.
* You can populate the field in one of the following options:
* Static value – number / string. when using strings, you need to surround them with single quotes (‘).
* Property value from a previous activity (Using the tooltip that opens when clicking on the field).
* Expression – using [functions](/help/tools/enginis-functions) and/or Previous activity properties and/or static values (Using the tooltip that opens when clicking on the field).
4. Repeat these steps for each condition you want to add.
**Note:** The available fields and conditions may change depending on the activity you choose, but the concept stays the same: you select a field, choose the condition it must meet, and define the value to compare against.
In some triggers, the available condition fields depend on the selected Object Type.
In these cases, select the Object Type first. After the object is selected, Engini loads the relevant fields for that specific object, and those fields become available in the Conditions section. If a different Object Type is selected, the available condition fields may change accordingly.
*For example with objects:*
1. Select from the dropdown the field you want to apply the condition on.
2. Select the condition you want the record to meet.
3. Click on the empty value field. The tooltip will pop up and show the available options.
* You can populate the field in one of the following options:
* Static value – number / string. when using strings, you need to surround them with single quotes (‘).
* Property value from a previous activity (Using the tooltip that opens when clicking on the field).
* Expression – using [functions](/help/tools/enginis-functions) and/or Previous activity properties and/or static values (Using the tooltip that opens when clicking on the field).
4. Repeat these steps for each condition you want to add.
**Note:** The available fields and conditions may change depending on the activity you choose, but the concept stays the same: you select a field, choose the condition it must meet, and define the value to compare against.
In some triggers, the available condition fields depend on the selected Object Type.
In these cases, select the Object Type first. After the object is selected, Engini loads the relevant fields for that specific object, and those fields become available in the Conditions section. If a different Object Type is selected, the available condition fields may change accordingly.
*For example with objects:*
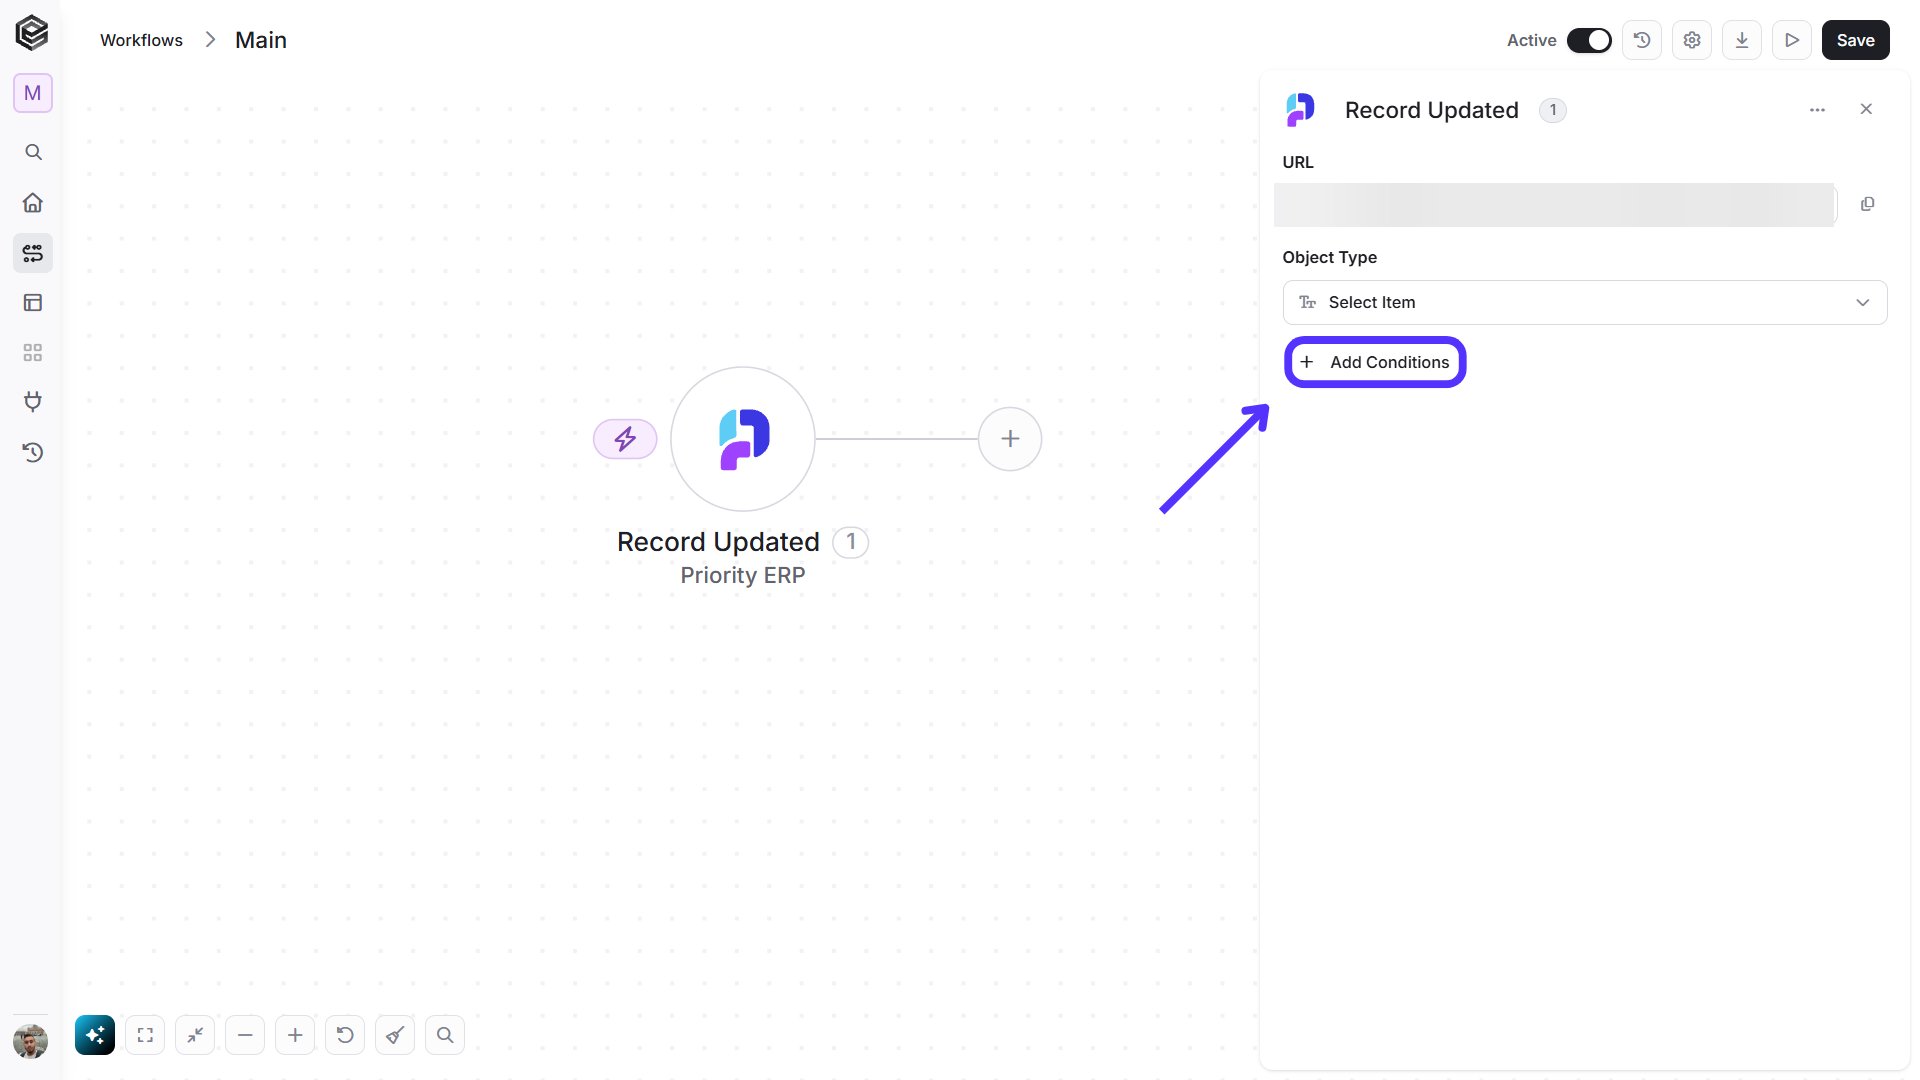 If the activity or trigger includes an Object Type field, select the relevant object first.
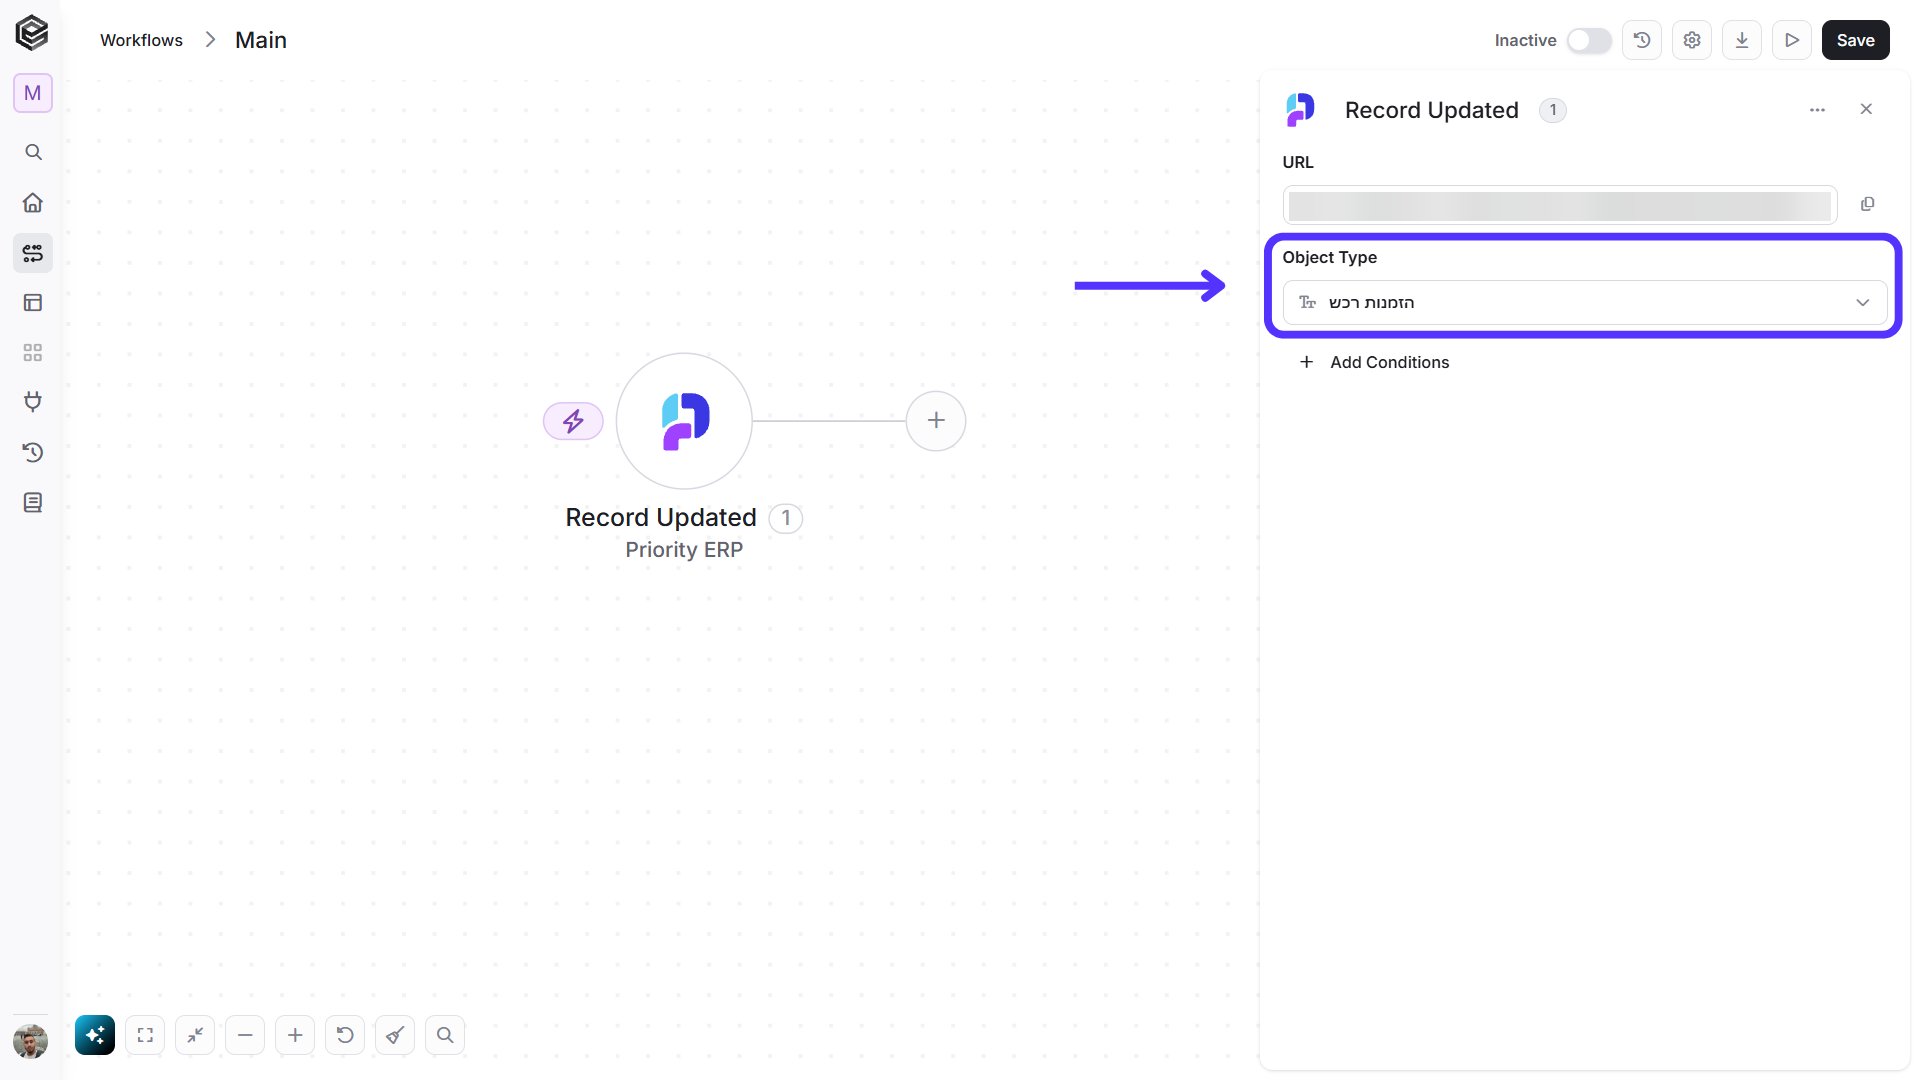 Choose the Add Conditions option. A dropdown of available condition fields will pop up.
 Choose the field you want to apply the condition on.
 1. Select from the dropdown the field you want to apply the condition on.
2. Select the condition you want the record to meet.
3. Click on the empty value field. The tooltip will pop up and show the available options.
* You can populate the field in one of the following options:
* Static value – number / string. when using strings, you need to surround them with single quotes (‘).
* Property value from a previous activity (Using the tooltip that opens when clicking on the field).
* Expression – using [functions](/help/tools/enginis-functions) and/or Previous activity properties and/or static values (Using the tooltip that opens when clicking on the field).
4. Repeat these steps for each condition you want to add.
### Add Sorts
Enable use of several different sorting options according to the use of activity. While the available options change depending on the activity you choose, the concept always stays the same: you are defining how the returned records should be ordered.
*For example:*
1. Select from the dropdown the field you want to apply the condition on.
2. Select the condition you want the record to meet.
3. Click on the empty value field. The tooltip will pop up and show the available options.
* You can populate the field in one of the following options:
* Static value – number / string. when using strings, you need to surround them with single quotes (‘).
* Property value from a previous activity (Using the tooltip that opens when clicking on the field).
* Expression – using [functions](/help/tools/enginis-functions) and/or Previous activity properties and/or static values (Using the tooltip that opens when clicking on the field).
4. Repeat these steps for each condition you want to add.
### Add Sorts
Enable use of several different sorting options according to the use of activity. While the available options change depending on the activity you choose, the concept always stays the same: you are defining how the returned records should be ordered.
*For example:*
 *Choose the Add Sort option, a drop down of options will pop up.*
 *Choose the field you want to sort by.*
 1. Select from the drop down the field you want to sort by.
2. Select the sorting direction you want to apply.
* You can choose one of the following options:
3\. Ascending – sorts the records from lowest to highest / A-Z.
4\. Descending – sorts the records from highest to lowest / Z-A.
## Workflow Edit Top Bar
1. Select from the drop down the field you want to sort by.
2. Select the sorting direction you want to apply.
* You can choose one of the following options:
3\. Ascending – sorts the records from lowest to highest / A-Z.
4\. Descending – sorts the records from highest to lowest / Z-A.
## Workflow Edit Top Bar
 ### Save
When you’re done editing your workflow, click the save icon to save your progress.
### Save
When you’re done editing your workflow, click the save icon to save your progress.
 The workflow isn’t saved automatically.
If you have unsaved edits and you try to leave the page, to restore previous version or to run a workflow, Engini will display the Unsaved Changes dialog.
You can then choose from the following options:
The workflow isn’t saved automatically.
If you have unsaved edits and you try to leave the page, to restore previous version or to run a workflow, Engini will display the Unsaved Changes dialog.
You can then choose from the following options:
 * **Leave without saving** to leave without saving
* **Save** to keep your new edits and proceed to the page you wanted to navigate to.
* **X** to dismiss the dialog and remain on the page.
In addition, if you try to access another page without saving your changes in Engini, the system will display the following message:
* **Leave without saving** to leave without saving
* **Save** to keep your new edits and proceed to the page you wanted to navigate to.
* **X** to dismiss the dialog and remain on the page.
In addition, if you try to access another page without saving your changes in Engini, the system will display the following message:
 This is an extra layer of protection to ensure you don’t lose your work unintentionally. You can choose to *leave* the page or remain on the Engini page by clicking *Cancel*.
### Run
Run your workflow to ensure that all components are functioning correctly.
To learn how to run workflow click [here](/help/workflows/run-and-stop-workflow#how-to-run-workflow)
### Export
Allows you to download the workflow configuration file so it can be imported into another environment or used as a backup.
This is an extra layer of protection to ensure you don’t lose your work unintentionally. You can choose to *leave* the page or remain on the Engini page by clicking *Cancel*.
### Run
Run your workflow to ensure that all components are functioning correctly.
To learn how to run workflow click [here](/help/workflows/run-and-stop-workflow#how-to-run-workflow)
### Export
Allows you to download the workflow configuration file so it can be imported into another environment or used as a backup.
 After clicking **Export**, the workflow is downloaded to your computer as a JSON file.
You can then refer to the [Import & Export Workflow](/help/workflows/import-export-workflow) guide (link here) to learn more about how to use it.
After clicking **Export**, the workflow is downloaded to your computer as a JSON file.
You can then refer to the [Import & Export Workflow](/help/workflows/import-export-workflow) guide (link here) to learn more about how to use it.
 ### Settings
This section defines the general configuration of the workflow, including its name, description, and connected apps. To learn more click [here.](/help/workflows/workflow-editor#workflow-settings)
### Settings
This section defines the general configuration of the workflow, including its name, description, and connected apps. To learn more click [here.](/help/workflows/workflow-editor#workflow-settings)
 If you want to restore to a previous version, follow the next steps:
1. Click on the restore icon located at the top bar.
2. Go to versions.
If you want to restore to a previous version, follow the next steps:
1. Click on the restore icon located at the top bar.
2. Go to versions.
 3. Choose the version you want to restore.
 4. Click on "Restore this version".
5. After getting the message below, need to "Save" the workflow to change the version.
4. Click on "Restore this version".
5. After getting the message below, need to "Save" the workflow to change the version.
 **Note:** Previous versions of workflows over 45 days will be automatically removed.
### Workflow status
A workflow in Engini has two types of states: Active or inactive.
Active workflows run when their trigger is activated and also when you run them manually by testing them.
You can switch between the two statuses whenever you want (active workflows can become inactive and vice versa), by clicking the ON/OFF button in the top bar. To save the workflow status you have to save the workflow.
**Note:** Previous versions of workflows over 45 days will be automatically removed.
### Workflow status
A workflow in Engini has two types of states: Active or inactive.
Active workflows run when their trigger is activated and also when you run them manually by testing them.
You can switch between the two statuses whenever you want (active workflows can become inactive and vice versa), by clicking the ON/OFF button in the top bar. To save the workflow status you have to save the workflow.
 You can also change the workflow status from the details page of the workflow or from the workflow’s table.
## Using values from previous operations
After you add an action, press on the empty field to enter a value. Choose the previous activity from which you want to take a value and press on the arrow next to it.
You can also change the workflow status from the details page of the workflow or from the workflow’s table.
## Using values from previous operations
After you add an action, press on the empty field to enter a value. Choose the previous activity from which you want to take a value and press on the arrow next to it.
 Choose the value you want to use.
 ## Webhook metadata
Metadata can be useful for storing additional information about the object in a structured format. If you would like to use the metadata of certain connector:
1. Choose the action of the desired connector.
## Webhook metadata
Metadata can be useful for storing additional information about the object in a structured format. If you would like to use the metadata of certain connector:
1. Choose the action of the desired connector.
 2. Press on the arrow next to the “Webhook metadata”
 3. Choose the the data you need:
 * *Url* - The address where the webhook expects to receive HTTP requests, It’s where the data will be sent after trigger.
* *Method* - The HTTP method used for sending data to the webhook endpoint.
* *Headers\[]* - HTTP request headers contain additional information related to the request itself.
* *Query parameters\[]* - key-value pairs, where the key identifies the parameter and the value is the information associated with that parameter.
* *URL parameters\[]* - The additional information appended to a URL that is sent to a web server as part of an HTTP request.
* *Body* - The request body contains data that the client wants to send to the server.
## Workflow Editor Bottom Bar
The bottom toolbar provides quick actions to control the canvas view and workflow behavior:
* *Url* - The address where the webhook expects to receive HTTP requests, It’s where the data will be sent after trigger.
* *Method* - The HTTP method used for sending data to the webhook endpoint.
* *Headers\[]* - HTTP request headers contain additional information related to the request itself.
* *Query parameters\[]* - key-value pairs, where the key identifies the parameter and the value is the information associated with that parameter.
* *URL parameters\[]* - The additional information appended to a URL that is sent to a web server as part of an HTTP request.
* *Body* - The request body contains data that the client wants to send to the server.
## Workflow Editor Bottom Bar
The bottom toolbar provides quick actions to control the canvas view and workflow behavior:
 ### Zoom to Fit
Adjusts the canvas view to display the entire workflow within the screen.
### Zoom to Fit
Adjusts the canvas view to display the entire workflow within the screen.
 ### Collapse All
Collapses all actions that contain nested steps (such as If, For Each, or Switch), hiding their internal actions so they are not displayed on the canvas.
### Collapse All
Collapses all actions that contain nested steps (such as If, For Each, or Switch), hiding their internal actions so they are not displayed on the canvas.
 * For example, if you have a For Each action with inner actions inside it, clicking this option will hide those internal actions.
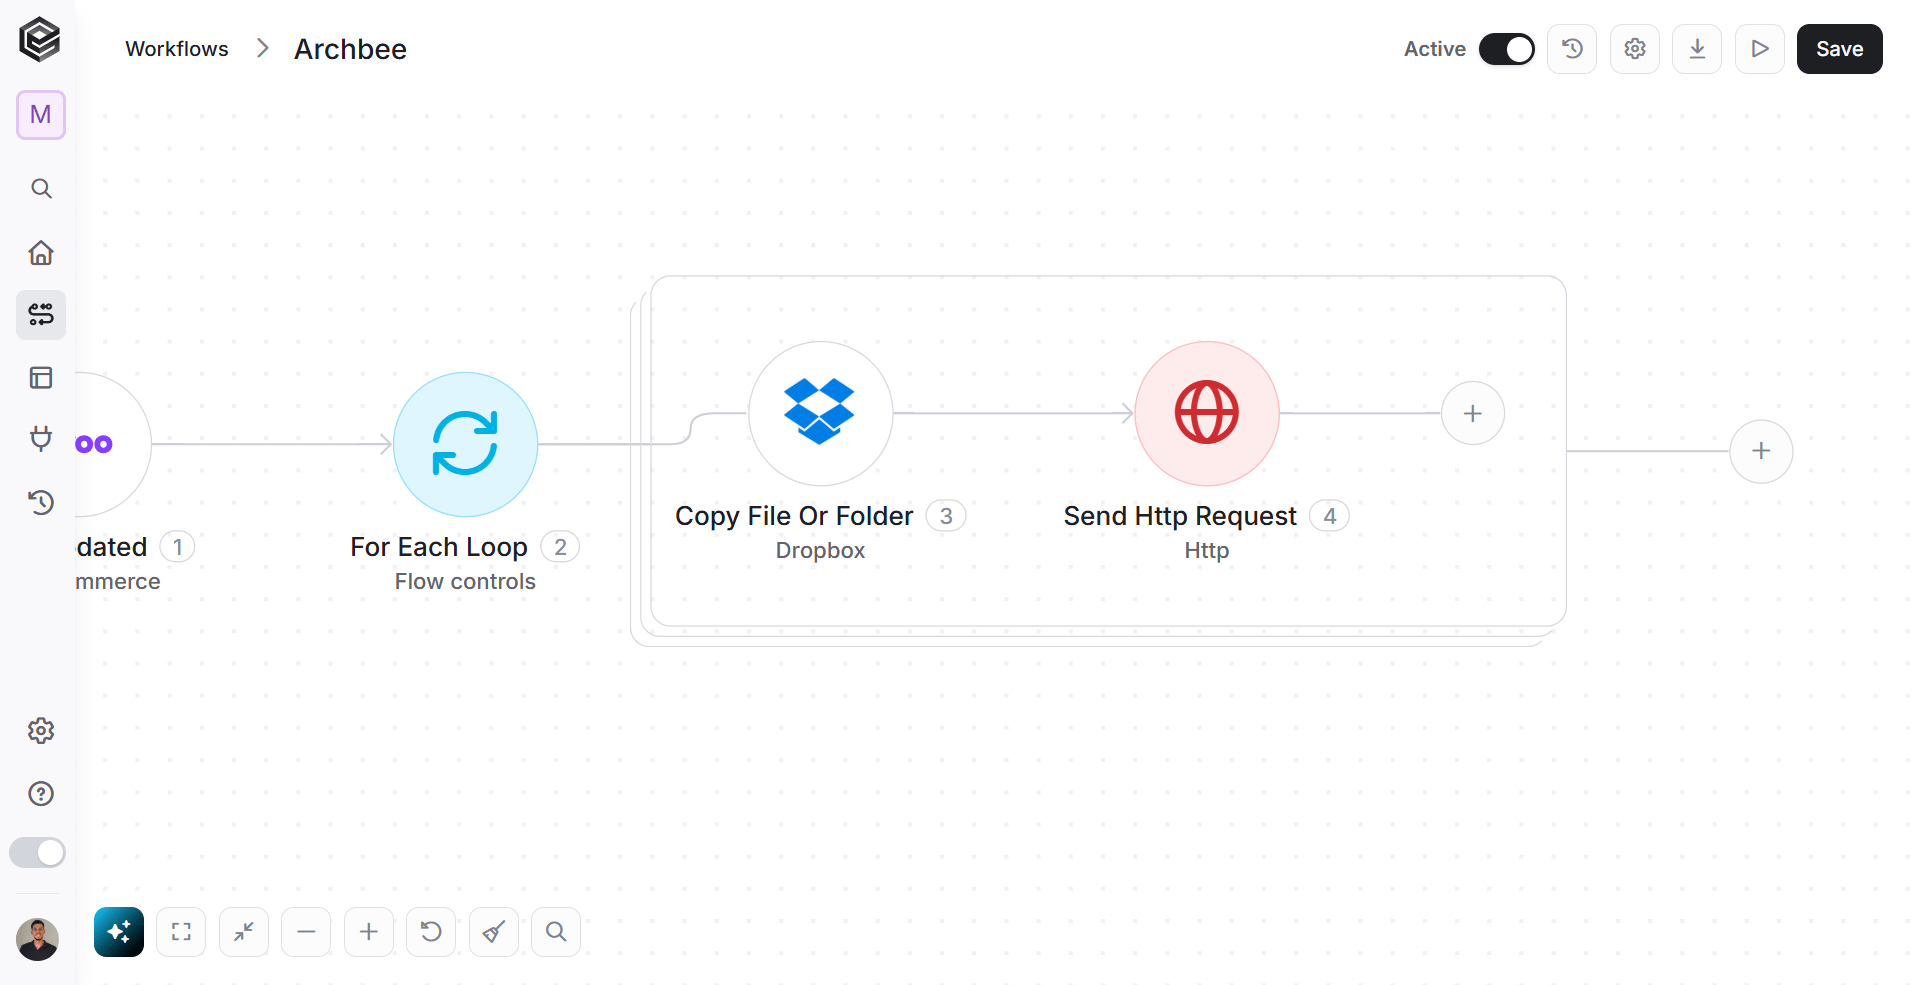 A collapse indicator will appear next to the parent action, showing that it contains hidden steps.
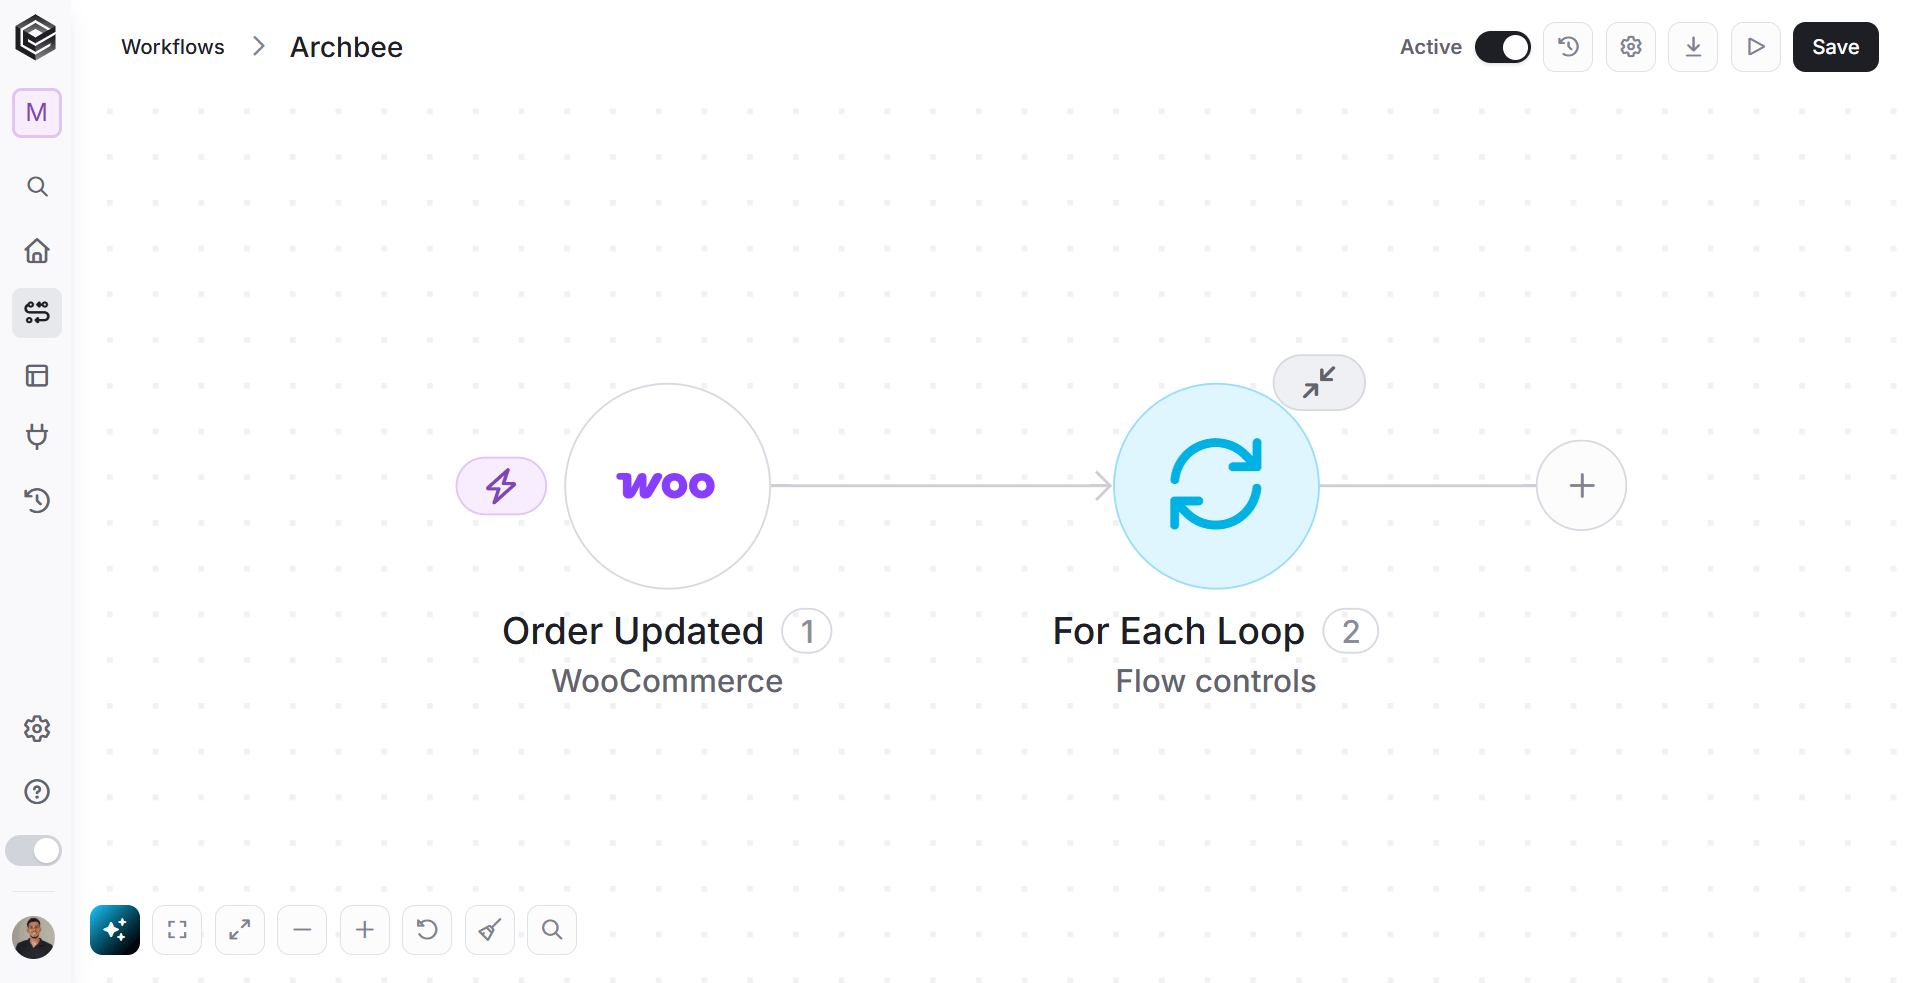 **Note:** When all nested actions are collapsed, the button changes to **Expand All**, allowing you to expand and display all internal actions again.
 ### Zoom Out
Decreases the zoom level to show more of the workflow.
### Zoom Out
Decreases the zoom level to show more of the workflow.
 ### Zoom In
Increases the zoom level for a closer view of specific actions.
### Zoom In
Increases the zoom level for a closer view of specific actions.
 ### Undo
Reverts the last change made in the workflow.
### Undo
Reverts the last change made in the workflow.
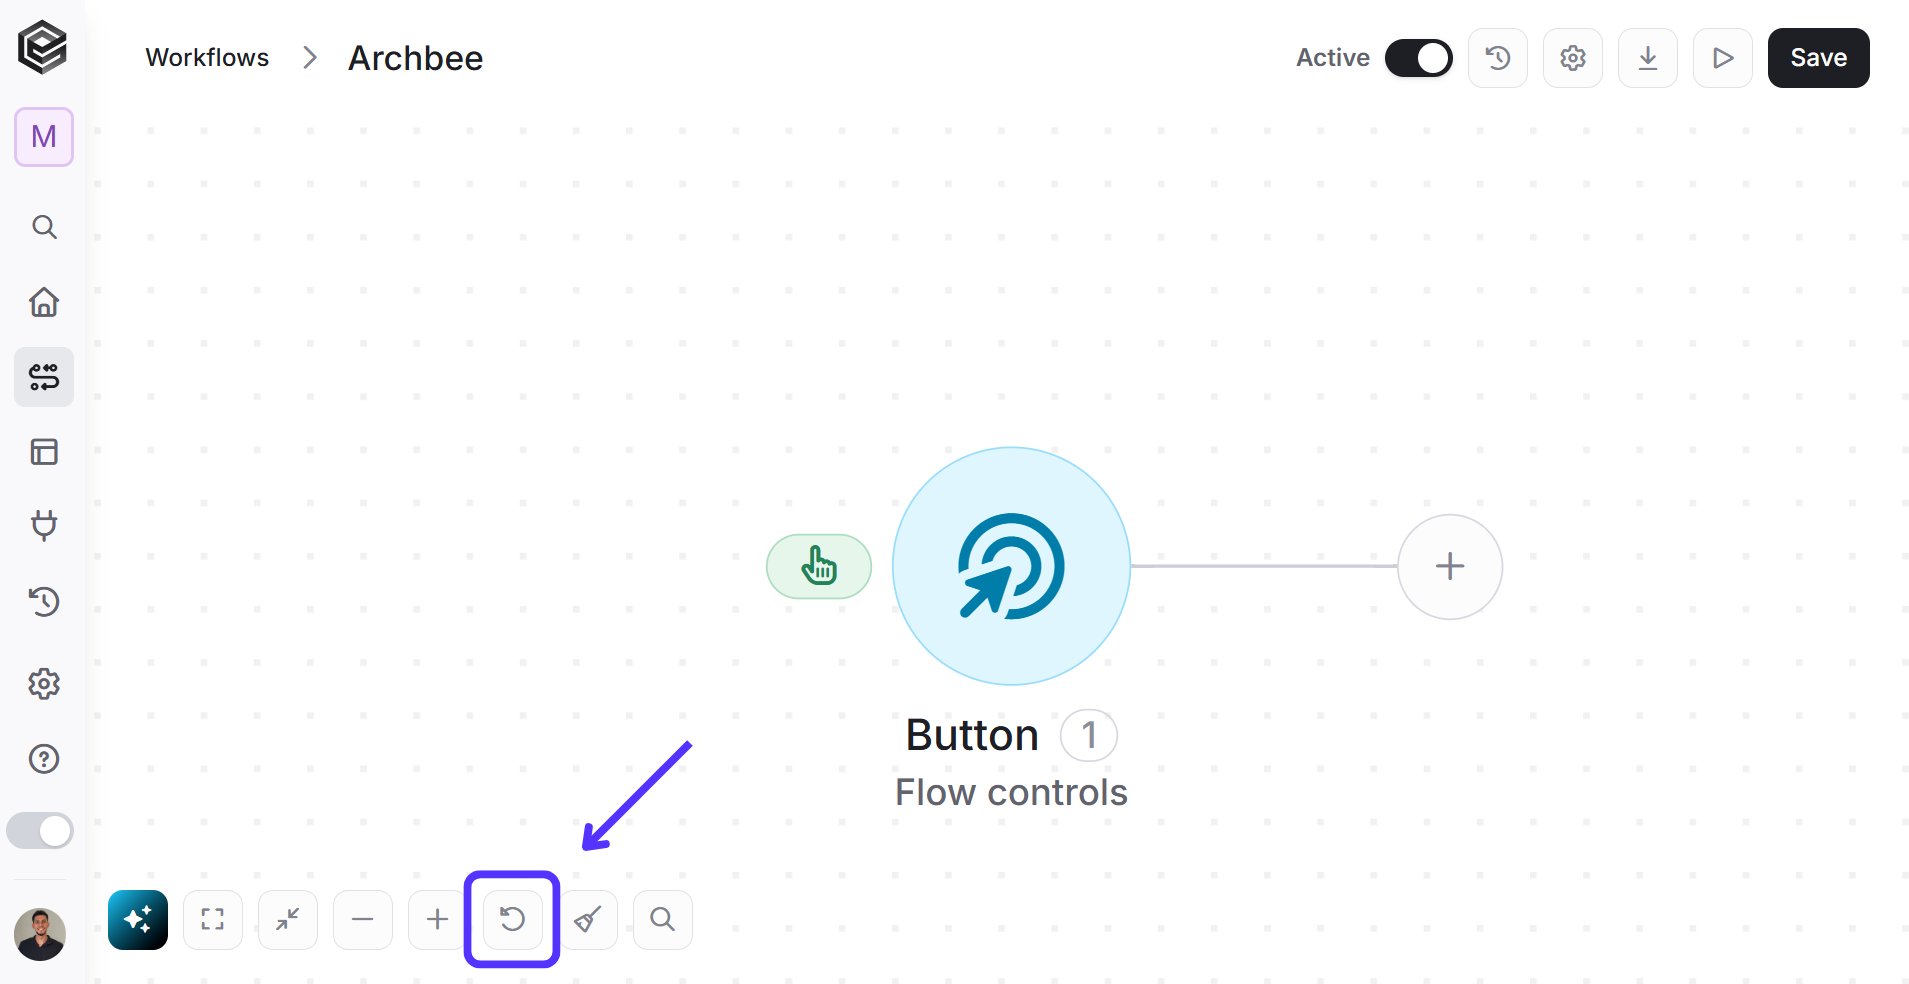 ### Tidy Up
Automatically arranges the actions on the canvas into a cleaner and more organized layout when the workflow appears messy or misaligned.
### Tidy Up
Automatically arranges the actions on the canvas into a cleaner and more organized layout when the workflow appears messy or misaligned.
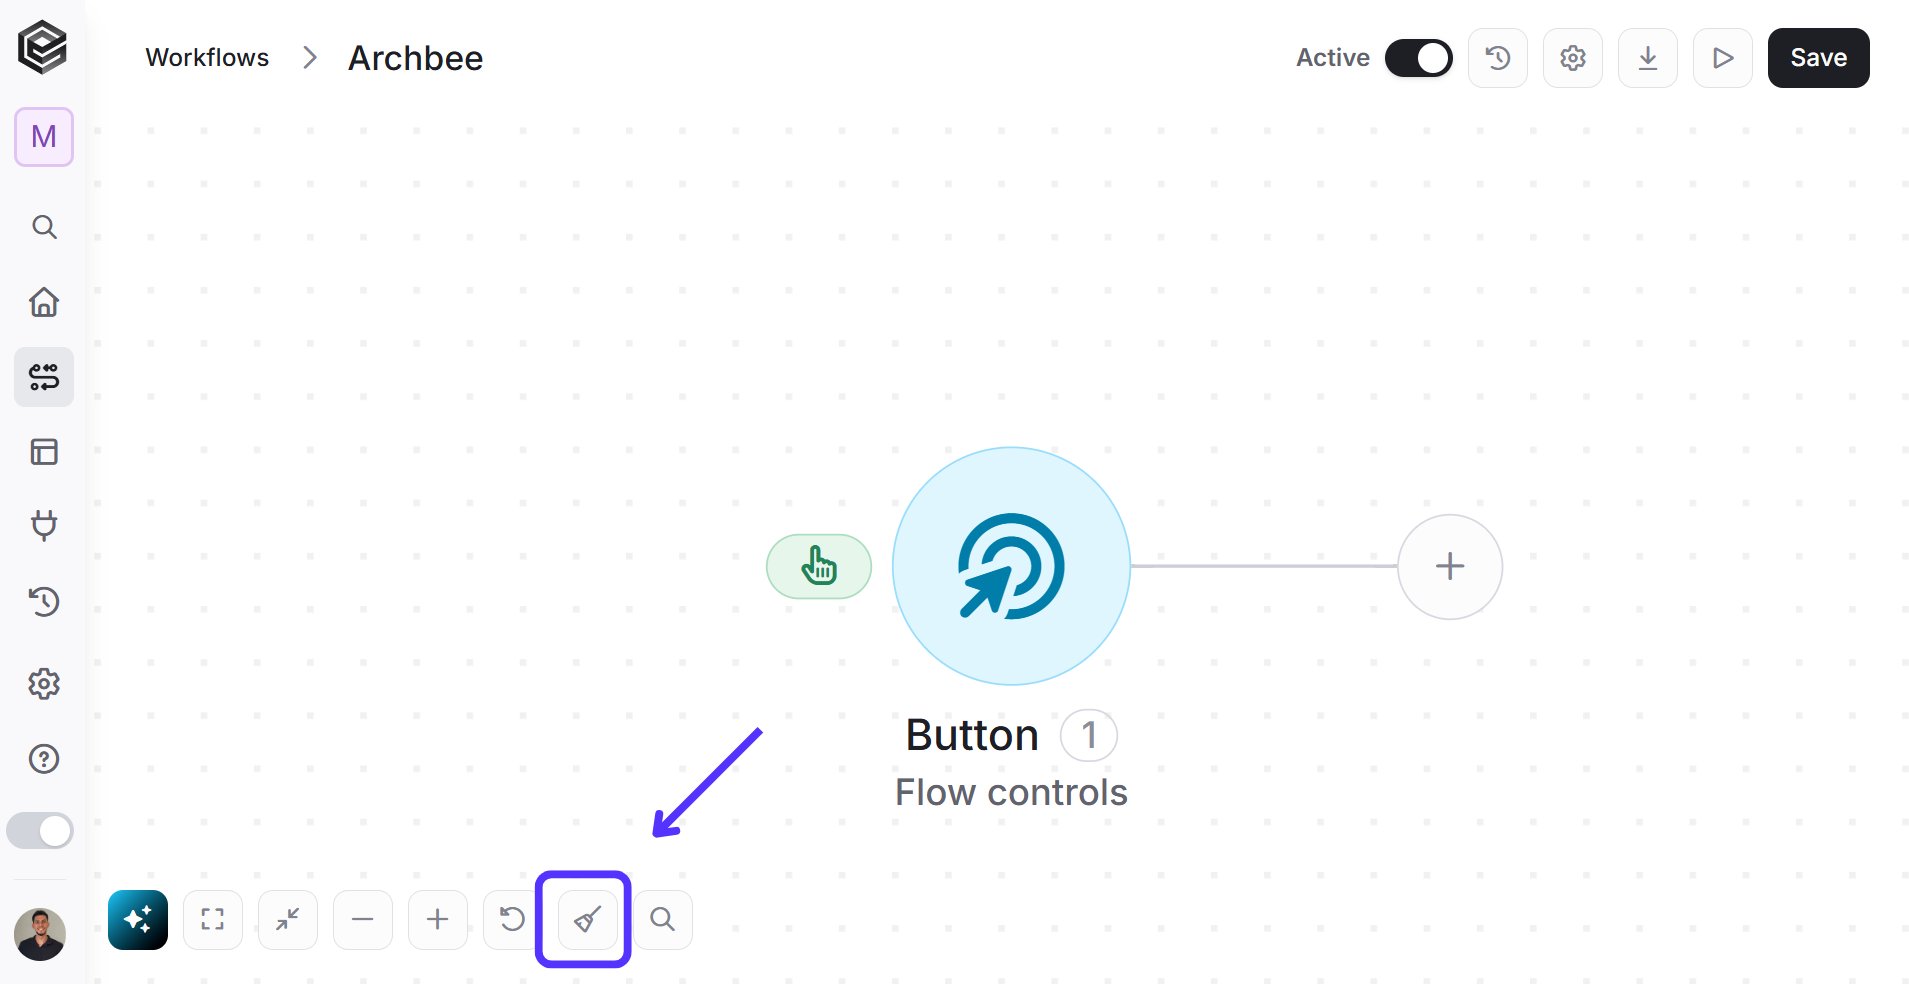 * For example, When the workflow becomes messy and actions are not aligned properly, it can be hard to follow the flow and understand the logic.
 After using **Tidy Up**, the workflow is automatically rearranged into a clean, structured layout, making it much easier to read and work with.
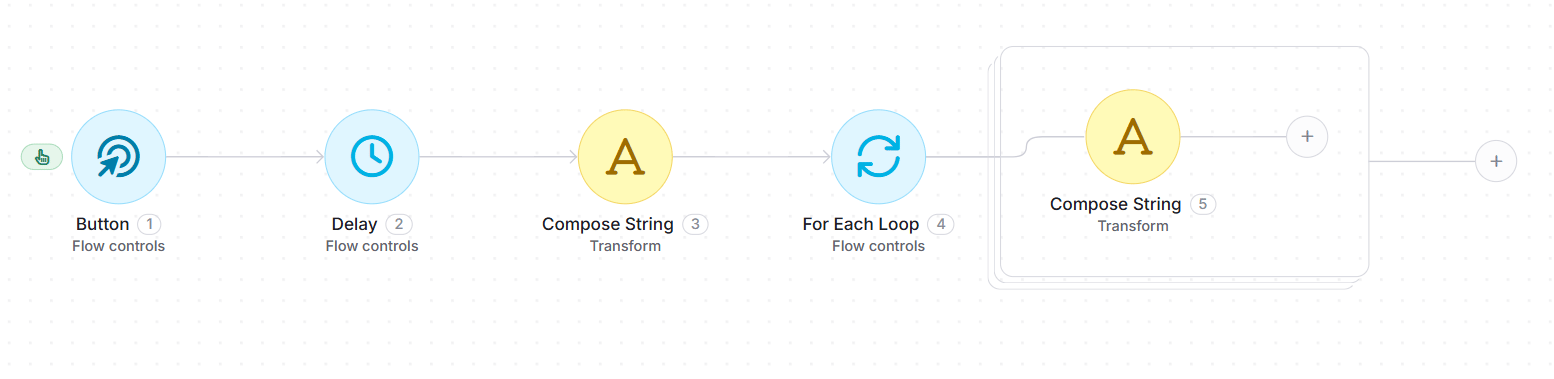 ### Search
Allows you to quickly find actions within the workflow.
### Search
Allows you to quickly find actions within the workflow.
 ### Notes
Opens the list of all the sticky notes in the workflow. For more information click [here](/help/workflows/workflow-editor#sticky-notes).
### Notes
Opens the list of all the sticky notes in the workflow. For more information click [here](/help/workflows/workflow-editor#sticky-notes).
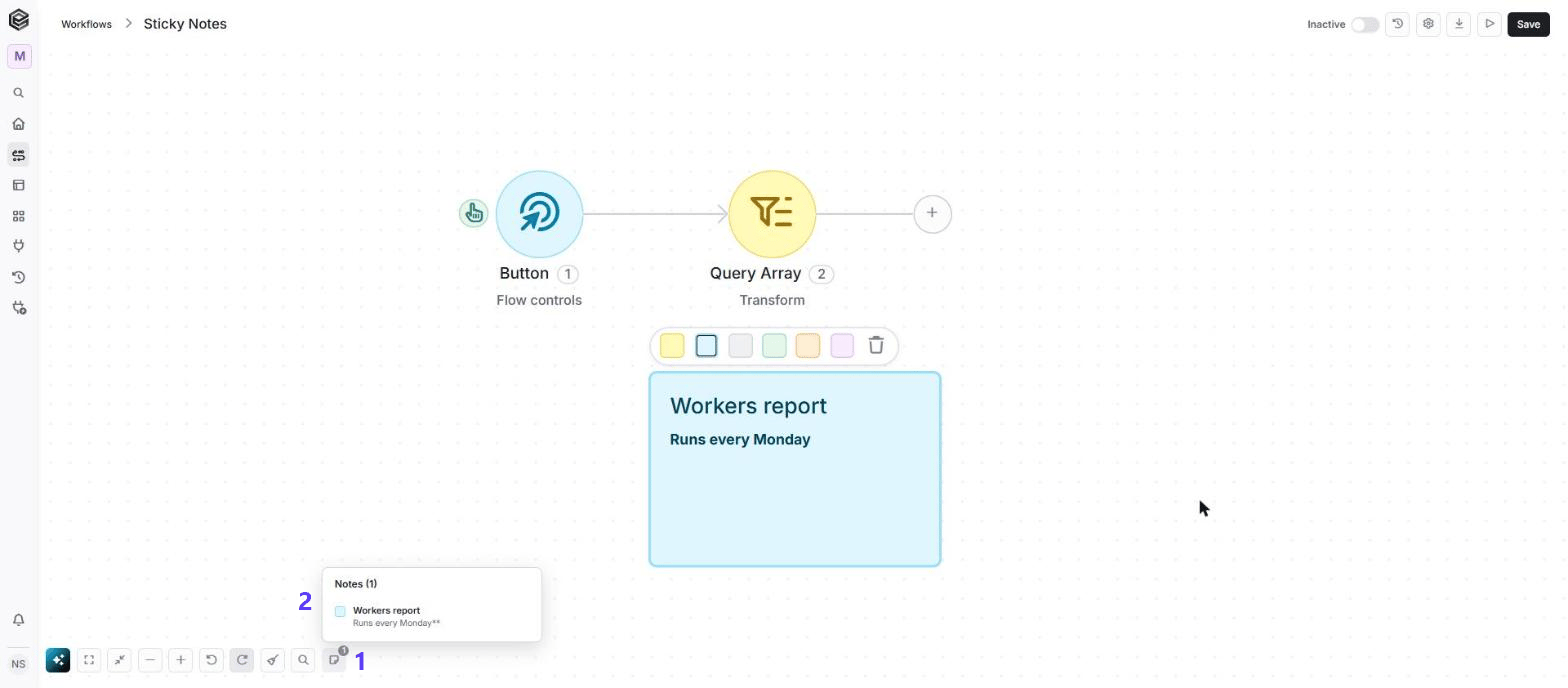 ## Right-Click Actions Menu
You can also right-click anywhere on the canvas to open a quick actions menu.
## Right-Click Actions Menu
You can also right-click anywhere on the canvas to open a quick actions menu.
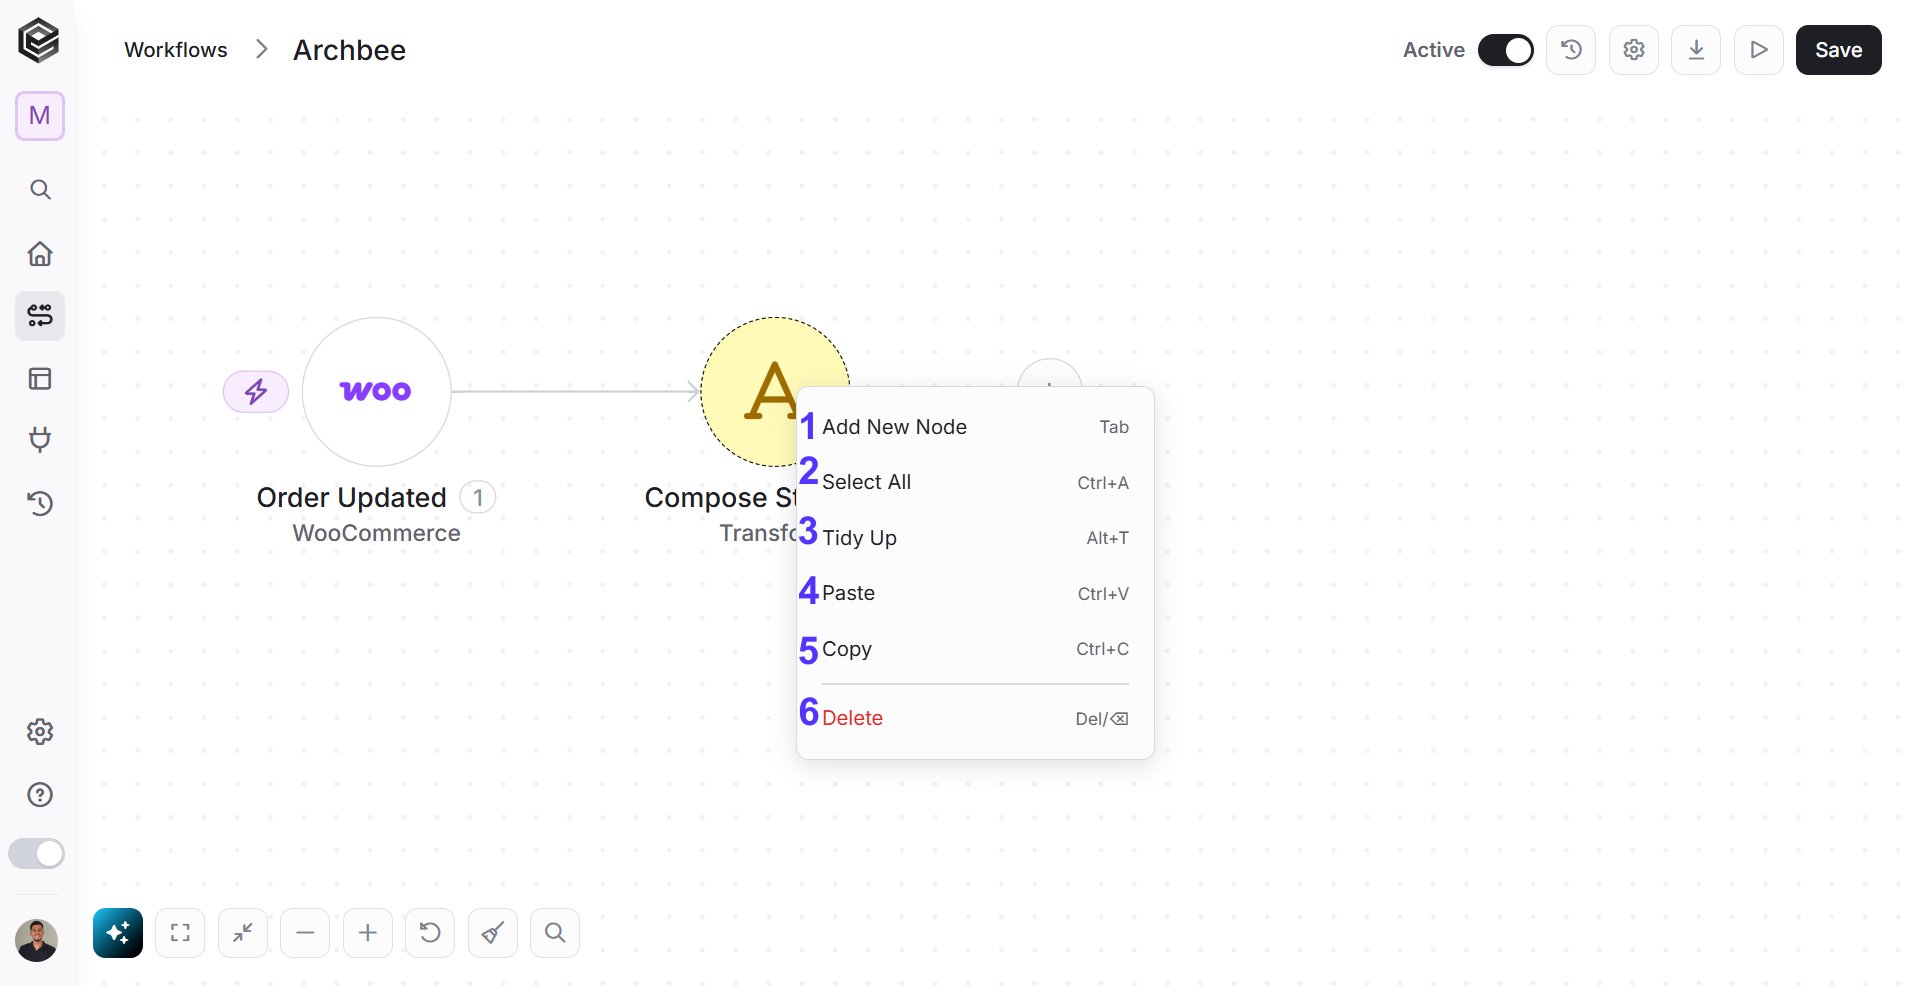 1. *Add New Node (Tab)* – Quickly add a new action to the workflow. For more information click [here](/help/workflows/create-workflow#add-your-actions).
2. *Select All (Ctrl+A)* – Select all actions on the canvas.
3. *Tidy Up (Alt+T)* – Automatically organize and align the workflow layout For more information click here.
4. *Paste (Ctrl+V)* – Paste copied actions.
5. *Copy (Ctrl+C)* – Copy selected actions.
6. *Delete (Del)* – Delete selected actions. For more information click [here](/help/workflows/workflow-editor#delete-actions).
7. *Add Note (Shift + N)* – Add a sticky note at the pointer. For more information click [here](/help/workflows/workflow-editor#sticky-notes).
**Note:** The **Copy** and **Delete** options are only available when one or more actions are selected, and the **Paste** option appears only after an action has been copied.
## Sticky Notes
Sticky notes let you pin free-text notes anywhere on the workflow canvas, so you can document what a workflow does, flag open questions, or leave context for your teammates. Notes never affect how the workflow runs.
### Add a Note
1. Right-click an empty spot on the canvas and select *Add Note (Shift + N)*. The note appears where you clicked.
1. *Add New Node (Tab)* – Quickly add a new action to the workflow. For more information click [here](/help/workflows/create-workflow#add-your-actions).
2. *Select All (Ctrl+A)* – Select all actions on the canvas.
3. *Tidy Up (Alt+T)* – Automatically organize and align the workflow layout For more information click here.
4. *Paste (Ctrl+V)* – Paste copied actions.
5. *Copy (Ctrl+C)* – Copy selected actions.
6. *Delete (Del)* – Delete selected actions. For more information click [here](/help/workflows/workflow-editor#delete-actions).
7. *Add Note (Shift + N)* – Add a sticky note at the pointer. For more information click [here](/help/workflows/workflow-editor#sticky-notes).
**Note:** The **Copy** and **Delete** options are only available when one or more actions are selected, and the **Paste** option appears only after an action has been copied.
## Sticky Notes
Sticky notes let you pin free-text notes anywhere on the workflow canvas, so you can document what a workflow does, flag open questions, or leave context for your teammates. Notes never affect how the workflow runs.
### Add a Note
1. Right-click an empty spot on the canvas and select *Add Note (Shift + N)*. The note appears where you clicked.
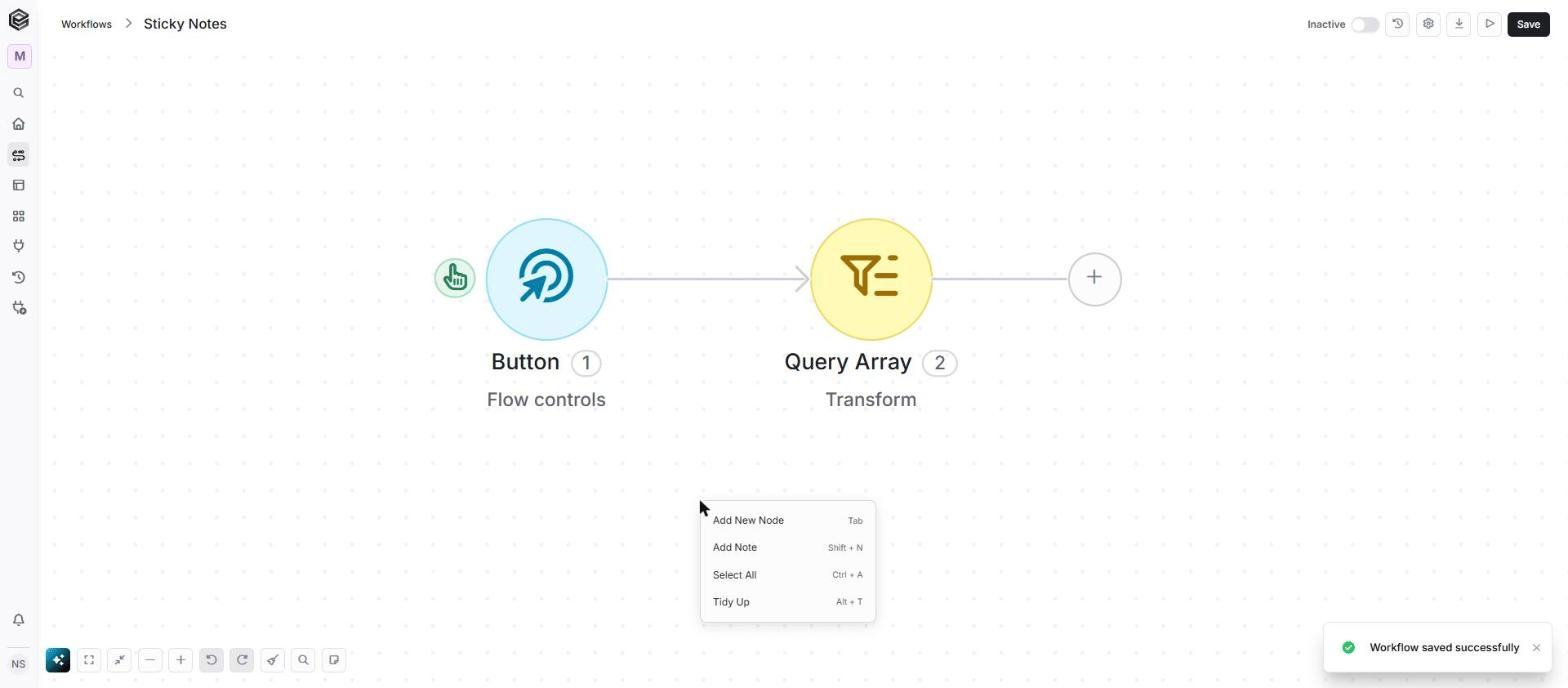 2. Or place the pointer where you want the note and press **Shift + N**.
The new note appears with the placeholder text *New note – Double-click or press F2 to edit*. Double-click it, or select it and press **F2**, to replace the text with your own.
**Note:** The note button in the bottom bar does not add notes, it only lists them.
### Edit a Note
1. Double-click the note, or select it and press **F2**, to edit its text.
2. Press **Esc** to leave edit mode.
2. Or place the pointer where you want the note and press **Shift + N**.
The new note appears with the placeholder text *New note – Double-click or press F2 to edit*. Double-click it, or select it and press **F2**, to replace the text with your own.
**Note:** The note button in the bottom bar does not add notes, it only lists them.
### Edit a Note
1. Double-click the note, or select it and press **F2**, to edit its text.
2. Press **Esc** to leave edit mode.
 3. *Text area* – Type your note here.
4. *Style with Markdown* – Opens a short guide to the Markdown syntax.
Notes are formatted with Markdown, which you type by hand. There are no formatting buttons. For example, type `## Title` for a heading, `**text**` for bold, or `- item` for a list. The editor shows a *Style with Markdown* link with a short guide to the syntax.
### Change the Color
Click a note to select it. A small toolbar appears above it.
3. *Text area* – Type your note here.
4. *Style with Markdown* – Opens a short guide to the Markdown syntax.
Notes are formatted with Markdown, which you type by hand. There are no formatting buttons. For example, type `## Title` for a heading, `**text**` for bold, or `- item` for a list. The editor shows a *Style with Markdown* link with a short guide to the syntax.
### Change the Color
Click a note to select it. A small toolbar appears above it.
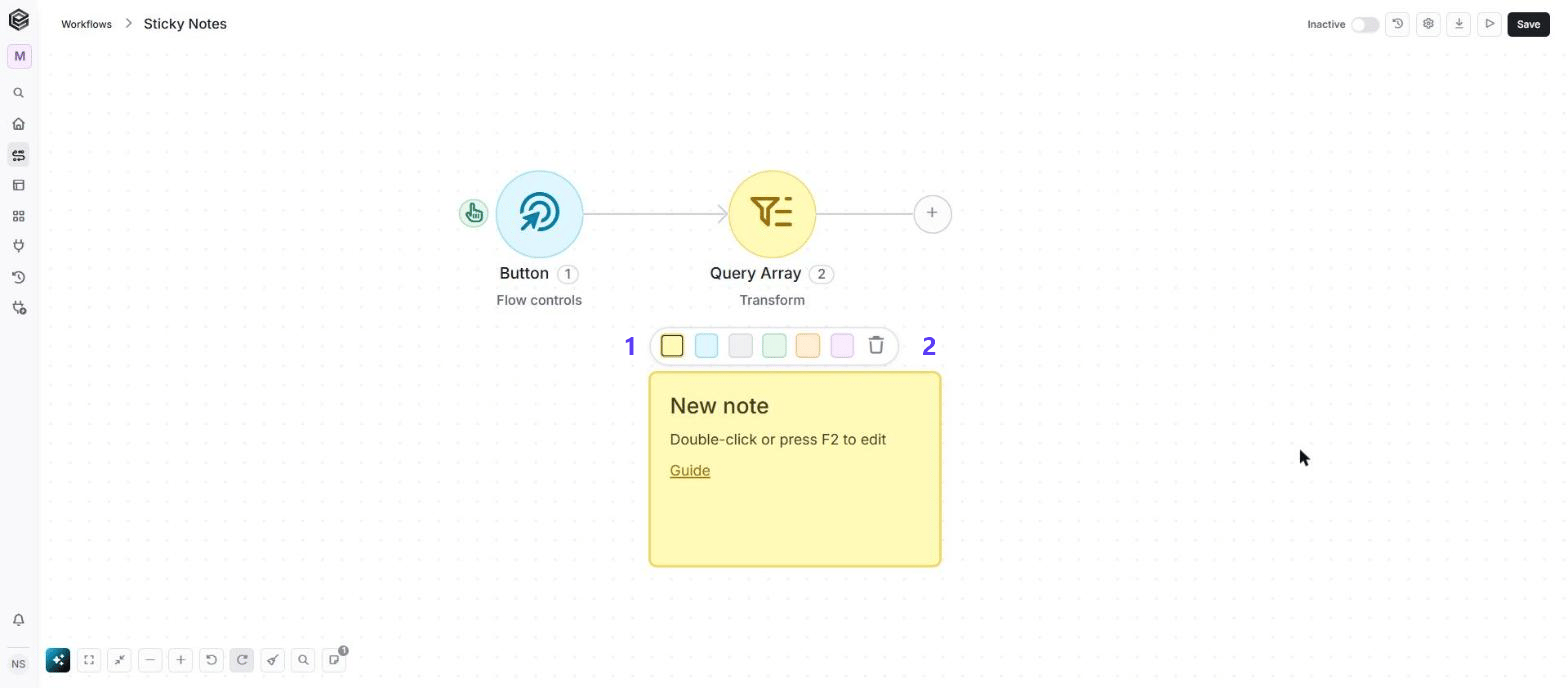 1. *Colors* – Pick yellow, blue, gray, green, orange or purple.
2. *Trash icon* – Deletes the note.
New notes are yellow by default.
### Resize, Move and Delete
* *Resize* – Drag any corner or edge of the note.
* *Move* – Drag the note by its body to place it anywhere on the canvas.
* *Delete* – Select the note and click the trash icon in its toolbar.
**Note:** Deleting a note does not ask for confirmation. If you delete one by mistake, use **Undo**.
Notes always sit behind the actions on the canvas, so a note never covers a step.
### Notes List
Click the *Notes (N)* button on the right side of the bottom bar, or press **N**, to see all the notes in the workflow. Click a note in the list to jump to it on the canvas. The button shows how many notes the workflow has.
1. *Colors* – Pick yellow, blue, gray, green, orange or purple.
2. *Trash icon* – Deletes the note.
New notes are yellow by default.
### Resize, Move and Delete
* *Resize* – Drag any corner or edge of the note.
* *Move* – Drag the note by its body to place it anywhere on the canvas.
* *Delete* – Select the note and click the trash icon in its toolbar.
**Note:** Deleting a note does not ask for confirmation. If you delete one by mistake, use **Undo**.
Notes always sit behind the actions on the canvas, so a note never covers a step.
### Notes List
Click the *Notes (N)* button on the right side of the bottom bar, or press **N**, to see all the notes in the workflow. Click a note in the list to jump to it on the canvas. The button shows how many notes the workflow has.