> ## Documentation Index
> Fetch the complete documentation index at: https://docs.engini.ai/llms.txt
> Use this file to discover all available pages before exploring further.
# Opportunity closed won in salesforce -> create customer and SO in NetSuite
In this tutorial, learn how to automate the creation of customers and sales orders in NetSuite when an Opportunity is Closed Won in Salesforce.
## Prerequisites
Before you begin, ensure the following connections are established:
1. Connection between Engini and Nesuite.
Learn how to [connect NetSuite to Engini](/help/apps/netsuite#connecting-engini-to-netsuite-com)
2. Connection between Engini and Salesforce.
Learn how to [connect Salesforce to Engini](/help/apps/salesforce#connecting-engini-to-salesforce)
## Add Outbound Message Webhook
To get started, add a trigger:
1. Add a new activity and choose “Outbound Message Webhook” trigger of Salesforce.
 2. Click on the “to JSON\XML sample” button to paste sample JSON payload and click on the “next step” button.
* example for a JSON payload:
```text theme={null}
{
"?xml": {
"@version": "1.0",
"@encoding": "UTF-8"
},
"soapenv:Envelope": {
"@xmlns:soapenv": "http://schemas.xmlsoap.org/soap/envelope/",
"@xmlns:xsd": "http://www.w3.org/2001/XMLSchema",
"@xmlns:xsi": "http://www.w3.org/2001/XMLSchema-instance",
"soapenv:Body": {
"notifications": {
"@xmlns": "http://soap.sforce.com/2005/09/outbound",
"OrganizationId": "00D8d000008CGKjEAO",
"ActionId": "04k8d000000XZMhAAO",
"SessionId": {
"@xsi:nil": "true"
},
"EnterpriseUrl": "https://engini2-dev-ed.develop.my.salesforce.com/services/Soap/c/58.0/00D8d000008CGKj",
"PartnerUrl": "https://engini2-dev-ed.develop.my.salesforce.com/services/Soap/u/58.0/00D8d000008CGKj",
"Notification": {
"Id": "04l8d00000TRPf0AAH",
"sObject": {
"@xsi:type": "sf:Opportunity",
"@xmlns:sf": "urn:sobject.enterprise.soap.sforce.com",
"sf:Id": "0068d00000JAtxbAAD"
}
}
}
}
}
}
```
3. Click on the icon on the right side of the URL to copy the URL.
4. Set up an Outbound Message in salesforce with the copied URL.
2. Click on the “to JSON\XML sample” button to paste sample JSON payload and click on the “next step” button.
* example for a JSON payload:
```text theme={null}
{
"?xml": {
"@version": "1.0",
"@encoding": "UTF-8"
},
"soapenv:Envelope": {
"@xmlns:soapenv": "http://schemas.xmlsoap.org/soap/envelope/",
"@xmlns:xsd": "http://www.w3.org/2001/XMLSchema",
"@xmlns:xsi": "http://www.w3.org/2001/XMLSchema-instance",
"soapenv:Body": {
"notifications": {
"@xmlns": "http://soap.sforce.com/2005/09/outbound",
"OrganizationId": "00D8d000008CGKjEAO",
"ActionId": "04k8d000000XZMhAAO",
"SessionId": {
"@xsi:nil": "true"
},
"EnterpriseUrl": "https://engini2-dev-ed.develop.my.salesforce.com/services/Soap/c/58.0/00D8d000008CGKj",
"PartnerUrl": "https://engini2-dev-ed.develop.my.salesforce.com/services/Soap/u/58.0/00D8d000008CGKj",
"Notification": {
"Id": "04l8d00000TRPf0AAH",
"sObject": {
"@xsi:type": "sf:Opportunity",
"@xmlns:sf": "urn:sobject.enterprise.soap.sforce.com",
"sf:Id": "0068d00000JAtxbAAD"
}
}
}
}
}
}
```
3. Click on the icon on the right side of the URL to copy the URL.
4. Set up an Outbound Message in salesforce with the copied URL.
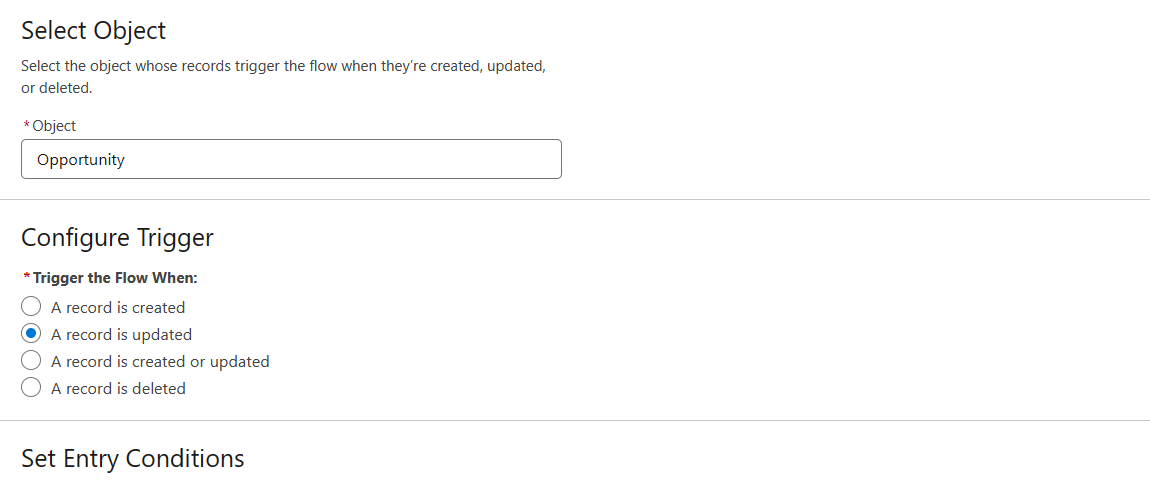
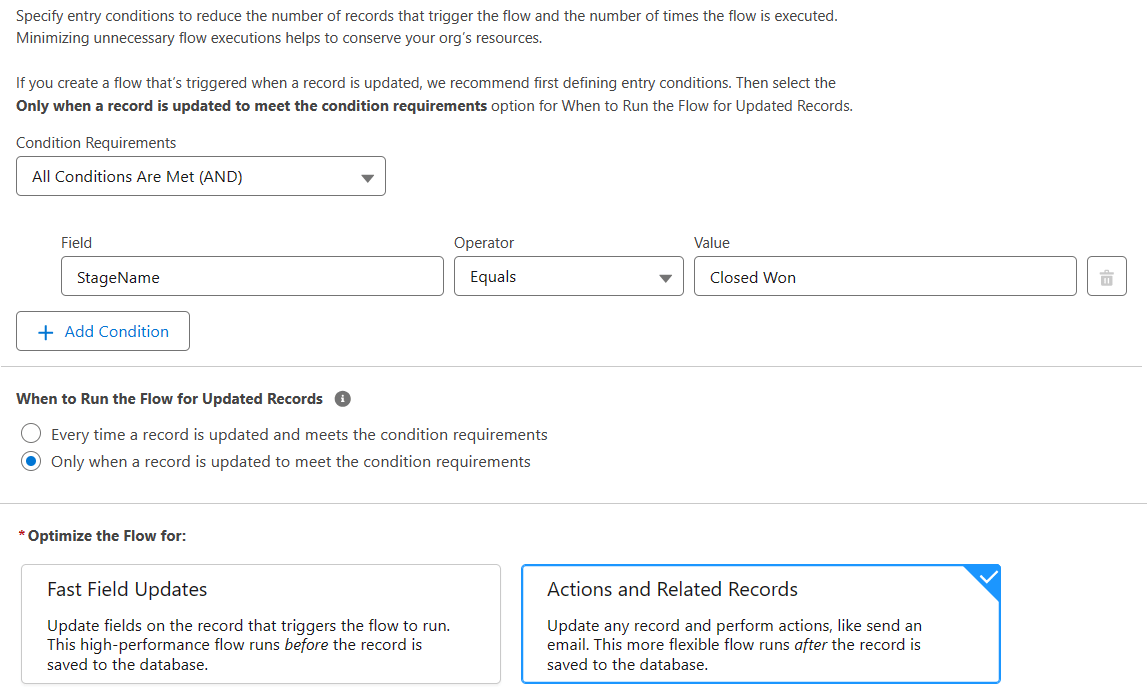
 5. Set up an Flow in Salesforce with the outbound message:
 6. Back in Engini, click on the “next step” button.
## Get Opportunity
Add the “Get Opportunity” action of salesforce to get all details of the opportunity:
6. Back in Engini, click on the “next step” button.
## Get Opportunity
Add the “Get Opportunity” action of salesforce to get all details of the opportunity:
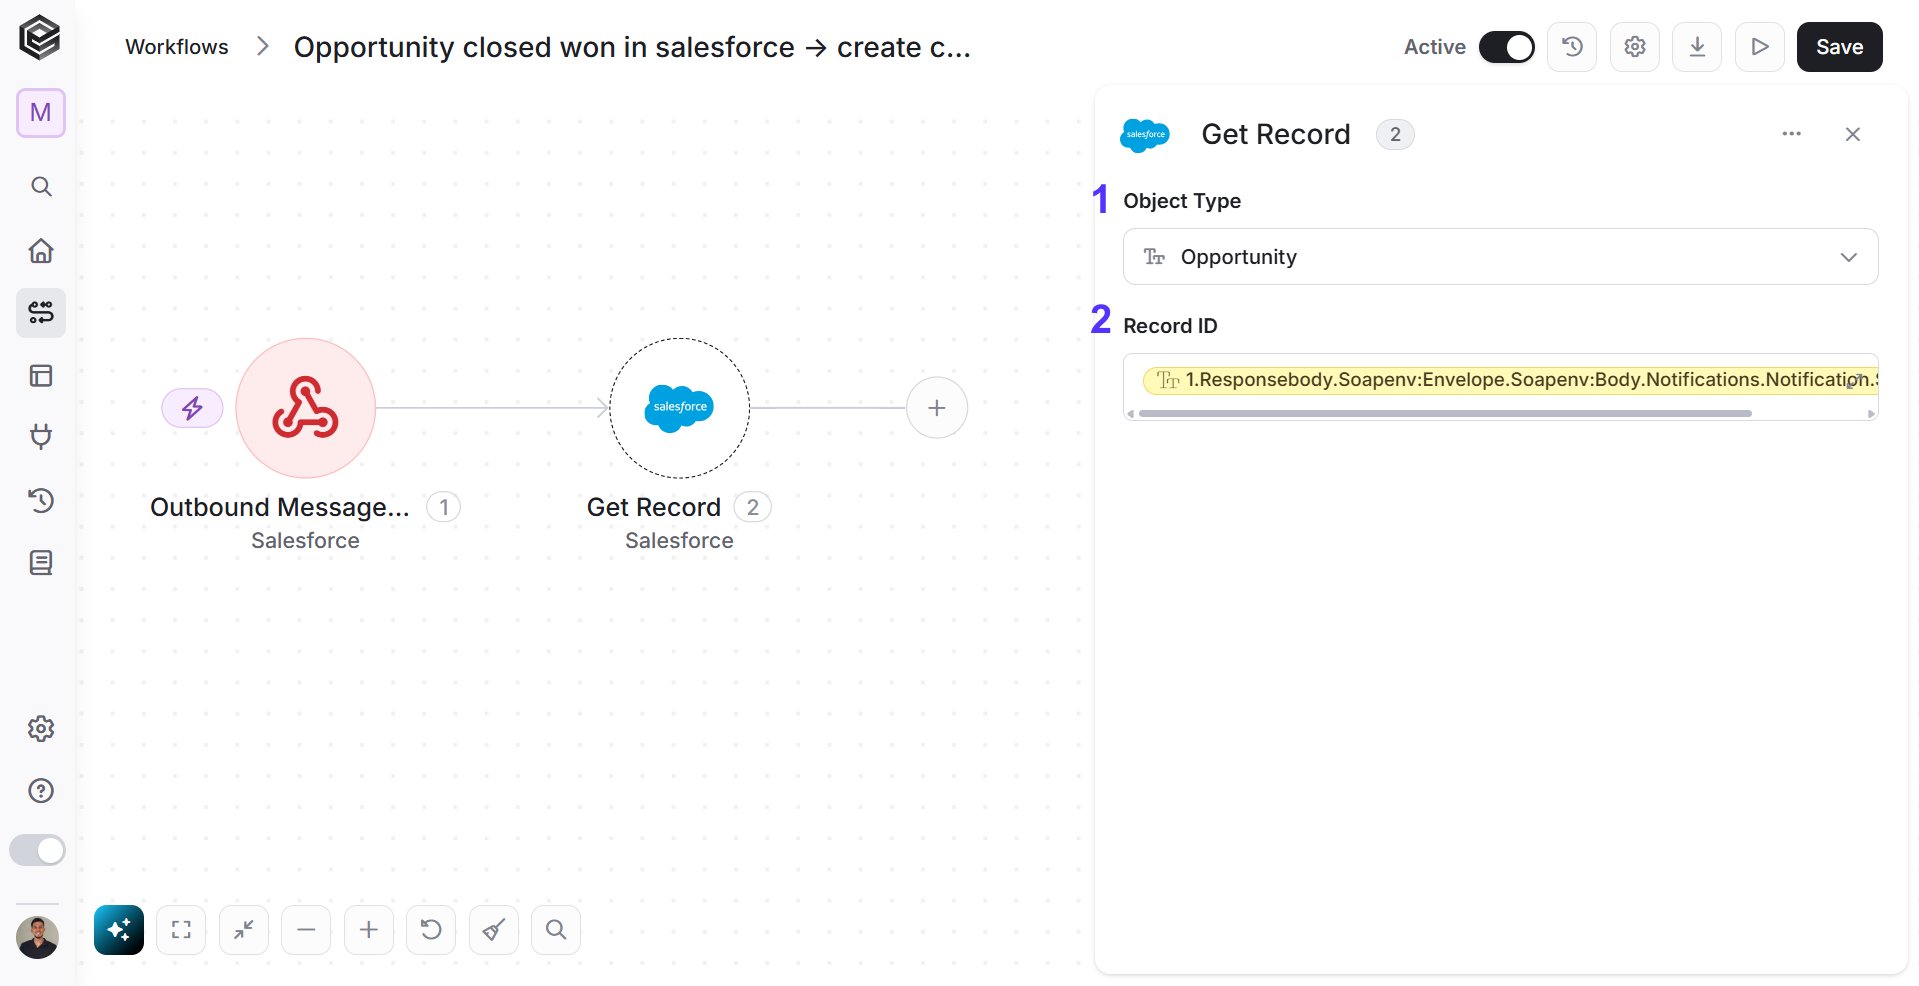 1. *Object Type* - Choose from the drop down the opportunity option.
2. *Record ID*
1. Click on the empty field, and the tooltip will pop up showing the options of the values you can choose.
2. Choose the “sd:id” value, by following the path:
response body -> soapenv:Envelope -> notifications -> Notification -> Sobject -> sf:id
## Get Account
Add the “Get Account” action of salesforce to the account:
1. *Object Type* - Choose from the drop down the opportunity option.
2. *Record ID*
1. Click on the empty field, and the tooltip will pop up showing the options of the values you can choose.
2. Choose the “sd:id” value, by following the path:
response body -> soapenv:Envelope -> notifications -> Notification -> Sobject -> sf:id
## Get Account
Add the “Get Account” action of salesforce to the account:
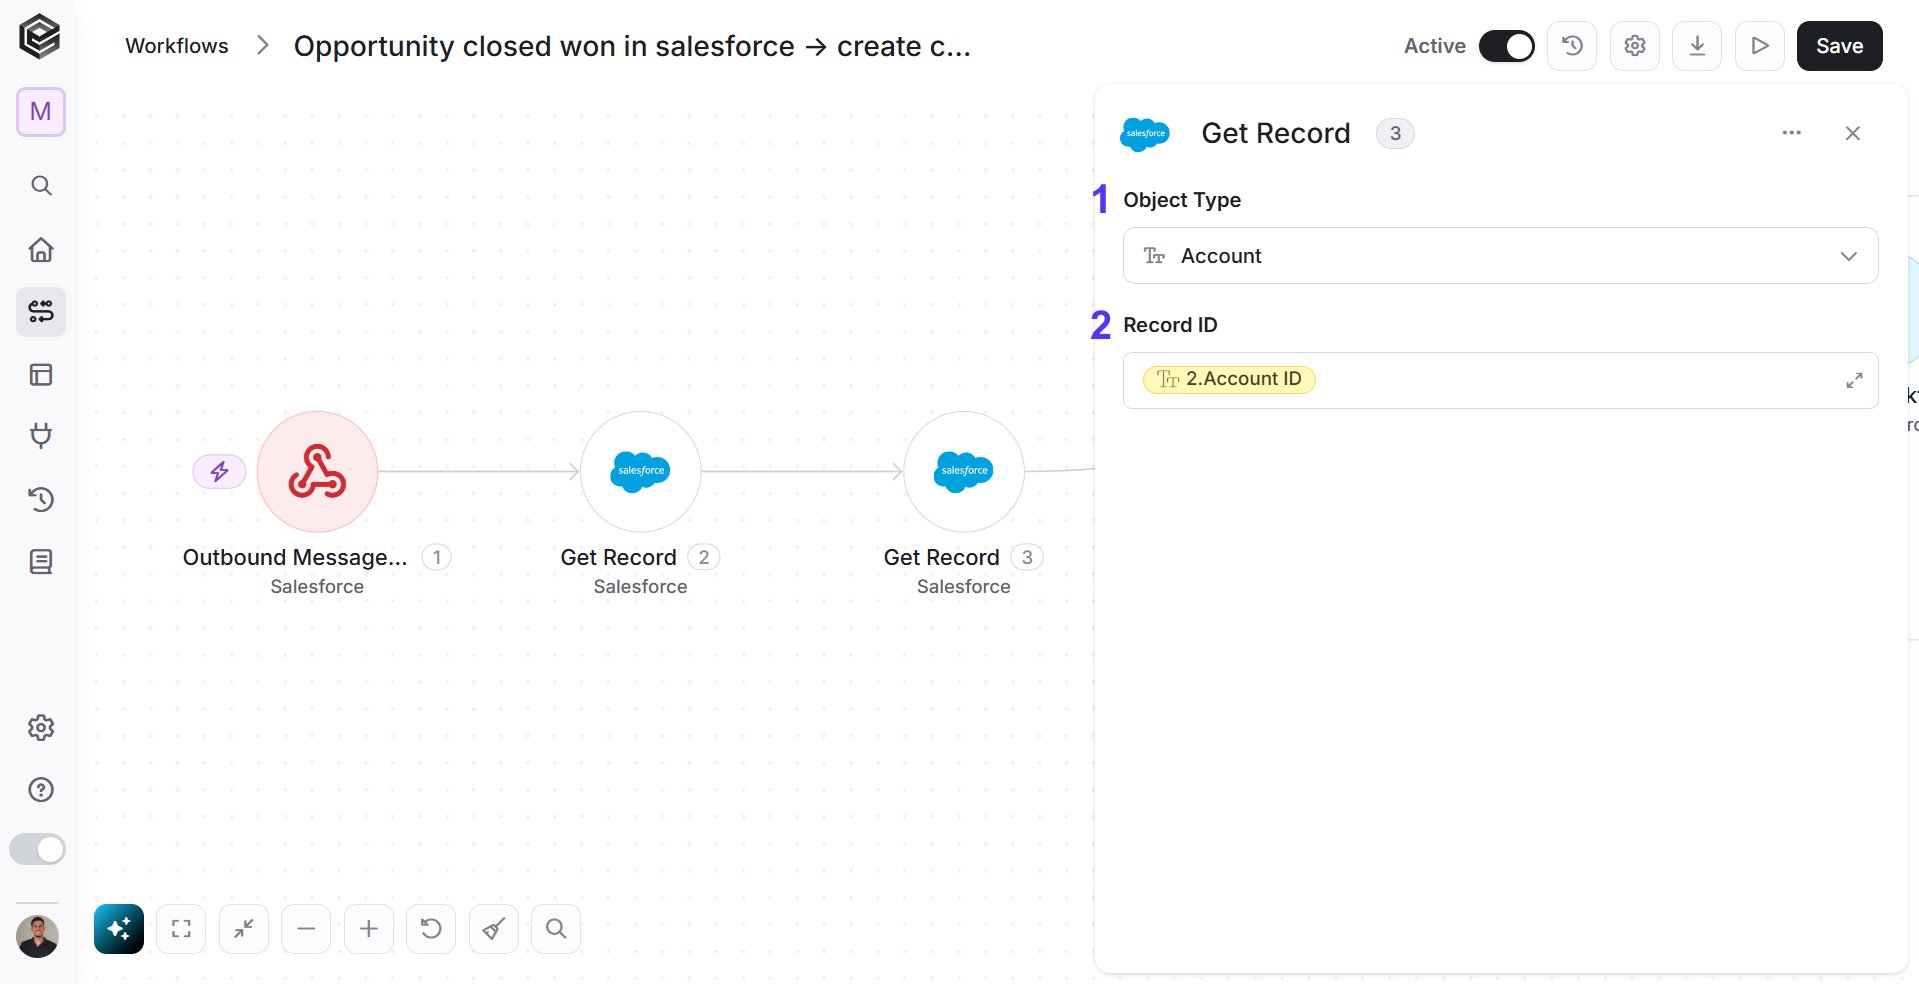 1. *Object Type -* Choose from the drop down the “Account” option.
2. *Record ID*
1. Click on the empty field, and the tooltip will pop up showing the options of the values you can choose.
2. Choose the “Account ID” from the “Get Opportunity” activity.
## Add If Condition
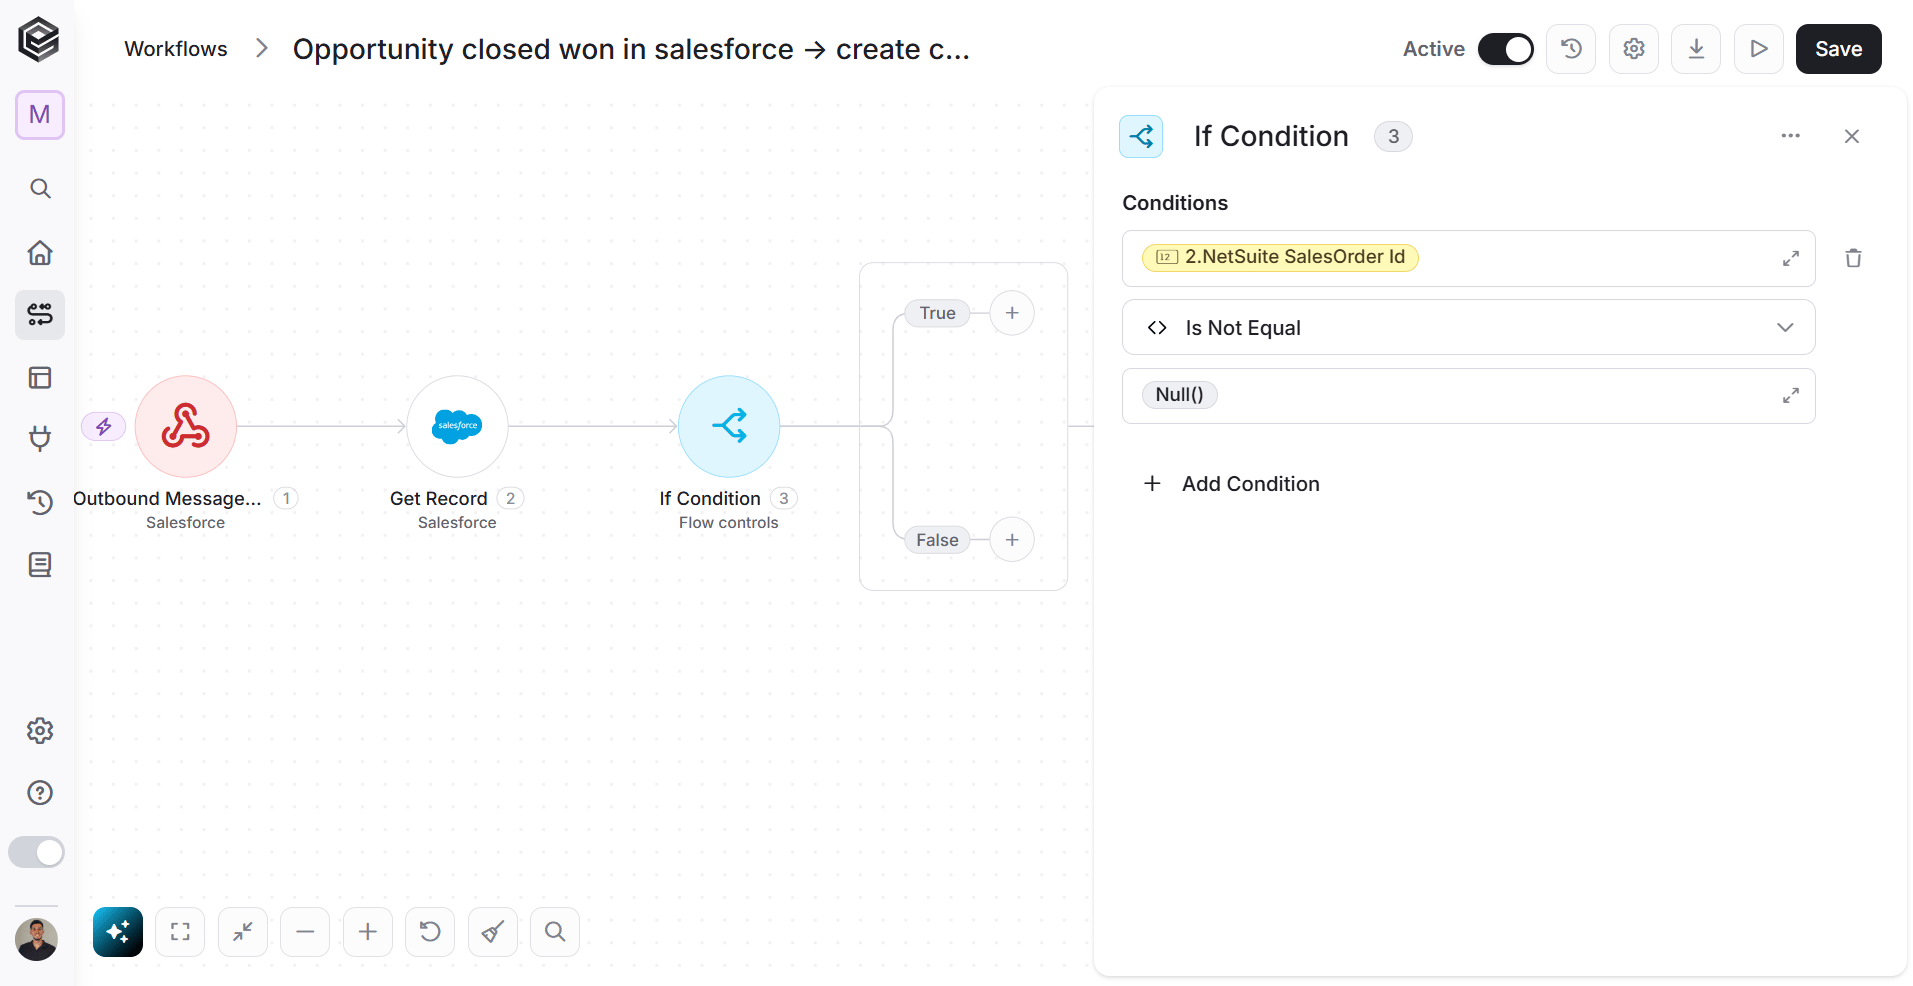
Add the “If Condition” action of Engini to check whether a sale order has been established in NetSuite or not. When we set up a sale order in NetSuite, we will populate the “NetSuite salesorder id” field with the number of the set-up sale order.
Using the if activity, we check whether the value in the “NetSuite salesorder id” field is populated or not, if so – it means that the sale order has been established and there is no need to continue the process. If not – it means that the sale order has not been established and the process will continue.
1. *Object Type -* Choose from the drop down the “Account” option.
2. *Record ID*
1. Click on the empty field, and the tooltip will pop up showing the options of the values you can choose.
2. Choose the “Account ID” from the “Get Opportunity” activity.
## Add If Condition
Add the “If Condition” action of Engini to check whether a sale order has been established in NetSuite or not. When we set up a sale order in NetSuite, we will populate the “NetSuite salesorder id” field with the number of the set-up sale order.
Using the if activity, we check whether the value in the “NetSuite salesorder id” field is populated or not, if so – it means that the sale order has been established and there is no need to continue the process. If not – it means that the sale order has not been established and the process will continue.
 1. Click on “Add conditions” button.
2. Click on left the field to show the tooltip with all the options you can choose:
* Click on the Dynamic Content label.
* Choose the “NetSuite SalesOrder Id” field from the “Get Opportunity” activity.
3. Select the “Is Not Equal” (\<>) condition.
4. Click on the right to show the tooltip with all the options you can choose:
* Click on the functions label
* Choose the “Null()” function, which return null.
5. *If Yes -* If the condition is met, the workflow will Terminate:
1. Click on “Next step” button to add a activity that will be carried out if the condition is met.
2. Add “Terminate workflow” activity.
3. Choose the “Fell by condition” status from the dropdown options.
1. Click on “Add conditions” button.
2. Click on left the field to show the tooltip with all the options you can choose:
* Click on the Dynamic Content label.
* Choose the “NetSuite SalesOrder Id” field from the “Get Opportunity” activity.
3. Select the “Is Not Equal” (\<>) condition.
4. Click on the right to show the tooltip with all the options you can choose:
* Click on the functions label
* Choose the “Null()” function, which return null.
5. *If Yes -* If the condition is met, the workflow will Terminate:
1. Click on “Next step” button to add a activity that will be carried out if the condition is met.
2. Add “Terminate workflow” activity.
3. Choose the “Fell by condition” status from the dropdown options.
 6. *If N*o - If the condition isn’t met, Engini will not take any action and the workflow can proceed to the next step.
## Initialize Variable
Now, let’s initialize a variable that will later hold the customer Id of the customer in NetSuite:
6. *If N*o - If the condition isn’t met, Engini will not take any action and the workflow can proceed to the next step.
## Initialize Variable
Now, let’s initialize a variable that will later hold the customer Id of the customer in NetSuite:
 1. *Name -* Click on the empty field and choose a name for the variable. For example “customer”.
2. Type - Choose from the drop down the “Integer” option.
3. *Value -* In this case, the variable value should be left empty.
## Add If Condition
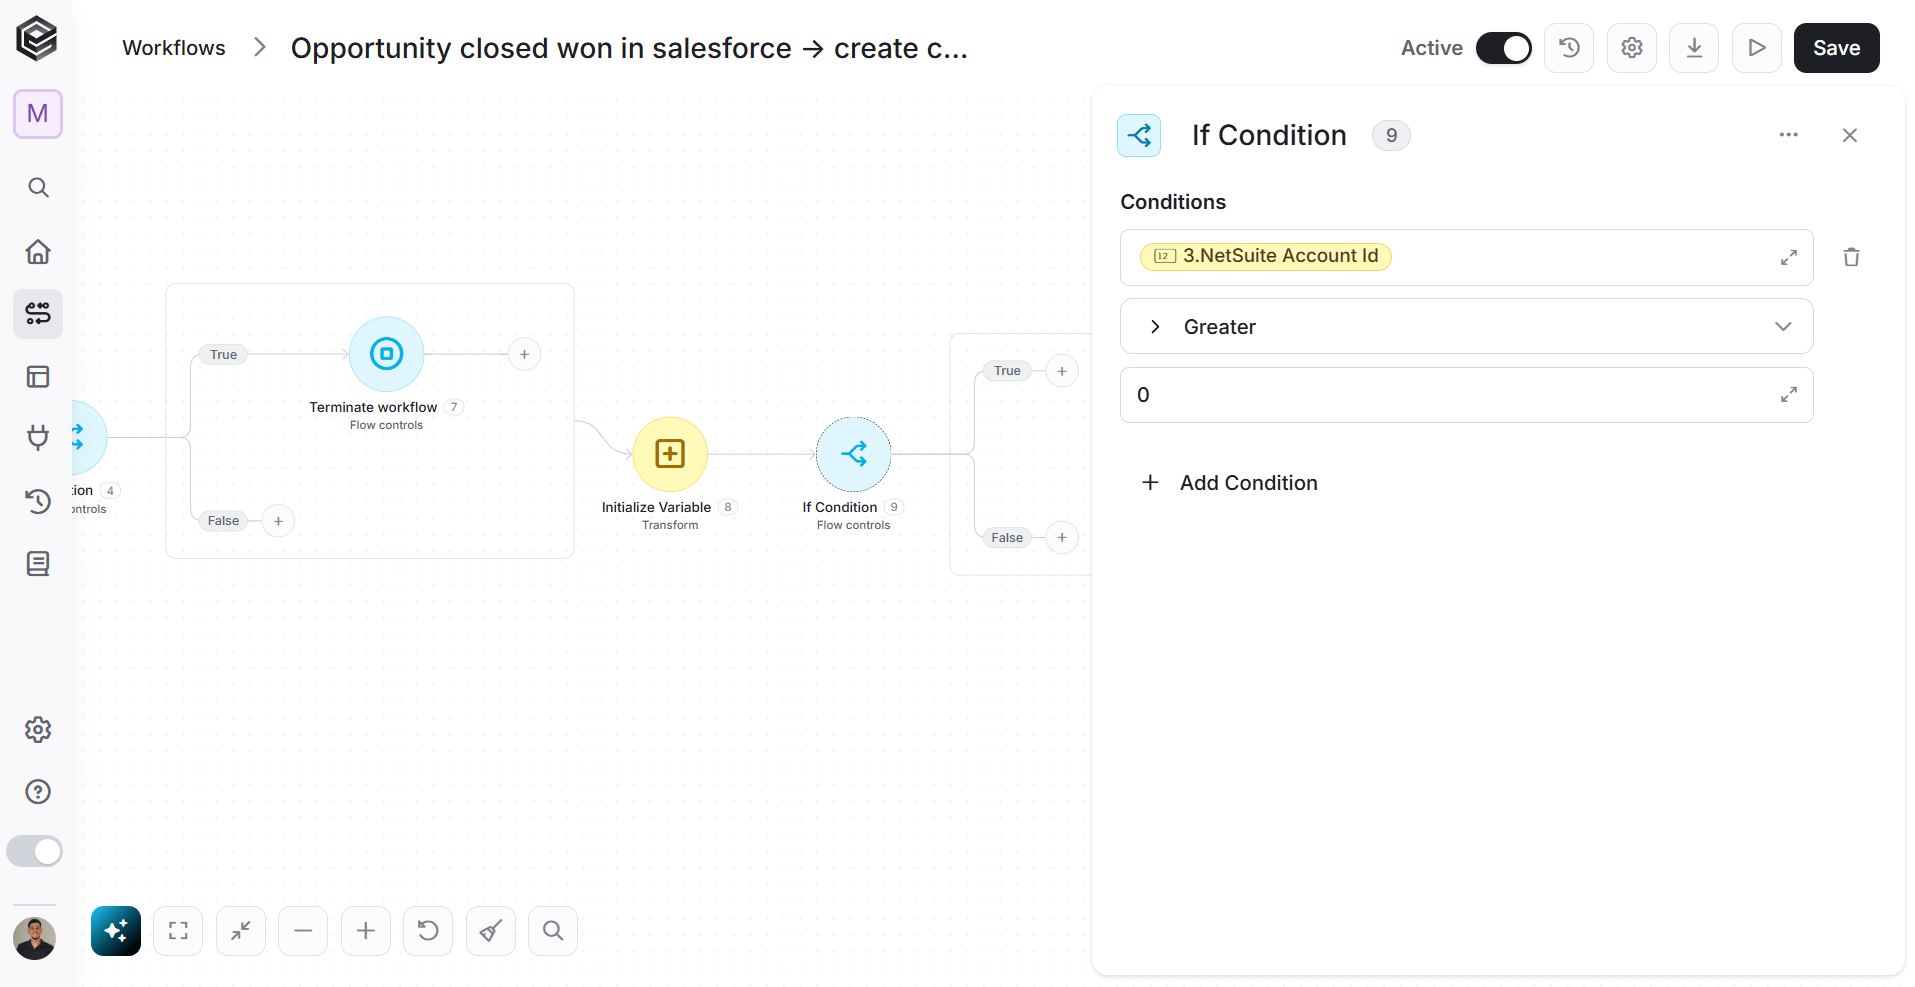
Add Engini’s “if condition” activity to check if the customer exists in NetSuite or not. When we create a customer in NetSuite, we will populate the “Netsuite Account id” field with the customer ID.
Using the if activity we check whether the value in the “NetSuite order ID” field is populated or not, if so – this means that the customer has been established and there is no need to establish a new customer. If not – it means that the customer has not been established and you need to establish it, populate the field “Netsuite Account id” and only then continue the process.
1. *Name -* Click on the empty field and choose a name for the variable. For example “customer”.
2. Type - Choose from the drop down the “Integer” option.
3. *Value -* In this case, the variable value should be left empty.
## Add If Condition
Add Engini’s “if condition” activity to check if the customer exists in NetSuite or not. When we create a customer in NetSuite, we will populate the “Netsuite Account id” field with the customer ID.
Using the if activity we check whether the value in the “NetSuite order ID” field is populated or not, if so – this means that the customer has been established and there is no need to establish a new customer. If not – it means that the customer has not been established and you need to establish it, populate the field “Netsuite Account id” and only then continue the process.
 1. Click on “Add conditions” button.
2. Click on left the field to show the tooltip with all the options you can choose:
* Click on the Dynamic Content label.
* Choose the “NetSuite Account Id” field from the “Get Account” activity.
1. Click on “Add conditions” button.
2. Click on left the field to show the tooltip with all the options you can choose:
* Click on the Dynamic Content label.
* Choose the “NetSuite Account Id” field from the “Get Account” activity.
 3. Select the “Greater” (>) condition.
4. Click on the right field and write ‘0’.
5. *If Yes -* If the condition is met, the workflow will turn to execute the process within the if yes block.
3. Select the “Greater” (>) condition.
4. Click on the right field and write ‘0’.
5. *If Yes -* If the condition is met, the workflow will turn to execute the process within the if yes block.
 1. Click on “Next step” button to add a activity that will be carried out if the condition is met.
2. Choose “Set Variable” action of Engini.
3. Click on the drop down and choose the name you gave the variable you initialize.
4. Click on the empty field next to the “value” and choose from the tool tip the “NetSuite Account Id” field from the “Get Account” activity.
6. *If No -* If the condition isn’t met, the workflow will turn to execute the process within the if no block.
1. Click on “Next step” button to add a activity that will be carried out if the condition is met.
2. Choose “Set Variable” action of Engini.
3. Click on the drop down and choose the name you gave the variable you initialize.
4. Click on the empty field next to the “value” and choose from the tool tip the “NetSuite Account Id” field from the “Get Account” activity.
6. *If No -* If the condition isn’t met, the workflow will turn to execute the process within the if no block.
 ### Create Record
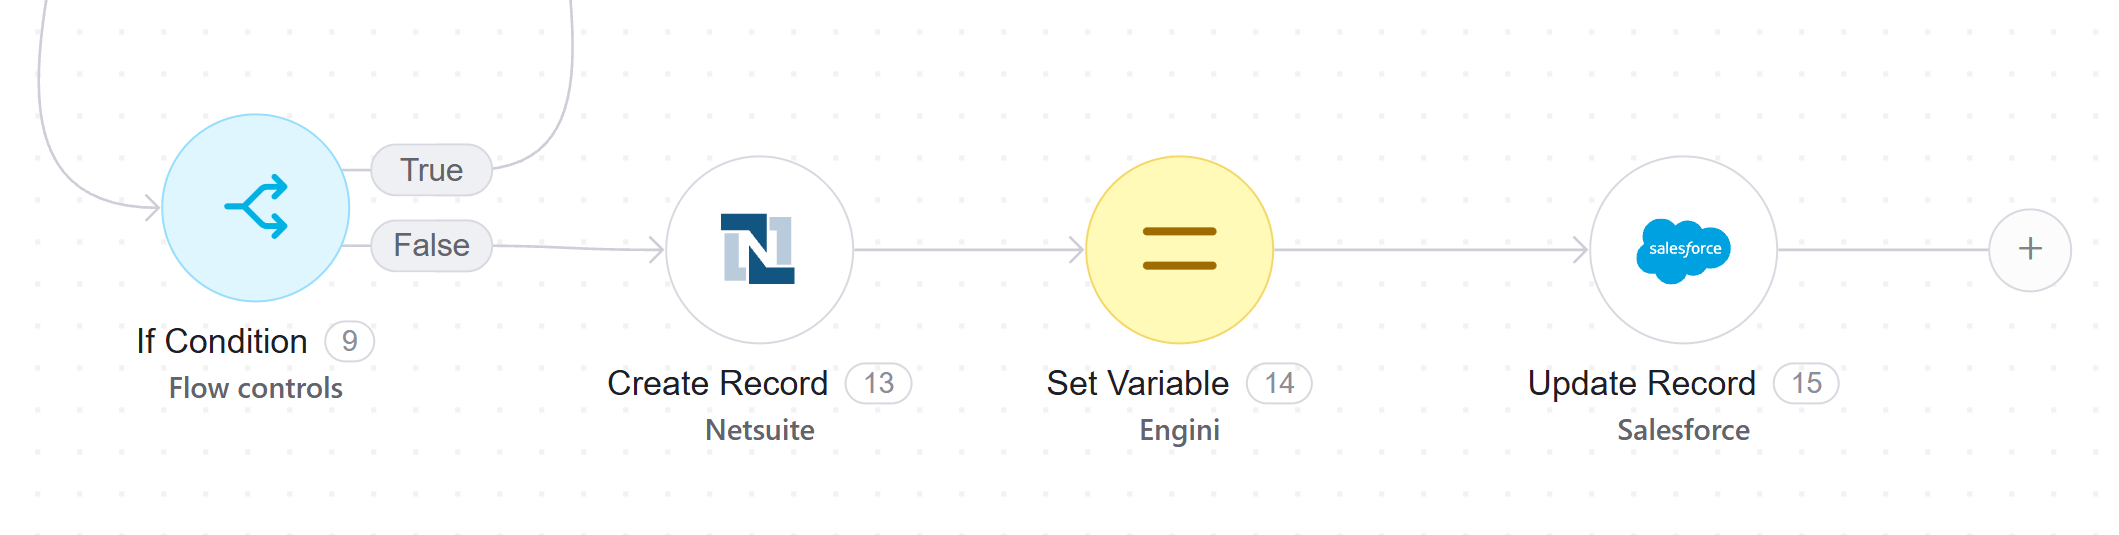
1. Click on “Next step” button to add a activity that will be carried out if the condition is not met.
2. Add “Create Record” activity of NetSuite:
### Create Record
1. Click on “Next step” button to add a activity that will be carried out if the condition is not met.
2. Add “Create Record” activity of NetSuite:
 * Choose the “Customer” object type from the dropdown menu.
* Click on the “Add fields” button to fill the fields in the “Customer” form.
* On the left field, select from the drop down the field you want to populate in the table. For this process choose the following fields:
* Company Name
* Subsidiary>>Internal Identifier (When you encounter a field name with ‘>>’ between the words, it signifies that the field is of an object type, and in such cases, you should populate the value in right – in this case “Internal Identifier”)
* Email
* Click on the right field, and the tooltip will pop up showing the options of the values you can choose:
* For the companyName field choose the “Account Name” value from the “Get Account” activity.
* For the remaining fields, select the values that best align with your specific requirements.
### Set Variable
1. Click on the “next step” button inside the “If No” block.
2. Add “Set Variable” activity of Engini:
* Choose the “Customer” object type from the dropdown menu.
* Click on the “Add fields” button to fill the fields in the “Customer” form.
* On the left field, select from the drop down the field you want to populate in the table. For this process choose the following fields:
* Company Name
* Subsidiary>>Internal Identifier (When you encounter a field name with ‘>>’ between the words, it signifies that the field is of an object type, and in such cases, you should populate the value in right – in this case “Internal Identifier”)
* Email
* Click on the right field, and the tooltip will pop up showing the options of the values you can choose:
* For the companyName field choose the “Account Name” value from the “Get Account” activity.
* For the remaining fields, select the values that best align with your specific requirements.
### Set Variable
1. Click on the “next step” button inside the “If No” block.
2. Add “Set Variable” activity of Engini:
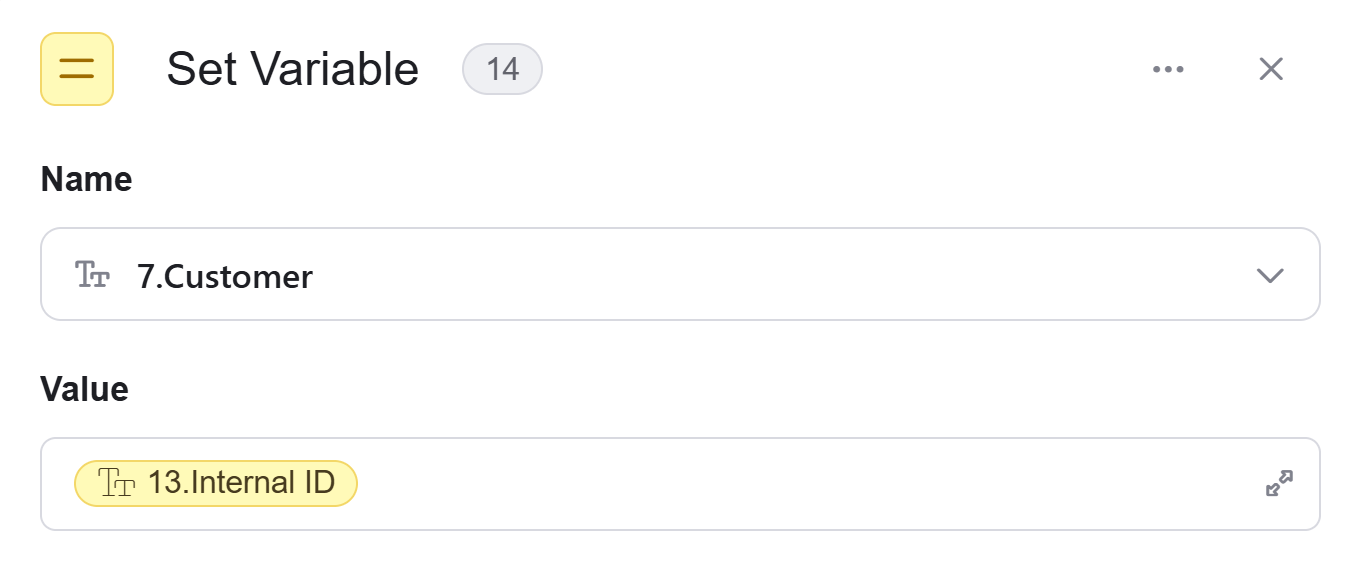 * Click on the drop down and choose the name you gave the variable you initialize. In this case- “Customer”.
* Click on the empty field next to the “value” and choose from the tool tip the “Internal ID” field from the “Create Customer” activity.
### Update Record
1. Click on the “next step” button inside the “If No” block.
2. Add “Update Record” activity of Salesforce:
* Click on the drop down and choose the name you gave the variable you initialize. In this case- “Customer”.
* Click on the empty field next to the “value” and choose from the tool tip the “Internal ID” field from the “Create Customer” activity.
### Update Record
1. Click on the “next step” button inside the “If No” block.
2. Add “Update Record” activity of Salesforce:
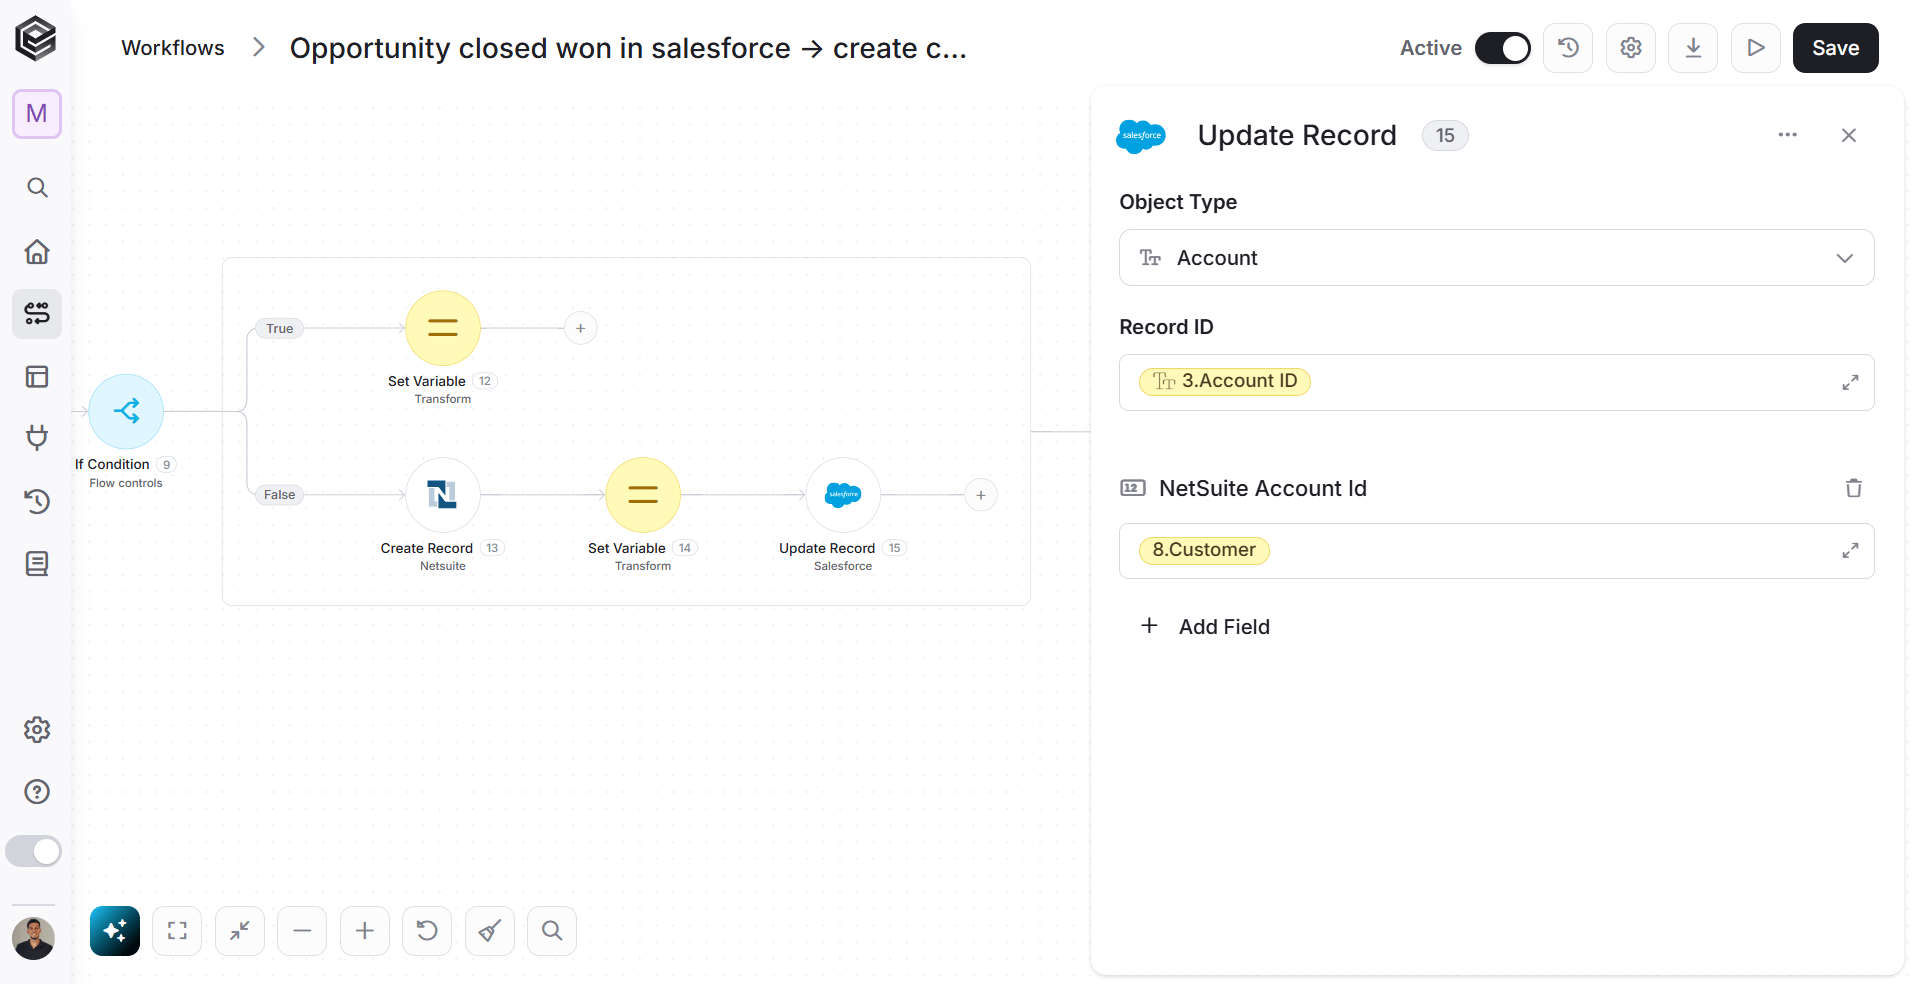 After creating the new customer in NetSuite, we need to update the corresponding Account record in Salesforce with the “NetSuite Account id” for future reference.
* *Object Type -* Choose from the drop down the “Account” option.
* *Record ID*
1. Click on the empty field, and the tooltip will pop up showing the options of the values you can choose.
2. Choose the “Account ID” value from the “Get Account” activity.
* Click on the “Add fields” button.
* On the left field, select from the drop down the field you want to populate in the table. For this process choose the “NetSuite Account id” field.
* Click on the right field, and the tooltip will pop up showing the options of the values you can choose. For the “NetSuite Account id” field choose the "Customer" variable value, from the previous activity of “Set Variable”.
3. Click on the “next step” button.
## Initialize Objects Array
Add the “Initialize Objects Array” action of NetSuite:
After creating the new customer in NetSuite, we need to update the corresponding Account record in Salesforce with the “NetSuite Account id” for future reference.
* *Object Type -* Choose from the drop down the “Account” option.
* *Record ID*
1. Click on the empty field, and the tooltip will pop up showing the options of the values you can choose.
2. Choose the “Account ID” value from the “Get Account” activity.
* Click on the “Add fields” button.
* On the left field, select from the drop down the field you want to populate in the table. For this process choose the “NetSuite Account id” field.
* Click on the right field, and the tooltip will pop up showing the options of the values you can choose. For the “NetSuite Account id” field choose the "Customer" variable value, from the previous activity of “Set Variable”.
3. Click on the “next step” button.
## Initialize Objects Array
Add the “Initialize Objects Array” action of NetSuite:
 1. *Name -* Click on the empty field and choose a name for the variable. For example “Object array”.
2. *Object Element Type -* Choose from the drop down the “SalesOrder-itemElement” option.
3. Click on the “next step” button.
## Append Item Object To Array
Add the “Append Item Objects To Array” action of NetSuite:
1. *Name -* Click on the empty field and choose a name for the variable. For example “Object array”.
2. *Object Element Type -* Choose from the drop down the “SalesOrder-itemElement” option.
3. Click on the “next step” button.
## Append Item Object To Array
Add the “Append Item Objects To Array” action of NetSuite:
 1. *Variable -* Click on the drop down and choose the name you gave the variable you initialize.
2. *Fields -* Click on the “Add fields” button to fill the fields you want to append.
* On the left field, select from the drop down the field you want to populate in the table. For this process choose the following fields:
1. item>>Internal Identifier (When you encounter a field name with ‘>>’ between the words, it signifies that the field is of an object type, and in such cases, you should populate the value in right – in this case “Internal Identifier”)
2. rate
3. Click on the right field, and the tooltip will pop up showing the options of the values you can choose. For those fields, select the values that best align with your specific requirements.
4. Click on the “next step” button.
## Create Sales Order
Add a new activity and choose the “Create Record” action of NetSuite:
1. *Variable -* Click on the drop down and choose the name you gave the variable you initialize.
2. *Fields -* Click on the “Add fields” button to fill the fields you want to append.
* On the left field, select from the drop down the field you want to populate in the table. For this process choose the following fields:
1. item>>Internal Identifier (When you encounter a field name with ‘>>’ between the words, it signifies that the field is of an object type, and in such cases, you should populate the value in right – in this case “Internal Identifier”)
2. rate
3. Click on the right field, and the tooltip will pop up showing the options of the values you can choose. For those fields, select the values that best align with your specific requirements.
4. Click on the “next step” button.
## Create Sales Order
Add a new activity and choose the “Create Record” action of NetSuite:
 1. *Object Type -* Choose from the drop down the “Sales Order” type.
2. *Fields -* Click on the “Add fields” button to fill the fields you want to create.
3. On the left field, select from the drop down the field you want to populate in the table. For this process choose the following fields:
* entity>>Internal Identified
* tranDate
* message
* custbody\_order\_type>>id
* custbody\_end\_user\_record>>Internal Identified
* items\[]
4. Click on the right field, and the tooltip will pop up showing the options of the values you can choose. For this process choose the following values:
* For “entity>>Internal Identified” field choose the “Customer” value from the “Initialize variavle” activity of Engini.
* For “tranDate” field choose the “close Date” value from the “Get Opportunity” activity.
* For “custbody\_order\_type>>id” field write ‘1’.
* For “custbody\_end\_user\_record>>Internal Identified” field choose the “Customer” value from the “Initialize variavle” activity of Engini.
* For “items\[]” field choose the “object array\[]” value from the “Initialize Objects Array” activity.
5. Click on the “next step” button.
## Update Record
Add a new activity and choose the “Update Record” action of SalesForce:
1. *Object Type -* Choose from the drop down the “Sales Order” type.
2. *Fields -* Click on the “Add fields” button to fill the fields you want to create.
3. On the left field, select from the drop down the field you want to populate in the table. For this process choose the following fields:
* entity>>Internal Identified
* tranDate
* message
* custbody\_order\_type>>id
* custbody\_end\_user\_record>>Internal Identified
* items\[]
4. Click on the right field, and the tooltip will pop up showing the options of the values you can choose. For this process choose the following values:
* For “entity>>Internal Identified” field choose the “Customer” value from the “Initialize variavle” activity of Engini.
* For “tranDate” field choose the “close Date” value from the “Get Opportunity” activity.
* For “custbody\_order\_type>>id” field write ‘1’.
* For “custbody\_end\_user\_record>>Internal Identified” field choose the “Customer” value from the “Initialize variavle” activity of Engini.
* For “items\[]” field choose the “object array\[]” value from the “Initialize Objects Array” activity.
5. Click on the “next step” button.
## Update Record
Add a new activity and choose the “Update Record” action of SalesForce:
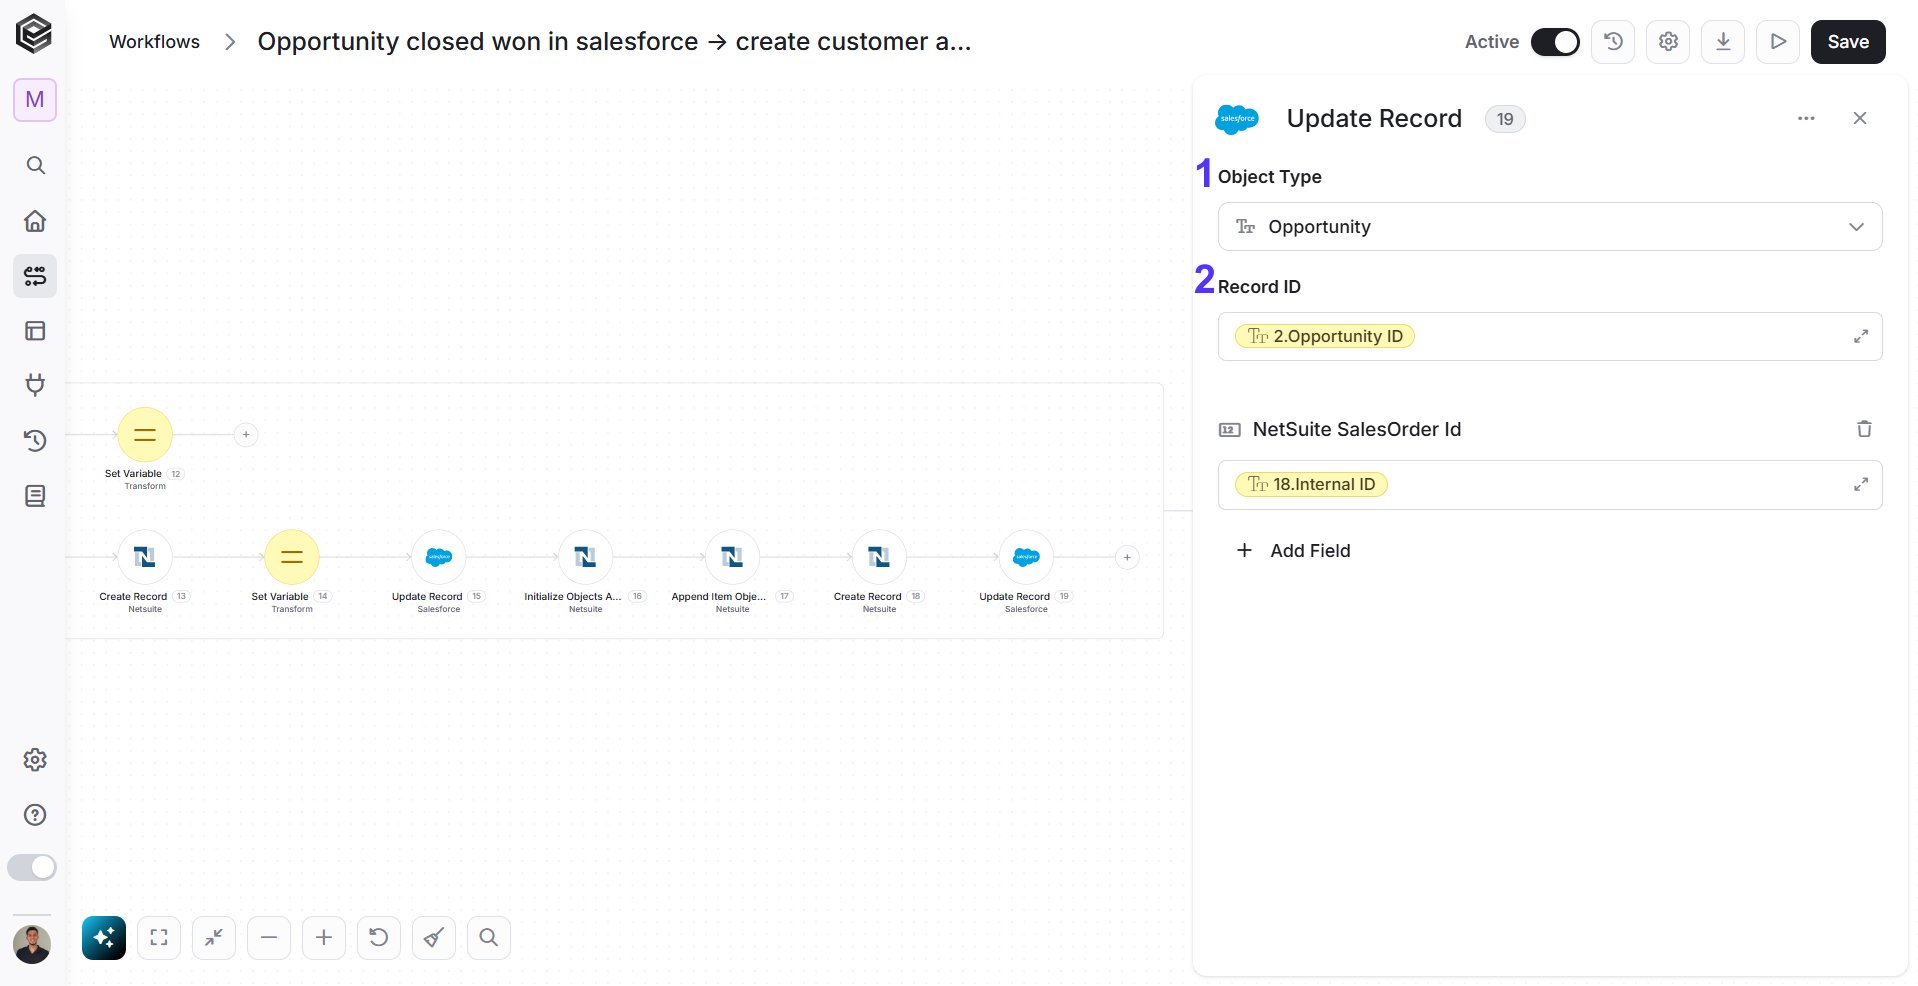 After creating the new sales order in NetSuite, we need to update the corresponding Opportunity record in Salesforce with the “NetSuite SalesOrder Id” for future reference.
1. *Object Type -* Choose from the drop down the “Opportunity” type.
2. *Record ID*
* Click on the empty field, and the tooltip will pop up showing the options of the values you can choose.
* Choose the “Opportunity ID” value from the “Get Opportunity” activity.
3. *Fields*
* Click on the “Add fields” button.
* On the left field, select from the drop down the field you want to populate in the table. For this process choose the “NetSuite SalesOrder id” field.
* Click on the right field, and the tooltip will pop up showing the options of the values you can choose. For the “NetSuite SalesOrder id” field choose the “Internal ID” value, from the previous activity of “Create Sales Order”.
This documentation is built and hosted on [Mintlify](https://mintlify.com), a developer documentation platform.
After creating the new sales order in NetSuite, we need to update the corresponding Opportunity record in Salesforce with the “NetSuite SalesOrder Id” for future reference.
1. *Object Type -* Choose from the drop down the “Opportunity” type.
2. *Record ID*
* Click on the empty field, and the tooltip will pop up showing the options of the values you can choose.
* Choose the “Opportunity ID” value from the “Get Opportunity” activity.
3. *Fields*
* Click on the “Add fields” button.
* On the left field, select from the drop down the field you want to populate in the table. For this process choose the “NetSuite SalesOrder id” field.
* Click on the right field, and the tooltip will pop up showing the options of the values you can choose. For the “NetSuite SalesOrder id” field choose the “Internal ID” value, from the previous activity of “Create Sales Order”.
This documentation is built and hosted on [Mintlify](https://mintlify.com), a developer documentation platform.