> ## Documentation Index
> Fetch the complete documentation index at: https://docs.engini.ai/llms.txt
> Use this file to discover all available pages before exploring further.
# HR Resources Automations
Automation of HR processes, especially in recruiting, is essential. This not only speeds up the recruitment process but also ensures accuracy.
Follow the guide to learn step by step how to build the tables and automations.
## Step 1: Create a Workbook
To learn how to create a workbook, click on [Workbooks](/help/tables/create-folderstables#create-a-table).
## Step 2: Build a Table
In this example, HR employees can monitor recruiters who may later become workers. Additionally, HR employees have the capability to oversee tasks that need to be completed by them (some of the tasks are related to recruitment).
### Workers
The Worker’s Table allowing for a comprehensive overview of employee statuses, including those currently employed and those who have been terminated, along with their respective department.
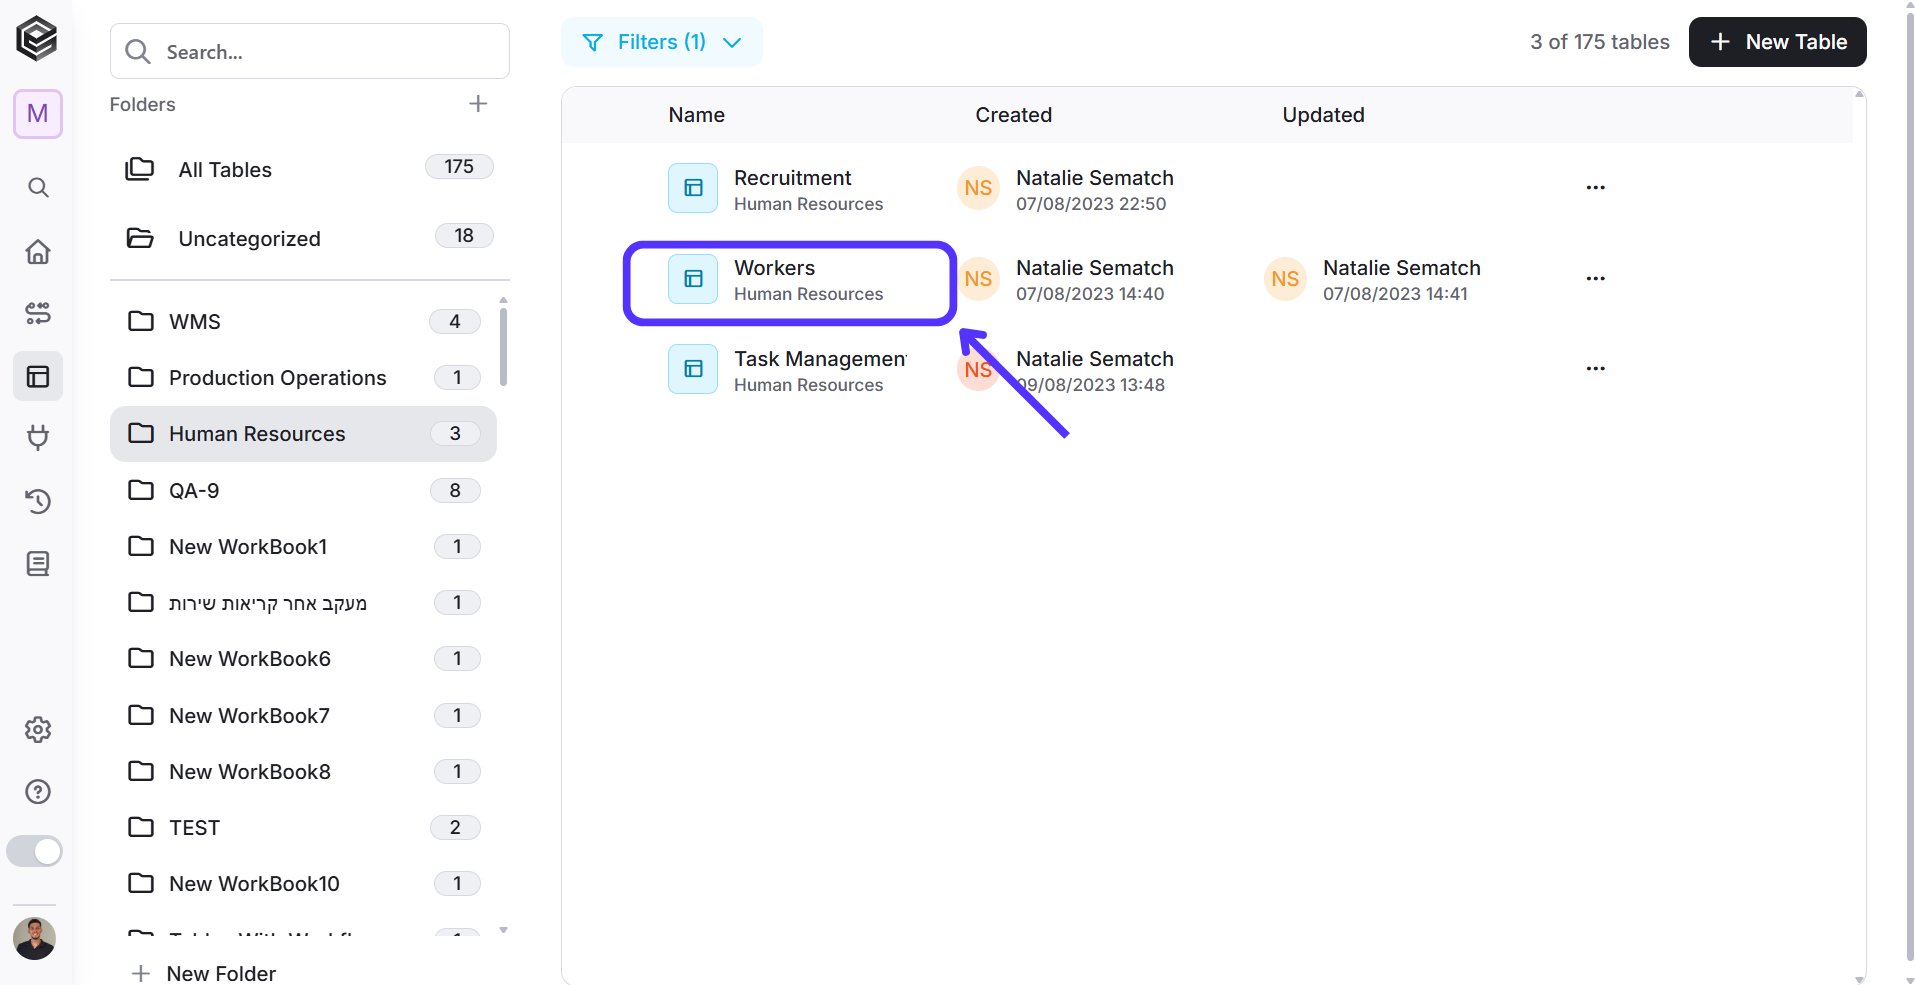 The Workers table contains:
 1. *ID* (text) - The id of the worker
2. *Name* (text)*-* Worker’s name
3. *Worker status* (status) *-* Worker’s status (Hired/Terminated)
4. *Department* (text) - Worker's department
### Recruitment
The Recruitment Table tracks the stage in which a candidate is during the recruitment process.
1. *ID* (text) - The id of the worker
2. *Name* (text)*-* Worker’s name
3. *Worker status* (status) *-* Worker’s status (Hired/Terminated)
4. *Department* (text) - Worker's department
### Recruitment
The Recruitment Table tracks the stage in which a candidate is during the recruitment process.
 The Recruitment table contains:
 1. *Name* (text)*-* Names of the candidates
2. *Status* (status) - Candidate’s statuses (Not selected/In progress/Hired)
3. *Department* (text) - Department to which they are intended
4. *Candidates ID* (text) Candidates IDs
### Task Management
The Task Management table for HR workers is a way to keep track of tasks, their statuses (To do, Stuck, Done), categories (Recruitment, Welfare, Overlap), the due date and the names of the HR employees responsible for each task.
1. *Name* (text)*-* Names of the candidates
2. *Status* (status) - Candidate’s statuses (Not selected/In progress/Hired)
3. *Department* (text) - Department to which they are intended
4. *Candidates ID* (text) Candidates IDs
### Task Management
The Task Management table for HR workers is a way to keep track of tasks, their statuses (To do, Stuck, Done), categories (Recruitment, Welfare, Overlap), the due date and the names of the HR employees responsible for each task.
 The Task Management contains:
 1. *Task* (text) - Tasks information.
2. *Due date* (datetime) - Tasks deadline.
3. *Task Status* (status) - Status options (To Do/In Progress/Done/Stuck).
4. *Category* (status) - Category options (Recruitment/Overlap/Welfare).
5. *Name* (text) - This field is linked to the Workers table, displaying the names of existing workers. Here, you can select one or more workers for the same task. For more information click [here](/help/tables/build-a-table).
To learn how to build tables, click on [Creating Columns](/help/tables/build-a-table#create-columns)
To learn about Table’s Records, click on [Records](/help/tables/tables-records#add-a-record)
## Step 3: Automate Fields
### New Hire Addition & Existing Worker Status Update
When onboarding a new employee, add them to the Workers table, or update the employment status of previously terminated workers to ‘hired’ in Workers table.
1. *Task* (text) - Tasks information.
2. *Due date* (datetime) - Tasks deadline.
3. *Task Status* (status) - Status options (To Do/In Progress/Done/Stuck).
4. *Category* (status) - Category options (Recruitment/Overlap/Welfare).
5. *Name* (text) - This field is linked to the Workers table, displaying the names of existing workers. Here, you can select one or more workers for the same task. For more information click [here](/help/tables/build-a-table).
To learn how to build tables, click on [Creating Columns](/help/tables/build-a-table#create-columns)
To learn about Table’s Records, click on [Records](/help/tables/tables-records#add-a-record)
## Step 3: Automate Fields
### New Hire Addition & Existing Worker Status Update
When onboarding a new employee, add them to the Workers table, or update the employment status of previously terminated workers to ‘hired’ in Workers table.
 1. Add an automation and change its name to a significant name, for example ‘New Employee’.
 2. Add a trigger to the automation – ‘On record updated’.
3. Select the ‘Status’ column and add a proper condition to it.
4. Apply the condition: Candidate status is ‘Hired’.
2. Add a trigger to the automation – ‘On record updated’.
3. Select the ‘Status’ column and add a proper condition to it.
4. Apply the condition: Candidate status is ‘Hired’.
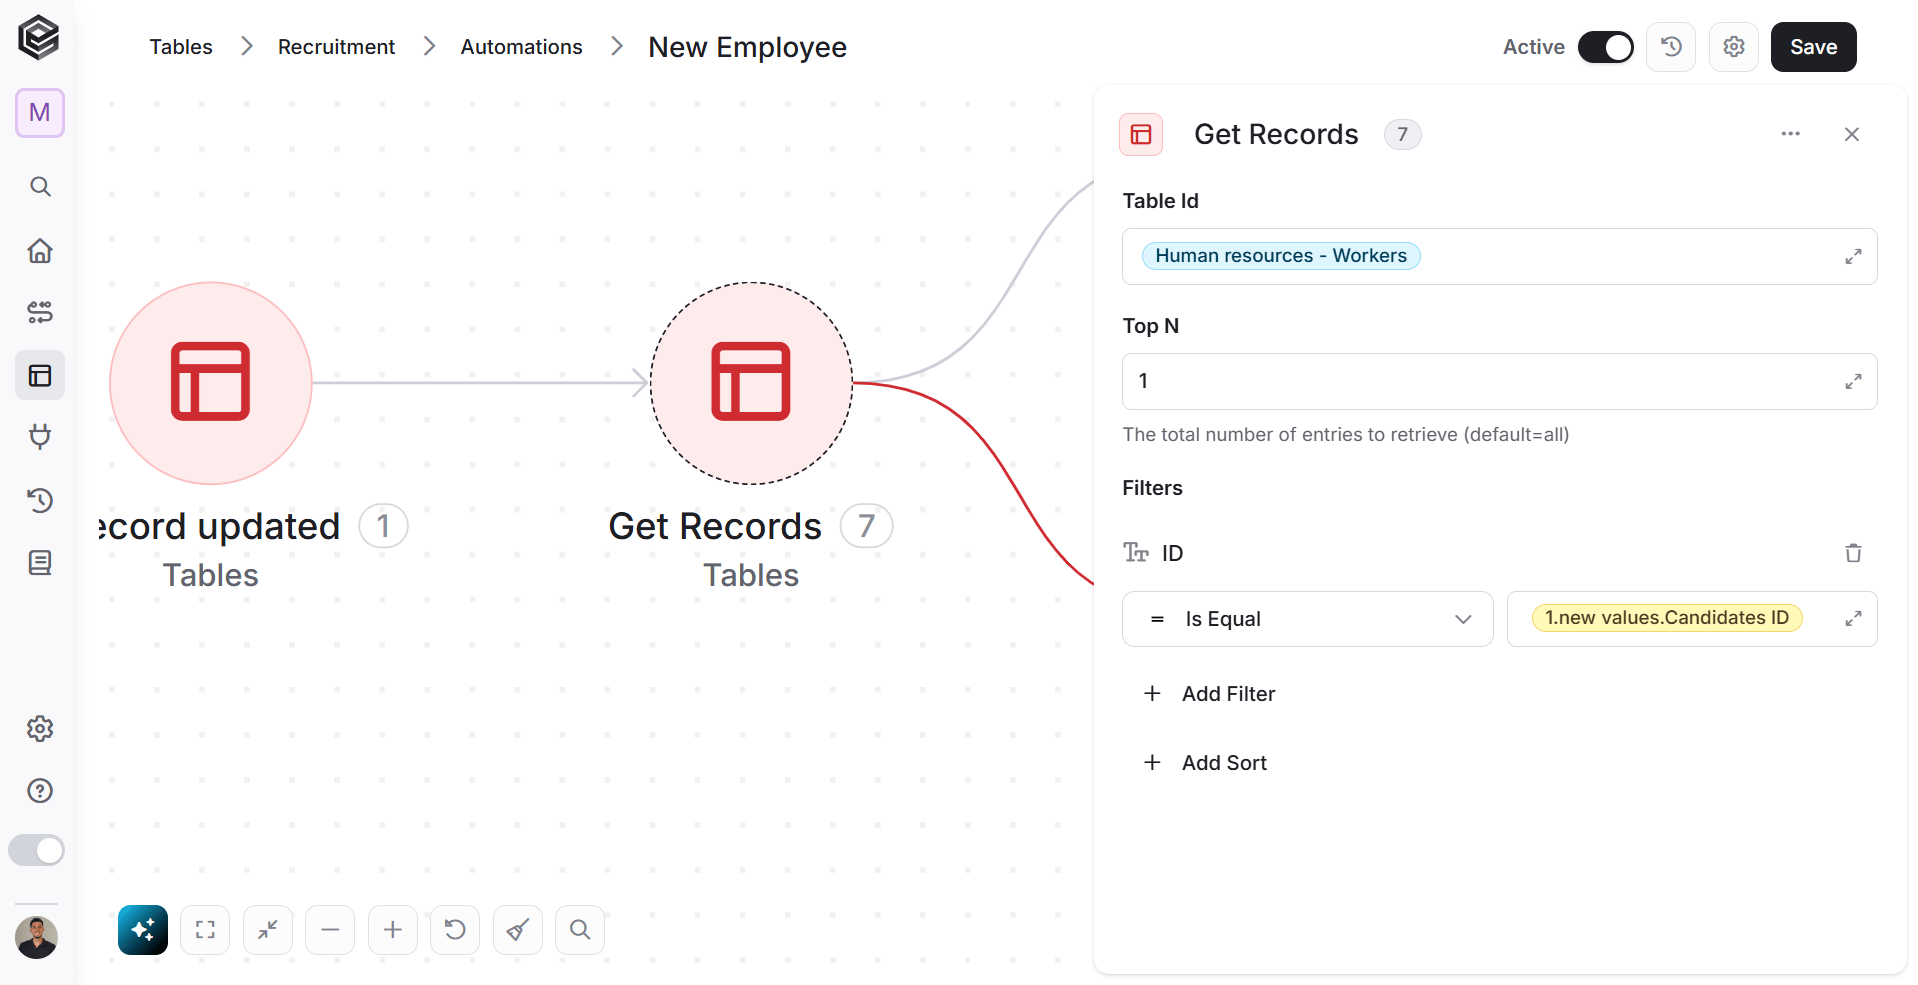 5. Click on the “next step” button.
6. Click on ‘Get Records’
* In table id- choose ‘Human Resources- Workers. This is the table from which you are retrieving the records.
* Add a filter for when the ID of the worker is equal to the new candidate ID.
5. Click on the “next step” button.
6. Click on ‘Get Records’
* In table id- choose ‘Human Resources- Workers. This is the table from which you are retrieving the records.
* Add a filter for when the ID of the worker is equal to the new candidate ID.
 7. Add a parallel action- click on the three dots (**•••**) in the right side of ‘Get Records’ action.
If a new employee does not yet have an ID in the workers table, activity 7 will fail; however, if it matches, activity 7 will succeed. Therefore, we should consider two cases
1. Create Record- Will occur if activity 7 has failed. If the ID’s don’t match, create a record that contains Name, Department, ID and Worker Status.
* Click on the three dots (**•••**) in the right side of ‘Create Record’ action.
* Click on ‘Configure run after’
* Since the condition isn’t met (the IDs are different), click on ‘Has Failed’.
7. Add a parallel action- click on the three dots (**•••**) in the right side of ‘Get Records’ action.
If a new employee does not yet have an ID in the workers table, activity 7 will fail; however, if it matches, activity 7 will succeed. Therefore, we should consider two cases
1. Create Record- Will occur if activity 7 has failed. If the ID’s don’t match, create a record that contains Name, Department, ID and Worker Status.
* Click on the three dots (**•••**) in the right side of ‘Create Record’ action.
* Click on ‘Configure run after’
* Since the condition isn’t met (the IDs are different), click on ‘Has Failed’.
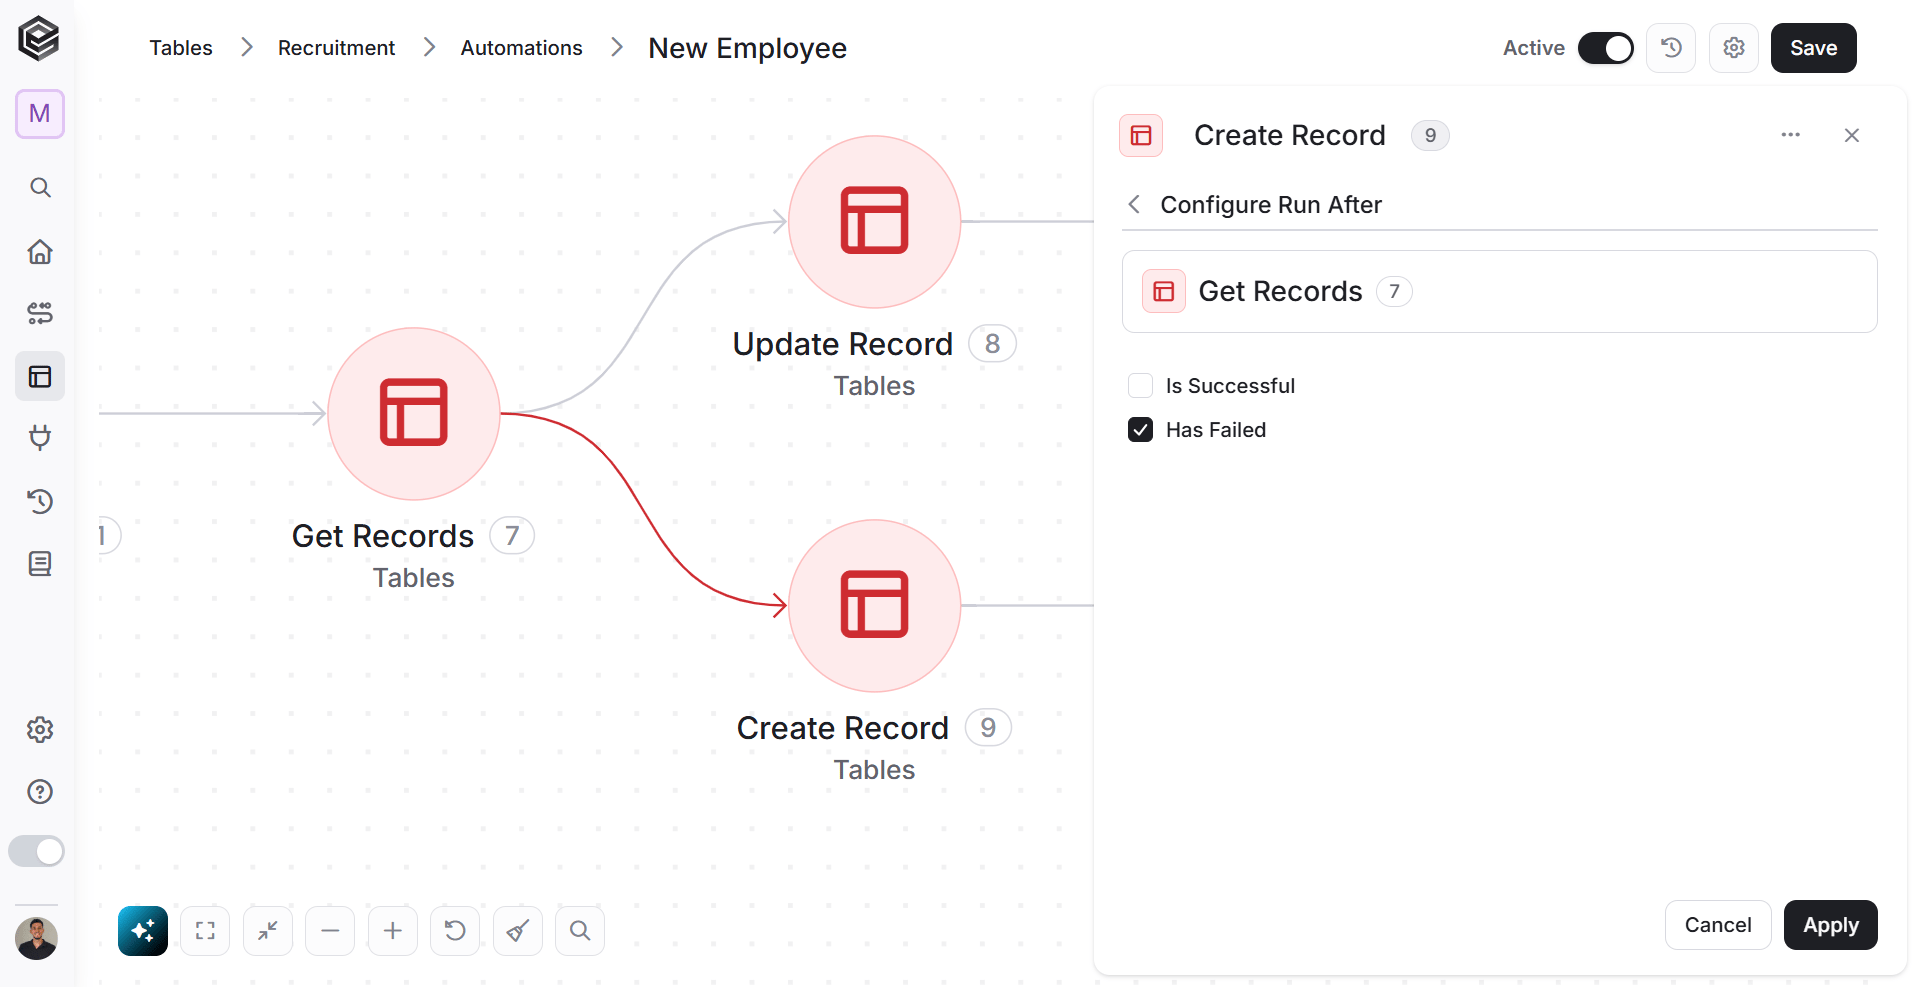 Note: If a new employee does not yet have an ID in the workers table, activity 7 will fail. Therefore, the red arrow will appear when it happens and we will create a new record for the new employee.
2. Update Record- Will occur if activity 7 has succeeded. If the candidate ID and worker ID match, it means that a worker who was previously terminated has been assigned a new role. Therefore, we proceed to update the worker’s status to ‘Hired’.
Note: If a new employee does not yet have an ID in the workers table, activity 7 will fail. Therefore, the red arrow will appear when it happens and we will create a new record for the new employee.
2. Update Record- Will occur if activity 7 has succeeded. If the candidate ID and worker ID match, it means that a worker who was previously terminated has been assigned a new role. Therefore, we proceed to update the worker’s status to ‘Hired’.
 ### New Tasks for HR Workers
When a new candidate has been selected for hiring, the HR team has some tasks to take care of.
### New Tasks for HR Workers
When a new candidate has been selected for hiring, the HR team has some tasks to take care of.
 First, Add an automation and change it’s name to ‘New Tasks’.
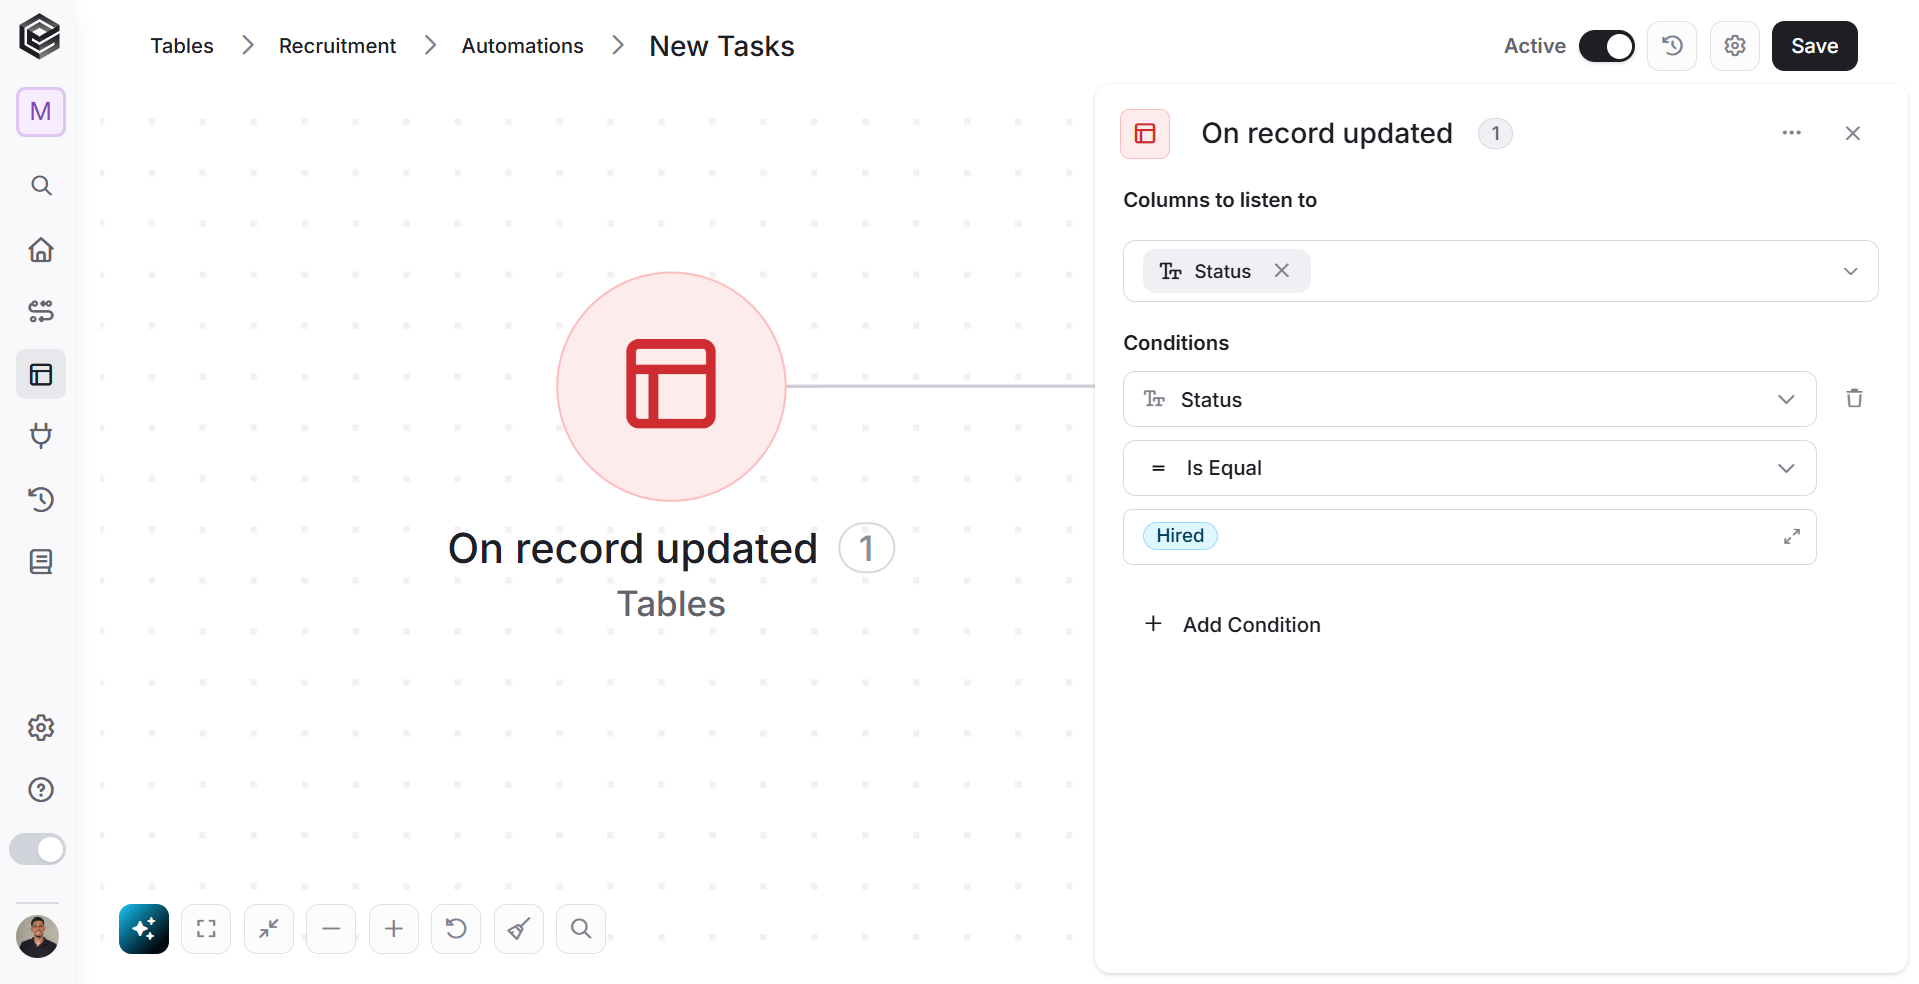 1. Add a trigger to your workflow- ‘On record updated’.
2. Click on the “next step” button.
3. Select the ‘Status’ column.
4. Apply the condition : Candidate status is ‘Hired’.
1. Add a trigger to your workflow- ‘On record updated’.
2. Click on the “next step” button.
3. Select the ‘Status’ column.
4. Apply the condition : Candidate status is ‘Hired’.
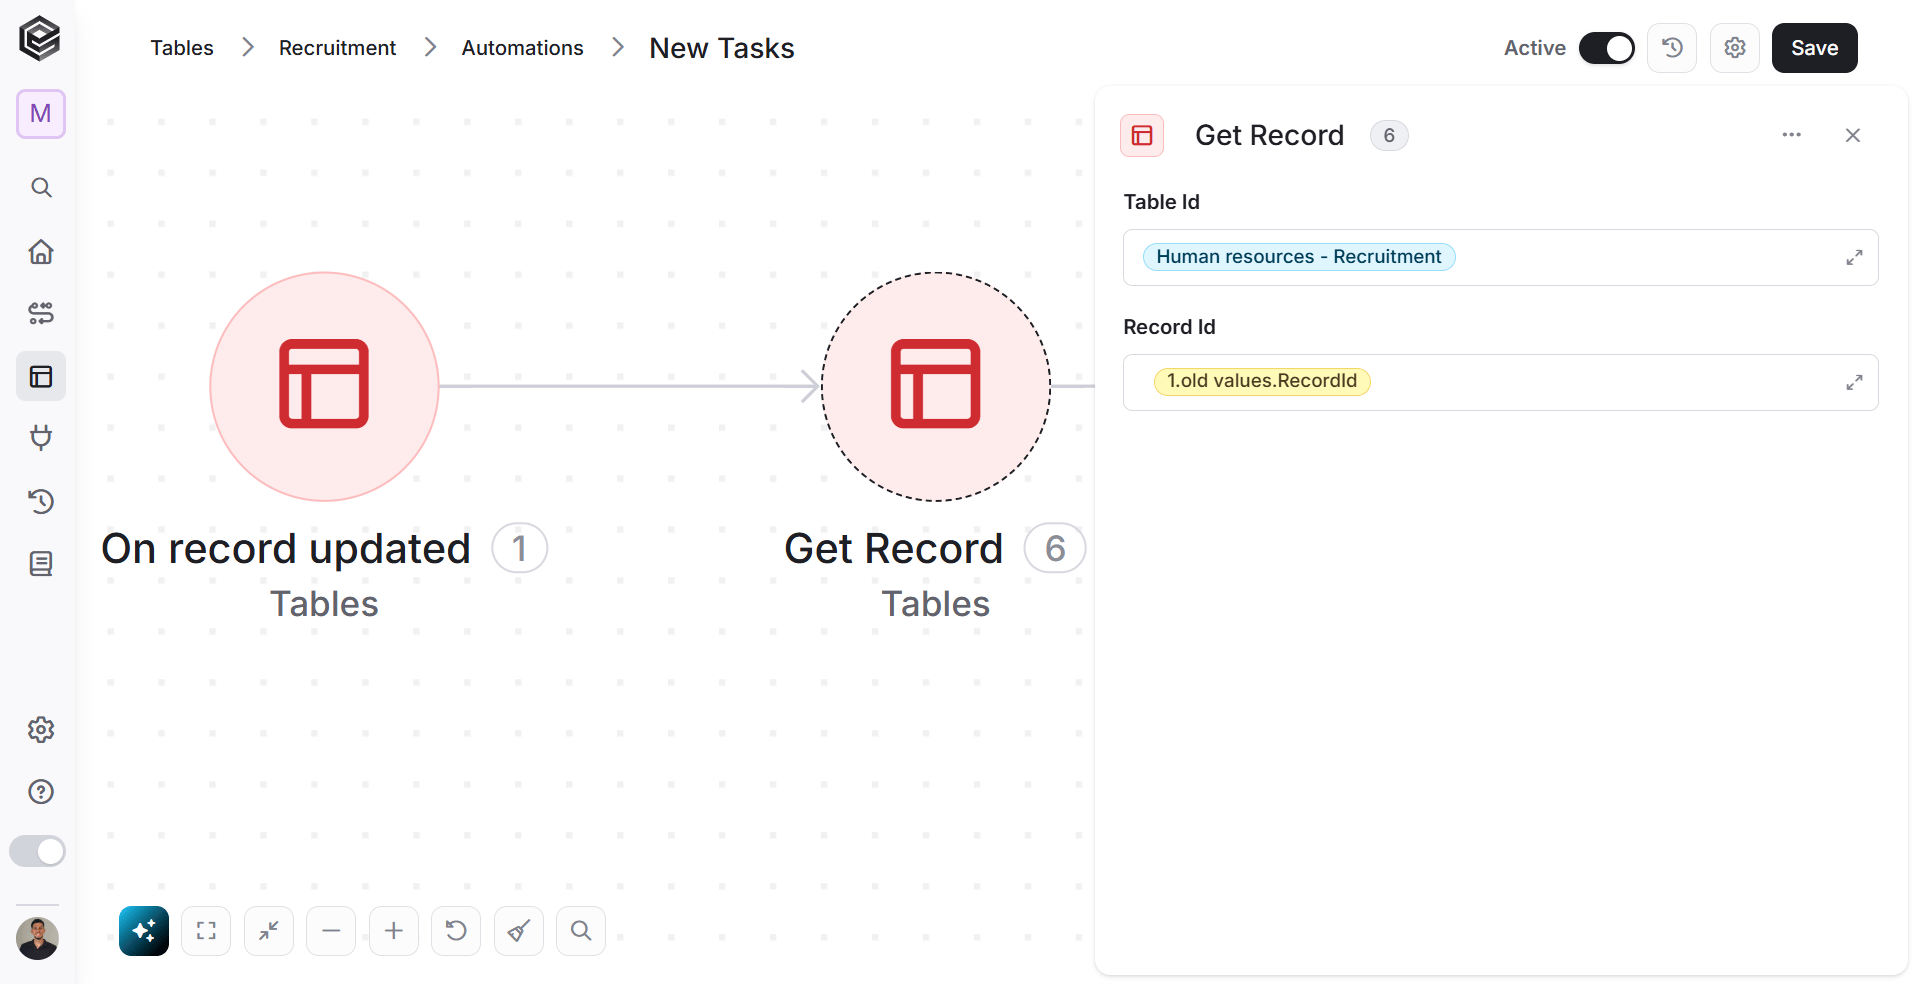 5. Click on the “next step” button.
6. Now click on ‘Get Record’
* In table id-choose ‘Human Resources- Task Management’. This is the table from which you are retrieving the record.
7. Click on the “next step” button.
8. Add the activity Create Record and choose one of the examples:
Example 1:
5. Click on the “next step” button.
6. Now click on ‘Get Record’
* In table id-choose ‘Human Resources- Task Management’. This is the table from which you are retrieving the record.
7. Click on the “next step” button.
8. Add the activity Create Record and choose one of the examples:
Example 1:
 Example 2:
 Example 3:
 8. Create a record in the Task Management table and repeat this action three times.
* Create Record
* Task- Add a field that uses the Concat function to combine the task and associate it with the new worker.
* Category- Enter on the field and click on ‘Overlap’.
Note: To learn more about Concat, click on [functions](/help/tools/enginis-functions).
### New Task Status
When a new task is created for HR, the default status will be set as ‘To Do’ in Task Management table.
8. Create a record in the Task Management table and repeat this action three times.
* Create Record
* Task- Add a field that uses the Concat function to combine the task and associate it with the new worker.
* Category- Enter on the field and click on ‘Overlap’.
Note: To learn more about Concat, click on [functions](/help/tools/enginis-functions).
### New Task Status
When a new task is created for HR, the default status will be set as ‘To Do’ in Task Management table.
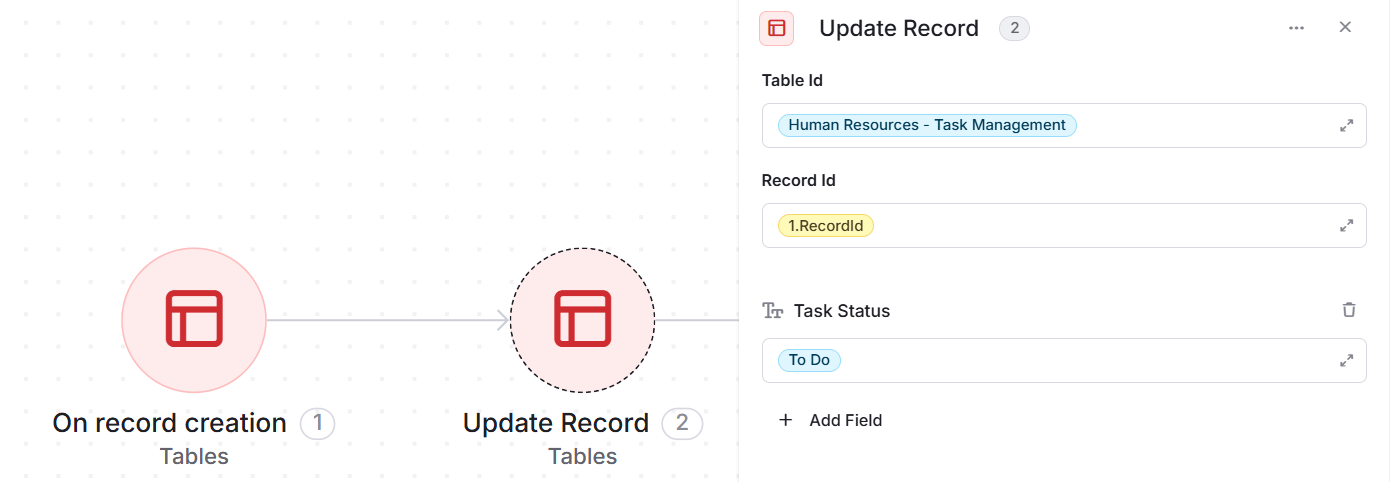 1. Add a trigger to your workflow- ‘On record creation’.
2. Click on the “next step” button.
3. Choose ‘Update Record’ action.
* In table id- choose ‘Human Resources- Task Management’. This is the table from which you are updating the record.
* Add a filter for updating only the ‘Task Status’ of the HR worker to ‘To Do’.
To learn more about table’s automations click [here](/help/tables/table-automations#add-new-automation).
This documentation is built and hosted on [Mintlify](https://mintlify.com), a developer documentation platform.
1. Add a trigger to your workflow- ‘On record creation’.
2. Click on the “next step” button.
3. Choose ‘Update Record’ action.
* In table id- choose ‘Human Resources- Task Management’. This is the table from which you are updating the record.
* Add a filter for updating only the ‘Task Status’ of the HR worker to ‘To Do’.
To learn more about table’s automations click [here](/help/tables/table-automations#add-new-automation).
This documentation is built and hosted on [Mintlify](https://mintlify.com), a developer documentation platform.