> ## Documentation Index
> Fetch the complete documentation index at: https://docs.engini.ai/llms.txt
> Use this file to discover all available pages before exploring further.
# How to Set a Priority Webhook
In this tutorial, learn how to set a Priority webhook to streamline your processes and ensure seamless integration with your existing systems.
## Prerequisites
Before you begin, ensure the following:
1. Connection between Engini and Priority.
Learn how to [connect Priority to Engini](/help/apps/priority-erp#connecting-engini-to-priority-erp).
2. Webhook module of Priority.
## Add Priority Trigger
To get started, add a trigger:
1. Add a new activity and choose trigger of priority.
For example: “Customer Order Updated”
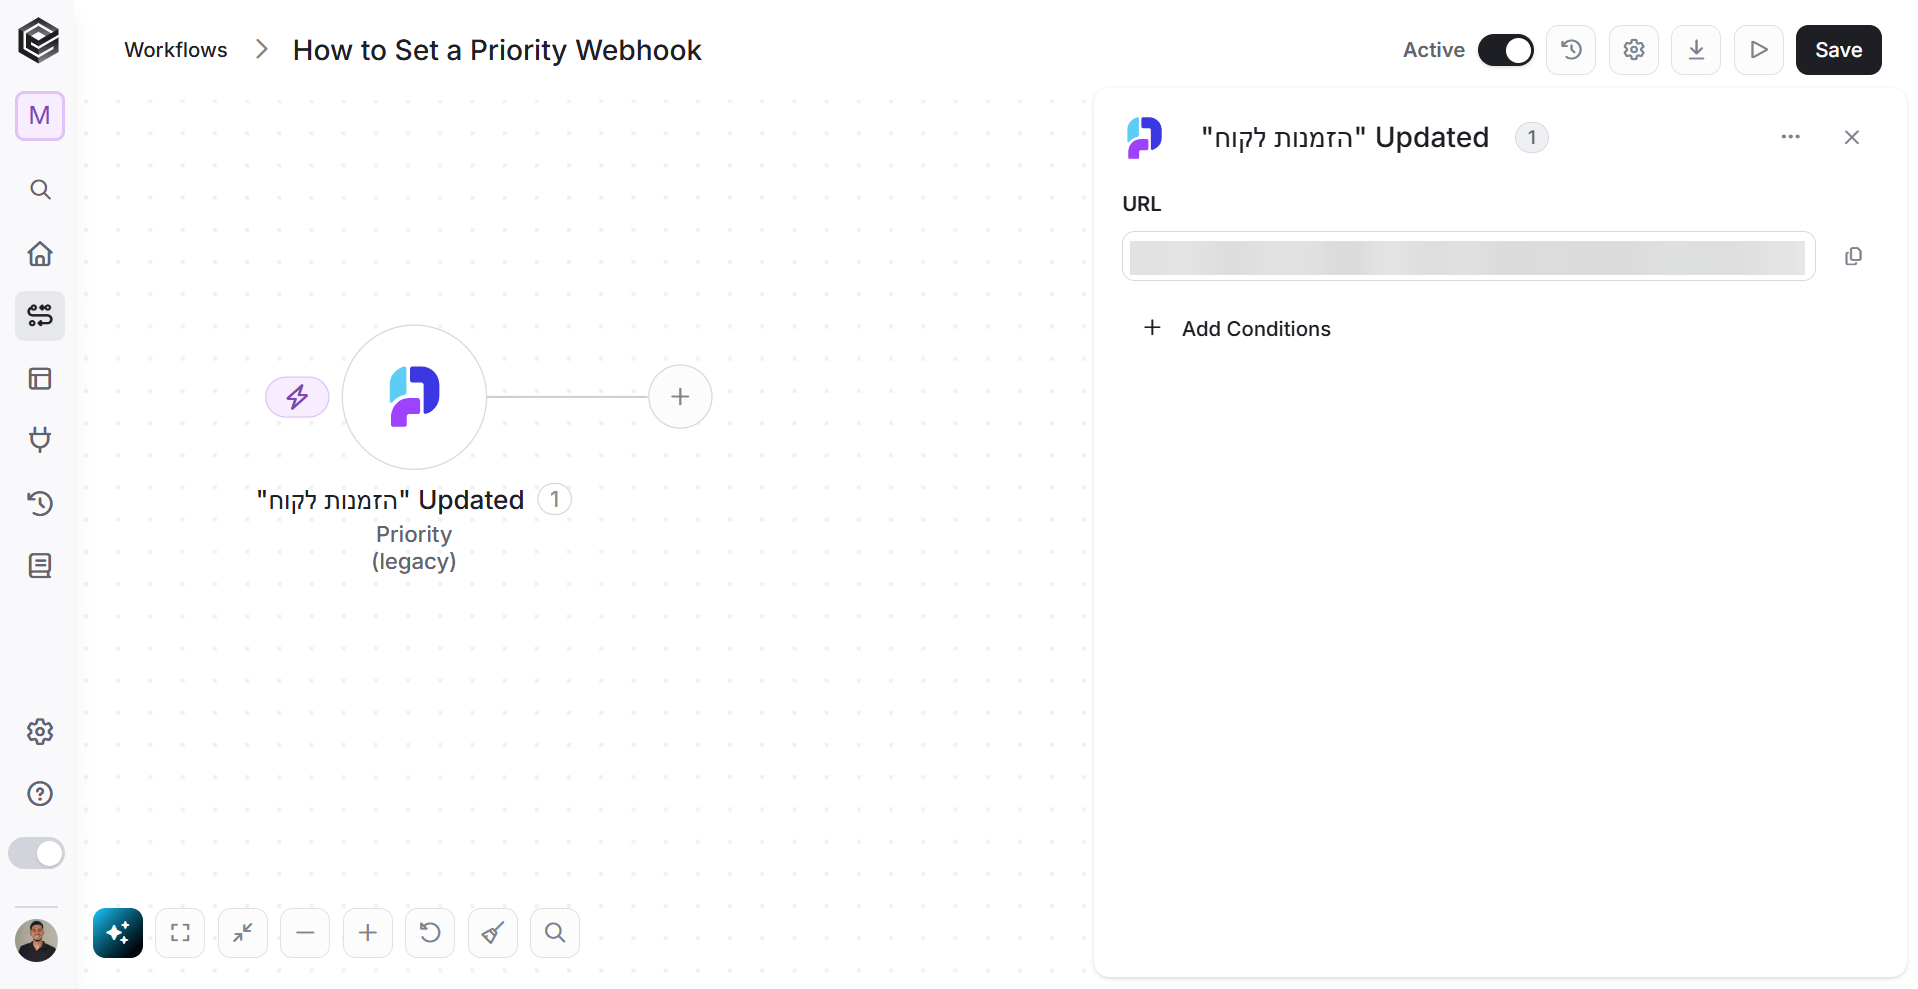 2. Click on the “Copy” Icon to copy the Url.
 * Notice that the following message is received after copying: Successfully copied URL to clipboard.
## Set the webhook in Priority
1. Enter to your Priority account
2. Follow the next path:
* Notice that the following message is received after copying: Successfully copied URL to clipboard.
## Set the webhook in Priority
1. Enter to your Priority account
2. Follow the next path:
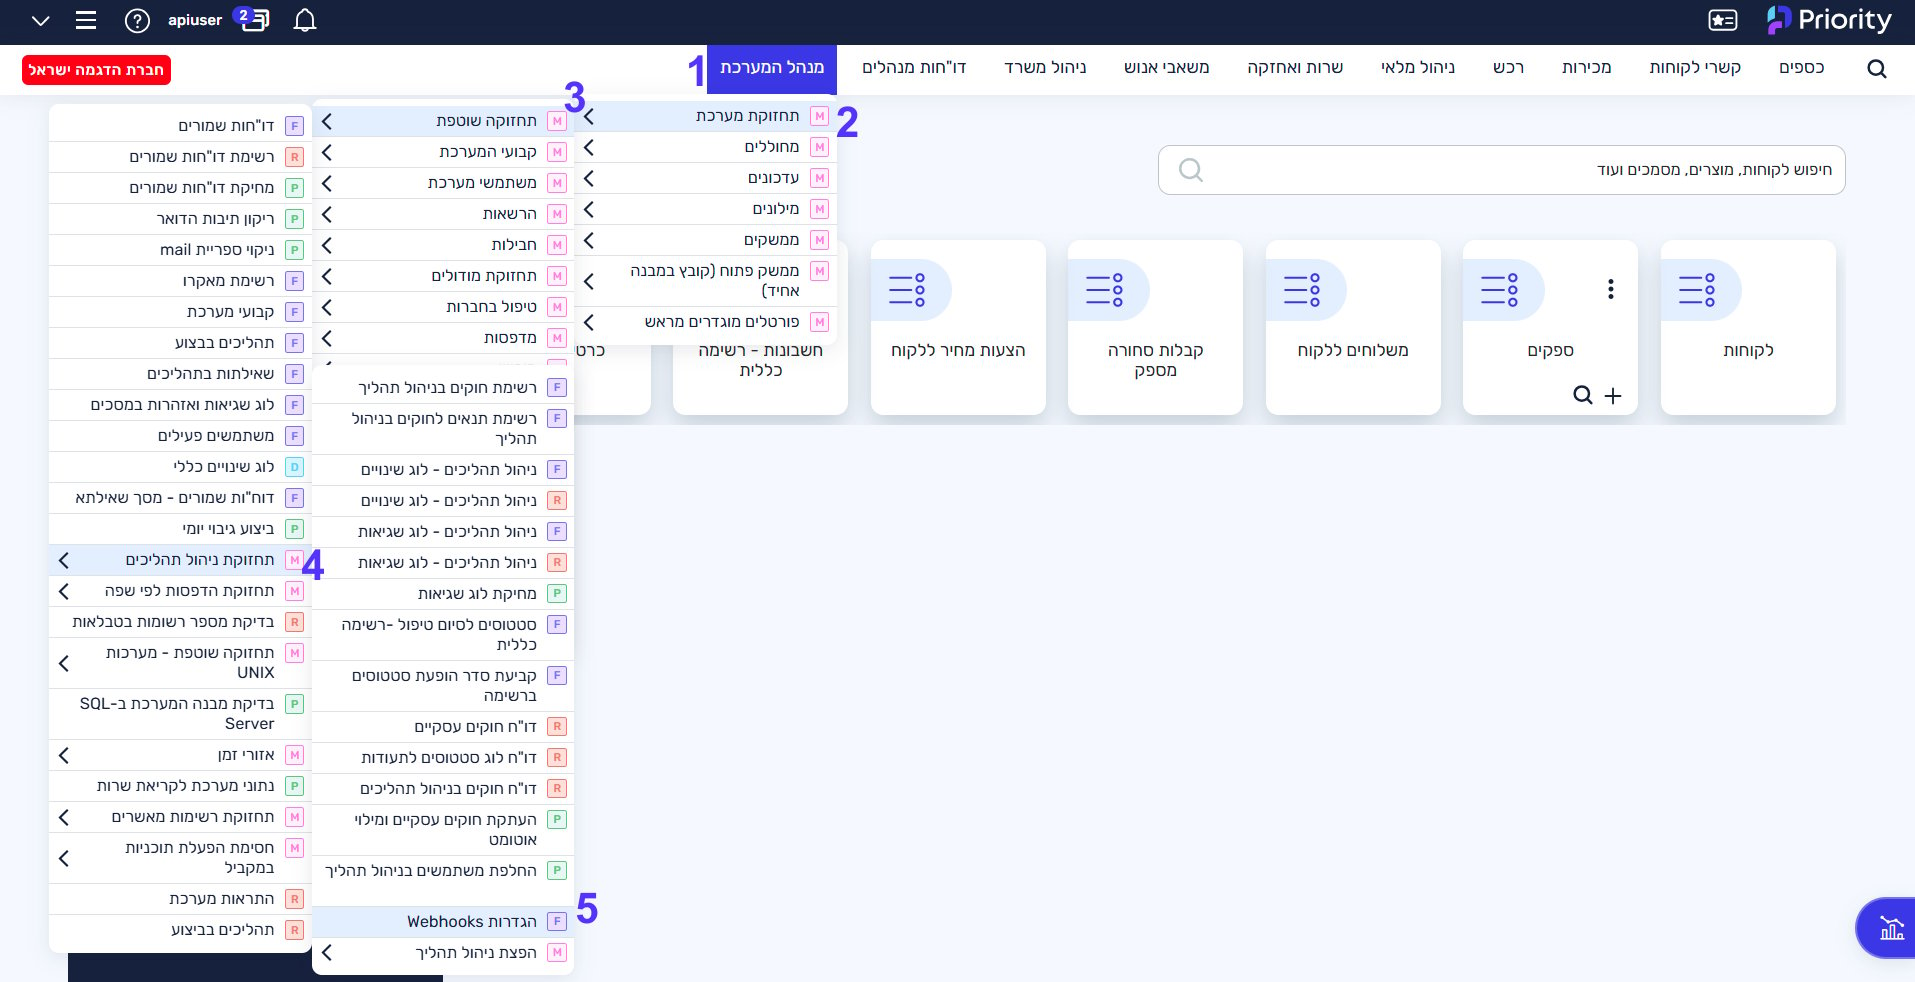 1. System Management – מנהל המערכת
2. System Maintenance – תחזוקת מערכת
3. Periodic Maintenance – תחזוקה שוטפת
4. BPM Maintenance – תחזוקת ניהול תהליכים
5. Webhook Defamations – הגדרות Webhooks
3. Click on the “New” button to add new webhook
1. System Management – מנהל המערכת
2. System Maintenance – תחזוקת מערכת
3. Periodic Maintenance – תחזוקה שוטפת
4. BPM Maintenance – תחזוקת ניהול תהליכים
5. Webhook Defamations – הגדרות Webhooks
3. Click on the “New” button to add new webhook
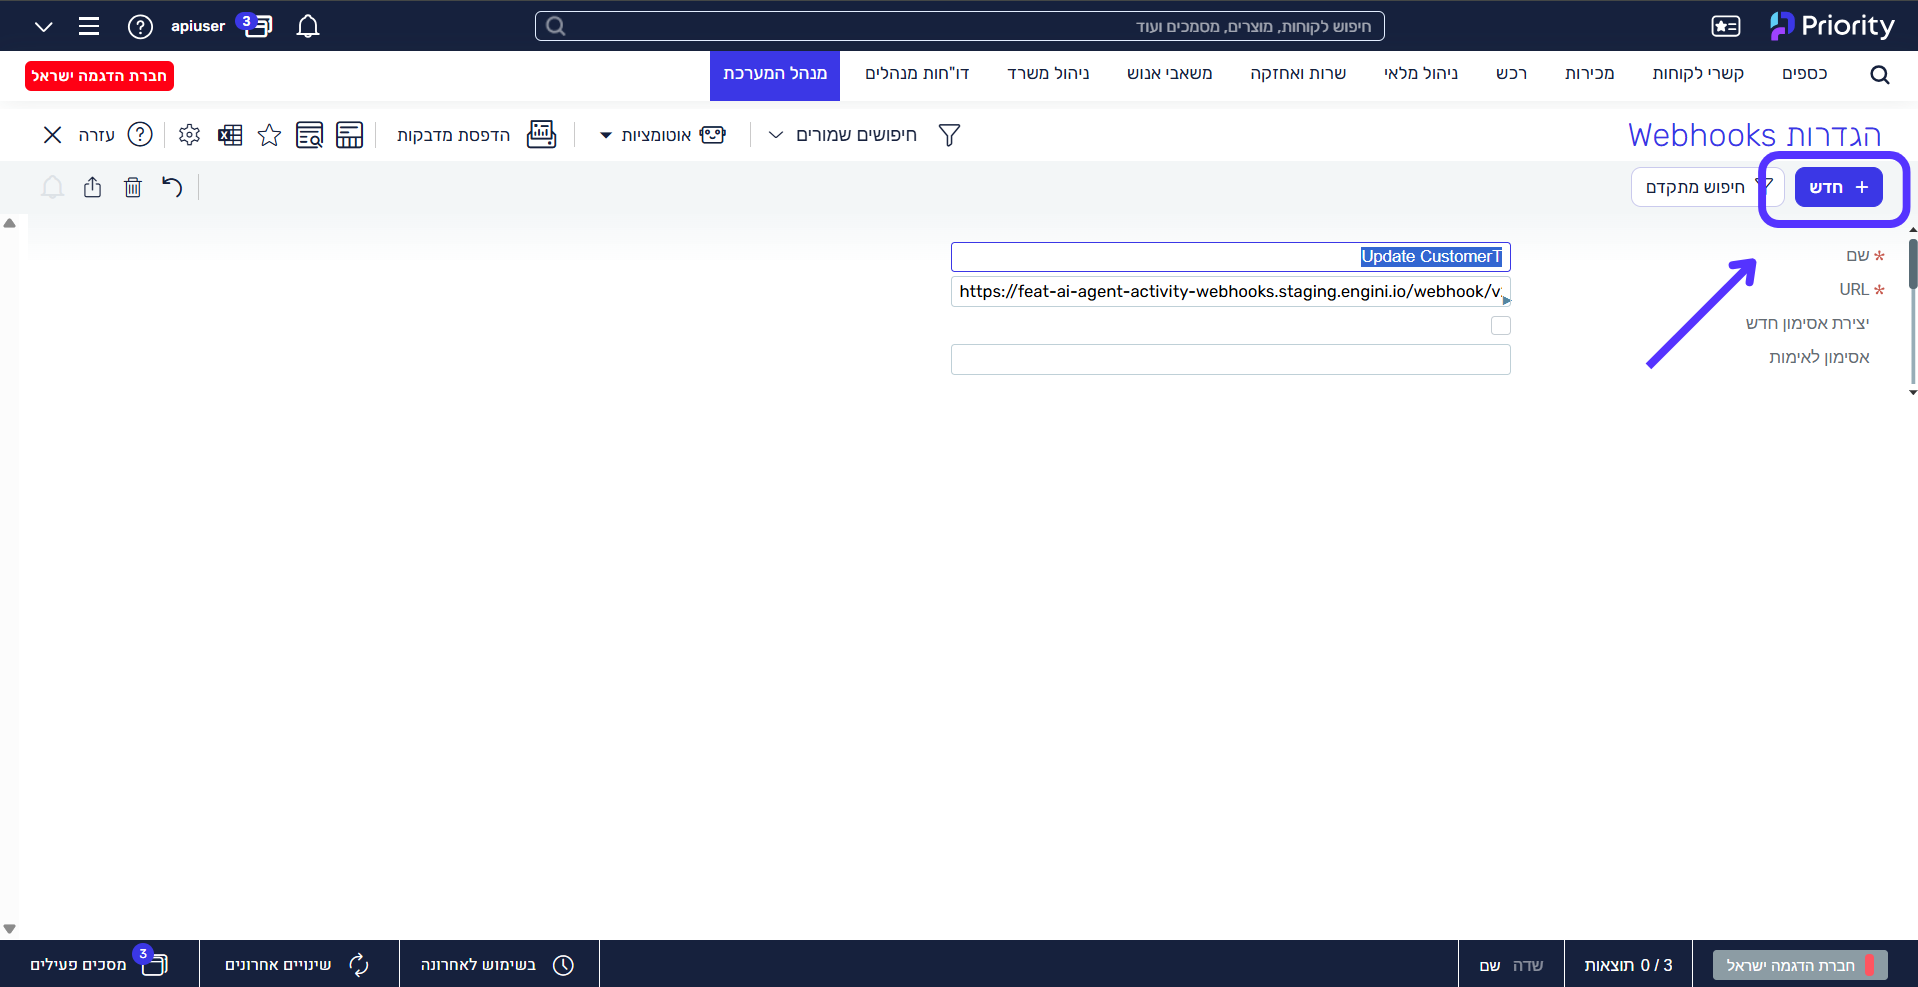 4. Populate this fields:
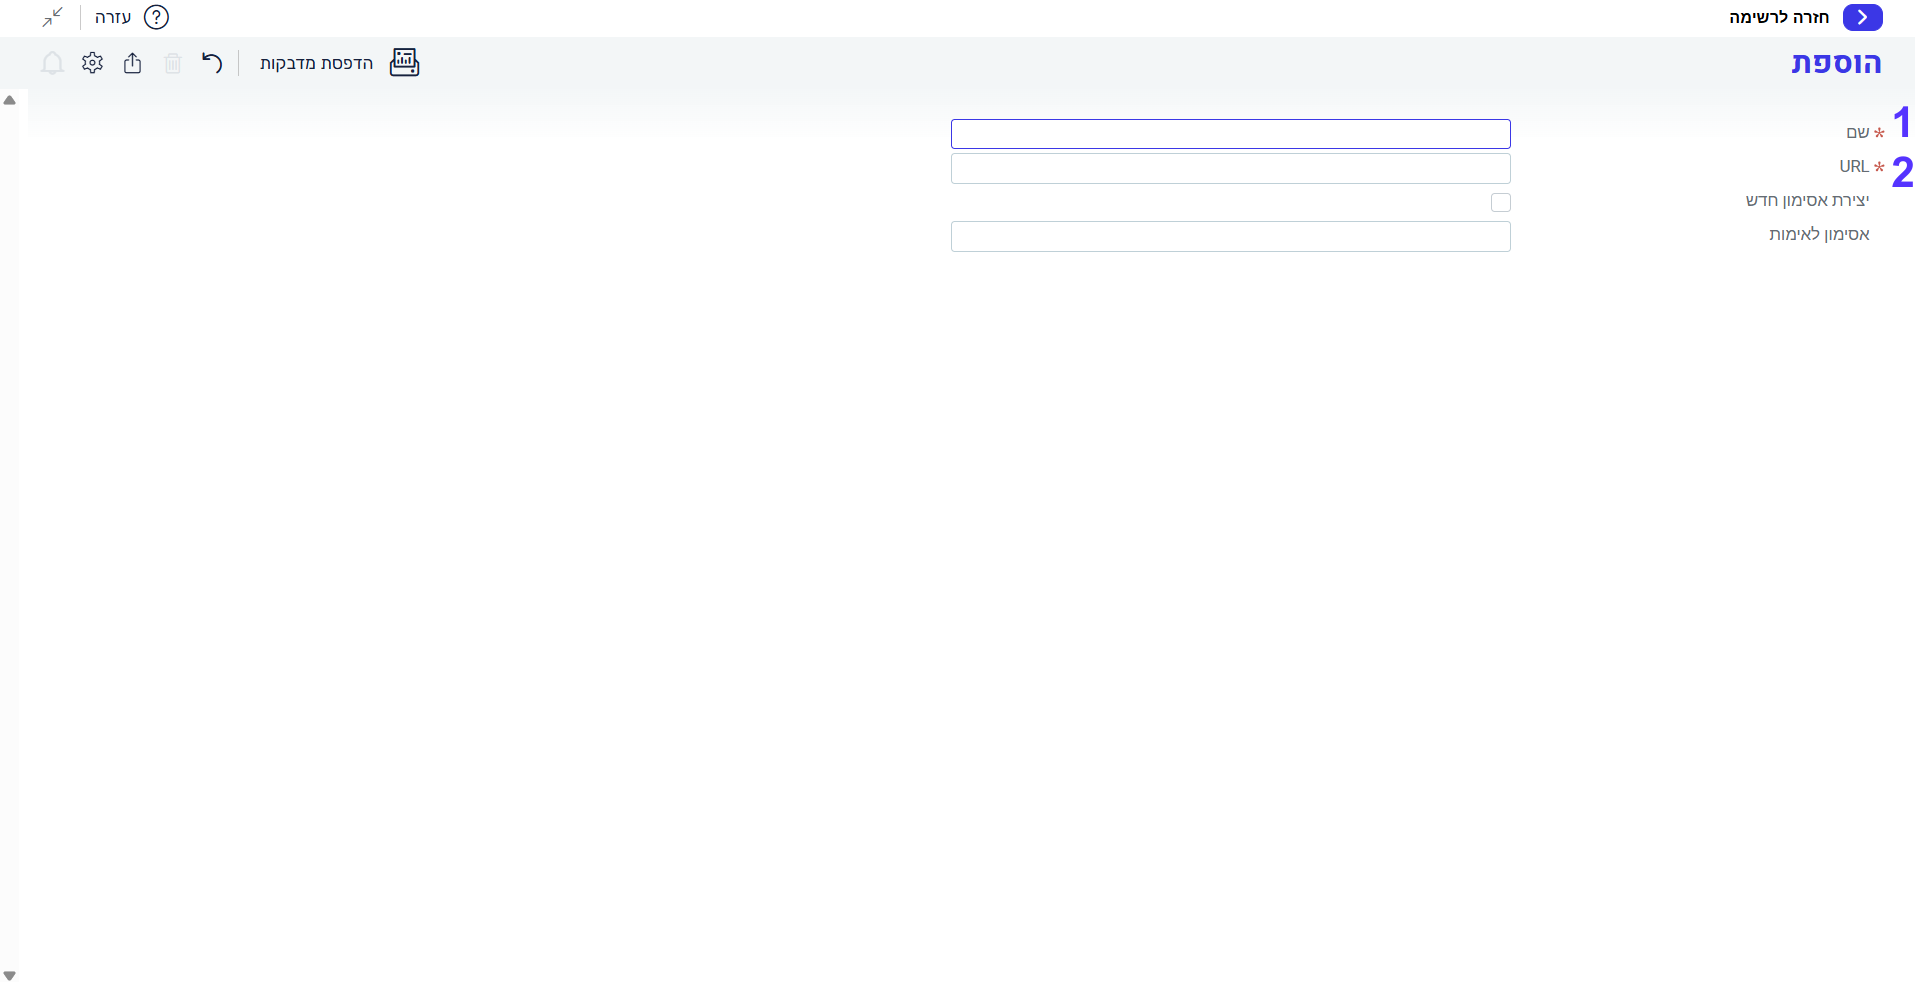 1. *Name/שם* - enter the name of the Webhook
2. *URL* - enter the Url you copied from Engini trigger
5. After populating the fields click on the arrow at the right top side of the screen to save the webhook and exit.
1. *Name/שם* - enter the name of the Webhook
2. *URL* - enter the Url you copied from Engini trigger
5. After populating the fields click on the arrow at the right top side of the screen to save the webhook and exit.
 ## Define a Business Rule
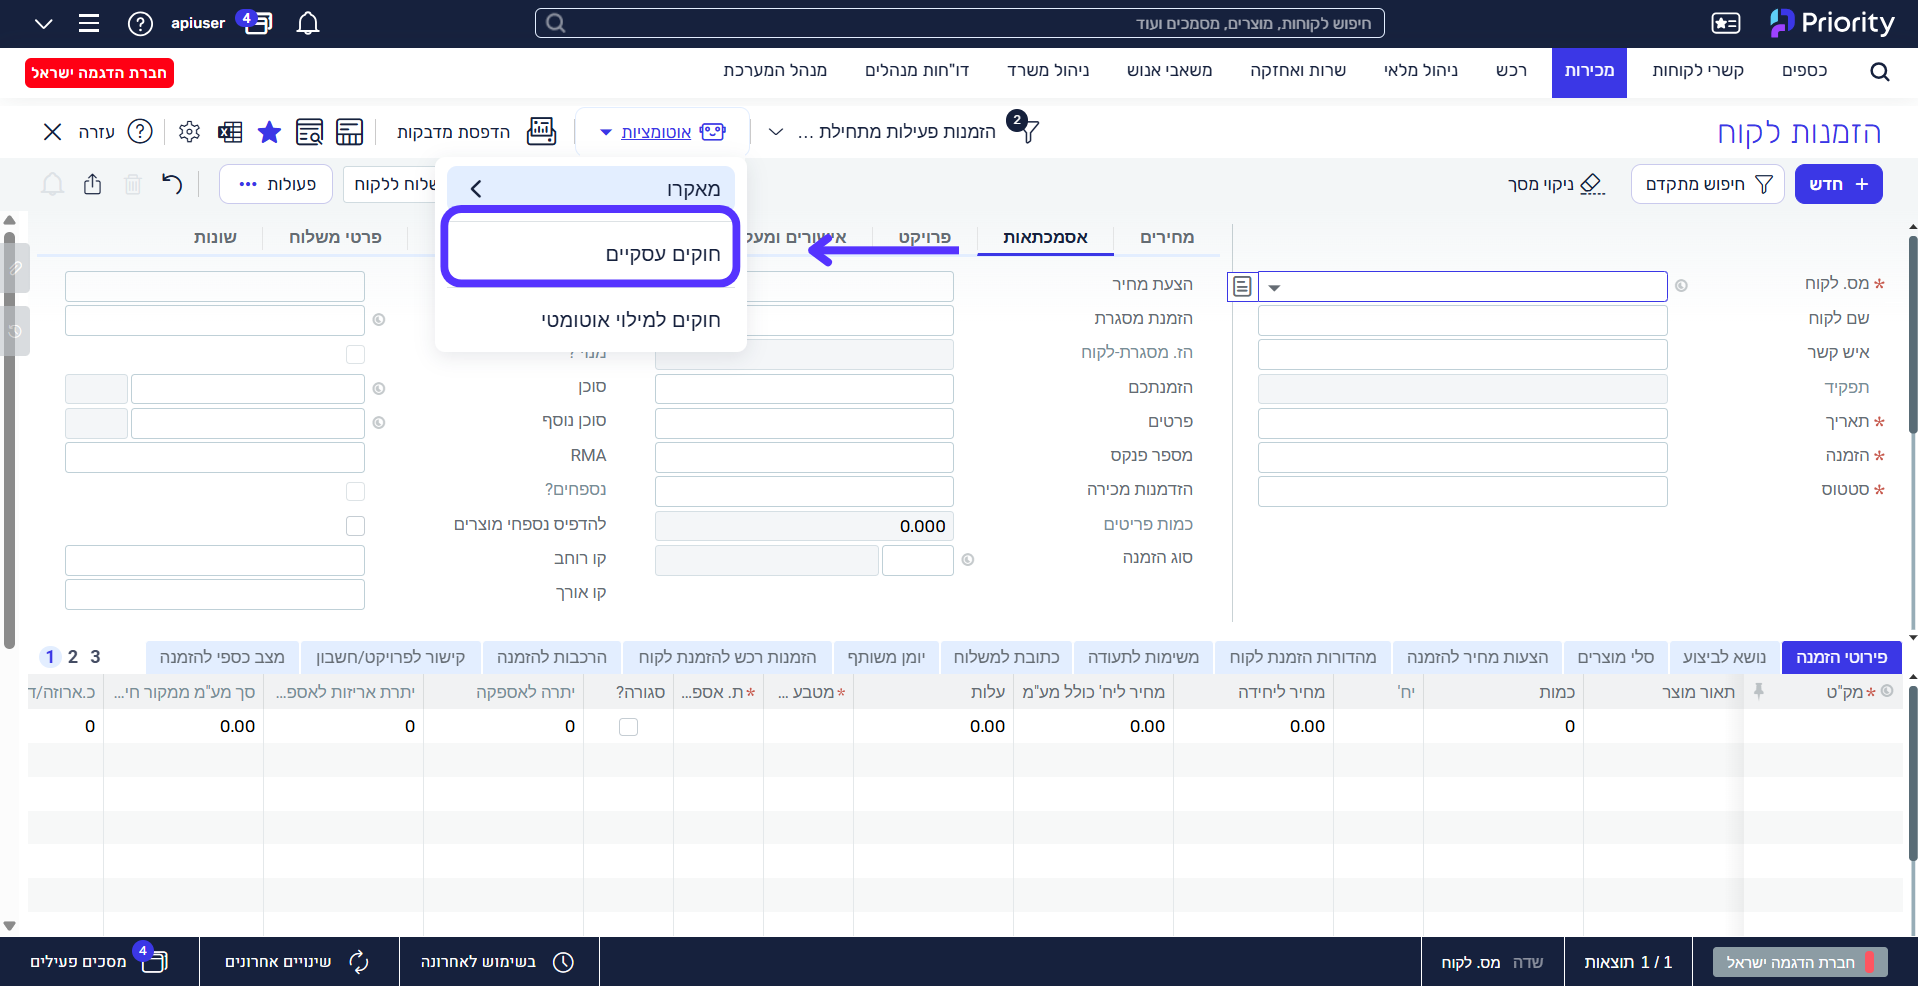
1. Enter the screen from which you want the trigger to be sent.
For example, to “Customer orders” screen.
2. Click on the Automations “אוטמציות” button.
## Define a Business Rule
1. Enter the screen from which you want the trigger to be sent.
For example, to “Customer orders” screen.
2. Click on the Automations “אוטמציות” button.
 3. Click on the Business rules “חוקים עסקיים” button.
 4. Define the Business rule:
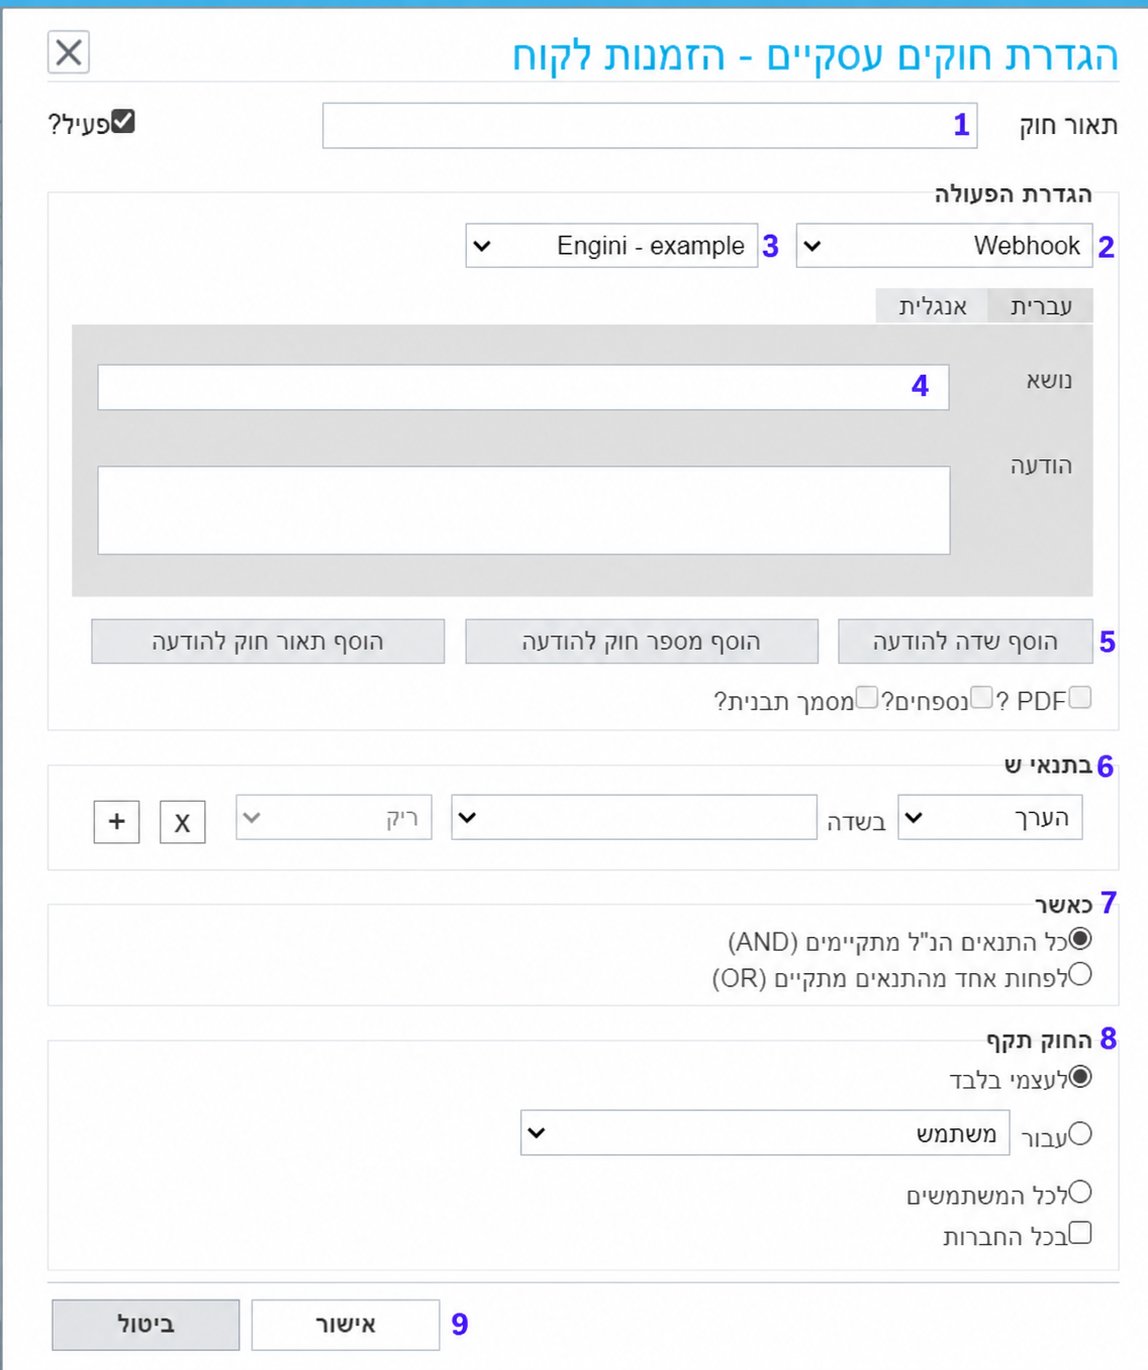 1. *Description of the rule/תאור חוק* - Give a meaningful description of the rule.
* We recommend writing the description in English.
2. Click on the dropdown and click on the “Webhook” option.
1. *Description of the rule/תאור חוק* - Give a meaningful description of the rule.
* We recommend writing the description in English.
2. Click on the dropdown and click on the “Webhook” option.
 3. Click on the added dropdown and select the name of the webhook you set in the previous level.
4. Subject: Enter the subject of the rule.
* We recommend writing the subject in English
5. Message: Click on the “הוסף שדה להודעה/add field to the message” button and select the fields that will be sent in the webhook to Engini.
* Our recommendation is to send the unique identifier of the form record. For example, the order number in the case of an order or the customer’s number in the case of a customer. Then use the get activity to pull all the information about the order or the customer that was received in the webhook.
6. Condition: Define what is the condition for sending the webhook.
3. Click on the added dropdown and select the name of the webhook you set in the previous level.
4. Subject: Enter the subject of the rule.
* We recommend writing the subject in English
5. Message: Click on the “הוסף שדה להודעה/add field to the message” button and select the fields that will be sent in the webhook to Engini.
* Our recommendation is to send the unique identifier of the form record. For example, the order number in the case of an order or the customer’s number in the case of a customer. Then use the get activity to pull all the information about the order or the customer that was received in the webhook.
6. Condition: Define what is the condition for sending the webhook.
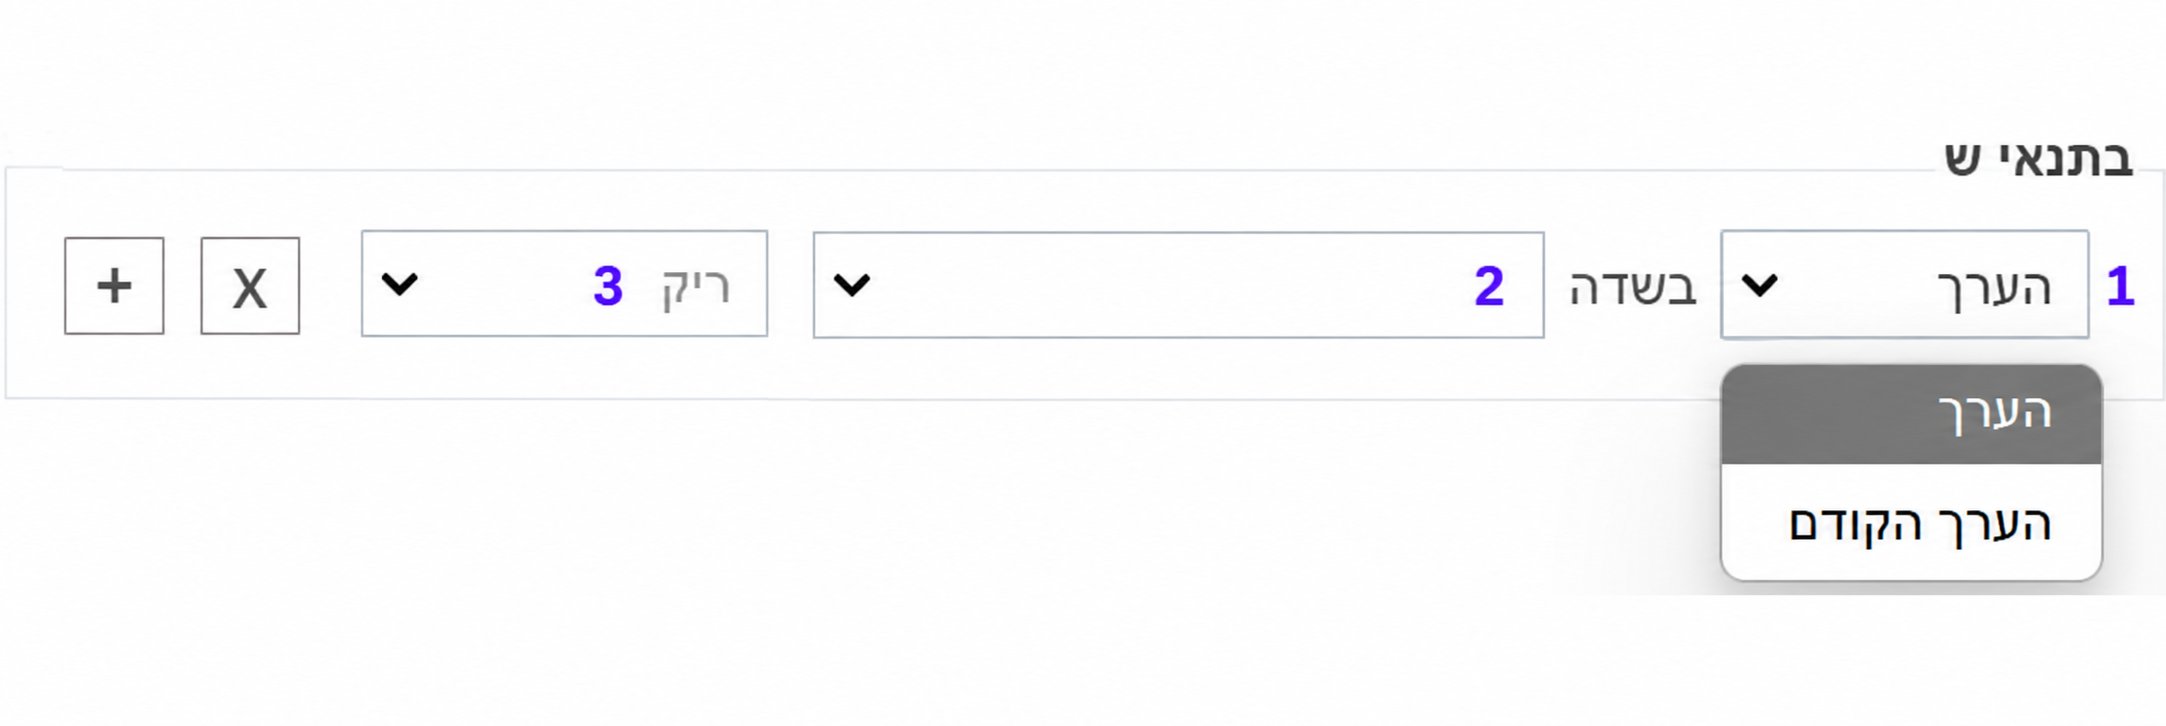 1. Choose whether what will trigger the webhook is the current or previous value in the selected field.
2. Choose the field
3. Choose the condition
4. Click on the “Plus” button to add another condition and repeat steps 1-4.
* Pay attention! If you don’t define a condition, it will be sent every time a change is made in the form a webhook.
7. Choose whether the ‘call ‘ webhook should be triggered when all conditions are met (**And**) or only when one of the conditions is met (**Or**)
8. Choose who the rule applies to.
9. Click the OK “אישור” button to save the business rule.
This documentation is built and hosted on [Mintlify](https://mintlify.com), a developer documentation platform.
1. Choose whether what will trigger the webhook is the current or previous value in the selected field.
2. Choose the field
3. Choose the condition
4. Click on the “Plus” button to add another condition and repeat steps 1-4.
* Pay attention! If you don’t define a condition, it will be sent every time a change is made in the form a webhook.
7. Choose whether the ‘call ‘ webhook should be triggered when all conditions are met (**And**) or only when one of the conditions is met (**Or**)
8. Choose who the rule applies to.
9. Click the OK “אישור” button to save the business rule.
This documentation is built and hosted on [Mintlify](https://mintlify.com), a developer documentation platform.