> ## Documentation Index
> Fetch the complete documentation index at: https://docs.engini.ai/llms.txt
> Use this file to discover all available pages before exploring further.
# Transform & Format
# Introduction to Transform & Format
The **Transform & Format** tool is the data processing in Engini. It allows you to take raw data coming from your Trigger, process it, change its format, and prepare it perfectly for the subsequent steps in your workflow.
To add a data processing action to your workflow, follow these steps:
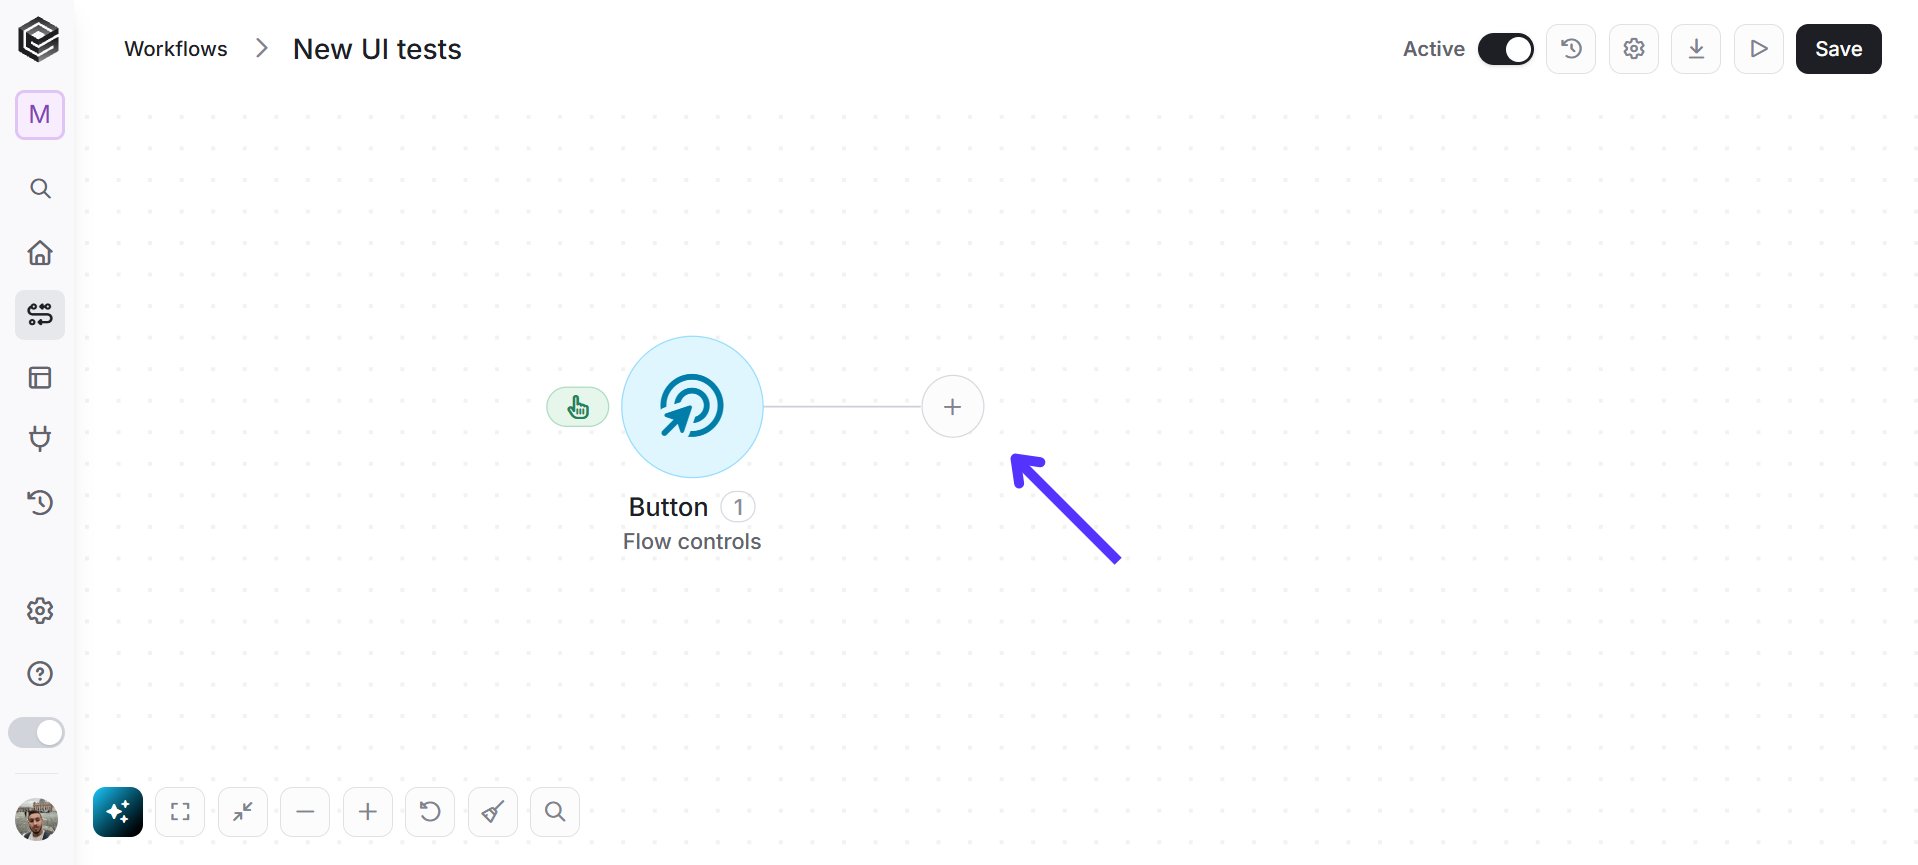
1. *Add a New Step -* After setting up your Trigger (the event that starts the flow), click the **(+)** button that appears next in the sequence.
2. *Choose Transformation -* Click on **Transform & Format**. This is where you will find all the tools for data parsing, formatting, and structural changes.
**Note:** Using **Transform & Format** correctly saves valuable time and prevents errors down the line by ensuring your data is delivered in exactly the format your destination apps expect to receive.
# Variables
## Initialize Variable
Creates a variable.
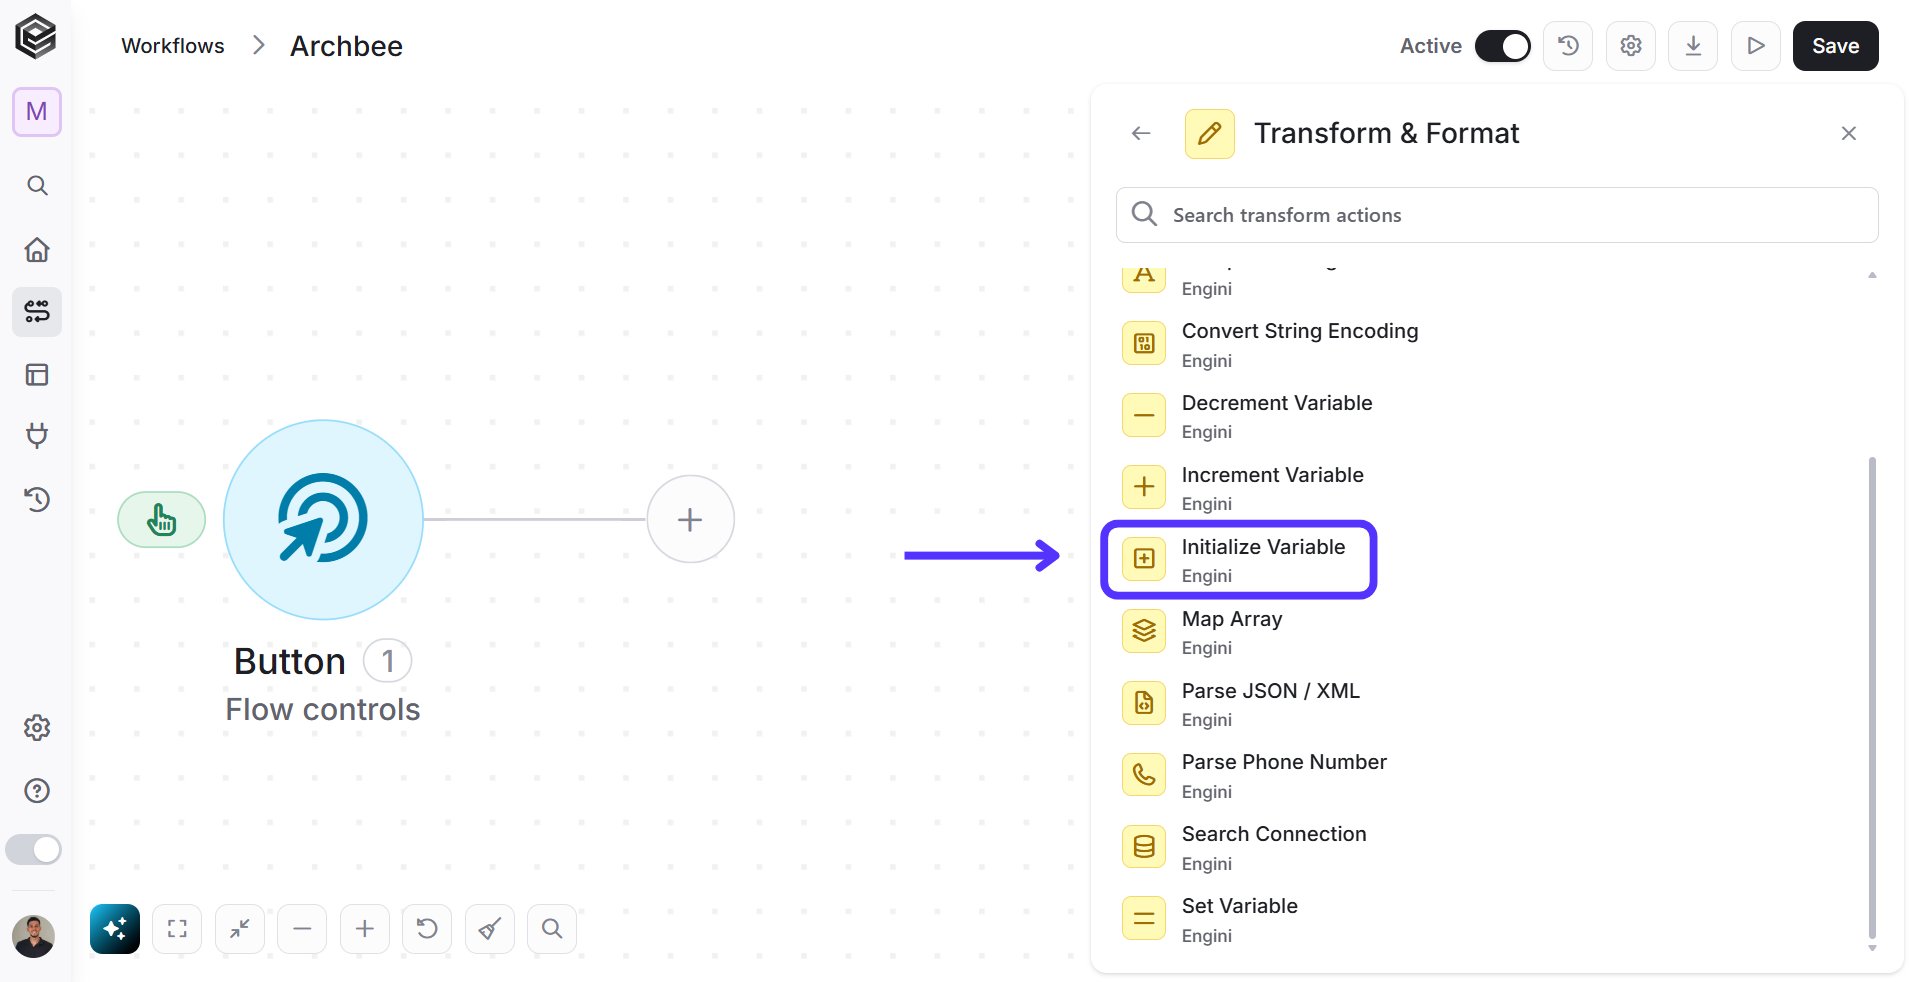
Choose the Transform & Format software and click on the “Initialize variable” action:
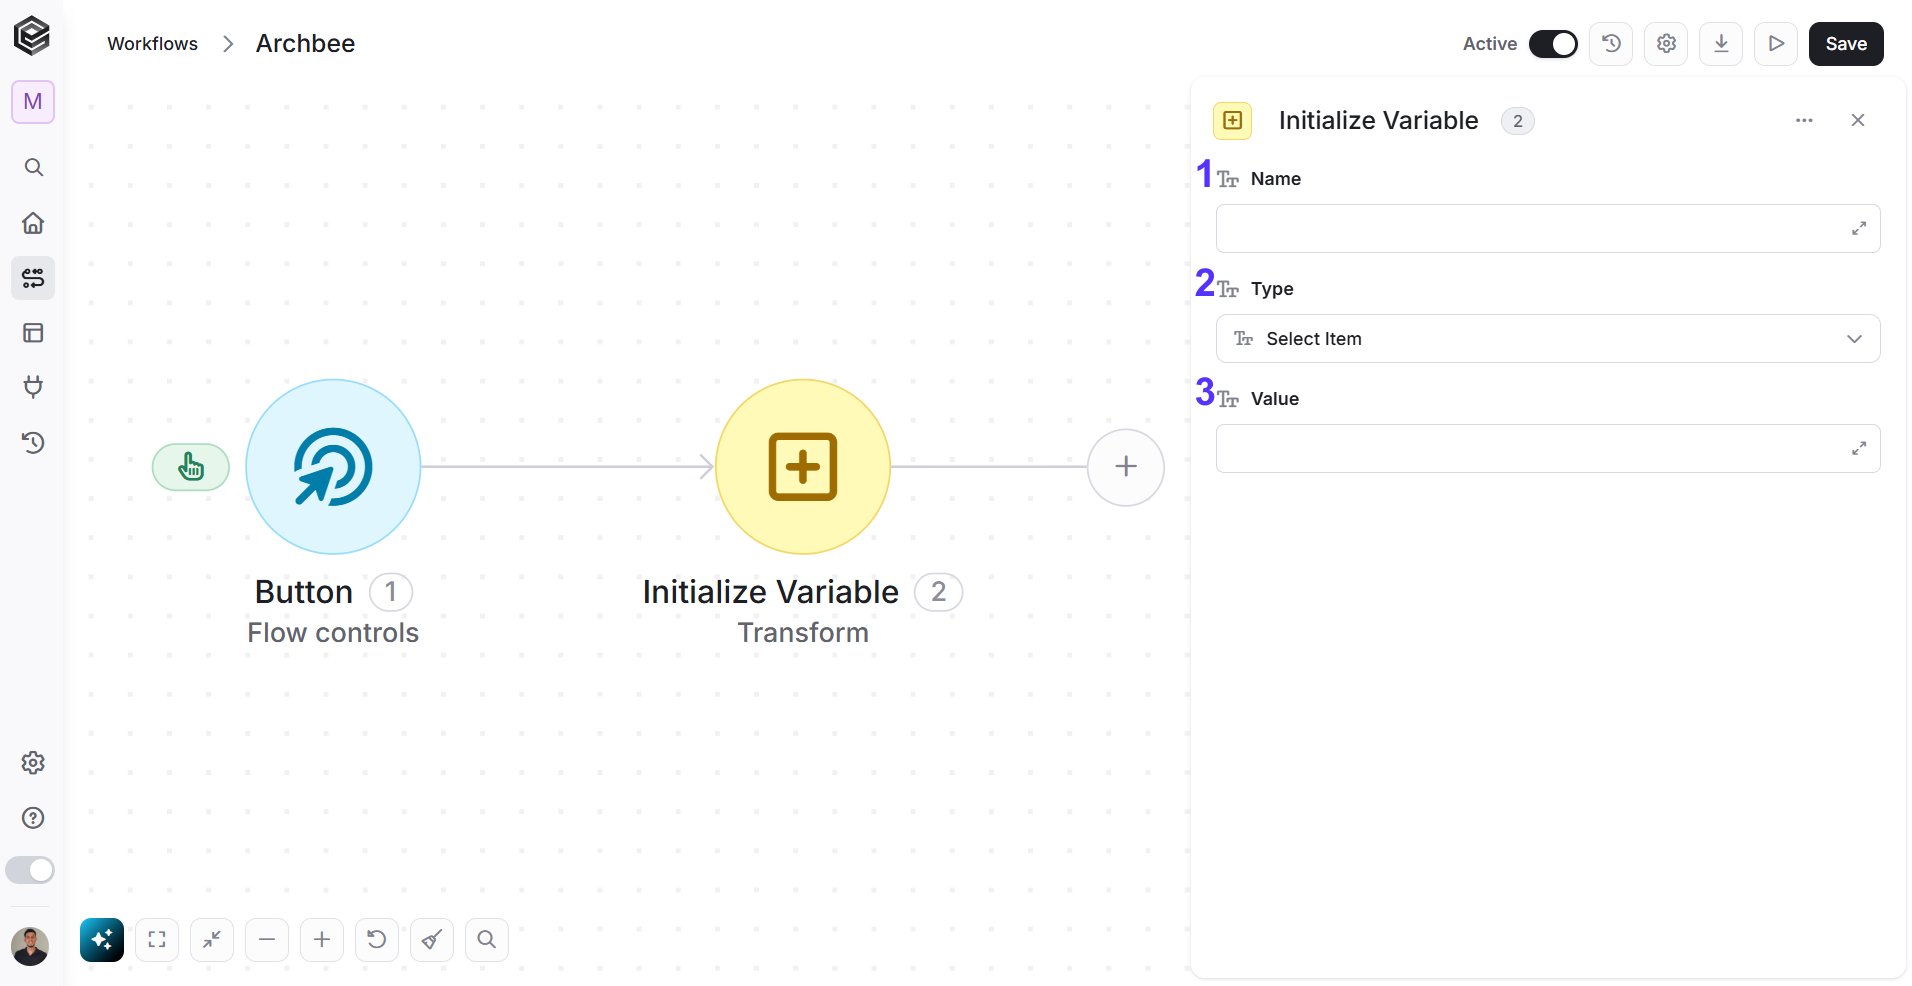
Follow the next steps to learn how to define this activity:
1. *Name -* Click Add Field to add and populate additional fields for the selected activity. To learn more about managing activity data, [click here](/help/workflows/workflow-editor#add-fields).
2. *Type -* Choose from the drop down list the type of variable you want to define.
* Array
* Boolean
* Datetime
* Integer
* Numeric
* Object
* String
3. *Value*
The value is optional. You can set it in a variable that you initialize as an initial value, but you can choose not to fill the field of the variable and populate it later in the workflow.
* Option 1- Without Initial Value:
When a variable is not initialized with an initial value, the system automatically assigns a default value based on the variable type.
* For a **String Variable**, the system assigns an empty string ("").
* For a **Number Variable**, the system assigns the value 0.
* For a **Boolean Variable**, the system assigns the value false.
* For a **Array Variable**, the system assigns an empty list/array (\[]).
* For an **Object Variable**, the system assigns an empty object (\{}).
* Option 2- With Initial Value:
Click on the empty field to and the tooltip will popup showing all the options you can use to fill the value.
You can populate the value in one of the following options:
* Static value – number / string. when using strings, you need to surround them with single quotes (‘).
* Property value from a previous activity (Using the tooltip that opens when clicking on the field).
* Expression – using functions and/or Previous activity properties and/or static values (Using the tooltip that opens when clicking on the field). To learn more about functions [click here.](/help/tools/enginis-functions#logical-functions)
## Set Variable
Updates the value stored in the variable with a new value.
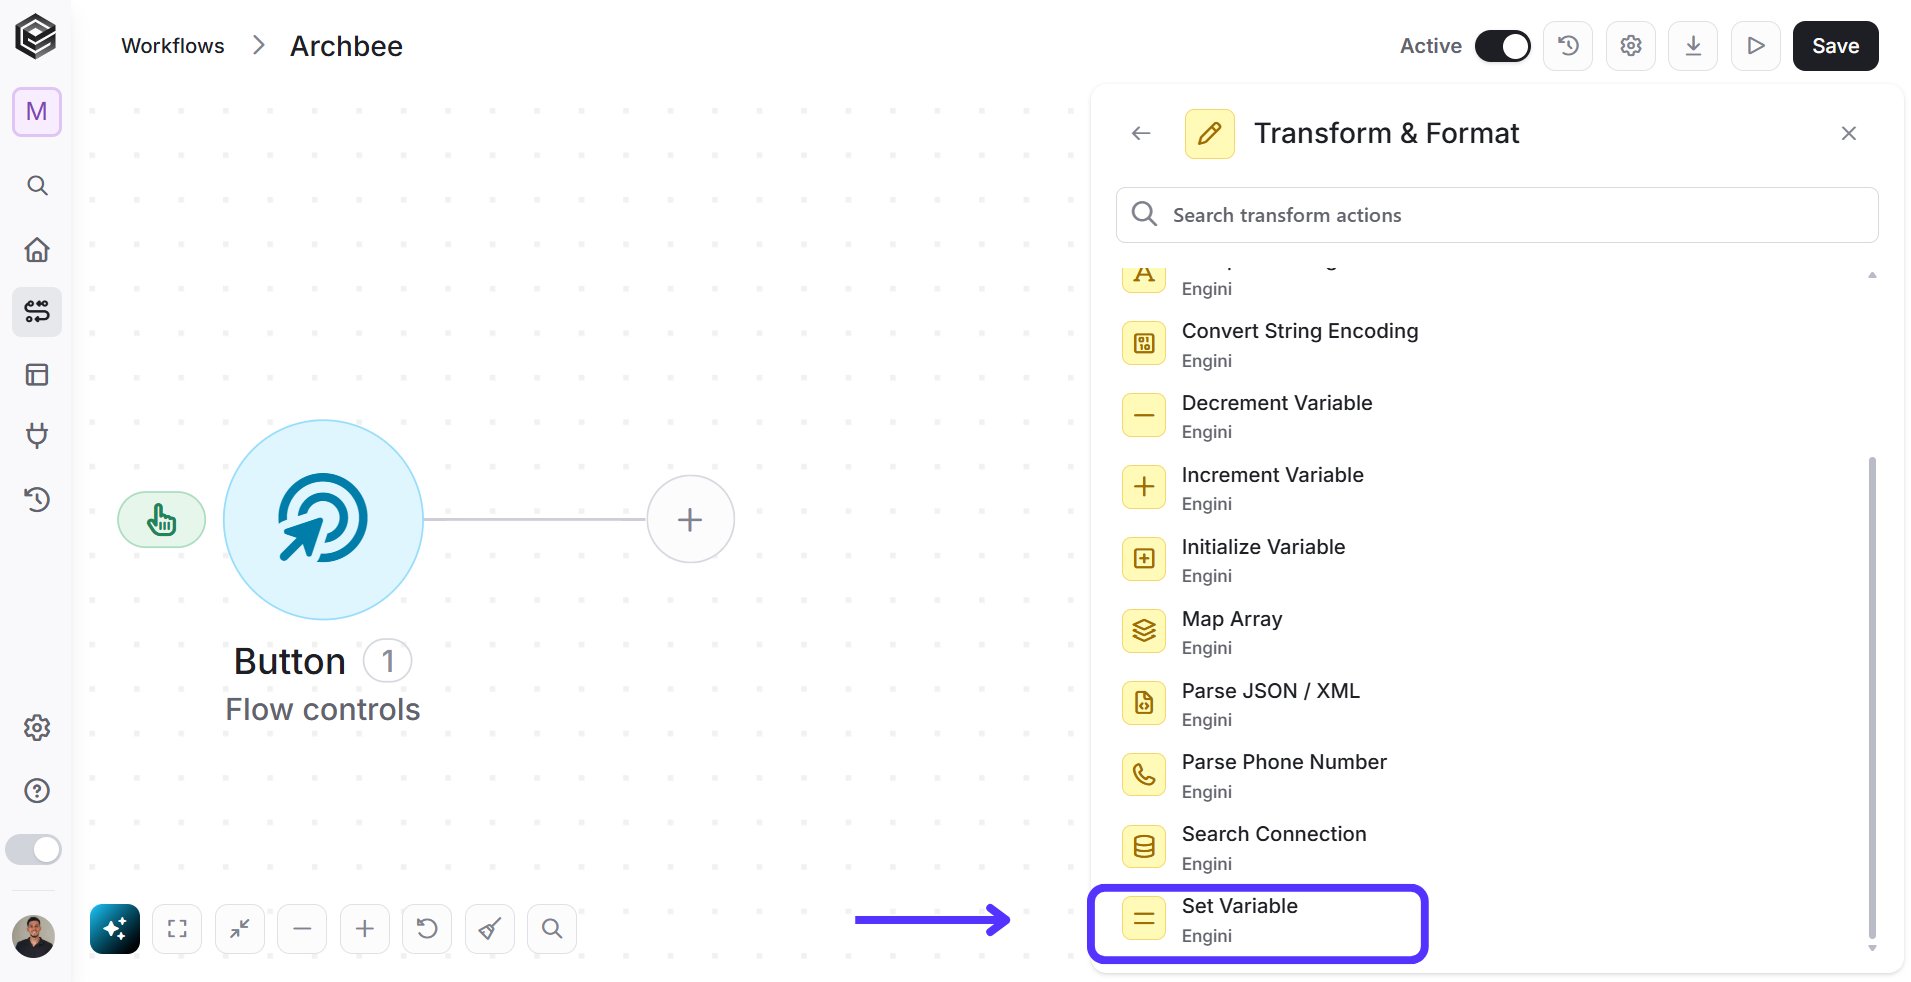
Choose the Transform & Format software and click on the “Set variable” action:
Follow the next steps to learn how to use this activity:
1. *Name -* Choose from the drop down the name of the variable you want to set.
2. *Value*
* Click on the empty field to be shown the tooltip with all the options you can use to fill the value.
* You can populate the value in one of the following options:
* Static value – number / string. when using strings, you need to surround them with single quotes (‘).
* Property value from a previous activity (Using the tooltip that opens when clicking on the field).
* Expression – using functions and/or Previous activity properties and/or static values (Using the tooltip that opens when clicking on the field). To learn more about functions [click here.](/help/tools/enginis-functions#logical-functions)
## Append To Array Variable
Appending to an array variable allows you to dynamically add new values to the end of the array without changing the size or structure of the array.
Choose the Transform & Format software and click on the “Append to array variable” action:
Follow the next steps to learn how to use this activity:
1. *Name -* Choose from the drop down the name of the variable you want to append to.
2. *Value*
* Click on the empty field to be shown the tooltip with all the values you can use to fill the value field.
* You can populate the value in one of the following options:
* Static value – number / string. when using strings, you need to surround them with single quotes (‘).
* Property value from a previous activity (Using the tooltip that opens when clicking on the field).
* Expression – using functions and/or Previous activity properties and/or static values (Using the tooltip that opens when clicking on the field).
3. *Add Nested Array*
* *False* - (Default) Adds the value as a normal item. *Example:* \[1, 2] + 3 → \[1, 2, 3]
* *True* - Wraps the value in brackets \[], creating a "list inside a list." *Example:* \[1, 2] + 3 → \[1, 2, \[3]]
**Recommendation**: Keep it on False unless you specifically need a complex structure (like coordinates).
## Append to String Variable
Appending to an string variable allows you to dynamically add new values to the end of the string without changing the size or structure of the string.
Choose the Transform & Format software and click on the “Append to string variable” action:
Follow the next steps to learn how to use this activity:
1. *Name -* Choose from the drop down the name of the variable you want to append to.
2. *Value*
* Click on the empty field to be shown the tooltip with all the values you can use to fill the value field.
* You can populate the value in one of the following options:
* Static value – number / string. when using strings, you need to surround them with single quotes (‘).
* Property value from a previous activity (Using the tooltip that opens when clicking on the field).
* Expression – using functions and/or Previous activity properties and/or static values (Using the tooltip that opens when clicking on the field). To learn more about functions [click here.](/help/tools/enginis-functions#logical-functions)
## Increment Variable
Increment variable refers to the operation of increasing the value of a variable by a specific amount.
Choose the Transform & Format software and click on the “Increment Variable” action:
Follow the next steps to learn how to use this activity:
1. *Name -* Choose from the drop down the name of the variable you want to set.
2. *Increment Value -* Click on the empty field to fill the increment number.
## Decrement Variable
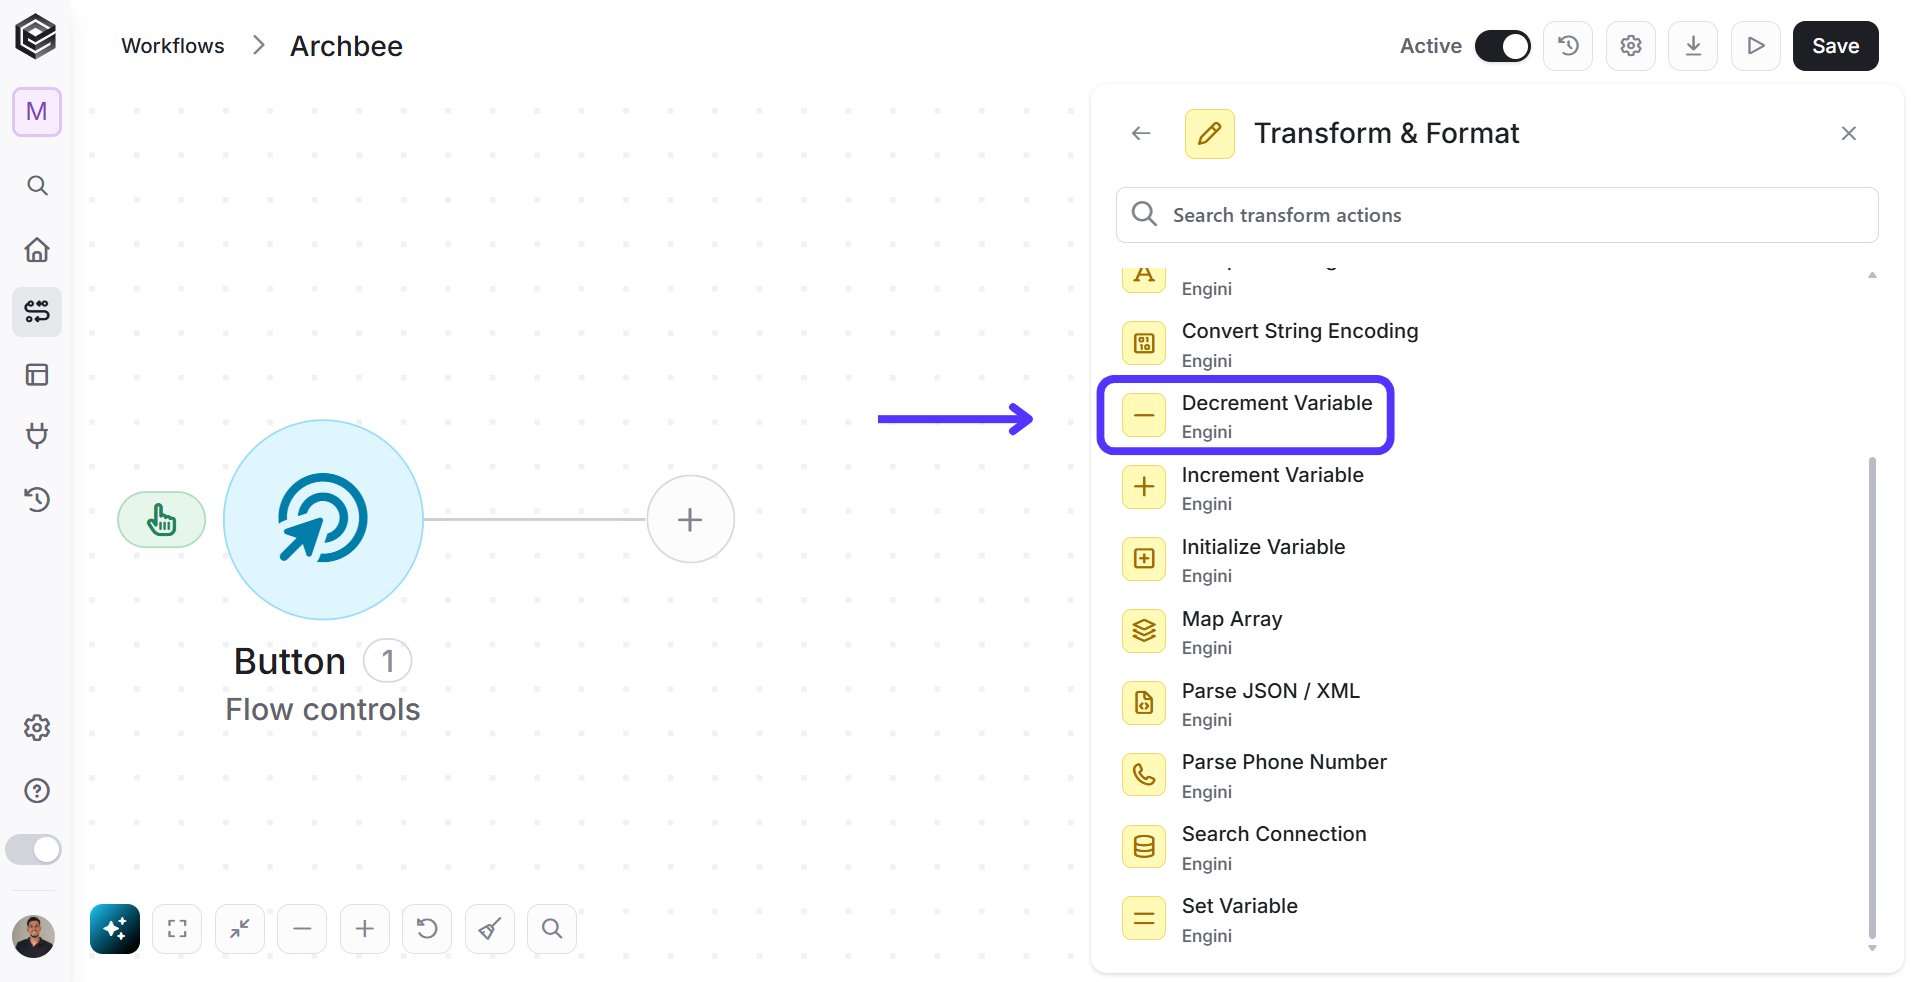
Decrement variable refers to the operation of decreasing the value of a variable by a specific amount or step.
Choose the Transform & Format software and click on the “Decrement Variable” action:
Follow the next steps to learn how to use this activity:
1. *Name -* Choose from the drop down the name of the variable you want to set.
2. *Decrement Value -* Click on the empty field to fill the decrement number.
## Map Array
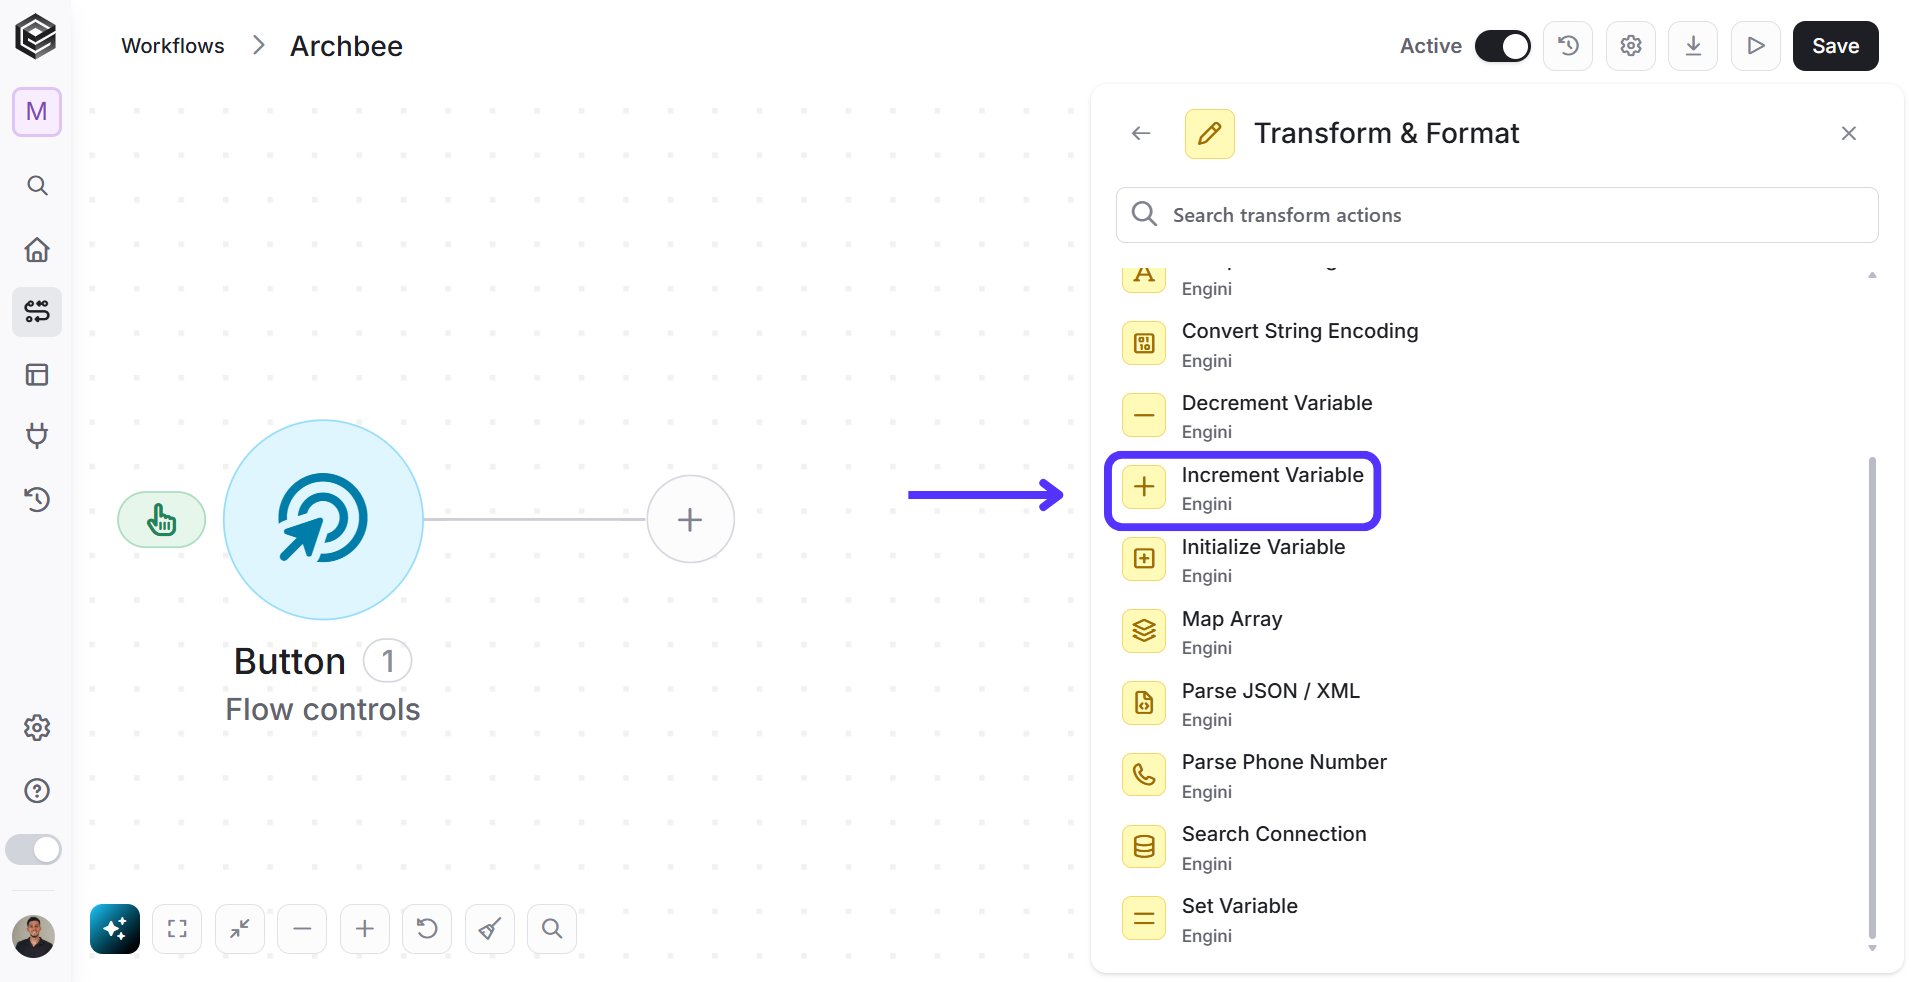
The map array activity allows you to transform a data list that contains multiple pieces of data into a new data list based on the properties and values you choose.
Choose the Transform & Format software and click on the “Map Array” action:
Follow the next steps to learn how to use this activity:
1. *Data List-* Click this field to select the source array you want to transform from a previous activity in your workflow.
2. *Add Properties-* Click here to define the new structure. You will specify the new property names and map them to the corresponding values from the original data list
For example, let’s consider the following data list:
> \[\
> "status": "Working on it",\
> "date4": "2023-08-19",\
> "text": "052123456",\
> "text2": "[info1@engini.io](mailto:info1@engini.io)",\
> "checkbox": "v",\
> "checkbox\_1": "v",\
> "BOARD\_ID": "5017384721",\
> "GROUP\_ID": "topics",\
> "ITEM\_ID": "5017384726",\
> "name": "Meital Borenstein"\
> },\
> "status": "Done",\
> "date4": "2023-08-20",\
> "text": "052123456",\
> "text2": "[info2@engini.io](mailto:info2@engini.io)",\
> "checkbox": "",\
> "checkbox\_1": "v",\
> "BOARD\_ID": "5017384721",\
> "GROUP\_ID": "topics",\
> "ITEM\_ID": "5017384728",\
> "name": "Nimrod Tzeler"\
> },\
> "status": "Working on it",\
> "date4": "2023-08-17",\
> "text": "052123456",\
> "text2": "[info3@engini.io](mailto:info3@engini.io)",\
> "checkbox": "v",\
> "checkbox\_1": "",\
> "BOARD\_ID": "5017384721",\
> "GROUP\_ID": "topics",\
> "ITEM\_ID": "5017384729",\
> "name": "Itay Guttman"\
> },\
> "status": "Stuck",\
> "date4": "2023-10-10",\
> "text": "052123456",\
> "text2": "[info@engini.io](mailto:info@engini.io)",\
> "checkbox": "",\
> "checkbox\_1": "v",\
> "BOARD\_ID": "052123456",\
> "GROUP\_ID": "topics",\
> "ITEM\_ID": "5352748005",\
> "name": "Michael Golnik"\
> },\
> "status": "Working on it",\
> "date4": "2023-10-01",\
> "text": "052123456",\
> "text2": "[info4@engini.io](mailto:info4@engini.io)",\
> "checkbox": "v",\
> "checkbox\_1": "v",\
> "BOARD\_ID": "5017384721",\
> "GROUP\_ID": "topics",\
> "ITEM\_ID": "5352749950",\
> "name": "Avishai Dotan"\
> }\
> ]
Using the activity, we will create an array containing the names and emails of employees. To do this, select the appropriate properties and values. For this example, choose the following properties:
Applying the map array, you will get the following array:
> \[\
> \{\
> "Name": "Meital Borenstein",\
> "Email": "[info1@engini.io](mailto:info1@engini.io)"\
> },\
> \{\
> "Name": "Nimrod Tzeler",\
> "Email": "[info2@engini.io](mailto:info2@engini.io)"\
> },\
> \{\
> "Name": "Itay Guttman",\
> "Email": "[info3@engini.io](mailto:info3@engini.io)"\
> },\
> \{\
> "Name": "Michael Golnik",\
> "Email": "[info@engini.io](mailto:info@engini.io)"\
> },\
> \{\
> "Name": "Avishai Dotan",\
> "Email": "[info4@engini.io](mailto:info4@engini.io)"\
> }\
> ]
This array contains the names and emails of the employees extracted from the original data list.
## Query Array
Query Array combines Sort & Filter, [Map Array](#map-array), Group By and aggregations in one activity. You give it an array of objects (a list from an earlier step), filter, sort and limit the rows, and then either aggregate them or pick which fields to return. The result is passed on as a new list.
It can also produce brand new datasets. Aggregations, Group By and Having build a new set of rows from your data, and Output Limit returns only the first X rows of that resulting dataset.
Choose the Transform & Format software and click on the “Query Array” action.
Follow the next steps to learn how to use this activity:
**Input - choose which rows to work on**
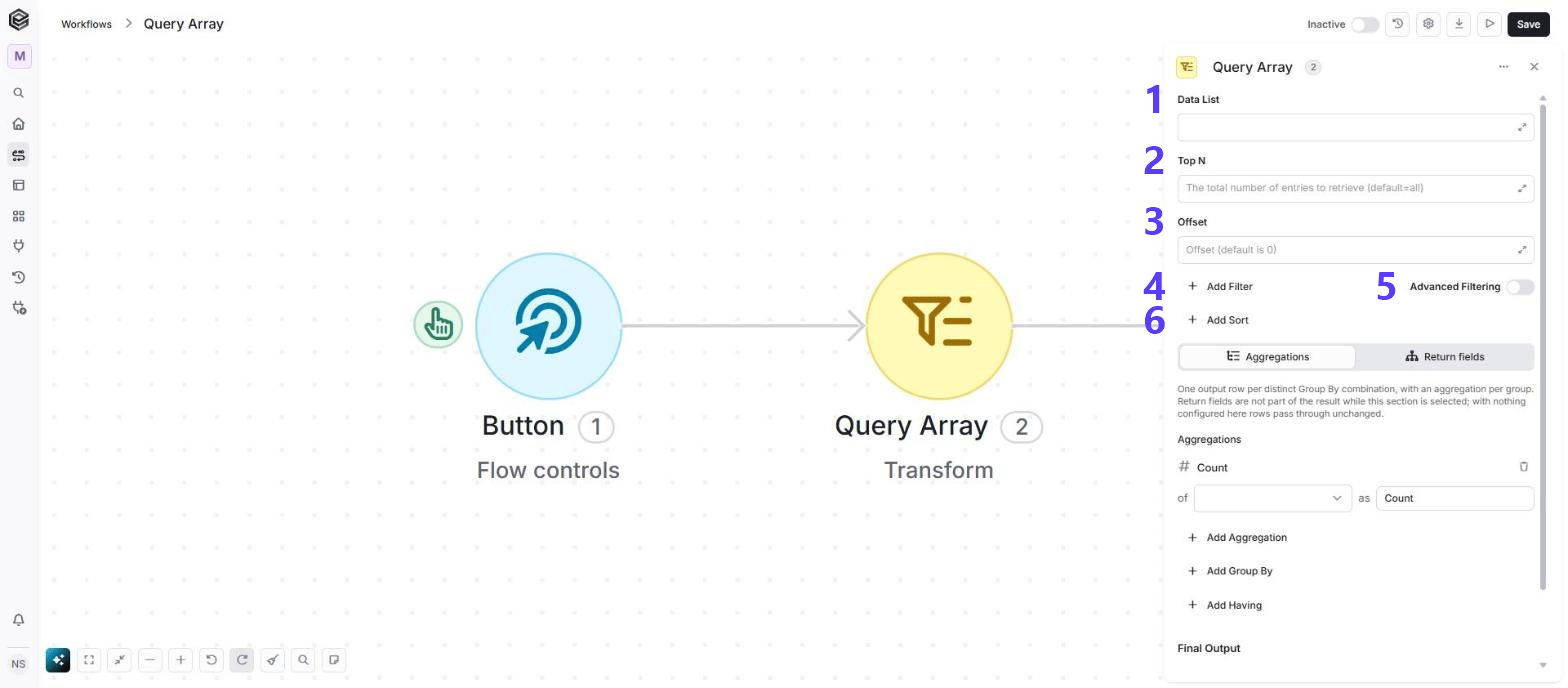
1. *Data List -* Click this field to select the list you want to query from a previous activity in your workflow.
2. *Top N -* The maximum number of rows to take from the list before anything else runs. Leave it empty to take all rows.
3. *Offset -* Skip this number of rows at the start of the list. The default is 0.
4. *Add Filter -* Keep only the rows that match. Each filter is a field, a condition and a value. Click Add Filter again to add more.
5. *Advanced Filtering -* Turn this switch on to write the filter and sort rows as free-text expressions instead of choosing a field, a condition and a value.
6. *Add Sort -* Click Add Sort, choose a field and choose Ascending or Descending. Add more rows for a multi-level sort. The top row is applied first, and you can drag rows to reorder them.
**Note:** Filters always combine with AND. Query Array has no OR and no condition groups.
**Choose what the activity returns: Aggregations or Return fields**
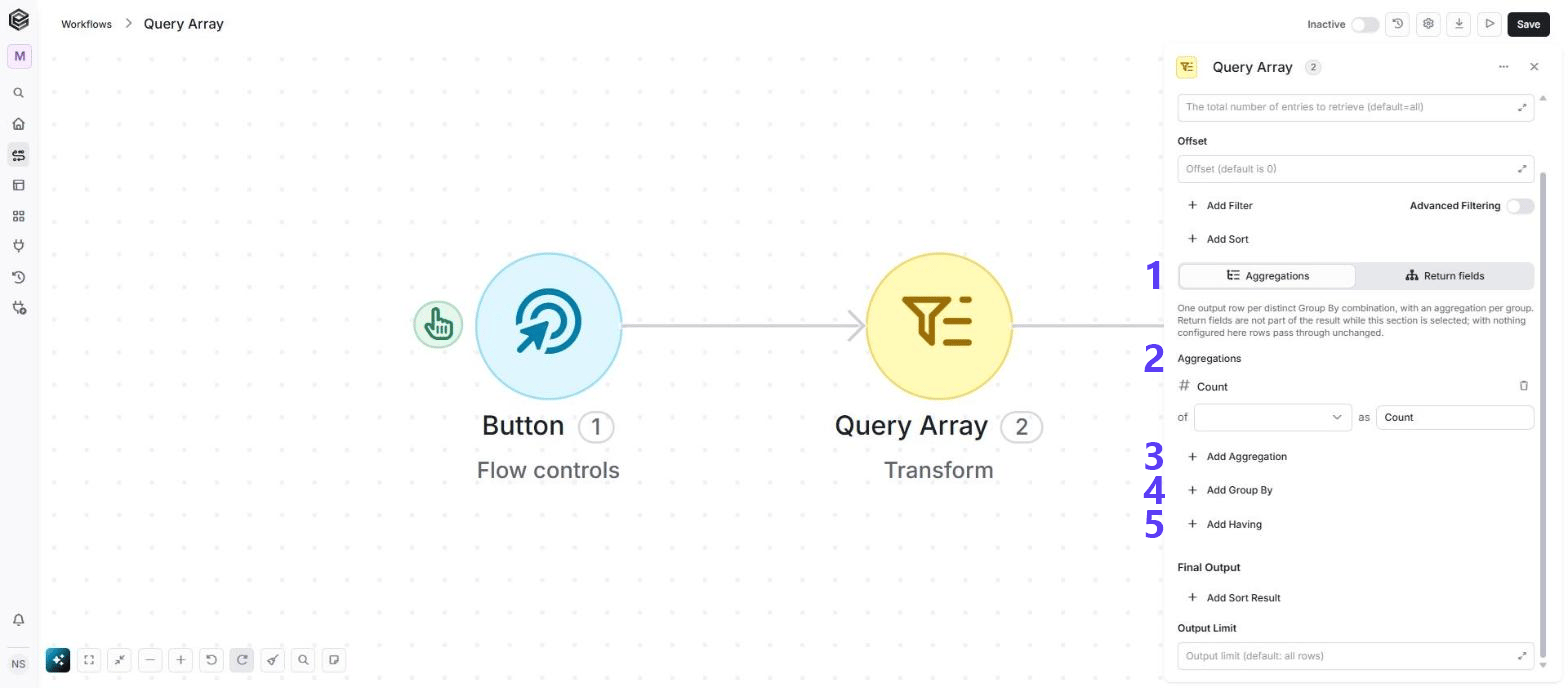
1. *Aggregations / Return fields -* Choose the mode with the toggle below Add Sort:
* *Aggregations* - (Default) Returns one row for each distinct Group By combination, with a calculated column for every aggregation. Return fields are not part of the result.
* *Return fields* - Returns one row for each input row, reshaped to the fields you list. Group By, aggregations and Having are not applied.
2. *Aggregations -* The calculated columns. Each one shows its function (for example Count), the field it works on (*of*) and the name of the new column in the result (*as*). The *of* list offers only fields that suit the function. Count without a field counts whole rows. The name is filled in for you, for example Unit Price with Sum becomes UnitPriceSum, and you can change it. Use the bin icon to remove a row.
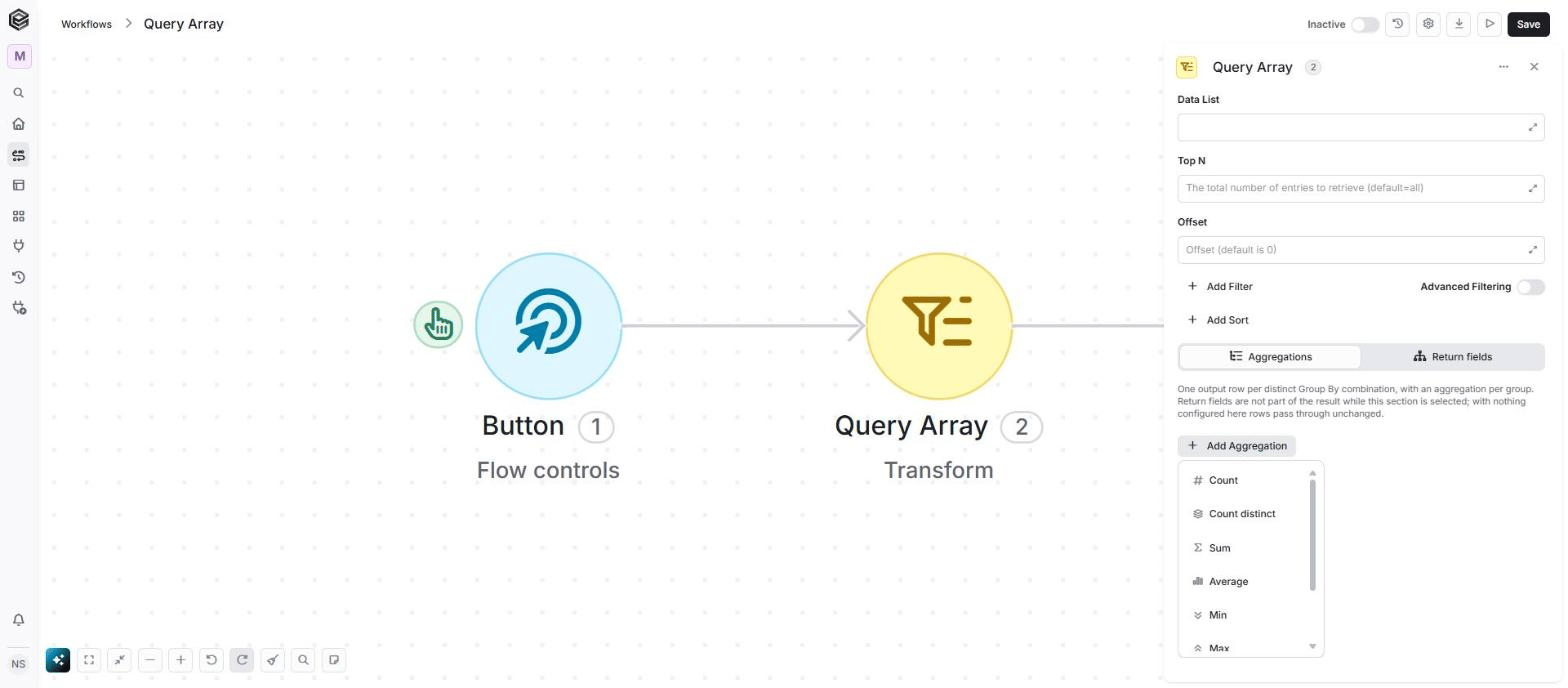
3. *Add Aggregation -* Adds another calculated column. Choose the function: Count, Count distinct, Sum, Average, Min, Max, First or Last.
4. *Add Group By -* Choose the fields to group by. Each distinct combination becomes one row in the result. Use *as* to rename the column the group is returned under. Grouping is optional: with no Group By, the aggregations return a single summary row.
5. *Add Having -* Filter the grouped results, for example keep only the groups where Count is above 5. Each row is a field, a condition and a value. This option appears only after you add an aggregation.
Switching the toggle does not delete what you set up on the other side, but only the selected mode is used when the workflow runs.
The functions you can choose in Add Aggregation:
**Return fields mode: pick and rename fields**
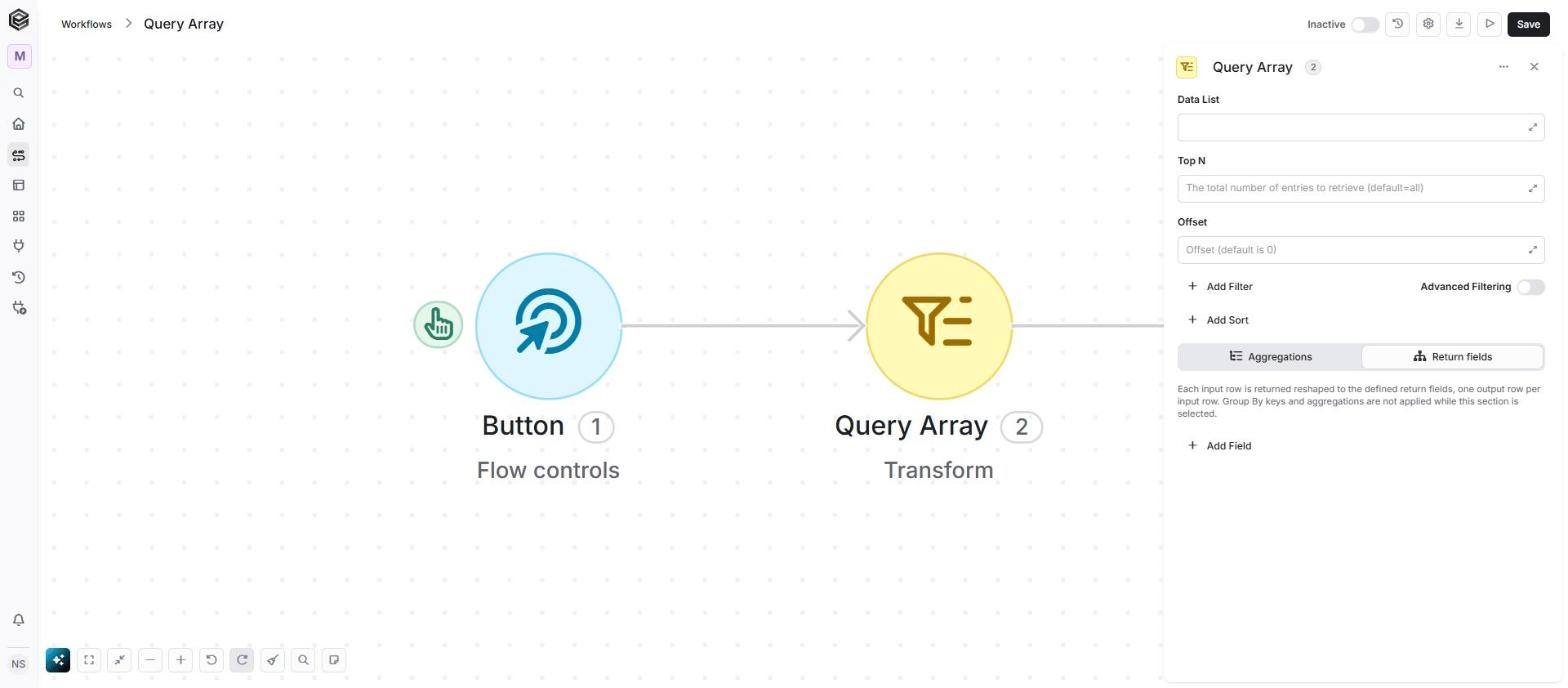
Use this mode to reshape the structure of your list without any aggregation, similar to [Map Array](#map-array) but together with the filter, sort and limit options above. You choose which fields to return and you can give each one a different name.
* *Add Field -* Choose a field to keep on every row. Fields inside nested objects can be chosen too. Each field has a *Property name*, the name the field gets in the result. It is filled in for you, and you can type a different name to rename the field.
For example, add Name, Email and Department and rename Email to ContactEmail. You get one row per worker with the columns Name, ContactEmail and Department.
**Final Output** (both modes, shown once the activity has output columns)
1. *Add Sort Result -* Sort the finished rows by one of the output columns, Ascending or Descending. Add more rows for a multi-level sort.
2. *Output Limit -* The maximum number of rows to return. Leave it empty to return all rows.
**Note:**
* *Filters vs Having:* Filters run on the original rows, before grouping. Having runs on the result, after grouping, so it can use your calculated columns such as Count.
* *Add Sort vs Add Sort Result:* Add Sort orders the original rows before the query runs. Add Sort Result orders the finished result.
* *Sum and Average* work on number fields only. If a function does not suit the chosen field, the panel tells you.
* *Output names must be unique.* If two columns get the same name, one of them is dropped from the result, and the panel warns you. Typing a name by hand and then changing the *of* field replaces your name with a generated one.
* *Output Limit of 1* returns a single item, not a list with one row.
**What the activity returns**
The result is always a list. In Aggregations mode the columns are the Group By columns first, followed by the aggregations. In Return fields mode the columns are the fields you listed. In later steps, pick the columns from the Query Array step in the dynamic content. If nothing is set up in the selected mode, the rows pass through unchanged, after the filters, sort and limit of the input.
**Example**
A workflow gets a list of workers from your HR system. You want the five departments with the most active workers, and their average salary:
* *Filters:* Status equal Active
* *Mode:* Aggregations
* *Add Group By:* Department
* *Add Aggregation:* Count, named Count
* *Add Aggregation:* Average of Salary, named SalaryAverage
* *Add Having:* Count greater than 5
* *Add Sort Result:* Count, Descending
* *Output Limit:* 5
The result is a list of up to five rows with the columns Department, Count and SalaryAverage.
# Engini's Helpers
## Compose String
The Compose String is type less. You can provide it with any type of data as an input, and it will provide you back an output after doing anything we ask it to with things like expressions. Compose String will effectively tell you what the output will be of some content you give it.
Choose the Transform & Format software and click on the “Compose String” action:
Follow the next steps to learn how to use this activity:
*Input-* Click the field to enter your text. You can type manual text or use the tooltip to insert dynamic variables (properties) from earlier activities.
## Compose Html/ Markdown
Compose HTML / Markdown activity allows you to combine text using HTML or Markdown syntax with dynamic data from previous workflow steps.
Choose the Transform & Format software and click on the “Compose HTML/ Markdown” action:
Follow the next steps to learn how to use this activity:
*Input - Press this field to edit your text.*
This window is used to create and edit content in HTML or Markdown format, which can be inserted into the workflow.
1. *Code Editor -* Enable the Code Editor toggle if you want to edit the content using HTML or Markdown code.
* Keep the toggle **OFF** to use the visual editor and format your content with the toolbar.
* Turn the toggle **ON** to manually enter or modify HTML/Markdown code.
2. *Select Format -* Choose the format you want to use for your content:
* HTML – Select this option if you want to create content using HTML tags and advanced formatting.
* Markdown – Select this option if you want to write content using Markdown syntax.
3. *Content Editor -* Use the Content Editor to create and customize the content that will be displayed in your workflow. You can work in either Visual Editor mode or Code Editor mode, depending on how you want to create your content.
**Visual Editor Mode**
Enter and format your content directly in the editing area.
You can:
* Type your text directly into the editor.
* Use the toolbar to customize the appearance of your content:
* Change font style and size.
* Add colors and text formatting.
* Apply **bold**, *italic*, or underline styles.
* Create bullet points or numbered lists.
* Align your text.
* Add links or images.
* Use the Dynamic Content panel to insert information from previous steps in your workflow.
**Code Editor Mode**
Enable the Code Editor toggle to create or edit your content using HTML or Markdown code.
In this mode:
* Write or edit HTML or Markdown syntax.
* Add dynamic values from previous workflow steps.
* Modify existing content to match your workflow requirements.
1. *Cancel / Apply*
* Click Apply to save your changes and add the content to your workflow.
* Click Cancel if you want to exit without saving your changes.
### The difference between variables and when to use Construct
The construct simulates opening a note pad at runtime.
Variables can be initialized then repeatedly updated in your workflow. Construct doesn’t do the same thing. When you have a value that needs to be set once and accessed from anywhere within your flow below your ‘setting’ action, this is when to use a construct. Construct can only be set once, and cannot be changed after, until of course the flow is run again with new data.
## ReRun Workflow History
This action allows you to re-execute a previously completed workflow run using its history ID. It is typically used for troubleshooting, retrying failed runs, or replaying a past execution without manually triggering the entire process again.
1. *Workflow -* Click on the empty field, and a tooltip will appear with all the workflows linked to your project that has the button trigger.
Then, you can choose which one to run!
2. *History Id* - Provide the history ID or array of IDs that you want to rerun. To obtain the workflow history ID of the currently running workflow, you can use the “GetWorkflowHistoryId()” function.
3. *Next Step -* Click “Next Step” to add actions to your workflow. You can add multiple actions by clicking “Next Step” after each one. To finish, continue to the next step outside the current flow.
## Run Workflow
This action allows you to trigger another existing workflow from within the current flow. It is typically used to break complex processes into smaller workflows, reuse logic, or create modular automation structures.
1. *Workflow* - Click on the empty field, and a tooltip will appear with all the workflows linked to your project that has the button trigger.
Now, you get to choose which one will be running!
2. *Add Field* - Click Add Field to add and populate additional fields for the selected activity. To learn more about managing activity data, [click here](/help/workflows/workflow-editor#add-fields).
3. *Next Step -* Click “Next Step” to add actions to your workflow. You can add multiple actions by clicking “Next Step” after each one. To finish, continue to the next step outside the current flow.
## Convert String Encoding
Choose the Transform & Format software and click on the “Convert String Encoding” action:
Follow the next steps to learn how to use this activity:
1. *Input* - Enter a string you want to convert. If you have Base 64 and not a string, use the Base64ToString function.
2. *Input Encoding -* Click on the empty field and choose from the popup the encoding type.
3. *Output Encoding -* Click on the empty field and choose from the popup the encoding type.
## Parse JSON / XML
Choose the Transform & Format software and click on the “Parse JSON/XML” action:
Follow the next steps to learn how to use this activity:
1. *Content* - Click on the empty field and the tooltip will pop up showing contents from the previous activities which you can choose to parse.
2. *Generate Output Schema -* Click on it to generate structure.
1. *JSON/XML Payload -* is where you paste a valid JSON sample. The system uses it to automatically generate the data structure. It must be formatted correctly for the mapping to work.
2. *Format Field Description* - This feature capitalizes the first letter of each field and removes unnecessary characters, such as the underscore (“\_”).
3. *Map Dictionary* - If your JSON is structured as a dictionary, you can parse it as key-value pairs. This makes it easier to loop through each entry and access the data you need. Each key-value pair includes a key (the name or identifier) and a value (the data associated with that key).
4. *Apply*- Click on it to save the changes.
**You can now add fields on your own!**
*Add Field-* Customize your Output Schema and add your own fields and be more precise with your goal and result. Follow the steps to build the field:
1. *Name-* Choose a unique name.
2. *Display name*- The name that will be shown to users inside the workflow and dynamic mapping fields.
3. *Description*- Additional context for the AI tool about the purpose of the field and the expected value. Helps the AI understand how and when to use this field dynamically during workflow execution.
4. *Type*- Defines the data type of the field.
5. *Required -* Determines whether the field is mandatory. If enabled, users must provide a value for this field before the workflow can run.
6. *Apply*- Saves and applies the current field.
7. Repeat 1-6 to populate more fields.
2. *Define manually-* is exactly where you can see the structure of your JSON. It visually displays the "skeleton" of your data showing the hierarchy and data types (like String, Number, or Collection) confirming that the system understands the JSON so you can use its data in the next steps.
## Parse Phone Number
This action helps you standardize phone numbers.
Choose the Transform & Format software and click on the “Parse Phone Number” action:
Follow the next steps to learn how to use this activity:
1. *Phone Number -* Enter the phone number you want to check or clean.
2. *Region for Country Code -* This field defines the country or region context used to interpret the phone number correctly.
* Click on the empty field and the tooltip will pop up showing all the available country codes.
* Select the option that matches your desired country or region.
## Display Web Page
This action displays a custom web page to the user, using the values provided in the Header, Body, and Footer fields.
The action is triggered by a webhook (for example, when a customer clicks a specific button), and then the corresponding **Display Web Page** is shown to the customer with the provided details.
1. *Header –* The main title or message displayed at the top of the page. Use this field to grab the user’s attention or confirm the purpose of the page (e.g., “Submission Received”).
2. *Body –* The main content area of the page. This is where you provide detailed information, instructions, or confirmation messages (e.g., “Thank you for your submission. We will contact you soon.”).
3. *Footer* – The text shown at the bottom of the page. Typically used for additional notes, support contact details (e.g., “If you have questions, contact [support@example.com](mailto:support@example.com)”).
### Steps
1. Click the empty field to open a window where you can enter your value.
2. Enter the value you want to display on the web, and use the toolbar to apply formatting such as bold, italic, underline, alignment, and more.
You can also add :
* Property value from a previous activity (Using the tooltip that opens when clicking on the field).
* Expression – using functions and/or Previous activity properties and/or static values (Using the tooltip that opens when clicking on the field).
To learn more about Functions [click here.](/help/tools/enginis-functions#logical-functions)
3. When you’re done, click save.
This documentation is built and hosted on [Mintlify](https://mintlify.com), a developer documentation platform.
 2. *Choose Transformation -* Click on **Transform & Format**. This is where you will find all the tools for data parsing, formatting, and structural changes.
 **Note:** Using **Transform & Format** correctly saves valuable time and prevents errors down the line by ensuring your data is delivered in exactly the format your destination apps expect to receive.
# Variables
## Initialize Variable
Creates a variable.
Choose the Transform & Format software and click on the “Initialize variable” action:
**Note:** Using **Transform & Format** correctly saves valuable time and prevents errors down the line by ensuring your data is delivered in exactly the format your destination apps expect to receive.
# Variables
## Initialize Variable
Creates a variable.
Choose the Transform & Format software and click on the “Initialize variable” action:
 Follow the next steps to learn how to define this activity:
 1. *Name -* Click Add Field to add and populate additional fields for the selected activity. To learn more about managing activity data, [click here](/help/workflows/workflow-editor#add-fields).
2. *Type -* Choose from the drop down list the type of variable you want to define.
* Array
* Boolean
* Datetime
* Integer
* Numeric
* Object
* String
3. *Value*
The value is optional. You can set it in a variable that you initialize as an initial value, but you can choose not to fill the field of the variable and populate it later in the workflow.
* Option 1- Without Initial Value:
When a variable is not initialized with an initial value, the system automatically assigns a default value based on the variable type.
* For a **String Variable**, the system assigns an empty string ("").
* For a **Number Variable**, the system assigns the value 0.
* For a **Boolean Variable**, the system assigns the value false.
* For a **Array Variable**, the system assigns an empty list/array (\[]).
* For an **Object Variable**, the system assigns an empty object (\{}).
* Option 2- With Initial Value:
Click on the empty field to and the tooltip will popup showing all the options you can use to fill the value.
You can populate the value in one of the following options:
* Static value – number / string. when using strings, you need to surround them with single quotes (‘).
* Property value from a previous activity (Using the tooltip that opens when clicking on the field).
* Expression – using functions and/or Previous activity properties and/or static values (Using the tooltip that opens when clicking on the field). To learn more about functions [click here.](/help/tools/enginis-functions#logical-functions)
## Set Variable
Updates the value stored in the variable with a new value.
Choose the Transform & Format software and click on the “Set variable” action:
1. *Name -* Click Add Field to add and populate additional fields for the selected activity. To learn more about managing activity data, [click here](/help/workflows/workflow-editor#add-fields).
2. *Type -* Choose from the drop down list the type of variable you want to define.
* Array
* Boolean
* Datetime
* Integer
* Numeric
* Object
* String
3. *Value*
The value is optional. You can set it in a variable that you initialize as an initial value, but you can choose not to fill the field of the variable and populate it later in the workflow.
* Option 1- Without Initial Value:
When a variable is not initialized with an initial value, the system automatically assigns a default value based on the variable type.
* For a **String Variable**, the system assigns an empty string ("").
* For a **Number Variable**, the system assigns the value 0.
* For a **Boolean Variable**, the system assigns the value false.
* For a **Array Variable**, the system assigns an empty list/array (\[]).
* For an **Object Variable**, the system assigns an empty object (\{}).
* Option 2- With Initial Value:
Click on the empty field to and the tooltip will popup showing all the options you can use to fill the value.
You can populate the value in one of the following options:
* Static value – number / string. when using strings, you need to surround them with single quotes (‘).
* Property value from a previous activity (Using the tooltip that opens when clicking on the field).
* Expression – using functions and/or Previous activity properties and/or static values (Using the tooltip that opens when clicking on the field). To learn more about functions [click here.](/help/tools/enginis-functions#logical-functions)
## Set Variable
Updates the value stored in the variable with a new value.
Choose the Transform & Format software and click on the “Set variable” action:
 Follow the next steps to learn how to use this activity:
 1. *Name -* Choose from the drop down the name of the variable you want to set.
2. *Value*
* Click on the empty field to be shown the tooltip with all the options you can use to fill the value.
* You can populate the value in one of the following options:
* Static value – number / string. when using strings, you need to surround them with single quotes (‘).
* Property value from a previous activity (Using the tooltip that opens when clicking on the field).
* Expression – using functions and/or Previous activity properties and/or static values (Using the tooltip that opens when clicking on the field). To learn more about functions [click here.](/help/tools/enginis-functions#logical-functions)
## Append To Array Variable
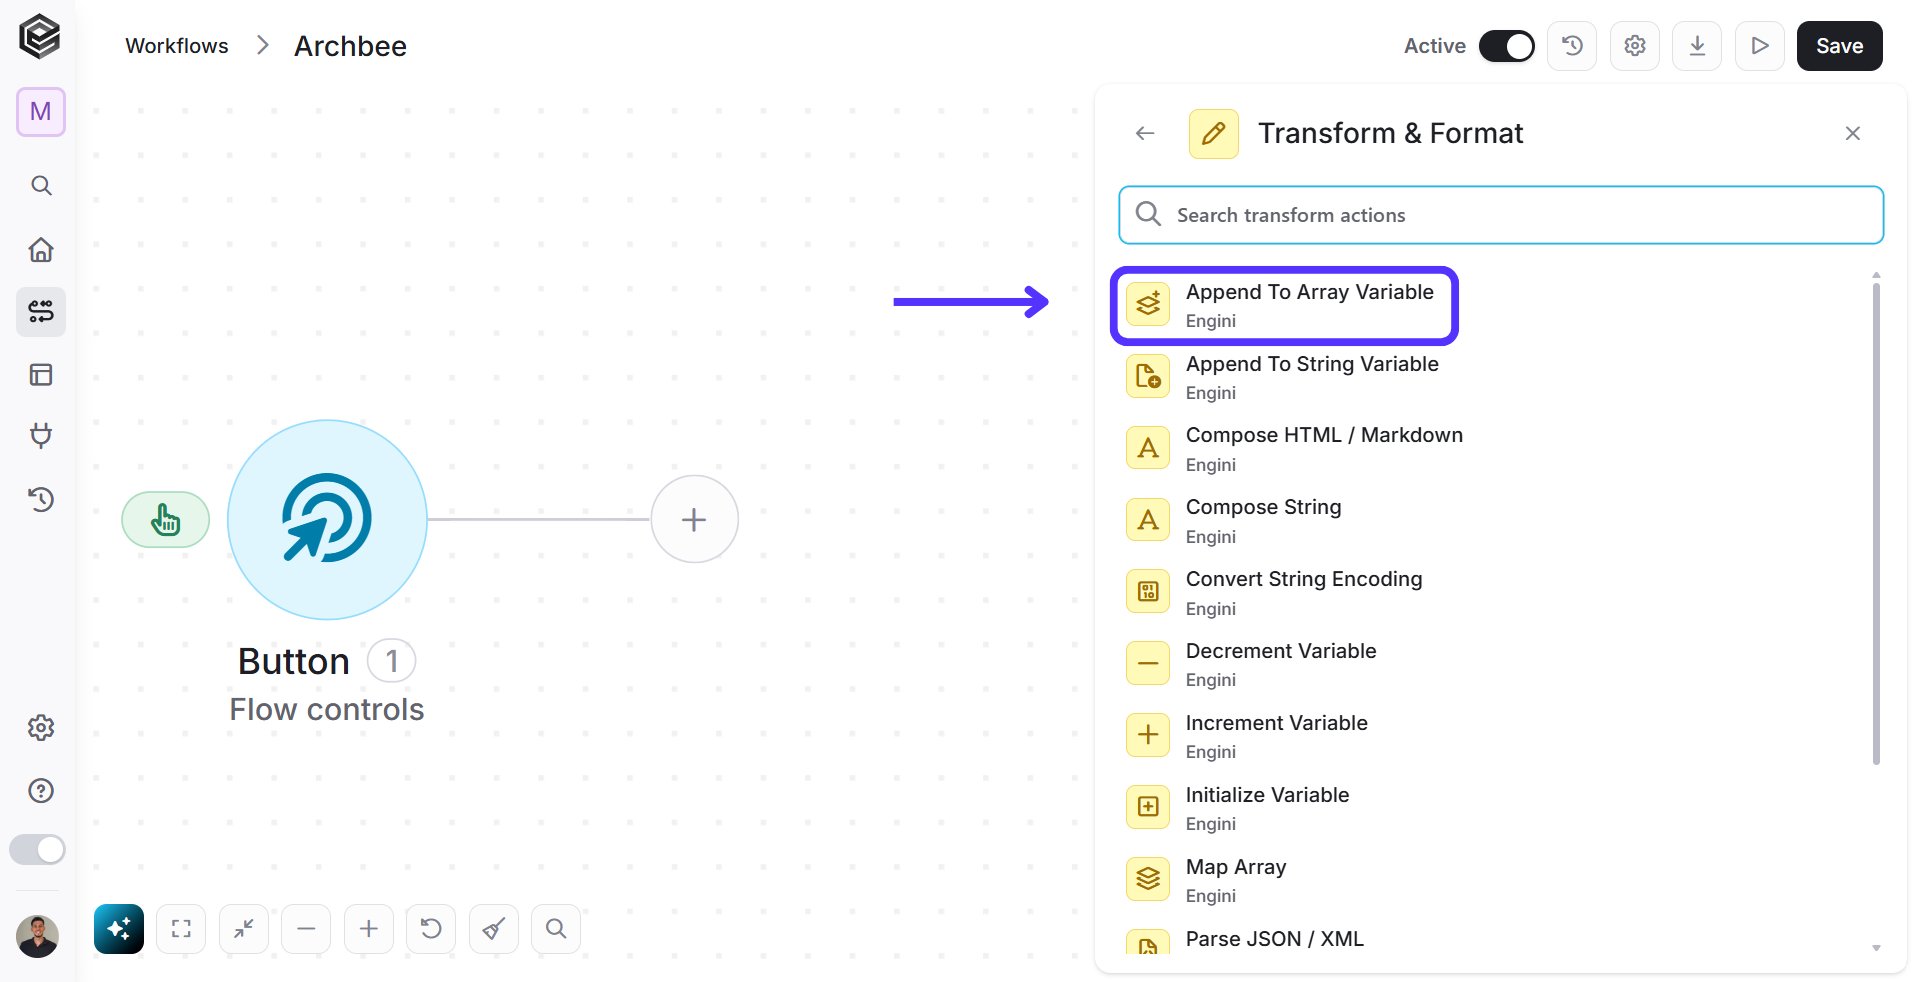
Appending to an array variable allows you to dynamically add new values to the end of the array without changing the size or structure of the array.
Choose the Transform & Format software and click on the “Append to array variable” action:
1. *Name -* Choose from the drop down the name of the variable you want to set.
2. *Value*
* Click on the empty field to be shown the tooltip with all the options you can use to fill the value.
* You can populate the value in one of the following options:
* Static value – number / string. when using strings, you need to surround them with single quotes (‘).
* Property value from a previous activity (Using the tooltip that opens when clicking on the field).
* Expression – using functions and/or Previous activity properties and/or static values (Using the tooltip that opens when clicking on the field). To learn more about functions [click here.](/help/tools/enginis-functions#logical-functions)
## Append To Array Variable
Appending to an array variable allows you to dynamically add new values to the end of the array without changing the size or structure of the array.
Choose the Transform & Format software and click on the “Append to array variable” action:
 Follow the next steps to learn how to use this activity:
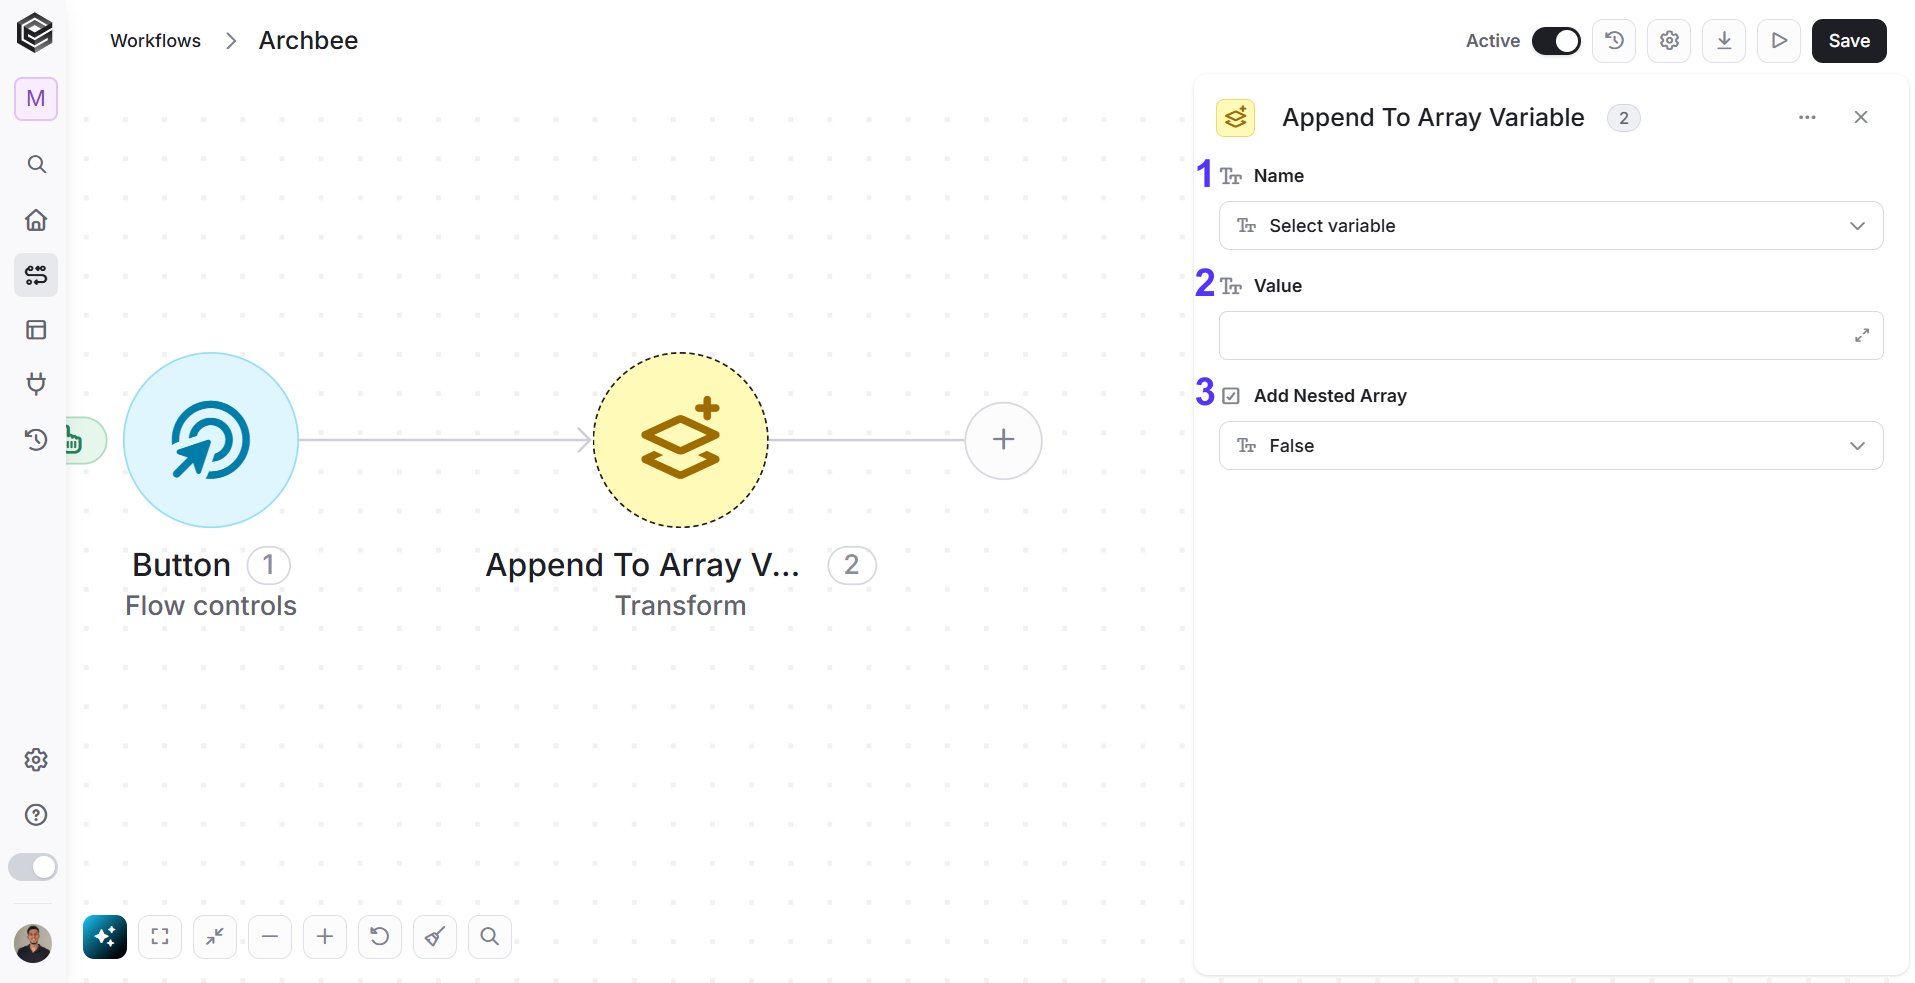 1. *Name -* Choose from the drop down the name of the variable you want to append to.
2. *Value*
* Click on the empty field to be shown the tooltip with all the values you can use to fill the value field.
* You can populate the value in one of the following options:
* Static value – number / string. when using strings, you need to surround them with single quotes (‘).
* Property value from a previous activity (Using the tooltip that opens when clicking on the field).
* Expression – using functions and/or Previous activity properties and/or static values (Using the tooltip that opens when clicking on the field).
3. *Add Nested Array*
* *False* - (Default) Adds the value as a normal item. *Example:* \[1, 2] + 3 → \[1, 2, 3]
* *True* - Wraps the value in brackets \[], creating a "list inside a list." *Example:* \[1, 2] + 3 → \[1, 2, \[3]]
**Recommendation**: Keep it on False unless you specifically need a complex structure (like coordinates).
## Append to String Variable
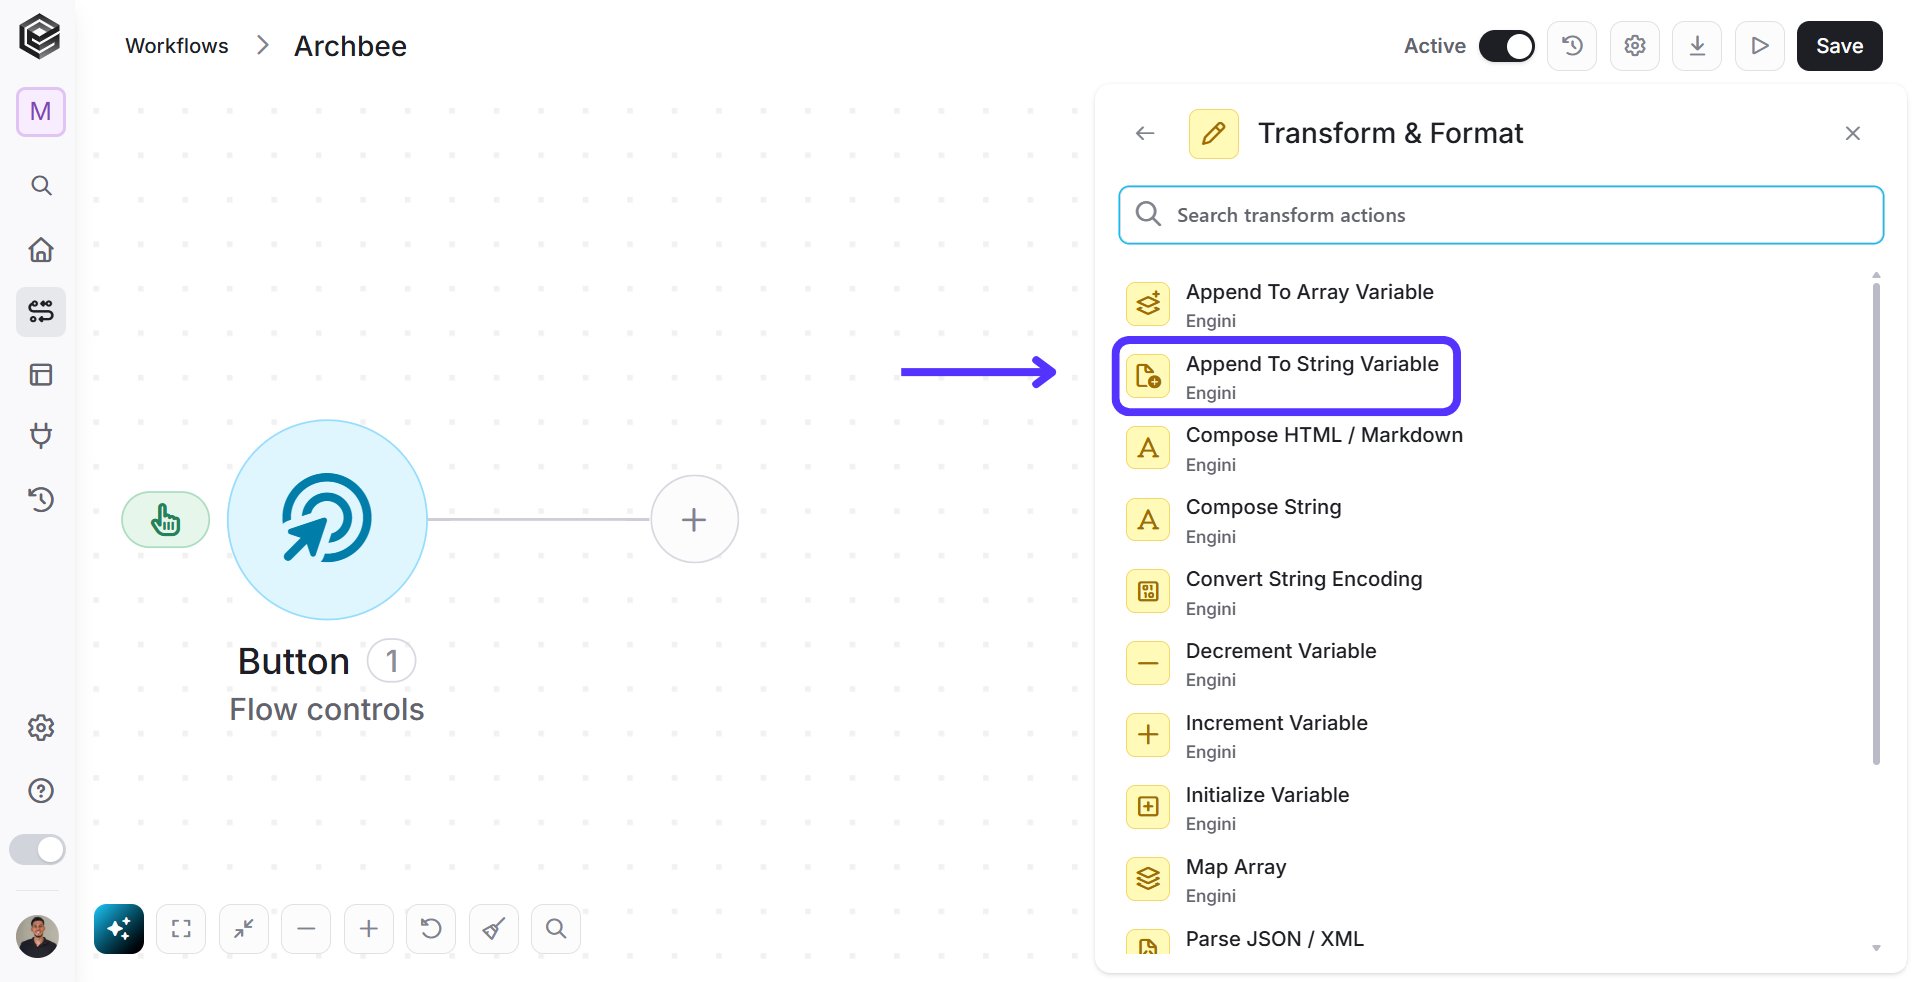
Appending to an string variable allows you to dynamically add new values to the end of the string without changing the size or structure of the string.
Choose the Transform & Format software and click on the “Append to string variable” action:
1. *Name -* Choose from the drop down the name of the variable you want to append to.
2. *Value*
* Click on the empty field to be shown the tooltip with all the values you can use to fill the value field.
* You can populate the value in one of the following options:
* Static value – number / string. when using strings, you need to surround them with single quotes (‘).
* Property value from a previous activity (Using the tooltip that opens when clicking on the field).
* Expression – using functions and/or Previous activity properties and/or static values (Using the tooltip that opens when clicking on the field).
3. *Add Nested Array*
* *False* - (Default) Adds the value as a normal item. *Example:* \[1, 2] + 3 → \[1, 2, 3]
* *True* - Wraps the value in brackets \[], creating a "list inside a list." *Example:* \[1, 2] + 3 → \[1, 2, \[3]]
**Recommendation**: Keep it on False unless you specifically need a complex structure (like coordinates).
## Append to String Variable
Appending to an string variable allows you to dynamically add new values to the end of the string without changing the size or structure of the string.
Choose the Transform & Format software and click on the “Append to string variable” action:
 Follow the next steps to learn how to use this activity:
 1. *Name -* Choose from the drop down the name of the variable you want to append to.
2. *Value*
* Click on the empty field to be shown the tooltip with all the values you can use to fill the value field.
* You can populate the value in one of the following options:
* Static value – number / string. when using strings, you need to surround them with single quotes (‘).
* Property value from a previous activity (Using the tooltip that opens when clicking on the field).
* Expression – using functions and/or Previous activity properties and/or static values (Using the tooltip that opens when clicking on the field). To learn more about functions [click here.](/help/tools/enginis-functions#logical-functions)
## Increment Variable
Increment variable refers to the operation of increasing the value of a variable by a specific amount.
Choose the Transform & Format software and click on the “Increment Variable” action:
1. *Name -* Choose from the drop down the name of the variable you want to append to.
2. *Value*
* Click on the empty field to be shown the tooltip with all the values you can use to fill the value field.
* You can populate the value in one of the following options:
* Static value – number / string. when using strings, you need to surround them with single quotes (‘).
* Property value from a previous activity (Using the tooltip that opens when clicking on the field).
* Expression – using functions and/or Previous activity properties and/or static values (Using the tooltip that opens when clicking on the field). To learn more about functions [click here.](/help/tools/enginis-functions#logical-functions)
## Increment Variable
Increment variable refers to the operation of increasing the value of a variable by a specific amount.
Choose the Transform & Format software and click on the “Increment Variable” action:
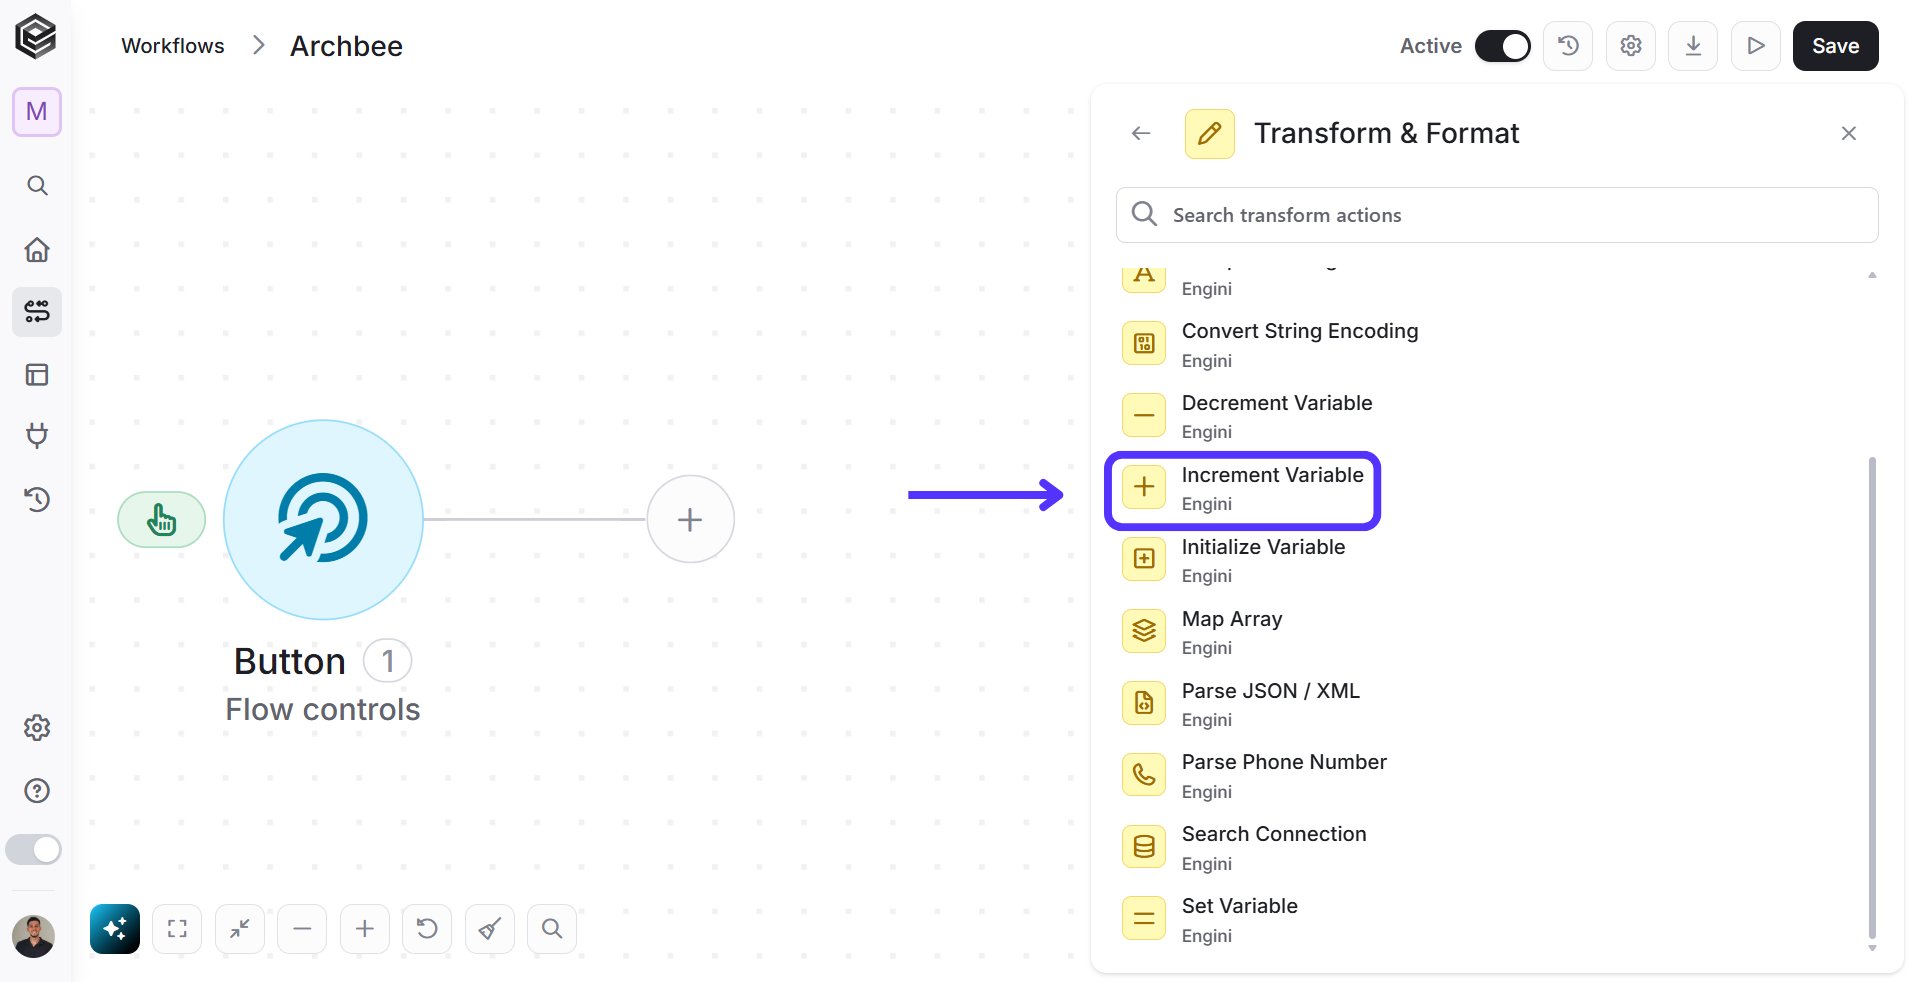 Follow the next steps to learn how to use this activity:
 1. *Name -* Choose from the drop down the name of the variable you want to set.
2. *Increment Value -* Click on the empty field to fill the increment number.
## Decrement Variable
Decrement variable refers to the operation of decreasing the value of a variable by a specific amount or step.
Choose the Transform & Format software and click on the “Decrement Variable” action:
1. *Name -* Choose from the drop down the name of the variable you want to set.
2. *Increment Value -* Click on the empty field to fill the increment number.
## Decrement Variable
Decrement variable refers to the operation of decreasing the value of a variable by a specific amount or step.
Choose the Transform & Format software and click on the “Decrement Variable” action:
 Follow the next steps to learn how to use this activity:
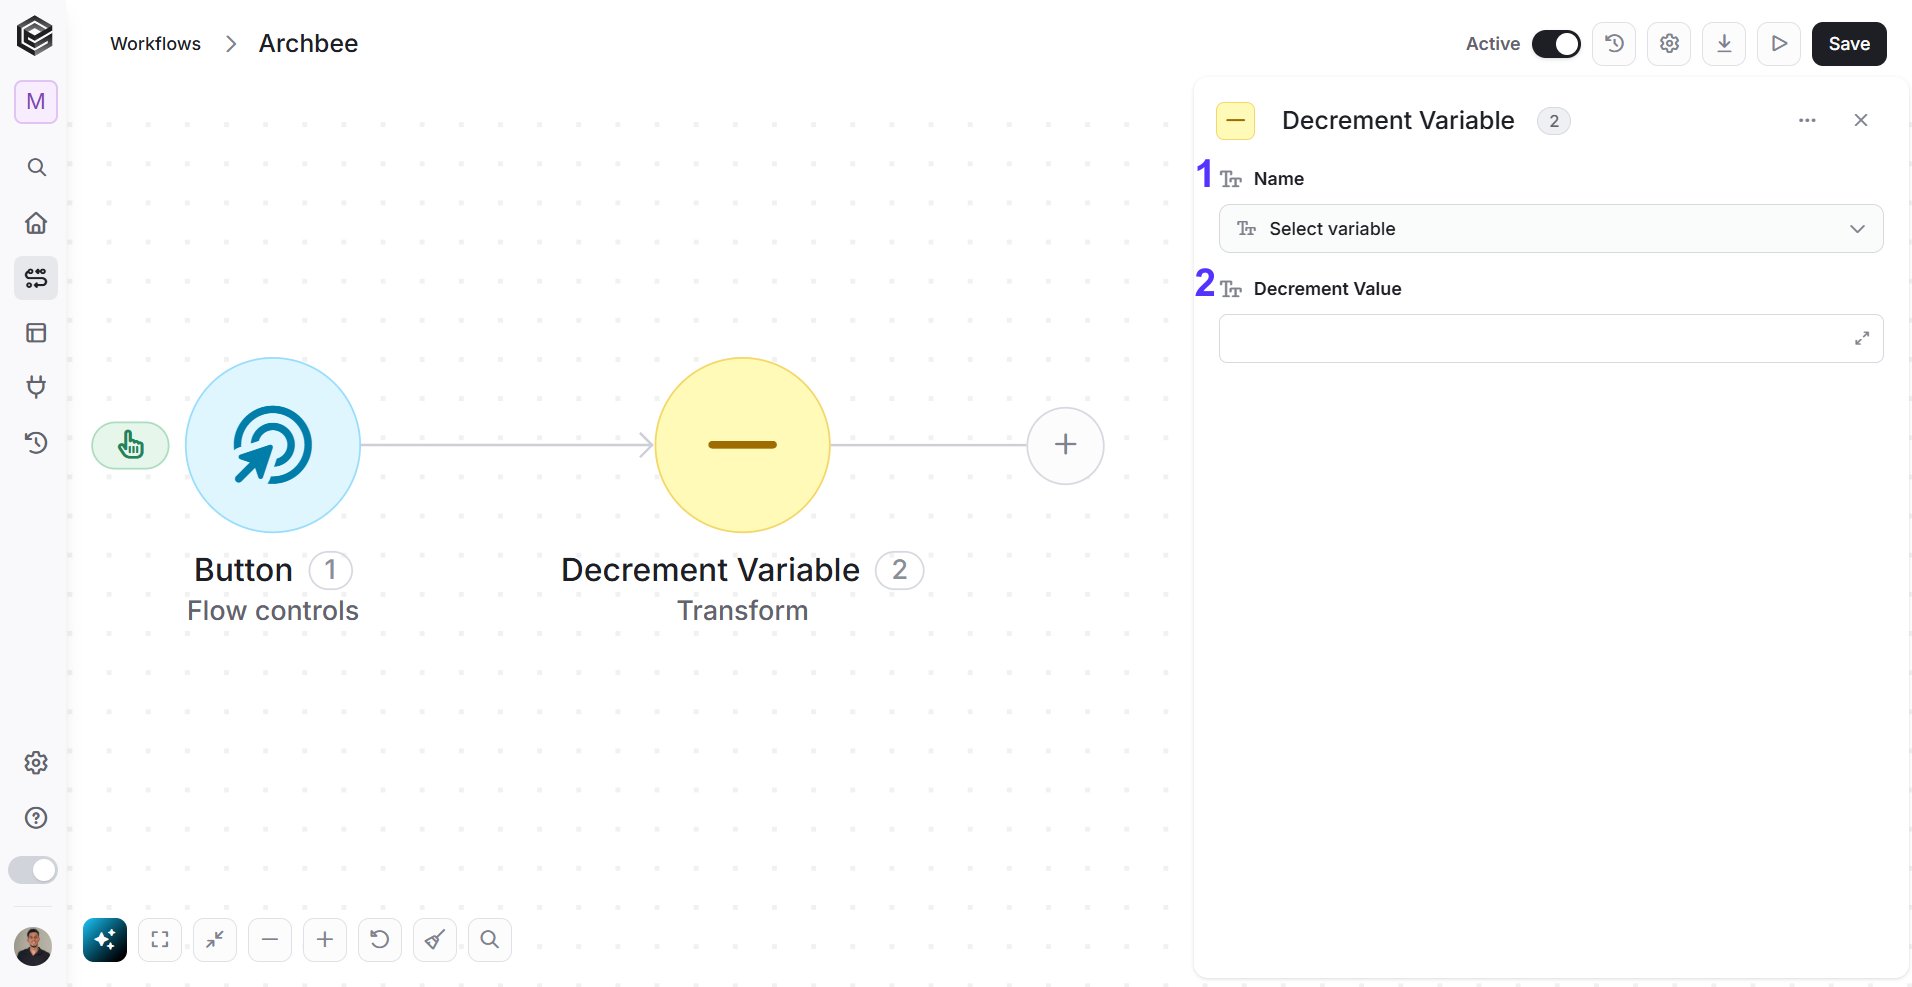 1. *Name -* Choose from the drop down the name of the variable you want to set.
2. *Decrement Value -* Click on the empty field to fill the decrement number.
## Map Array
The map array activity allows you to transform a data list that contains multiple pieces of data into a new data list based on the properties and values you choose.
Choose the Transform & Format software and click on the “Map Array” action:
1. *Name -* Choose from the drop down the name of the variable you want to set.
2. *Decrement Value -* Click on the empty field to fill the decrement number.
## Map Array
The map array activity allows you to transform a data list that contains multiple pieces of data into a new data list based on the properties and values you choose.
Choose the Transform & Format software and click on the “Map Array” action:
 Follow the next steps to learn how to use this activity:
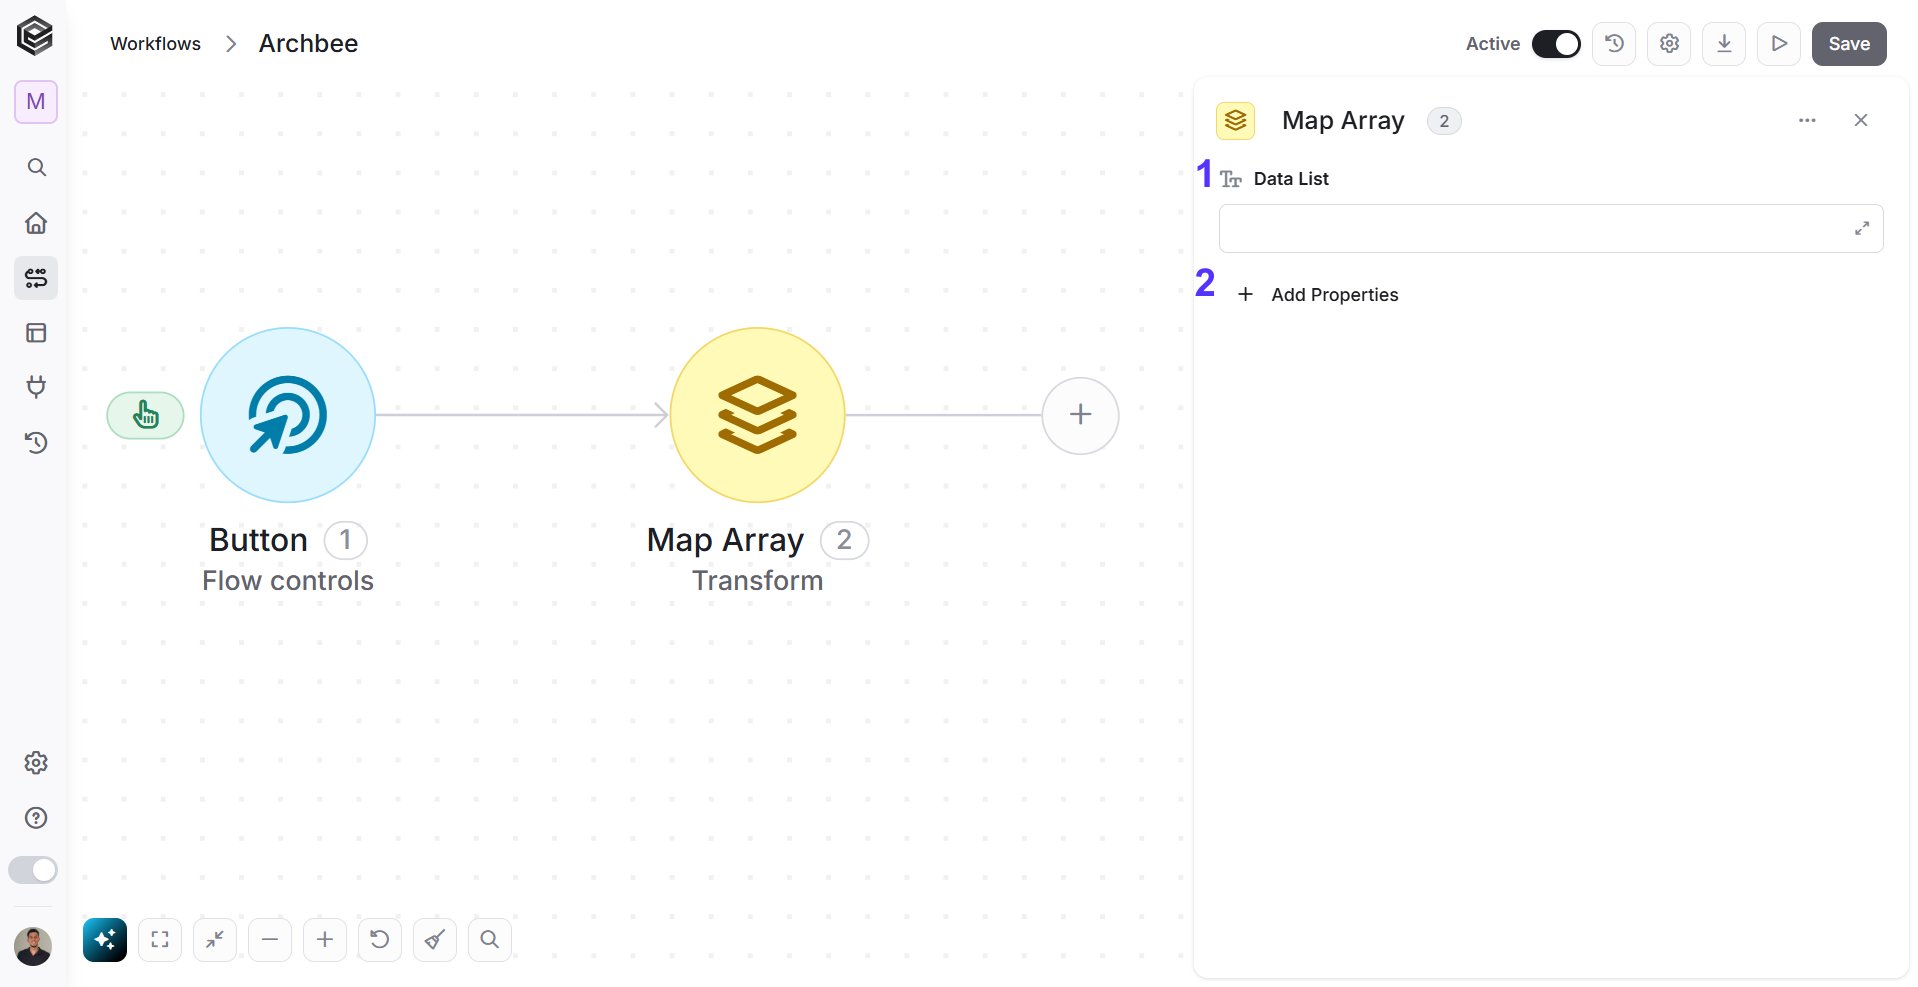 1. *Data List-* Click this field to select the source array you want to transform from a previous activity in your workflow.
2. *Add Properties-* Click here to define the new structure. You will specify the new property names and map them to the corresponding values from the original data list
For example, let’s consider the following data list:
> \[\
> "status": "Working on it",\
> "date4": "2023-08-19",\
> "text": "052123456",\
> "text2": "[info1@engini.io](mailto:info1@engini.io)",\
> "checkbox": "v",\
> "checkbox\_1": "v",\
> "BOARD\_ID": "5017384721",\
> "GROUP\_ID": "topics",\
> "ITEM\_ID": "5017384726",\
> "name": "Meital Borenstein"\
> },\
> "status": "Done",\
> "date4": "2023-08-20",\
> "text": "052123456",\
> "text2": "[info2@engini.io](mailto:info2@engini.io)",\
> "checkbox": "",\
> "checkbox\_1": "v",\
> "BOARD\_ID": "5017384721",\
> "GROUP\_ID": "topics",\
> "ITEM\_ID": "5017384728",\
> "name": "Nimrod Tzeler"\
> },\
> "status": "Working on it",\
> "date4": "2023-08-17",\
> "text": "052123456",\
> "text2": "[info3@engini.io](mailto:info3@engini.io)",\
> "checkbox": "v",\
> "checkbox\_1": "",\
> "BOARD\_ID": "5017384721",\
> "GROUP\_ID": "topics",\
> "ITEM\_ID": "5017384729",\
> "name": "Itay Guttman"\
> },\
> "status": "Stuck",\
> "date4": "2023-10-10",\
> "text": "052123456",\
> "text2": "[info@engini.io](mailto:info@engini.io)",\
> "checkbox": "",\
> "checkbox\_1": "v",\
> "BOARD\_ID": "052123456",\
> "GROUP\_ID": "topics",\
> "ITEM\_ID": "5352748005",\
> "name": "Michael Golnik"\
> },\
> "status": "Working on it",\
> "date4": "2023-10-01",\
> "text": "052123456",\
> "text2": "[info4@engini.io](mailto:info4@engini.io)",\
> "checkbox": "v",\
> "checkbox\_1": "v",\
> "BOARD\_ID": "5017384721",\
> "GROUP\_ID": "topics",\
> "ITEM\_ID": "5352749950",\
> "name": "Avishai Dotan"\
> }\
> ]
Using the activity, we will create an array containing the names and emails of employees. To do this, select the appropriate properties and values. For this example, choose the following properties:
1. *Data List-* Click this field to select the source array you want to transform from a previous activity in your workflow.
2. *Add Properties-* Click here to define the new structure. You will specify the new property names and map them to the corresponding values from the original data list
For example, let’s consider the following data list:
> \[\
> "status": "Working on it",\
> "date4": "2023-08-19",\
> "text": "052123456",\
> "text2": "[info1@engini.io](mailto:info1@engini.io)",\
> "checkbox": "v",\
> "checkbox\_1": "v",\
> "BOARD\_ID": "5017384721",\
> "GROUP\_ID": "topics",\
> "ITEM\_ID": "5017384726",\
> "name": "Meital Borenstein"\
> },\
> "status": "Done",\
> "date4": "2023-08-20",\
> "text": "052123456",\
> "text2": "[info2@engini.io](mailto:info2@engini.io)",\
> "checkbox": "",\
> "checkbox\_1": "v",\
> "BOARD\_ID": "5017384721",\
> "GROUP\_ID": "topics",\
> "ITEM\_ID": "5017384728",\
> "name": "Nimrod Tzeler"\
> },\
> "status": "Working on it",\
> "date4": "2023-08-17",\
> "text": "052123456",\
> "text2": "[info3@engini.io](mailto:info3@engini.io)",\
> "checkbox": "v",\
> "checkbox\_1": "",\
> "BOARD\_ID": "5017384721",\
> "GROUP\_ID": "topics",\
> "ITEM\_ID": "5017384729",\
> "name": "Itay Guttman"\
> },\
> "status": "Stuck",\
> "date4": "2023-10-10",\
> "text": "052123456",\
> "text2": "[info@engini.io](mailto:info@engini.io)",\
> "checkbox": "",\
> "checkbox\_1": "v",\
> "BOARD\_ID": "052123456",\
> "GROUP\_ID": "topics",\
> "ITEM\_ID": "5352748005",\
> "name": "Michael Golnik"\
> },\
> "status": "Working on it",\
> "date4": "2023-10-01",\
> "text": "052123456",\
> "text2": "[info4@engini.io](mailto:info4@engini.io)",\
> "checkbox": "v",\
> "checkbox\_1": "v",\
> "BOARD\_ID": "5017384721",\
> "GROUP\_ID": "topics",\
> "ITEM\_ID": "5352749950",\
> "name": "Avishai Dotan"\
> }\
> ]
Using the activity, we will create an array containing the names and emails of employees. To do this, select the appropriate properties and values. For this example, choose the following properties:
 Applying the map array, you will get the following array:
> \[\
> \{\
> "Name": "Meital Borenstein",\
> "Email": "[info1@engini.io](mailto:info1@engini.io)"\
> },\
> \{\
> "Name": "Nimrod Tzeler",\
> "Email": "[info2@engini.io](mailto:info2@engini.io)"\
> },\
> \{\
> "Name": "Itay Guttman",\
> "Email": "[info3@engini.io](mailto:info3@engini.io)"\
> },\
> \{\
> "Name": "Michael Golnik",\
> "Email": "[info@engini.io](mailto:info@engini.io)"\
> },\
> \{\
> "Name": "Avishai Dotan",\
> "Email": "[info4@engini.io](mailto:info4@engini.io)"\
> }\
> ]
This array contains the names and emails of the employees extracted from the original data list.
## Query Array
Query Array combines Sort & Filter, [Map Array](#map-array), Group By and aggregations in one activity. You give it an array of objects (a list from an earlier step), filter, sort and limit the rows, and then either aggregate them or pick which fields to return. The result is passed on as a new list.
It can also produce brand new datasets. Aggregations, Group By and Having build a new set of rows from your data, and Output Limit returns only the first X rows of that resulting dataset.
Choose the Transform & Format software and click on the “Query Array” action.
Follow the next steps to learn how to use this activity:
**Input - choose which rows to work on**
Applying the map array, you will get the following array:
> \[\
> \{\
> "Name": "Meital Borenstein",\
> "Email": "[info1@engini.io](mailto:info1@engini.io)"\
> },\
> \{\
> "Name": "Nimrod Tzeler",\
> "Email": "[info2@engini.io](mailto:info2@engini.io)"\
> },\
> \{\
> "Name": "Itay Guttman",\
> "Email": "[info3@engini.io](mailto:info3@engini.io)"\
> },\
> \{\
> "Name": "Michael Golnik",\
> "Email": "[info@engini.io](mailto:info@engini.io)"\
> },\
> \{\
> "Name": "Avishai Dotan",\
> "Email": "[info4@engini.io](mailto:info4@engini.io)"\
> }\
> ]
This array contains the names and emails of the employees extracted from the original data list.
## Query Array
Query Array combines Sort & Filter, [Map Array](#map-array), Group By and aggregations in one activity. You give it an array of objects (a list from an earlier step), filter, sort and limit the rows, and then either aggregate them or pick which fields to return. The result is passed on as a new list.
It can also produce brand new datasets. Aggregations, Group By and Having build a new set of rows from your data, and Output Limit returns only the first X rows of that resulting dataset.
Choose the Transform & Format software and click on the “Query Array” action.
Follow the next steps to learn how to use this activity:
**Input - choose which rows to work on**
 1. *Data List -* Click this field to select the list you want to query from a previous activity in your workflow.
2. *Top N -* The maximum number of rows to take from the list before anything else runs. Leave it empty to take all rows.
3. *Offset -* Skip this number of rows at the start of the list. The default is 0.
4. *Add Filter -* Keep only the rows that match. Each filter is a field, a condition and a value. Click Add Filter again to add more.
5. *Advanced Filtering -* Turn this switch on to write the filter and sort rows as free-text expressions instead of choosing a field, a condition and a value.
6. *Add Sort -* Click Add Sort, choose a field and choose Ascending or Descending. Add more rows for a multi-level sort. The top row is applied first, and you can drag rows to reorder them.
**Note:** Filters always combine with AND. Query Array has no OR and no condition groups.
**Choose what the activity returns: Aggregations or Return fields**
1. *Data List -* Click this field to select the list you want to query from a previous activity in your workflow.
2. *Top N -* The maximum number of rows to take from the list before anything else runs. Leave it empty to take all rows.
3. *Offset -* Skip this number of rows at the start of the list. The default is 0.
4. *Add Filter -* Keep only the rows that match. Each filter is a field, a condition and a value. Click Add Filter again to add more.
5. *Advanced Filtering -* Turn this switch on to write the filter and sort rows as free-text expressions instead of choosing a field, a condition and a value.
6. *Add Sort -* Click Add Sort, choose a field and choose Ascending or Descending. Add more rows for a multi-level sort. The top row is applied first, and you can drag rows to reorder them.
**Note:** Filters always combine with AND. Query Array has no OR and no condition groups.
**Choose what the activity returns: Aggregations or Return fields**
 1. *Aggregations / Return fields -* Choose the mode with the toggle below Add Sort:
* *Aggregations* - (Default) Returns one row for each distinct Group By combination, with a calculated column for every aggregation. Return fields are not part of the result.
* *Return fields* - Returns one row for each input row, reshaped to the fields you list. Group By, aggregations and Having are not applied.
2. *Aggregations -* The calculated columns. Each one shows its function (for example Count), the field it works on (*of*) and the name of the new column in the result (*as*). The *of* list offers only fields that suit the function. Count without a field counts whole rows. The name is filled in for you, for example Unit Price with Sum becomes UnitPriceSum, and you can change it. Use the bin icon to remove a row.
3. *Add Aggregation -* Adds another calculated column. Choose the function: Count, Count distinct, Sum, Average, Min, Max, First or Last.
4. *Add Group By -* Choose the fields to group by. Each distinct combination becomes one row in the result. Use *as* to rename the column the group is returned under. Grouping is optional: with no Group By, the aggregations return a single summary row.
5. *Add Having -* Filter the grouped results, for example keep only the groups where Count is above 5. Each row is a field, a condition and a value. This option appears only after you add an aggregation.
Switching the toggle does not delete what you set up on the other side, but only the selected mode is used when the workflow runs.
The functions you can choose in Add Aggregation:
1. *Aggregations / Return fields -* Choose the mode with the toggle below Add Sort:
* *Aggregations* - (Default) Returns one row for each distinct Group By combination, with a calculated column for every aggregation. Return fields are not part of the result.
* *Return fields* - Returns one row for each input row, reshaped to the fields you list. Group By, aggregations and Having are not applied.
2. *Aggregations -* The calculated columns. Each one shows its function (for example Count), the field it works on (*of*) and the name of the new column in the result (*as*). The *of* list offers only fields that suit the function. Count without a field counts whole rows. The name is filled in for you, for example Unit Price with Sum becomes UnitPriceSum, and you can change it. Use the bin icon to remove a row.
3. *Add Aggregation -* Adds another calculated column. Choose the function: Count, Count distinct, Sum, Average, Min, Max, First or Last.
4. *Add Group By -* Choose the fields to group by. Each distinct combination becomes one row in the result. Use *as* to rename the column the group is returned under. Grouping is optional: with no Group By, the aggregations return a single summary row.
5. *Add Having -* Filter the grouped results, for example keep only the groups where Count is above 5. Each row is a field, a condition and a value. This option appears only after you add an aggregation.
Switching the toggle does not delete what you set up on the other side, but only the selected mode is used when the workflow runs.
The functions you can choose in Add Aggregation:
 **Return fields mode: pick and rename fields**
Use this mode to reshape the structure of your list without any aggregation, similar to [Map Array](#map-array) but together with the filter, sort and limit options above. You choose which fields to return and you can give each one a different name.
**Return fields mode: pick and rename fields**
Use this mode to reshape the structure of your list without any aggregation, similar to [Map Array](#map-array) but together with the filter, sort and limit options above. You choose which fields to return and you can give each one a different name.
 * *Add Field -* Choose a field to keep on every row. Fields inside nested objects can be chosen too. Each field has a *Property name*, the name the field gets in the result. It is filled in for you, and you can type a different name to rename the field.
For example, add Name, Email and Department and rename Email to ContactEmail. You get one row per worker with the columns Name, ContactEmail and Department.
**Final Output** (both modes, shown once the activity has output columns)
* *Add Field -* Choose a field to keep on every row. Fields inside nested objects can be chosen too. Each field has a *Property name*, the name the field gets in the result. It is filled in for you, and you can type a different name to rename the field.
For example, add Name, Email and Department and rename Email to ContactEmail. You get one row per worker with the columns Name, ContactEmail and Department.
**Final Output** (both modes, shown once the activity has output columns)
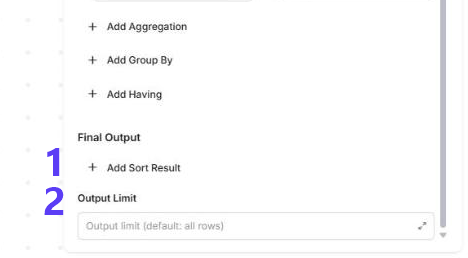 1. *Add Sort Result -* Sort the finished rows by one of the output columns, Ascending or Descending. Add more rows for a multi-level sort.
2. *Output Limit -* The maximum number of rows to return. Leave it empty to return all rows.
**Note:**
* *Filters vs Having:* Filters run on the original rows, before grouping. Having runs on the result, after grouping, so it can use your calculated columns such as Count.
* *Add Sort vs Add Sort Result:* Add Sort orders the original rows before the query runs. Add Sort Result orders the finished result.
* *Sum and Average* work on number fields only. If a function does not suit the chosen field, the panel tells you.
* *Output names must be unique.* If two columns get the same name, one of them is dropped from the result, and the panel warns you. Typing a name by hand and then changing the *of* field replaces your name with a generated one.
* *Output Limit of 1* returns a single item, not a list with one row.
**What the activity returns**
The result is always a list. In Aggregations mode the columns are the Group By columns first, followed by the aggregations. In Return fields mode the columns are the fields you listed. In later steps, pick the columns from the Query Array step in the dynamic content. If nothing is set up in the selected mode, the rows pass through unchanged, after the filters, sort and limit of the input.
**Example**
A workflow gets a list of workers from your HR system. You want the five departments with the most active workers, and their average salary:
* *Filters:* Status equal Active
* *Mode:* Aggregations
* *Add Group By:* Department
* *Add Aggregation:* Count, named Count
* *Add Aggregation:* Average of Salary, named SalaryAverage
* *Add Having:* Count greater than 5
* *Add Sort Result:* Count, Descending
* *Output Limit:* 5
The result is a list of up to five rows with the columns Department, Count and SalaryAverage.
# Engini's Helpers
## Compose String
The Compose String is type less. You can provide it with any type of data as an input, and it will provide you back an output after doing anything we ask it to with things like expressions. Compose String will effectively tell you what the output will be of some content you give it.
Choose the Transform & Format software and click on the “Compose String” action:
1. *Add Sort Result -* Sort the finished rows by one of the output columns, Ascending or Descending. Add more rows for a multi-level sort.
2. *Output Limit -* The maximum number of rows to return. Leave it empty to return all rows.
**Note:**
* *Filters vs Having:* Filters run on the original rows, before grouping. Having runs on the result, after grouping, so it can use your calculated columns such as Count.
* *Add Sort vs Add Sort Result:* Add Sort orders the original rows before the query runs. Add Sort Result orders the finished result.
* *Sum and Average* work on number fields only. If a function does not suit the chosen field, the panel tells you.
* *Output names must be unique.* If two columns get the same name, one of them is dropped from the result, and the panel warns you. Typing a name by hand and then changing the *of* field replaces your name with a generated one.
* *Output Limit of 1* returns a single item, not a list with one row.
**What the activity returns**
The result is always a list. In Aggregations mode the columns are the Group By columns first, followed by the aggregations. In Return fields mode the columns are the fields you listed. In later steps, pick the columns from the Query Array step in the dynamic content. If nothing is set up in the selected mode, the rows pass through unchanged, after the filters, sort and limit of the input.
**Example**
A workflow gets a list of workers from your HR system. You want the five departments with the most active workers, and their average salary:
* *Filters:* Status equal Active
* *Mode:* Aggregations
* *Add Group By:* Department
* *Add Aggregation:* Count, named Count
* *Add Aggregation:* Average of Salary, named SalaryAverage
* *Add Having:* Count greater than 5
* *Add Sort Result:* Count, Descending
* *Output Limit:* 5
The result is a list of up to five rows with the columns Department, Count and SalaryAverage.
# Engini's Helpers
## Compose String
The Compose String is type less. You can provide it with any type of data as an input, and it will provide you back an output after doing anything we ask it to with things like expressions. Compose String will effectively tell you what the output will be of some content you give it.
Choose the Transform & Format software and click on the “Compose String” action:
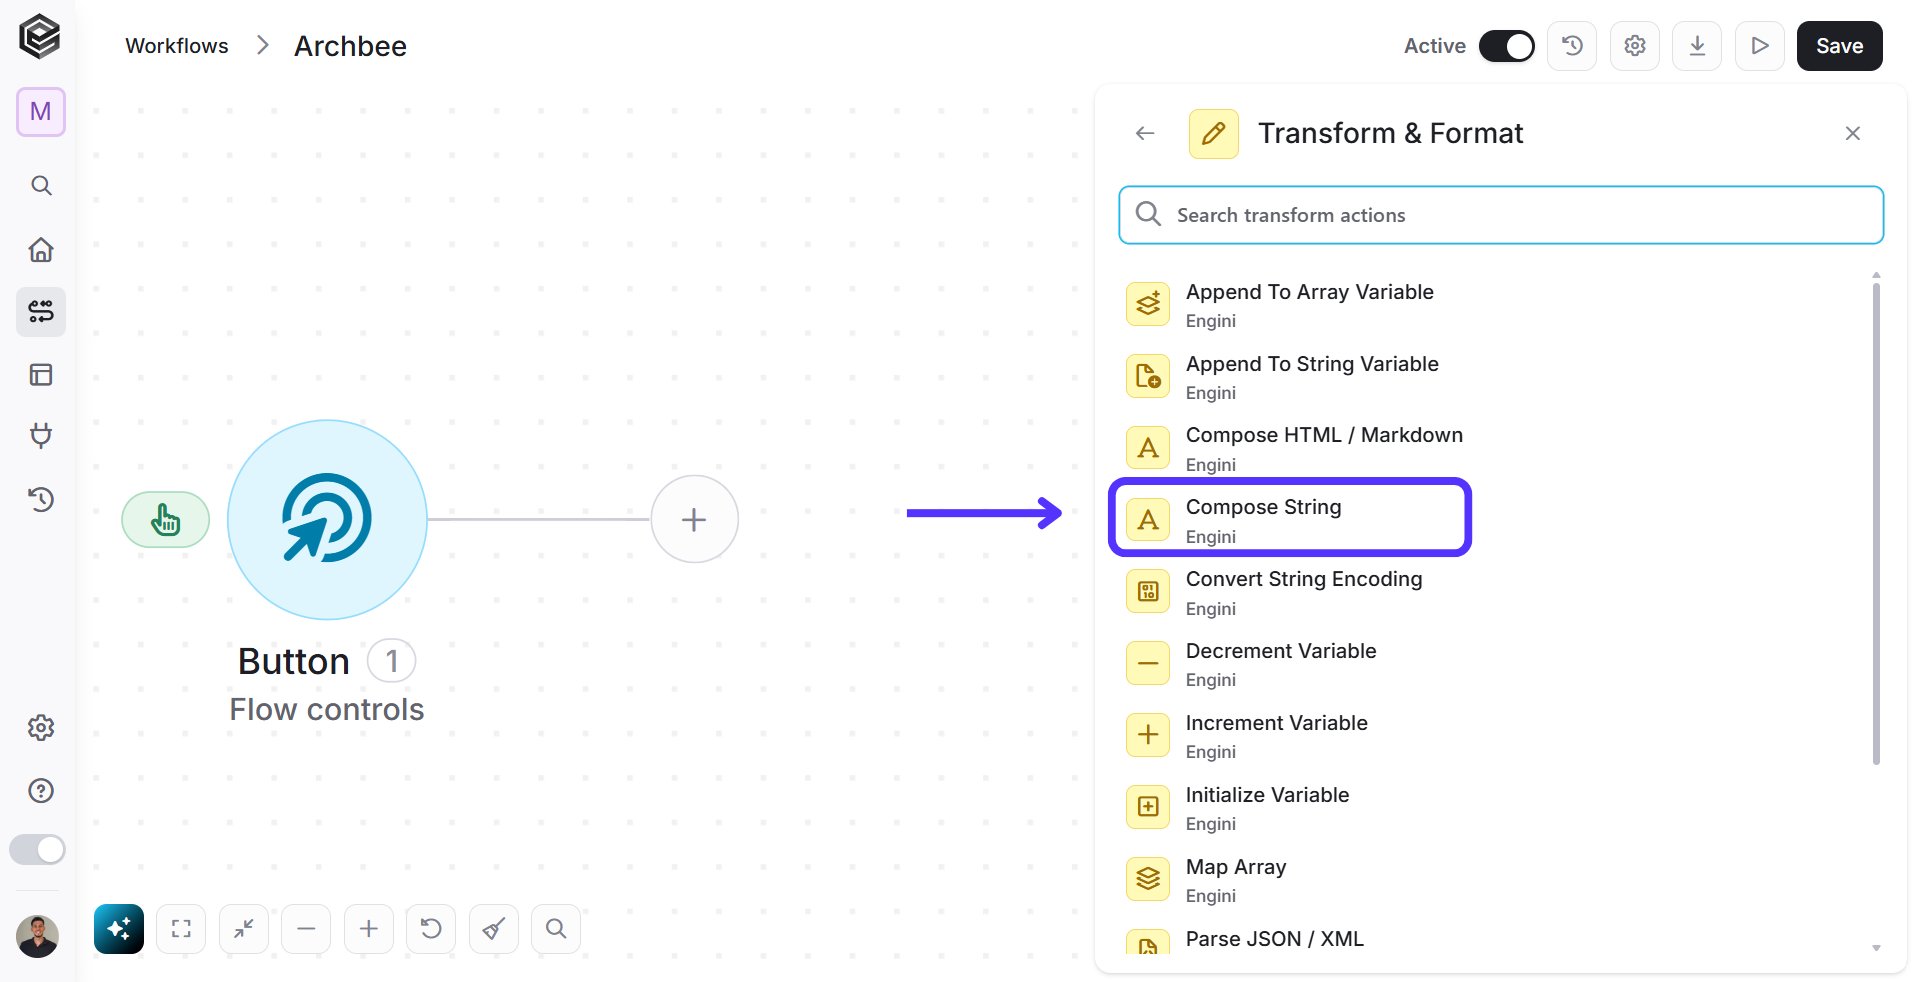 Follow the next steps to learn how to use this activity:
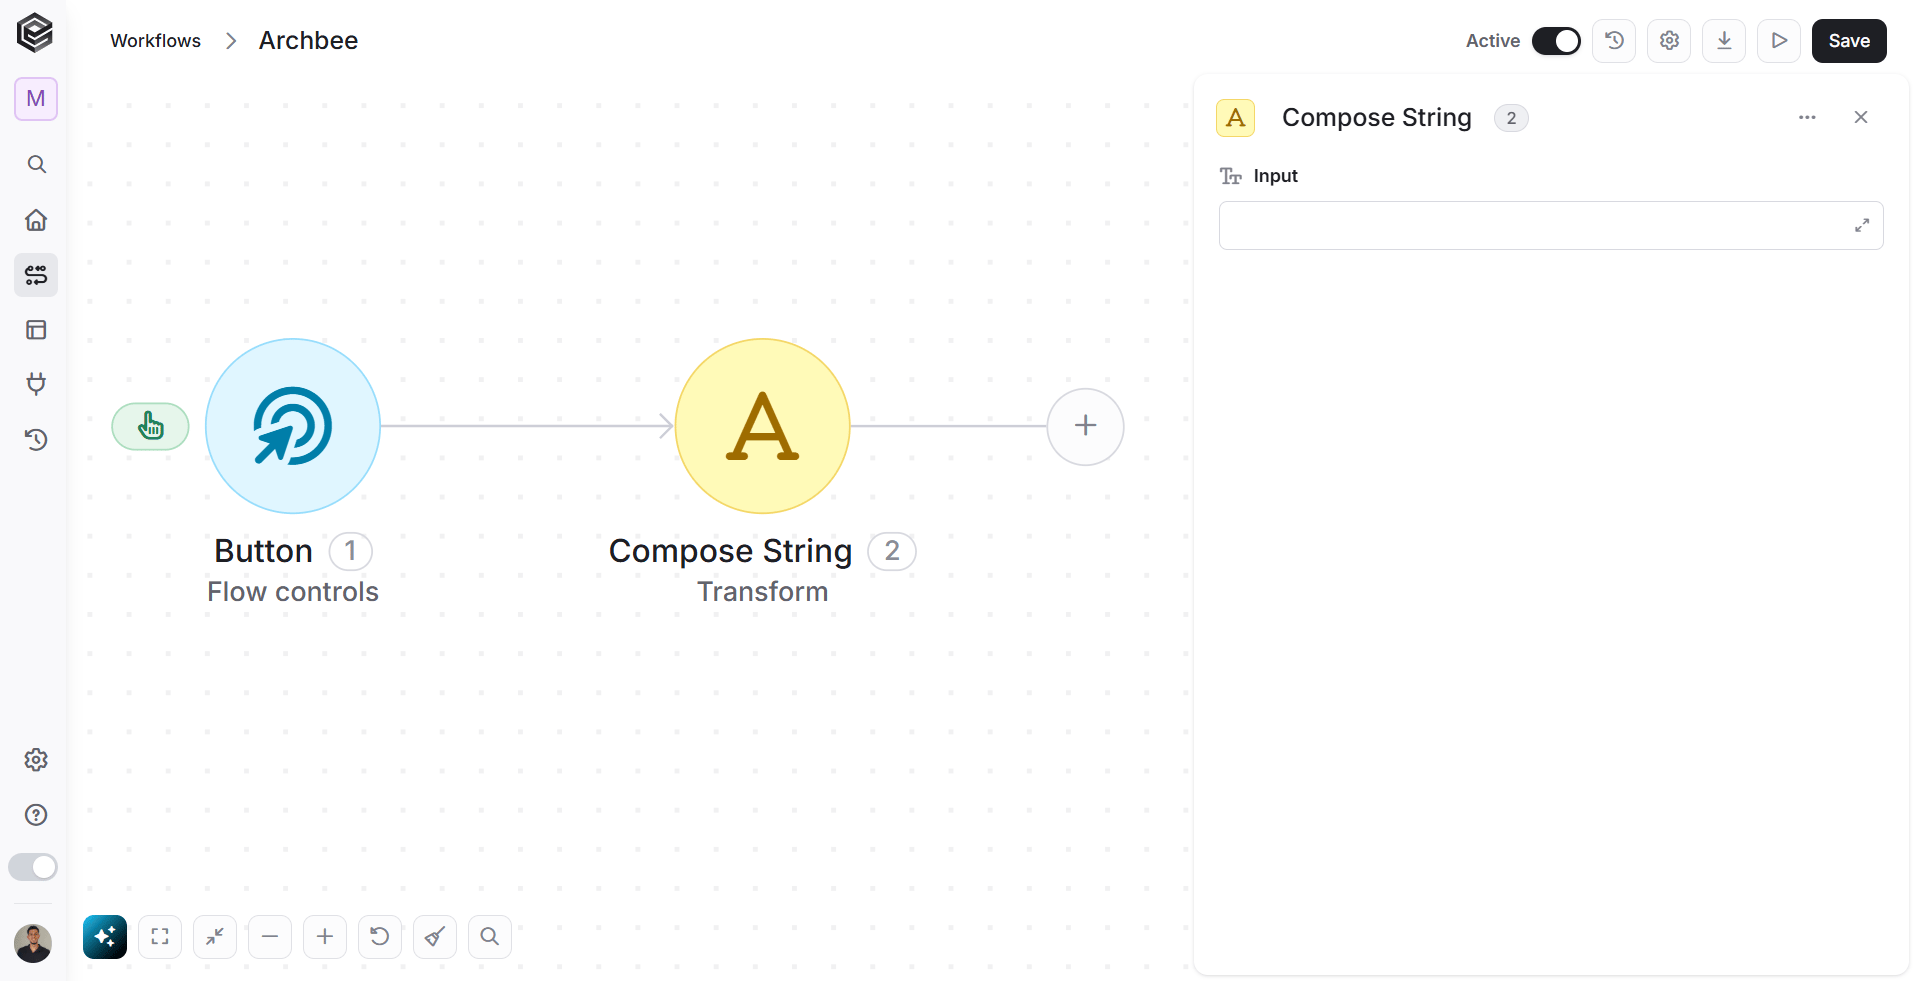 *Input-* Click the field to enter your text. You can type manual text or use the tooltip to insert dynamic variables (properties) from earlier activities.
## Compose Html/ Markdown
Compose HTML / Markdown activity allows you to combine text using HTML or Markdown syntax with dynamic data from previous workflow steps.
Choose the Transform & Format software and click on the “Compose HTML/ Markdown” action:
*Input-* Click the field to enter your text. You can type manual text or use the tooltip to insert dynamic variables (properties) from earlier activities.
## Compose Html/ Markdown
Compose HTML / Markdown activity allows you to combine text using HTML or Markdown syntax with dynamic data from previous workflow steps.
Choose the Transform & Format software and click on the “Compose HTML/ Markdown” action:
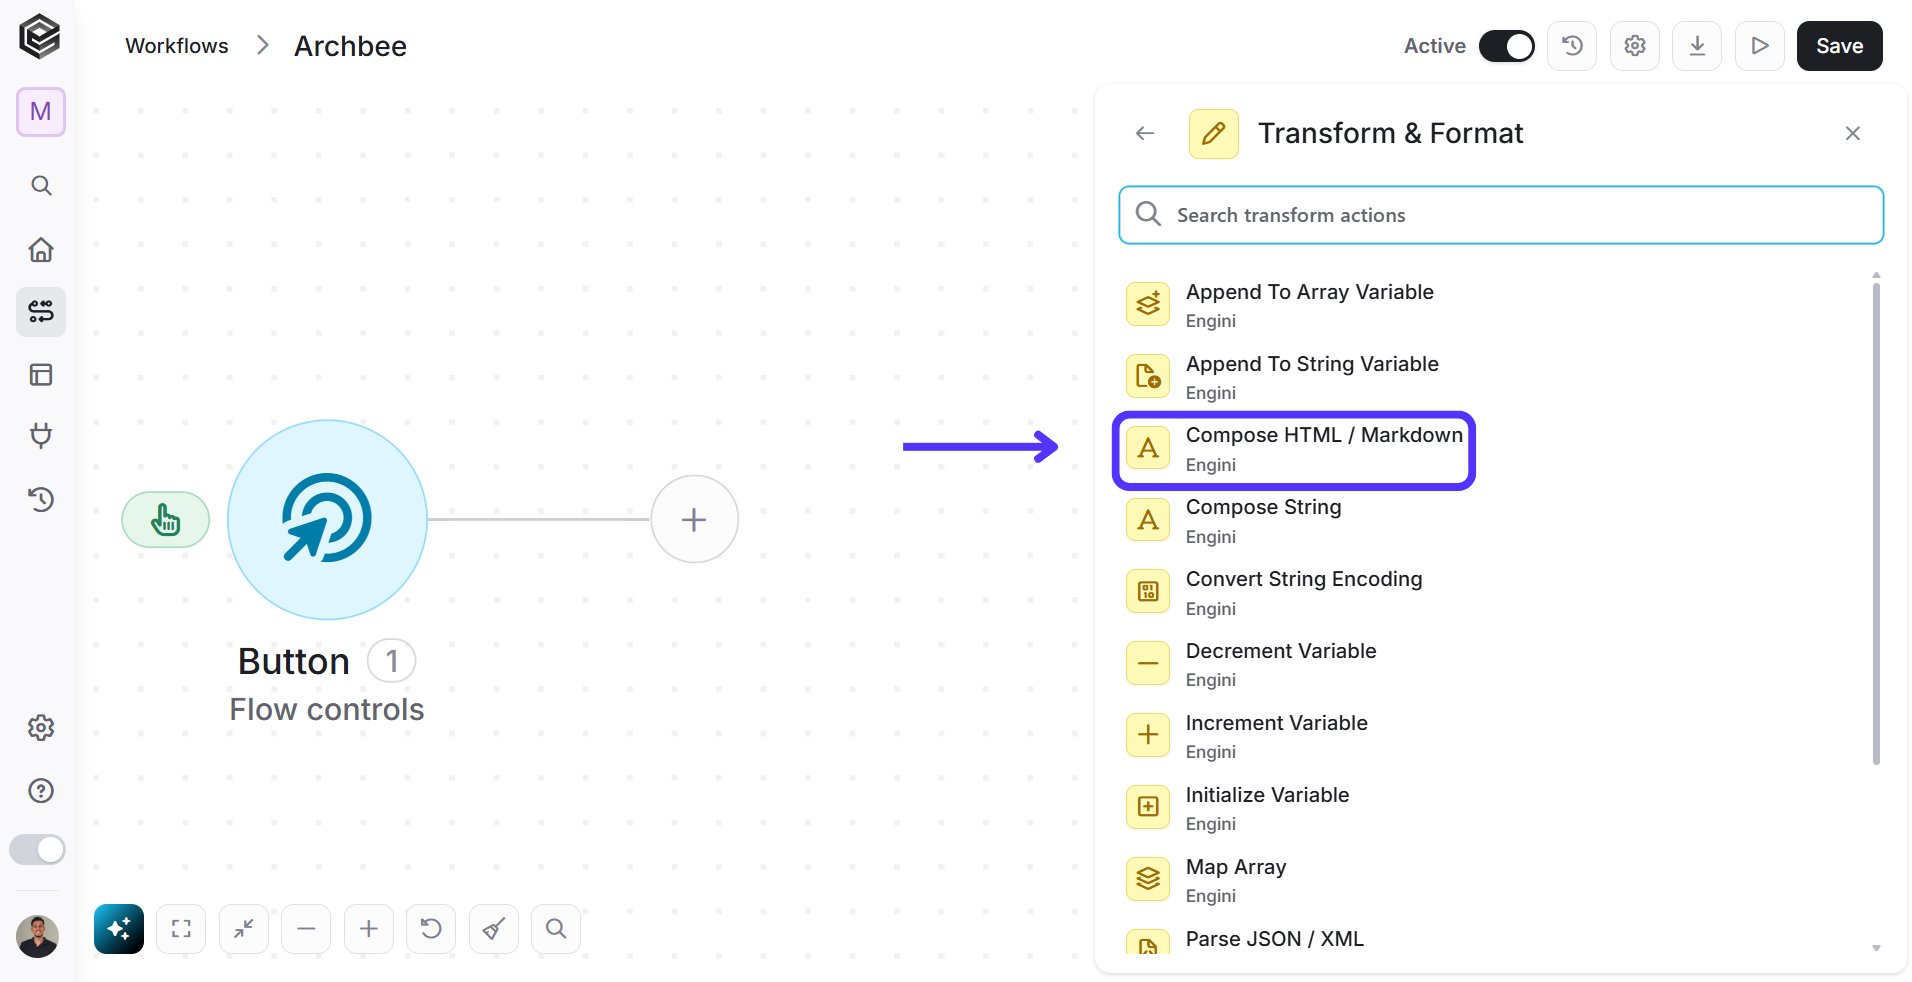 Follow the next steps to learn how to use this activity:
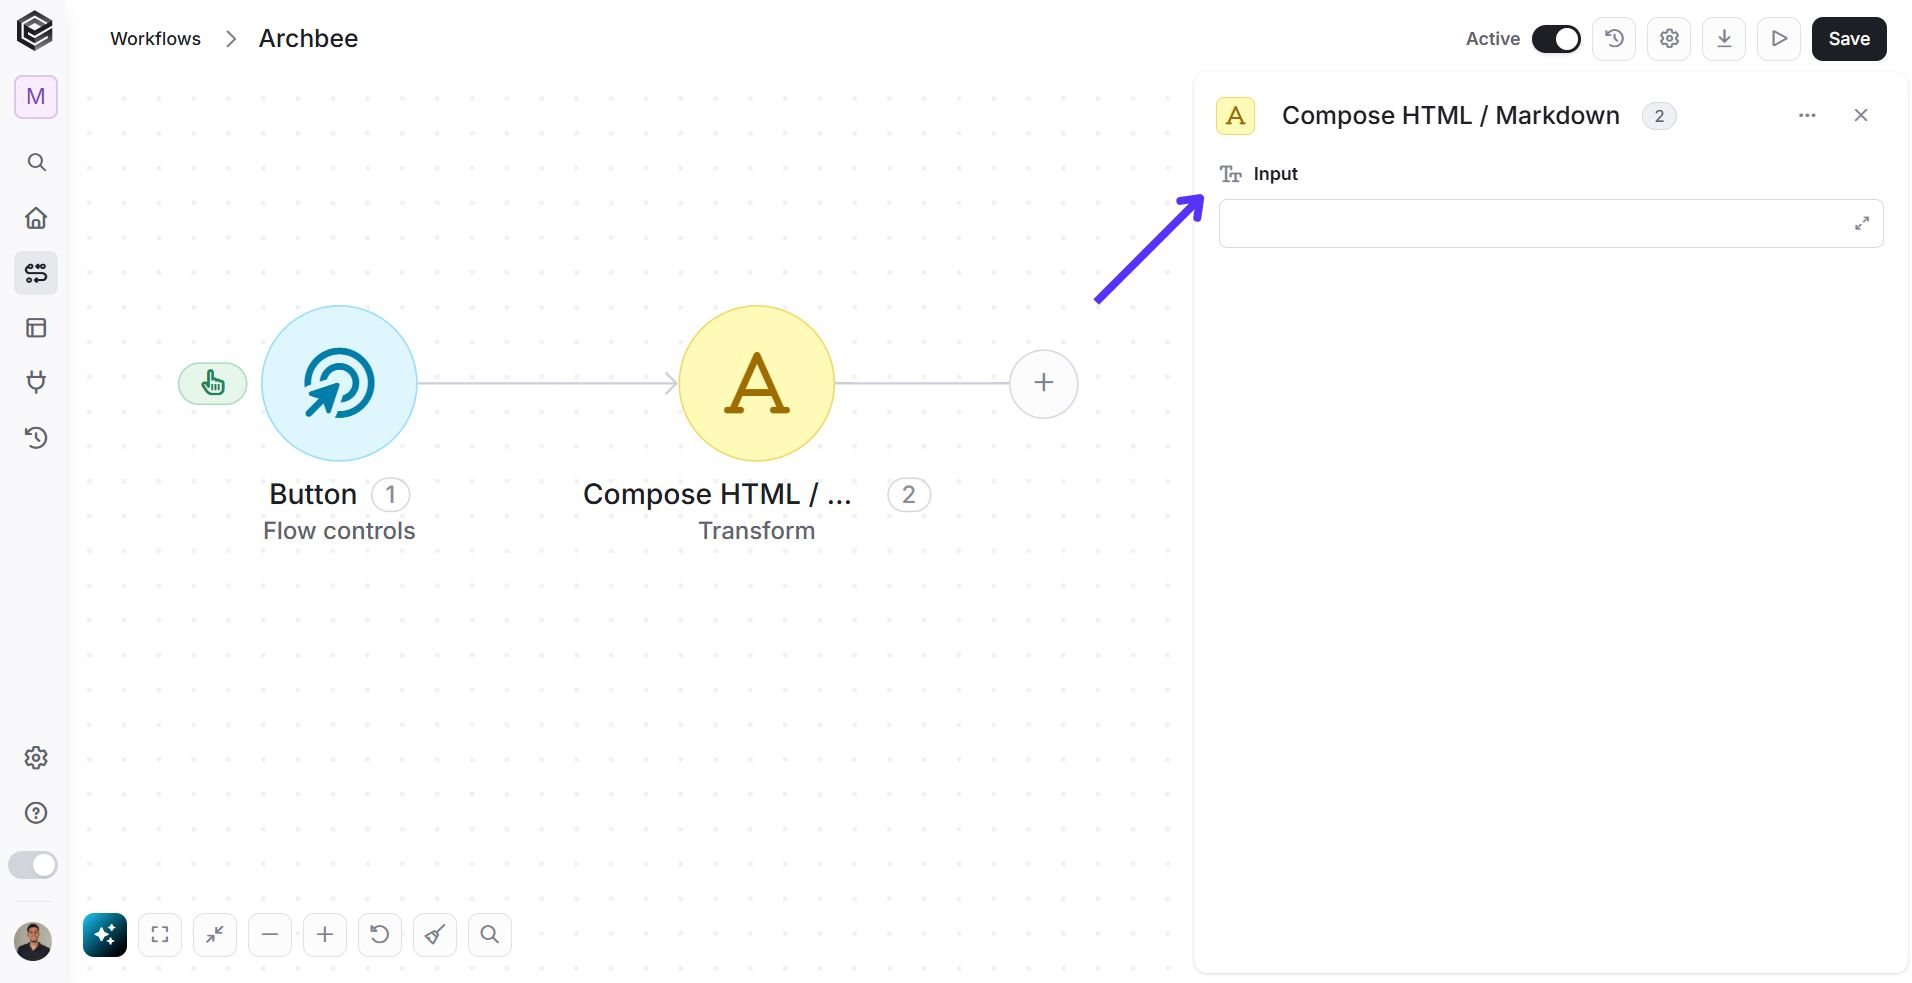 *Input - Press this field to edit your text.*
 This window is used to create and edit content in HTML or Markdown format, which can be inserted into the workflow.
1. *Code Editor -* Enable the Code Editor toggle if you want to edit the content using HTML or Markdown code.
* Keep the toggle **OFF** to use the visual editor and format your content with the toolbar.
* Turn the toggle **ON** to manually enter or modify HTML/Markdown code.
2. *Select Format -* Choose the format you want to use for your content:
* HTML – Select this option if you want to create content using HTML tags and advanced formatting.
* Markdown – Select this option if you want to write content using Markdown syntax.
3. *Content Editor -* Use the Content Editor to create and customize the content that will be displayed in your workflow. You can work in either Visual Editor mode or Code Editor mode, depending on how you want to create your content.
**Visual Editor Mode**
Enter and format your content directly in the editing area.
You can:
* Type your text directly into the editor.
* Use the toolbar to customize the appearance of your content:
* Change font style and size.
* Add colors and text formatting.
* Apply **bold**, *italic*, or underline styles.
* Create bullet points or numbered lists.
* Align your text.
* Add links or images.
* Use the Dynamic Content panel to insert information from previous steps in your workflow.
**Code Editor Mode**
Enable the Code Editor toggle to create or edit your content using HTML or Markdown code.
This window is used to create and edit content in HTML or Markdown format, which can be inserted into the workflow.
1. *Code Editor -* Enable the Code Editor toggle if you want to edit the content using HTML or Markdown code.
* Keep the toggle **OFF** to use the visual editor and format your content with the toolbar.
* Turn the toggle **ON** to manually enter or modify HTML/Markdown code.
2. *Select Format -* Choose the format you want to use for your content:
* HTML – Select this option if you want to create content using HTML tags and advanced formatting.
* Markdown – Select this option if you want to write content using Markdown syntax.
3. *Content Editor -* Use the Content Editor to create and customize the content that will be displayed in your workflow. You can work in either Visual Editor mode or Code Editor mode, depending on how you want to create your content.
**Visual Editor Mode**
Enter and format your content directly in the editing area.
You can:
* Type your text directly into the editor.
* Use the toolbar to customize the appearance of your content:
* Change font style and size.
* Add colors and text formatting.
* Apply **bold**, *italic*, or underline styles.
* Create bullet points or numbered lists.
* Align your text.
* Add links or images.
* Use the Dynamic Content panel to insert information from previous steps in your workflow.
**Code Editor Mode**
Enable the Code Editor toggle to create or edit your content using HTML or Markdown code.
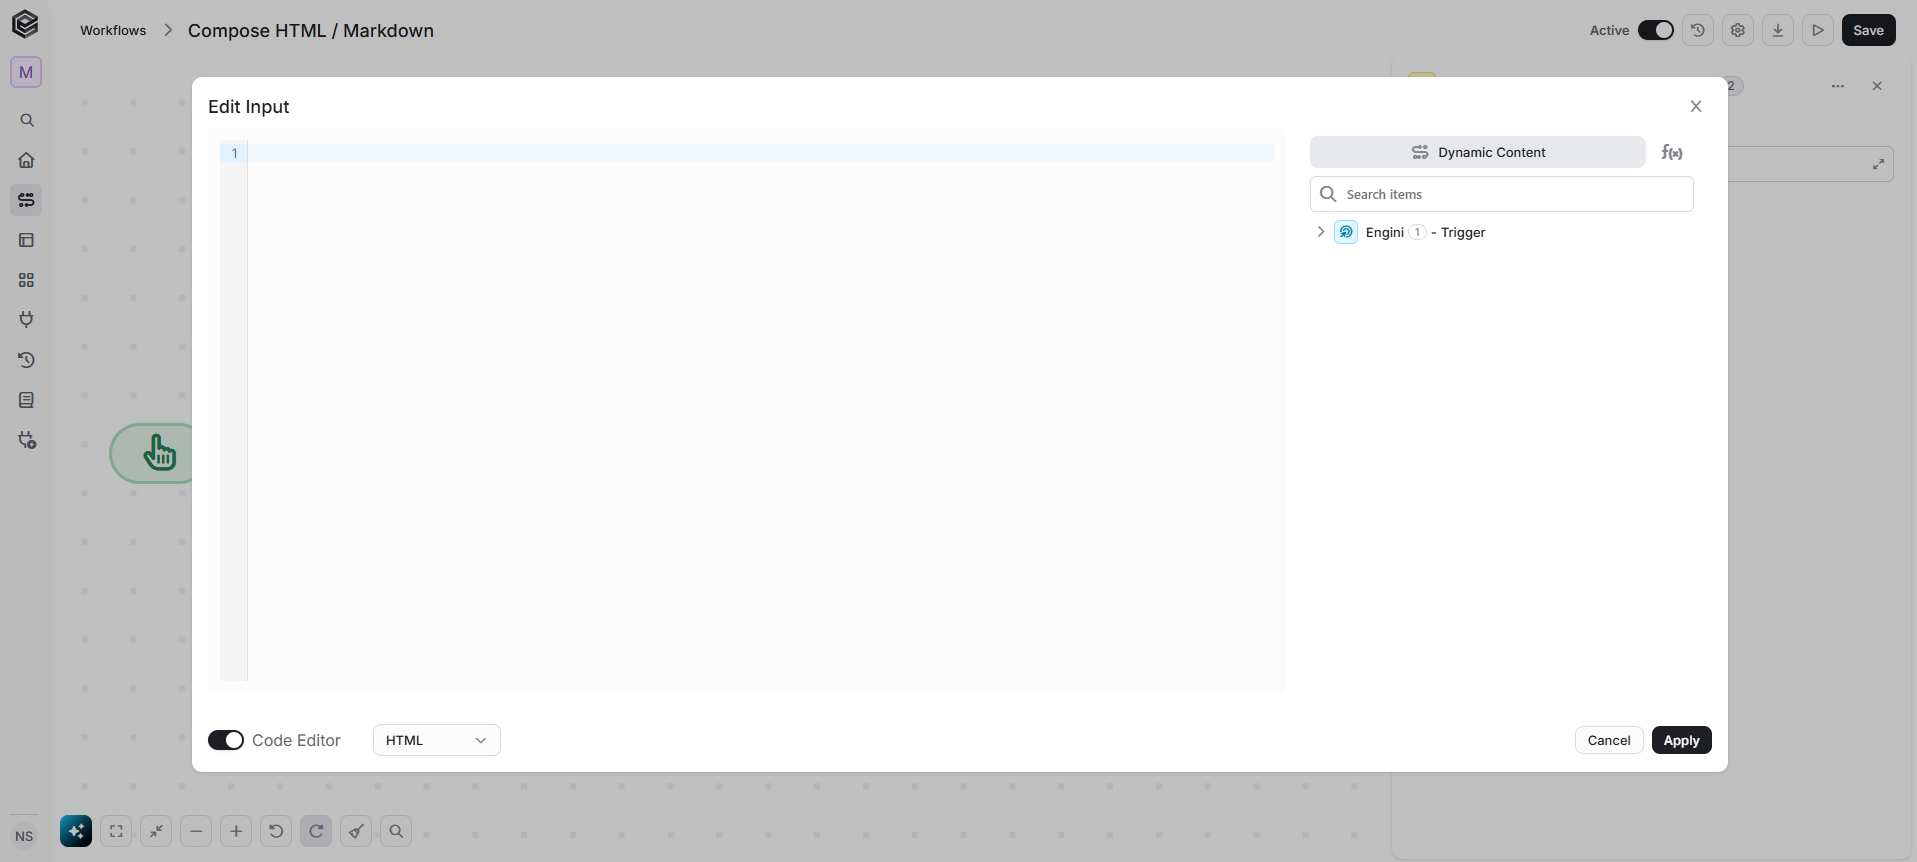 In this mode:
* Write or edit HTML or Markdown syntax.
* Add dynamic values from previous workflow steps.
* Modify existing content to match your workflow requirements.
1. *Cancel / Apply*
* Click Apply to save your changes and add the content to your workflow.
* Click Cancel if you want to exit without saving your changes.
### The difference between variables and when to use Construct
The construct simulates opening a note pad at runtime.
Variables can be initialized then repeatedly updated in your workflow. Construct doesn’t do the same thing. When you have a value that needs to be set once and accessed from anywhere within your flow below your ‘setting’ action, this is when to use a construct. Construct can only be set once, and cannot be changed after, until of course the flow is run again with new data.
## ReRun Workflow History
This action allows you to re-execute a previously completed workflow run using its history ID. It is typically used for troubleshooting, retrying failed runs, or replaying a past execution without manually triggering the entire process again.
In this mode:
* Write or edit HTML or Markdown syntax.
* Add dynamic values from previous workflow steps.
* Modify existing content to match your workflow requirements.
1. *Cancel / Apply*
* Click Apply to save your changes and add the content to your workflow.
* Click Cancel if you want to exit without saving your changes.
### The difference between variables and when to use Construct
The construct simulates opening a note pad at runtime.
Variables can be initialized then repeatedly updated in your workflow. Construct doesn’t do the same thing. When you have a value that needs to be set once and accessed from anywhere within your flow below your ‘setting’ action, this is when to use a construct. Construct can only be set once, and cannot be changed after, until of course the flow is run again with new data.
## ReRun Workflow History
This action allows you to re-execute a previously completed workflow run using its history ID. It is typically used for troubleshooting, retrying failed runs, or replaying a past execution without manually triggering the entire process again.
 1. *Workflow -* Click on the empty field, and a tooltip will appear with all the workflows linked to your project that has the button trigger.
Then, you can choose which one to run!
2. *History Id* - Provide the history ID or array of IDs that you want to rerun. To obtain the workflow history ID of the currently running workflow, you can use the “GetWorkflowHistoryId()” function.
3. *Next Step -* Click “Next Step” to add actions to your workflow. You can add multiple actions by clicking “Next Step” after each one. To finish, continue to the next step outside the current flow.
## Run Workflow
This action allows you to trigger another existing workflow from within the current flow. It is typically used to break complex processes into smaller workflows, reuse logic, or create modular automation structures.
1. *Workflow -* Click on the empty field, and a tooltip will appear with all the workflows linked to your project that has the button trigger.
Then, you can choose which one to run!
2. *History Id* - Provide the history ID or array of IDs that you want to rerun. To obtain the workflow history ID of the currently running workflow, you can use the “GetWorkflowHistoryId()” function.
3. *Next Step -* Click “Next Step” to add actions to your workflow. You can add multiple actions by clicking “Next Step” after each one. To finish, continue to the next step outside the current flow.
## Run Workflow
This action allows you to trigger another existing workflow from within the current flow. It is typically used to break complex processes into smaller workflows, reuse logic, or create modular automation structures.
 1. *Workflow* - Click on the empty field, and a tooltip will appear with all the workflows linked to your project that has the button trigger.
Now, you get to choose which one will be running!
2. *Add Field* - Click Add Field to add and populate additional fields for the selected activity. To learn more about managing activity data, [click here](/help/workflows/workflow-editor#add-fields).
3. *Next Step -* Click “Next Step” to add actions to your workflow. You can add multiple actions by clicking “Next Step” after each one. To finish, continue to the next step outside the current flow.
## Convert String Encoding
Choose the Transform & Format software and click on the “Convert String Encoding” action:
1. *Workflow* - Click on the empty field, and a tooltip will appear with all the workflows linked to your project that has the button trigger.
Now, you get to choose which one will be running!
2. *Add Field* - Click Add Field to add and populate additional fields for the selected activity. To learn more about managing activity data, [click here](/help/workflows/workflow-editor#add-fields).
3. *Next Step -* Click “Next Step” to add actions to your workflow. You can add multiple actions by clicking “Next Step” after each one. To finish, continue to the next step outside the current flow.
## Convert String Encoding
Choose the Transform & Format software and click on the “Convert String Encoding” action:
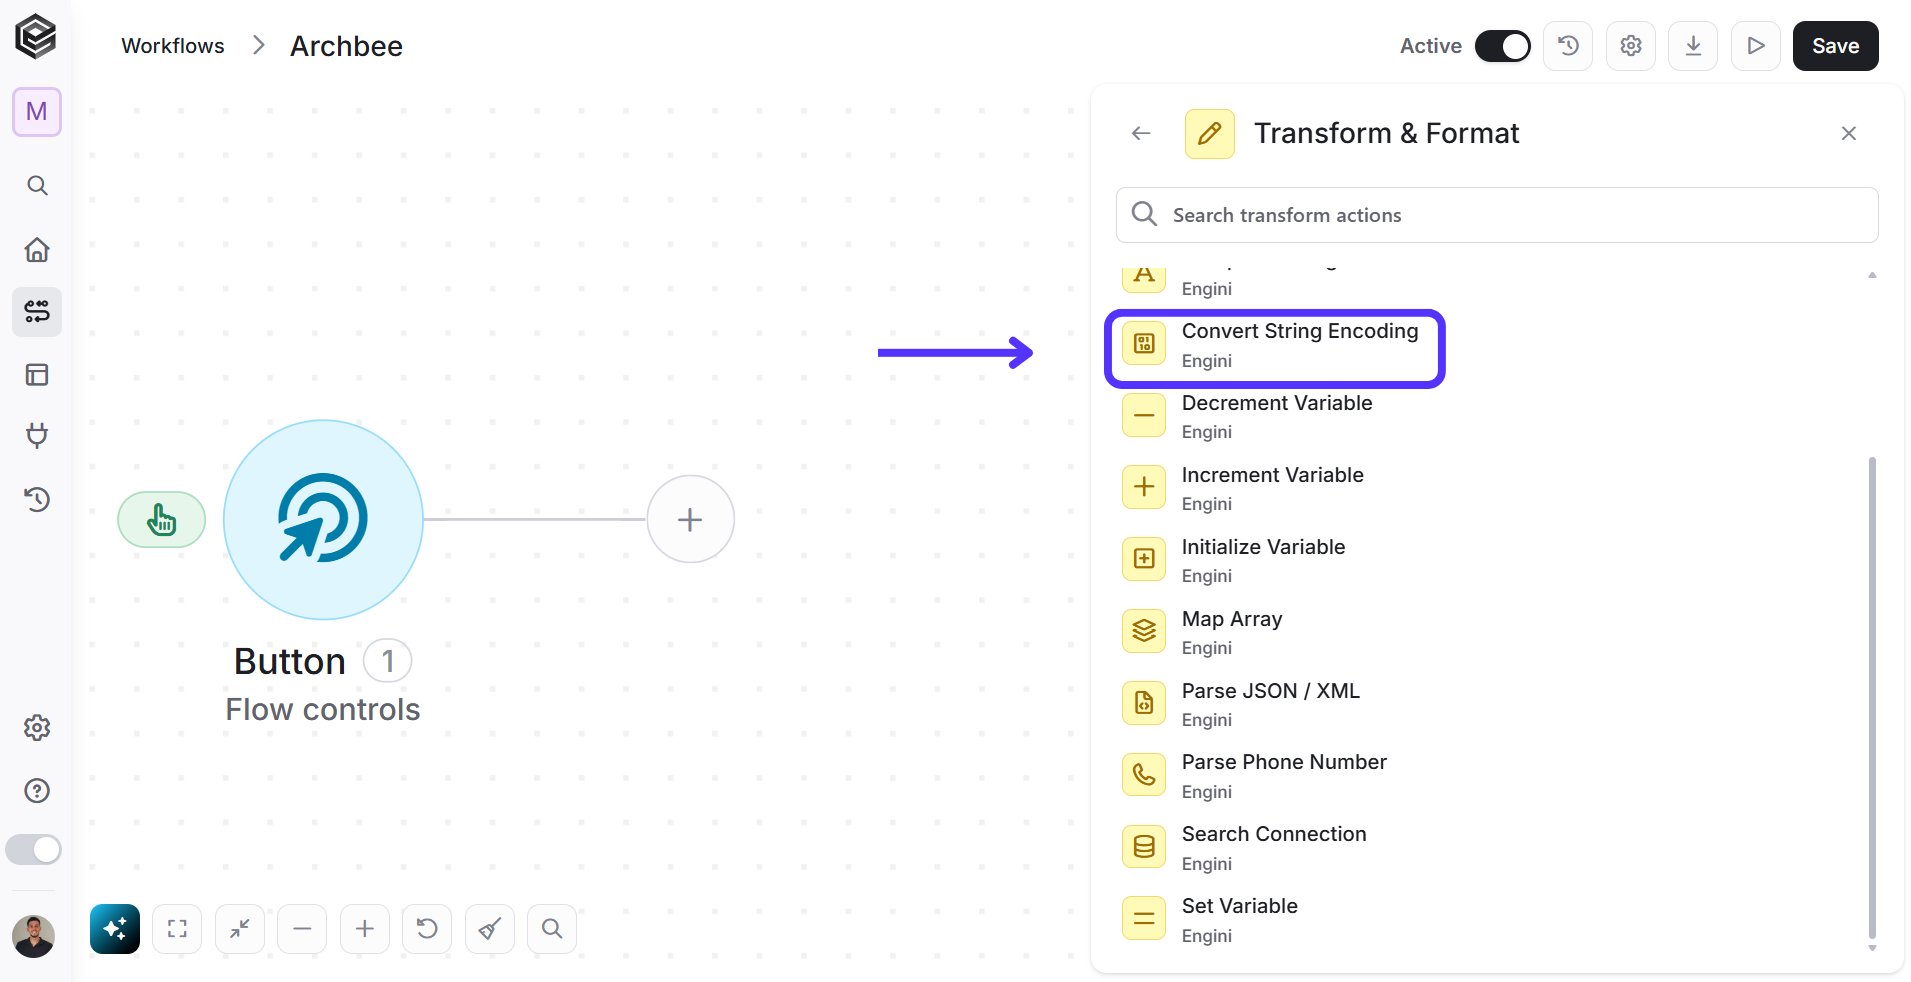 Follow the next steps to learn how to use this activity:
 1. *Input* - Enter a string you want to convert. If you have Base 64 and not a string, use the Base64ToString function.
2. *Input Encoding -* Click on the empty field and choose from the popup the encoding type.
3. *Output Encoding -* Click on the empty field and choose from the popup the encoding type.
## Parse JSON / XML
Choose the Transform & Format software and click on the “Parse JSON/XML” action:
1. *Input* - Enter a string you want to convert. If you have Base 64 and not a string, use the Base64ToString function.
2. *Input Encoding -* Click on the empty field and choose from the popup the encoding type.
3. *Output Encoding -* Click on the empty field and choose from the popup the encoding type.
## Parse JSON / XML
Choose the Transform & Format software and click on the “Parse JSON/XML” action:
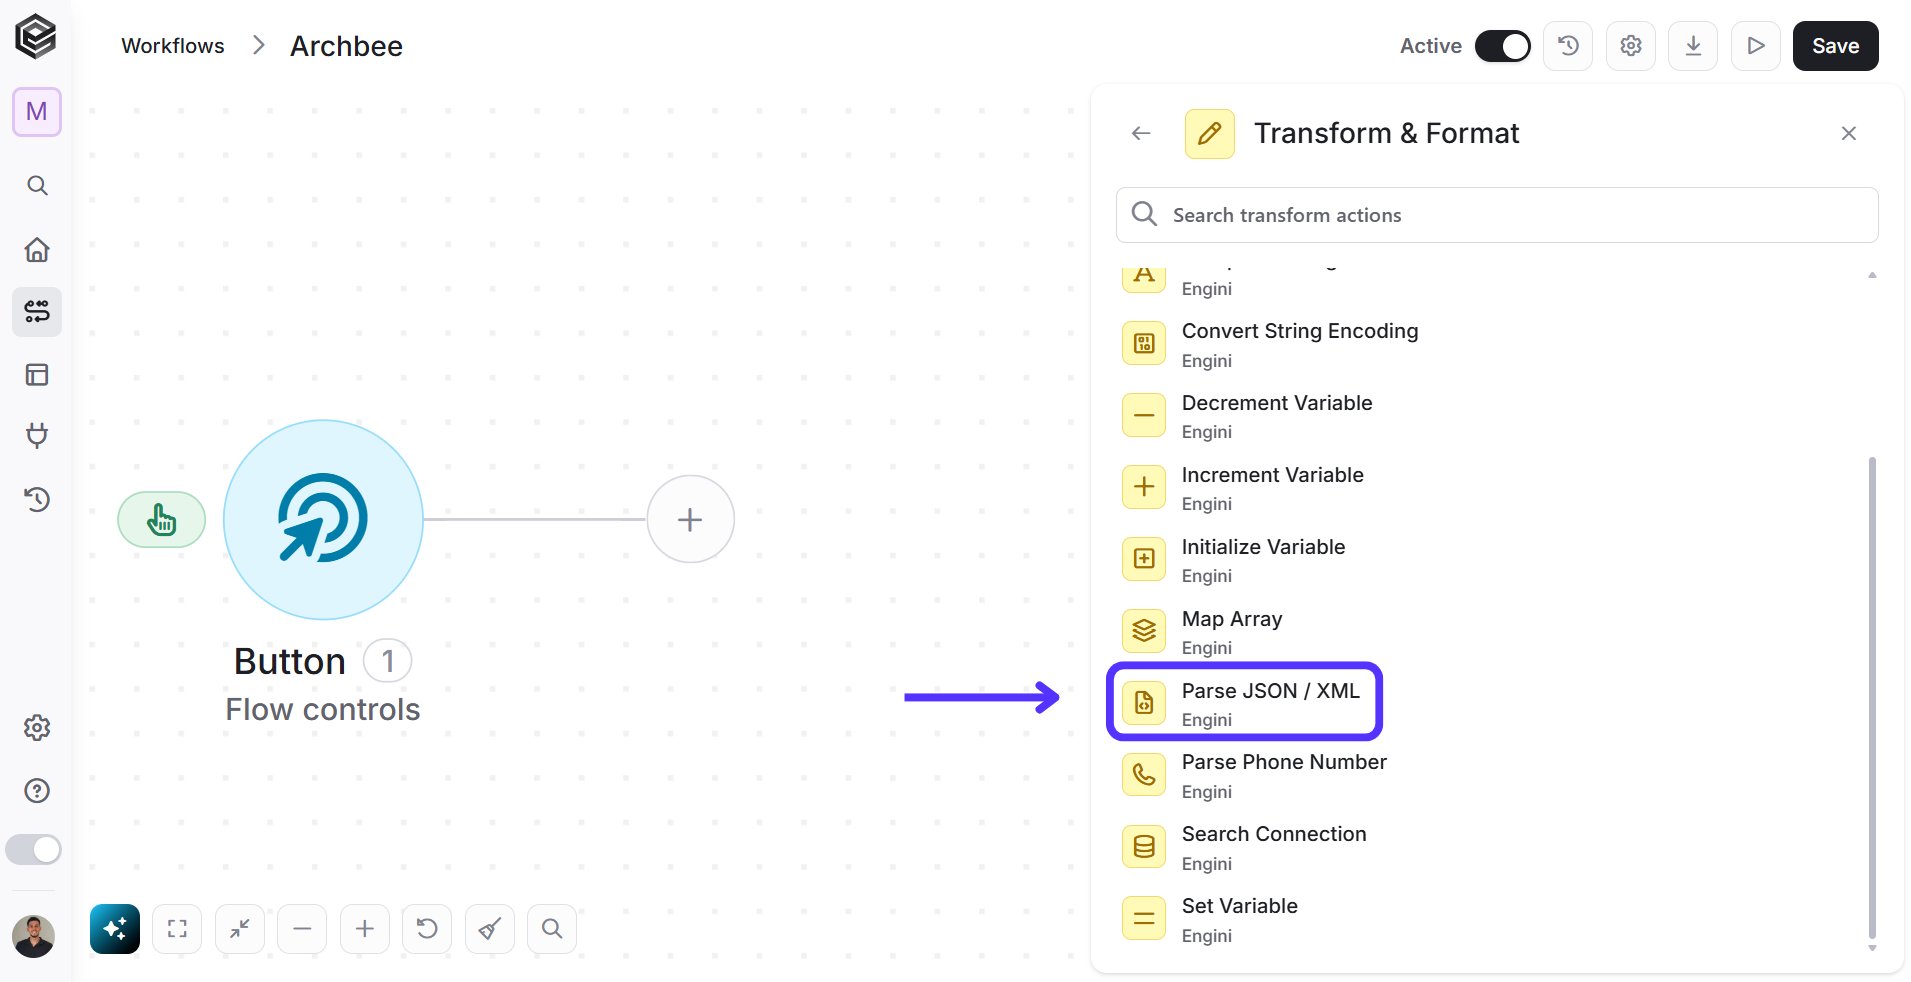 Follow the next steps to learn how to use this activity:
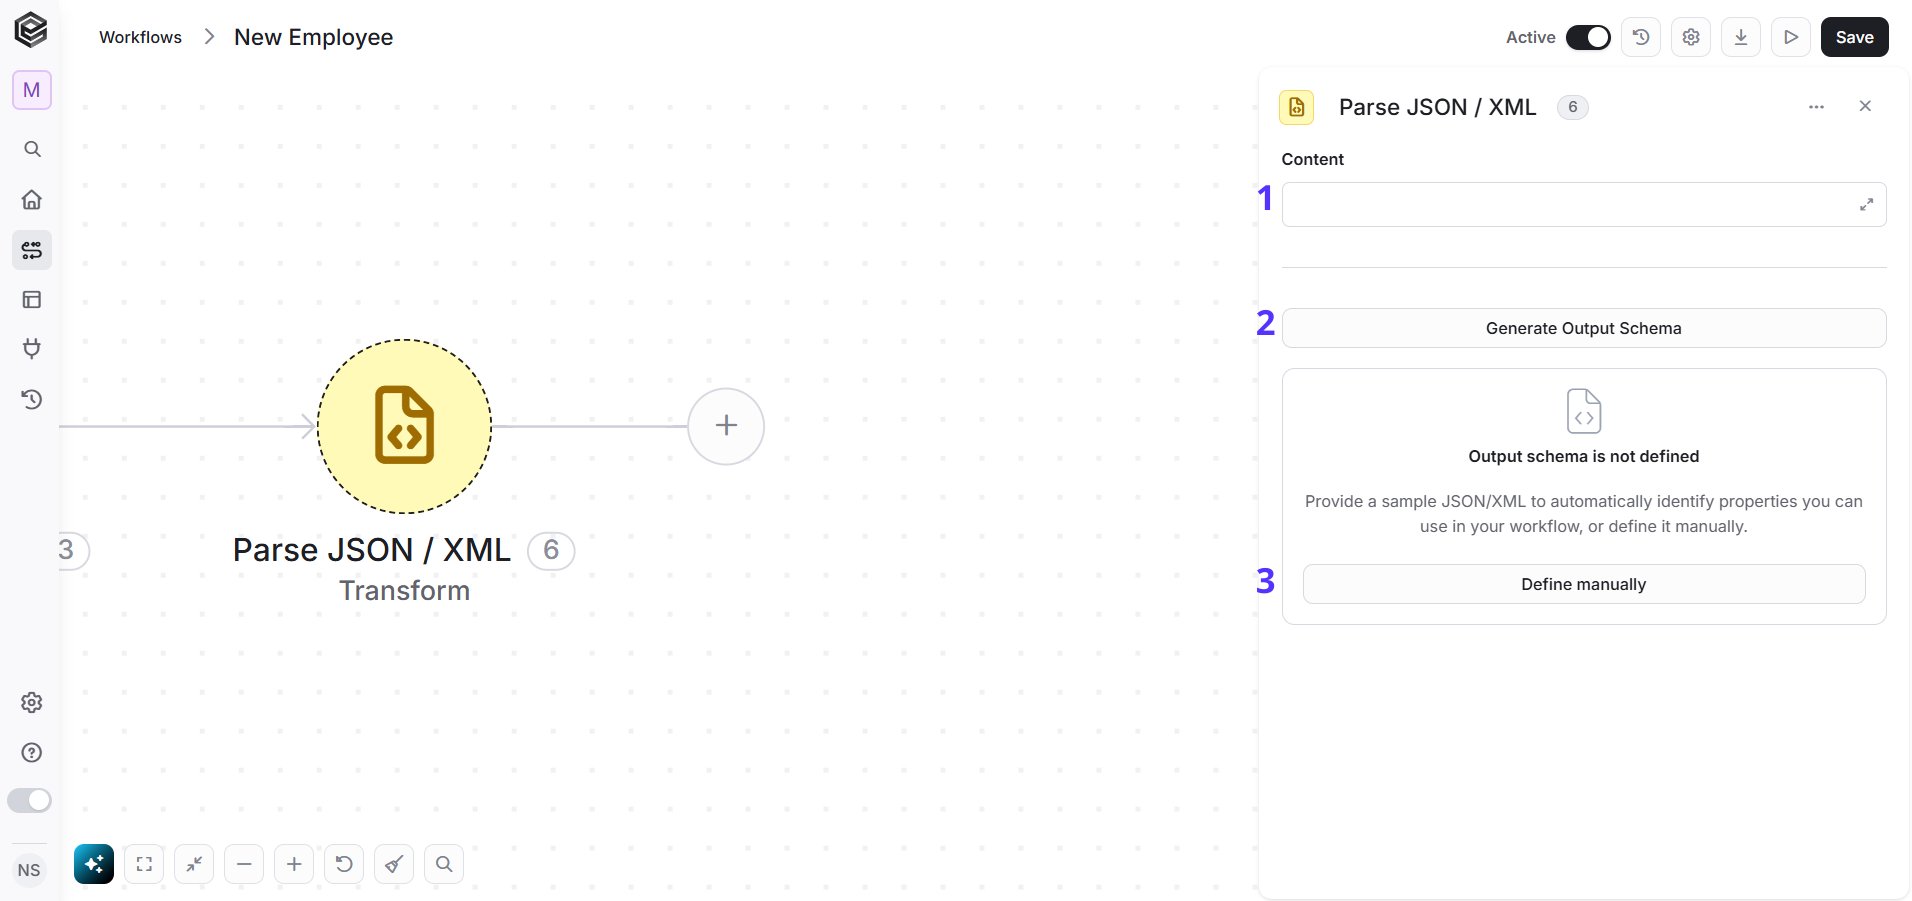 1. *Content* - Click on the empty field and the tooltip will pop up showing contents from the previous activities which you can choose to parse.
2. *Generate Output Schema -* Click on it to generate structure.
1. *Content* - Click on the empty field and the tooltip will pop up showing contents from the previous activities which you can choose to parse.
2. *Generate Output Schema -* Click on it to generate structure.
 1. *JSON/XML Payload -* is where you paste a valid JSON sample. The system uses it to automatically generate the data structure. It must be formatted correctly for the mapping to work.
2. *Format Field Description* - This feature capitalizes the first letter of each field and removes unnecessary characters, such as the underscore (“\_”).
3. *Map Dictionary* - If your JSON is structured as a dictionary, you can parse it as key-value pairs. This makes it easier to loop through each entry and access the data you need. Each key-value pair includes a key (the name or identifier) and a value (the data associated with that key).
4. *Apply*- Click on it to save the changes.
**You can now add fields on your own!**
1. *JSON/XML Payload -* is where you paste a valid JSON sample. The system uses it to automatically generate the data structure. It must be formatted correctly for the mapping to work.
2. *Format Field Description* - This feature capitalizes the first letter of each field and removes unnecessary characters, such as the underscore (“\_”).
3. *Map Dictionary* - If your JSON is structured as a dictionary, you can parse it as key-value pairs. This makes it easier to loop through each entry and access the data you need. Each key-value pair includes a key (the name or identifier) and a value (the data associated with that key).
4. *Apply*- Click on it to save the changes.
**You can now add fields on your own!**
 *Add Field-* Customize your Output Schema and add your own fields and be more precise with your goal and result. Follow the steps to build the field:
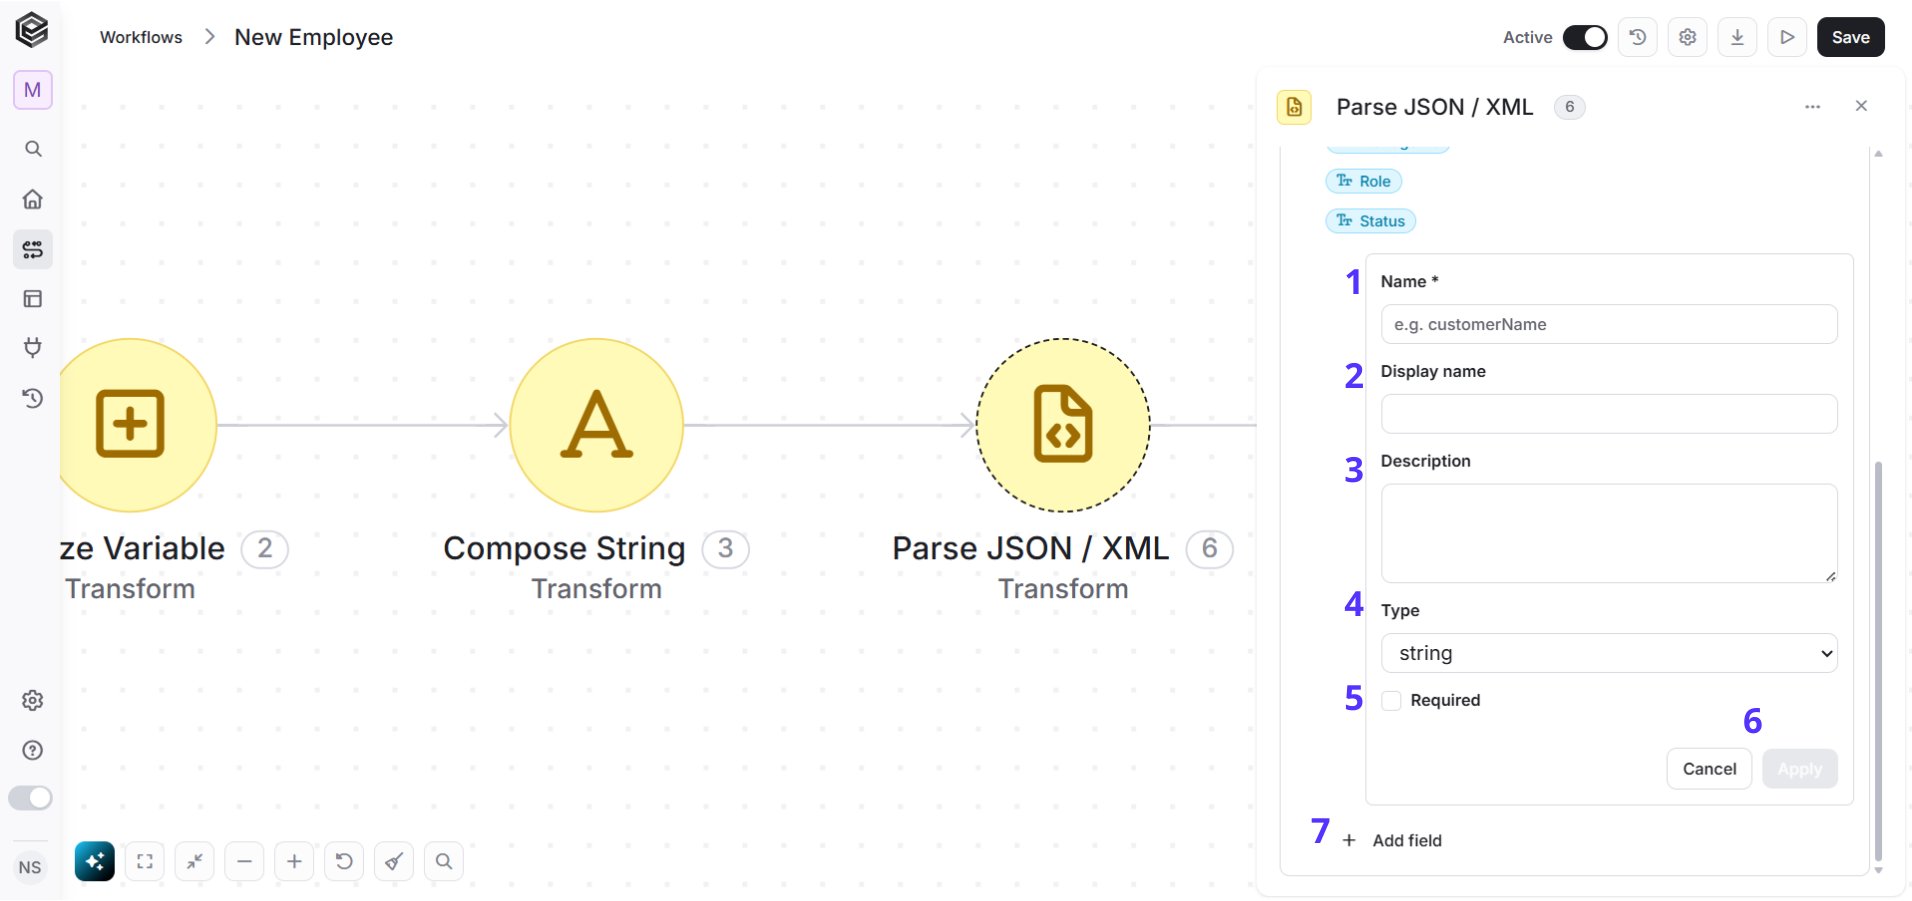 1. *Name-* Choose a unique name.
2. *Display name*- The name that will be shown to users inside the workflow and dynamic mapping fields.
3. *Description*- Additional context for the AI tool about the purpose of the field and the expected value. Helps the AI understand how and when to use this field dynamically during workflow execution.
4. *Type*- Defines the data type of the field.
5. *Required -* Determines whether the field is mandatory. If enabled, users must provide a value for this field before the workflow can run.
6. *Apply*- Saves and applies the current field.
7. Repeat 1-6 to populate more fields.
2. *Define manually-* is exactly where you can see the structure of your JSON. It visually displays the "skeleton" of your data showing the hierarchy and data types (like String, Number, or Collection) confirming that the system understands the JSON so you can use its data in the next steps.
## Parse Phone Number
This action helps you standardize phone numbers.
Choose the Transform & Format software and click on the “Parse Phone Number” action:
1. *Name-* Choose a unique name.
2. *Display name*- The name that will be shown to users inside the workflow and dynamic mapping fields.
3. *Description*- Additional context for the AI tool about the purpose of the field and the expected value. Helps the AI understand how and when to use this field dynamically during workflow execution.
4. *Type*- Defines the data type of the field.
5. *Required -* Determines whether the field is mandatory. If enabled, users must provide a value for this field before the workflow can run.
6. *Apply*- Saves and applies the current field.
7. Repeat 1-6 to populate more fields.
2. *Define manually-* is exactly where you can see the structure of your JSON. It visually displays the "skeleton" of your data showing the hierarchy and data types (like String, Number, or Collection) confirming that the system understands the JSON so you can use its data in the next steps.
## Parse Phone Number
This action helps you standardize phone numbers.
Choose the Transform & Format software and click on the “Parse Phone Number” action:
 Follow the next steps to learn how to use this activity:
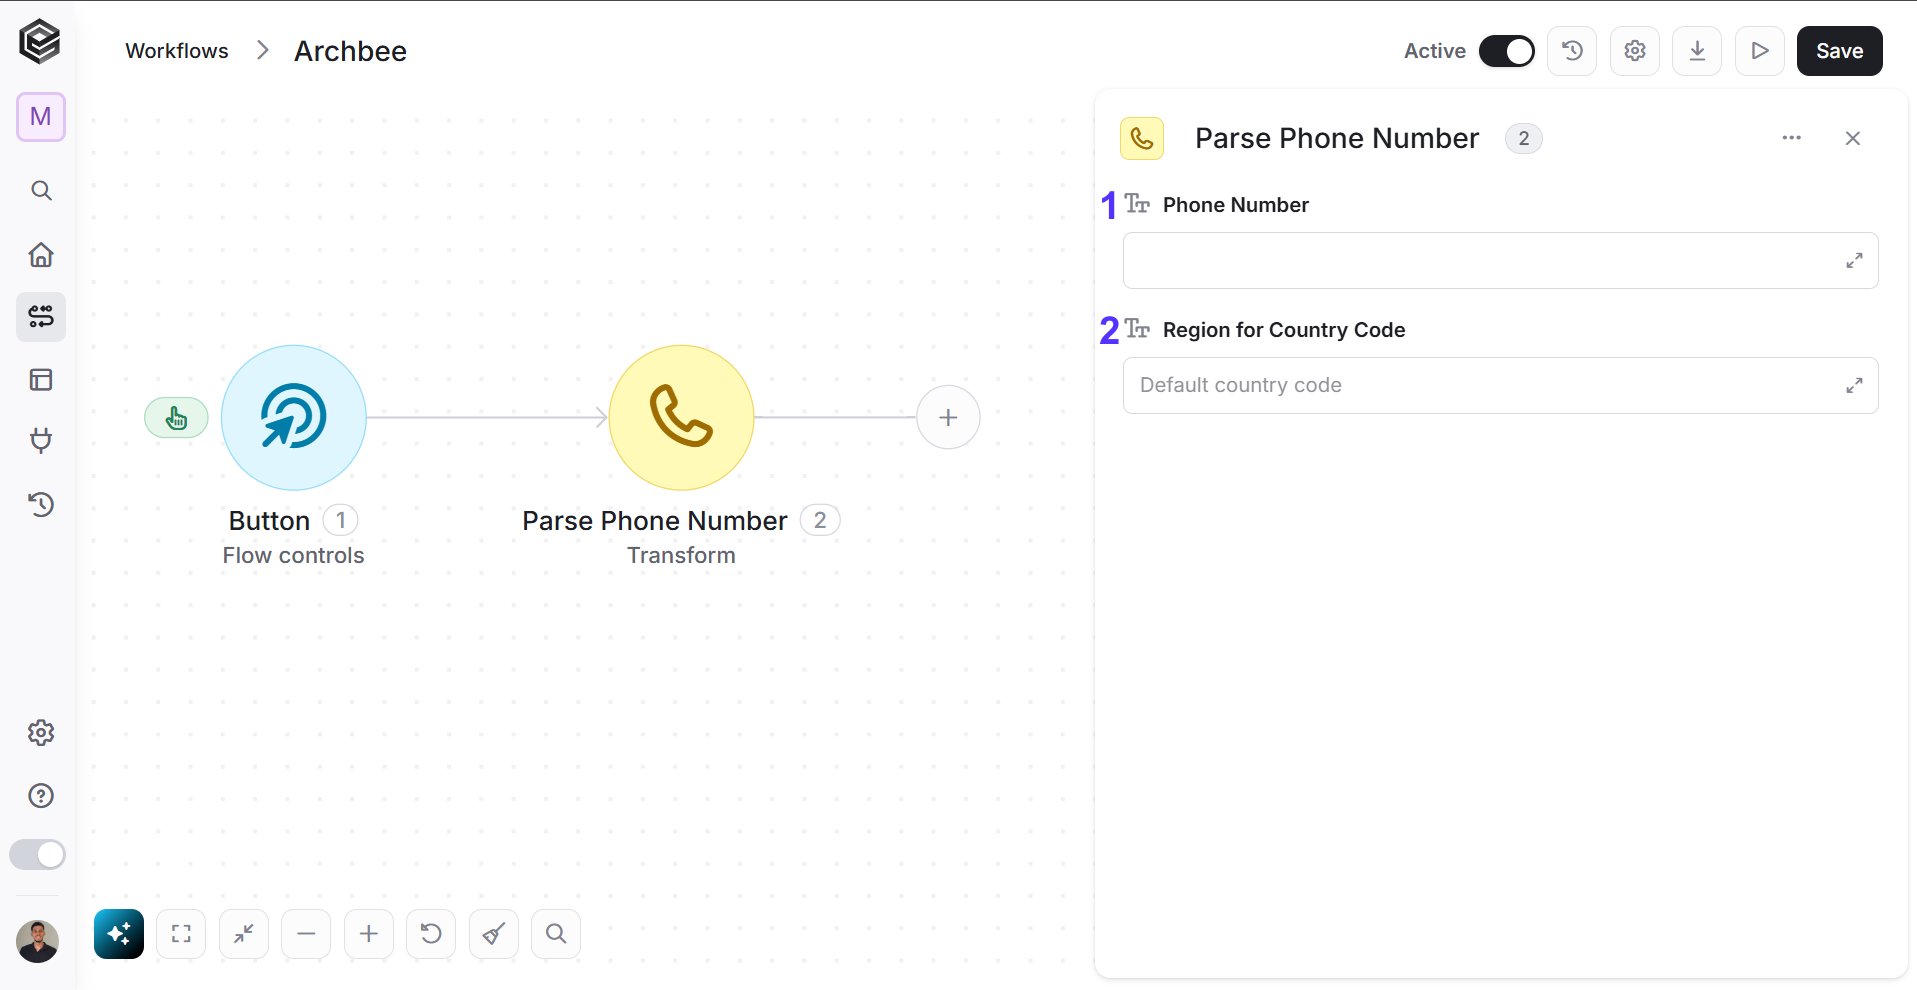 1. *Phone Number -* Enter the phone number you want to check or clean.
2. *Region for Country Code -* This field defines the country or region context used to interpret the phone number correctly.
1. *Phone Number -* Enter the phone number you want to check or clean.
2. *Region for Country Code -* This field defines the country or region context used to interpret the phone number correctly.
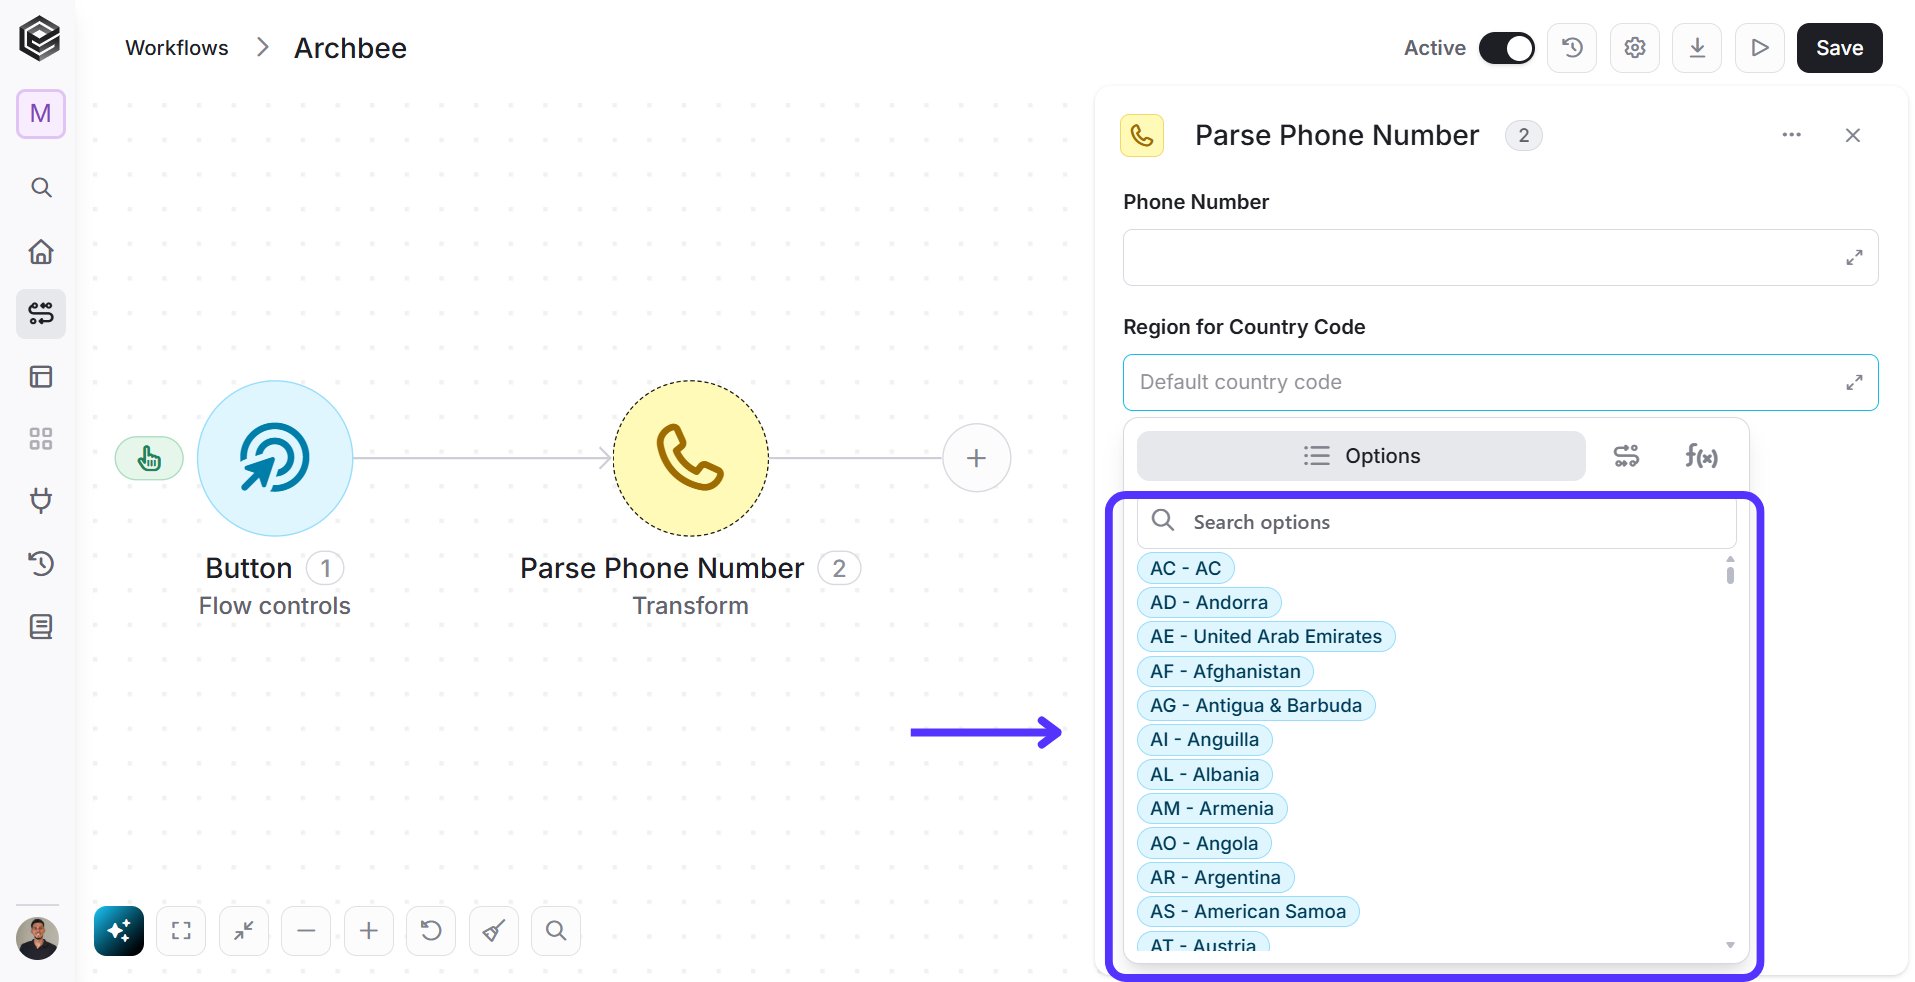 * Click on the empty field and the tooltip will pop up showing all the available country codes.
* Select the option that matches your desired country or region.
## Display Web Page
This action displays a custom web page to the user, using the values provided in the Header, Body, and Footer fields.
The action is triggered by a webhook (for example, when a customer clicks a specific button), and then the corresponding **Display Web Page** is shown to the customer with the provided details.
* Click on the empty field and the tooltip will pop up showing all the available country codes.
* Select the option that matches your desired country or region.
## Display Web Page
This action displays a custom web page to the user, using the values provided in the Header, Body, and Footer fields.
The action is triggered by a webhook (for example, when a customer clicks a specific button), and then the corresponding **Display Web Page** is shown to the customer with the provided details.
 1. *Header –* The main title or message displayed at the top of the page. Use this field to grab the user’s attention or confirm the purpose of the page (e.g., “Submission Received”).
2. *Body –* The main content area of the page. This is where you provide detailed information, instructions, or confirmation messages (e.g., “Thank you for your submission. We will contact you soon.”).
3. *Footer* – The text shown at the bottom of the page. Typically used for additional notes, support contact details (e.g., “If you have questions, contact [support@example.com](mailto:support@example.com)”).
### Steps
1. Click the empty field to open a window where you can enter your value.
2. Enter the value you want to display on the web, and use the toolbar to apply formatting such as bold, italic, underline, alignment, and more.
You can also add :
* Property value from a previous activity (Using the tooltip that opens when clicking on the field).
* Expression – using functions and/or Previous activity properties and/or static values (Using the tooltip that opens when clicking on the field).
To learn more about Functions [click here.](/help/tools/enginis-functions#logical-functions)
1. *Header –* The main title or message displayed at the top of the page. Use this field to grab the user’s attention or confirm the purpose of the page (e.g., “Submission Received”).
2. *Body –* The main content area of the page. This is where you provide detailed information, instructions, or confirmation messages (e.g., “Thank you for your submission. We will contact you soon.”).
3. *Footer* – The text shown at the bottom of the page. Typically used for additional notes, support contact details (e.g., “If you have questions, contact [support@example.com](mailto:support@example.com)”).
### Steps
1. Click the empty field to open a window where you can enter your value.
2. Enter the value you want to display on the web, and use the toolbar to apply formatting such as bold, italic, underline, alignment, and more.
You can also add :
* Property value from a previous activity (Using the tooltip that opens when clicking on the field).
* Expression – using functions and/or Previous activity properties and/or static values (Using the tooltip that opens when clicking on the field).
To learn more about Functions [click here.](/help/tools/enginis-functions#logical-functions)
 3. When you’re done, click save.
 This documentation is built and hosted on [Mintlify](https://mintlify.com), a developer documentation platform.