> ## Documentation Index
> Fetch the complete documentation index at: https://docs.engini.ai/llms.txt
> Use this file to discover all available pages before exploring further.
# Table Automations
Take your work tables a step further with our automations!
Every automation starts with a trigger and includes one or more actions. Whenever a trigger occurs, an action is initiated.
Within a table, automation can be activated in response to a range of triggers, including record creation, record update, and record deletion. These triggers enable you to automate specific tasks, ensuring that your data and processes remain consistent.
**Note:** Prior to automating the fields in the table, it is necessary to create a workbook and table.
To learn how to create a workbook, [click here.](/help/tables/create-folderstables#create-a-table)
To learn how to build tables, check out the following links: [Columns](/help/tables/build-a-table#create-columns), [Records](/help/tables/tables-records)
## Add new Automation
Inside a table click on ‘Automations’ in the right side of the workbook page.
Click on "*New Automation*" to create your own automation for your table.
**Note**: If its your first automation you have two button to click on for a fresh new automation.
## Build your Automation
### Step 1: Choose a Trigger
The first step in building your automation is to add a trigger. A trigger is the event that initiates the process, and it occurs only once each time an automation begins.
From the workflow that opened press the '+' to choose your trigger.
Choose the trigger you want to start with. More explanations down below.
## Triggers
### On record creation
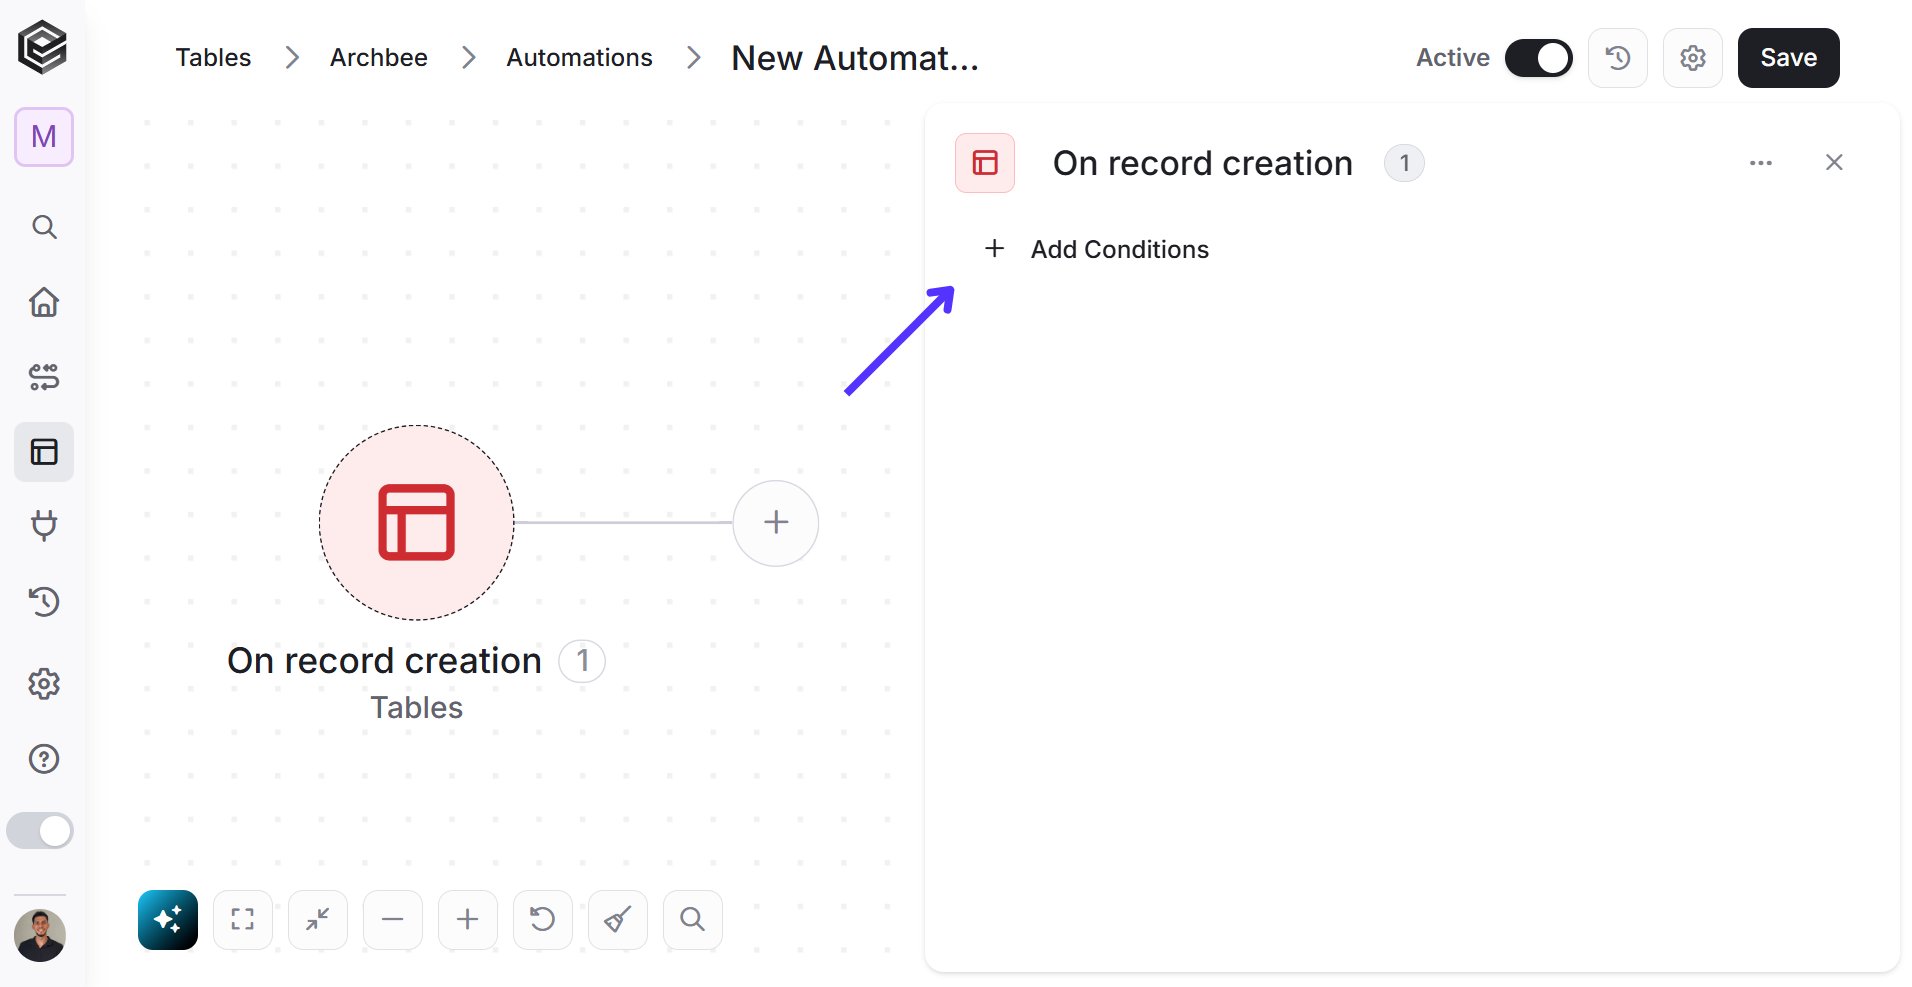
Automation is initiated when a new record is generated, resulting in the execution of one or more actions. You can also include a condition in the trigger, ensuring that the process only activates if this condition is satisfied.
* *Add Conditions -* Click Add Conditions to define conditions that narrow down the data list and return only the relevant items. To learn more about using filters, [click here](/help/workflows/workflow-editor#add-conditions).
### On record deleted
Automation is initiated when a record is deleted from a table, leading to the execution of one or more actions. You can also integrate a condition into the trigger, in order to ensure that the process only activates if this condition is met.
* *Add Conditions -* Click Add Conditions to define conditions that narrow down the data list and return only the relevant items. To learn more about using filters, [click here](/help/workflows/workflow-editor#add-conditions).
### On record updated
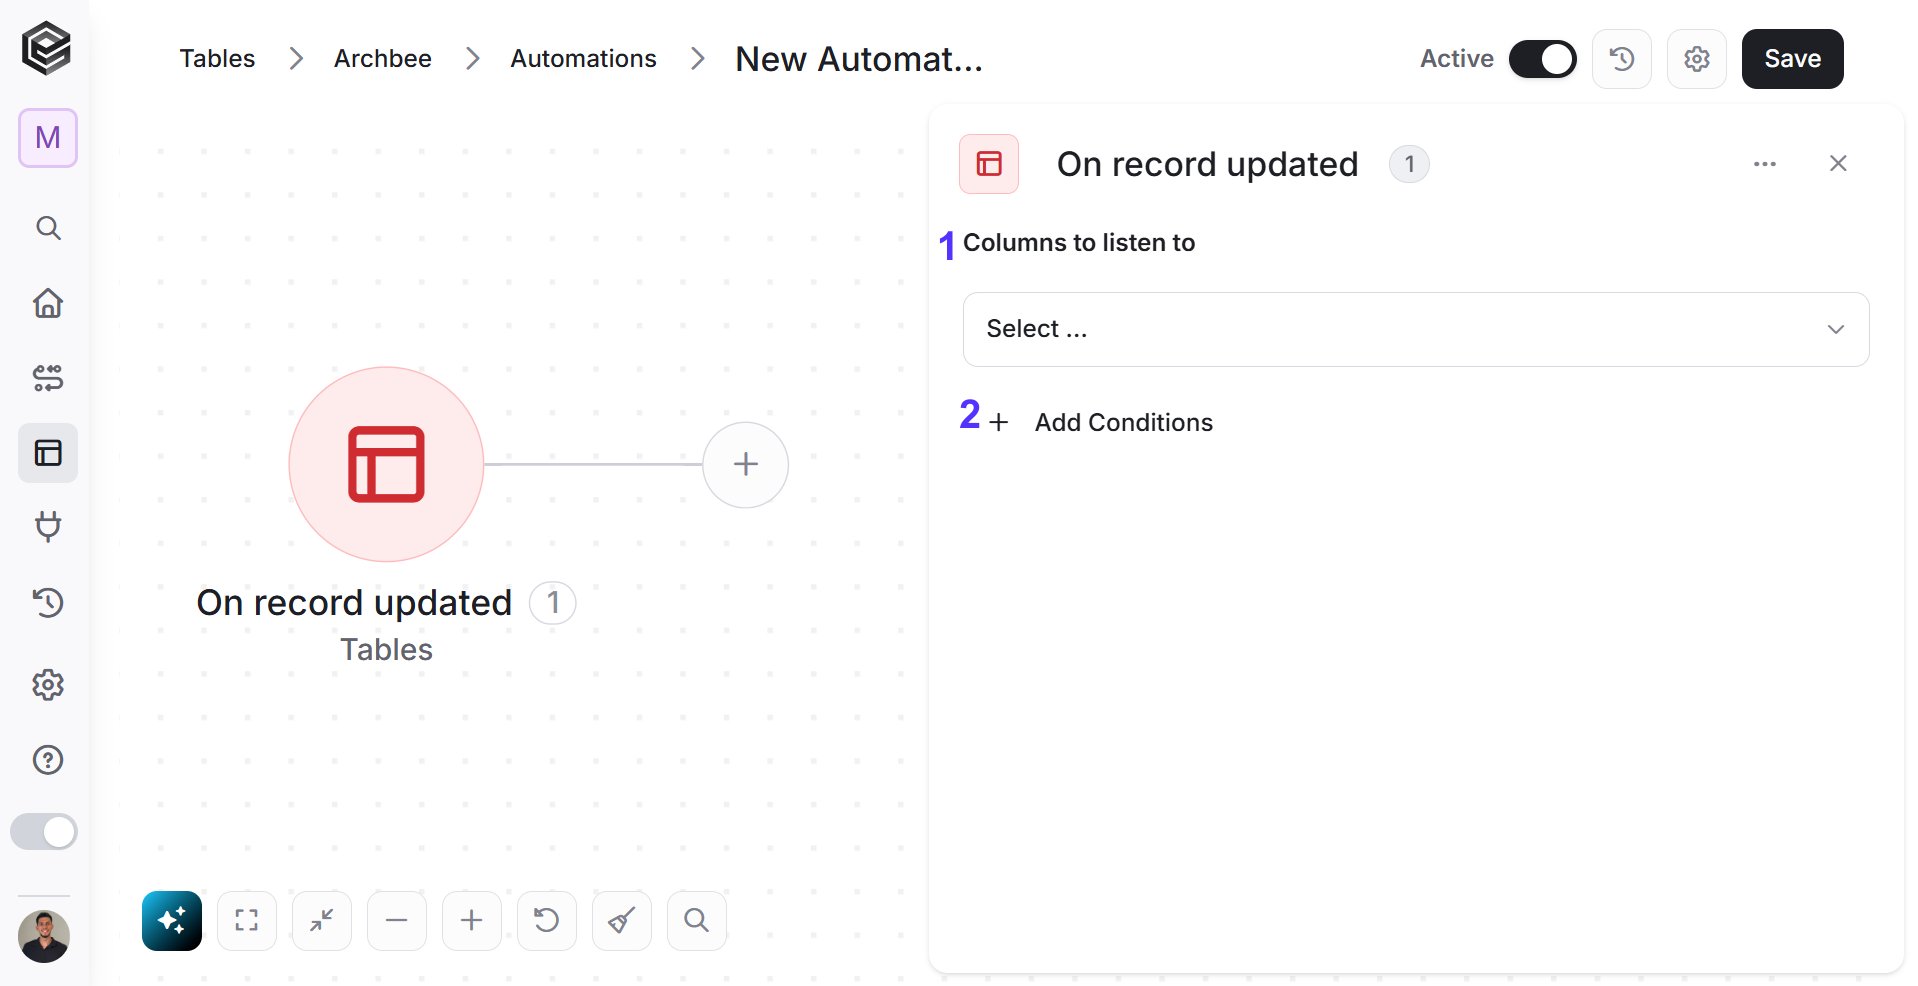
An automation is activated when an existing record is modified or updated, leading to the execution of one or more actions.
1. *Columns to listen to -* You have the option to choose a specific column from the table, which, when changes occur in it, will trigger the automation.
2. *Add Conditions -* Click Add Conditions to define conditions that narrow down the data list and return only the relevant items. To learn more about using filters, [click here](/help/workflows/workflow-editor#add-conditions).
### Step 2: Choose an Action
The action is simply an action or event that occurs one or more times as a result of the activation of the trigger and the fulfillment of the conditions for its activation.
You can choose an action of the tables, or an action related to any other software. You can learn more about each software and its operations in the Apps category.
## Actions
The following actions displayed are related to **Tables**.
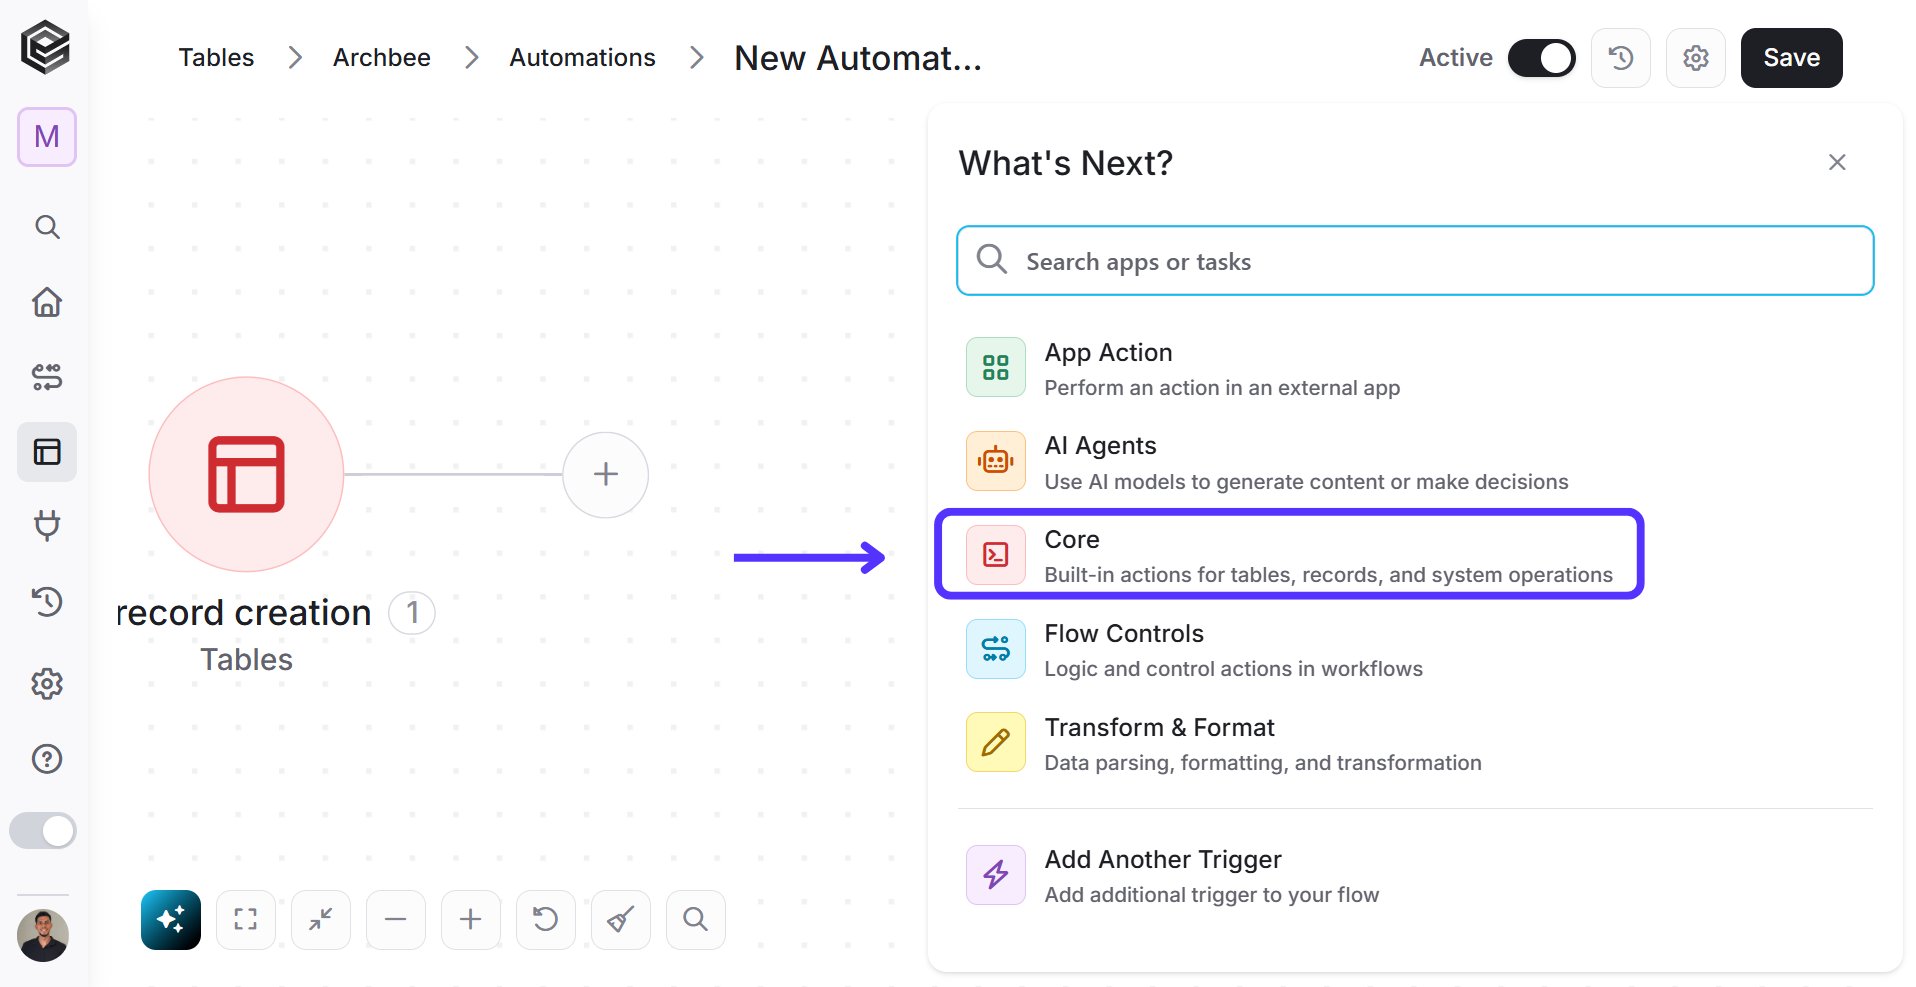
1. Click on 'Core'.
2. Select 'Tables' from the list inside Core.
### Create Record
By using this action, you can generate a new record in the table.
1. *Table Id* - Select the table where the new record will be created.
2. *Add Field* - Click Add Field to add and populate additional fields for the selected activity. To learn more about managing activity data, [click here](/help/workflows/workflow-editor#add-fields).
**Note:** Some tables include Connected Table fields, which are used to create relationships between records in different tables.
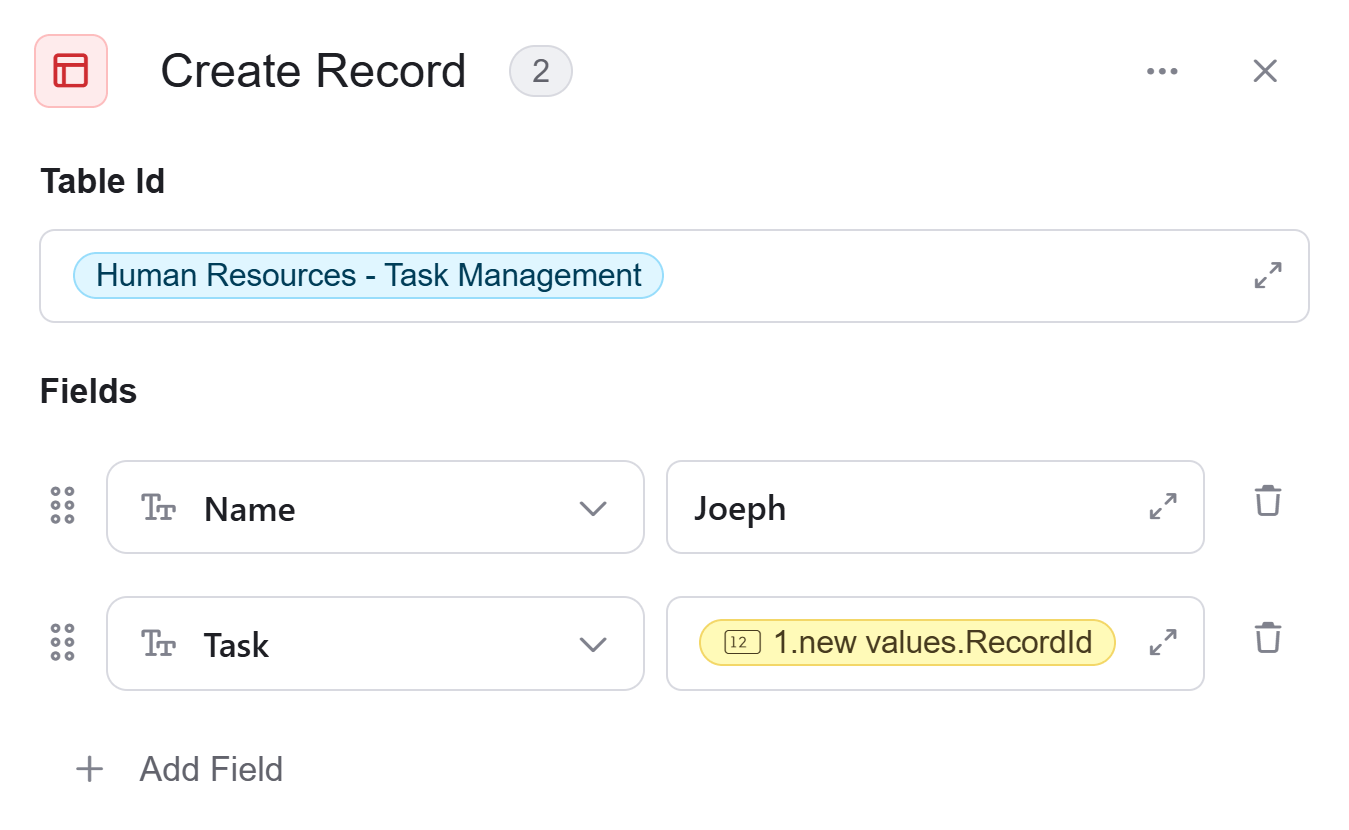
When using the **Create Record** action, you can map a Connected Table field by providing the **Record ID** of the related record.*\**
* *For Example -* A new Employee record is created. The **Task** field is a **Connected Table** field that links the employee to an existing task record.
To create this connection, the workflow maps the **Record ID** of the relevant task into the **Task** field.
### Create Records Batch
With this action, you can create multiple new records in your table simultaneously. The number of records created will match the number of objects in the data list. Each record will include the properties of the objects from the data list in sequential order.
1. *Data List*
* Click on the empty field.
* Choose the data list from the tooltip.
2. *Table Id*
* Choose the appropriate table in the ‘Table ID’ field.
3. *Add Field* - Click Add Field to add and populate additional fields for the selected activity. To learn more about managing activity data, [click here](/help/workflows/workflow-editor#add-fields).
**Note:** You can use this activity for 50,000 records. However, if you still want to perform a create operation for more than 50,000 records, you will need to use a for each/ do while activity.
### Delete Record
By using this action, you can delete a single record in the table.
1. *Table Id* - Select the table from which the record will be deleted.
2. *Record Id* - Specify the unique ID of the record you want to delete from the selected table.
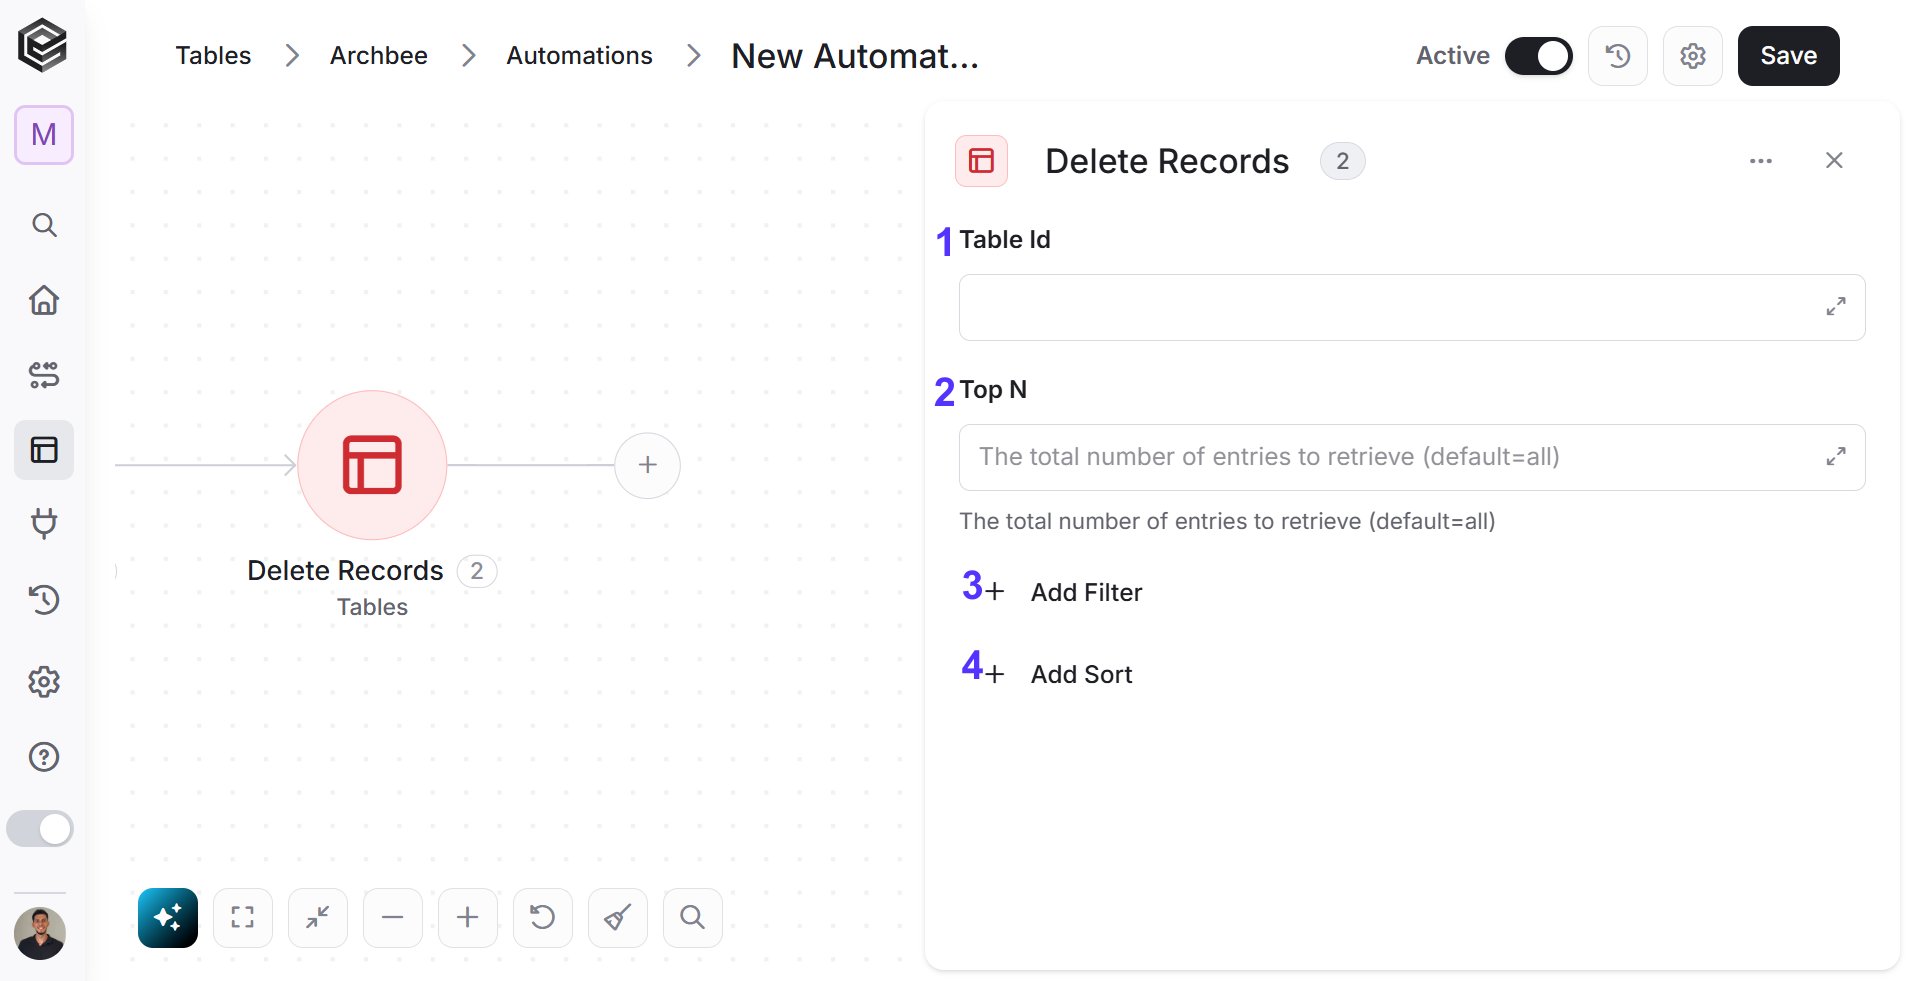
### Delete Records
By using this operation, you can delete one or more records in the table.
1. *Table Id* - Choose the table from which you want to delete records in.
2. *Top N* - Define how many records to delete (if not specified, all matching records will be considered).
3. *Add Filter -* Click Add Filter to define conditions that narrow down the data list and return only the relevant items. To learn more about using filters, [click here](/help/workflows/workflow-editor#add-filters).
4. *Add Sort -* Click Add Sort to organize the data list by a selected field in ascending or descending order. To learn more about sorting data, [click here](/help/workflows/workflow-editor#add-sorts).
### Delete Record Batch
By using this action, you can delete multiple records from your table at once. The number of records that will be deleted is the number of objects in the data list. This allows for efficient bulk deletion instead of removing records individually.
1. *Data List*
* The list of objects that represent the records to be deleted.
* The Data List should contain a list of objects where each object includes a RecordId property
2. *Table Id*
* Specifies the table where the records are stored.
* Select the table from the dropdown or input its identifier in the ‘Table ID’ field.
3. *RecordId -* Identifies the records to be deleted. Each object in the Data List must include a valid RecordId to specify which record to delete.
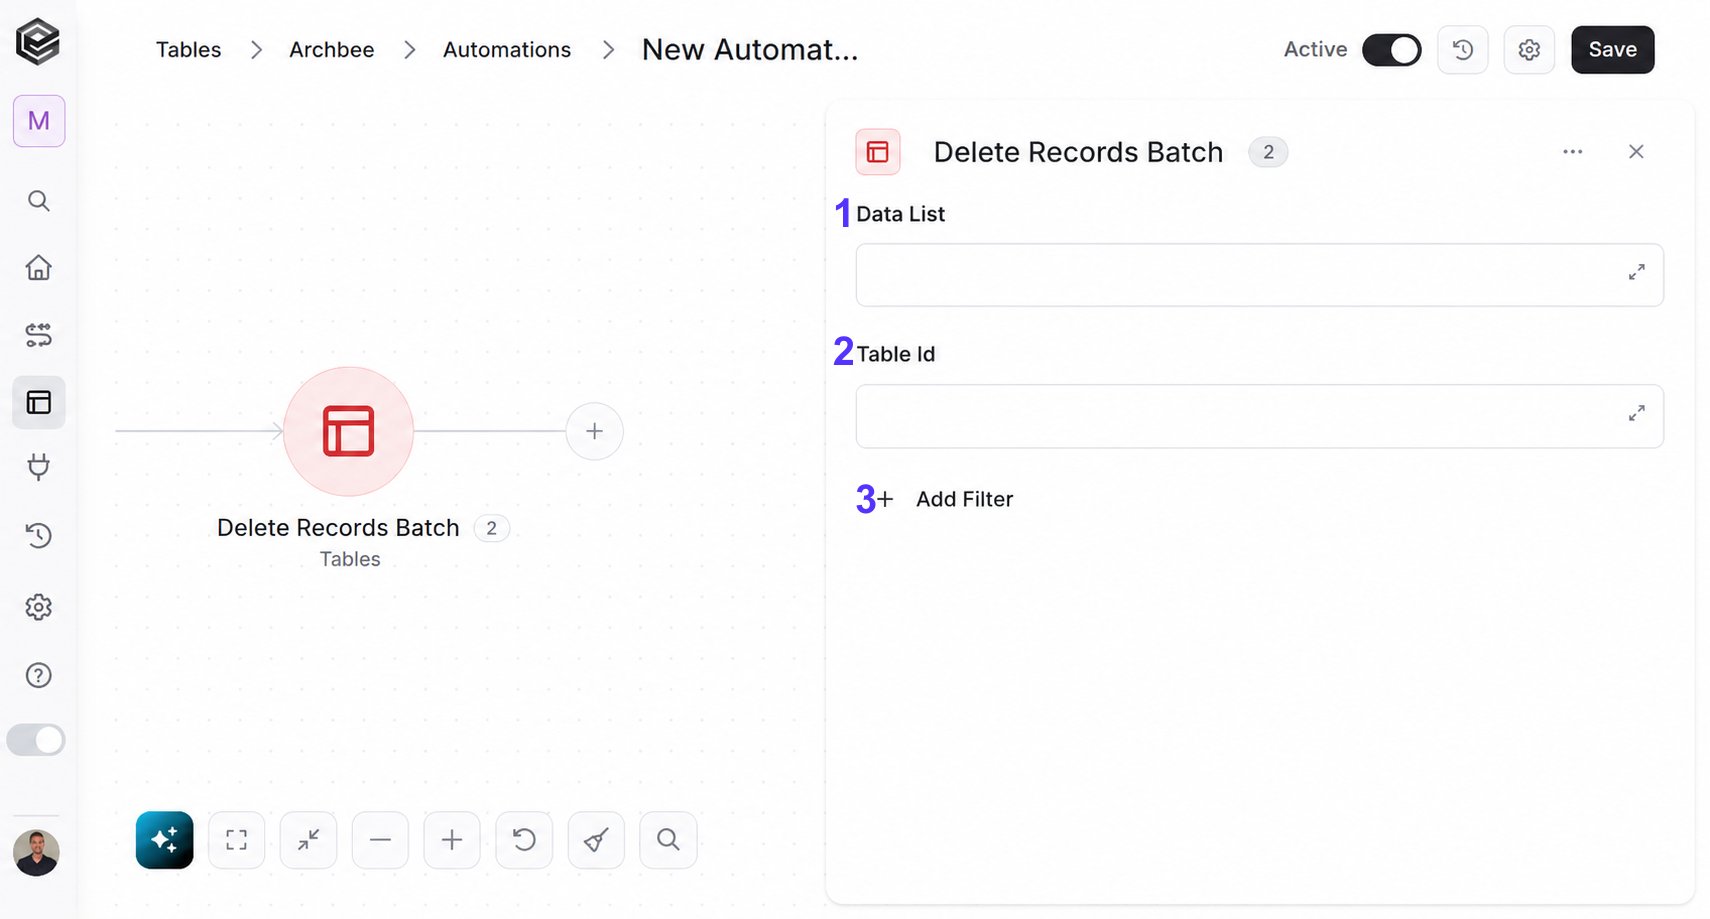
### Delete Records Batch
By using this action, you can delete multiple records from your table at once based on a specified Data List or filtered conditions. This action is particularly useful when you need to perform bulk deletion operations efficiently without deleting records individually.
1. *Data List*
* The list of objects that represent the records to be deleted.
* The Data List should contain a list of objects where each object includes a RecordId property
2. *Table Id*
* Specifies the table where the records are stored.
* Select the table from the dropdown or input its identifier in the ‘Table ID’ field.
3. *Add Filter -* Click Add Filter to define conditions that narrow down the data list and return only the relevant items. To learn more about using filters, [click here](/help/workflows/workflow-editor#add-filters).
### Get record
By using this action, you can get one or more records from a table.
1. *Table Id* - Click on the empty field and choose table from which you want to retrieve the record in.
2. *Record Id* - Click on the empty field and choose the record you want to get.
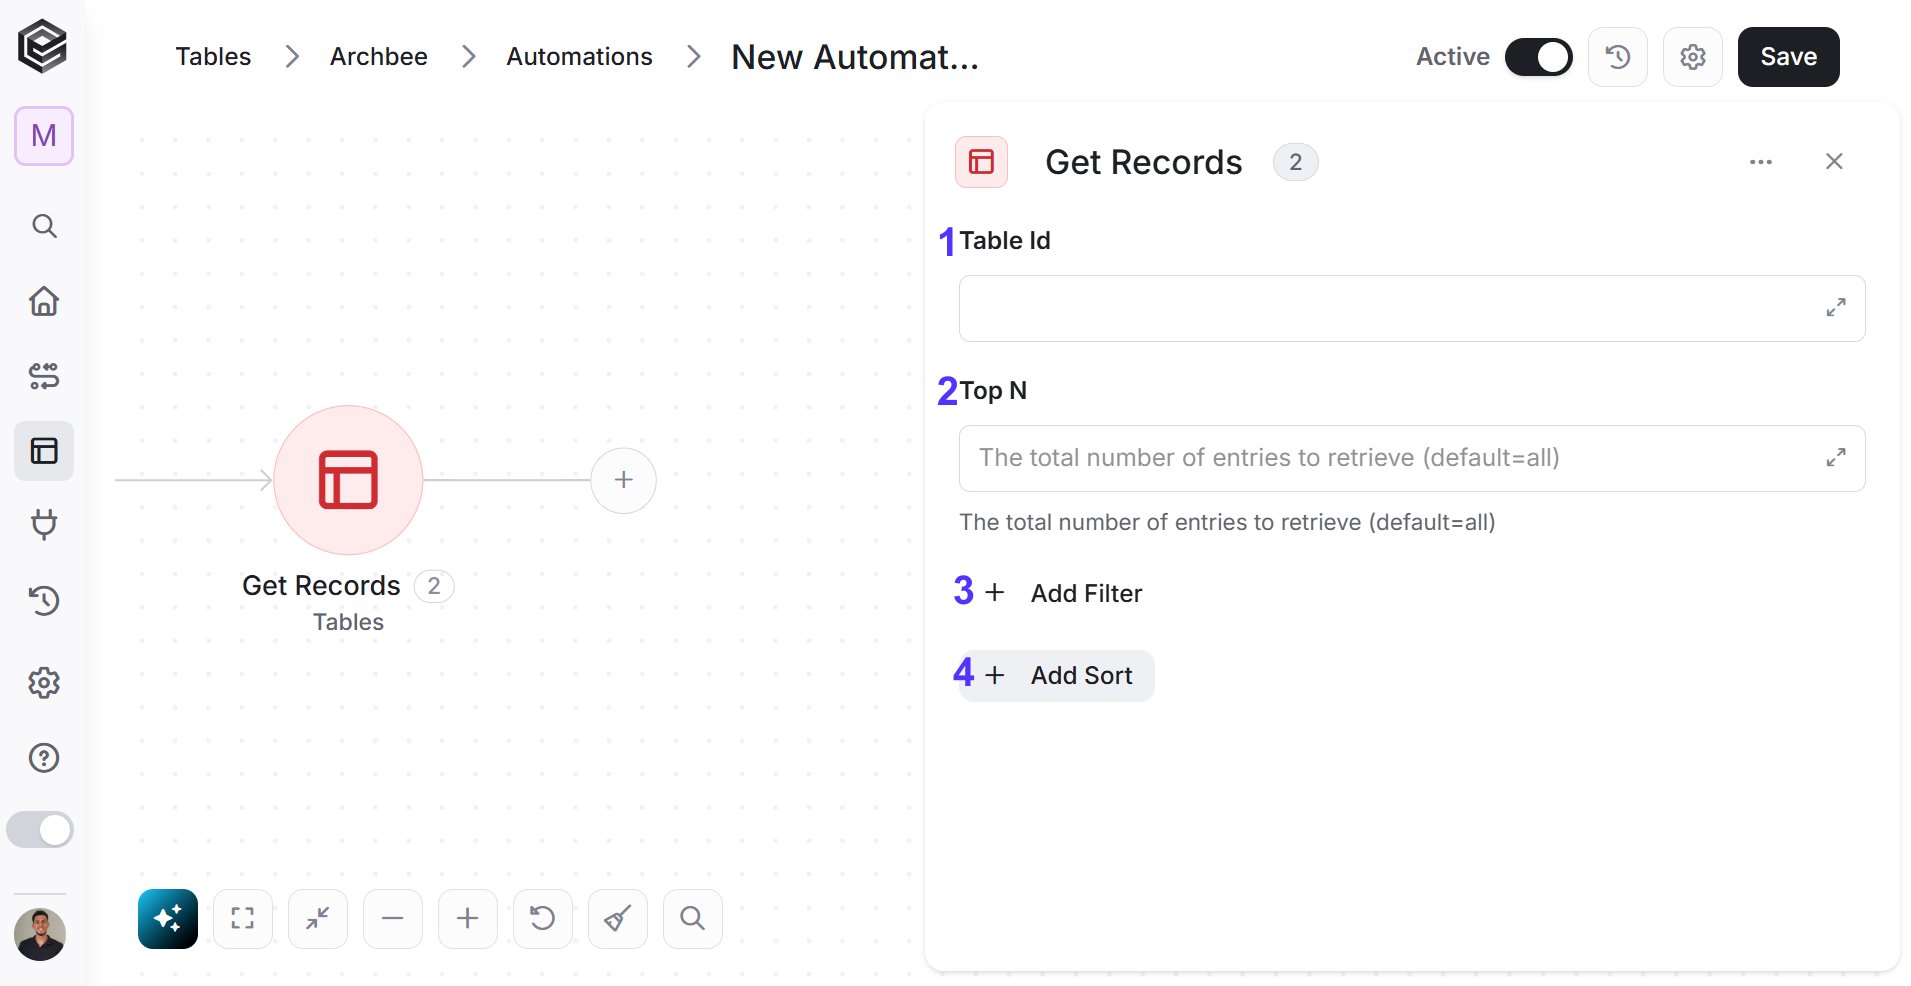
### Get Records
By using this action, you can get one or more records from a table.
* *Table Id* - Choose the table from which you want to get records in.
1. *Top N* - Define how many records to get (if not specified, all matching records will be considered).
2. *Add Filter -* Click Add Filter to define conditions that narrow down the data list and return only the relevant items. To learn more about using filters, [click here](/help/workflows/workflow-editor#add-filters).
3. *Add Sort -* Click Add Sort to organize the data list by a selected field in ascending or descending order. To learn more about sorting data, [click here](/help/workflows/workflow-editor#add-sorts).
### Update Record
Using this action you can update a record.
1. *Table Id* - Click on the empty field and select the table from which you want to retrieve the record in.
2. *Record Id* - Click on the empty field and choose the record Id you want to update.
3. *Add Field* - Click Add Field to add and populate additional fields for the selected activity. To learn more about managing activity data, [click here](/help/workflows/workflow-editor#add-fields).
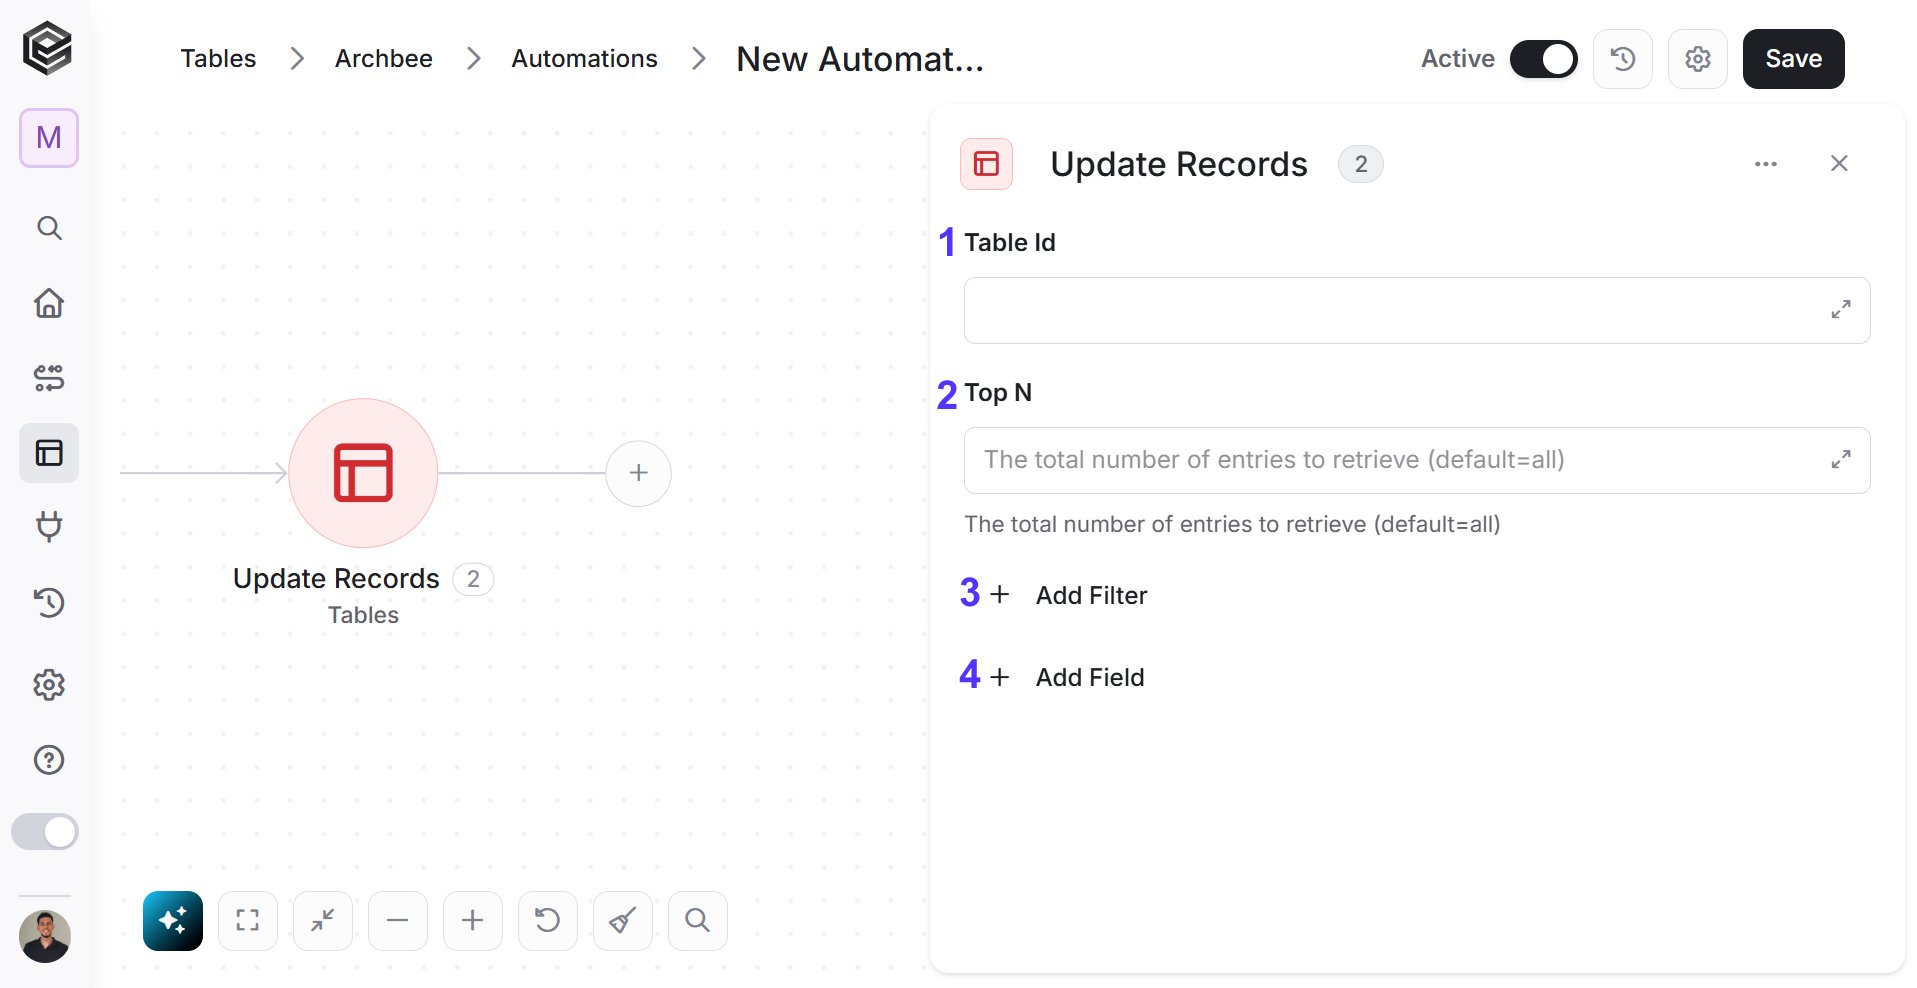
### Update Records
By using this action, you can update multiple records in a selected table.
1. *Table id-* Click on the empty field and select the table from which you want to retrieve the record in.
2. *Top N*- Click on the empty field to define the maximum number of records that can be updated in a single run.
3. *Add Filter -* Click Add Filter to define conditions that narrow down the data list and return only the relevant items. To learn more about using filters, [click here](/help/workflows/workflow-editor#add-filters).
4. *Add Field* - Click Add Field to add and populate additional fields for the selected activity. To learn more about managing activity data, [click here](/help/workflows/workflow-editor#add-fields).
### Update Record Batch
By using this action, you can update a single record in your table with multiple changes at once. The updates are defined by the properties specified in the Data List, and you can choose which fields to update and their corresponding values.
1. *Data List*
* Click on the empty field.
* Select the appropriate Data List from the tooltip
2. *Table Id* - Choose the appropriate table from the dropdown or enter the table’s identifier in the ‘Table ID’ field.
3. *RecordId* - Enter the record’s RecordId in the field or map it dynamically using available variables.
4. *Add Field* - Click Add Field to add and populate additional fields for the selected activity. To learn more about managing activity data, [click here](/help/workflows/workflow-editor#add-fields).
### Update Records Batch
By using this action, you can update multiple records in your table at once. The number of records that will be updated is the number of objects in the data list. Every time you update record, it will contain the properties of the object in the data list in order.
1. *Data List*
* Click on the empty field.
* Choose the data list from the tooltip.
2. *Table Id* - Choose the appropriate table in the ‘Table ID’ field.
3. *Add Filter -* Click Add Filter to define conditions that narrow down the data list and return only the relevant items. To learn more about using filters, [click here](/help/workflows/workflow-editor#add-filters).
4. *Add Field* - Click Add Field to add and populate additional fields for the selected activity. To learn more about managing activity data, [click here](/help/workflows/workflow-editor#add-fields).
**Note:** You can use this activity for 50,000 records. However, if you still want to perform an update operation for more than 50,000 records, you will need to use a for each/ do while activity.
### Add Comment to Record
Using this action, you can add a comment to a record.
1. *Table Id -* Click on the empty field and choose the table where you want to add the comment to.
2. *Record Id -* Click on the empty field and select the Record ID of the record want to add the comment to.
3. *Comment*
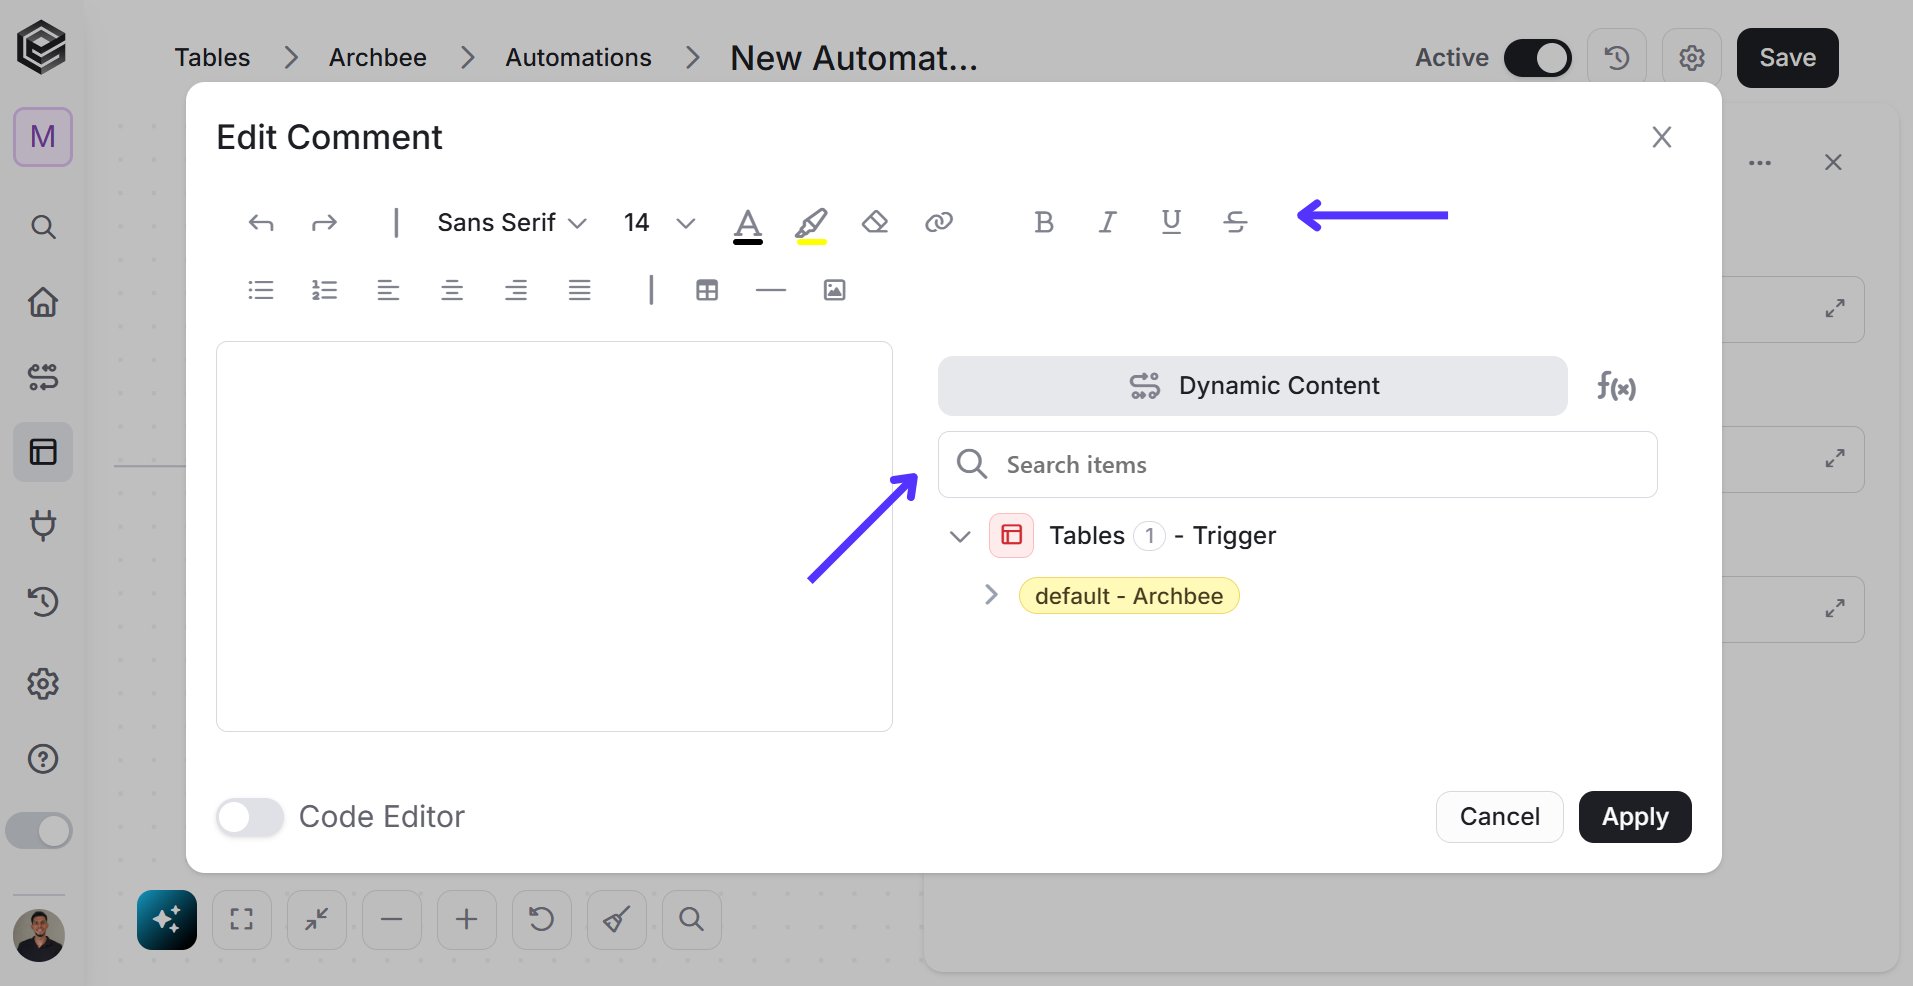
* At first click on the empty field, a window will open where you can write your comment.
* Write your comment and use the toolbar to bold, italicize, underline, align etc. You can also add to your comment Dynamic Content and Functions.
To learn more about Functions click [here](/help/tools/enginis-functions).
* When you’re done, click save.
4. *Add Field* - Click Add Field to add and populate additional fields for the selected activity. To learn more about managing activity data, [click here](/help/workflows/workflow-editor#add-fields).
### Get Record Comments
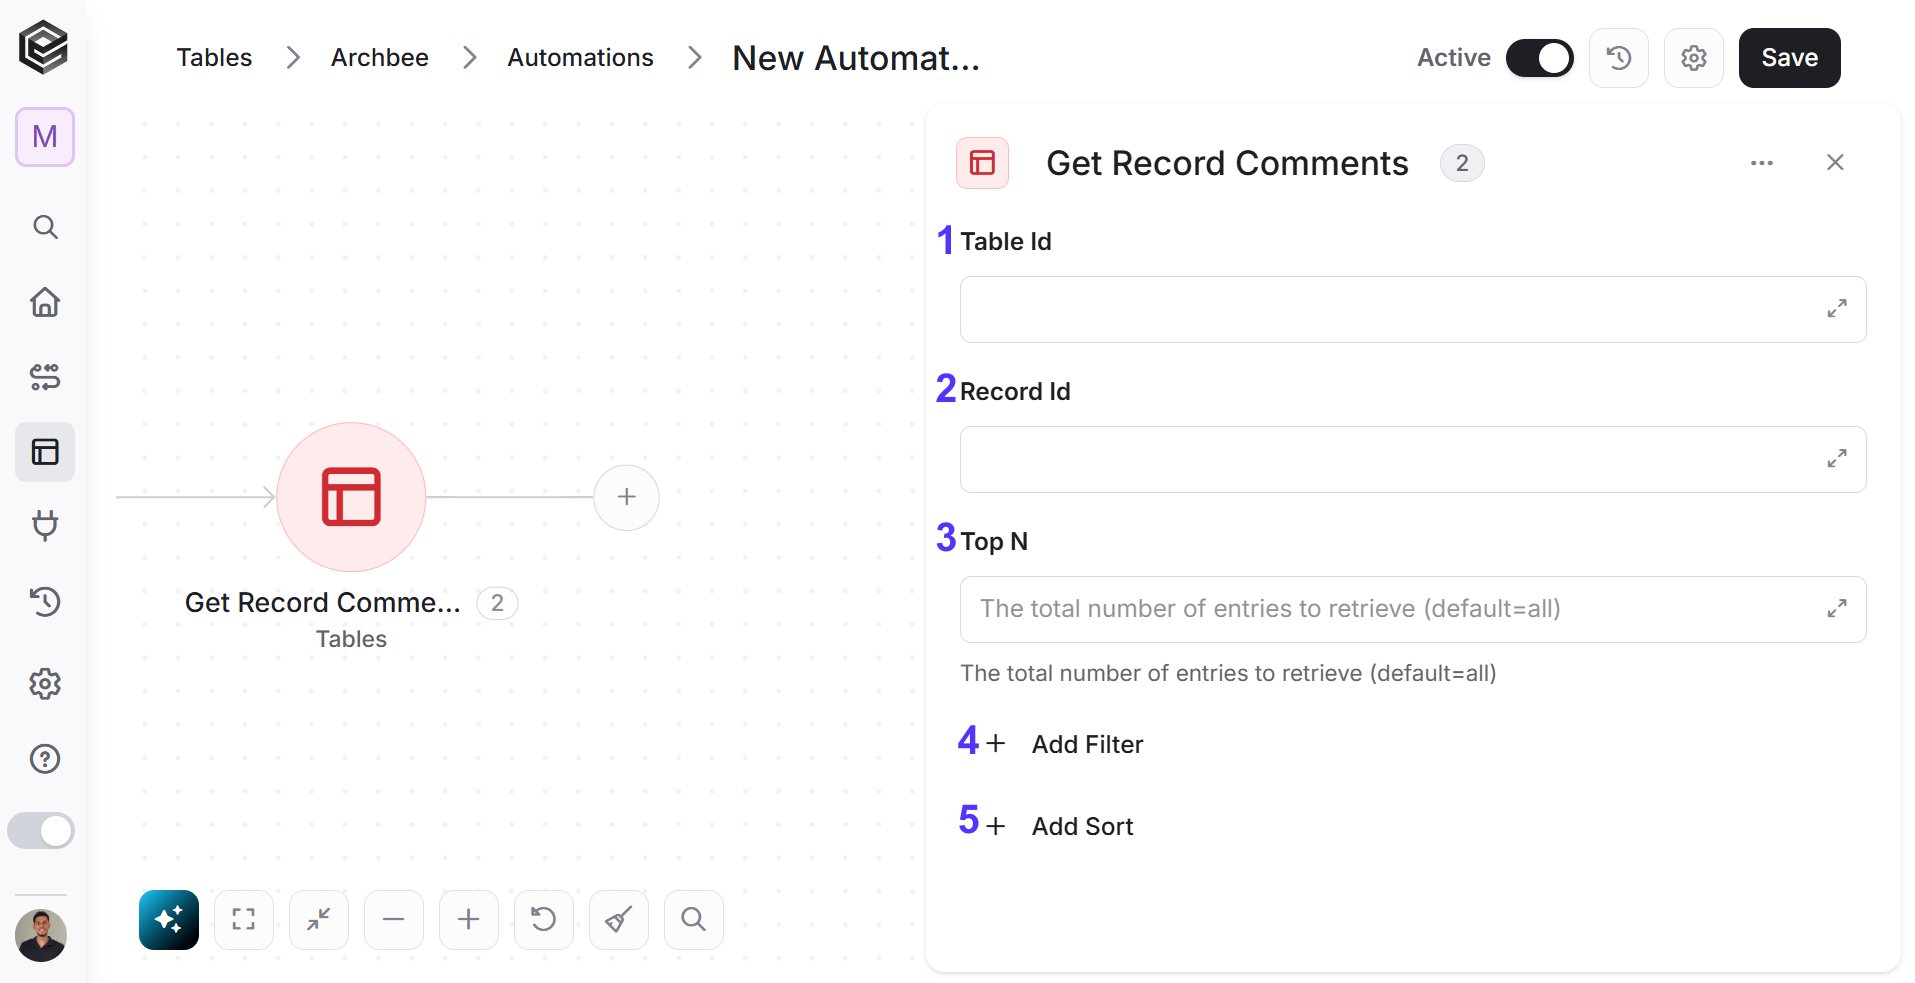
By using this action, you can get one or more comments from a table.
1. *Table Id -* Click on the empty field and select the table from which you want to retrieve the comment in.
2. *Record Id -* Click on the empty field and select the Record ID of the comment you want to retrieve.
3. *Top N -* You can specify how many comments you want to get. Click on ‘Top N’ and enter the maximum number of comments you want to retrieve.
If you set `Top N = 1`, a single comment will be returned instead of an array. If no comment is found, the action will fail, allowing you to implement an IF condition within the workflow. This can be useful for processes where the existence of a comment determines the next steps in the workflow.
4. *Add Filter -* Click Add Filter to define conditions that narrow down the data list and return only the relevant items. To learn more about using filters, [click here](/help/workflows/workflow-editor#add-filters).
5. *Add Sort -* Click Add Sort to organize the data list by a selected field in ascending or descending order. To learn more about sorting data, [click here](/help/workflows/workflow-editor#add-sorts).
## Save the Automation
Save the automation by clicking on the button in the right side of the window.
You can exit the automation by clicking on ‘Save’.
## Activate your Automation
Activate your automation. Perform an action that should activate the automation you’ve created.
* Click on the “Automations” button on the upper right side of the workbook.
* Click on ‘Automation Activity’ on the right side.
* Check the status of the automation—whether it’s ‘Failure,’ ‘Fell by condition,’ ‘Modified,’ or ‘Success’—by clicking on ‘Automations’ on the right side.
* To access information about the process click Details. To learn how to analyze workflow or automation history, you can navigate to the “Workflow History” category. There you’ll find the details you need to review and understand the history of your workflows or automations.
* After clicking on ‘Details’ If you want to run the same automation again, click on ‘Re-run’ button, located on the right side.
## Update the File column via workflow
### Initialize Files Array
Creates a Files Array.
1. *Name*
1. Click on the empty field and the tooltip will pop up.
2. Select from the tooltip the name of the new item you create. you can use:
* Static value – number / string. when using strings, you need to surround them with single quotes (‘).
* Property value from a previous activity (Using the tooltip that opens when clicking on the field).
2. *Value -* The value is optional. You can set it in a variable that you initialize as an initial value, but you can choose not to fill the field of the variable and populate it later in the workflow.
### Append File to Array
Appending to an array allows you to dynamically add new files to the end of the array without changing the size or structure of the array.
1. *Variable -* Choose from the drop down the name of the array you want to append to.
2. *Name -* Set the file name.
3. *Base64Content -* Enter the Base64 of the file.
4. *Content Type -* Enter the content type.
### Add File to Column
Add file to files column.
1. *Table -* Choose from the drop down the name of the table you want to add to.
2. *Field -* Choose from the drop down the name of the column field you want to add to.
3. *Record Id* - Enter the Record id of the record you want to add to.
4. *File* - Enter the file content.
1. *Content Type -* Enter the content type format base64.
2. *Name -* Set the file name.
5. *Add Field* - Click Add Field to add and populate additional fields for the selected activity. To learn more about managing activity data, [click here](/help/workflows/workflow-editor#add-fields).
### Delete Files
Delete file from column.
1. *Table -* Choose from the drop down the name of the table you want to delete from.
2. *Field -* Choose from the drop down the name of the column field you want to delete from.
3. *Record Id -* Enter the Record id of the record you want to delete from.
4. *Add Field* - Click Add Field to add and populate additional fields for the selected activity. To learn more about managing activity data, [click here](/help/workflows/workflow-editor#add-fields).
### Get Files
Choose the “Get Files” activity.
1. *Table -* Choose from the drop down the name of the table you want to delete from.
2. *Record Id -* Enter the Record id of the record you want to delete from.
3. *Add Field* - Click Add Field to add and populate additional fields for the selected activity. To learn more about managing activity data, [click here](/help/workflows/workflow-editor#add-fields).
This documentation is built and hosted on [Mintlify](https://mintlify.com), a developer documentation platform.
 Click on "*New Automation*" to create your own automation for your table.
 **Note**: If its your first automation you have two button to click on for a fresh new automation.
## Build your Automation
### Step 1: Choose a Trigger
The first step in building your automation is to add a trigger. A trigger is the event that initiates the process, and it occurs only once each time an automation begins.
**Note**: If its your first automation you have two button to click on for a fresh new automation.
## Build your Automation
### Step 1: Choose a Trigger
The first step in building your automation is to add a trigger. A trigger is the event that initiates the process, and it occurs only once each time an automation begins.
 From the workflow that opened press the '+' to choose your trigger.
 Choose the trigger you want to start with. More explanations down below.
## Triggers
### On record creation
Automation is initiated when a new record is generated, resulting in the execution of one or more actions. You can also include a condition in the trigger, ensuring that the process only activates if this condition is satisfied.
Choose the trigger you want to start with. More explanations down below.
## Triggers
### On record creation
Automation is initiated when a new record is generated, resulting in the execution of one or more actions. You can also include a condition in the trigger, ensuring that the process only activates if this condition is satisfied.
 * *Add Conditions -* Click Add Conditions to define conditions that narrow down the data list and return only the relevant items. To learn more about using filters, [click here](/help/workflows/workflow-editor#add-conditions).
### On record deleted
Automation is initiated when a record is deleted from a table, leading to the execution of one or more actions. You can also integrate a condition into the trigger, in order to ensure that the process only activates if this condition is met.
* *Add Conditions -* Click Add Conditions to define conditions that narrow down the data list and return only the relevant items. To learn more about using filters, [click here](/help/workflows/workflow-editor#add-conditions).
### On record deleted
Automation is initiated when a record is deleted from a table, leading to the execution of one or more actions. You can also integrate a condition into the trigger, in order to ensure that the process only activates if this condition is met.
 * *Add Conditions -* Click Add Conditions to define conditions that narrow down the data list and return only the relevant items. To learn more about using filters, [click here](/help/workflows/workflow-editor#add-conditions).
### On record updated
An automation is activated when an existing record is modified or updated, leading to the execution of one or more actions.
* *Add Conditions -* Click Add Conditions to define conditions that narrow down the data list and return only the relevant items. To learn more about using filters, [click here](/help/workflows/workflow-editor#add-conditions).
### On record updated
An automation is activated when an existing record is modified or updated, leading to the execution of one or more actions.
 1. *Columns to listen to -* You have the option to choose a specific column from the table, which, when changes occur in it, will trigger the automation.
2. *Add Conditions -* Click Add Conditions to define conditions that narrow down the data list and return only the relevant items. To learn more about using filters, [click here](/help/workflows/workflow-editor#add-conditions).
### Step 2: Choose an Action
The action is simply an action or event that occurs one or more times as a result of the activation of the trigger and the fulfillment of the conditions for its activation.
You can choose an action of the tables, or an action related to any other software. You can learn more about each software and its operations in the Apps category.
## Actions
The following actions displayed are related to **Tables**.
1. Click on 'Core'.
1. *Columns to listen to -* You have the option to choose a specific column from the table, which, when changes occur in it, will trigger the automation.
2. *Add Conditions -* Click Add Conditions to define conditions that narrow down the data list and return only the relevant items. To learn more about using filters, [click here](/help/workflows/workflow-editor#add-conditions).
### Step 2: Choose an Action
The action is simply an action or event that occurs one or more times as a result of the activation of the trigger and the fulfillment of the conditions for its activation.
You can choose an action of the tables, or an action related to any other software. You can learn more about each software and its operations in the Apps category.
## Actions
The following actions displayed are related to **Tables**.
1. Click on 'Core'.
 2. Select 'Tables' from the list inside Core.
 ### Create Record
By using this action, you can generate a new record in the table.
### Create Record
By using this action, you can generate a new record in the table.
 1. *Table Id* - Select the table where the new record will be created.
2. *Add Field* - Click Add Field to add and populate additional fields for the selected activity. To learn more about managing activity data, [click here](/help/workflows/workflow-editor#add-fields).
**Note:** Some tables include Connected Table fields, which are used to create relationships between records in different tables.
When using the **Create Record** action, you can map a Connected Table field by providing the **Record ID** of the related record.*\**
* *For Example -* A new Employee record is created. The **Task** field is a **Connected Table** field that links the employee to an existing task record.
1. *Table Id* - Select the table where the new record will be created.
2. *Add Field* - Click Add Field to add and populate additional fields for the selected activity. To learn more about managing activity data, [click here](/help/workflows/workflow-editor#add-fields).
**Note:** Some tables include Connected Table fields, which are used to create relationships between records in different tables.
When using the **Create Record** action, you can map a Connected Table field by providing the **Record ID** of the related record.*\**
* *For Example -* A new Employee record is created. The **Task** field is a **Connected Table** field that links the employee to an existing task record.
 To create this connection, the workflow maps the **Record ID** of the relevant task into the **Task** field.
### Create Records Batch
With this action, you can create multiple new records in your table simultaneously. The number of records created will match the number of objects in the data list. Each record will include the properties of the objects from the data list in sequential order.
To create this connection, the workflow maps the **Record ID** of the relevant task into the **Task** field.
### Create Records Batch
With this action, you can create multiple new records in your table simultaneously. The number of records created will match the number of objects in the data list. Each record will include the properties of the objects from the data list in sequential order.
 1. *Data List*
* Click on the empty field.
* Choose the data list from the tooltip.
2. *Table Id*
* Choose the appropriate table in the ‘Table ID’ field.
3. *Add Field* - Click Add Field to add and populate additional fields for the selected activity. To learn more about managing activity data, [click here](/help/workflows/workflow-editor#add-fields).
**Note:** You can use this activity for 50,000 records. However, if you still want to perform a create operation for more than 50,000 records, you will need to use a for each/ do while activity.
### Delete Record
By using this action, you can delete a single record in the table.
1. *Data List*
* Click on the empty field.
* Choose the data list from the tooltip.
2. *Table Id*
* Choose the appropriate table in the ‘Table ID’ field.
3. *Add Field* - Click Add Field to add and populate additional fields for the selected activity. To learn more about managing activity data, [click here](/help/workflows/workflow-editor#add-fields).
**Note:** You can use this activity for 50,000 records. However, if you still want to perform a create operation for more than 50,000 records, you will need to use a for each/ do while activity.
### Delete Record
By using this action, you can delete a single record in the table.
 1. *Table Id* - Select the table from which the record will be deleted.
2. *Record Id* - Specify the unique ID of the record you want to delete from the selected table.
### Delete Records
By using this operation, you can delete one or more records in the table.
1. *Table Id* - Select the table from which the record will be deleted.
2. *Record Id* - Specify the unique ID of the record you want to delete from the selected table.
### Delete Records
By using this operation, you can delete one or more records in the table.
 1. *Table Id* - Choose the table from which you want to delete records in.
2. *Top N* - Define how many records to delete (if not specified, all matching records will be considered).
3. *Add Filter -* Click Add Filter to define conditions that narrow down the data list and return only the relevant items. To learn more about using filters, [click here](/help/workflows/workflow-editor#add-filters).
4. *Add Sort -* Click Add Sort to organize the data list by a selected field in ascending or descending order. To learn more about sorting data, [click here](/help/workflows/workflow-editor#add-sorts).
### Delete Record Batch
By using this action, you can delete multiple records from your table at once. The number of records that will be deleted is the number of objects in the data list. This allows for efficient bulk deletion instead of removing records individually.
1. *Table Id* - Choose the table from which you want to delete records in.
2. *Top N* - Define how many records to delete (if not specified, all matching records will be considered).
3. *Add Filter -* Click Add Filter to define conditions that narrow down the data list and return only the relevant items. To learn more about using filters, [click here](/help/workflows/workflow-editor#add-filters).
4. *Add Sort -* Click Add Sort to organize the data list by a selected field in ascending or descending order. To learn more about sorting data, [click here](/help/workflows/workflow-editor#add-sorts).
### Delete Record Batch
By using this action, you can delete multiple records from your table at once. The number of records that will be deleted is the number of objects in the data list. This allows for efficient bulk deletion instead of removing records individually.
 1. *Data List*
* The list of objects that represent the records to be deleted.
* The Data List should contain a list of objects where each object includes a RecordId property
2. *Table Id*
* Specifies the table where the records are stored.
* Select the table from the dropdown or input its identifier in the ‘Table ID’ field.
3. *RecordId -* Identifies the records to be deleted. Each object in the Data List must include a valid RecordId to specify which record to delete.
### Delete Records Batch
By using this action, you can delete multiple records from your table at once based on a specified Data List or filtered conditions. This action is particularly useful when you need to perform bulk deletion operations efficiently without deleting records individually.
1. *Data List*
* The list of objects that represent the records to be deleted.
* The Data List should contain a list of objects where each object includes a RecordId property
2. *Table Id*
* Specifies the table where the records are stored.
* Select the table from the dropdown or input its identifier in the ‘Table ID’ field.
3. *RecordId -* Identifies the records to be deleted. Each object in the Data List must include a valid RecordId to specify which record to delete.
### Delete Records Batch
By using this action, you can delete multiple records from your table at once based on a specified Data List or filtered conditions. This action is particularly useful when you need to perform bulk deletion operations efficiently without deleting records individually.
 1. *Data List*
* The list of objects that represent the records to be deleted.
* The Data List should contain a list of objects where each object includes a RecordId property
2. *Table Id*
* Specifies the table where the records are stored.
* Select the table from the dropdown or input its identifier in the ‘Table ID’ field.
3. *Add Filter -* Click Add Filter to define conditions that narrow down the data list and return only the relevant items. To learn more about using filters, [click here](/help/workflows/workflow-editor#add-filters).
### Get record
By using this action, you can get one or more records from a table.
1. *Data List*
* The list of objects that represent the records to be deleted.
* The Data List should contain a list of objects where each object includes a RecordId property
2. *Table Id*
* Specifies the table where the records are stored.
* Select the table from the dropdown or input its identifier in the ‘Table ID’ field.
3. *Add Filter -* Click Add Filter to define conditions that narrow down the data list and return only the relevant items. To learn more about using filters, [click here](/help/workflows/workflow-editor#add-filters).
### Get record
By using this action, you can get one or more records from a table.
 1. *Table Id* - Click on the empty field and choose table from which you want to retrieve the record in.
2. *Record Id* - Click on the empty field and choose the record you want to get.
### Get Records
By using this action, you can get one or more records from a table.
1. *Table Id* - Click on the empty field and choose table from which you want to retrieve the record in.
2. *Record Id* - Click on the empty field and choose the record you want to get.
### Get Records
By using this action, you can get one or more records from a table.
 * *Table Id* - Choose the table from which you want to get records in.
1. *Top N* - Define how many records to get (if not specified, all matching records will be considered).
2. *Add Filter -* Click Add Filter to define conditions that narrow down the data list and return only the relevant items. To learn more about using filters, [click here](/help/workflows/workflow-editor#add-filters).
3. *Add Sort -* Click Add Sort to organize the data list by a selected field in ascending or descending order. To learn more about sorting data, [click here](/help/workflows/workflow-editor#add-sorts).
### Update Record
Using this action you can update a record.
* *Table Id* - Choose the table from which you want to get records in.
1. *Top N* - Define how many records to get (if not specified, all matching records will be considered).
2. *Add Filter -* Click Add Filter to define conditions that narrow down the data list and return only the relevant items. To learn more about using filters, [click here](/help/workflows/workflow-editor#add-filters).
3. *Add Sort -* Click Add Sort to organize the data list by a selected field in ascending or descending order. To learn more about sorting data, [click here](/help/workflows/workflow-editor#add-sorts).
### Update Record
Using this action you can update a record.
 1. *Table Id* - Click on the empty field and select the table from which you want to retrieve the record in.
2. *Record Id* - Click on the empty field and choose the record Id you want to update.
3. *Add Field* - Click Add Field to add and populate additional fields for the selected activity. To learn more about managing activity data, [click here](/help/workflows/workflow-editor#add-fields).
### Update Records
By using this action, you can update multiple records in a selected table.
1. *Table Id* - Click on the empty field and select the table from which you want to retrieve the record in.
2. *Record Id* - Click on the empty field and choose the record Id you want to update.
3. *Add Field* - Click Add Field to add and populate additional fields for the selected activity. To learn more about managing activity data, [click here](/help/workflows/workflow-editor#add-fields).
### Update Records
By using this action, you can update multiple records in a selected table.
 1. *Table id-* Click on the empty field and select the table from which you want to retrieve the record in.
2. *Top N*- Click on the empty field to define the maximum number of records that can be updated in a single run.
3. *Add Filter -* Click Add Filter to define conditions that narrow down the data list and return only the relevant items. To learn more about using filters, [click here](/help/workflows/workflow-editor#add-filters).
4. *Add Field* - Click Add Field to add and populate additional fields for the selected activity. To learn more about managing activity data, [click here](/help/workflows/workflow-editor#add-fields).
### Update Record Batch
By using this action, you can update a single record in your table with multiple changes at once. The updates are defined by the properties specified in the Data List, and you can choose which fields to update and their corresponding values.
1. *Table id-* Click on the empty field and select the table from which you want to retrieve the record in.
2. *Top N*- Click on the empty field to define the maximum number of records that can be updated in a single run.
3. *Add Filter -* Click Add Filter to define conditions that narrow down the data list and return only the relevant items. To learn more about using filters, [click here](/help/workflows/workflow-editor#add-filters).
4. *Add Field* - Click Add Field to add and populate additional fields for the selected activity. To learn more about managing activity data, [click here](/help/workflows/workflow-editor#add-fields).
### Update Record Batch
By using this action, you can update a single record in your table with multiple changes at once. The updates are defined by the properties specified in the Data List, and you can choose which fields to update and their corresponding values.
 1. *Data List*
* Click on the empty field.
* Select the appropriate Data List from the tooltip
2. *Table Id* - Choose the appropriate table from the dropdown or enter the table’s identifier in the ‘Table ID’ field.
3. *RecordId* - Enter the record’s RecordId in the field or map it dynamically using available variables.
4. *Add Field* - Click Add Field to add and populate additional fields for the selected activity. To learn more about managing activity data, [click here](/help/workflows/workflow-editor#add-fields).
### Update Records Batch
By using this action, you can update multiple records in your table at once. The number of records that will be updated is the number of objects in the data list. Every time you update record, it will contain the properties of the object in the data list in order.
1. *Data List*
* Click on the empty field.
* Select the appropriate Data List from the tooltip
2. *Table Id* - Choose the appropriate table from the dropdown or enter the table’s identifier in the ‘Table ID’ field.
3. *RecordId* - Enter the record’s RecordId in the field or map it dynamically using available variables.
4. *Add Field* - Click Add Field to add and populate additional fields for the selected activity. To learn more about managing activity data, [click here](/help/workflows/workflow-editor#add-fields).
### Update Records Batch
By using this action, you can update multiple records in your table at once. The number of records that will be updated is the number of objects in the data list. Every time you update record, it will contain the properties of the object in the data list in order.
 1. *Data List*
* Click on the empty field.
* Choose the data list from the tooltip.
2. *Table Id* - Choose the appropriate table in the ‘Table ID’ field.
3. *Add Filter -* Click Add Filter to define conditions that narrow down the data list and return only the relevant items. To learn more about using filters, [click here](/help/workflows/workflow-editor#add-filters).
4. *Add Field* - Click Add Field to add and populate additional fields for the selected activity. To learn more about managing activity data, [click here](/help/workflows/workflow-editor#add-fields).
**Note:** You can use this activity for 50,000 records. However, if you still want to perform an update operation for more than 50,000 records, you will need to use a for each/ do while activity.
### Add Comment to Record
Using this action, you can add a comment to a record.
1. *Data List*
* Click on the empty field.
* Choose the data list from the tooltip.
2. *Table Id* - Choose the appropriate table in the ‘Table ID’ field.
3. *Add Filter -* Click Add Filter to define conditions that narrow down the data list and return only the relevant items. To learn more about using filters, [click here](/help/workflows/workflow-editor#add-filters).
4. *Add Field* - Click Add Field to add and populate additional fields for the selected activity. To learn more about managing activity data, [click here](/help/workflows/workflow-editor#add-fields).
**Note:** You can use this activity for 50,000 records. However, if you still want to perform an update operation for more than 50,000 records, you will need to use a for each/ do while activity.
### Add Comment to Record
Using this action, you can add a comment to a record.
 1. *Table Id -* Click on the empty field and choose the table where you want to add the comment to.
2. *Record Id -* Click on the empty field and select the Record ID of the record want to add the comment to.
3. *Comment*
* At first click on the empty field, a window will open where you can write your comment.
* Write your comment and use the toolbar to bold, italicize, underline, align etc. You can also add to your comment Dynamic Content and Functions.
To learn more about Functions click [here](/help/tools/enginis-functions).
1. *Table Id -* Click on the empty field and choose the table where you want to add the comment to.
2. *Record Id -* Click on the empty field and select the Record ID of the record want to add the comment to.
3. *Comment*
* At first click on the empty field, a window will open where you can write your comment.
* Write your comment and use the toolbar to bold, italicize, underline, align etc. You can also add to your comment Dynamic Content and Functions.
To learn more about Functions click [here](/help/tools/enginis-functions).
 * When you’re done, click save.
 4. *Add Field* - Click Add Field to add and populate additional fields for the selected activity. To learn more about managing activity data, [click here](/help/workflows/workflow-editor#add-fields).
### Get Record Comments
By using this action, you can get one or more comments from a table.
4. *Add Field* - Click Add Field to add and populate additional fields for the selected activity. To learn more about managing activity data, [click here](/help/workflows/workflow-editor#add-fields).
### Get Record Comments
By using this action, you can get one or more comments from a table.
 1. *Table Id -* Click on the empty field and select the table from which you want to retrieve the comment in.
2. *Record Id -* Click on the empty field and select the Record ID of the comment you want to retrieve.
3. *Top N -* You can specify how many comments you want to get. Click on ‘Top N’ and enter the maximum number of comments you want to retrieve.
If you set `Top N = 1`, a single comment will be returned instead of an array. If no comment is found, the action will fail, allowing you to implement an IF condition within the workflow. This can be useful for processes where the existence of a comment determines the next steps in the workflow.
4. *Add Filter -* Click Add Filter to define conditions that narrow down the data list and return only the relevant items. To learn more about using filters, [click here](/help/workflows/workflow-editor#add-filters).
5. *Add Sort -* Click Add Sort to organize the data list by a selected field in ascending or descending order. To learn more about sorting data, [click here](/help/workflows/workflow-editor#add-sorts).
## Save the Automation
Save the automation by clicking on the button in the right side of the window.
1. *Table Id -* Click on the empty field and select the table from which you want to retrieve the comment in.
2. *Record Id -* Click on the empty field and select the Record ID of the comment you want to retrieve.
3. *Top N -* You can specify how many comments you want to get. Click on ‘Top N’ and enter the maximum number of comments you want to retrieve.
If you set `Top N = 1`, a single comment will be returned instead of an array. If no comment is found, the action will fail, allowing you to implement an IF condition within the workflow. This can be useful for processes where the existence of a comment determines the next steps in the workflow.
4. *Add Filter -* Click Add Filter to define conditions that narrow down the data list and return only the relevant items. To learn more about using filters, [click here](/help/workflows/workflow-editor#add-filters).
5. *Add Sort -* Click Add Sort to organize the data list by a selected field in ascending or descending order. To learn more about sorting data, [click here](/help/workflows/workflow-editor#add-sorts).
## Save the Automation
Save the automation by clicking on the button in the right side of the window.
 You can exit the automation by clicking on ‘Save’.
## Activate your Automation
Activate your automation. Perform an action that should activate the automation you’ve created.
* Click on the “Automations” button on the upper right side of the workbook.
* Click on ‘Automation Activity’ on the right side.
* Check the status of the automation—whether it’s ‘Failure,’ ‘Fell by condition,’ ‘Modified,’ or ‘Success’—by clicking on ‘Automations’ on the right side.
* To access information about the process click Details. To learn how to analyze workflow or automation history, you can navigate to the “Workflow History” category. There you’ll find the details you need to review and understand the history of your workflows or automations.
* After clicking on ‘Details’ If you want to run the same automation again, click on ‘Re-run’ button, located on the right side.
## Update the File column via workflow
### Initialize Files Array
Creates a Files Array.
You can exit the automation by clicking on ‘Save’.
## Activate your Automation
Activate your automation. Perform an action that should activate the automation you’ve created.
* Click on the “Automations” button on the upper right side of the workbook.
* Click on ‘Automation Activity’ on the right side.
* Check the status of the automation—whether it’s ‘Failure,’ ‘Fell by condition,’ ‘Modified,’ or ‘Success’—by clicking on ‘Automations’ on the right side.
* To access information about the process click Details. To learn how to analyze workflow or automation history, you can navigate to the “Workflow History” category. There you’ll find the details you need to review and understand the history of your workflows or automations.
* After clicking on ‘Details’ If you want to run the same automation again, click on ‘Re-run’ button, located on the right side.
## Update the File column via workflow
### Initialize Files Array
Creates a Files Array.
 1. *Name*
1. Click on the empty field and the tooltip will pop up.
2. Select from the tooltip the name of the new item you create. you can use:
* Static value – number / string. when using strings, you need to surround them with single quotes (‘).
* Property value from a previous activity (Using the tooltip that opens when clicking on the field).
2. *Value -* The value is optional. You can set it in a variable that you initialize as an initial value, but you can choose not to fill the field of the variable and populate it later in the workflow.
### Append File to Array
Appending to an array allows you to dynamically add new files to the end of the array without changing the size or structure of the array.
1. *Name*
1. Click on the empty field and the tooltip will pop up.
2. Select from the tooltip the name of the new item you create. you can use:
* Static value – number / string. when using strings, you need to surround them with single quotes (‘).
* Property value from a previous activity (Using the tooltip that opens when clicking on the field).
2. *Value -* The value is optional. You can set it in a variable that you initialize as an initial value, but you can choose not to fill the field of the variable and populate it later in the workflow.
### Append File to Array
Appending to an array allows you to dynamically add new files to the end of the array without changing the size or structure of the array.
 1. *Variable -* Choose from the drop down the name of the array you want to append to.
2. *Name -* Set the file name.
3. *Base64Content -* Enter the Base64 of the file.
4. *Content Type -* Enter the content type.
### Add File to Column
Add file to files column.
1. *Variable -* Choose from the drop down the name of the array you want to append to.
2. *Name -* Set the file name.
3. *Base64Content -* Enter the Base64 of the file.
4. *Content Type -* Enter the content type.
### Add File to Column
Add file to files column.
 1. *Table -* Choose from the drop down the name of the table you want to add to.
2. *Field -* Choose from the drop down the name of the column field you want to add to.
3. *Record Id* - Enter the Record id of the record you want to add to.
4. *File* - Enter the file content.
1. *Content Type -* Enter the content type format base64.
2. *Name -* Set the file name.
5. *Add Field* - Click Add Field to add and populate additional fields for the selected activity. To learn more about managing activity data, [click here](/help/workflows/workflow-editor#add-fields).
### Delete Files
Delete file from column.
1. *Table -* Choose from the drop down the name of the table you want to add to.
2. *Field -* Choose from the drop down the name of the column field you want to add to.
3. *Record Id* - Enter the Record id of the record you want to add to.
4. *File* - Enter the file content.
1. *Content Type -* Enter the content type format base64.
2. *Name -* Set the file name.
5. *Add Field* - Click Add Field to add and populate additional fields for the selected activity. To learn more about managing activity data, [click here](/help/workflows/workflow-editor#add-fields).
### Delete Files
Delete file from column.
 1. *Table -* Choose from the drop down the name of the table you want to delete from.
2. *Field -* Choose from the drop down the name of the column field you want to delete from.
3. *Record Id -* Enter the Record id of the record you want to delete from.
4. *Add Field* - Click Add Field to add and populate additional fields for the selected activity. To learn more about managing activity data, [click here](/help/workflows/workflow-editor#add-fields).
### Get Files
Choose the “Get Files” activity.
1. *Table -* Choose from the drop down the name of the table you want to delete from.
2. *Field -* Choose from the drop down the name of the column field you want to delete from.
3. *Record Id -* Enter the Record id of the record you want to delete from.
4. *Add Field* - Click Add Field to add and populate additional fields for the selected activity. To learn more about managing activity data, [click here](/help/workflows/workflow-editor#add-fields).
### Get Files
Choose the “Get Files” activity.
 1. *Table -* Choose from the drop down the name of the table you want to delete from.
2. *Record Id -* Enter the Record id of the record you want to delete from.
3. *Add Field* - Click Add Field to add and populate additional fields for the selected activity. To learn more about managing activity data, [click here](/help/workflows/workflow-editor#add-fields).
This documentation is built and hosted on [Mintlify](https://mintlify.com), a developer documentation platform.
1. *Table -* Choose from the drop down the name of the table you want to delete from.
2. *Record Id -* Enter the Record id of the record you want to delete from.
3. *Add Field* - Click Add Field to add and populate additional fields for the selected activity. To learn more about managing activity data, [click here](/help/workflows/workflow-editor#add-fields).
This documentation is built and hosted on [Mintlify](https://mintlify.com), a developer documentation platform.