> ## Documentation Index
> Fetch the complete documentation index at: https://docs.engini.ai/llms.txt
> Use this file to discover all available pages before exploring further.
# Security
# How to get Security page?
The Security section in Engini allows customers to customize and fortify their account’s security measures. It provides access to essential security features designed to protect user data, enhance access control, and ensure secure workflows. Here’s how you can navigate to and utilize the security features:
1. First, click your profile at the bottom of the sidebar.
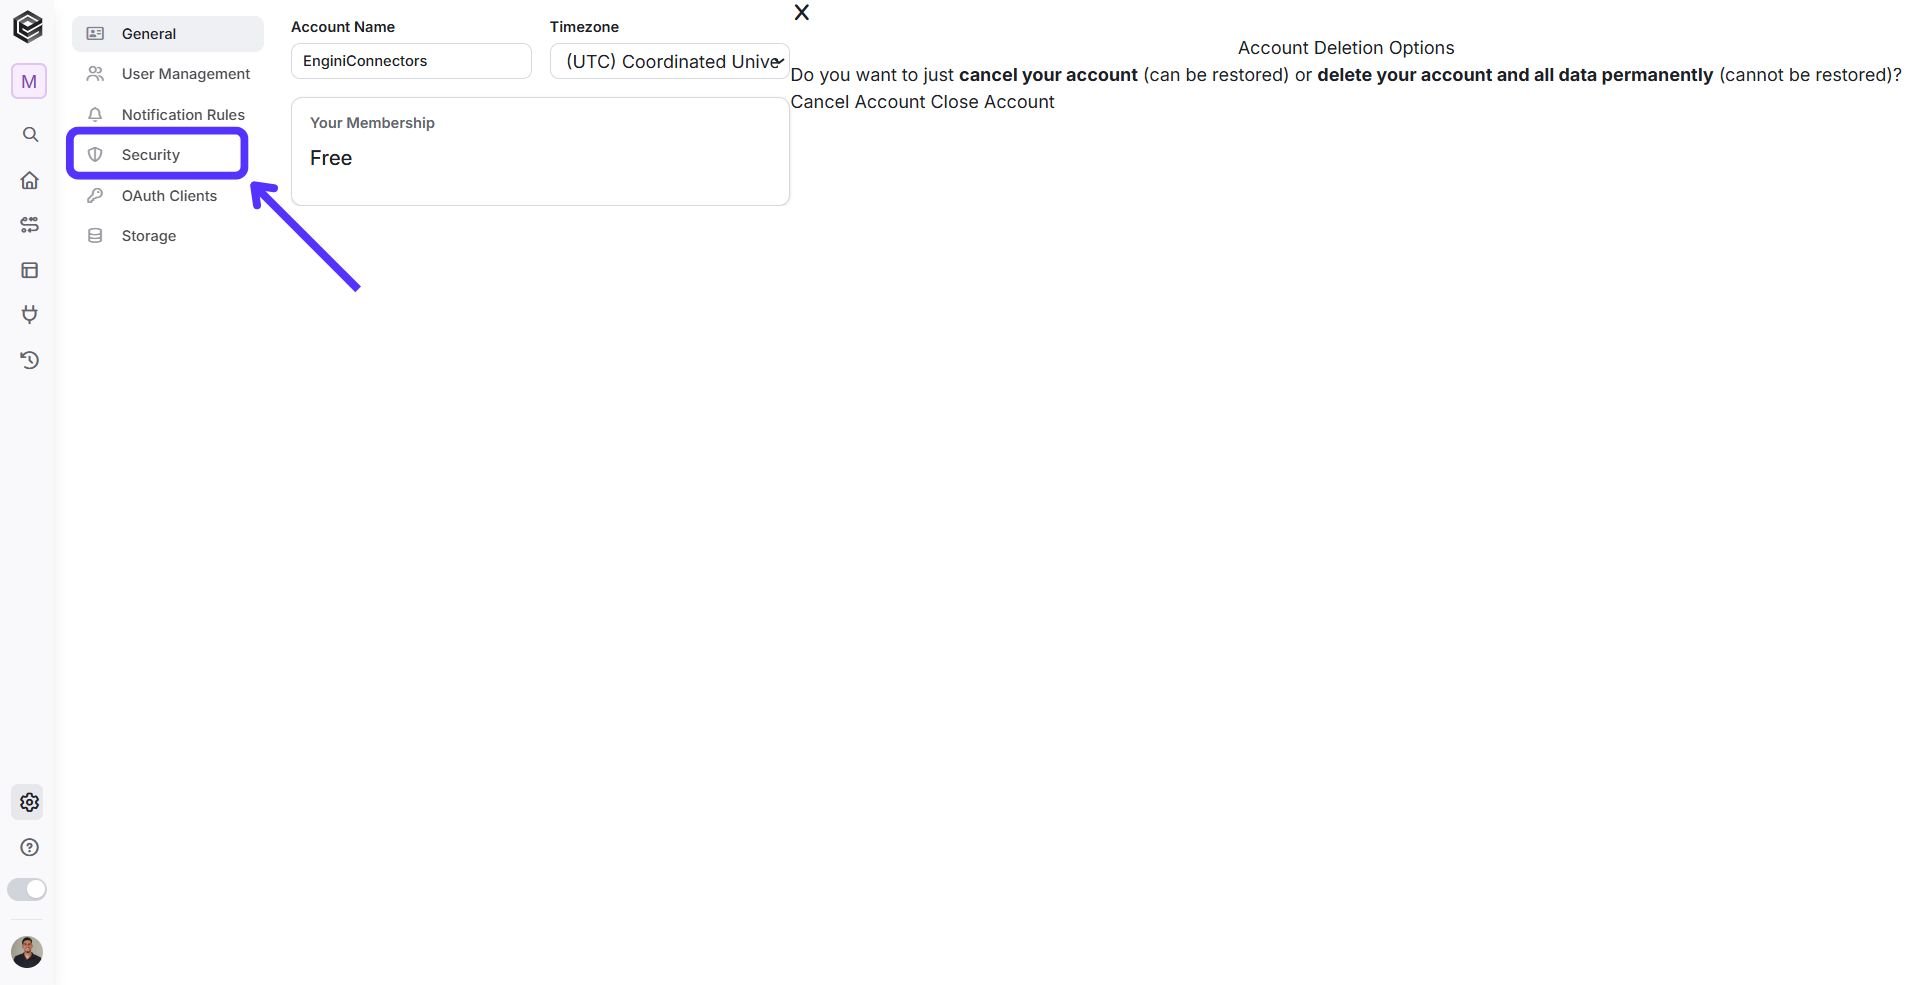
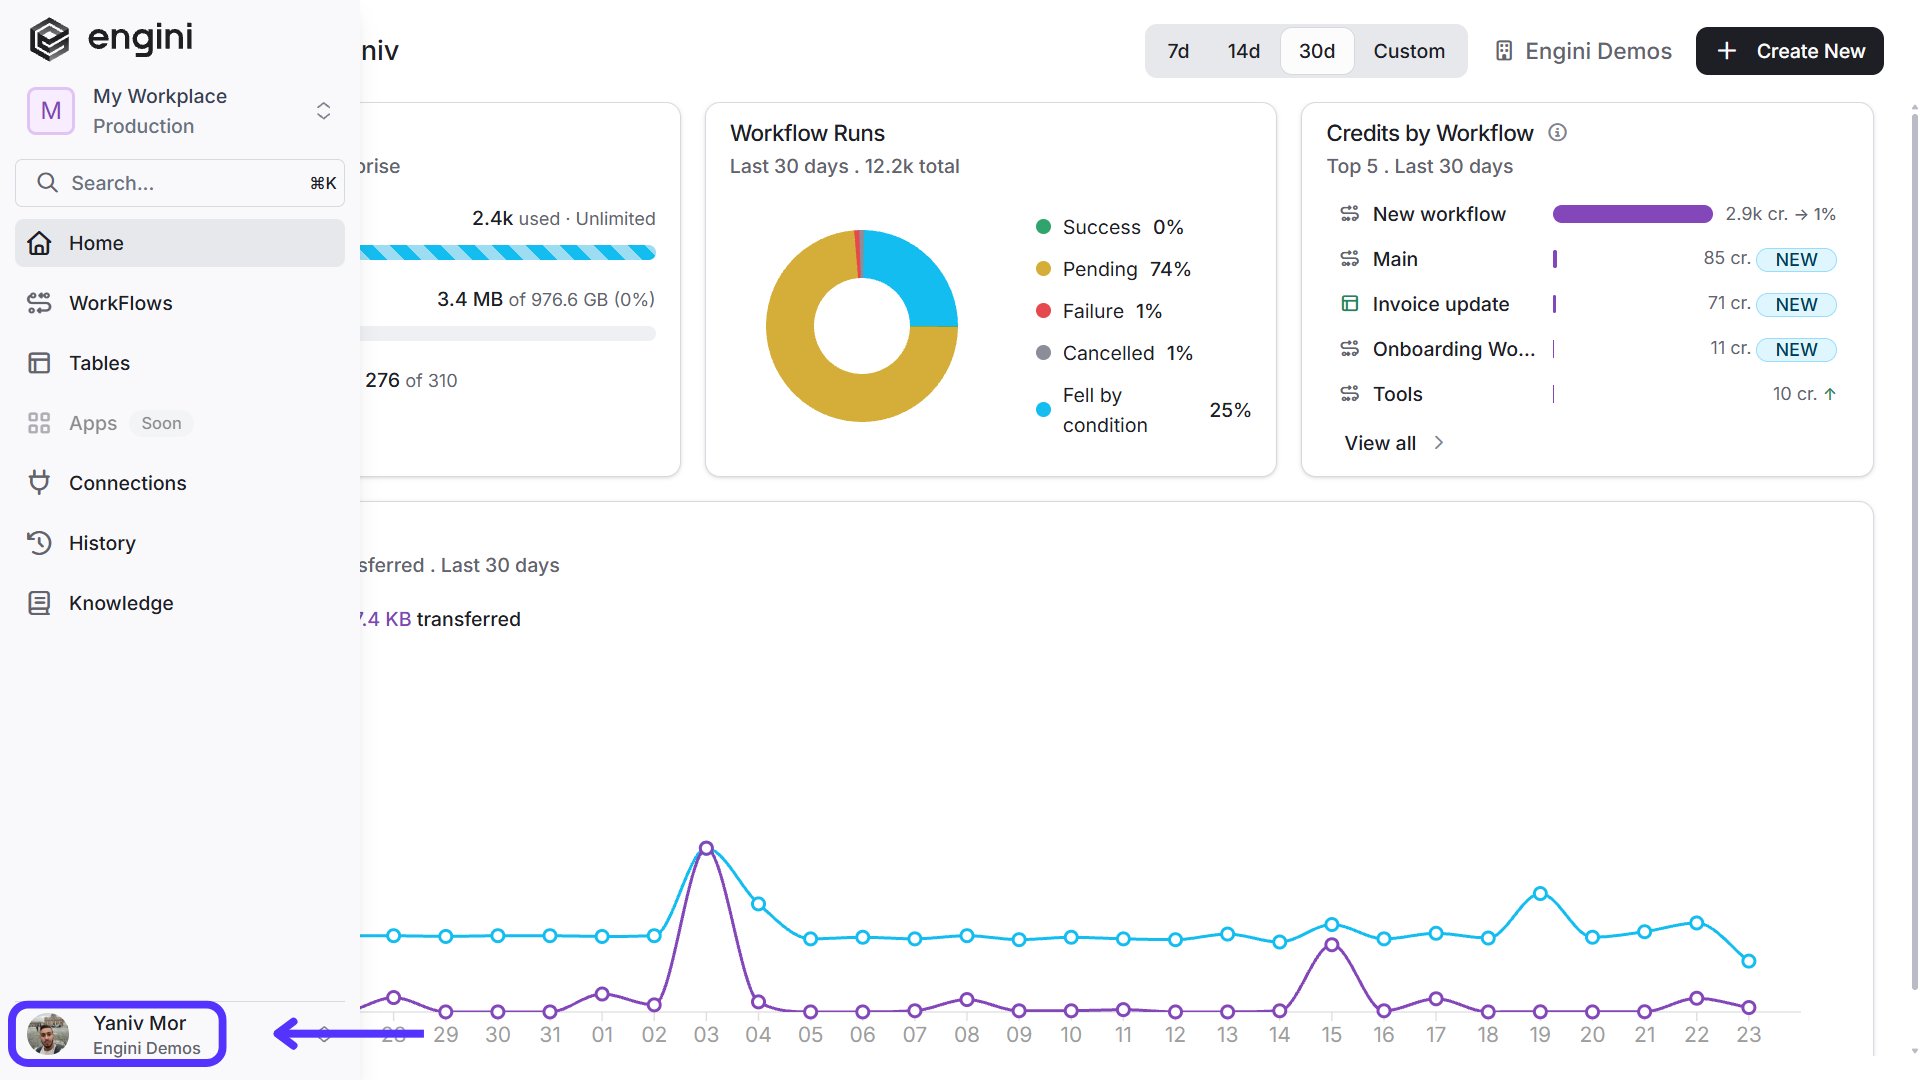 2. Click on the Gear Wheel Icon (setting) locate in the lower left corner of the screen.
 3. Click on the “Security” section.
 # Security Options
## Session Timout
Allows users to activate or deactivate this feature.
# Security Options
## Session Timout
Allows users to activate or deactivate this feature.
 1. Click on the toggle to turn on the session time out and to define the idle time.
2. Enter the idle session timeout.
* Minimum idle time can be set to a minimum of 30 minutes.
3. If you changed the default (30 minutes) idle session time out, click on the “save” button to save the changes.
**Note:** After the specified time of inactivity, the user is automatically logged out and redirected to the login page. If this feature remains inactive, users can remain on the platform indefinitely without being disconnected.
## SSO Authentication
SSO (Single Sign-On) allows users to securely access Engini with a single login, eliminating the need for multiple credentials while enhancing security and user convenience.
* Click on “Configure SSO” to open the configuration dialog.
1. Click on the toggle to turn on the session time out and to define the idle time.
2. Enter the idle session timeout.
* Minimum idle time can be set to a minimum of 30 minutes.
3. If you changed the default (30 minutes) idle session time out, click on the “save” button to save the changes.
**Note:** After the specified time of inactivity, the user is automatically logged out and redirected to the login page. If this feature remains inactive, users can remain on the platform indefinitely without being disconnected.
## SSO Authentication
SSO (Single Sign-On) allows users to securely access Engini with a single login, eliminating the need for multiple credentials while enhancing security and user convenience.
* Click on “Configure SSO” to open the configuration dialog.
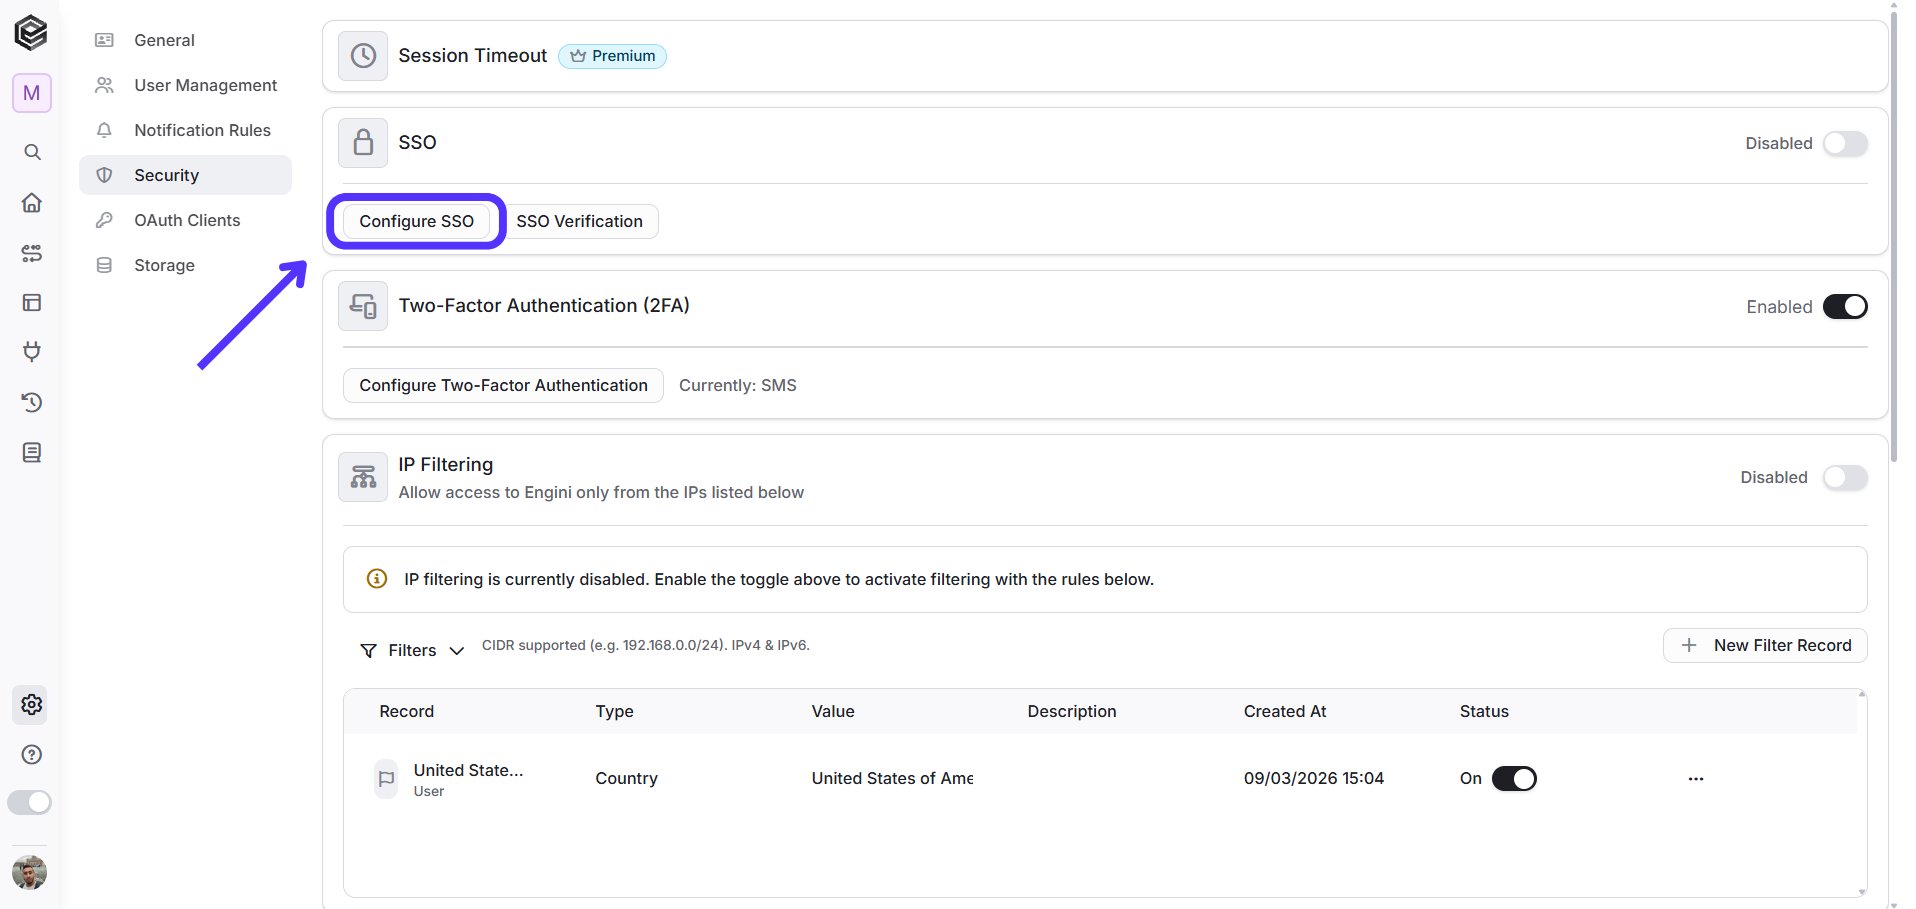 * A window will open where you can fill in the required SSO details.
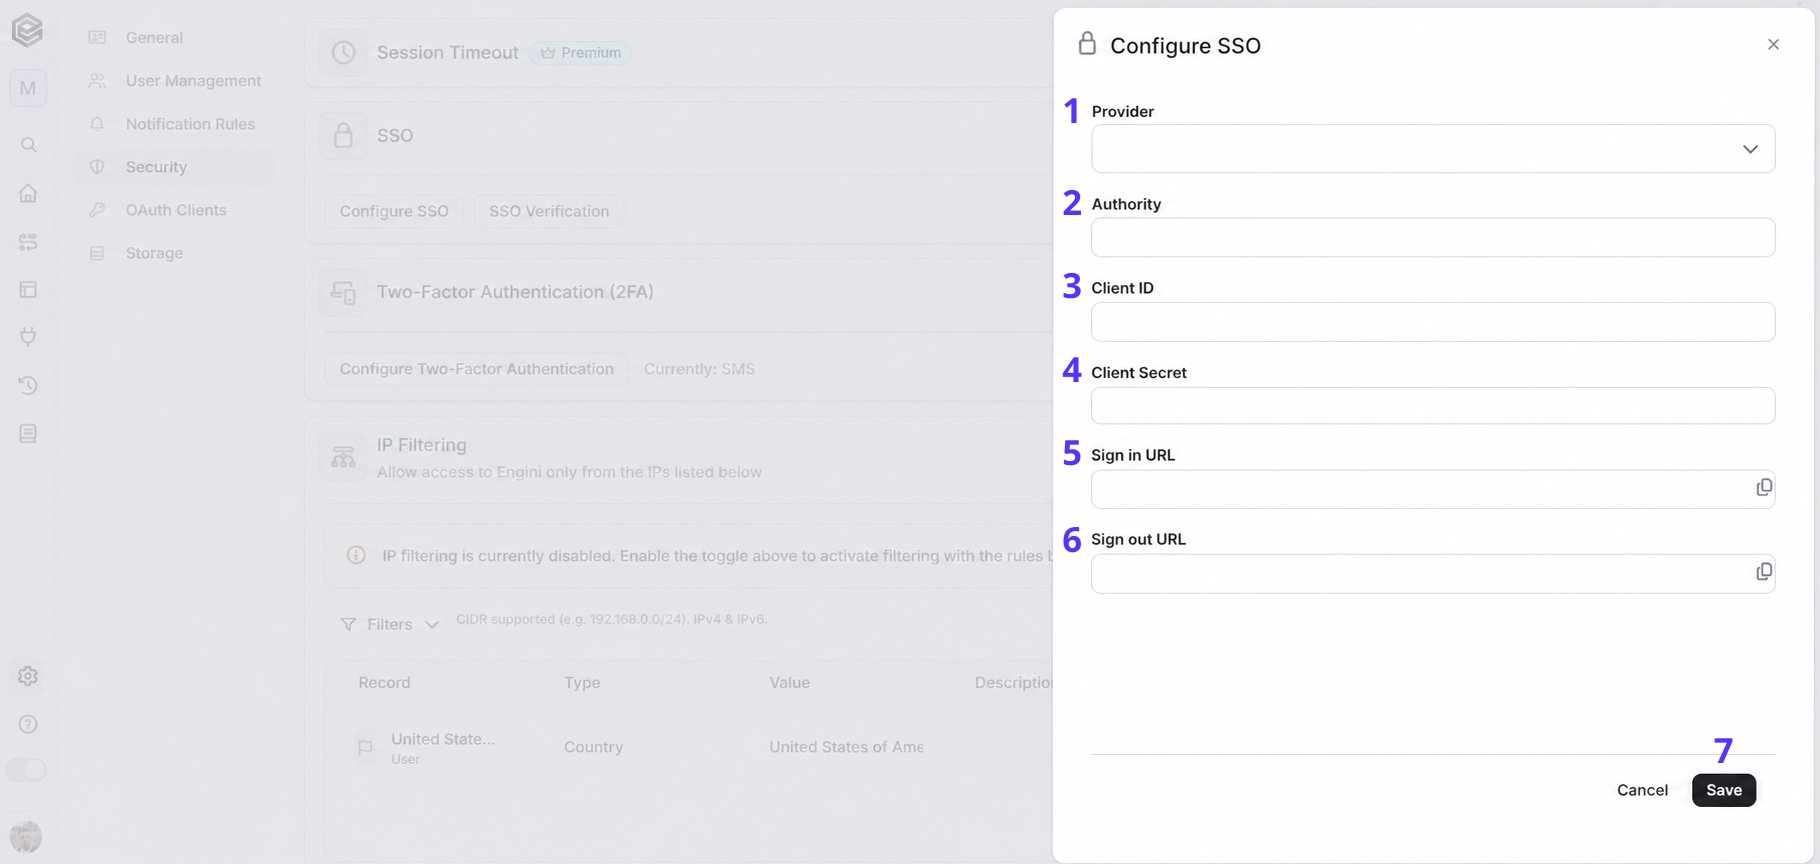 1. *Provider –* Select your Identity Provider (e.g., OKTA). Once selected, the Authority, Sign-in URL, and Sign-out URL fields will be automatically filled based on your provider.
2. *Authority-* The URL of your Identity Provider’s authorization server. (This will be pre-filled if the provider is selected).
3. *Client Id –* The unique identifier provided by your SSO provider for the application.
4. *Client Secret –* The secure secret key provided by your SSO provider for authentication.
5. *Sign-in URL –* The URL where users are redirected for authentication. This field is pre-filled if the provider is selected.
6. *Sign-out URL –* The URL for logging out and redirecting users back to the application. This field is pre-filled if the provider is selected.
7. *Save* - Click on the save button to save your connection.
### Setting Up SSO in Engini
To configure SSO, you need to exchange information between Engini and your chosen Identity Provider (e.g., Okta):
1. *Log in to Okta:*
1. *Provider –* Select your Identity Provider (e.g., OKTA). Once selected, the Authority, Sign-in URL, and Sign-out URL fields will be automatically filled based on your provider.
2. *Authority-* The URL of your Identity Provider’s authorization server. (This will be pre-filled if the provider is selected).
3. *Client Id –* The unique identifier provided by your SSO provider for the application.
4. *Client Secret –* The secure secret key provided by your SSO provider for authentication.
5. *Sign-in URL –* The URL where users are redirected for authentication. This field is pre-filled if the provider is selected.
6. *Sign-out URL –* The URL for logging out and redirecting users back to the application. This field is pre-filled if the provider is selected.
7. *Save* - Click on the save button to save your connection.
### Setting Up SSO in Engini
To configure SSO, you need to exchange information between Engini and your chosen Identity Provider (e.g., Okta):
1. *Log in to Okta:*
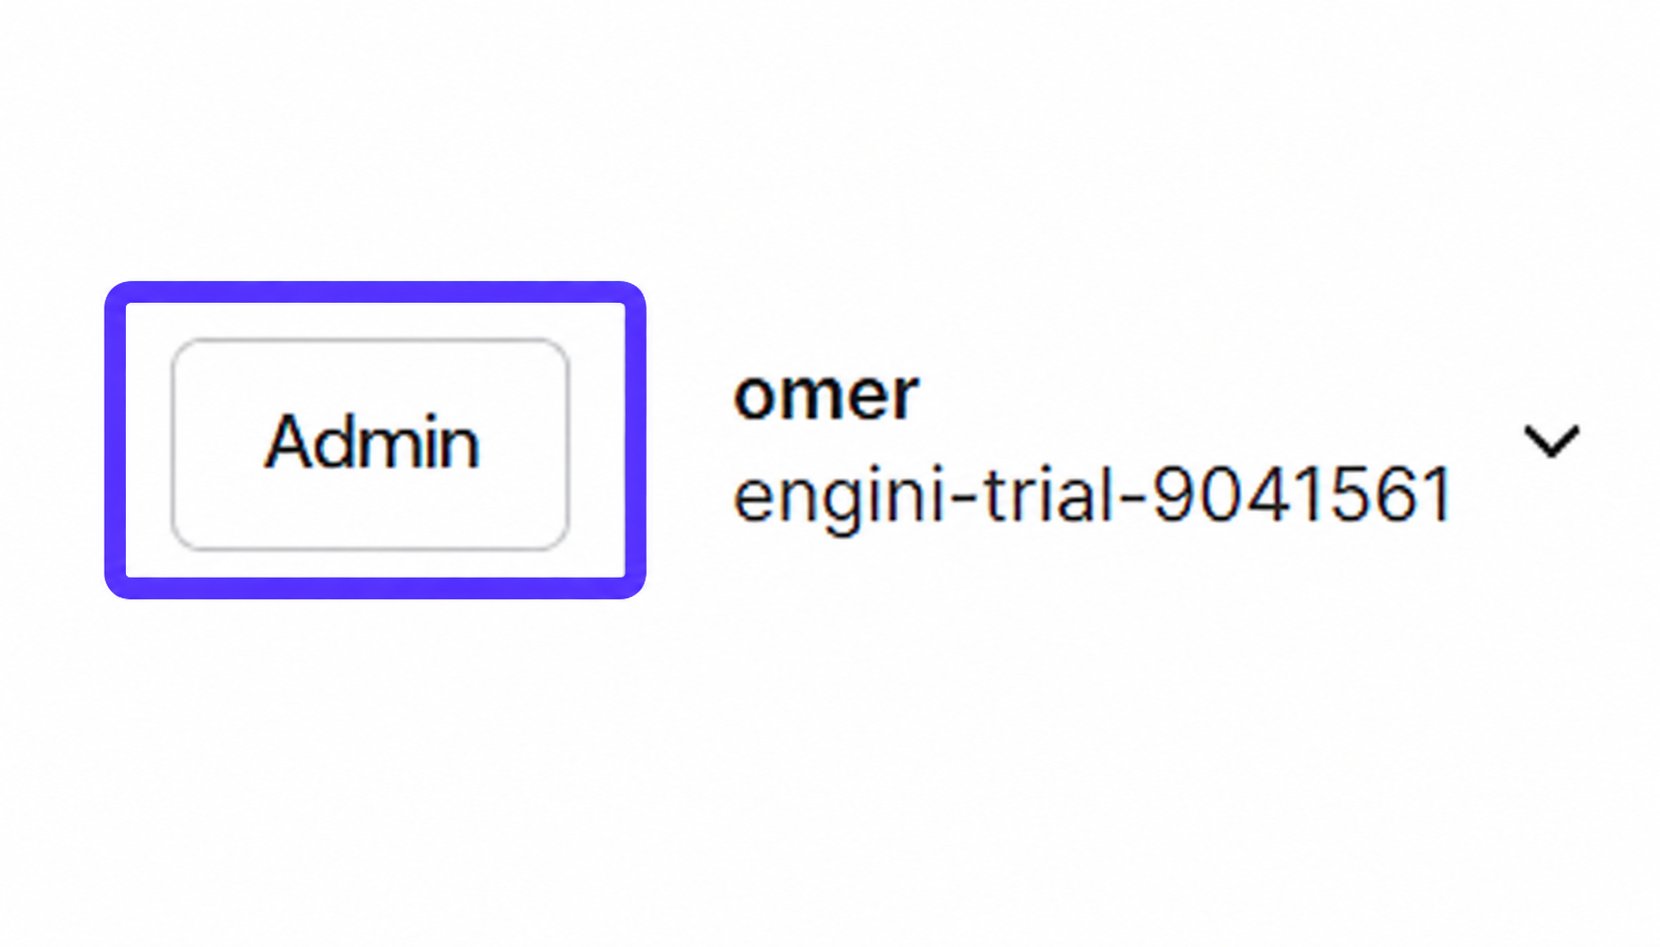 * Access your Okta account and log in with your credentials.
* Navigate to Account and click on Admin.
* Enter the verification code from the Okta Verify app to proceed.
2. *Create an App integration:*
* Access your Okta account and log in with your credentials.
* Navigate to Account and click on Admin.
* Enter the verification code from the Okta Verify app to proceed.
2. *Create an App integration:*
 * On the left side of the Okta dashboard, click Applications.
* Click Create App Integration.
* Choose the required Sign-in method and Application type (follow your organization’s preferences).
* Assign a name for your application and proceed to the next step.
3. *Configure Redirect URLs:*
* On the left side of the Okta dashboard, click Applications.
* Click Create App Integration.
* Choose the required Sign-in method and Application type (follow your organization’s preferences).
* Assign a name for your application and proceed to the next step.
3. *Configure Redirect URLs:*
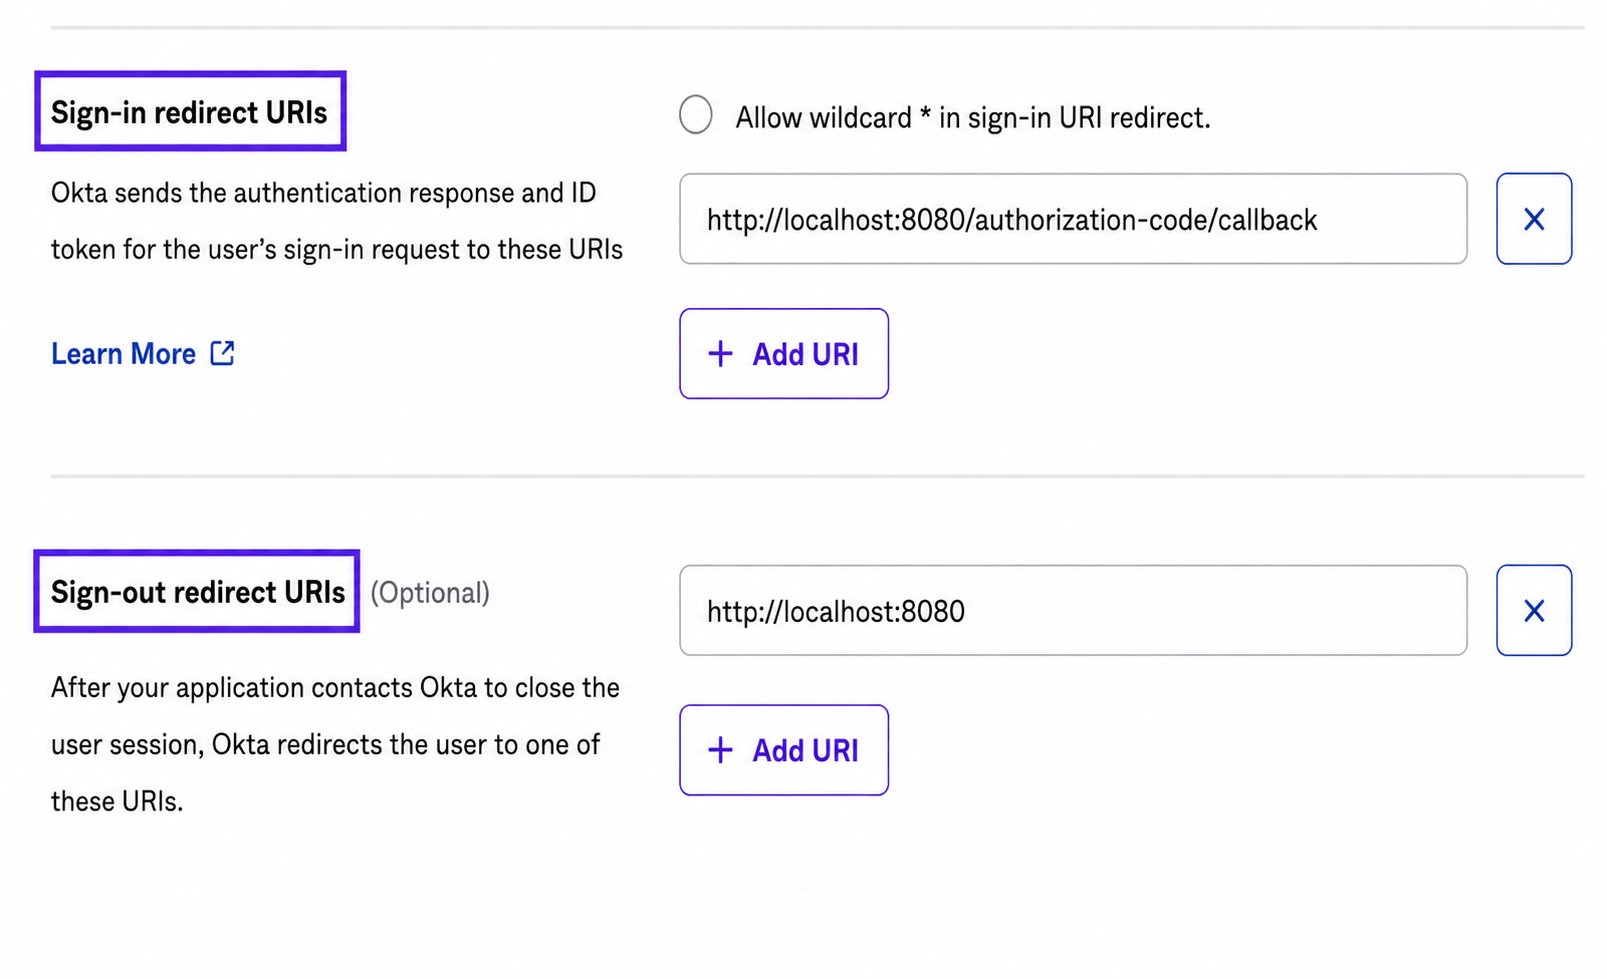 * Scroll down to the section for Sign-In Redirect URLs and Sign-Out Redirect URLs.
* Open Engini and copy the Sign-In URL from Engini’s SSO configuration page into Okta’s Sign-In Redirect URL field.
* Similarly, copy the Sign-Out URL from Engini into Okta’s Sign-Out Redirect URL field.
4. *Set Assignments:*
* Scroll down to the section for Sign-In Redirect URLs and Sign-Out Redirect URLs.
* Open Engini and copy the Sign-In URL from Engini’s SSO configuration page into Okta’s Sign-In Redirect URL field.
* Similarly, copy the Sign-Out URL from Engini into Okta’s Sign-Out Redirect URL field.
4. *Set Assignments:*
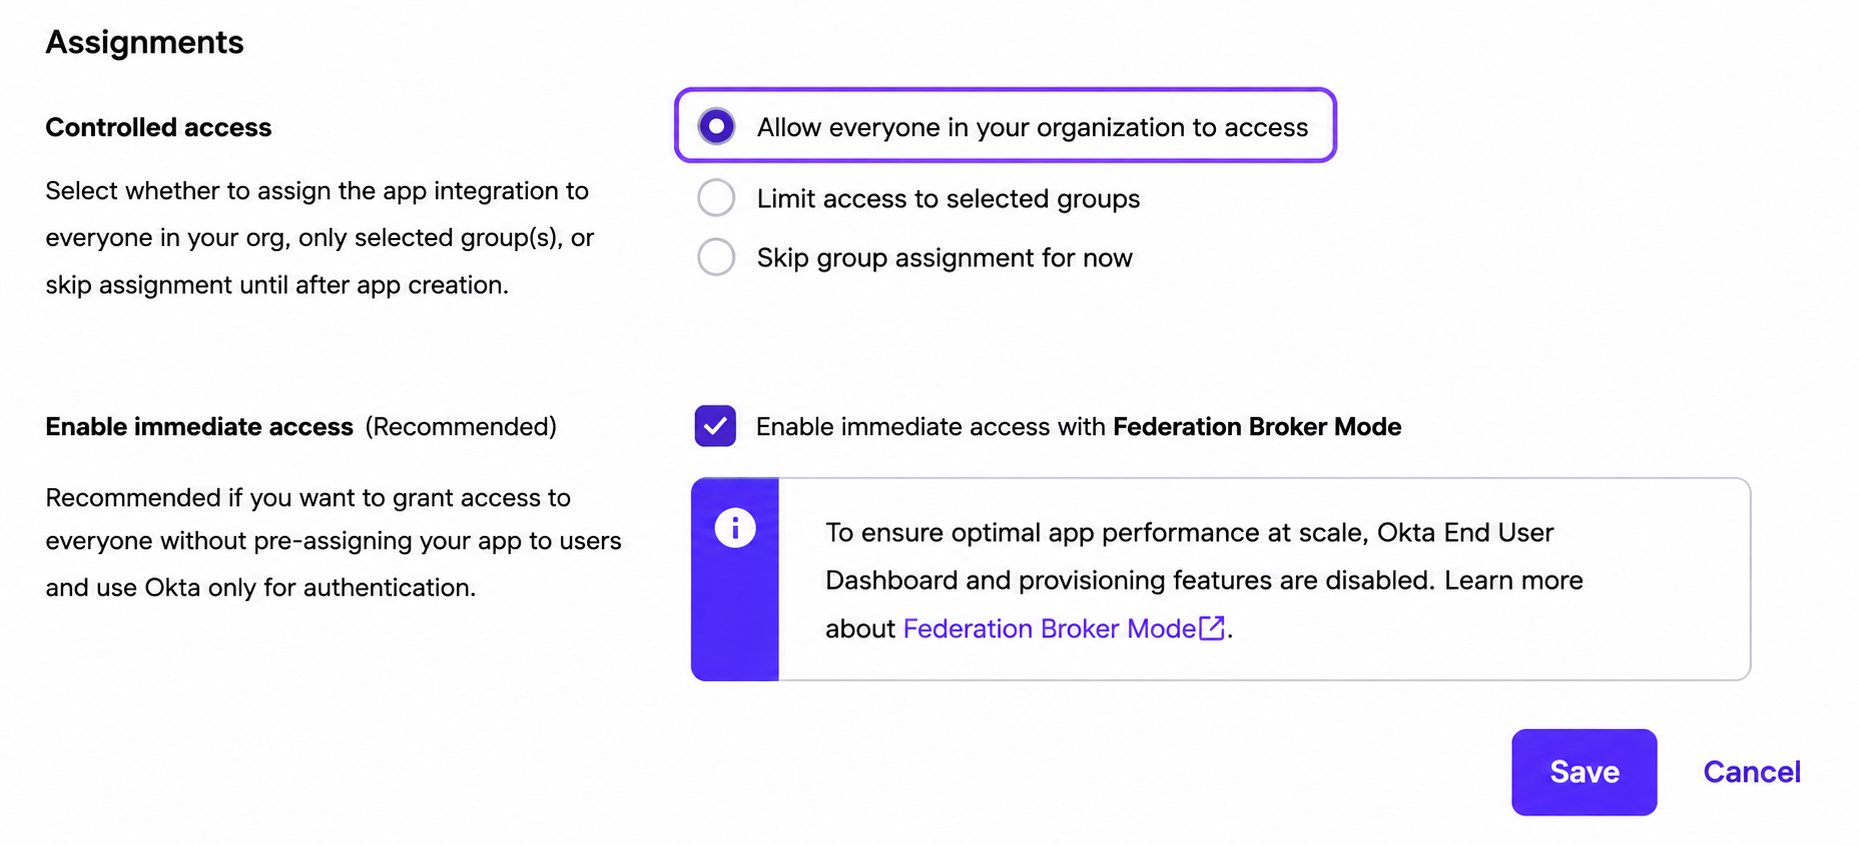 * At the bottom of the Okta configuration page, in the Assignments section, select Allow everyone in your organization to access.
* Click Save.
5. *Copy Client Credentials from Okta to Engini:*
* At the bottom of the Okta configuration page, in the Assignments section, select Allow everyone in your organization to access.
* Click Save.
5. *Copy Client Credentials from Okta to Engini:*
 * After saving, you will be redirected to a page showing the Client ID and Client Secret.
* Copy the Client ID from Okta and paste it into the Client ID field in Engini’s SSO configuration window.
* Copy the Client Secret from Okta and paste it into the Client Secret field in Engini.
6. *Configure the Authority Field in Engini:*
* After saving, you will be redirected to a page showing the Client ID and Client Secret.
* Copy the Client ID from Okta and paste it into the Client ID field in Engini’s SSO configuration window.
* Copy the Client Secret from Okta and paste it into the Client Secret field in Engini.
6. *Configure the Authority Field in Engini:*
 * In your browser, look at the URL in the address bar of the Okta page.
* Copy the domain part of the URL (the portion between http\:// and okta) and paste it into the Authority field in Engini.
7. *Save the Configuration in Engini:*
* Once all the fields in Engini are filled out (Client ID, Client Secret, Authority, Sign-In URL, and Sign-Out URL), click Save in Engini’s SSO configuration window.
8. *Disable Federation Broker Mode:*
* In your browser, look at the URL in the address bar of the Okta page.
* Copy the domain part of the URL (the portion between http\:// and okta) and paste it into the Authority field in Engini.
7. *Save the Configuration in Engini:*
* Once all the fields in Engini are filled out (Client ID, Client Secret, Authority, Sign-In URL, and Sign-Out URL), click Save in Engini’s SSO configuration window.
8. *Disable Federation Broker Mode:*
 * Go to the Applications section in Okta.
* Locate and disable the Federation Broker Mode option for the application.
9. *Assign the Application to Users:*
* Go to the Applications section in Okta.
* Locate and disable the Federation Broker Mode option for the application.
9. *Assign the Application to Users:*
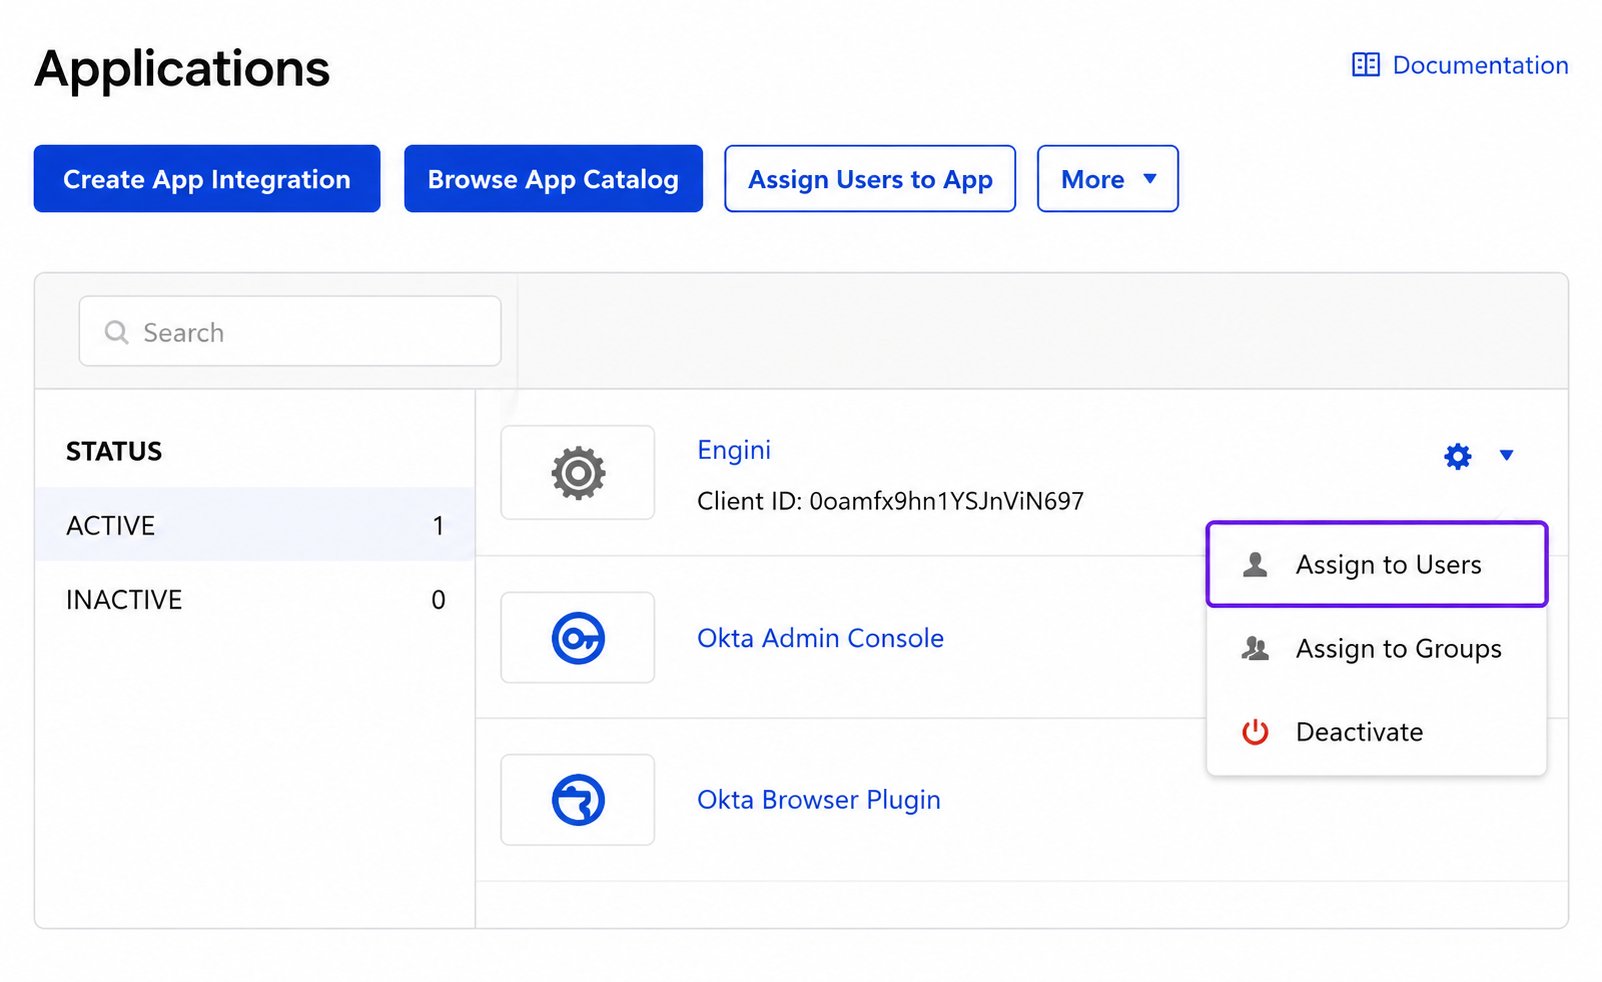 * Navigate back to Applications in Okta.
* Click Assign to Users for the application you created.
* Select the users you want to assign to this application.
10. *Create a New Policy:*
* Navigate back to Applications in Okta.
* Click Assign to Users for the application you created.
* Select the users you want to assign to this application.
10. *Create a New Policy:*
 * On the left-hand menu, click on Security, then select API.
* Locate the relevant Authorization Server and click Edit.
* In the Authorization Server settings, click on the Access Policies tab.
* Click Add Policy and provide a name and description for the policy.
* Select who to assign the policy to:
* All clients or
* Specific clients (you’ll need to select the clients manually).
* Click Create Policy.
11. *Add a Rule:*
* On the left-hand menu, click on Security, then select API.
* Locate the relevant Authorization Server and click Edit.
* In the Authorization Server settings, click on the Access Policies tab.
* Click Add Policy and provide a name and description for the policy.
* Select who to assign the policy to:
* All clients or
* Specific clients (you’ll need to select the clients manually).
* Click Create Policy.
11. *Add a Rule:*
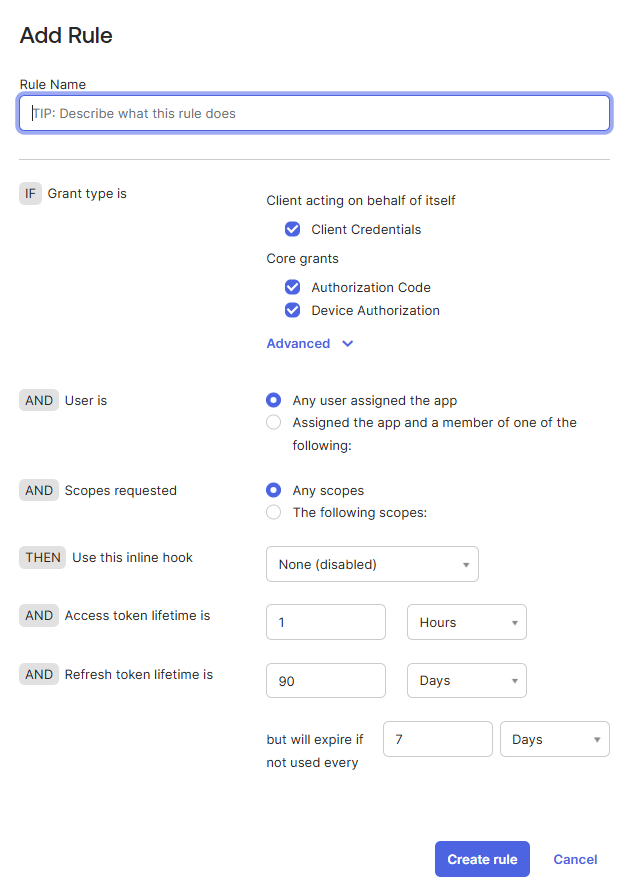 * On the same Access Policies page, click Add Rule under the created policy.
* Configure the rule as needed.
After completing the SSO configuration, click on the SSO Verification button in order to checks the connectivity between Engini and the Identity Provider (e.g., Okta).
* On the same Access Policies page, click Add Rule under the created policy.
* Configure the rule as needed.
After completing the SSO configuration, click on the SSO Verification button in order to checks the connectivity between Engini and the Identity Provider (e.g., Okta).
 **Final Step**
Now, simply toggle Enable SSO to activate SSO authentication and start using it seamlessly.
**Final Step**
Now, simply toggle Enable SSO to activate SSO authentication and start using it seamlessly.
 ## Signing in with SSO
After setting up SSO in Engini, you can sign in using your organizational credentials.
If you haven’t configured it yet, [click here.](/help/security-and-data/security#setting-up-sso-in-engini)
Follow the steps below to connect to Engini using SSO:
## Signing in with SSO
After setting up SSO in Engini, you can sign in using your organizational credentials.
If you haven’t configured it yet, [click here.](/help/security-and-data/security#setting-up-sso-in-engini)
Follow the steps below to connect to Engini using SSO:
 1. Click on Sign in with SSO
2. *Sign in with SSO -* allows you to log in with the name of your account.
1. Click on Sign in with SSO
2. *Sign in with SSO -* allows you to log in with the name of your account.
 1. *Account Name -* Enter you account name.
2. *Sign in with SSO -* Click the button to sign in to your Engini account.
3. *Not SSO user? Go back -* Returns you to the regular login flow if you are not using SSO.
3. *Redirect to your Identity Provider -* After you enter your **Account Name** and click **“Sign in with SSO”**, Engini will automatically redirect you to your organization’s login portal (such as Okta).
* Log in using your company credentials (email and password).
Before attempting to sign in with SSO, make sure your organization has configured the correct **Redirect URLs** in the Engini **Security Settings**. Learn how to configure Redirect URLs [here.](/help/security-and-data/security#setting-up-sso-in-engini)
4. *Successful Login -* Once authenticated, you will be automatically redirected back to your Engini account, no need to enter a separate password for Engini.
## Two-Factor Authentication (2FA)
When the user who created the account sets up two-factor authentication, the users invited to access that account are required to set up their own two-factor authentication. Account-level settings require full authentication while allowing users to customize their preferences.
1. Click the button to initiate the setup process if it is disabled.
1. *Account Name -* Enter you account name.
2. *Sign in with SSO -* Click the button to sign in to your Engini account.
3. *Not SSO user? Go back -* Returns you to the regular login flow if you are not using SSO.
3. *Redirect to your Identity Provider -* After you enter your **Account Name** and click **“Sign in with SSO”**, Engini will automatically redirect you to your organization’s login portal (such as Okta).
* Log in using your company credentials (email and password).
Before attempting to sign in with SSO, make sure your organization has configured the correct **Redirect URLs** in the Engini **Security Settings**. Learn how to configure Redirect URLs [here.](/help/security-and-data/security#setting-up-sso-in-engini)
4. *Successful Login -* Once authenticated, you will be automatically redirected back to your Engini account, no need to enter a separate password for Engini.
## Two-Factor Authentication (2FA)
When the user who created the account sets up two-factor authentication, the users invited to access that account are required to set up their own two-factor authentication. Account-level settings require full authentication while allowing users to customize their preferences.
1. Click the button to initiate the setup process if it is disabled.
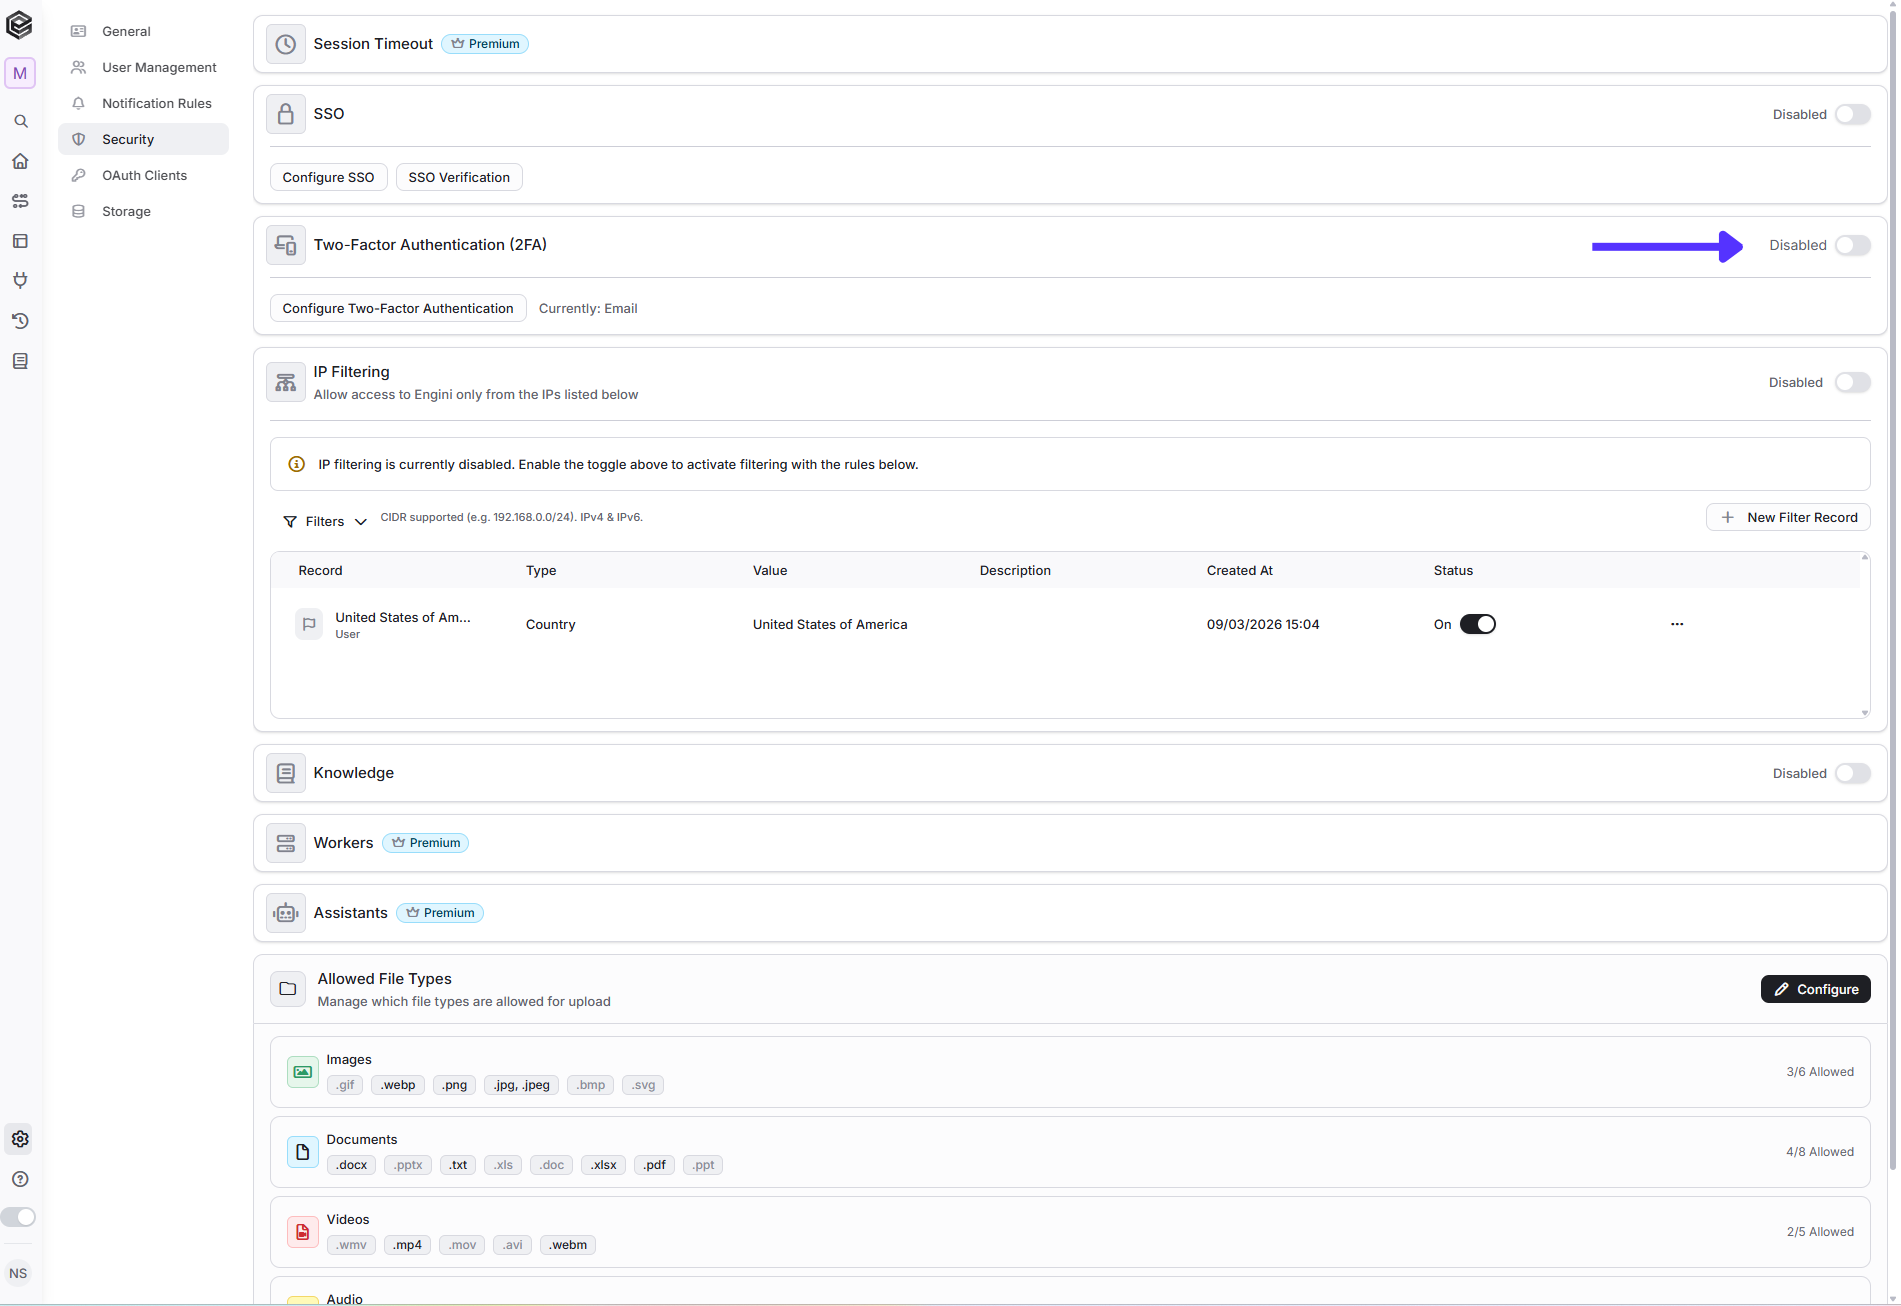 2. An authentication methods window will pop-up and you can choose between phone number or email for verification.
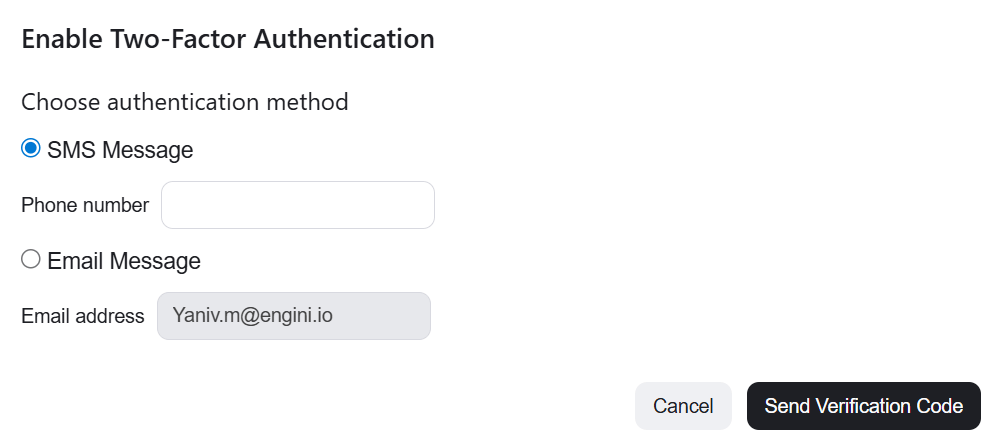 3. Click on the “Send Verification Code” button to request a code be sent to your chosen phone/email. Once received, utilize the code as necessary.
**Note**: You can change the authentication type at any time, either here or from your Profile page.
To change it from the Profile page, click Configure 2FA and select the authentication method, as explained above.
3. Click on the “Send Verification Code” button to request a code be sent to your chosen phone/email. Once received, utilize the code as necessary.
**Note**: You can change the authentication type at any time, either here or from your Profile page.
To change it from the Profile page, click Configure 2FA and select the authentication method, as explained above.
 ## IP Filtering
Allows users to limit account access to specific addresses or countries. Users must configure at least one filtering row to use the IP filtering.
1. Click “Add filter record” to start defining filters.
2. Applying Filters: Choose between the options below.
### User
Manage system users, including their access, roles, and permissions.
## IP Filtering
Allows users to limit account access to specific addresses or countries. Users must configure at least one filtering row to use the IP filtering.
1. Click “Add filter record” to start defining filters.
2. Applying Filters: Choose between the options below.
### User
Manage system users, including their access, roles, and permissions.
 1. *Type* - IP-related values or country.
2. *Value* – Enter the value for the selected type. The required format and input will change depending on the type selected (for example: a single IP address, an IP range, a CIDR block, or a country).
1. *IP Address -* Allows access only from a specific single IP address.
2. *IP Range -* Allows access from a range of IP addresses between a defined start and end IP.
3. *CIDR -* Allows access using CIDR notation, which defines a block of IP addresses in a compact format (e.g., 192.168.1.0/24).
4. *Country -* Allows or restricts access based on the user’s geographic location (country).
2. *Description* – An optional field used to add a short note explaining the purpose of the IP rule, making it easier to identify and manage later.
### App
Manage applications within the platform, including their settings and configurations.
1. *Type* - IP-related values or country.
2. *Value* – Enter the value for the selected type. The required format and input will change depending on the type selected (for example: a single IP address, an IP range, a CIDR block, or a country).
1. *IP Address -* Allows access only from a specific single IP address.
2. *IP Range -* Allows access from a range of IP addresses between a defined start and end IP.
3. *CIDR -* Allows access using CIDR notation, which defines a block of IP addresses in a compact format (e.g., 192.168.1.0/24).
4. *Country -* Allows or restricts access based on the user’s geographic location (country).
2. *Description* – An optional field used to add a short note explaining the purpose of the IP rule, making it easier to identify and manage later.
### App
Manage applications within the platform, including their settings and configurations.
 1. *Application* – Select the application to which the IP rule will apply. The rule will control access specifically for this application.
2. *Type* – Defines the type of IP rule you want to create (such as IP Address, IP Range, CIDR, or Country). The selected type determines how access will be filtered.
1. *IP Address -* Allows access only from a specific single IP address.
2. *IP Range -* Allows access from a range of IP addresses between a defined start and end IP.
3. *CIDR -* Allows access using CIDR notation, which defines a block of IP addresses in a compact format (e.g., 192.168.1.0/24).
4. *Country -* Allows or restricts access based on the user’s geographic location (country).
2. *Value* – Enter the value for the selected type. The required format and input will change depending on the type selected (for example: a single IP address, an IP range, a CIDR block, or a country).
3. *Description* – An optional field where you can add a short note describing the purpose of the rule to make it easier to identify later.
### Connection
Manage integrations and external service connections used by the system.
1. *Application* – Select the application to which the IP rule will apply. The rule will control access specifically for this application.
2. *Type* – Defines the type of IP rule you want to create (such as IP Address, IP Range, CIDR, or Country). The selected type determines how access will be filtered.
1. *IP Address -* Allows access only from a specific single IP address.
2. *IP Range -* Allows access from a range of IP addresses between a defined start and end IP.
3. *CIDR -* Allows access using CIDR notation, which defines a block of IP addresses in a compact format (e.g., 192.168.1.0/24).
4. *Country -* Allows or restricts access based on the user’s geographic location (country).
2. *Value* – Enter the value for the selected type. The required format and input will change depending on the type selected (for example: a single IP address, an IP range, a CIDR block, or a country).
3. *Description* – An optional field where you can add a short note describing the purpose of the rule to make it easier to identify later.
### Connection
Manage integrations and external service connections used by the system.
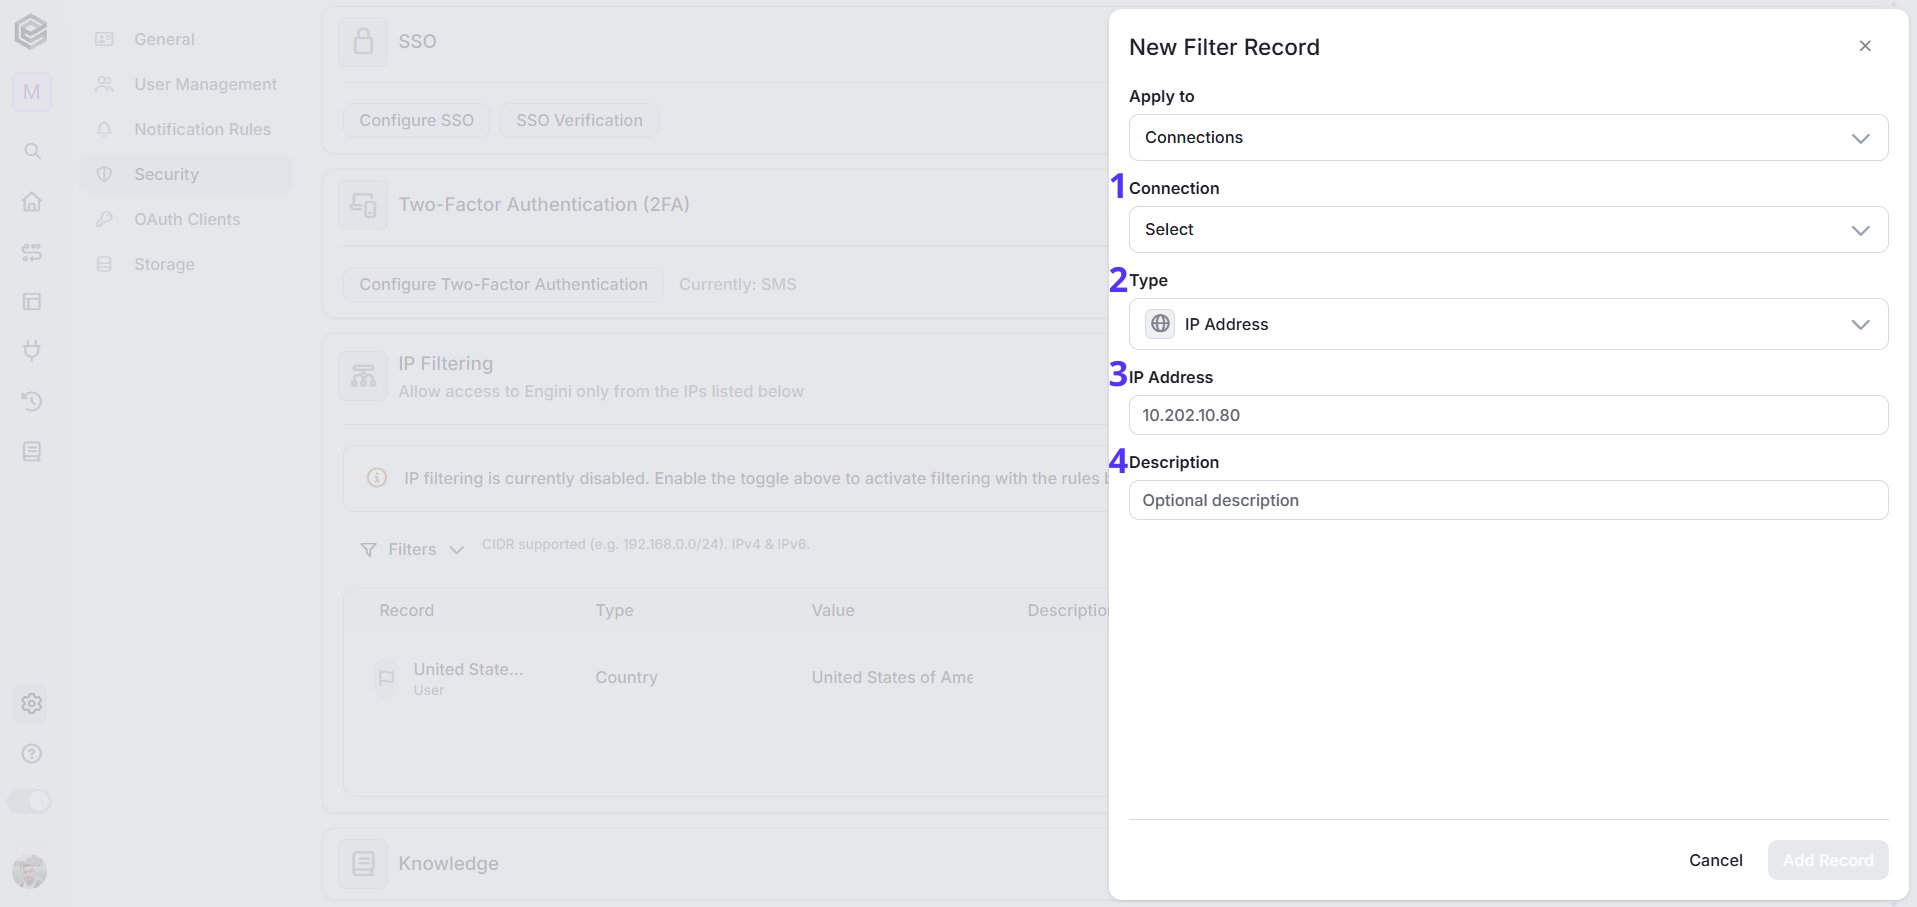 1. *Connection* – Select the specific connection for which the IP restriction rule will apply. The rule will control access only for this selected connection.
2. *Type* – Defines the type of IP rule you want to create (such as IP Address, IP Range, CIDR, or Country). The selected type determines how access will be filtered.
1. *IP Address -* Allows access only from a specific single IP address.
2. *IP Range -* Allows access from a range of IP addresses between a defined start and end IP.
3. *CIDR -* Allows access using CIDR notation, which defines a block of IP addresses in a compact format (e.g., 192.168.1.0/24).
4. *Country -* Allows or restricts access based on the user’s geographic location (country).
2. *Value* – Enter the value for the selected type. The required format and input will change depending on the type selected (for example: a single IP address, an IP range, a CIDR block, or a country).
3. *Description* – An optional field where you can add a short note describing the purpose of the rule to make it easier to identify later.
### Worker
Manage background workers that run automated tasks, processes, or workflows.
1. *Connection* – Select the specific connection for which the IP restriction rule will apply. The rule will control access only for this selected connection.
2. *Type* – Defines the type of IP rule you want to create (such as IP Address, IP Range, CIDR, or Country). The selected type determines how access will be filtered.
1. *IP Address -* Allows access only from a specific single IP address.
2. *IP Range -* Allows access from a range of IP addresses between a defined start and end IP.
3. *CIDR -* Allows access using CIDR notation, which defines a block of IP addresses in a compact format (e.g., 192.168.1.0/24).
4. *Country -* Allows or restricts access based on the user’s geographic location (country).
2. *Value* – Enter the value for the selected type. The required format and input will change depending on the type selected (for example: a single IP address, an IP range, a CIDR block, or a country).
3. *Description* – An optional field where you can add a short note describing the purpose of the rule to make it easier to identify later.
### Worker
Manage background workers that run automated tasks, processes, or workflows.
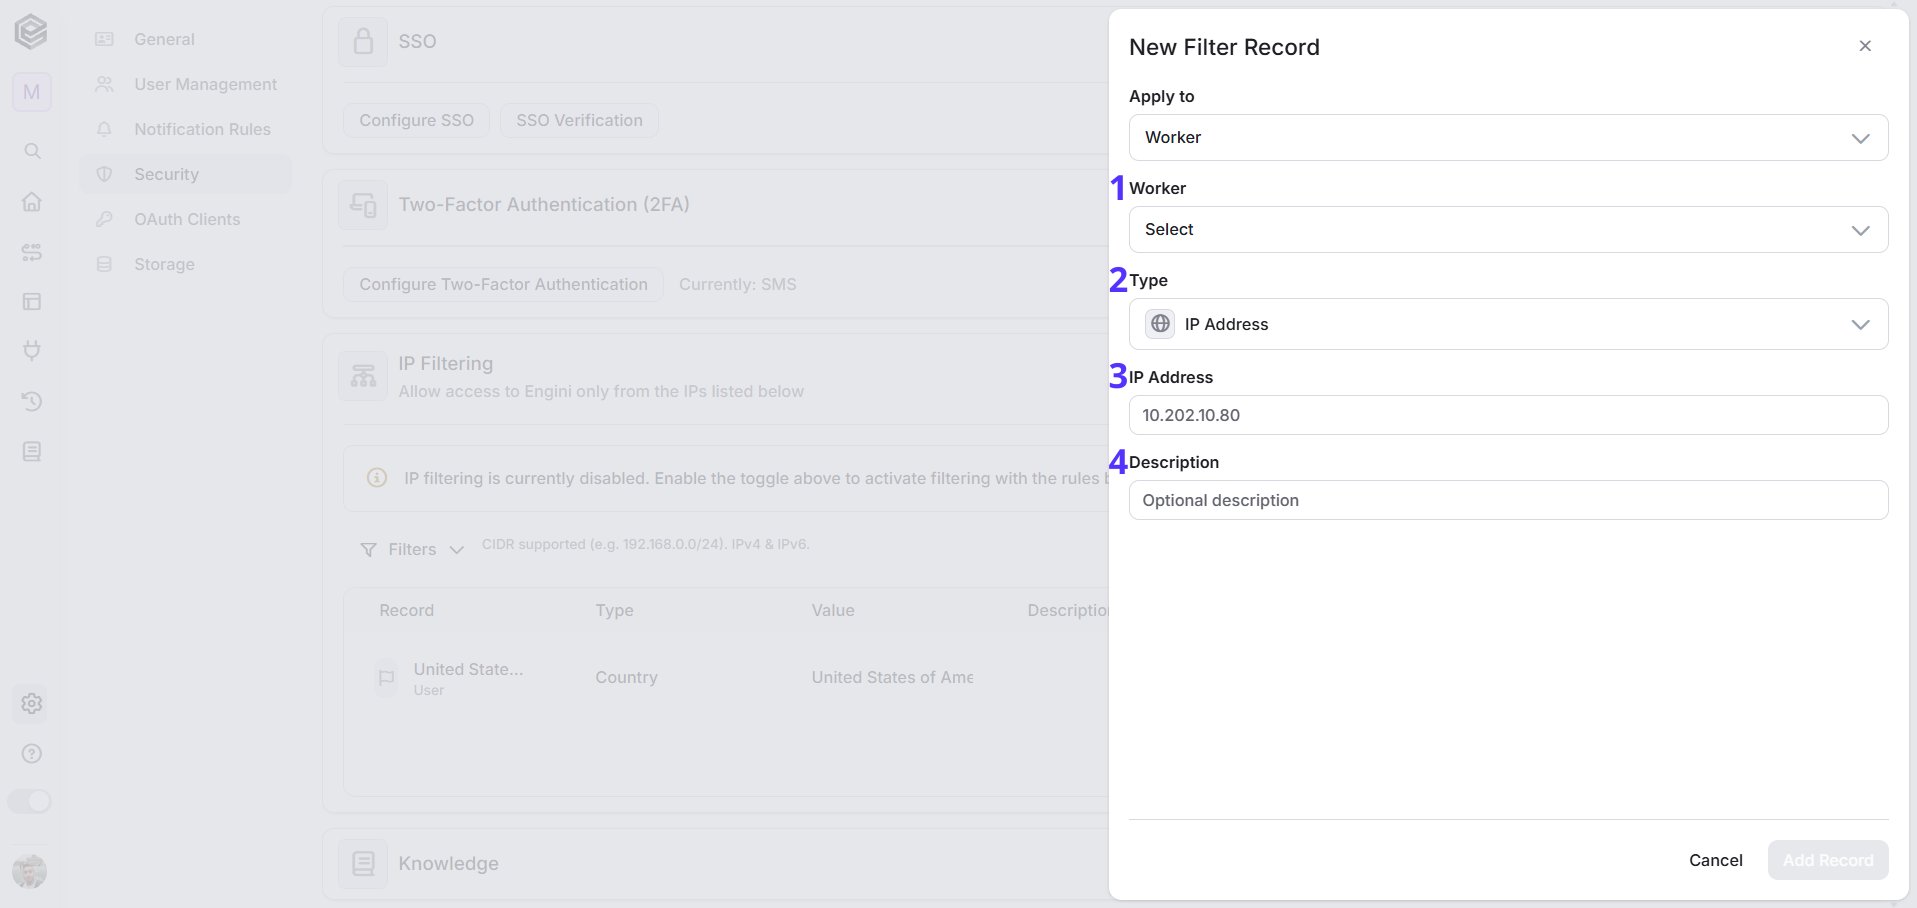 1. *Connection* – Select the specific connection for which the IP restriction rule will apply. The rule will control access only for this selected connection.
2. *Type* – Defines the type of IP rule you want to create (such as IP Address, IP Range, CIDR, or Country). The selected type determines how access will be filtered.
1. *IP Address -* Allows access only from a specific single IP address.
2. *IP Range -* Allows access from a range of IP addresses between a defined start and end IP.
3. *CIDR -* Allows access using CIDR notation, which defines a block of IP addresses in a compact format (e.g., 192.168.1.0/24).
4. *Country -* Allows or restricts access based on the user’s geographic location (country).
5. *CORS* - Controls which external domains are allowed to send requests to the worker. This is used to allow cross-origin requests from specific domains.
2. *Value* – Enter the value for the selected type. The required format and input will change depending on the type selected (for example: a single IP address, an IP range, a CIDR block, a country or allowed domain when using CORS).
3. *Description* – An optional field where you can add a short note describing the purpose of the rule to make it easier to identify later.
2. Activate the filter once configured and press on the green V to save the filter settings.
1. *Connection* – Select the specific connection for which the IP restriction rule will apply. The rule will control access only for this selected connection.
2. *Type* – Defines the type of IP rule you want to create (such as IP Address, IP Range, CIDR, or Country). The selected type determines how access will be filtered.
1. *IP Address -* Allows access only from a specific single IP address.
2. *IP Range -* Allows access from a range of IP addresses between a defined start and end IP.
3. *CIDR -* Allows access using CIDR notation, which defines a block of IP addresses in a compact format (e.g., 192.168.1.0/24).
4. *Country -* Allows or restricts access based on the user’s geographic location (country).
5. *CORS* - Controls which external domains are allowed to send requests to the worker. This is used to allow cross-origin requests from specific domains.
2. *Value* – Enter the value for the selected type. The required format and input will change depending on the type selected (for example: a single IP address, an IP range, a CIDR block, a country or allowed domain when using CORS).
3. *Description* – An optional field where you can add a short note describing the purpose of the rule to make it easier to identify later.
2. Activate the filter once configured and press on the green V to save the filter settings.
 **Notes:**
* These security features are available exclusively with a premium subscription in Engini.
* Configuration and management of these features empower users to enforce personalized security protocols suited to their workflow and access requirements.
## Allowed File Types
The Allowed File Types configuration enables administrators to control which types of files can be uploaded to the system. Instead of allowing users to upload any file type, administrators can restrict uploads to a predefined list of supported formats.
**Notes:**
* These security features are available exclusively with a premium subscription in Engini.
* Configuration and management of these features empower users to enforce personalized security protocols suited to their workflow and access requirements.
## Allowed File Types
The Allowed File Types configuration enables administrators to control which types of files can be uploaded to the system. Instead of allowing users to upload any file type, administrators can restrict uploads to a predefined list of supported formats.
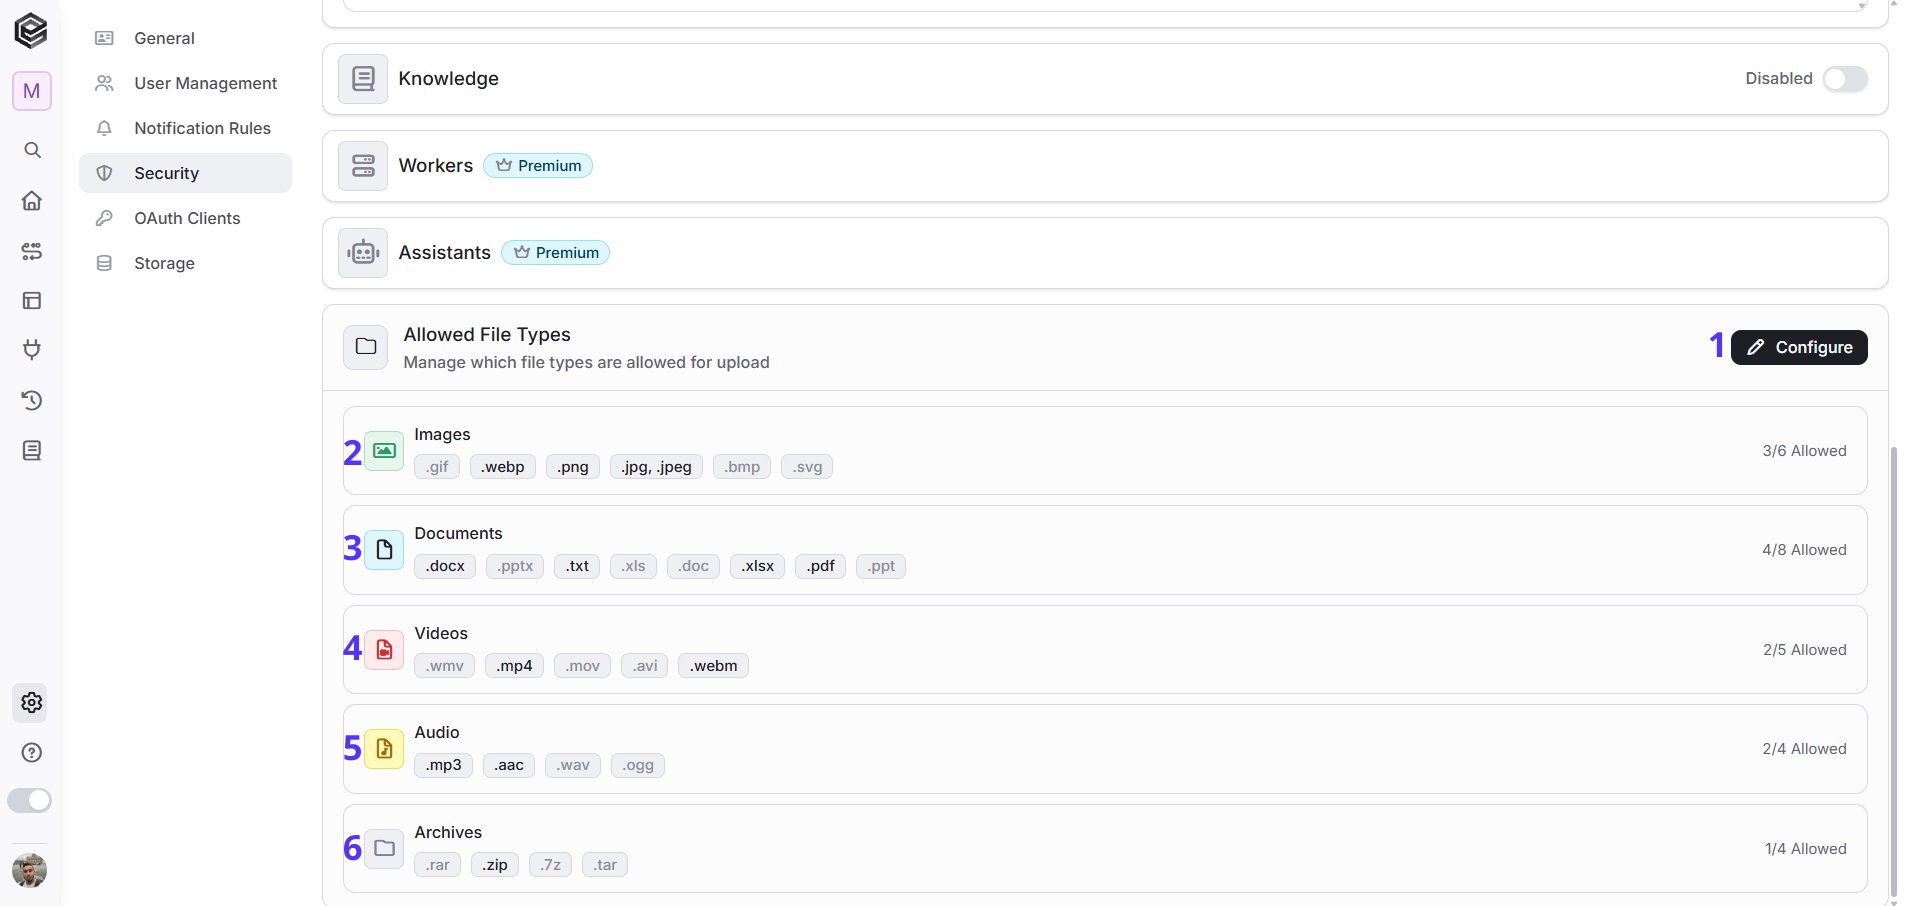 1. *Configure -* Opens the configuration panel where administrators can define which file formats are allowed for upload. All changes to the allowed file types are managed from this configuration screen.
2. *Images -* Displays the category for image file types. The indicator shows how many image formats are currently enabled out of the total available formats for this category.
* Available image file types that can be enabled or disabled:
* GIF Image (.gif)
* WebP Image (.webp)
* PNG Image (.png)
* JPEG Image (.jpg, .jpeg)
* Bitmap Image (.bmp)
* SVG Vector (.svg)
3. *Documents -* Displays the category for document file types. The progress indicator represents the number of document formats currently allowed compared to the total supported formats.
* Available document file types that can be enabled or disabled:
* Word Document 2007+ (.docx)
* PowerPoint 2007+ (.pptx)
* Text File (.txt)
* Excel Spreadsheet (.xls)
* Word Document (.doc)
* Excel Spreadsheet 2007+ (.xlsx)
* PDF Document (.pdf)
* PowerPoint (.ppt)
4. *Videos -* Displays the category for video file types. The indicator provides a visual overview of how many video formats are currently approved.
* Available video file types that can be enabled or disabled:
* Windows Media Video (.wmv)
* MP4 Video (.mp4)
* QuickTime Video (.mov)
* AVI Video (.avi)
* WebM Video (.webm)
5. *Audio -* Displays the category for audio file types. The progress bar indicates the number of allowed audio formats within this category.
* Available audio file types that can be enabled or disabled:
* MP3 Audio (.mp3)
* AAC Audio (.aac)
* WAV Audio (.wav)
* OGG Audio (.ogg)
6. *Archives -* Displays the category for compressed archive file types. The indicator shows how many archive formats are currently permitted.
* Available archive file types that can be enabled or disabled:
* RAR Archive (.rar)
* ZIP Archive (.zip)
* 7-Zip Archive (.7z)
* TAR Archive (.tar)
**Note:** You can view the files that have already been uploaded by navigating to the **Storage.**
## Storage Usage
This page helps administrators understand the overall storage consumption of the account and track which types of files are occupying storage space. By reviewing this information, users can better manage their storage resources and maintain visibility over the files stored within the system. Here’s how you can navigate to and utilize the Storage features:
1. First, click your profile at the bottom of the sidebar.
2. Click on the Gear Wheel Icon (setting) locate in the lower left corner of the screen.
3. Click on the “Security” section.
1. *Configure -* Opens the configuration panel where administrators can define which file formats are allowed for upload. All changes to the allowed file types are managed from this configuration screen.
2. *Images -* Displays the category for image file types. The indicator shows how many image formats are currently enabled out of the total available formats for this category.
* Available image file types that can be enabled or disabled:
* GIF Image (.gif)
* WebP Image (.webp)
* PNG Image (.png)
* JPEG Image (.jpg, .jpeg)
* Bitmap Image (.bmp)
* SVG Vector (.svg)
3. *Documents -* Displays the category for document file types. The progress indicator represents the number of document formats currently allowed compared to the total supported formats.
* Available document file types that can be enabled or disabled:
* Word Document 2007+ (.docx)
* PowerPoint 2007+ (.pptx)
* Text File (.txt)
* Excel Spreadsheet (.xls)
* Word Document (.doc)
* Excel Spreadsheet 2007+ (.xlsx)
* PDF Document (.pdf)
* PowerPoint (.ppt)
4. *Videos -* Displays the category for video file types. The indicator provides a visual overview of how many video formats are currently approved.
* Available video file types that can be enabled or disabled:
* Windows Media Video (.wmv)
* MP4 Video (.mp4)
* QuickTime Video (.mov)
* AVI Video (.avi)
* WebM Video (.webm)
5. *Audio -* Displays the category for audio file types. The progress bar indicates the number of allowed audio formats within this category.
* Available audio file types that can be enabled or disabled:
* MP3 Audio (.mp3)
* AAC Audio (.aac)
* WAV Audio (.wav)
* OGG Audio (.ogg)
6. *Archives -* Displays the category for compressed archive file types. The indicator shows how many archive formats are currently permitted.
* Available archive file types that can be enabled or disabled:
* RAR Archive (.rar)
* ZIP Archive (.zip)
* 7-Zip Archive (.7z)
* TAR Archive (.tar)
**Note:** You can view the files that have already been uploaded by navigating to the **Storage.**
## Storage Usage
This page helps administrators understand the overall storage consumption of the account and track which types of files are occupying storage space. By reviewing this information, users can better manage their storage resources and maintain visibility over the files stored within the system. Here’s how you can navigate to and utilize the Storage features:
1. First, click your profile at the bottom of the sidebar.
2. Click on the Gear Wheel Icon (setting) locate in the lower left corner of the screen.
3. Click on the “Security” section.
 In the Security section, users can view and manage 4 distinct features tailored to their specific security requirements:
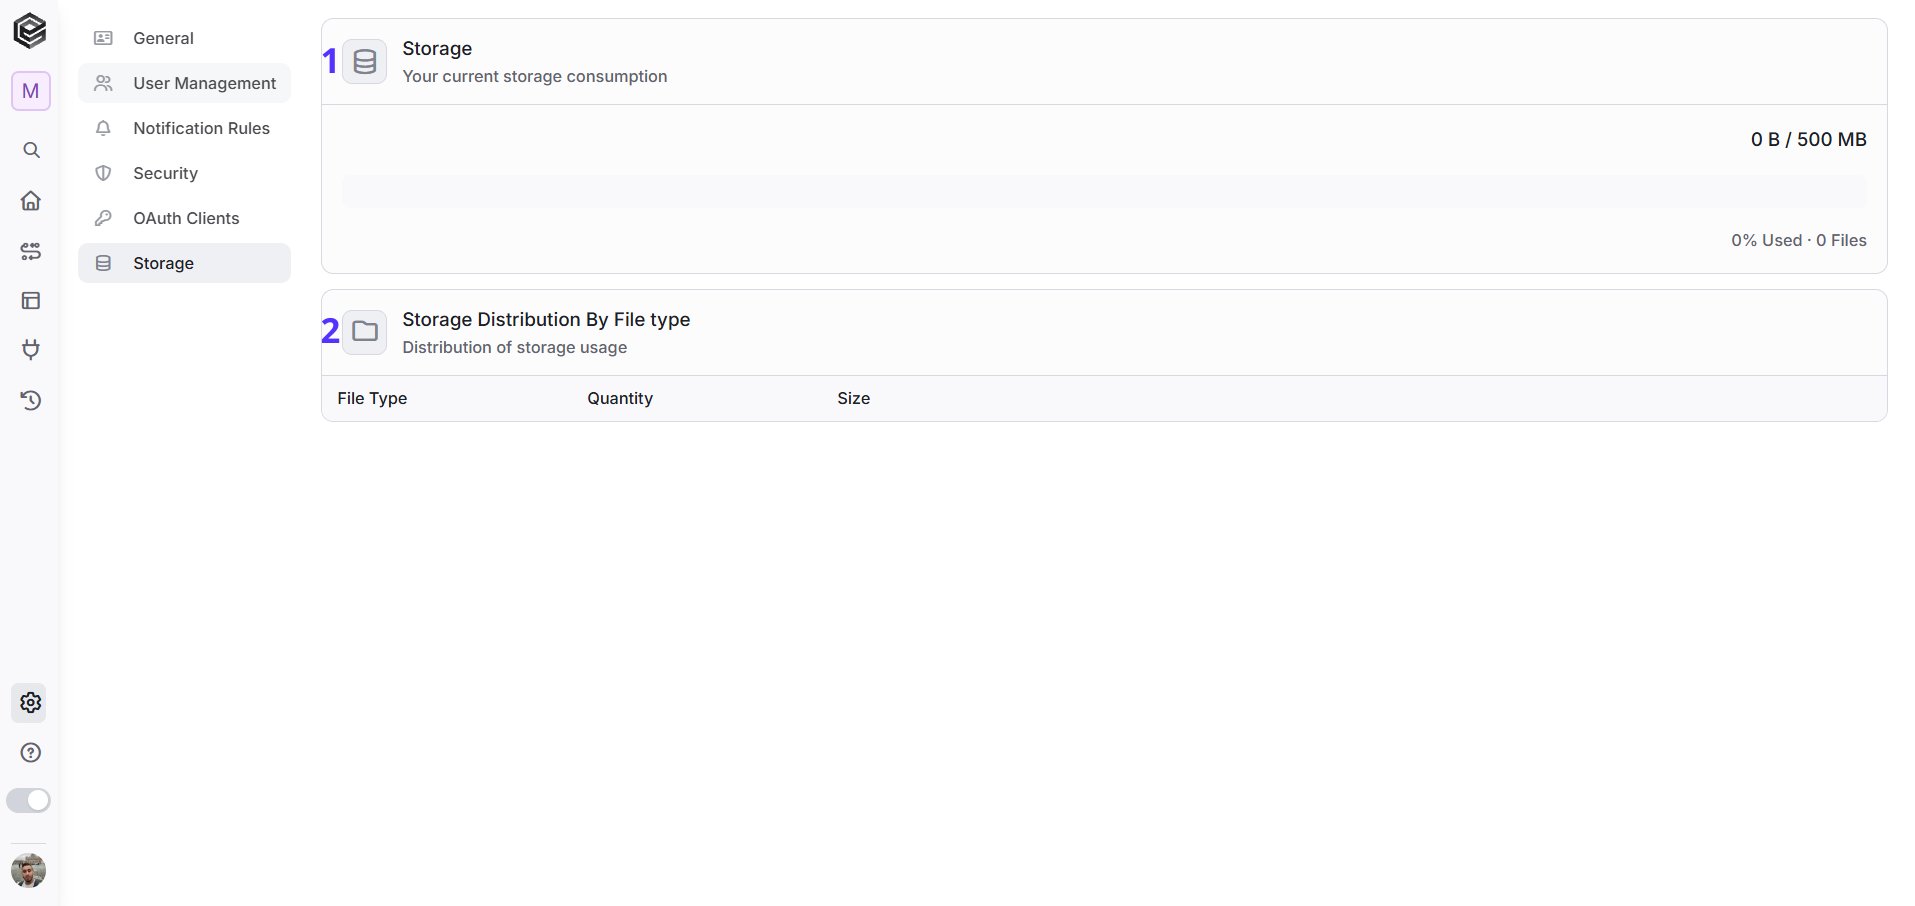 1. *Summary -* Displays a general overview of the account’s current storage usage. This section shows how much storage is currently used, how much storage is available in the account, and the total number of files stored in the system.
* *Used* - Indicates the total amount of storage currently being used by files in the account.
* *Available* - Shows the total storage capacity available for the account.
* *Files -* Displays the total number of files currently stored in the system.
2. *By File Type -* Presents a breakdown of storage usage based on file types, for example, you can see how much storage is used by workflows. This section displays the Top 5 file types stored in the account and shows how storage is distributed between them.
* *File Type -* The type and format of the stored file (for example: JPEG Image, PDF Document).
* *Files -* The number of files stored for that specific file type.
* *Size -* The total storage space currently used by files of that file type.
## Knowledge
Knowledge is a premium capability that allows users to upload, manage, and connect internal documents, files, and structured information so the system can use them as a reliable knowledge source.
Once enabled, the uploaded content can be used to search for relevant information, answer questions, and support workflows, workers, or assistants with context based on the organization’s own data.
This option can be enabled or disabled from the Security page and may be available only for accounts with a custom subscription plan or a plan that explicitly includes Knowledge access.
On the Settings page, in order to see the Knowledge option, you need to toggle the "Disabled" button.
1. *Summary -* Displays a general overview of the account’s current storage usage. This section shows how much storage is currently used, how much storage is available in the account, and the total number of files stored in the system.
* *Used* - Indicates the total amount of storage currently being used by files in the account.
* *Available* - Shows the total storage capacity available for the account.
* *Files -* Displays the total number of files currently stored in the system.
2. *By File Type -* Presents a breakdown of storage usage based on file types, for example, you can see how much storage is used by workflows. This section displays the Top 5 file types stored in the account and shows how storage is distributed between them.
* *File Type -* The type and format of the stored file (for example: JPEG Image, PDF Document).
* *Files -* The number of files stored for that specific file type.
* *Size -* The total storage space currently used by files of that file type.
## Knowledge
Knowledge is a premium capability that allows users to upload, manage, and connect internal documents, files, and structured information so the system can use them as a reliable knowledge source.
Once enabled, the uploaded content can be used to search for relevant information, answer questions, and support workflows, workers, or assistants with context based on the organization’s own data.
This option can be enabled or disabled from the Security page and may be available only for accounts with a custom subscription plan or a plan that explicitly includes Knowledge access.
On the Settings page, in order to see the Knowledge option, you need to toggle the "Disabled" button.
 To continue, click "Yes".
 Once enabled, the Knowledge option will appear in the side toolbar.
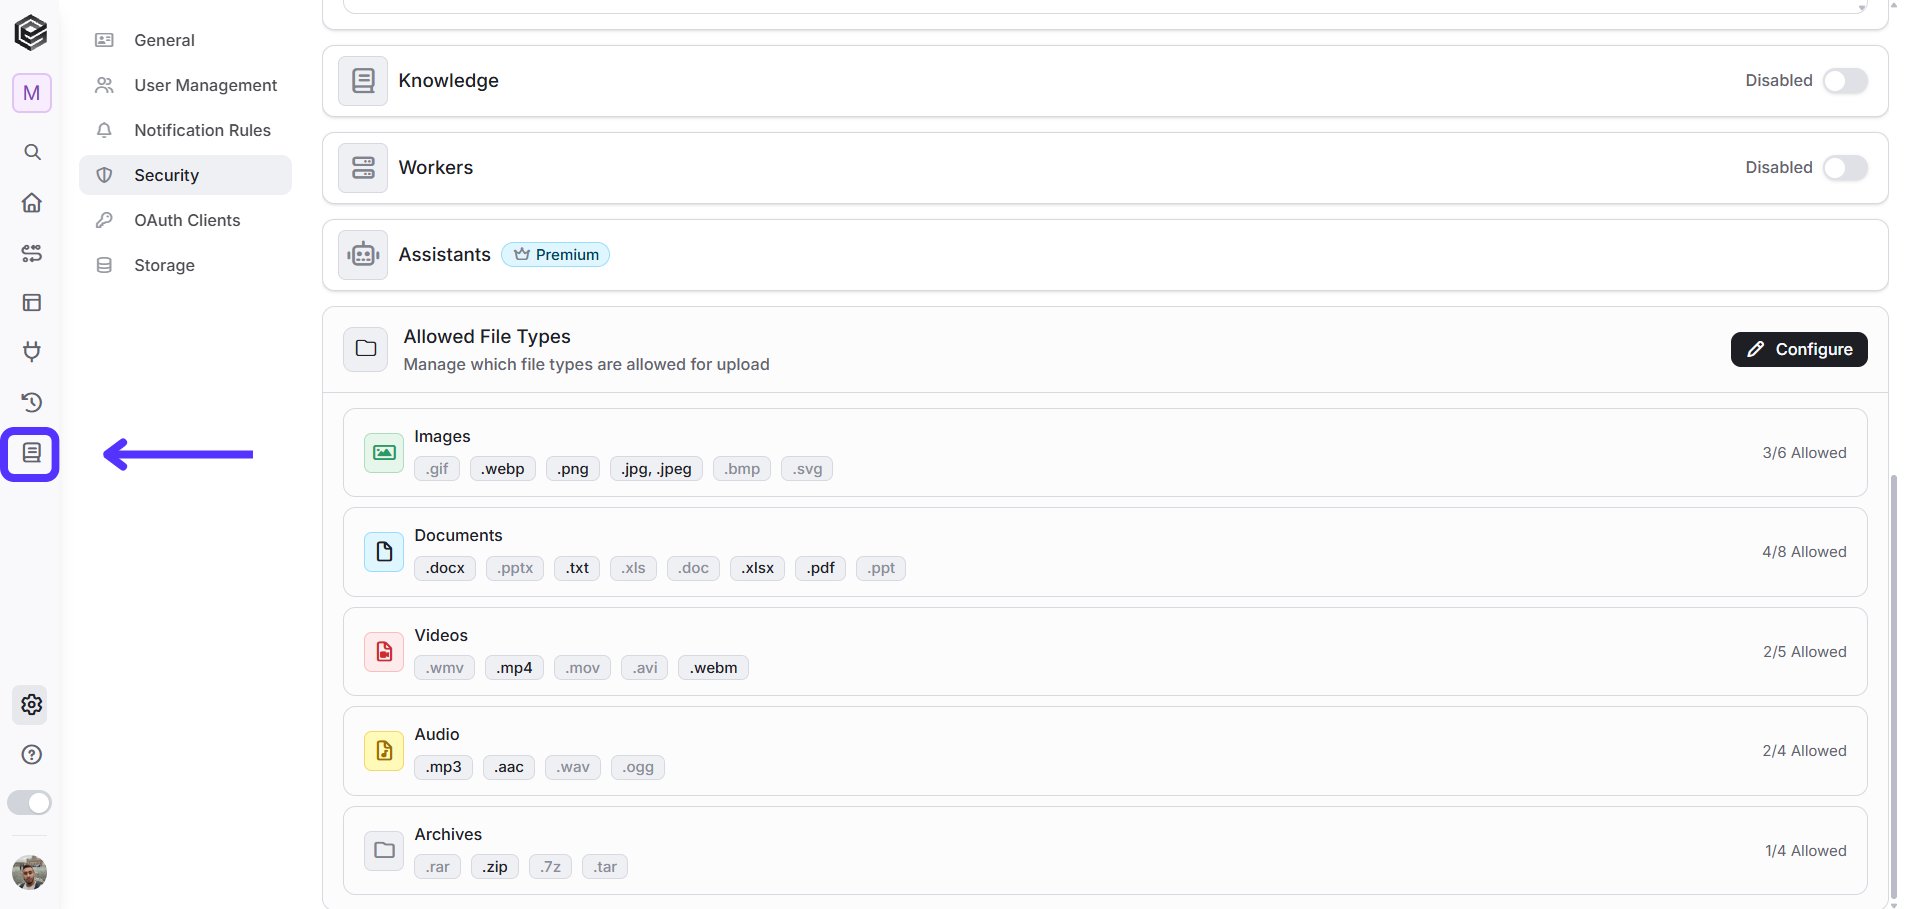 After clicking the Knowledge icon in the side toolbar, you will be redirected to the Knowledge page.
On this page, you can see that there is an option to create a new knowledge source by clicking the **“+ New Knowledge”** button. This allows you to add and manage new knowledge entries for use within the system.
After clicking the Knowledge icon in the side toolbar, you will be redirected to the Knowledge page.
On this page, you can see that there is an option to create a new knowledge source by clicking the **“+ New Knowledge”** button. This allows you to add and manage new knowledge entries for use within the system.
 This screen is used to create a new Knowledge Base (KB), which will store and organize data that can later be used by the system for search, retrieval, and context in workflows, workers, or assistants.
1. First, a Knowledge Base must be added.
This screen is used to create a new Knowledge Base (KB), which will store and organize data that can later be used by the system for search, retrieval, and context in workflows, workers, or assistants.
1. First, a Knowledge Base must be added.
 1. *Name* - The name of the Knowledge Base, used to identify it within the system.
2. *Description -* A short explanation of what the Knowledge Base contains or is used for.
3. *AI Connection (Embedding)* - The connection used to generate embeddings for the data, enabling semantic search and understanding.
4. *Embedding Model -* The specific model used to convert the data into vector representations; available after selecting a connection.
5. *Dimensions* - The size of the vector generated by the embedding model, automatically filled based on the selected model.
6. *Vector DB Connection -* The database where the vectorized data is stored and managed for efficient retrieval.
7. *Create -* The button used to create the Knowledge Base; it will only be enabled once all required fields are filled.
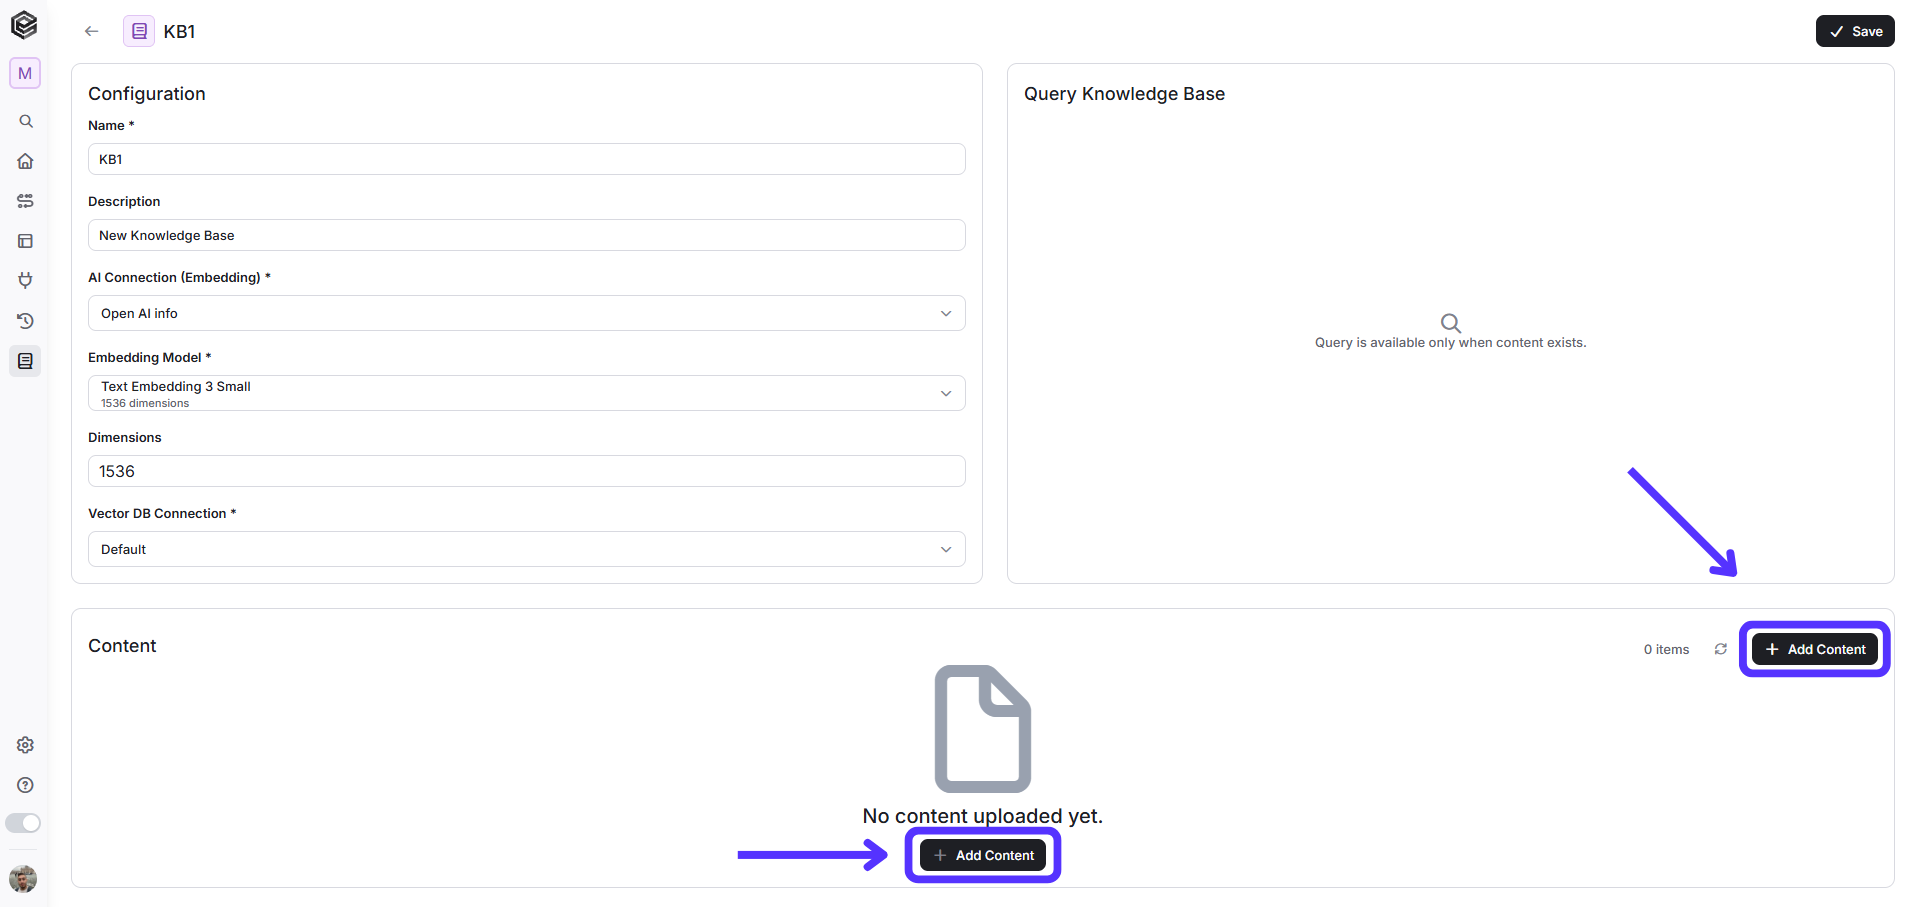
2. After creating a Knowledge Base, you are redirected to the edit page. At this stage, the Knowledge Base is empty, so before you can use the Query functionality, you must first Click **“Add Content”** this will open a file upload dialog where you can upload files from your computer. Once content is added, the Query section will become available for use.
1. *Name* - The name of the Knowledge Base, used to identify it within the system.
2. *Description -* A short explanation of what the Knowledge Base contains or is used for.
3. *AI Connection (Embedding)* - The connection used to generate embeddings for the data, enabling semantic search and understanding.
4. *Embedding Model -* The specific model used to convert the data into vector representations; available after selecting a connection.
5. *Dimensions* - The size of the vector generated by the embedding model, automatically filled based on the selected model.
6. *Vector DB Connection -* The database where the vectorized data is stored and managed for efficient retrieval.
7. *Create -* The button used to create the Knowledge Base; it will only be enabled once all required fields are filled.
2. After creating a Knowledge Base, you are redirected to the edit page. At this stage, the Knowledge Base is empty, so before you can use the Query functionality, you must first Click **“Add Content”** this will open a file upload dialog where you can upload files from your computer. Once content is added, the Query section will become available for use.
 3. You can add content to the Knowledge Base in two ways: **Files** or **URL**.
1. *Files -* This option allows you to upload files directly from your computer.
3. You can add content to the Knowledge Base in two ways: **Files** or **URL**.
1. *Files -* This option allows you to upload files directly from your computer.
 1. *Upload Area -* Click or drag & drop files to upload. Supported formats include: PDF, TXT, MD, DOCX, PPTX, JSON, CSV (up to 10 files, 50MB each).
2. *Chunk Size (tokens)* *(Optional) -* Defines how the content is split into chunks for processing. Larger chunks = more context per chunk, but heavier processing. Default: 1000 tokens.
3. *Overlap (tokens) (Optional) -* Determines how much content overlaps between chunks. Helps preserve context between chunks. Default: 200 tokens.
4. *Upload -* Becomes active after selecting files. Click to upload and process the content.
2. *URL -* This option allows you to scrape and add content from a web page.
1. *Upload Area -* Click or drag & drop files to upload. Supported formats include: PDF, TXT, MD, DOCX, PPTX, JSON, CSV (up to 10 files, 50MB each).
2. *Chunk Size (tokens)* *(Optional) -* Defines how the content is split into chunks for processing. Larger chunks = more context per chunk, but heavier processing. Default: 1000 tokens.
3. *Overlap (tokens) (Optional) -* Determines how much content overlaps between chunks. Helps preserve context between chunks. Default: 200 tokens.
4. *Upload -* Becomes active after selecting files. Click to upload and process the content.
2. *URL -* This option allows you to scrape and add content from a web page.
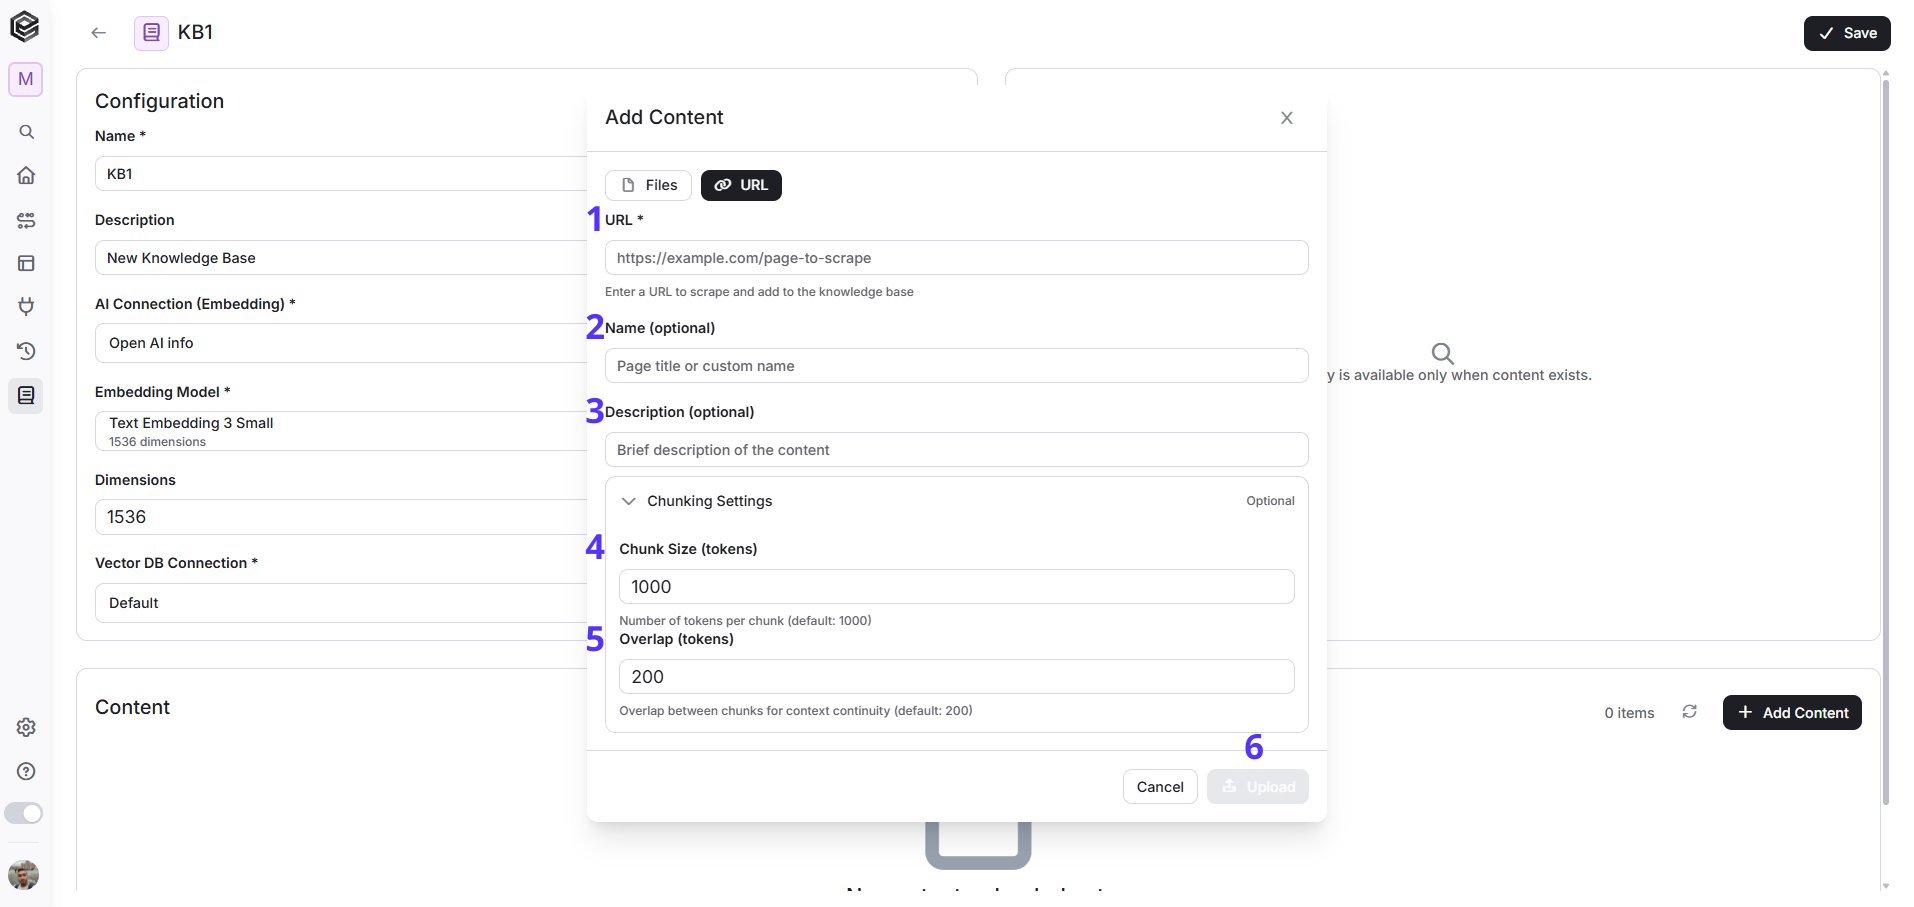 1. *URL -* The web page link you want to extract content from.
2. *Name (Optional) -* A custom name for the content. If not provided, the page title may be used.
3. *Description (Optional) -* A short description of the content to help identify it later.
4. *Chunk Size (tokens)* *(Optional) -* Same as in Files, controls how the scraped content is divided.
5. *Overlap (tokens)* *(Optional) -* Same as in Files, maintains context between chunks.
6. *Upload -* Click to fetch, process, and add the content from the URL.
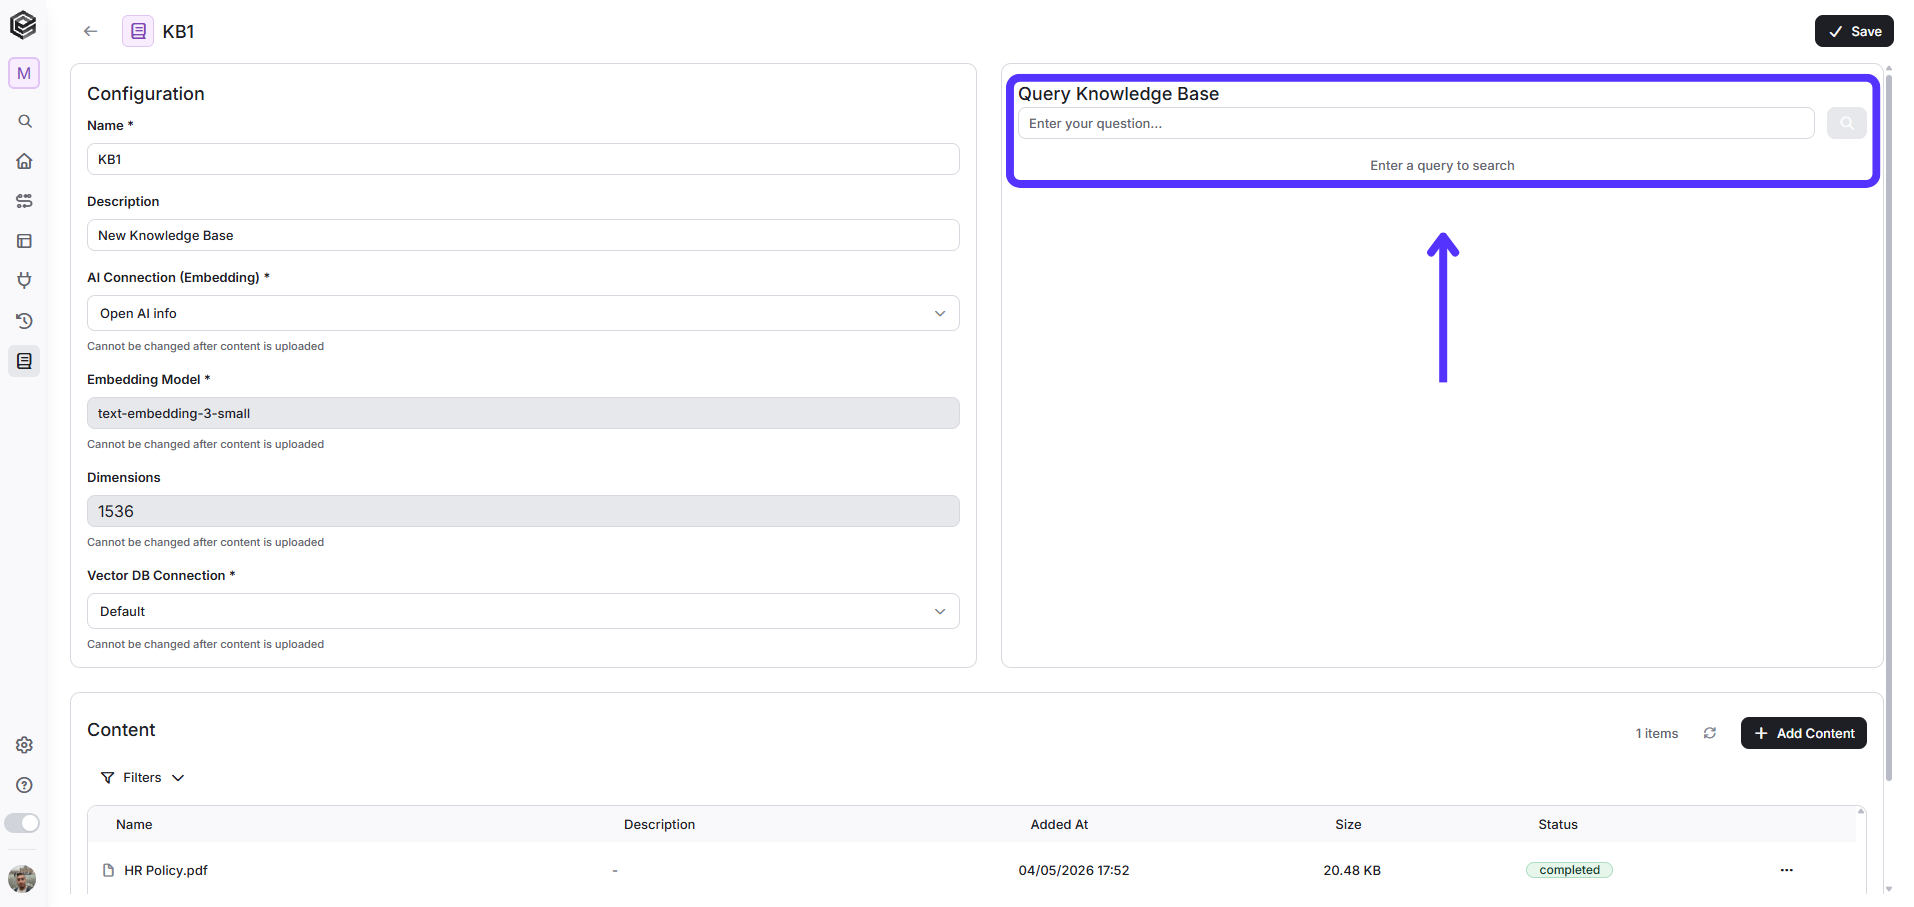
4. *Query -* After adding content to the Knowledge Base, the **Query** section becomes available. At this stage, you can enter a question in the query field, and the system will search across the uploaded content to return relevant results.
1. *URL -* The web page link you want to extract content from.
2. *Name (Optional) -* A custom name for the content. If not provided, the page title may be used.
3. *Description (Optional) -* A short description of the content to help identify it later.
4. *Chunk Size (tokens)* *(Optional) -* Same as in Files, controls how the scraped content is divided.
5. *Overlap (tokens)* *(Optional) -* Same as in Files, maintains context between chunks.
6. *Upload -* Click to fetch, process, and add the content from the URL.
4. *Query -* After adding content to the Knowledge Base, the **Query** section becomes available. At this stage, you can enter a question in the query field, and the system will search across the uploaded content to return relevant results.
 This documentation is built and hosted on [Mintlify](https://mintlify.com), a developer documentation platform.