> ## Documentation Index
> Fetch the complete documentation index at: https://docs.engini.ai/llms.txt
> Use this file to discover all available pages before exploring further.
# Keys
In order to communicate with a web page and perform actions, we need to establish a connection to the server via http, we call it a **key.**
# Create a Key
## Step 1: Add Keys in Engini
1. Enter your Engini account at [https://app.engini.io](https://app.engini.io).
2. Navigate to the Connections page by clicking on 'Connections' in the left sidebar, where the red rectangle is, or simply click here.
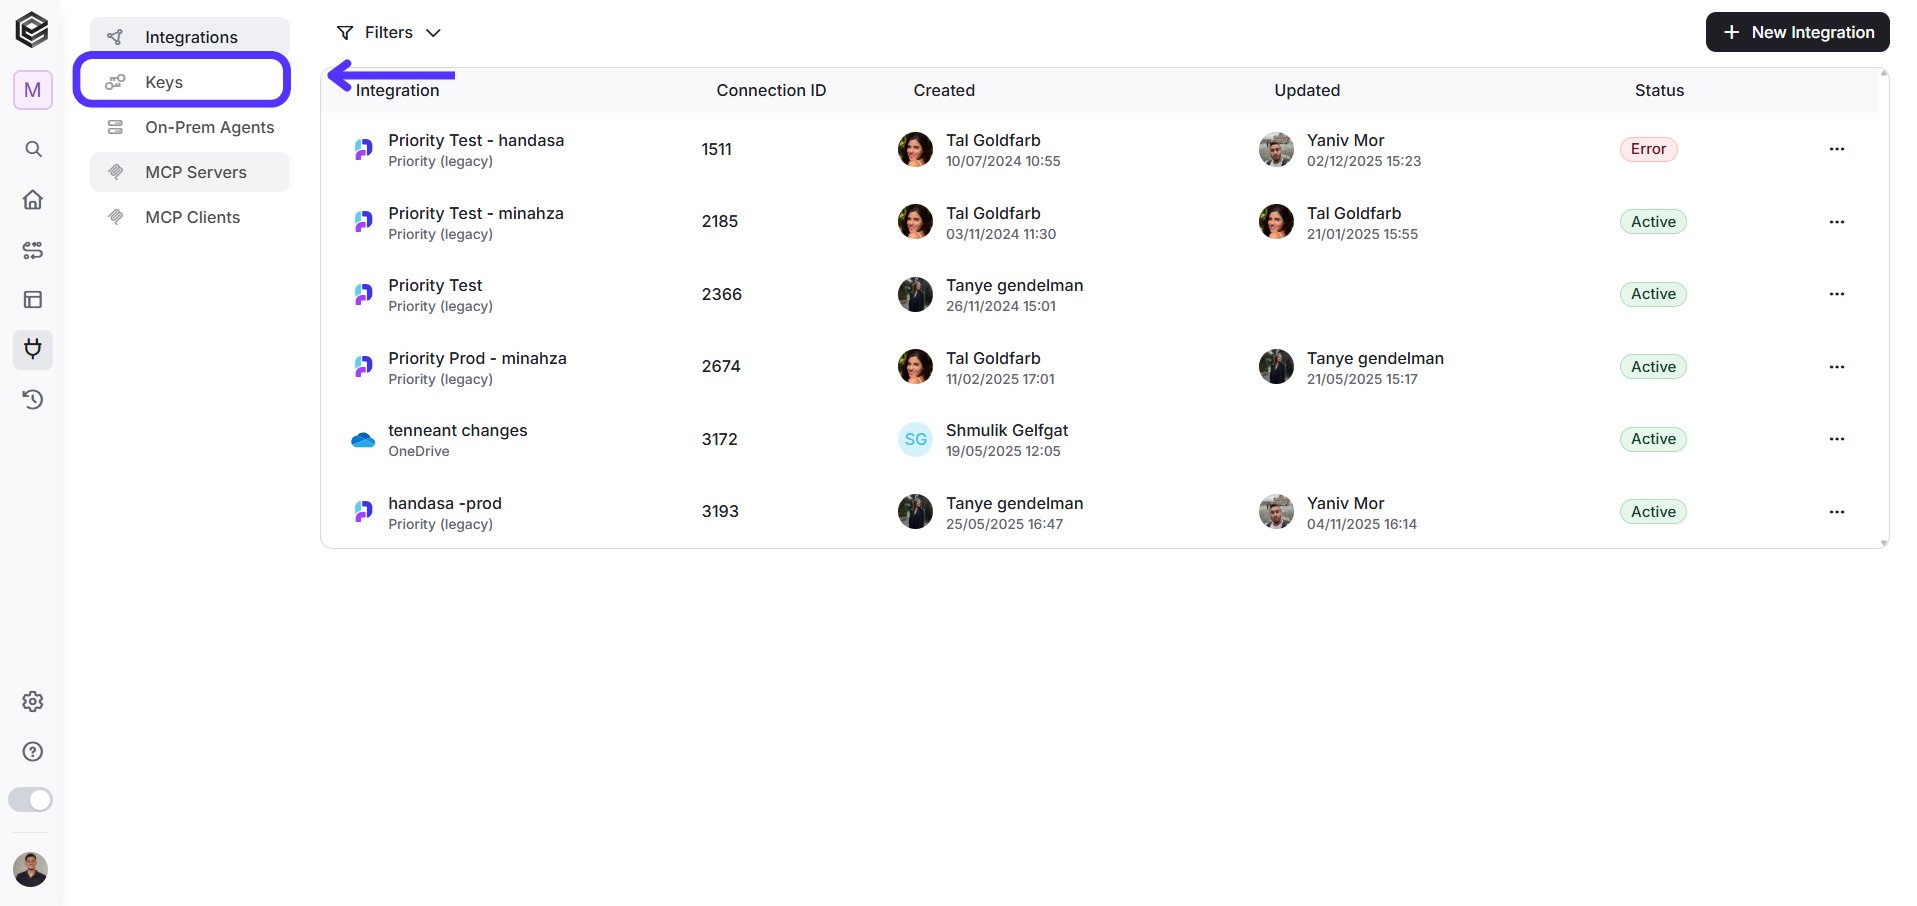
3. Choose Keys from the menu:
## Step 2: Add a New Key
Click on 'New Key' or click on 'Create a new key' on this page.
## Step 3: Enter the Details
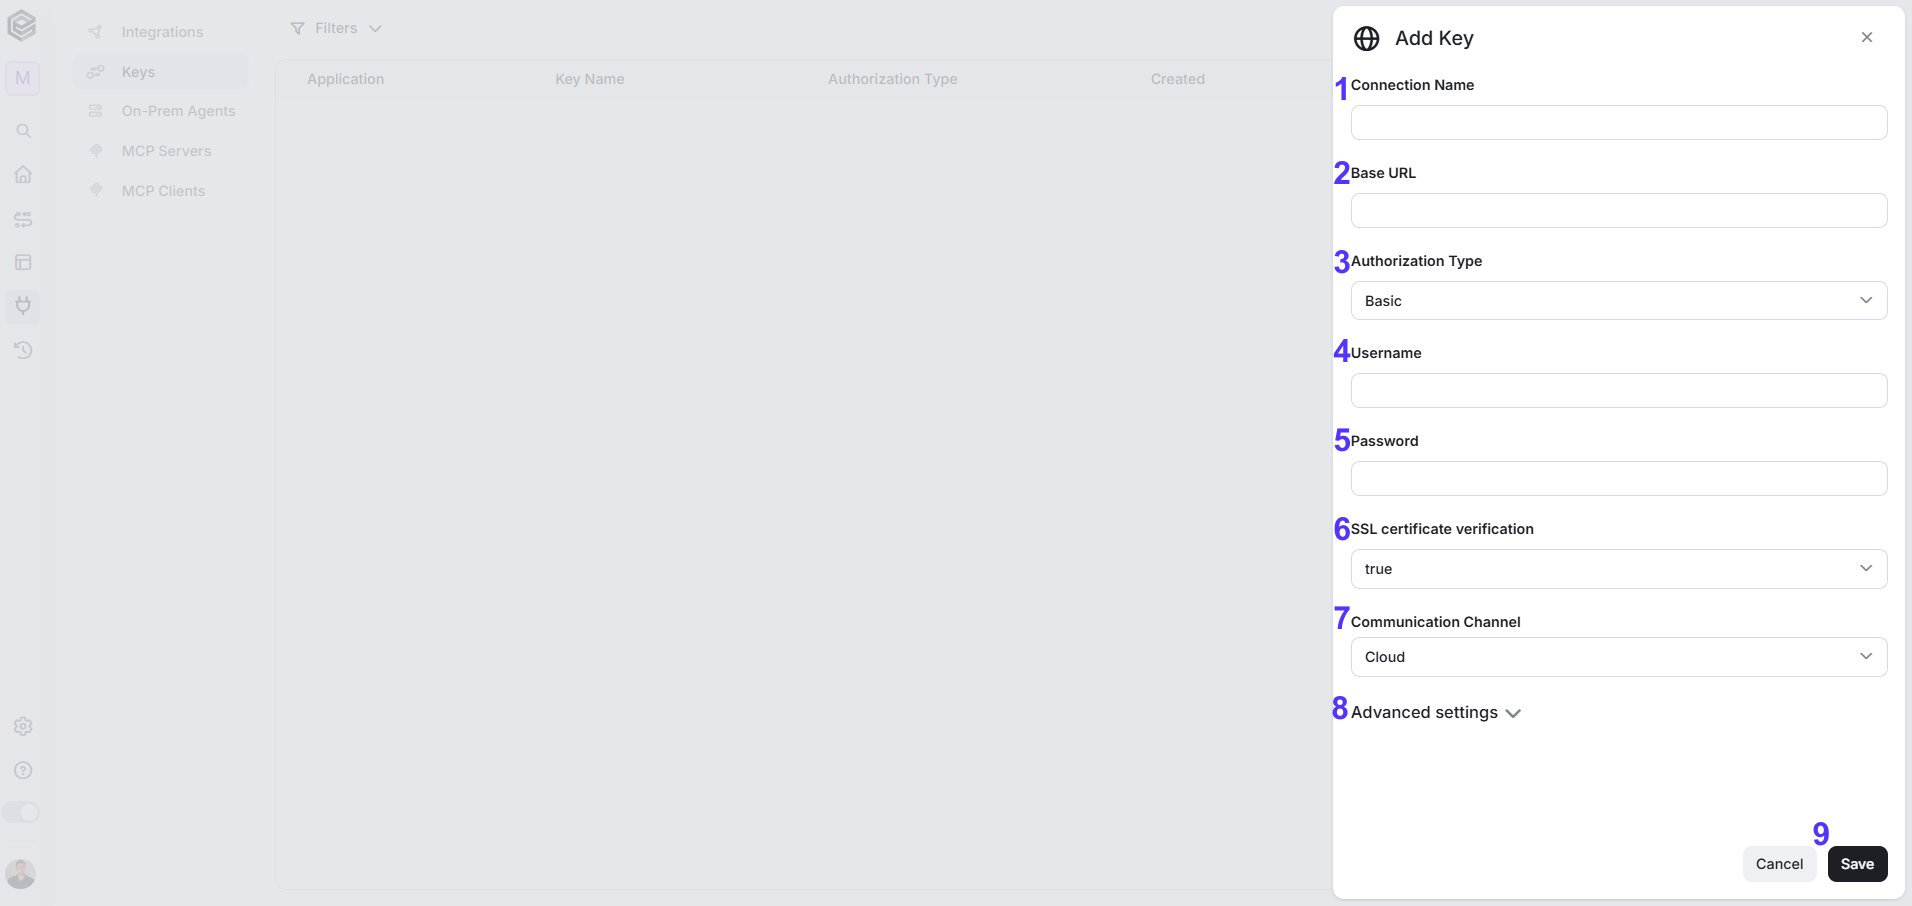
After clicking on 'Add key' or 'Create new key', populate the fields in the pop-up window.
### Basic Authorization
Note: Key Name, Base URL and Additional Header are records that will be in all kinds of the authorizations.
1. *Connection Name -* Fill the name of the key.
2. *Base URL -* **U**niform **R**esource **L**ocator: This identifies the location of the resource being requested on the web server. It typically includes the protocol (e.g., http\:// or https\://), the domain name or IP address of the server, and the path to the specific resource on the server.
* Enter the URL you want to authorize to.
3. *Authorization Type -* In Basic authorization (by default): the client includes a username and password. The server then verifies the provided credentials against a known list of usernames and passwords to authenticate the client. It is used to ensure that only authorized users or applications are allowed to access certain resources or perform specific actions on a web server.
* Choose the type of the authorization.
4. *Username -* Enter the username in the blank field. It is important to note that you fill in the username of the API user and not just a user without API access privileges.
5. *Password -* Enter the password in the empty field.
6. *SSL certificate verification -* Setting SSL certificate verification to true or false determines whether the client verifies the server’s SSL certificate.
7. *Communication Channel -* Choose the appropriate connection type based on your setup:
* Cloud - If you are connecting to a database hosted in a cloud environment, select “Cloud”.
* OPA - If your database is on-premises and you are using an On-Premises Agent (OPA) for the connection, select “OPA”.
In this case, an additional field will appear:
On-Prem Agent - Choose the specific On-Premises Agent that you want to use for this connection if you have multiple agents configured.
8. *Advanced Settings -* Additional metadata about the request, such as the type of data the Engini can accept, the length of the request body, and authentication information.
Each header consists of a key-value pair, where the key is the name of the parameter, and the value is the data associated with that parameter.
* Click on the “Add Headers” button to add an header.
* Click on the key field to enter the key, and on the value field to enter a value.
9. *Save Settings -* Click on “Save” button to save the key.
### Bearer Authorization
Note: Key Name, Base URL and Additional Header are records that will be present in all authorizations. You can refer to Basic authorization to see their usage.
1. *Connection Name -* Fill the name of the key.
2. *Base URL -* **U**niform **R**esource **L**ocator: This identifies the location of the resource being requested on the web server. It typically includes the protocol (e.g., http\:// or https\://), the domain name or IP address of the server, and the path to the specific resource on the server.
* Enter the URL you want to authorize to.
3. *Authorization Type -* Bearer token authorization is a method used for allowing access to resources by presenting a token in the HTTP Authorization header.
4. *Token -* The token is used to authenticate the client on the server. Bearer tokens are usually long strings of characters, and they do not include any information about the user or client in the token itself. Instead, the server tracks the relationship between the token and the authorized user or client.
* Enter the token in the empty field.
5. *SSL certificate verification -* Setting SSL certificate verification to true or false determines whether the client verifies the server’s SSL certificate.
6. *Communication Channel -* Choose the appropriate connection type based on your setup:
* Cloud - If you are connecting to a database hosted in a cloud environment, select “Cloud”.
* OPA - If your database is on-premises and you are using an On-Premises Agent (OPA) for the connection, select “OPA”.
In this case, an additional field will appear:
On-Prem Agent - Choose the specific On-Premises Agent that you want to use for this connection if you have multiple agents configured.
7. *Advanced Settings -* Additional metadata about the request, such as the type of data the Engini can accept, the length of the request body, and authentication information.
Each header consists of a key-value pair, where the key is the name of the parameter, and the value is the data associated with that parameter.
* Click on the “Add Headers” button to add an header.
* Click on the key field to enter the key, and on the value field to enter a value.
8. *Save Settings-* Click on “Save” button to save your key.
### OAuth 1.0 Authorization
1. *Connection Name -* Fill the name of the key.
2. *Base URL -* **U**niform **R**esource **L**ocator: This identifies the location of the resource being requested on the web server. It typically includes the protocol (e.g., http\:// or https\://), the domain name or IP address of the server, and the path to the specific resource on the server.
* Enter the URL you want to authorize to.
3. *Authorization Type-* OAuth 1.0 is a version of OAuth (Open Authorization) that enables secure access. To use OAuth 1.0 authorization, you configure various parameters to ensure secure authentication and authorization.
4. *Add Authorization to-* This field allows you to specify where to include OAuth 1.0 authorization information. You can add it to the request headers or the request URL.
5. *Signature Method-* Defines the method used to sign the OAuth 1.0 request. The most used signature method for this authorization is Hash-based Message Authentication Code with SHA (HMAC-SHA).
* HMAC-SHA256- is used for creating secure message authentication codes. (16 bytes code)
* HMAC-SHA512- is used for creating secure message authentication codes. (32 bytes code)
6. *Consumer Key-* This key, also known as an API key or client key, is used to uniquely identify and authenticate the application when making requests to access protected resources or APIs.
7. *Consumer Secret-* The consumer’s secret is used for identification with the service provider. It is known only to your application and the authorization server, and it used to sign the request.
8. *Access Token-* An access token is a temporary credential that grants your application access to a user’s protected resources on the service. It is essential for OAuth’s security system, providing secure and restricted access to protected resources.
9. *Token Secret*
* Similar to the consumer secret, the token secret is a secret key associated with the access token. It’s used to sign the request alongside the consumer secret.
* It makes sure the person or device has the right to access specific resources.
10. *Callback URL-* The destination to which the service provider redirects after obtaining authorization.
11. *Verifier-* The verification code given by the service provider after obtaining the authorization. It is used as part of the access token acquisition process and helps in confirming the identity of the user.
12. *Nonce-* A string provided by a client to enhance the security of URLs.
13. *Version-* Specify the version of OAuth. In this case the version is 1.0.
14. *Realm-*
* A string, provided by the server, typically contains the name of the host or server responsible for authentication. It may also include additional information regarding the group of users who are eligible for access. The purpose of the “realm” parameter is to provide context of the authentication.
* It’s often left empty or set to a specific value depending on the service’s requirements.
15. *Include body hash*
* Selecting this option (true) enables an integrity check for request bodies of various content types and includes the OAuth\_body\_hash parameter in the request.
* Setting this to “true” means adding an extra layer of security.
16. *Add empty parameters to signature -* If you select this option, any empty fields listed above will be included in the authorization.
17. *Encode the parameters into authorization header* – only found in the request headers (as mentioned in 2.)
* If set to “true,” the OAuth parameters are included in the request’s Authorization header. This is a common way to send OAuth parameters.
18. *SSL certificate verification -* Setting SSL certificate verification to true or false determines whether the client verifies the server’s SSL certificate.
19. *Communication Channel -* Choose the appropriate connection type based on your setup:
* Cloud - If you are connecting to a database hosted in a cloud environment, select “Cloud”.
* OPA - If your database is on-premises and you are using an On-Premises Agent (OPA) for the connection, select “OPA”.
In this case, an additional field will appear:
On-Prem Agent - Choose the specific On-Premises Agent that you want to use for this connection if you have multiple agents configured.
20. *Advanced Settings -* Additional metadata about the request, such as the type of data the Engini can accept, the length of the request body, and authentication information.
Each header consists of a key-value pair, where the key is the name of the parameter, and the value is the data associated with that parameter.
* Click on the “Add Headers” button to add an header.
* Click on the key field to enter the key, and on the value field to enter a value.
21. *Save Settings-* Click on “Save” button to save your key.
### OAuth 2.0 Authorization
1. *Connection Name -* Fill the name of the key.
2. *Base URL -* **U**niform **R**esource **L**ocator: This identifies the location of the resource being requested on the web server. It typically includes the protocol (e.g., http\:// or https\://), the domain name or IP address of the server, and the path to the specific resource on the server.
* Enter the URL you want to authorize to.
3. *Authorization Type-* OAuth 2.0 is a version of OAuth (Open Authorization) that enables secure access. To use OAuth 2.0 authorization, you configure various parameters to ensure secure authentication and authorization.
4. *SSL certificate verification -* Setting SSL certificate verification to true or false determines whether the client verifies the server’s SSL certificate.
5. *Access Token-* An access token is a temporary credential that grants your application access to a user’s protected resources on the service. It is essential for OAuth’s security system, providing secure and restricted access to protected resources.
6. *Redirect URL-*
* A string, provided by the server, typically contains the name of the host or server responsible for authentication. It may also include additional information regarding the group of users who are eligible for access. The purpose of the “realm” parameter is to provide context of the authentication.
* It’s often left empty or set to a specific value depending on the service’s requirements.
7. *Token URL -* The backend link used to finalize the secure "handshake" between the apps.
8. *Client Id-* This key, also known as an API key or client key, is used to uniquely identify and authenticate the application when making requests to access protected resources or APIs.
9. *Client Secret-* The consumer’s secret is used for identification with the service provider. It is known only to your application and the authorization server, and it used to sign the request.
10. *Scope-* A list of permissions you are requesting from the external app (like permission to "read contacts" or "write messages").
11. *Sign In URL -* The webpage address where you actually log in and click "Allow" to authorize the connection.
12. *Communication Channel -* Choose the appropriate connection type based on your setup:
* Cloud - If you are connecting to a database hosted in a cloud environment, select “Cloud”.
* OPA - If your database is on-premises and you are using an On-Premises Agent (OPA) for the connection, select “OPA”.
In this case, an additional field will appear:
On-Prem Agent - Choose the specific On-Premises Agent that you want to use for this connection if you have multiple agents configured.
13. *Advanced Settings -* Additional metadata about the request, such as the type of data the Engini can accept, the length of the request body, and authentication information.
Each header consists of a key-value pair, where the key is the name of the parameter, and the value is the data associated with that parameter.
* Click on the “Add Headers” button to add an header.
* Click on the key field to enter the key, and on the value field to enter a value.
14. *Sign In -* A popup window will appear asking you to log into the external app and authorize the access.
15. *Save Settings-* Click on “Save” button to save your key.
### OAuth 2.0 Without Sign-In
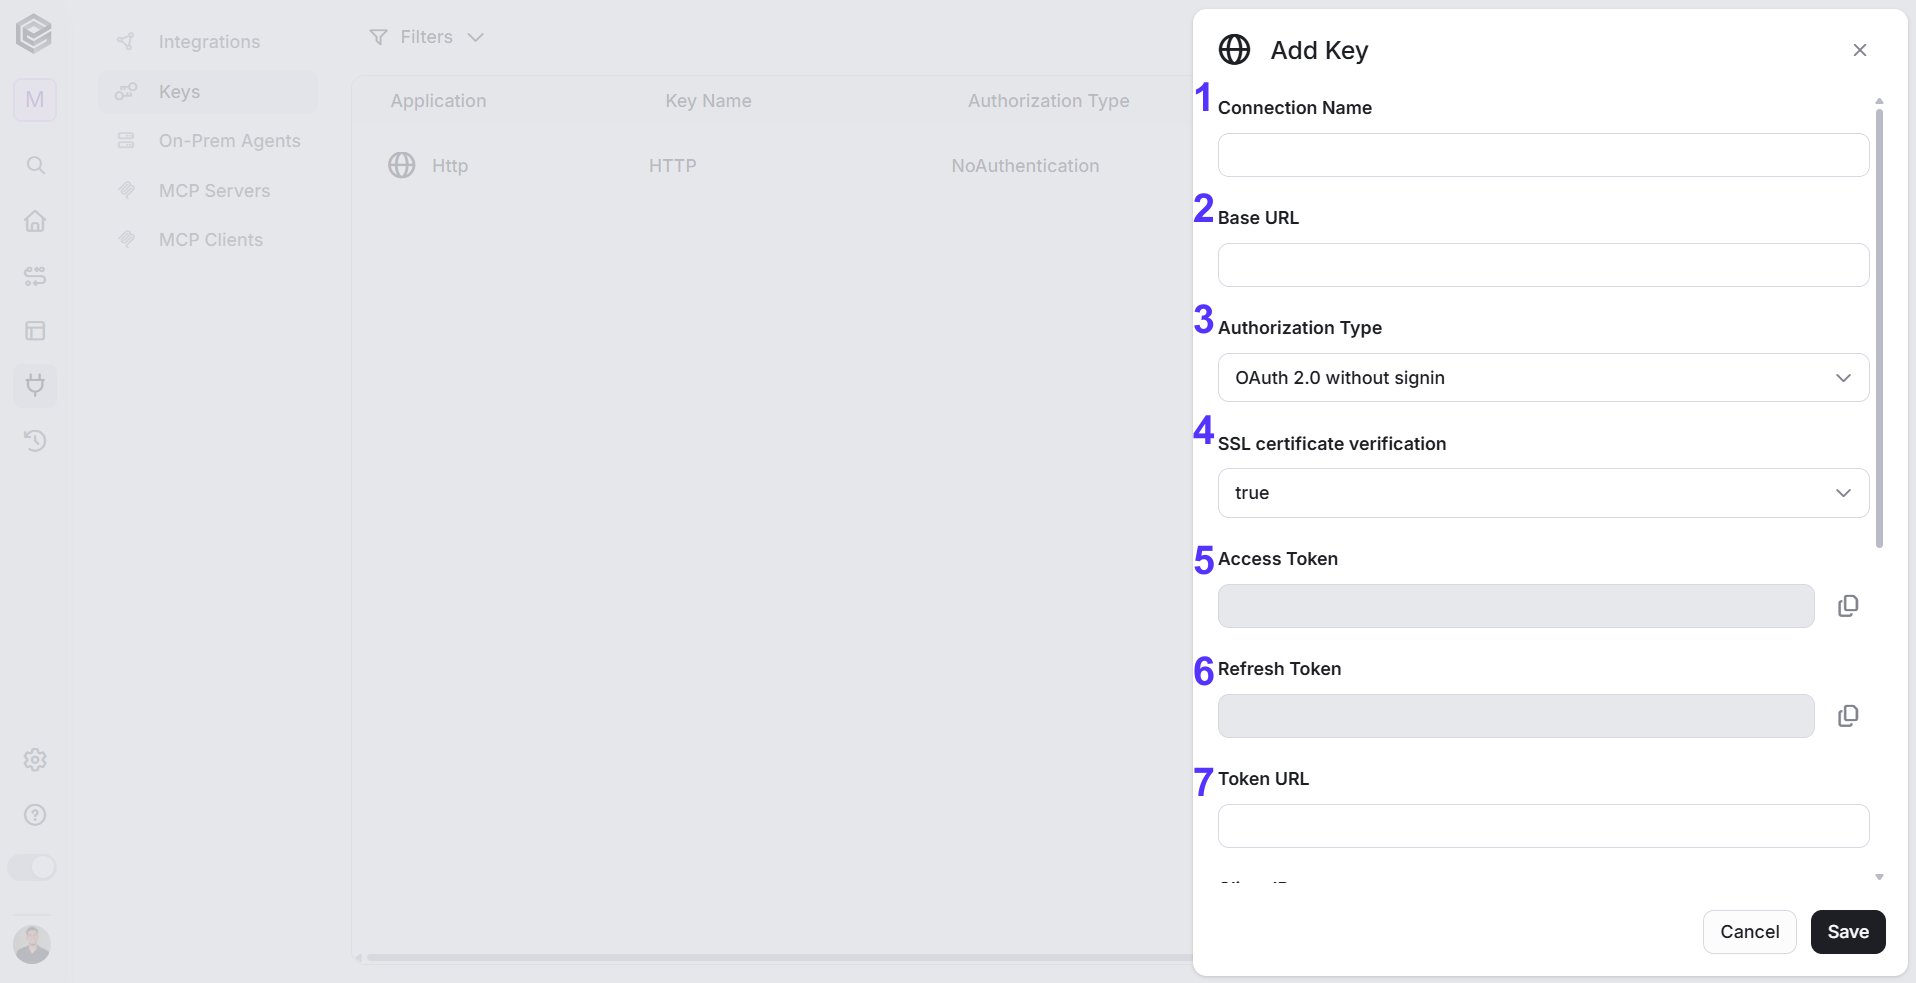
1. *Connection Name -* Fill the name of the key.
2. *Base URL -* **U**niform **R**esource **L**ocator: This identifies the location of the resource being requested on the web server. It typically includes the protocol (e.g., http\:// or https\://), the domain name or IP address of the server, and the path to the specific resource on the server.
* Enter the URL you want to authorize to.
3. *Authorization Type-* OAuth 2.0 is a version of OAuth (Open Authorization) that enables secure access. To use OAuth 2.0 authorization, you configure various parameters to ensure secure authentication and authorization.
4. *SSL certificate verification -* Setting SSL certificate verification to true or false determines whether the client verifies the server’s SSL certificate.
5. *Access Token-* An access token is a temporary credential that grants your application access to a user’s protected resources on the service. It is essential for OAuth’s security system, providing secure and restricted access to protected resources.
6. *Refresh Token-* A credential used to automatically request a new access token when the current one expires, preventing workflow interruption without requiring you to sign in again.
7. *Token URL-* The backend link used to finalize the secure "handshake" between the apps.
8. *Client Id-* This key, also known as an API key or client key, is used to uniquely identify and authenticate the application when making requests to access protected resources or APIs.
9. *Client Secret-* The consumer’s secret is used for identification with the service provider. It is known only to your application and the authorization server, and it used to sign the request.
10. *Grant Type-* Specifies the credential exchange method used to fetch access tokens.
11. *Scope-* A list of permissions you are requesting from the external app (like permission to "read contacts" or "write messages").
12. *Communication Channel -* Choose the appropriate connection type based on your setup:
* Cloud - If you are connecting to a database hosted in a cloud environment, select “Cloud”.
* OPA - If your database is on-premises and you are using an On-Premises Agent (OPA) for the connection, select “OPA”.
In this case, an additional field will appear:
On-Prem Agent - Choose the specific On-Premises Agent that you want to use for this connection if you have multiple agents configured.
13. *Advanced Settings -* Additional metadata about the request, such as the type of data the Engini can accept, the length of the request body, and authentication information.
Each header consists of a key-value pair, where the key is the name of the parameter, and the value is the data associated with that parameter.
* Click on the “Add Headers” button to add an header.
* Click on the key field to enter the key, and on the value field to enter a value.
14. *Save Settings-* Click on “Save” button to save your key.
This documentation is built and hosted on [Mintlify](https://mintlify.com), a developer documentation platform.
 3. Choose Keys from the menu:
 ## Step 2: Add a New Key
Click on 'New Key' or click on 'Create a new key' on this page.
## Step 2: Add a New Key
Click on 'New Key' or click on 'Create a new key' on this page.
 ## Step 3: Enter the Details
After clicking on 'Add key' or 'Create new key', populate the fields in the pop-up window.
### Basic Authorization
## Step 3: Enter the Details
After clicking on 'Add key' or 'Create new key', populate the fields in the pop-up window.
### Basic Authorization
 Note: Key Name, Base URL and Additional Header are records that will be in all kinds of the authorizations.
1. *Connection Name -* Fill the name of the key.
2. *Base URL -* **U**niform **R**esource **L**ocator: This identifies the location of the resource being requested on the web server. It typically includes the protocol (e.g., http\:// or https\://), the domain name or IP address of the server, and the path to the specific resource on the server.
* Enter the URL you want to authorize to.
3. *Authorization Type -* In Basic authorization (by default): the client includes a username and password. The server then verifies the provided credentials against a known list of usernames and passwords to authenticate the client. It is used to ensure that only authorized users or applications are allowed to access certain resources or perform specific actions on a web server.
* Choose the type of the authorization.
4. *Username -* Enter the username in the blank field. It is important to note that you fill in the username of the API user and not just a user without API access privileges.
5. *Password -* Enter the password in the empty field.
6. *SSL certificate verification -* Setting SSL certificate verification to true or false determines whether the client verifies the server’s SSL certificate.
7. *Communication Channel -* Choose the appropriate connection type based on your setup:
* Cloud - If you are connecting to a database hosted in a cloud environment, select “Cloud”.
* OPA - If your database is on-premises and you are using an On-Premises Agent (OPA) for the connection, select “OPA”.
In this case, an additional field will appear:
On-Prem Agent - Choose the specific On-Premises Agent that you want to use for this connection if you have multiple agents configured.
8. *Advanced Settings -* Additional metadata about the request, such as the type of data the Engini can accept, the length of the request body, and authentication information.
Each header consists of a key-value pair, where the key is the name of the parameter, and the value is the data associated with that parameter.
* Click on the “Add Headers” button to add an header.
* Click on the key field to enter the key, and on the value field to enter a value.
9. *Save Settings -* Click on “Save” button to save the key.
### Bearer Authorization
Note: Key Name, Base URL and Additional Header are records that will be in all kinds of the authorizations.
1. *Connection Name -* Fill the name of the key.
2. *Base URL -* **U**niform **R**esource **L**ocator: This identifies the location of the resource being requested on the web server. It typically includes the protocol (e.g., http\:// or https\://), the domain name or IP address of the server, and the path to the specific resource on the server.
* Enter the URL you want to authorize to.
3. *Authorization Type -* In Basic authorization (by default): the client includes a username and password. The server then verifies the provided credentials against a known list of usernames and passwords to authenticate the client. It is used to ensure that only authorized users or applications are allowed to access certain resources or perform specific actions on a web server.
* Choose the type of the authorization.
4. *Username -* Enter the username in the blank field. It is important to note that you fill in the username of the API user and not just a user without API access privileges.
5. *Password -* Enter the password in the empty field.
6. *SSL certificate verification -* Setting SSL certificate verification to true or false determines whether the client verifies the server’s SSL certificate.
7. *Communication Channel -* Choose the appropriate connection type based on your setup:
* Cloud - If you are connecting to a database hosted in a cloud environment, select “Cloud”.
* OPA - If your database is on-premises and you are using an On-Premises Agent (OPA) for the connection, select “OPA”.
In this case, an additional field will appear:
On-Prem Agent - Choose the specific On-Premises Agent that you want to use for this connection if you have multiple agents configured.
8. *Advanced Settings -* Additional metadata about the request, such as the type of data the Engini can accept, the length of the request body, and authentication information.
Each header consists of a key-value pair, where the key is the name of the parameter, and the value is the data associated with that parameter.
* Click on the “Add Headers” button to add an header.
* Click on the key field to enter the key, and on the value field to enter a value.
9. *Save Settings -* Click on “Save” button to save the key.
### Bearer Authorization
 Note: Key Name, Base URL and Additional Header are records that will be present in all authorizations. You can refer to Basic authorization to see their usage.
1. *Connection Name -* Fill the name of the key.
2. *Base URL -* **U**niform **R**esource **L**ocator: This identifies the location of the resource being requested on the web server. It typically includes the protocol (e.g., http\:// or https\://), the domain name or IP address of the server, and the path to the specific resource on the server.
* Enter the URL you want to authorize to.
3. *Authorization Type -* Bearer token authorization is a method used for allowing access to resources by presenting a token in the HTTP Authorization header.
4. *Token -* The token is used to authenticate the client on the server. Bearer tokens are usually long strings of characters, and they do not include any information about the user or client in the token itself. Instead, the server tracks the relationship between the token and the authorized user or client.
* Enter the token in the empty field.
5. *SSL certificate verification -* Setting SSL certificate verification to true or false determines whether the client verifies the server’s SSL certificate.
6. *Communication Channel -* Choose the appropriate connection type based on your setup:
* Cloud - If you are connecting to a database hosted in a cloud environment, select “Cloud”.
* OPA - If your database is on-premises and you are using an On-Premises Agent (OPA) for the connection, select “OPA”.
In this case, an additional field will appear:
On-Prem Agent - Choose the specific On-Premises Agent that you want to use for this connection if you have multiple agents configured.
7. *Advanced Settings -* Additional metadata about the request, such as the type of data the Engini can accept, the length of the request body, and authentication information.
Each header consists of a key-value pair, where the key is the name of the parameter, and the value is the data associated with that parameter.
* Click on the “Add Headers” button to add an header.
* Click on the key field to enter the key, and on the value field to enter a value.
8. *Save Settings-* Click on “Save” button to save your key.
### OAuth 1.0 Authorization
Note: Key Name, Base URL and Additional Header are records that will be present in all authorizations. You can refer to Basic authorization to see their usage.
1. *Connection Name -* Fill the name of the key.
2. *Base URL -* **U**niform **R**esource **L**ocator: This identifies the location of the resource being requested on the web server. It typically includes the protocol (e.g., http\:// or https\://), the domain name or IP address of the server, and the path to the specific resource on the server.
* Enter the URL you want to authorize to.
3. *Authorization Type -* Bearer token authorization is a method used for allowing access to resources by presenting a token in the HTTP Authorization header.
4. *Token -* The token is used to authenticate the client on the server. Bearer tokens are usually long strings of characters, and they do not include any information about the user or client in the token itself. Instead, the server tracks the relationship between the token and the authorized user or client.
* Enter the token in the empty field.
5. *SSL certificate verification -* Setting SSL certificate verification to true or false determines whether the client verifies the server’s SSL certificate.
6. *Communication Channel -* Choose the appropriate connection type based on your setup:
* Cloud - If you are connecting to a database hosted in a cloud environment, select “Cloud”.
* OPA - If your database is on-premises and you are using an On-Premises Agent (OPA) for the connection, select “OPA”.
In this case, an additional field will appear:
On-Prem Agent - Choose the specific On-Premises Agent that you want to use for this connection if you have multiple agents configured.
7. *Advanced Settings -* Additional metadata about the request, such as the type of data the Engini can accept, the length of the request body, and authentication information.
Each header consists of a key-value pair, where the key is the name of the parameter, and the value is the data associated with that parameter.
* Click on the “Add Headers” button to add an header.
* Click on the key field to enter the key, and on the value field to enter a value.
8. *Save Settings-* Click on “Save” button to save your key.
### OAuth 1.0 Authorization
 1. *Connection Name -* Fill the name of the key.
2. *Base URL -* **U**niform **R**esource **L**ocator: This identifies the location of the resource being requested on the web server. It typically includes the protocol (e.g., http\:// or https\://), the domain name or IP address of the server, and the path to the specific resource on the server.
* Enter the URL you want to authorize to.
3. *Authorization Type-* OAuth 1.0 is a version of OAuth (Open Authorization) that enables secure access. To use OAuth 1.0 authorization, you configure various parameters to ensure secure authentication and authorization.
4. *Add Authorization to-* This field allows you to specify where to include OAuth 1.0 authorization information. You can add it to the request headers or the request URL.
5. *Signature Method-* Defines the method used to sign the OAuth 1.0 request. The most used signature method for this authorization is Hash-based Message Authentication Code with SHA (HMAC-SHA).
* HMAC-SHA256- is used for creating secure message authentication codes. (16 bytes code)
* HMAC-SHA512- is used for creating secure message authentication codes. (32 bytes code)
6. *Consumer Key-* This key, also known as an API key or client key, is used to uniquely identify and authenticate the application when making requests to access protected resources or APIs.
7. *Consumer Secret-* The consumer’s secret is used for identification with the service provider. It is known only to your application and the authorization server, and it used to sign the request.
8. *Access Token-* An access token is a temporary credential that grants your application access to a user’s protected resources on the service. It is essential for OAuth’s security system, providing secure and restricted access to protected resources.
1. *Connection Name -* Fill the name of the key.
2. *Base URL -* **U**niform **R**esource **L**ocator: This identifies the location of the resource being requested on the web server. It typically includes the protocol (e.g., http\:// or https\://), the domain name or IP address of the server, and the path to the specific resource on the server.
* Enter the URL you want to authorize to.
3. *Authorization Type-* OAuth 1.0 is a version of OAuth (Open Authorization) that enables secure access. To use OAuth 1.0 authorization, you configure various parameters to ensure secure authentication and authorization.
4. *Add Authorization to-* This field allows you to specify where to include OAuth 1.0 authorization information. You can add it to the request headers or the request URL.
5. *Signature Method-* Defines the method used to sign the OAuth 1.0 request. The most used signature method for this authorization is Hash-based Message Authentication Code with SHA (HMAC-SHA).
* HMAC-SHA256- is used for creating secure message authentication codes. (16 bytes code)
* HMAC-SHA512- is used for creating secure message authentication codes. (32 bytes code)
6. *Consumer Key-* This key, also known as an API key or client key, is used to uniquely identify and authenticate the application when making requests to access protected resources or APIs.
7. *Consumer Secret-* The consumer’s secret is used for identification with the service provider. It is known only to your application and the authorization server, and it used to sign the request.
8. *Access Token-* An access token is a temporary credential that grants your application access to a user’s protected resources on the service. It is essential for OAuth’s security system, providing secure and restricted access to protected resources.
 9. *Token Secret*
* Similar to the consumer secret, the token secret is a secret key associated with the access token. It’s used to sign the request alongside the consumer secret.
* It makes sure the person or device has the right to access specific resources.
10. *Callback URL-* The destination to which the service provider redirects after obtaining authorization.
11. *Verifier-* The verification code given by the service provider after obtaining the authorization. It is used as part of the access token acquisition process and helps in confirming the identity of the user.
12. *Nonce-* A string provided by a client to enhance the security of URLs.
13. *Version-* Specify the version of OAuth. In this case the version is 1.0.
14. *Realm-*
* A string, provided by the server, typically contains the name of the host or server responsible for authentication. It may also include additional information regarding the group of users who are eligible for access. The purpose of the “realm” parameter is to provide context of the authentication.
* It’s often left empty or set to a specific value depending on the service’s requirements.
15. *Include body hash*
* Selecting this option (true) enables an integrity check for request bodies of various content types and includes the OAuth\_body\_hash parameter in the request.
* Setting this to “true” means adding an extra layer of security.
16. *Add empty parameters to signature -* If you select this option, any empty fields listed above will be included in the authorization.
9. *Token Secret*
* Similar to the consumer secret, the token secret is a secret key associated with the access token. It’s used to sign the request alongside the consumer secret.
* It makes sure the person or device has the right to access specific resources.
10. *Callback URL-* The destination to which the service provider redirects after obtaining authorization.
11. *Verifier-* The verification code given by the service provider after obtaining the authorization. It is used as part of the access token acquisition process and helps in confirming the identity of the user.
12. *Nonce-* A string provided by a client to enhance the security of URLs.
13. *Version-* Specify the version of OAuth. In this case the version is 1.0.
14. *Realm-*
* A string, provided by the server, typically contains the name of the host or server responsible for authentication. It may also include additional information regarding the group of users who are eligible for access. The purpose of the “realm” parameter is to provide context of the authentication.
* It’s often left empty or set to a specific value depending on the service’s requirements.
15. *Include body hash*
* Selecting this option (true) enables an integrity check for request bodies of various content types and includes the OAuth\_body\_hash parameter in the request.
* Setting this to “true” means adding an extra layer of security.
16. *Add empty parameters to signature -* If you select this option, any empty fields listed above will be included in the authorization.
 17. *Encode the parameters into authorization header* – only found in the request headers (as mentioned in 2.)
* If set to “true,” the OAuth parameters are included in the request’s Authorization header. This is a common way to send OAuth parameters.
18. *SSL certificate verification -* Setting SSL certificate verification to true or false determines whether the client verifies the server’s SSL certificate.
19. *Communication Channel -* Choose the appropriate connection type based on your setup:
* Cloud - If you are connecting to a database hosted in a cloud environment, select “Cloud”.
* OPA - If your database is on-premises and you are using an On-Premises Agent (OPA) for the connection, select “OPA”.
In this case, an additional field will appear:
On-Prem Agent - Choose the specific On-Premises Agent that you want to use for this connection if you have multiple agents configured.
20. *Advanced Settings -* Additional metadata about the request, such as the type of data the Engini can accept, the length of the request body, and authentication information.
Each header consists of a key-value pair, where the key is the name of the parameter, and the value is the data associated with that parameter.
* Click on the “Add Headers” button to add an header.
* Click on the key field to enter the key, and on the value field to enter a value.
21. *Save Settings-* Click on “Save” button to save your key.
### OAuth 2.0 Authorization
17. *Encode the parameters into authorization header* – only found in the request headers (as mentioned in 2.)
* If set to “true,” the OAuth parameters are included in the request’s Authorization header. This is a common way to send OAuth parameters.
18. *SSL certificate verification -* Setting SSL certificate verification to true or false determines whether the client verifies the server’s SSL certificate.
19. *Communication Channel -* Choose the appropriate connection type based on your setup:
* Cloud - If you are connecting to a database hosted in a cloud environment, select “Cloud”.
* OPA - If your database is on-premises and you are using an On-Premises Agent (OPA) for the connection, select “OPA”.
In this case, an additional field will appear:
On-Prem Agent - Choose the specific On-Premises Agent that you want to use for this connection if you have multiple agents configured.
20. *Advanced Settings -* Additional metadata about the request, such as the type of data the Engini can accept, the length of the request body, and authentication information.
Each header consists of a key-value pair, where the key is the name of the parameter, and the value is the data associated with that parameter.
* Click on the “Add Headers” button to add an header.
* Click on the key field to enter the key, and on the value field to enter a value.
21. *Save Settings-* Click on “Save” button to save your key.
### OAuth 2.0 Authorization
 1. *Connection Name -* Fill the name of the key.
2. *Base URL -* **U**niform **R**esource **L**ocator: This identifies the location of the resource being requested on the web server. It typically includes the protocol (e.g., http\:// or https\://), the domain name or IP address of the server, and the path to the specific resource on the server.
* Enter the URL you want to authorize to.
3. *Authorization Type-* OAuth 2.0 is a version of OAuth (Open Authorization) that enables secure access. To use OAuth 2.0 authorization, you configure various parameters to ensure secure authentication and authorization.
4. *SSL certificate verification -* Setting SSL certificate verification to true or false determines whether the client verifies the server’s SSL certificate.
5. *Access Token-* An access token is a temporary credential that grants your application access to a user’s protected resources on the service. It is essential for OAuth’s security system, providing secure and restricted access to protected resources.
6. *Redirect URL-*
* A string, provided by the server, typically contains the name of the host or server responsible for authentication. It may also include additional information regarding the group of users who are eligible for access. The purpose of the “realm” parameter is to provide context of the authentication.
* It’s often left empty or set to a specific value depending on the service’s requirements.
7. *Token URL -* The backend link used to finalize the secure "handshake" between the apps.
1. *Connection Name -* Fill the name of the key.
2. *Base URL -* **U**niform **R**esource **L**ocator: This identifies the location of the resource being requested on the web server. It typically includes the protocol (e.g., http\:// or https\://), the domain name or IP address of the server, and the path to the specific resource on the server.
* Enter the URL you want to authorize to.
3. *Authorization Type-* OAuth 2.0 is a version of OAuth (Open Authorization) that enables secure access. To use OAuth 2.0 authorization, you configure various parameters to ensure secure authentication and authorization.
4. *SSL certificate verification -* Setting SSL certificate verification to true or false determines whether the client verifies the server’s SSL certificate.
5. *Access Token-* An access token is a temporary credential that grants your application access to a user’s protected resources on the service. It is essential for OAuth’s security system, providing secure and restricted access to protected resources.
6. *Redirect URL-*
* A string, provided by the server, typically contains the name of the host or server responsible for authentication. It may also include additional information regarding the group of users who are eligible for access. The purpose of the “realm” parameter is to provide context of the authentication.
* It’s often left empty or set to a specific value depending on the service’s requirements.
7. *Token URL -* The backend link used to finalize the secure "handshake" between the apps.
 8. *Client Id-* This key, also known as an API key or client key, is used to uniquely identify and authenticate the application when making requests to access protected resources or APIs.
9. *Client Secret-* The consumer’s secret is used for identification with the service provider. It is known only to your application and the authorization server, and it used to sign the request.
10. *Scope-* A list of permissions you are requesting from the external app (like permission to "read contacts" or "write messages").
11. *Sign In URL -* The webpage address where you actually log in and click "Allow" to authorize the connection.
12. *Communication Channel -* Choose the appropriate connection type based on your setup:
* Cloud - If you are connecting to a database hosted in a cloud environment, select “Cloud”.
* OPA - If your database is on-premises and you are using an On-Premises Agent (OPA) for the connection, select “OPA”.
In this case, an additional field will appear:
On-Prem Agent - Choose the specific On-Premises Agent that you want to use for this connection if you have multiple agents configured.
13. *Advanced Settings -* Additional metadata about the request, such as the type of data the Engini can accept, the length of the request body, and authentication information.
Each header consists of a key-value pair, where the key is the name of the parameter, and the value is the data associated with that parameter.
* Click on the “Add Headers” button to add an header.
* Click on the key field to enter the key, and on the value field to enter a value.
14. *Sign In -* A popup window will appear asking you to log into the external app and authorize the access.
15. *Save Settings-* Click on “Save” button to save your key.
### OAuth 2.0 Without Sign-In
8. *Client Id-* This key, also known as an API key or client key, is used to uniquely identify and authenticate the application when making requests to access protected resources or APIs.
9. *Client Secret-* The consumer’s secret is used for identification with the service provider. It is known only to your application and the authorization server, and it used to sign the request.
10. *Scope-* A list of permissions you are requesting from the external app (like permission to "read contacts" or "write messages").
11. *Sign In URL -* The webpage address where you actually log in and click "Allow" to authorize the connection.
12. *Communication Channel -* Choose the appropriate connection type based on your setup:
* Cloud - If you are connecting to a database hosted in a cloud environment, select “Cloud”.
* OPA - If your database is on-premises and you are using an On-Premises Agent (OPA) for the connection, select “OPA”.
In this case, an additional field will appear:
On-Prem Agent - Choose the specific On-Premises Agent that you want to use for this connection if you have multiple agents configured.
13. *Advanced Settings -* Additional metadata about the request, such as the type of data the Engini can accept, the length of the request body, and authentication information.
Each header consists of a key-value pair, where the key is the name of the parameter, and the value is the data associated with that parameter.
* Click on the “Add Headers” button to add an header.
* Click on the key field to enter the key, and on the value field to enter a value.
14. *Sign In -* A popup window will appear asking you to log into the external app and authorize the access.
15. *Save Settings-* Click on “Save” button to save your key.
### OAuth 2.0 Without Sign-In
 1. *Connection Name -* Fill the name of the key.
2. *Base URL -* **U**niform **R**esource **L**ocator: This identifies the location of the resource being requested on the web server. It typically includes the protocol (e.g., http\:// or https\://), the domain name or IP address of the server, and the path to the specific resource on the server.
* Enter the URL you want to authorize to.
3. *Authorization Type-* OAuth 2.0 is a version of OAuth (Open Authorization) that enables secure access. To use OAuth 2.0 authorization, you configure various parameters to ensure secure authentication and authorization.
4. *SSL certificate verification -* Setting SSL certificate verification to true or false determines whether the client verifies the server’s SSL certificate.
5. *Access Token-* An access token is a temporary credential that grants your application access to a user’s protected resources on the service. It is essential for OAuth’s security system, providing secure and restricted access to protected resources.
6. *Refresh Token-* A credential used to automatically request a new access token when the current one expires, preventing workflow interruption without requiring you to sign in again.
7. *Token URL-* The backend link used to finalize the secure "handshake" between the apps.
1. *Connection Name -* Fill the name of the key.
2. *Base URL -* **U**niform **R**esource **L**ocator: This identifies the location of the resource being requested on the web server. It typically includes the protocol (e.g., http\:// or https\://), the domain name or IP address of the server, and the path to the specific resource on the server.
* Enter the URL you want to authorize to.
3. *Authorization Type-* OAuth 2.0 is a version of OAuth (Open Authorization) that enables secure access. To use OAuth 2.0 authorization, you configure various parameters to ensure secure authentication and authorization.
4. *SSL certificate verification -* Setting SSL certificate verification to true or false determines whether the client verifies the server’s SSL certificate.
5. *Access Token-* An access token is a temporary credential that grants your application access to a user’s protected resources on the service. It is essential for OAuth’s security system, providing secure and restricted access to protected resources.
6. *Refresh Token-* A credential used to automatically request a new access token when the current one expires, preventing workflow interruption without requiring you to sign in again.
7. *Token URL-* The backend link used to finalize the secure "handshake" between the apps.
 8. *Client Id-* This key, also known as an API key or client key, is used to uniquely identify and authenticate the application when making requests to access protected resources or APIs.
9. *Client Secret-* The consumer’s secret is used for identification with the service provider. It is known only to your application and the authorization server, and it used to sign the request.
10. *Grant Type-* Specifies the credential exchange method used to fetch access tokens.
11. *Scope-* A list of permissions you are requesting from the external app (like permission to "read contacts" or "write messages").
12. *Communication Channel -* Choose the appropriate connection type based on your setup:
* Cloud - If you are connecting to a database hosted in a cloud environment, select “Cloud”.
* OPA - If your database is on-premises and you are using an On-Premises Agent (OPA) for the connection, select “OPA”.
In this case, an additional field will appear:
On-Prem Agent - Choose the specific On-Premises Agent that you want to use for this connection if you have multiple agents configured.
13. *Advanced Settings -* Additional metadata about the request, such as the type of data the Engini can accept, the length of the request body, and authentication information.
Each header consists of a key-value pair, where the key is the name of the parameter, and the value is the data associated with that parameter.
* Click on the “Add Headers” button to add an header.
* Click on the key field to enter the key, and on the value field to enter a value.
14. *Save Settings-* Click on “Save” button to save your key.
This documentation is built and hosted on [Mintlify](https://mintlify.com), a developer documentation platform.
8. *Client Id-* This key, also known as an API key or client key, is used to uniquely identify and authenticate the application when making requests to access protected resources or APIs.
9. *Client Secret-* The consumer’s secret is used for identification with the service provider. It is known only to your application and the authorization server, and it used to sign the request.
10. *Grant Type-* Specifies the credential exchange method used to fetch access tokens.
11. *Scope-* A list of permissions you are requesting from the external app (like permission to "read contacts" or "write messages").
12. *Communication Channel -* Choose the appropriate connection type based on your setup:
* Cloud - If you are connecting to a database hosted in a cloud environment, select “Cloud”.
* OPA - If your database is on-premises and you are using an On-Premises Agent (OPA) for the connection, select “OPA”.
In this case, an additional field will appear:
On-Prem Agent - Choose the specific On-Premises Agent that you want to use for this connection if you have multiple agents configured.
13. *Advanced Settings -* Additional metadata about the request, such as the type of data the Engini can accept, the length of the request body, and authentication information.
Each header consists of a key-value pair, where the key is the name of the parameter, and the value is the data associated with that parameter.
* Click on the “Add Headers” button to add an header.
* Click on the key field to enter the key, and on the value field to enter a value.
14. *Save Settings-* Click on “Save” button to save your key.
This documentation is built and hosted on [Mintlify](https://mintlify.com), a developer documentation platform.