> ## Documentation Index
> Fetch the complete documentation index at: https://docs.engini.ai/llms.txt
> Use this file to discover all available pages before exploring further.
# Priority ERP
Engini’s Priority ERP activities allow you to create and modify records, activate form activations, and make API calls from your Priority ERP using Priority’s Webhooks module.
## Getting Started with Priority ERP
### Prerequisites
* Priority API License.
* Open access to Priority via port 443. If you can’t open this access, you can also just whitelist our IP (see below).
* 34.159.217.185
* 34.141.24.31
* Optional – Dictionary Module: To enable language-specific operations for both CRUD operations (Create, Read, Update, Delete) and procedures, ensure that the dictionary module is activated in your Priority ERP system. **By default, the API will operate according to the system language unless specified otherwise.**
## Connecting Engini to Priority ERP
1. Enter your Engini account at [https://app.engini.io](https://app.engini.io/).
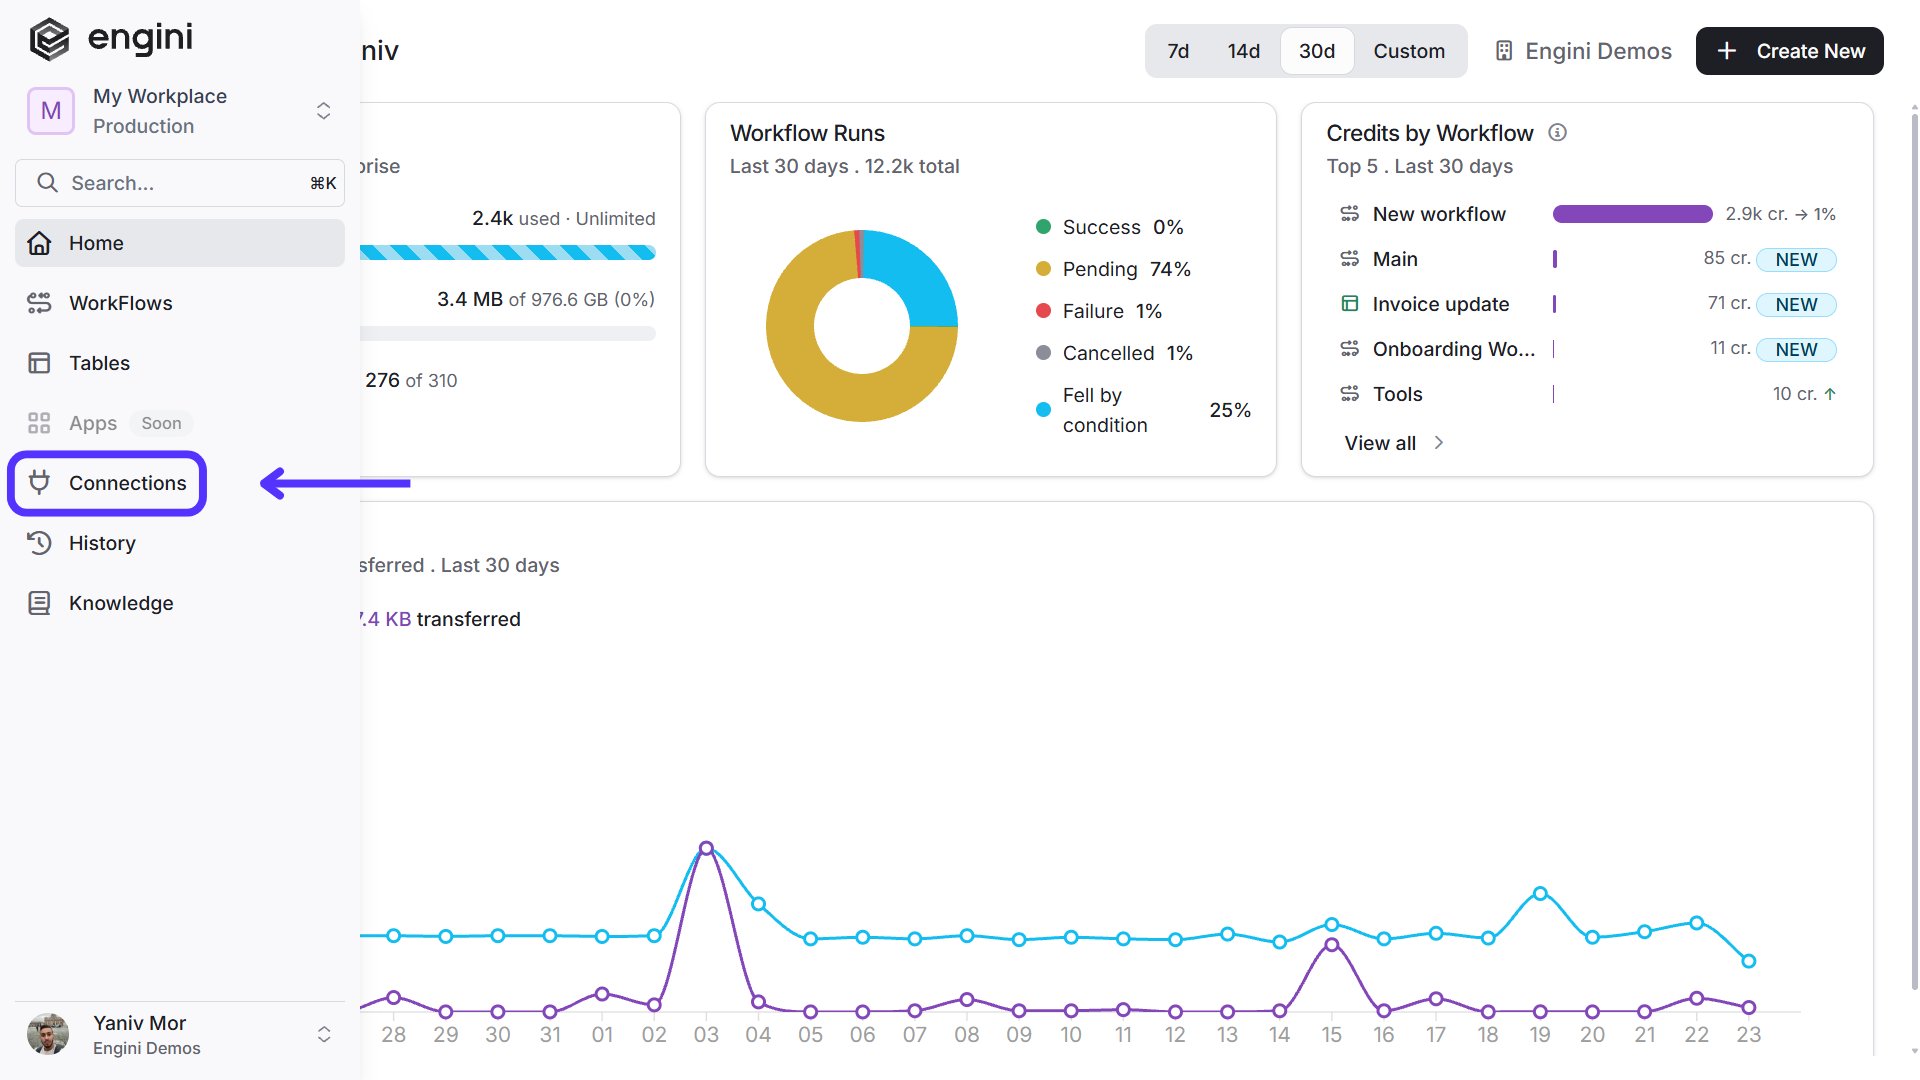
2. Navigate to Connections page by clicking on the Connections on the left sidebar or by clicking [here](https://app.engini.io/connections).
 3. Click on the "New Integration" option located at the top bar.
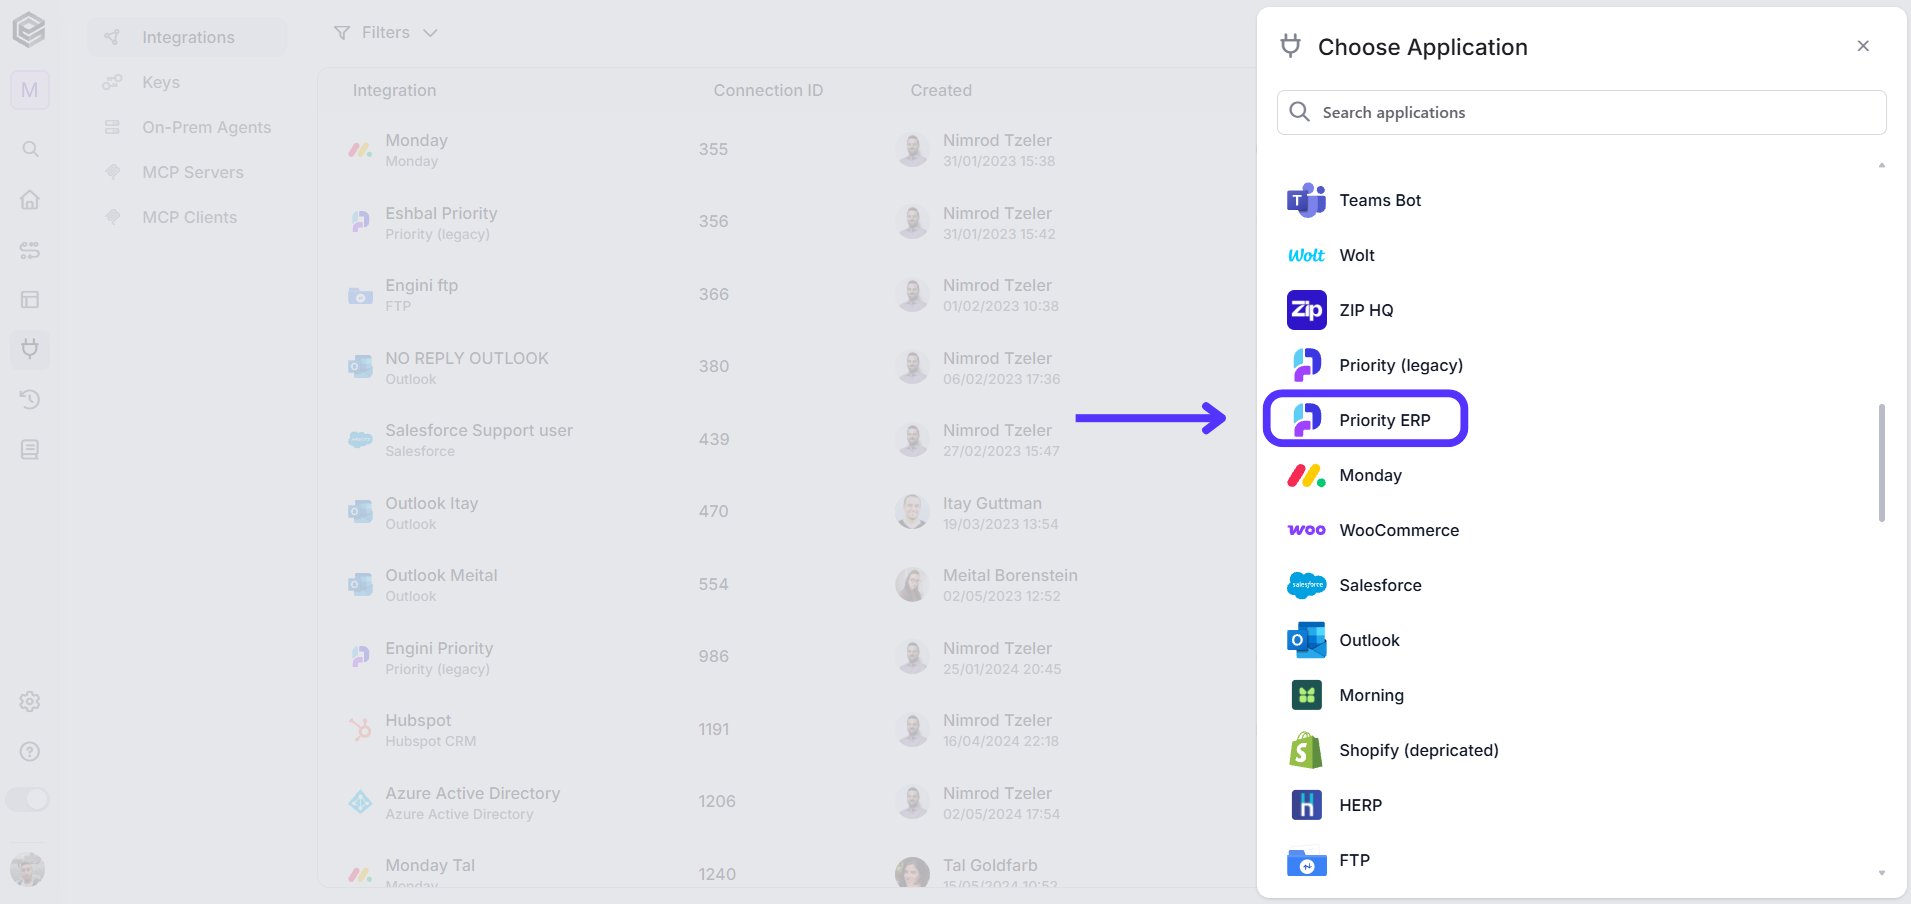
 4. Choose Priority ERP’s option from the available applications.
 5. Enter the following details in the “Edit Connection” form:
 1. *Connection name -* Choose a significant name.
2. *Public Connection -* Enable this option to allow multiple users and workflows to share the same connection instead of creating separate connections.
3. *API Url* - Including the tabula.ini.
For example: [https://erp.engini.io/odata/Priority/tabula.ini](https://erp.engini.io/odata/Priority/tabula.ini).
* To specify the language for API operations, append a comma and the language code to the end of the URL.
For example, for American English, use “[https://erp.engini.io/odata/Priority/tabula.ini,3](https://erp.engini.io/odata/Priority/tabula.ini,3)“.
4. *Database name -* Company id in companies form.
5. *API Username -* Companies that use Priority identity management module should place their personal access token.
6. *API Password -* Companies that use Priority identity management module should place “PAT” in all caps.
7. *WebSDK URL* - **Optional.** used when using a dedicated priority connector. X-App-Id & X-App-Key
8. *WebSDK Username -* **Optional.** used when using a Priority’s form activations, for example, for printing a Price quotation document.
9. *WebSDK Password* - **Optional.** used when using a Priority’s form activations, for example, for printing a Price quotation document.
1. *Connection name -* Choose a significant name.
2. *Public Connection -* Enable this option to allow multiple users and workflows to share the same connection instead of creating separate connections.
3. *API Url* - Including the tabula.ini.
For example: [https://erp.engini.io/odata/Priority/tabula.ini](https://erp.engini.io/odata/Priority/tabula.ini).
* To specify the language for API operations, append a comma and the language code to the end of the URL.
For example, for American English, use “[https://erp.engini.io/odata/Priority/tabula.ini,3](https://erp.engini.io/odata/Priority/tabula.ini,3)“.
4. *Database name -* Company id in companies form.
5. *API Username -* Companies that use Priority identity management module should place their personal access token.
6. *API Password -* Companies that use Priority identity management module should place “PAT” in all caps.
7. *WebSDK URL* - **Optional.** used when using a dedicated priority connector. X-App-Id & X-App-Key
8. *WebSDK Username -* **Optional.** used when using a Priority’s form activations, for example, for printing a Price quotation document.
9. *WebSDK Password* - **Optional.** used when using a Priority’s form activations, for example, for printing a Price quotation document.
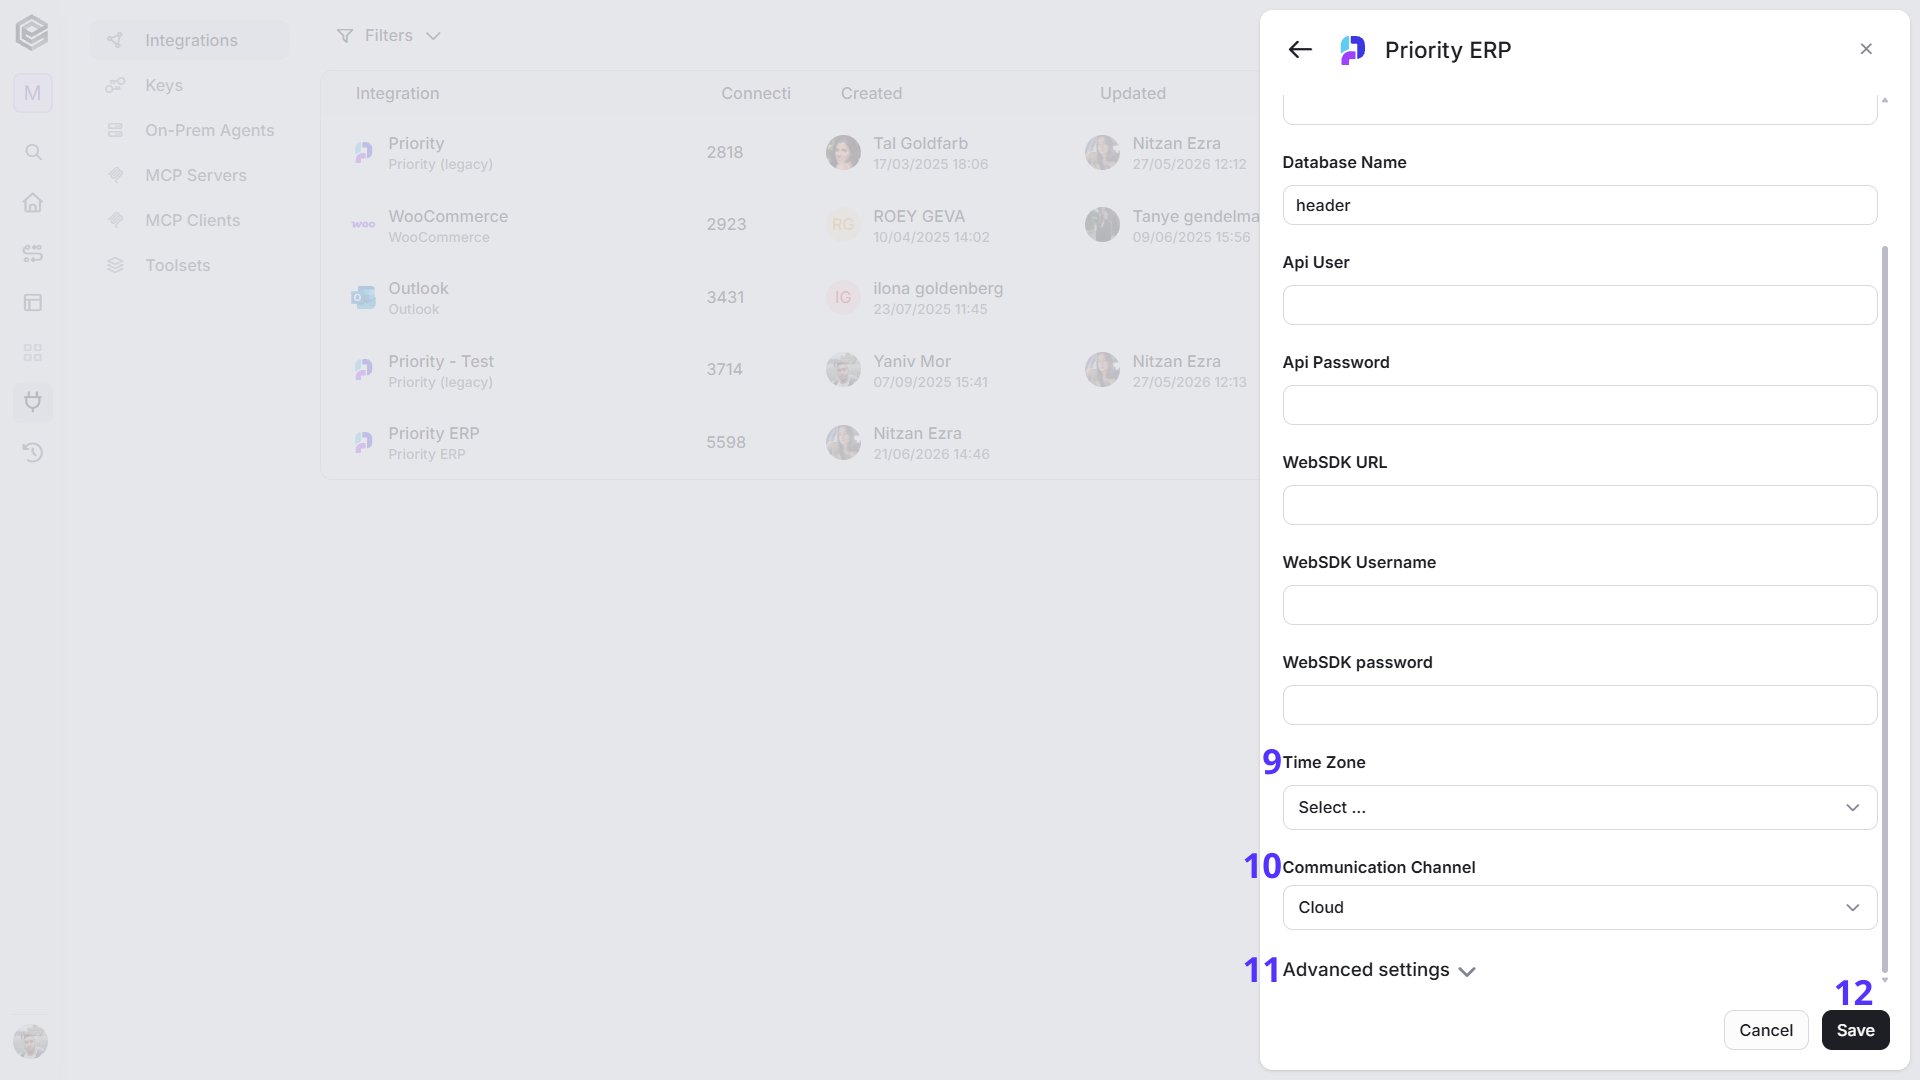 10. *Time Zone - Choose the correct time zone of your location, or you enterprise location.*
11. *Communication Channel -* Choose the appropriate connection type based on your setup:
* Cloud - If you are connecting to a database hosted in a cloud environment, select “Cloud”.
* OPA - If your database is on-premises and you are using an On-Premises Agent (OPA) for the connection, select “OPA”.
In this case, an additional field will appear:
On-Prem Agent - Choose the specific On-Premises Agent that you want to use for this connection if you have multiple agents configured.
12. *Advanced settings -* Provides additional configuration options for specific setup requirements, such as security settings and custom connection parameters. These settings are usually only needed in advanced scenarios.
13. *Save Settings -* Click on the Save button located at the bottom of the form.
## Triggers
### Record Updated
This action triggers when a record is updated and sends the updated data to a specified webhook URL for further processing.
10. *Time Zone - Choose the correct time zone of your location, or you enterprise location.*
11. *Communication Channel -* Choose the appropriate connection type based on your setup:
* Cloud - If you are connecting to a database hosted in a cloud environment, select “Cloud”.
* OPA - If your database is on-premises and you are using an On-Premises Agent (OPA) for the connection, select “OPA”.
In this case, an additional field will appear:
On-Prem Agent - Choose the specific On-Premises Agent that you want to use for this connection if you have multiple agents configured.
12. *Advanced settings -* Provides additional configuration options for specific setup requirements, such as security settings and custom connection parameters. These settings are usually only needed in advanced scenarios.
13. *Save Settings -* Click on the Save button located at the bottom of the form.
## Triggers
### Record Updated
This action triggers when a record is updated and sends the updated data to a specified webhook URL for further processing.
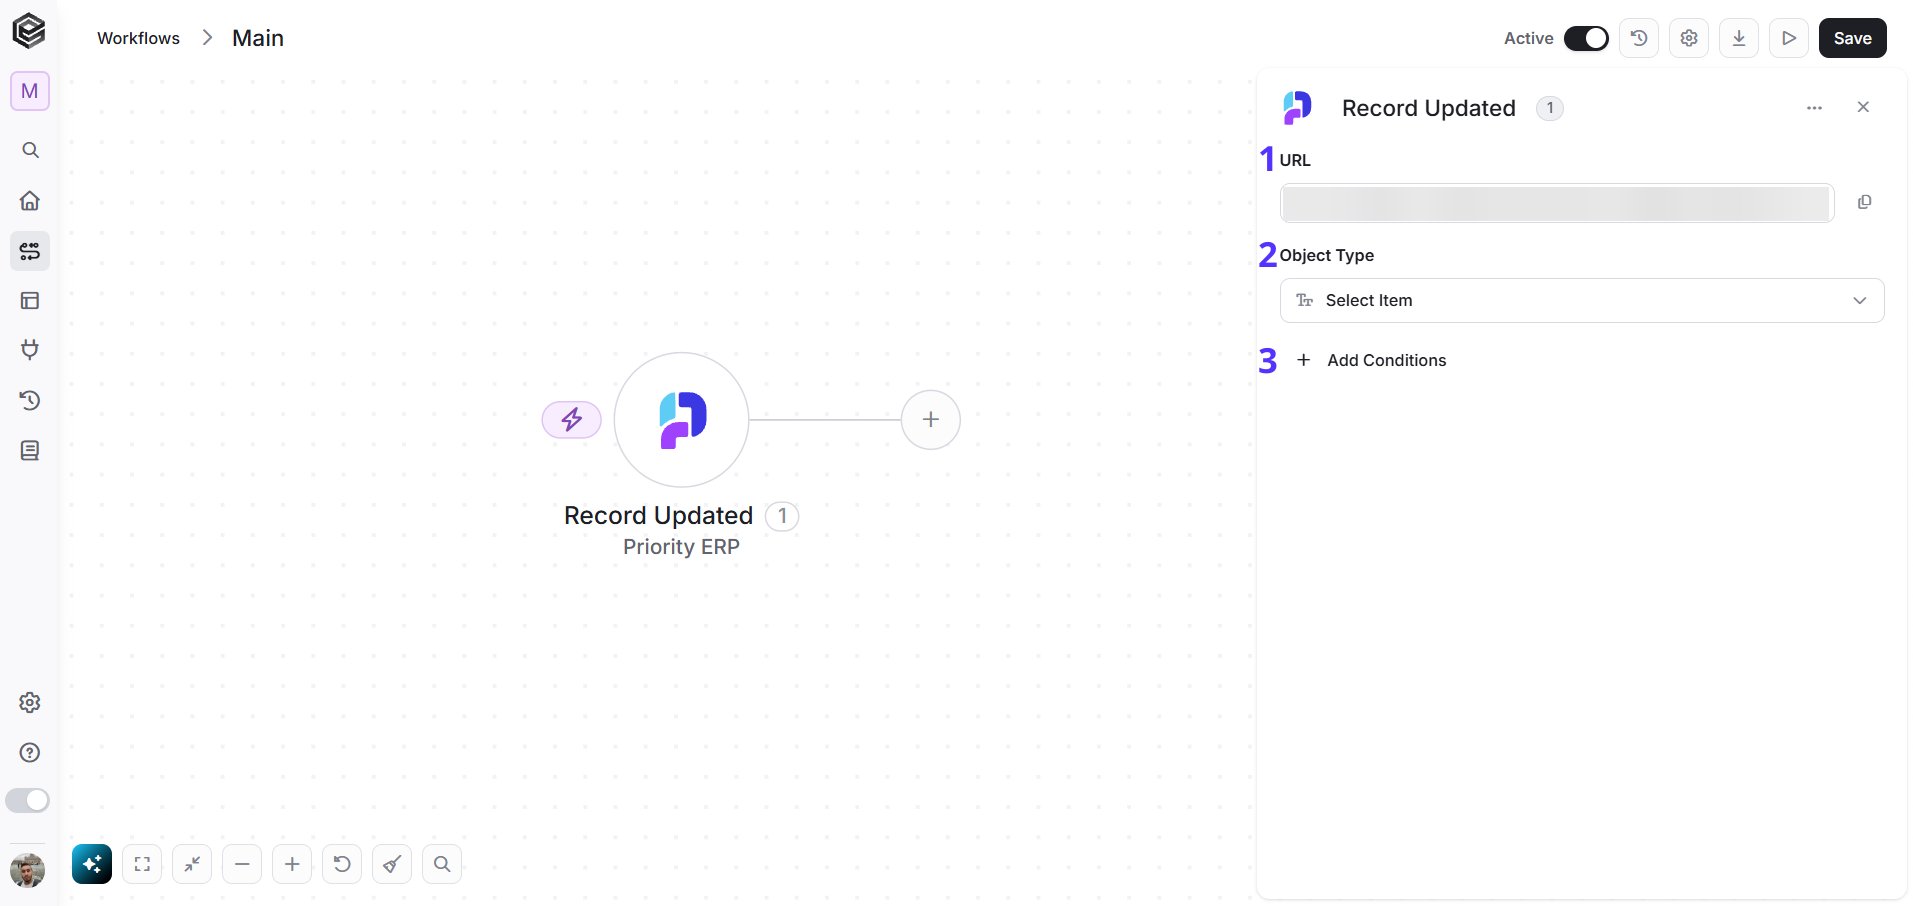 1. *URL -* The webhook endpoint where the updated record data will be sent. This is the destination that receives the event.
2. *Object Type -* Defines which type of record or entity you want to monitor for updates (e.g., item, order, contact).
3. *Add Conditions -* Click Add Conditions to define conditions that narrow down the data list and return only the relevant items. To learn more about using filters, [click here](/help/workflows/workflow-editor#add-conditions).
## Actions
### Create Record
This action creates a new record in the selected object type with the data you provide in the fields.
1. *URL -* The webhook endpoint where the updated record data will be sent. This is the destination that receives the event.
2. *Object Type -* Defines which type of record or entity you want to monitor for updates (e.g., item, order, contact).
3. *Add Conditions -* Click Add Conditions to define conditions that narrow down the data list and return only the relevant items. To learn more about using filters, [click here](/help/workflows/workflow-editor#add-conditions).
## Actions
### Create Record
This action creates a new record in the selected object type with the data you provide in the fields.
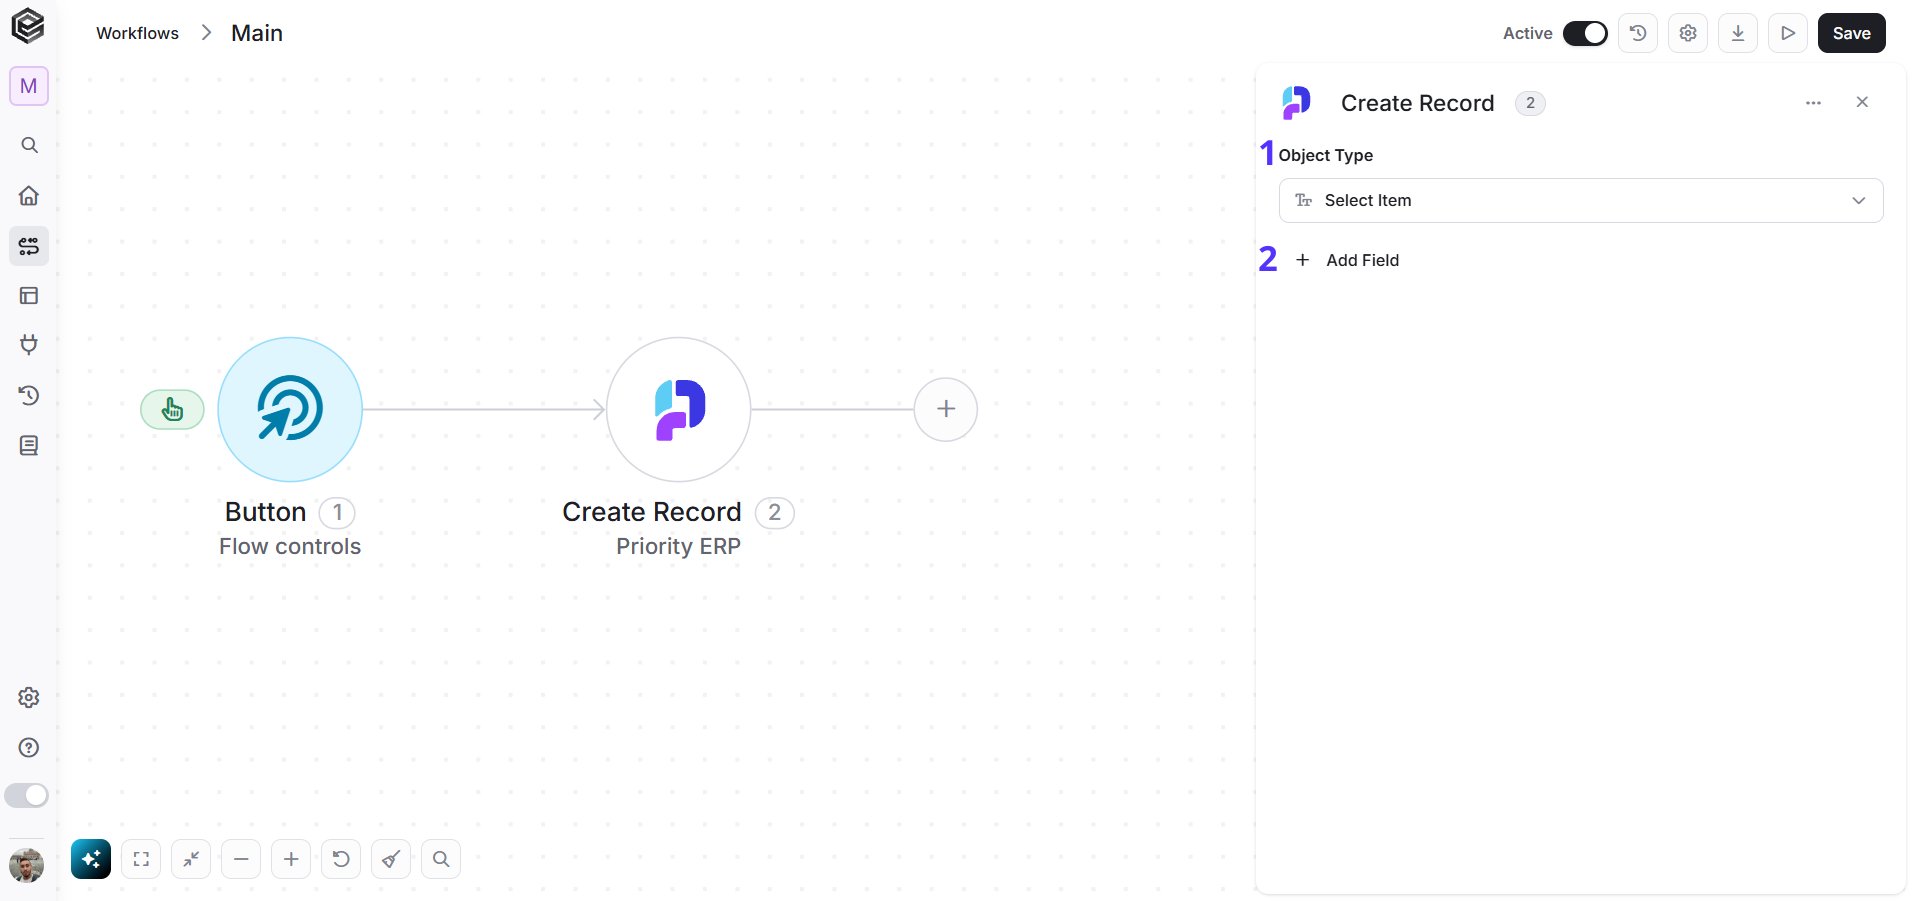 1. *Object Type -* Specifies the type of record you want to create (e.g., customer order, contact, item).
2. *Add Field -* Click Add Field to add and populate additional fields for the selected activity. To learn more about managing activity data, [click here](/help/workflows/workflow-editor#add-fields).
### Update Record
This action updates an existing record in the selected object type using the data provided in the fields.
1. *Object Type -* Specifies the type of record you want to create (e.g., customer order, contact, item).
2. *Add Field -* Click Add Field to add and populate additional fields for the selected activity. To learn more about managing activity data, [click here](/help/workflows/workflow-editor#add-fields).
### Update Record
This action updates an existing record in the selected object type using the data provided in the fields.
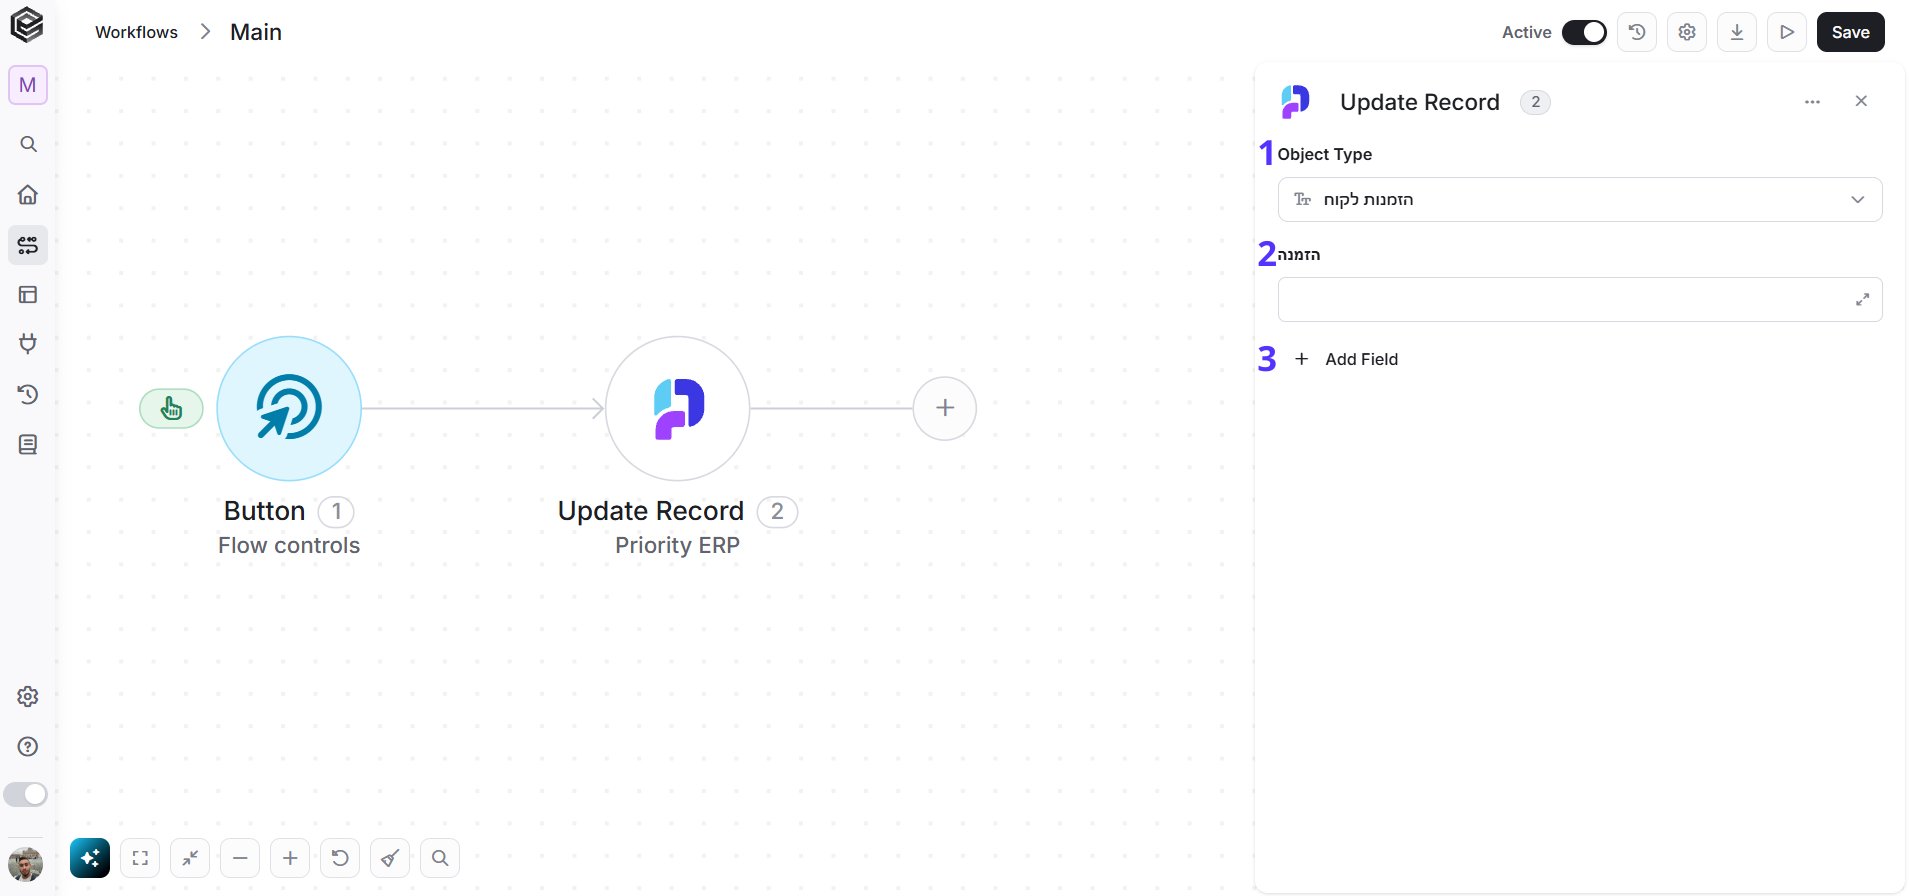 1. *Object Type* - Specifies the type of record you want to update (e.g., customer order, contact, item).
2. *Record (Customer Order) -* A required field that identifies the specific record to update. For each object type, this field will dynamically match the relevant entity (e.g., order ID, contact ID) that was connected or selected.
3. *Add Field -* Click Add Field to add and populate additional fields for the selected activity. To learn more about managing activity data, [click here](/help/workflows/workflow-editor#add-fields).
### Get Record
This action retrieves a specific record from the selected object type and returns the requested data fields.
1. *Object Type* - Specifies the type of record you want to update (e.g., customer order, contact, item).
2. *Record (Customer Order) -* A required field that identifies the specific record to update. For each object type, this field will dynamically match the relevant entity (e.g., order ID, contact ID) that was connected or selected.
3. *Add Field -* Click Add Field to add and populate additional fields for the selected activity. To learn more about managing activity data, [click here](/help/workflows/workflow-editor#add-fields).
### Get Record
This action retrieves a specific record from the selected object type and returns the requested data fields.
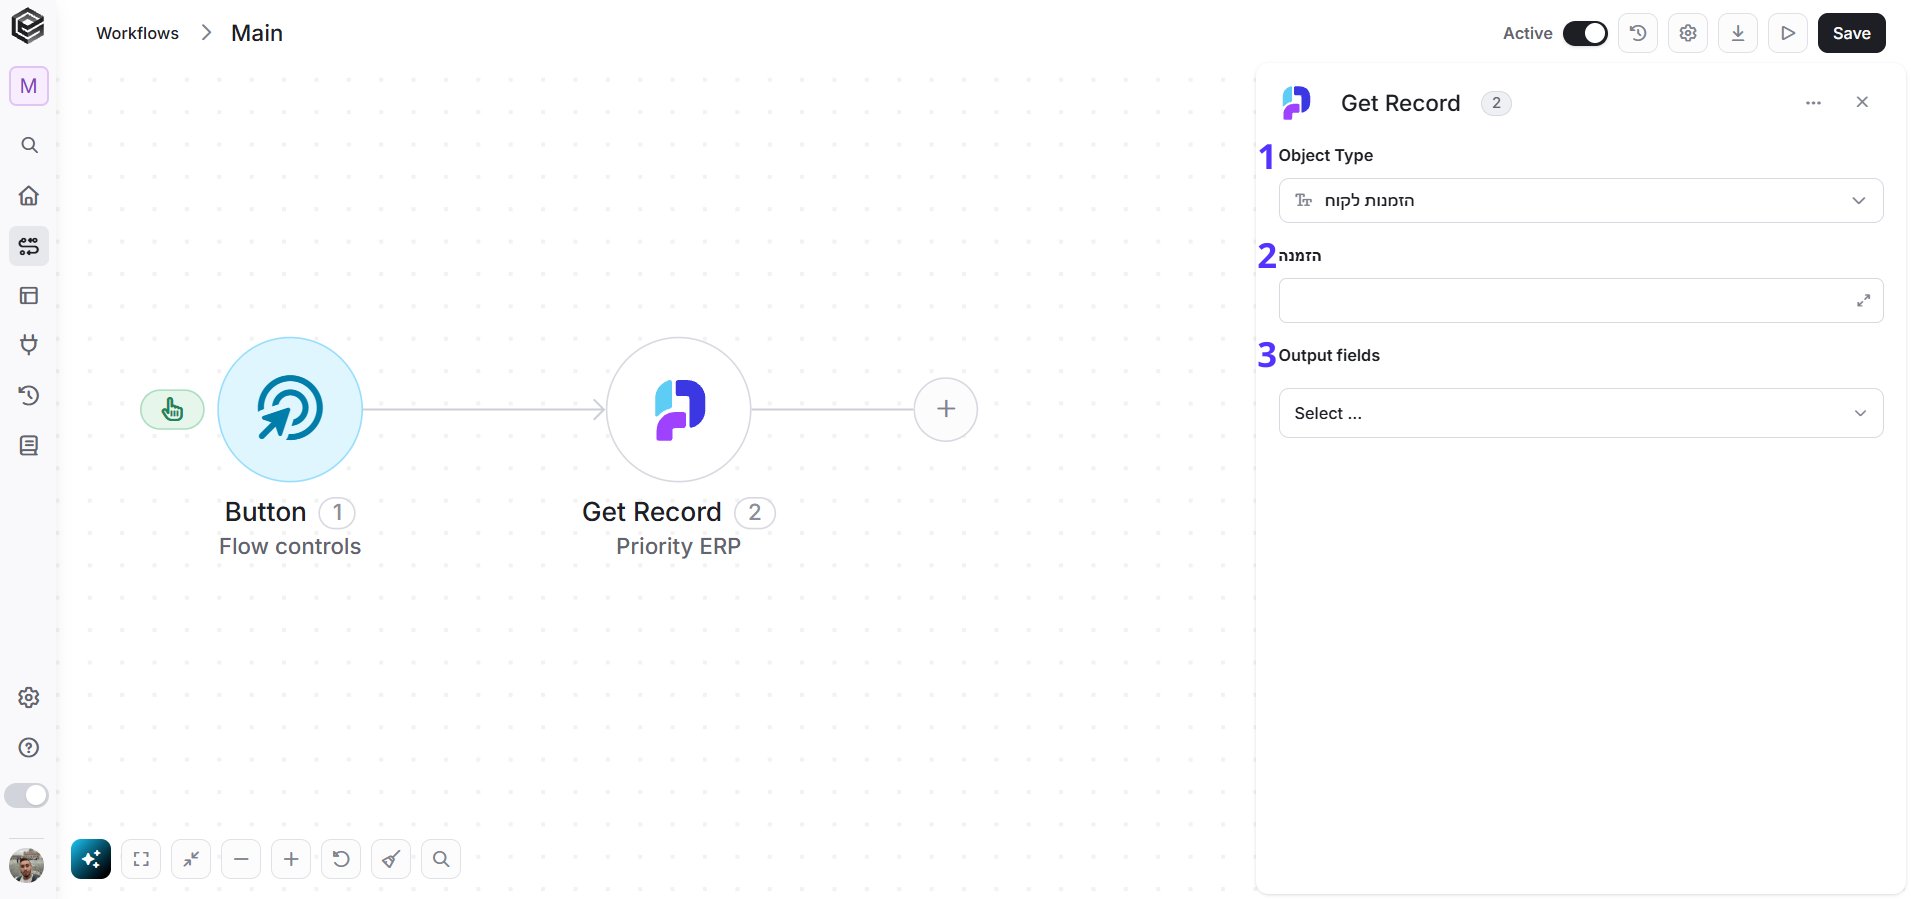 1. *Object Type -* Specifies the type of record you want to retrieve (e.g., customer order, contact, item).
2. *Record (Customer Order) -* A required field that identifies the specific record to retrieve. For each object type, this field dynamically represents the relevant entity (e.g., order ID, contact ID) that was connected or selected.
3. *Output Fields -* Allows you to choose which fields from the record will be returned in the response.
### Get Records
This action retrieves a list of records from the selected object type, with options to filter, sort, and limit the results.
1. *Object Type -* Specifies the type of record you want to retrieve (e.g., customer order, contact, item).
2. *Record (Customer Order) -* A required field that identifies the specific record to retrieve. For each object type, this field dynamically represents the relevant entity (e.g., order ID, contact ID) that was connected or selected.
3. *Output Fields -* Allows you to choose which fields from the record will be returned in the response.
### Get Records
This action retrieves a list of records from the selected object type, with options to filter, sort, and limit the results.
 1. *Object Type -* Specifies the type of records you want to retrieve (e.g., customer orders, contacts, items).
2. *Top N -* You can set the maximum number of Sales Order records Engini will return during one workflow cycle (default = all records).
* If you set `Top N = 1`, a single record will be returned instead of an array. If no record is found, the action will fail, allowing you to implement an IF condition within the workflow. This can be useful for processes where the existence of a record determines the next steps in the workflow.
3. *Offset -* The offset parameter allows you to skip a certain number of records from the beginning of the result set (default = 0 records).
4. *Add Filter -* Click Add Filter to define conditions that narrow down the data list and return only the relevant items. To learn more about using filters, [click here](/help/workflows/workflow-editor#add-filters).
5. *Add Sort -* Click Add Sort to organize the data list by a selected field in ascending or descending order. To learn more about sorting data, [click here](/help/workflows/workflow-editor#add-sorts).
### Delete Record
This action deletes a specific record from the selected object type.
1. *Object Type -* Specifies the type of records you want to retrieve (e.g., customer orders, contacts, items).
2. *Top N -* You can set the maximum number of Sales Order records Engini will return during one workflow cycle (default = all records).
* If you set `Top N = 1`, a single record will be returned instead of an array. If no record is found, the action will fail, allowing you to implement an IF condition within the workflow. This can be useful for processes where the existence of a record determines the next steps in the workflow.
3. *Offset -* The offset parameter allows you to skip a certain number of records from the beginning of the result set (default = 0 records).
4. *Add Filter -* Click Add Filter to define conditions that narrow down the data list and return only the relevant items. To learn more about using filters, [click here](/help/workflows/workflow-editor#add-filters).
5. *Add Sort -* Click Add Sort to organize the data list by a selected field in ascending or descending order. To learn more about sorting data, [click here](/help/workflows/workflow-editor#add-sorts).
### Delete Record
This action deletes a specific record from the selected object type.
 1. *Object Type* - Specifies the type of record you want to delete (e.g., customer order, contact, item).
2. *Record (ID)* - A required field that represents the unique identifier of the record you want to delete. This value corresponds to the specific object selected (e.g., order ID, contact ID).
### Form Activation
1. *Object Type* - Specifies the type of record you want to delete (e.g., customer order, contact, item).
2. *Record (ID)* - A required field that represents the unique identifier of the record you want to delete. This value corresponds to the specific object selected (e.g., order ID, contact ID).
### Form Activation
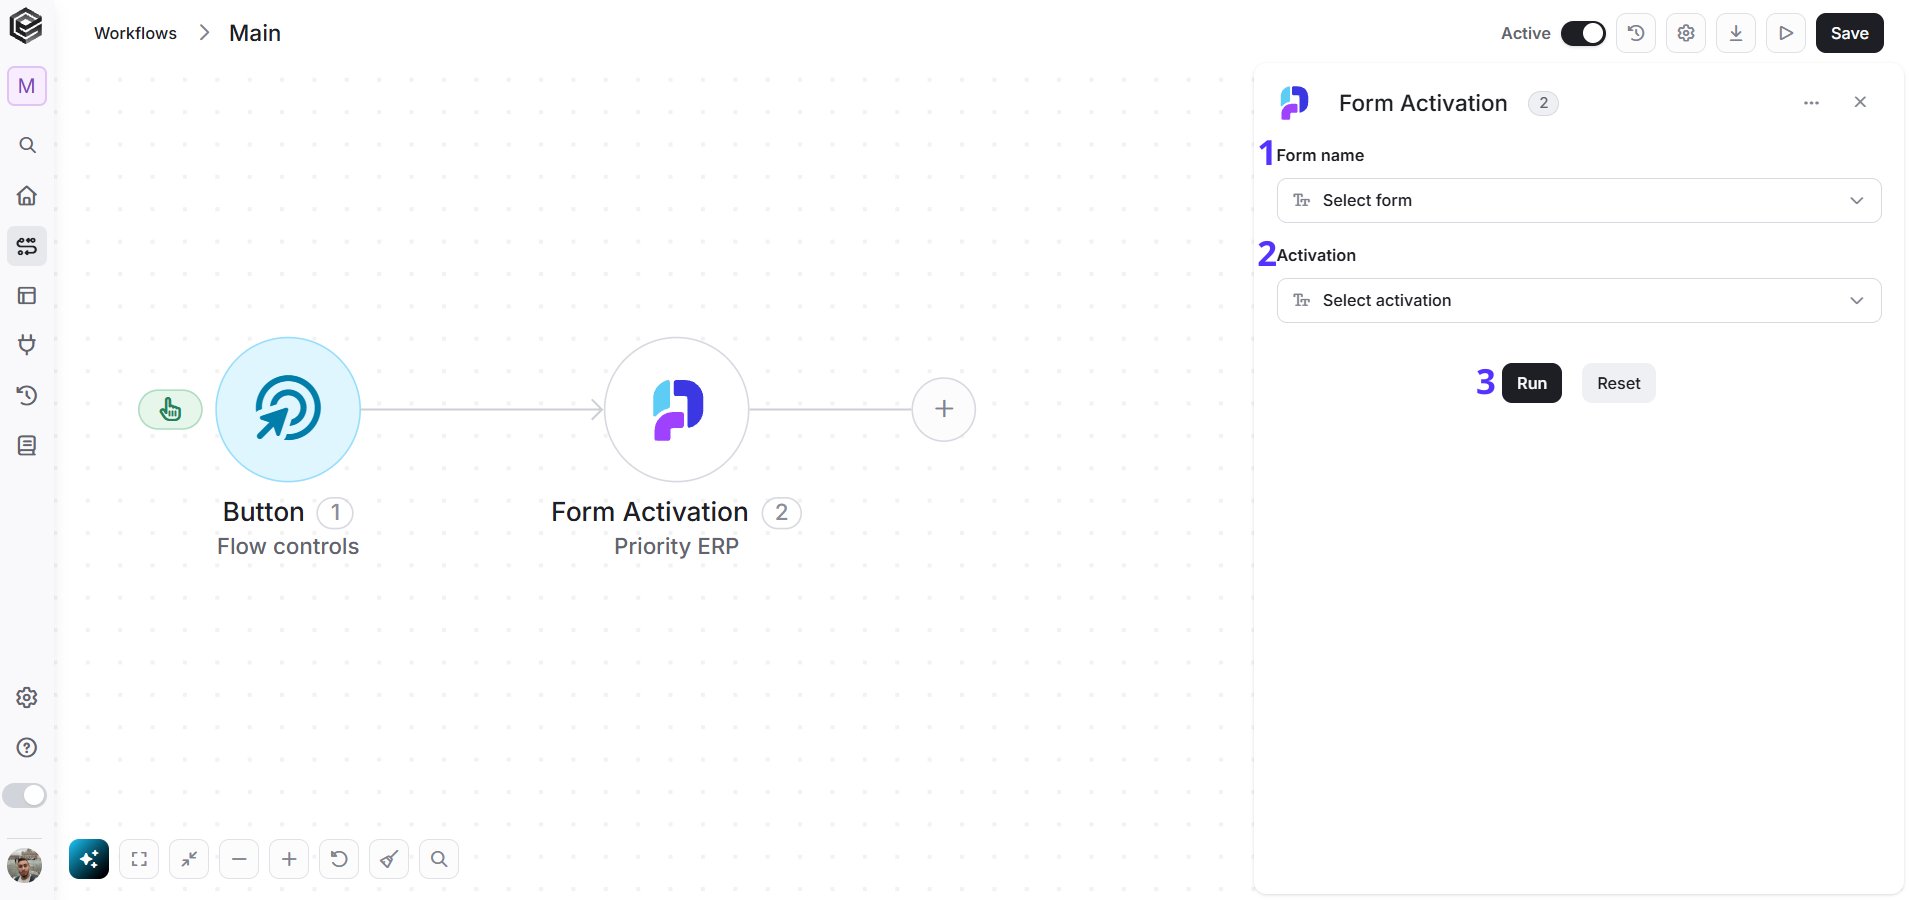 1. *Form name -* Choose the Form name from the drop down menu. The available forms are the open parent screens and child screens from your Priority account.
2. *Activation -* Choose the Activation from the drop down menu. According to the Form name, an identifier field will appear. Enter a **static value** as you can see at the image below:
3. *Run -* Press Run. Each Run can add new fields to fill in.
1. *Form name -* Choose the Form name from the drop down menu. The available forms are the open parent screens and child screens from your Priority account.
2. *Activation -* Choose the Activation from the drop down menu. According to the Form name, an identifier field will appear. Enter a **static value** as you can see at the image below:
3. *Run -* Press Run. Each Run can add new fields to fill in.
 4. Fill in the Required Fields Ensure all necessary fields are filled in correctly before proceeding.
### Run Procedure
**Prerequisites:**
1. EPROG form is accessible to API in FORMLIMITED form.
2. The user used for the integration should have at least read privileges to EPROG form.
3. The user used for the integration should have privileges to execute the relevant procedure.
To use Priority’s run procedure, follow the following steps:
4. Fill in the Required Fields Ensure all necessary fields are filled in correctly before proceeding.
### Run Procedure
**Prerequisites:**
1. EPROG form is accessible to API in FORMLIMITED form.
2. The user used for the integration should have at least read privileges to EPROG form.
3. The user used for the integration should have privileges to execute the relevant procedure.
To use Priority’s run procedure, follow the following steps:
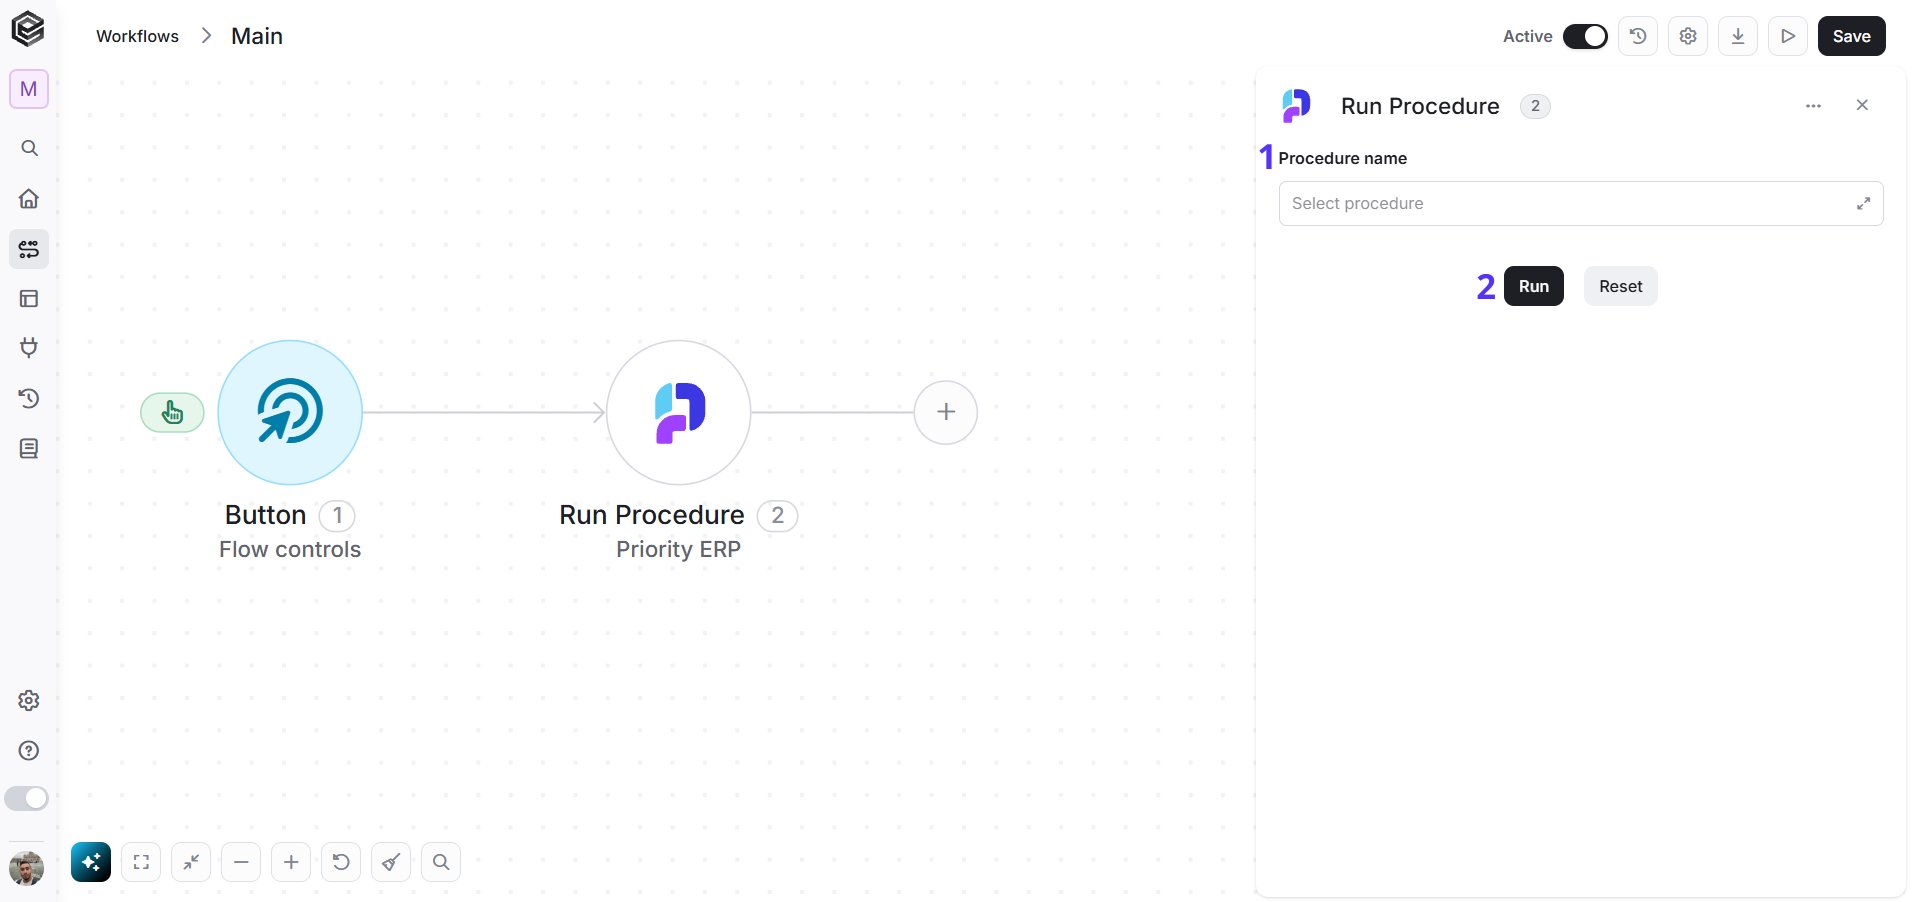 1. *Procedure name -* Choose the procedure name from the field options tab in the tooltip menu. All the available procedures.
2. *Run -* Press Run. Each Run can add new fields to fill in. When you need to reset the values you can press the “Reset” button.
1. *Procedure name -* Choose the procedure name from the field options tab in the tooltip menu. All the available procedures.
2. *Run -* Press Run. Each Run can add new fields to fill in. When you need to reset the values you can press the “Reset” button.
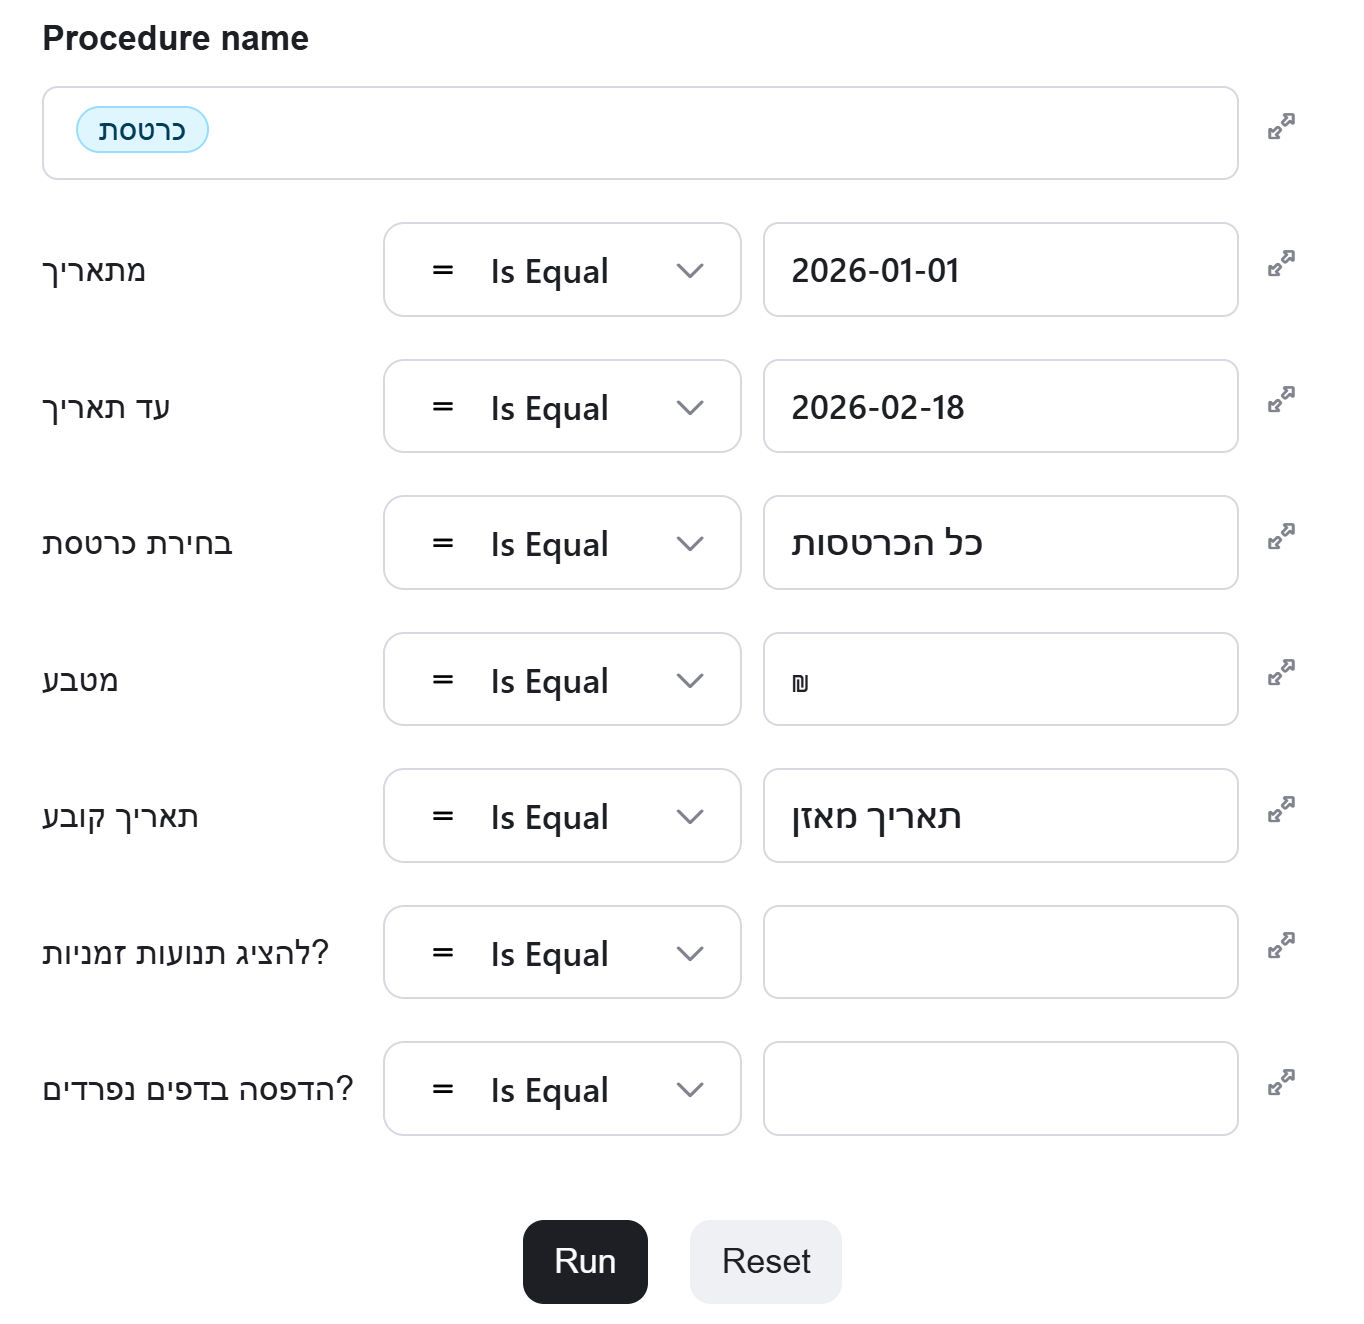 3. Repeat steps 2 until all required fields are filled up and “Ran successfully” message will appear.

4. After the procedure ran successfully, you can now change the relevant static values to parameters to allow the workflow to run using dynamic values.
### Send API Request
This action sends a custom API request to an external service, allowing you to interact with endpoints using different methods, headers, and payloads.
3. Repeat steps 2 until all required fields are filled up and “Ran successfully” message will appear.

4. After the procedure ran successfully, you can now change the relevant static values to parameters to allow the workflow to run using dynamic values.
### Send API Request
This action sends a custom API request to an external service, allowing you to interact with endpoints using different methods, headers, and payloads.
 1. *Base URL* - The main endpoint of the API you want to call (e.g., the server or service URL).
2. *Relative URL* The specific path or resource you want to access, appended to the Base URL.
3. *Method* - Defines the HTTP method used for the request (e.g., GET, POST, PUT, DELETE).
4. *Body Type* - Specifies the format of the request body (e.g., JSON, form-data).
5. *Body* - The payload sent with the request, usually required for methods like POST or PUT.
6. *Add Headers* - Allows you to include additional headers (e.g., Authorization, Content-Type) required by the API.
7. *Add Queries* - Allows you to add query parameters to the request URL (e.g., filters, pagination).
This documentation is built and hosted on [Mintlify](https://mintlify.com), a developer documentation platform.
1. *Base URL* - The main endpoint of the API you want to call (e.g., the server or service URL).
2. *Relative URL* The specific path or resource you want to access, appended to the Base URL.
3. *Method* - Defines the HTTP method used for the request (e.g., GET, POST, PUT, DELETE).
4. *Body Type* - Specifies the format of the request body (e.g., JSON, form-data).
5. *Body* - The payload sent with the request, usually required for methods like POST or PUT.
6. *Add Headers* - Allows you to include additional headers (e.g., Authorization, Content-Type) required by the API.
7. *Add Queries* - Allows you to add query parameters to the request URL (e.g., filters, pagination).
This documentation is built and hosted on [Mintlify](https://mintlify.com), a developer documentation platform.