> ## Documentation Index
> Fetch the complete documentation index at: https://docs.engini.ai/llms.txt
> Use this file to discover all available pages before exploring further.
# On Prem Files
This guide will show you how to use the **Engini On-Prem Agent** to securely manage files stored in your local environment. You’ll learn how to perform operations such as retrieving, creating, renaming, and organizing files. By following this guide, you’ll be able to seamlessly integrate your on-premises file systems into Engini workflows, enabling efficient and secure file management without compromising your corporate firewall.
## Set Up On Prem Agent
Before managing files with the Engini On-Prem Agent, you need to complete the setup process. This includes the following steps:
1. Add an Agent to your account.
2. Download and Install the Agent on your local system.
3. Test the Agent Connection to ensure it’s working correctly.
4. Add Your On-Prem Agent to the file management connection.
If you’re unsure how to complete these steps, please refer to the [On prem Agents](/help/connections/on-prem-agent) guide. Once the setup is complete, you can proceed to manage files securely.
## Add a connection to On Prem File in Engini
1. Enter your Engini account at [https://app.engini.io](https://app.engini.io/).
2. Navigate to Connections page by clicking on the Connections on the left sidebar or by clicking [here](https://app.engini.io/connections).
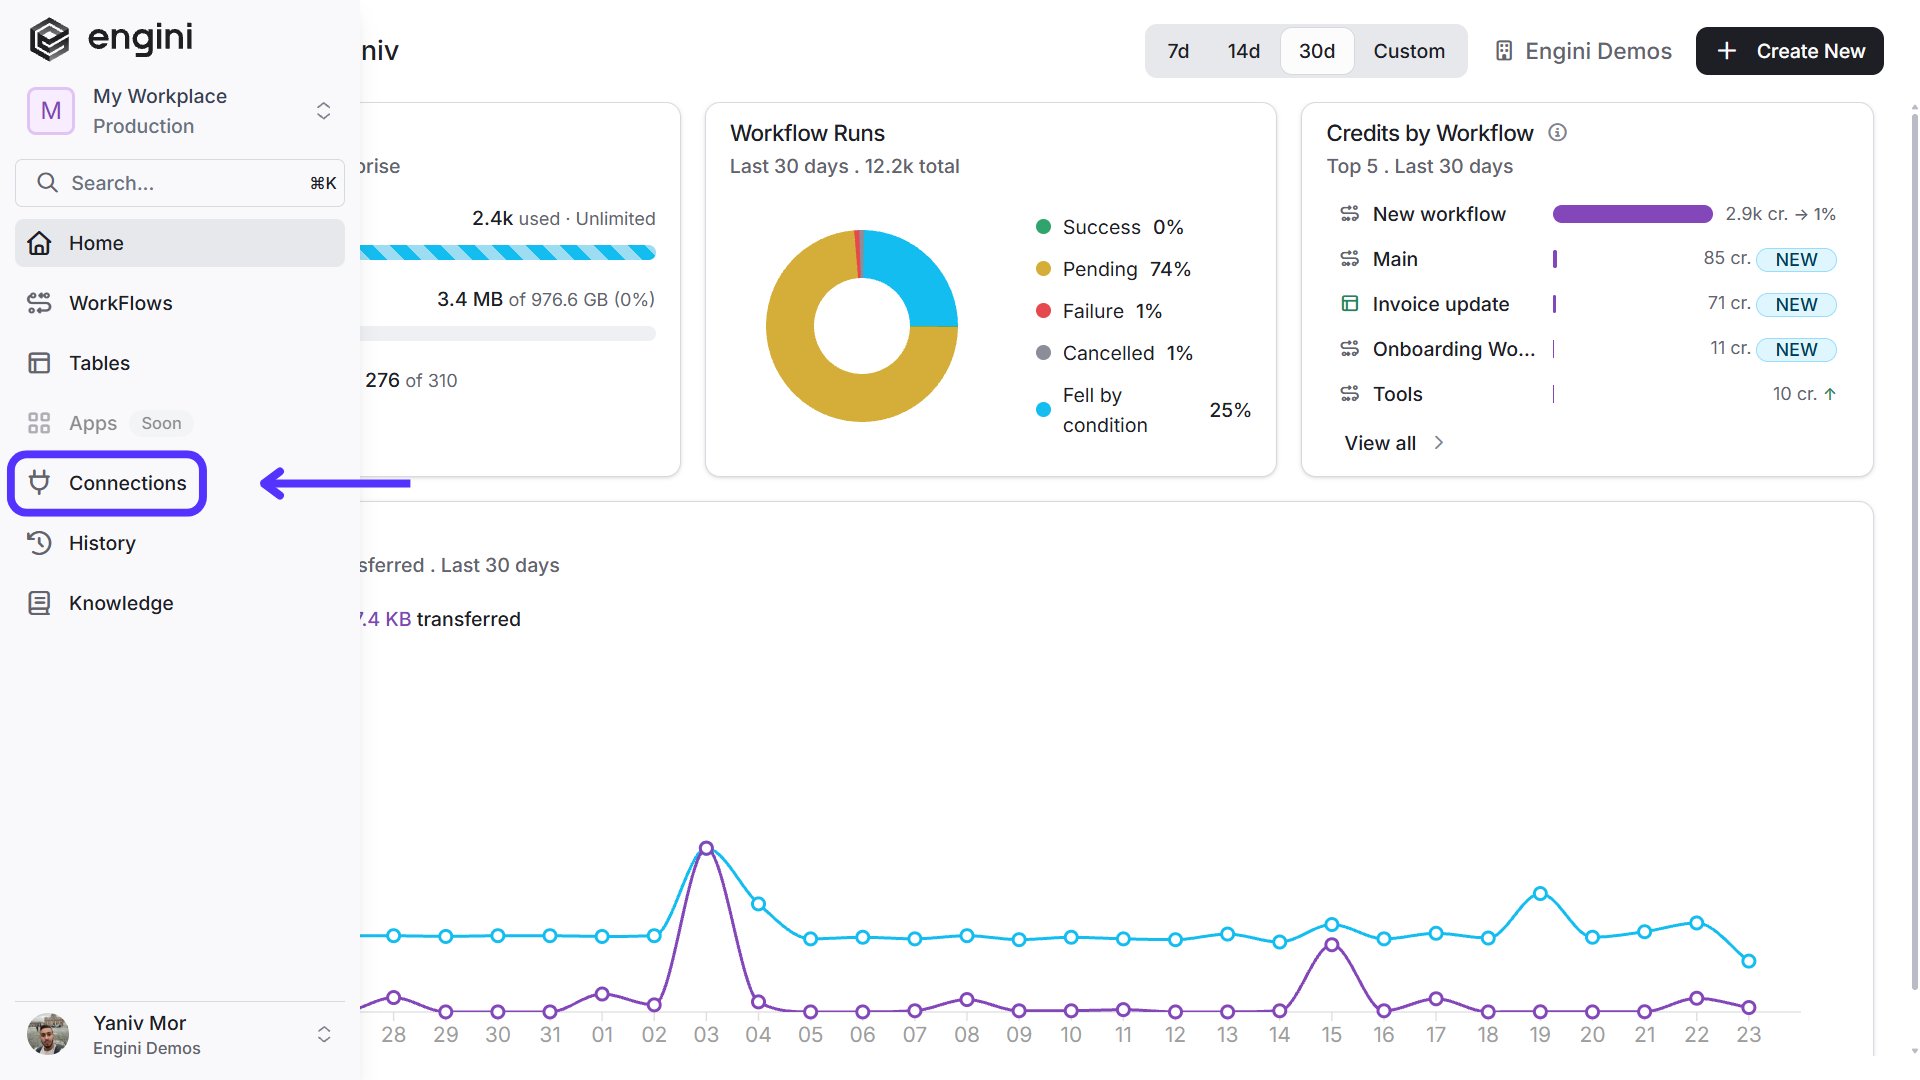 3. Click on the "New Integration" option located at the top bar.
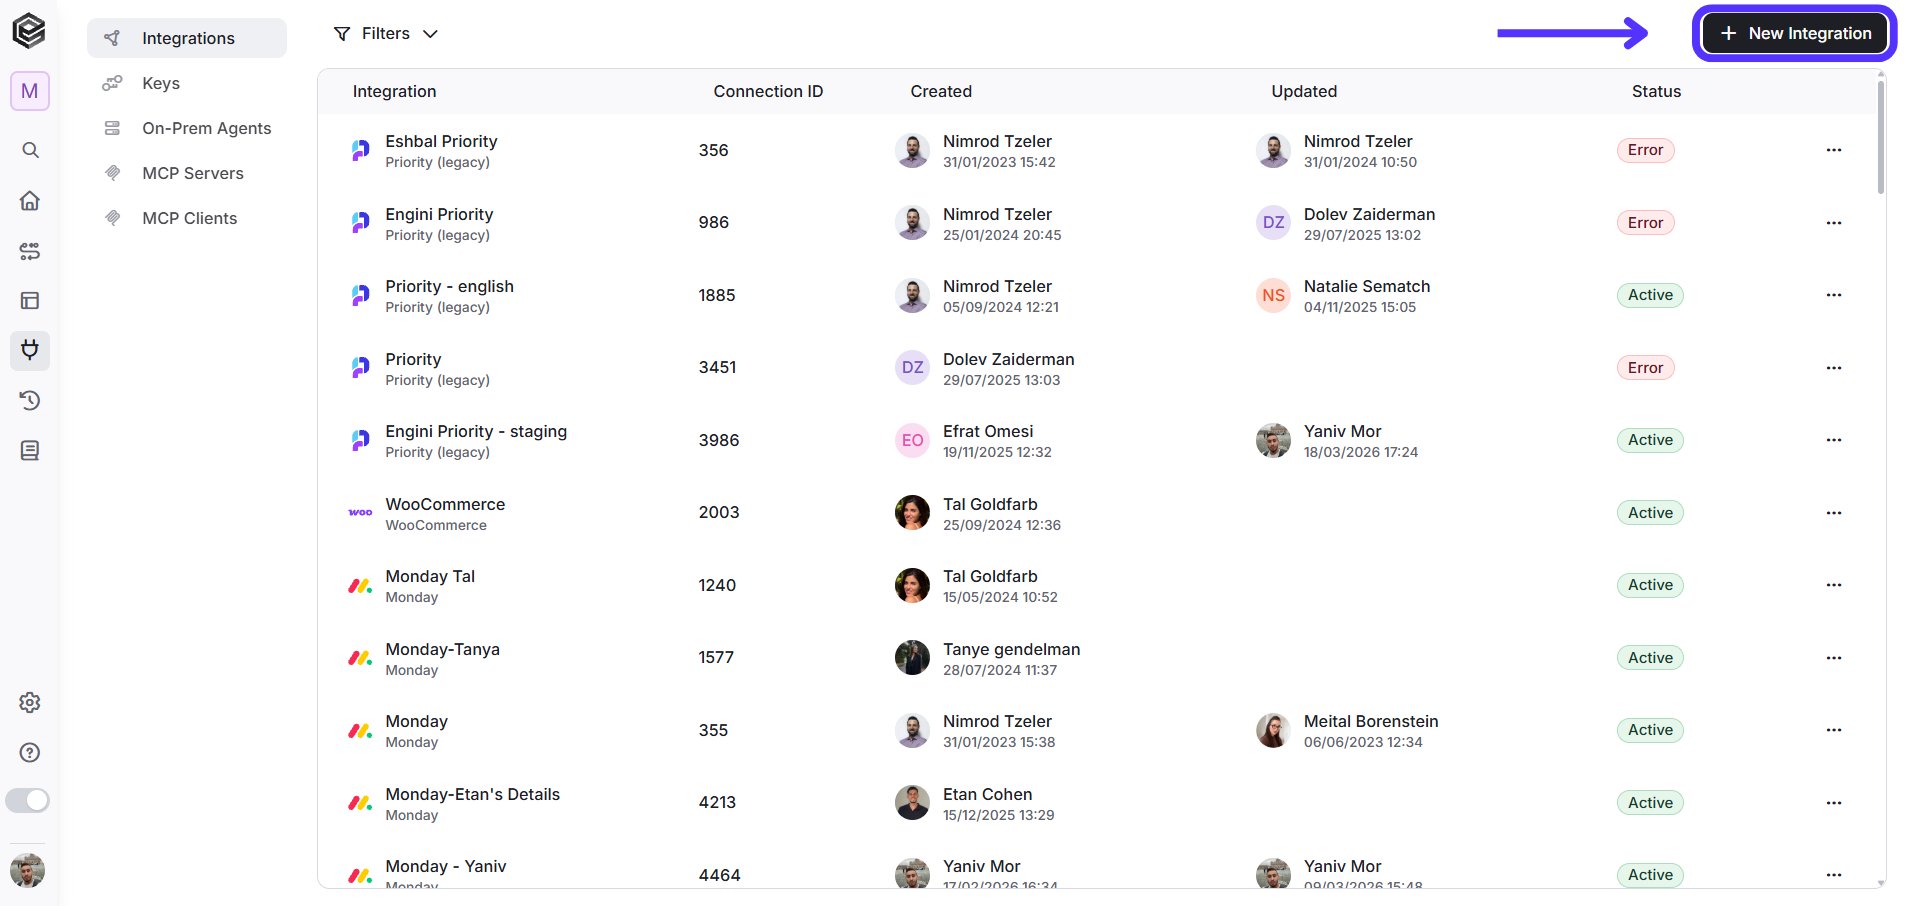 4. Choose On-Prem Files option from the available applications.
 5. Enter the following details in the "New Integration" form:
 1. *Connection name* – A required field where you provide a unique name for the connection.
2. *Directory* – The base folder path for file access. This is the root directory where the agent will operate. Paths specified in workflows will be relative to this base directory.
For example: *C:\Shared\Files.*
3. *On-prem Agent* – A dropdown menu where you select the desired On-Prem Agent for this connection. This agent must already be configured and available for selection.
4. Click on the save button to save the connection.
## Activities
### Create File
This activity creates a new file in the specified path and populates it with provided content.
1. *Connection name* – A required field where you provide a unique name for the connection.
2. *Directory* – The base folder path for file access. This is the root directory where the agent will operate. Paths specified in workflows will be relative to this base directory.
For example: *C:\Shared\Files.*
3. *On-prem Agent* – A dropdown menu where you select the desired On-Prem Agent for this connection. This agent must already be configured and available for selection.
4. Click on the save button to save the connection.
## Activities
### Create File
This activity creates a new file in the specified path and populates it with provided content.
 1. *File Path –* Specify the relative file path. The file path should also include the file name. If the file should be created in a directory inside the directory provided in the connection, then you should use the Concat() function to concatenate between the path to the file name.
2. *File Content* – Provide the content to be written into the file. Ensure the content is in Base64 format. You can use the *StringToBase64* function available in Engini to convert your string into Base64 format.
3. *Add Field* - Click Add Field to add and populate additional fields for the selected activity. To learn more about managing activity data, [click here](/help/workflows/workflow-editor#add-fields).
### Delete File
This activity deletes a file from the specified location.
1. *File Path –* Specify the relative file path. The file path should also include the file name. If the file should be created in a directory inside the directory provided in the connection, then you should use the Concat() function to concatenate between the path to the file name.
2. *File Content* – Provide the content to be written into the file. Ensure the content is in Base64 format. You can use the *StringToBase64* function available in Engini to convert your string into Base64 format.
3. *Add Field* - Click Add Field to add and populate additional fields for the selected activity. To learn more about managing activity data, [click here](/help/workflows/workflow-editor#add-fields).
### Delete File
This activity deletes a file from the specified location.
 1. *File Path* – Provide the relative file path of the file you want to delete.
2. *Add Field* - Click Add Field to add and populate additional fields for the selected activity. To learn more about managing activity data, [click here](/help/workflows/workflow-editor#add-fields).
### Get File
This activity retrieves the content of a specific file.
1. *File Path* – Provide the relative file path of the file you want to delete.
2. *Add Field* - Click Add Field to add and populate additional fields for the selected activity. To learn more about managing activity data, [click here](/help/workflows/workflow-editor#add-fields).
### Get File
This activity retrieves the content of a specific file.
 1. *File Path* – Specify the relative file path of the file you want to retrieve.
2. *Add Field* - Click Add Field to add and populate additional fields for the selected activity. To learn more about managing activity data, [click here](/help/workflows/workflow-editor#add-fields).
### Get Files
This activity lists all files in a specific folder, with optional filtering.
1. *File Path* – Specify the relative file path of the file you want to retrieve.
2. *Add Field* - Click Add Field to add and populate additional fields for the selected activity. To learn more about managing activity data, [click here](/help/workflows/workflow-editor#add-fields).
### Get Files
This activity lists all files in a specific folder, with optional filtering.
 1. *Folder*– Specify the folder path relative to the base path to list files from.
2. *Add Field* - Click Add Field to add and populate additional fields for the selected activity. To learn more about managing activity data, [click here](/help/workflows/workflow-editor#add-fields).
### Move File
This activity moves a file from its current location to a new destination.
1. *Folder*– Specify the folder path relative to the base path to list files from.
2. *Add Field* - Click Add Field to add and populate additional fields for the selected activity. To learn more about managing activity data, [click here](/help/workflows/workflow-editor#add-fields).
### Move File
This activity moves a file from its current location to a new destination.
 1. *File Path* – Specify the relative path of the file to be moved.
2. *Destination Folder Path* – Provide the relative destination folder path where the file will be moved.
3. *Add Field* - Click Add Field to add and populate additional fields for the selected activity. To learn more about managing activity data, [click here](/help/workflows/workflow-editor#add-fields).
### Rename File
This activity renames an existing file to a new name.
1. *File Path* – Specify the relative path of the file to be moved.
2. *Destination Folder Path* – Provide the relative destination folder path where the file will be moved.
3. *Add Field* - Click Add Field to add and populate additional fields for the selected activity. To learn more about managing activity data, [click here](/help/workflows/workflow-editor#add-fields).
### Rename File
This activity renames an existing file to a new name.
 1. *File Path –* Provide the relative path of the file to be renamed.
2. *New File Name-* Enter the new name for the file.
3. *Keep connection alive until complete-* If checked, the system maintains the connection to the agent throughout the renaming process to ensure completion.
### Create Folder
This activity creates a new folder in the specified path.
1. *File Path –* Provide the relative path of the file to be renamed.
2. *New File Name-* Enter the new name for the file.
3. *Keep connection alive until complete-* If checked, the system maintains the connection to the agent throughout the renaming process to ensure completion.
### Create Folder
This activity creates a new folder in the specified path.
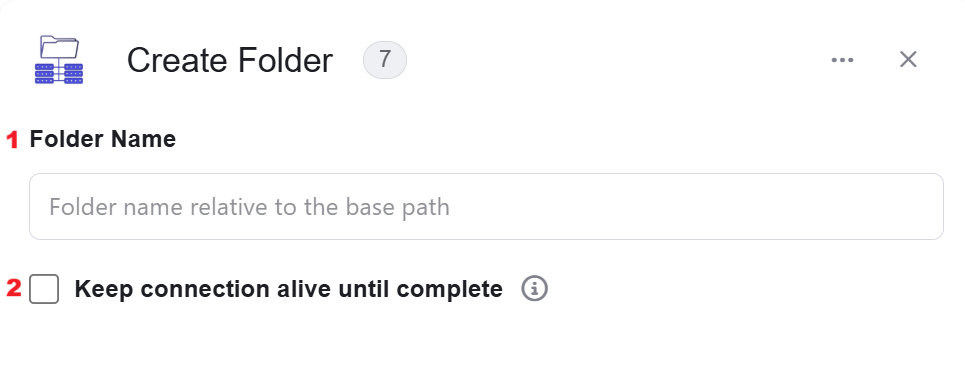 1. *Folder Name* – Provide the name of the folder to be created. The path is relative to the base path.
2. *Keep connection alive until complete-* If checked, the system maintains the connection to the agent throughout the renaming process to ensure completion.
### Delete Folder
This activity deletes an existing folder, including all its contents.
1. *Folder Name* – Provide the name of the folder to be created. The path is relative to the base path.
2. *Keep connection alive until complete-* If checked, the system maintains the connection to the agent throughout the renaming process to ensure completion.
### Delete Folder
This activity deletes an existing folder, including all its contents.
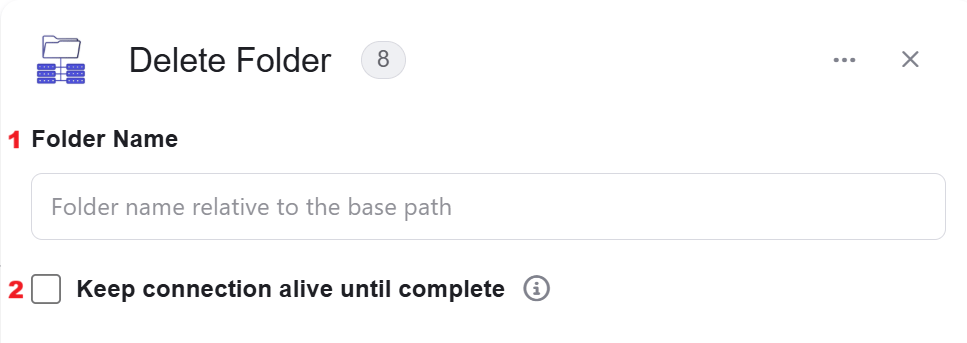 1. *Folder Name* – Specify the name of the folder to delete. The path should be relative to the base path.
2. *Keep connection alive until complete*– If checked, the connection to the agent is maintained until the folder deletion process is successfully completed.
### Get Folders
This activity retrieves a list of folders from a specified directory, with options to include subfolders and apply filters.
1. *Folder Name* – Specify the name of the folder to delete. The path should be relative to the base path.
2. *Keep connection alive until complete*– If checked, the connection to the agent is maintained until the folder deletion process is successfully completed.
### Get Folders
This activity retrieves a list of folders from a specified directory, with options to include subfolders and apply filters.
 1. *Folder* – Provide the folder path relative to the base path to list folders from.
2. *Add Field* - Click Add Field to add and populate additional fields for the selected activity. To learn more about managing activity data, [click here](/help/workflows/workflow-editor#add-fields).
* *Include Files in Sub folders* – Select *True* to include folders from subdirectories or *False* to limit results to the main directory.
* *Naming Pattern* – Use filters to retrieve specific folders based on naming patterns (e.g., Folder\* for names starting with “Folder”).
3. *Keep connection alive until complet*e – If checked, ensures the connection to the agent remains active during the folder retrieval process, especially for large directories or complex filters.
This documentation is built and hosted on [Mintlify](https://mintlify.com), a developer documentation platform.
1. *Folder* – Provide the folder path relative to the base path to list folders from.
2. *Add Field* - Click Add Field to add and populate additional fields for the selected activity. To learn more about managing activity data, [click here](/help/workflows/workflow-editor#add-fields).
* *Include Files in Sub folders* – Select *True* to include folders from subdirectories or *False* to limit results to the main directory.
* *Naming Pattern* – Use filters to retrieve specific folders based on naming patterns (e.g., Folder\* for names starting with “Folder”).
3. *Keep connection alive until complet*e – If checked, ensures the connection to the agent remains active during the folder retrieval process, especially for large directories or complex filters.
This documentation is built and hosted on [Mintlify](https://mintlify.com), a developer documentation platform.