> ## Documentation Index
> Fetch the complete documentation index at: https://docs.engini.ai/llms.txt
> Use this file to discover all available pages before exploring further.
# NetSuite
Learn how to connect Engini to NetSuite.
With the NetSuite activities in Engini you can create, update, delete, get one or more records.
## Getting Started with Netsuite
### Prerequisites
1. Access to NetSuite admin account.
2. Identify all NetSuite permissions required.
## Connecting Engini to NetSuite.com
### NetSuite Integration and Access Configuration
1. ***Enable web services & token-based authentication***
* Navigate to “Enable Features” form using the following path as described below and in the picture.
Setup > Company > Enable Features
 * Navigate to the “SuiteCloud” Tab.
* Enable CLIENT SUITESCRIPT & SERVER SUITESCRIPT in the SuiteScript section.
* Navigate to the “SuiteCloud” Tab.
* Enable CLIENT SUITESCRIPT & SERVER SUITESCRIPT in the SuiteScript section.
 * Enable SOAP WEB SERVICES & REST WEB SERVICES in the SuiteTalk section.
 * Enable TOKEN-BASED AUTHENTICATION & OAUTH 2.0 in the Manage Authentication section.
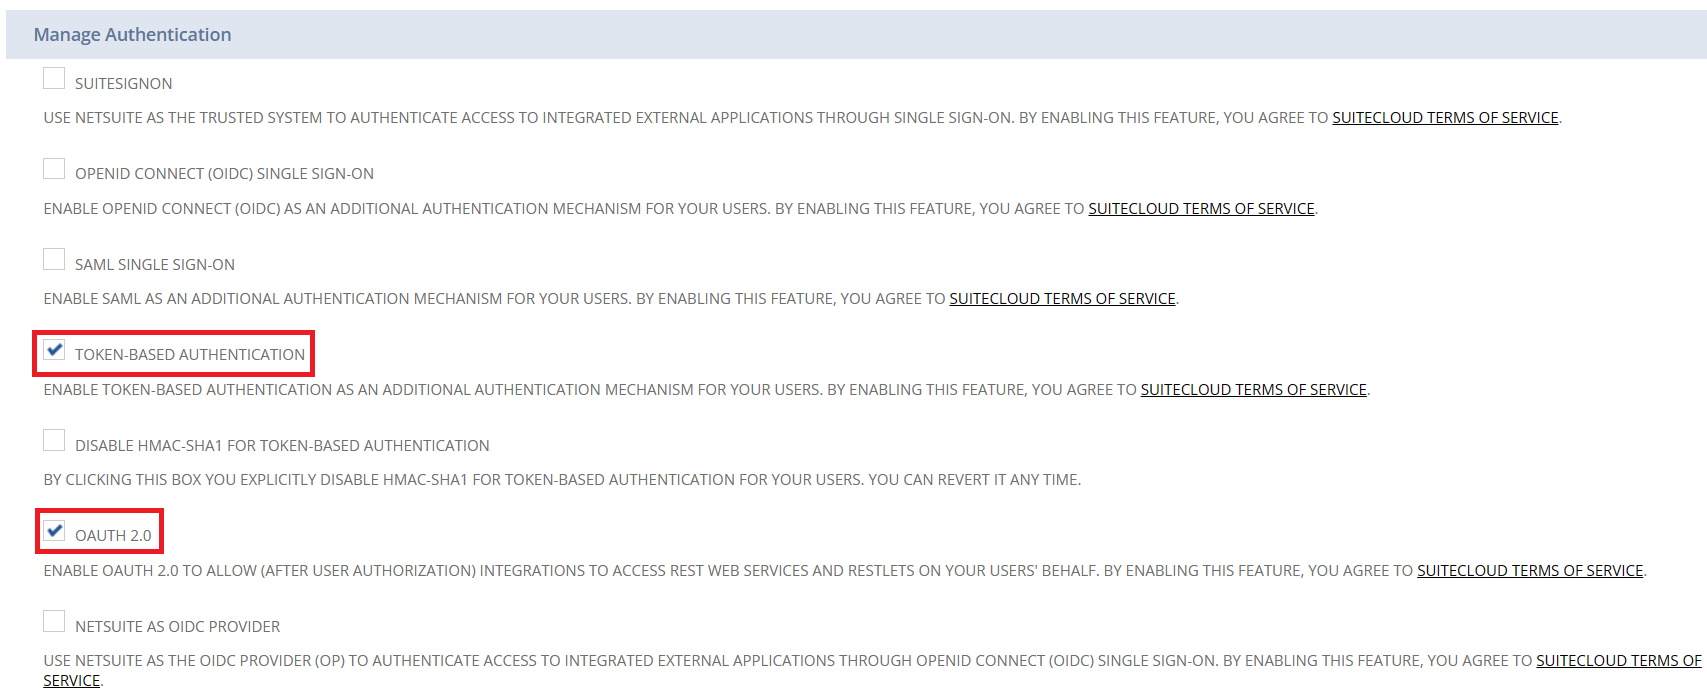 * Scroll back to the top of the page and save the changes.
 2. ***Create an integration record***
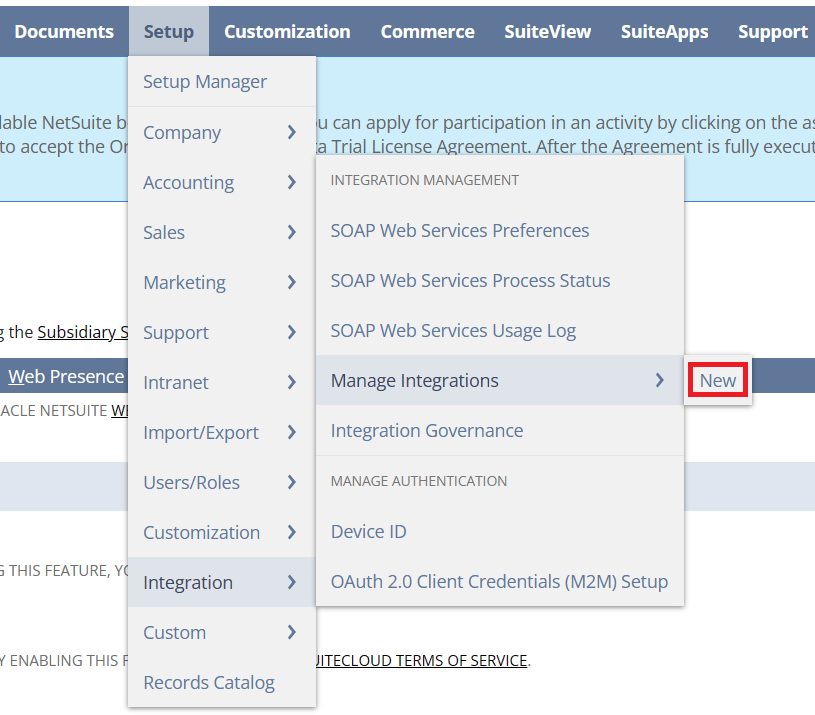
* Create a new Integration record by navigating to the following path as described below and in the picture.
Setup > Integration > Manage Integrations > New
2. ***Create an integration record***
* Create a new Integration record by navigating to the following path as described below and in the picture.
Setup > Integration > Manage Integrations > New
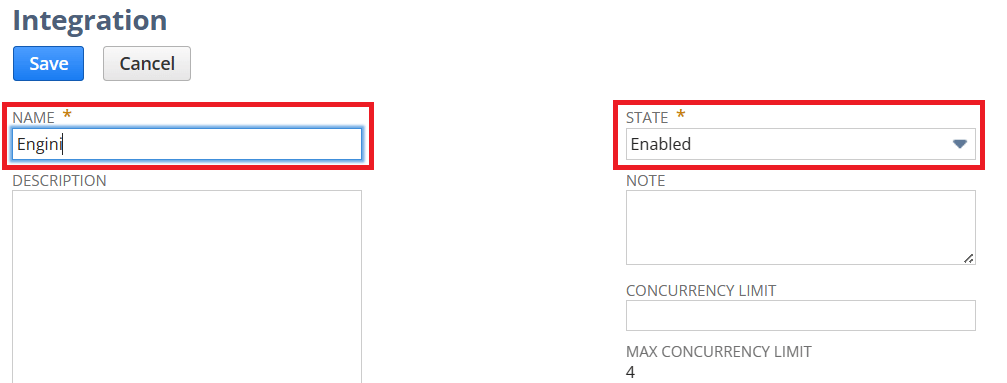
 * Provide a name to the integration record & make sure that the STATE is enabled.
 * Enable TOKEN-BASED AUTHENTICATION & Disable AUTHORIZATION FLOW in the Token-based authentication section.
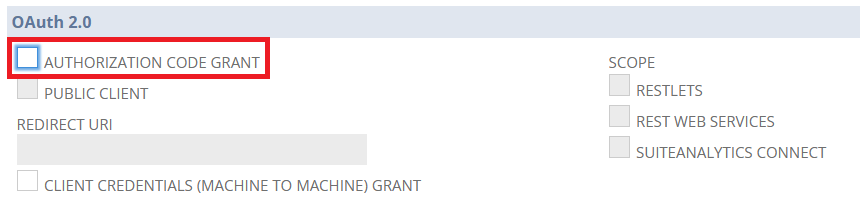
 * Disable AUTHORIZATION CODE GRANT in the OAuth 2.0 section.
 * Save the integration record.
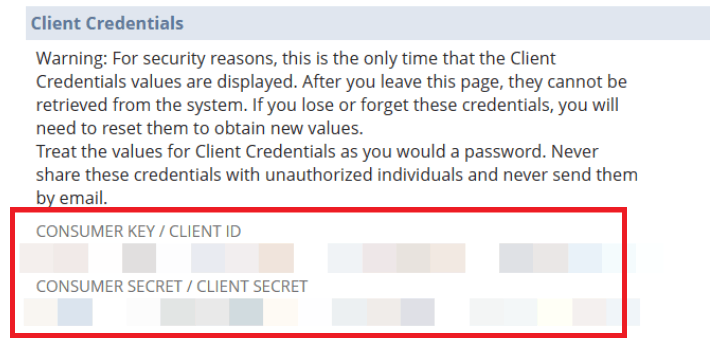
 * Copy and story the consumer key and secret somewhere safe since it will be displayed for you only once and we will need it to authenticate NetSuite with Engini.
 3. ***Create an integration role – Likely the most important part***
* Create a new Integration role by navigating to the following path as described below and in the picture.
Setup > Users/Roles > Manage Roles > New
3. ***Create an integration role – Likely the most important part***
* Create a new Integration role by navigating to the following path as described below and in the picture.
Setup > Users/Roles > Manage Roles > New
 * Provide a name to the integration role
 * If you are planning to interact with records that were created by Administrators and/or do actions that require Administrator role you should also check the “CORE ADMINISTRATION PERMISSIONS” checkbox on the right side of the General tab as seen below.
 * Check the “ALL” option & enable “ALLOW CROSS-SUBIDIARY RECORD VIEWING” in the Subsidiary Restrictions section.
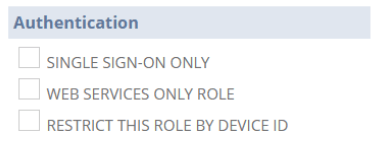
 * Optional – You can set this role as a WEB SERVICES ONLY ROLE in the Authentication section. meaning you won’t be able to sign in the NetSuite UI using this role but only to interact with it’s API’s.
 * Setting up permissions in the Permissions section (as example we will show adding a permissions to Sales orders transactions):
* In the Transaction tab choose “Sales Order”, then choose the permission level on the right column from the available options (View/Create/Edit/Full) and click on Add button.
* Setting up permissions in the Permissions section (as example we will show adding a permissions to Sales orders transactions):
* In the Transaction tab choose “Sales Order”, then choose the permission level on the right column from the available options (View/Create/Edit/Full) and click on Add button.
 * In the same tab, also add the Find Transaction permission as seen in the picture below. This permission will enable you to query NetSuite for transactions like Sales orders, invoice, etc.
 * The sales order has different lists related to it – for example, Customers and Item Collection (order items). To get access to those lists we need to define them in the Lists tab with the appropriate permissions level as following.
 * We will need to add the following permissions in the Setup tab as seen in the picture below.
 * To allow querying NetSuite and get lists of result we will need to add “SuiteAnalytics Workbook” permissions in the Reports tab as seen in the picture below.
 * Scroll back to the top of the page and save the changes.
 4. ***Assign the integration role – You can choose to create a new user or assign it to an existing user***
* Edit an Existing User
* Navigate to the following path as described below and in the picture.
Setup > Users/Roles > Manage Users
4. ***Assign the integration role – You can choose to create a new user or assign it to an existing user***
* Edit an Existing User
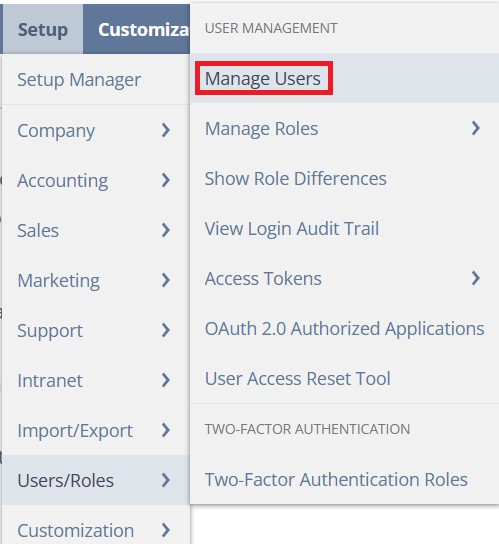
* Navigate to the following path as described below and in the picture.
Setup > Users/Roles > Manage Users
 * Click on the user you want to edit in the list.
* Once inside the Employee form click on Edit button to enter Edit mode.
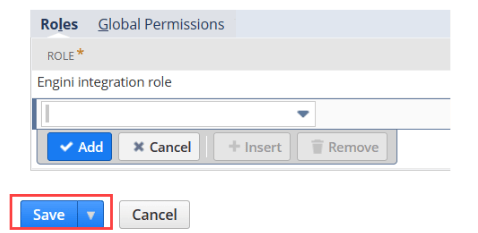
* Enable GIVE ACCESS (if not enabled already) in the access tab & assign the Engini Integration Role created earlier and click on the Add button.
* Click on the user you want to edit in the list.
* Once inside the Employee form click on Edit button to enter Edit mode.
* Enable GIVE ACCESS (if not enabled already) in the access tab & assign the Engini Integration Role created earlier and click on the Add button.
 * Click on the save button to save the changes.
 * Create a new user
* Navigate to the following path as described below and in the picture.
Lists > Employees > Employees > New
* Create a new user
* Navigate to the following path as described below and in the picture.
Lists > Employees > Employees > New
 * Name the employee.
 * Provide an email.
 * Choose the SUBSIDIARY.
 * Enable GIVE ACCESS in the access tab & assign the Engini Integration Role created earlier and click on the Add button.
 * Click on the save button to save the changes.
 5. ***Create access token for the integration user***
* Navigate to the following path as described below and in the picture.
Setup > Users/Roles > Access Token > New
5. ***Create access token for the integration user***
* Navigate to the following path as described below and in the picture.
Setup > Users/Roles > Access Token > New
 * For the APPLICATION NAME choose from the list the Integration Record we created earlier.
* For the USER choose from the list the user we created / edited and assigned the role to.
* For the ROLE choose from the list the role we created Earlier.
* Click the save button.
* Copy and store the TOKEN ID & TOKEN SECRET in a safe place. We will need it to authenticate NetSuite with Engini.
### Add a connection to NetSuite in Engini
1. Enter your Engini account at [https://app.engini.io](https://app.engini.io).
2. Navigate to Connections page by clicking on the Connections on the left sidebar or by clicking [here](https://app.engini.io/connections).
* For the APPLICATION NAME choose from the list the Integration Record we created earlier.
* For the USER choose from the list the user we created / edited and assigned the role to.
* For the ROLE choose from the list the role we created Earlier.
* Click the save button.
* Copy and store the TOKEN ID & TOKEN SECRET in a safe place. We will need it to authenticate NetSuite with Engini.
### Add a connection to NetSuite in Engini
1. Enter your Engini account at [https://app.engini.io](https://app.engini.io).
2. Navigate to Connections page by clicking on the Connections on the left sidebar or by clicking [here](https://app.engini.io/connections).
 3. Click on the "New Integration" option located at the top bar.
 4. Choose NetSuite option from the available applications.
 5. Enter the following details in the “New Integration” form and press Save:
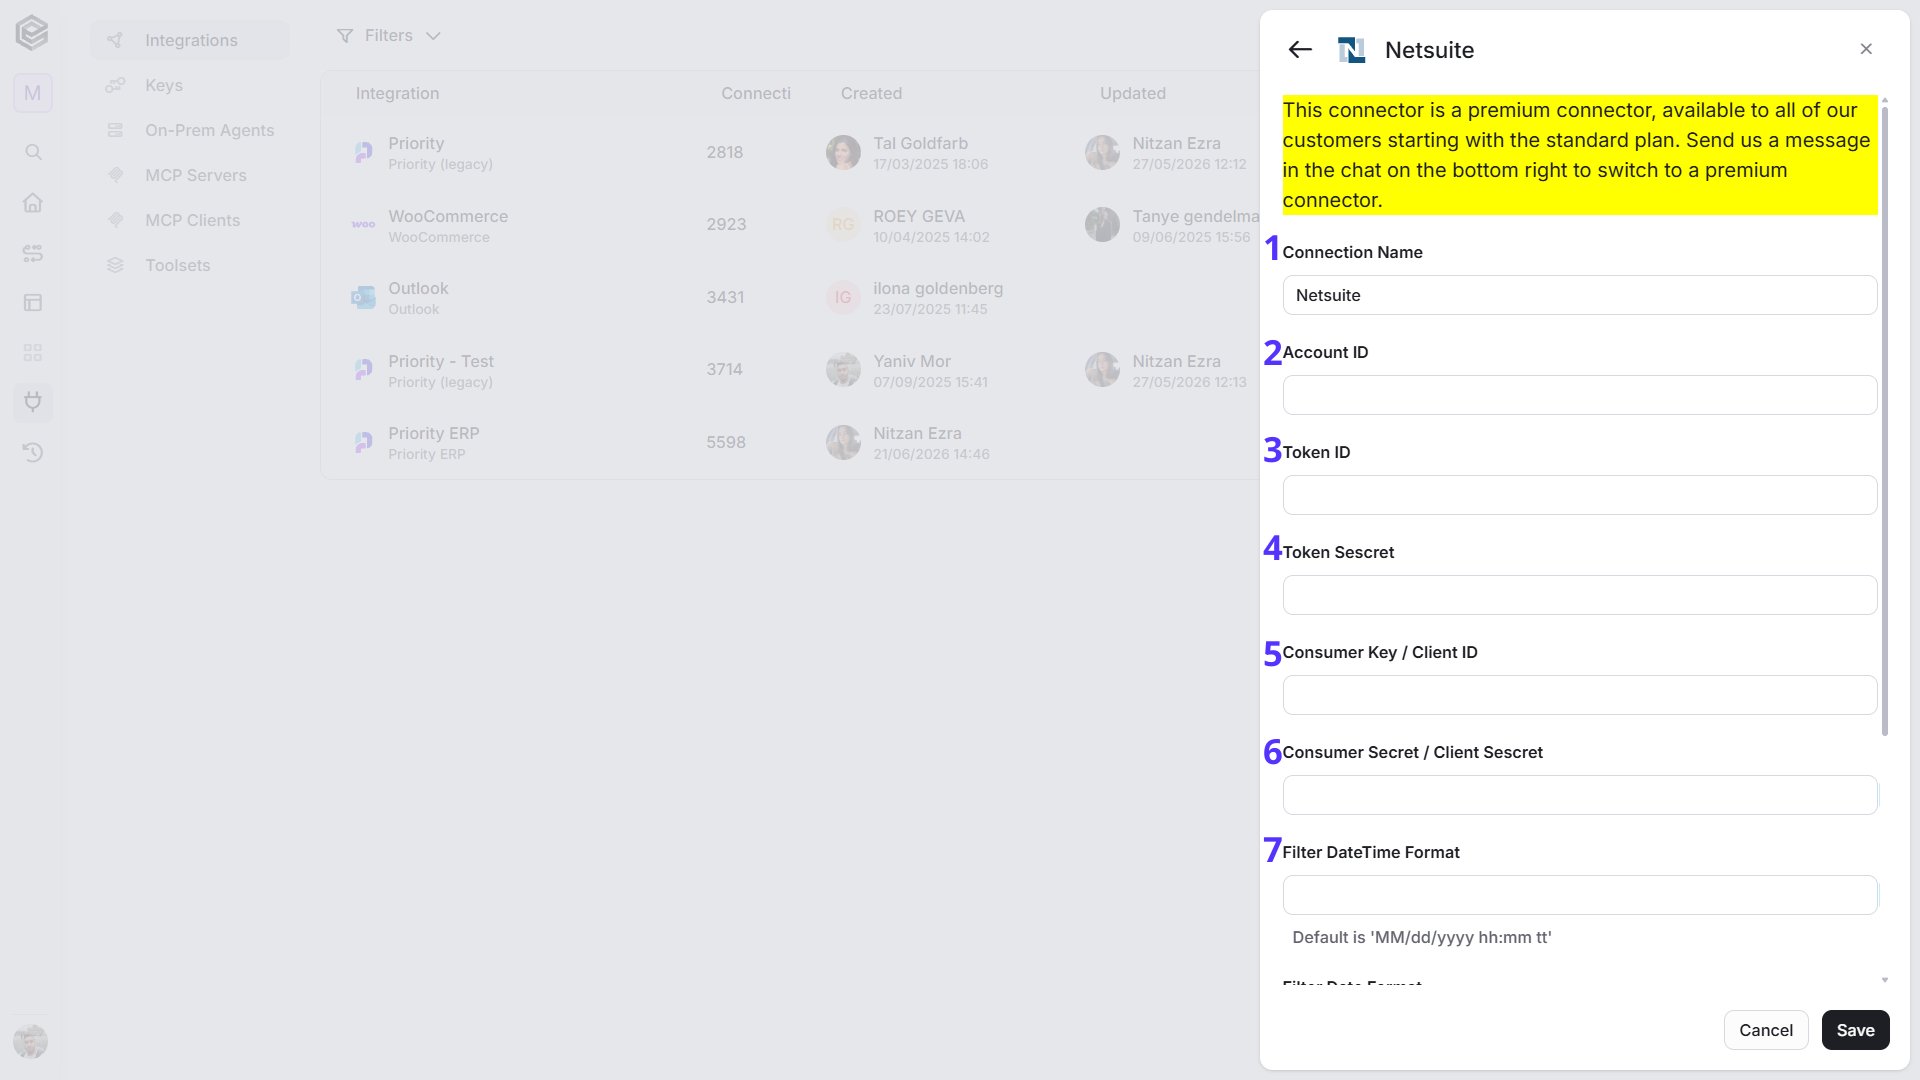 1. *Connection name -* Enter a unique and descriptive name for this connection. This name will help you identify and manage the connection in your Engini account. “NetSuite” by default.
2. *Account ID -* Input your Netsuite Account ID.
3. *Token ID -* Provide the Token ID for authentication.
4. *Token Secret -* Enter the Token Secret associated with your Netsuite account.
5. *Consumer Key / Client ID -* Input your Consumer Key or Client ID.
6. *Consumer Secret / Client Secret -* Enter your Consumer Secret or Client Secret.
7. *Filter DateTime Format -* Defines the date-time format used when sending date-time filters in API requests (for example: YYYY-MM-DDTHH:mm:ss).
1. *Connection name -* Enter a unique and descriptive name for this connection. This name will help you identify and manage the connection in your Engini account. “NetSuite” by default.
2. *Account ID -* Input your Netsuite Account ID.
3. *Token ID -* Provide the Token ID for authentication.
4. *Token Secret -* Enter the Token Secret associated with your Netsuite account.
5. *Consumer Key / Client ID -* Input your Consumer Key or Client ID.
6. *Consumer Secret / Client Secret -* Enter your Consumer Secret or Client Secret.
7. *Filter DateTime Format -* Defines the date-time format used when sending date-time filters in API requests (for example: YYYY-MM-DDTHH:mm:ss).
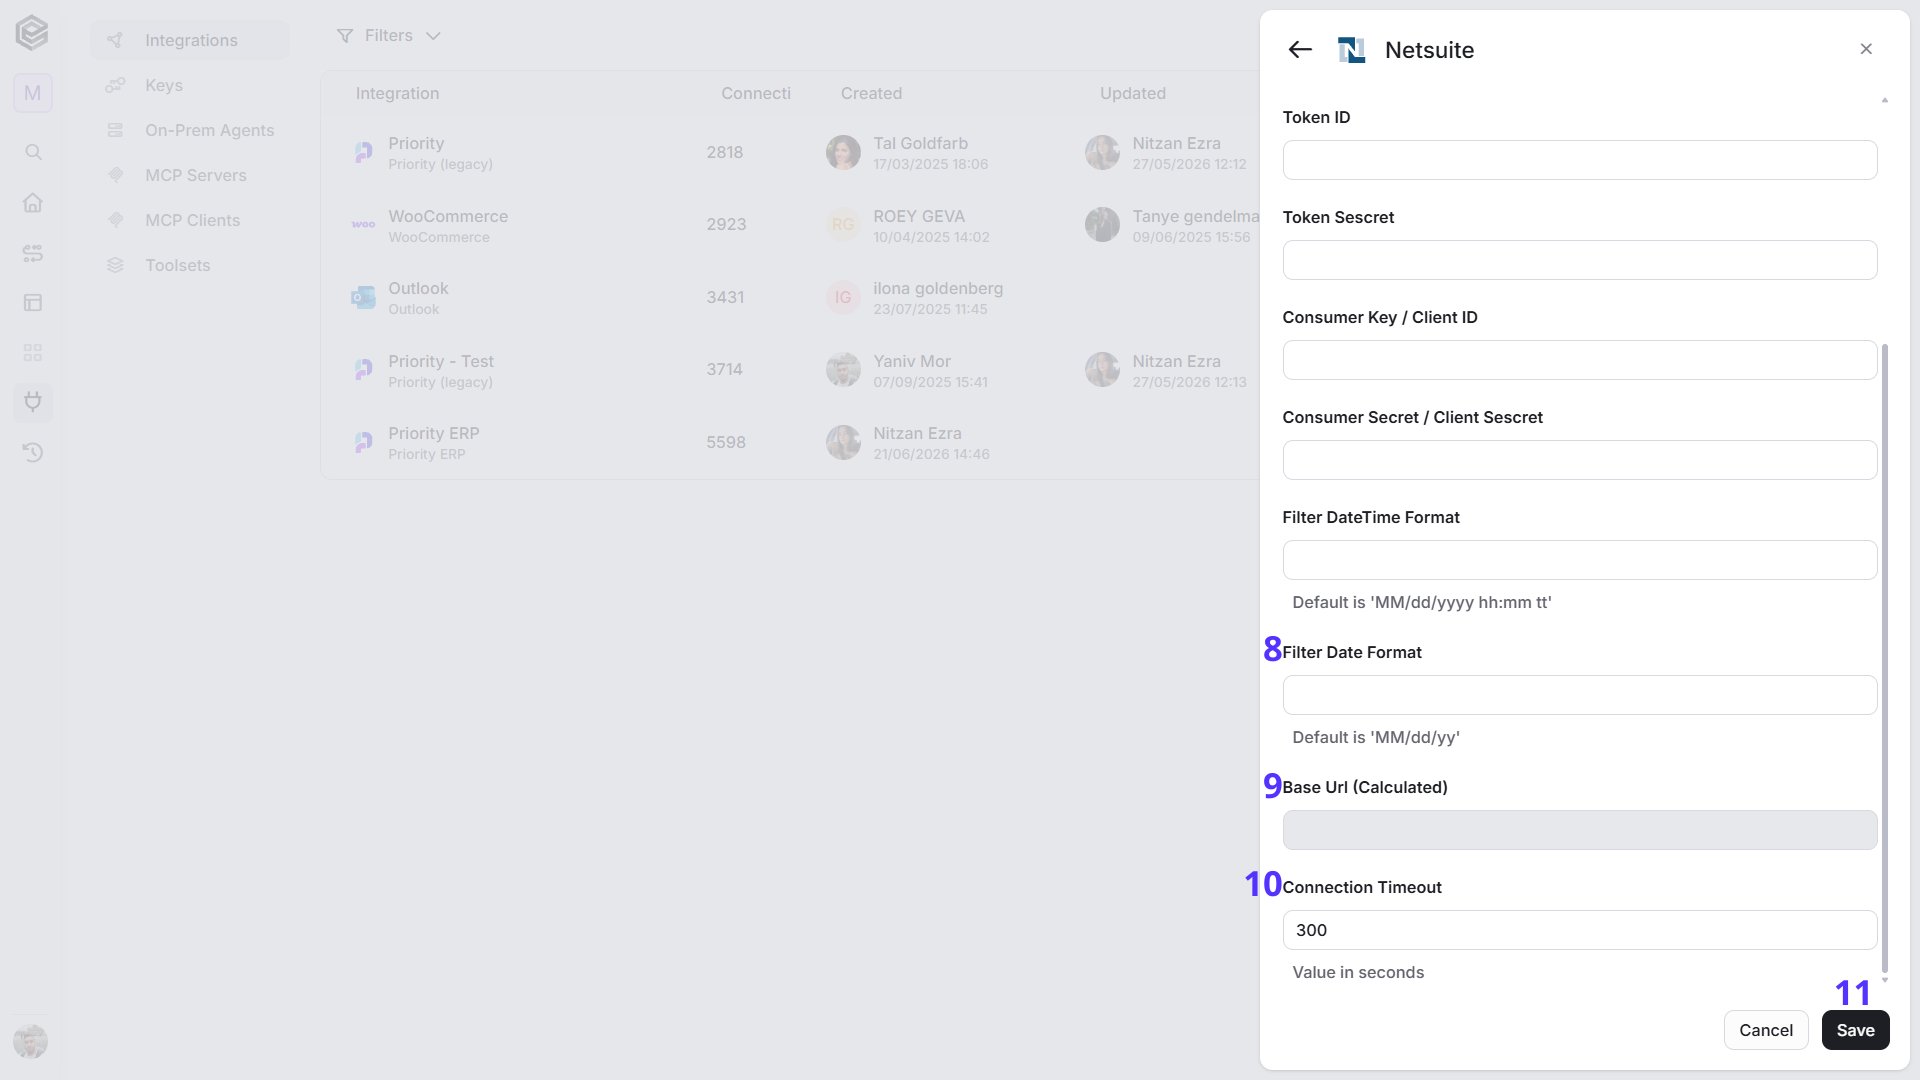 8. *Filter Date Format -* Defines the date-only format used when sending date filters without time (for example: YYYY-MM-DD).
9. *Base URL (Calculated) -* The final base API endpoint, automatically constructed from the connection settings. This field is read-only.
10. *Connection Timeout -* The maximum time (in seconds) to wait for an API response before the request is aborted.
11. *Save Settings -* Press “Save”.
**NOTE:** After you’ve saved the connection, a window will open displaying all available entities. From this window, select the entities you want to use.
* *Select Database Objects -* After you’ve saved the connection, you can add additional objects.
* Click on the three dots (⋯) on the right side of the connection and then click on Select database objects.
8. *Filter Date Format -* Defines the date-only format used when sending date filters without time (for example: YYYY-MM-DD).
9. *Base URL (Calculated) -* The final base API endpoint, automatically constructed from the connection settings. This field is read-only.
10. *Connection Timeout -* The maximum time (in seconds) to wait for an API response before the request is aborted.
11. *Save Settings -* Press “Save”.
**NOTE:** After you’ve saved the connection, a window will open displaying all available entities. From this window, select the entities you want to use.
* *Select Database Objects -* After you’ve saved the connection, you can add additional objects.
* Click on the three dots (⋯) on the right side of the connection and then click on Select database objects.
 * A window will open displaying all available entities. From this window, select the entities you want to use.
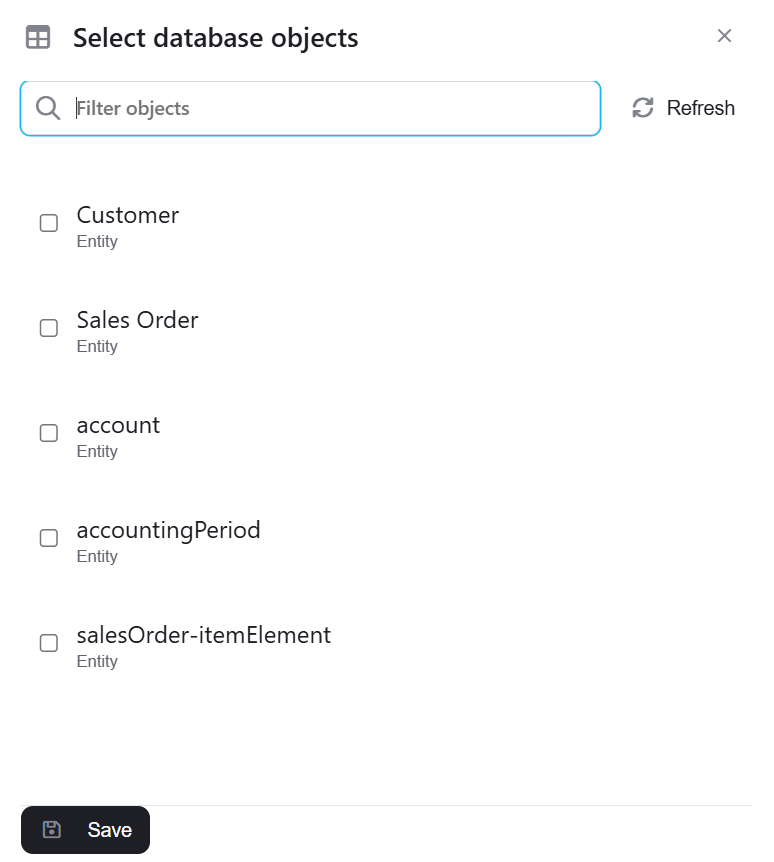 * Once you’ve finished selecting the additional entities, click **Save**.
## Schedule Triggers
### Check for created records
* Once you’ve finished selecting the additional entities, click **Save**.
## Schedule Triggers
### Check for created records
 1. *Object Type -* Select the type of object you want to check if a new record has been created.
2. *Starting (UTC) -* Choose the date and time for this workflow to start working. For the selected day time the workflow will run according to the selected frequency.
3. *Recur every -* Select the time interval. The minimum time interval is 15 minutes.
4. *Add time frame*
1. *Object Type -* Select the type of object you want to check if a new record has been created.
2. *Starting (UTC) -* Choose the date and time for this workflow to start working. For the selected day time the workflow will run according to the selected frequency.
3. *Recur every -* Select the time interval. The minimum time interval is 15 minutes.
4. *Add time frame*
 1. Click on the “Add time frames” button.
2. Select the specific time frame during which you want your workflow to be executed. Simply select the start time and end time that best align with your scheduling preferences.
3. Press the “Add time frame” button for adding more time frames.
5. *Top N -* By clicking on the empty field next to “Top N” you can define the maximum number of values you want to retrieve.
6. *Add Conditions -* Click Add Conditions to define conditions that narrow down the data list and return only the relevant items. To learn more about using filters, [click here](/help/workflows/workflow-editor#add-conditions).
### Check for updated records
1. Click on the “Add time frames” button.
2. Select the specific time frame during which you want your workflow to be executed. Simply select the start time and end time that best align with your scheduling preferences.
3. Press the “Add time frame” button for adding more time frames.
5. *Top N -* By clicking on the empty field next to “Top N” you can define the maximum number of values you want to retrieve.
6. *Add Conditions -* Click Add Conditions to define conditions that narrow down the data list and return only the relevant items. To learn more about using filters, [click here](/help/workflows/workflow-editor#add-conditions).
### Check for updated records
 1. *Object Type -* Select the type of object you want to check if a new record has been created.
2. *Starting (UTC) -* Choose the date and time for this workflow to start working. For the selected day time the workflow will run according to the selected frequency.
3. *Recur every -* Select the time interval. The minimum time interval is 15 minutes.
4. *Add time frame*
1. Click on the “Add time frames” button.
2. Select the specific time frame during which you want your workflow to be executed. Simply select the start time and end time that best align with your scheduling preferences.
3. Press the “Add time frame” button for adding more time frames.
5. *Top N -* By clicking on the empty field next to “Top N” you can define the maximum number of values you want to retrieve.
6. *Add Conditions -* Click Add Conditions to define conditions that narrow down the data list and return only the relevant items. To learn more about using filters, [click here](/help/workflows/workflow-editor#add-conditions).
## Actions
### Create Record
Creates a new record of the selected object type.
1. *Object Type -* Select the type of object you want to check if a new record has been created.
2. *Starting (UTC) -* Choose the date and time for this workflow to start working. For the selected day time the workflow will run according to the selected frequency.
3. *Recur every -* Select the time interval. The minimum time interval is 15 minutes.
4. *Add time frame*
1. Click on the “Add time frames” button.
2. Select the specific time frame during which you want your workflow to be executed. Simply select the start time and end time that best align with your scheduling preferences.
3. Press the “Add time frame” button for adding more time frames.
5. *Top N -* By clicking on the empty field next to “Top N” you can define the maximum number of values you want to retrieve.
6. *Add Conditions -* Click Add Conditions to define conditions that narrow down the data list and return only the relevant items. To learn more about using filters, [click here](/help/workflows/workflow-editor#add-conditions).
## Actions
### Create Record
Creates a new record of the selected object type.
 1. *Object Type -* Select from the drop down the type of record you want to create.
Depending on the object of the selected type, additional fields that must be completed will become available.
2. *Add Field* - Click Add Field to add and populate additional fields for the selected activity. To learn more about managing activity data, [click here](/help/workflows/workflow-editor#add-fields).
### Delete Record
1. *Object Type -* Select from the drop down the type of record you want to create.
Depending on the object of the selected type, additional fields that must be completed will become available.
2. *Add Field* - Click Add Field to add and populate additional fields for the selected activity. To learn more about managing activity data, [click here](/help/workflows/workflow-editor#add-fields).
### Delete Record
 1. *Object Type -* Select from the drop down the type of record you want to delete.
2. *ID -* Enter the ID of the record you want to delete.
### Update Record
Updates an existing record in an object.
1. *Object Type -* Select from the drop down the type of record you want to delete.
2. *ID -* Enter the ID of the record you want to delete.
### Update Record
Updates an existing record in an object.
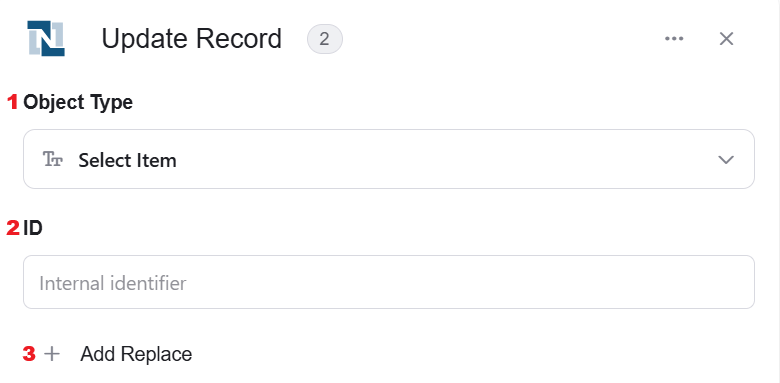 1. *Object Type -* Select from the drop down the type of record you want to update.
2. *ID -* Enter the ID of the record you want to update.
3. *Add Field* - Click Add Field to add and populate additional fields for the selected activity. To learn more about managing activity data, [click here](/help/workflows/workflow-editor#add-fields).
### Get Record
Gets a specified record in an object.
1. *Object Type -* Select from the drop down the type of record you want to update.
2. *ID -* Enter the ID of the record you want to update.
3. *Add Field* - Click Add Field to add and populate additional fields for the selected activity. To learn more about managing activity data, [click here](/help/workflows/workflow-editor#add-fields).
### Get Record
Gets a specified record in an object.
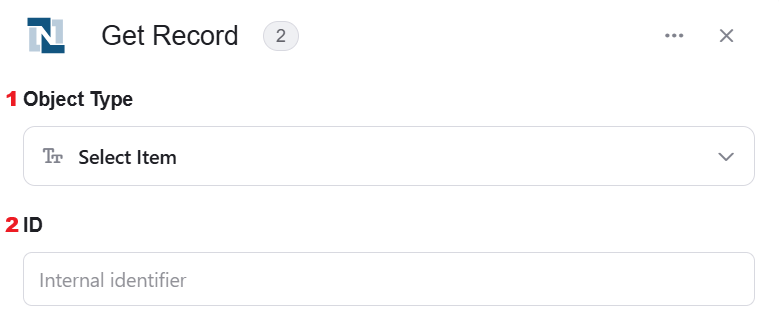 1. *Object Type -* Select from the drop down the type of record you want to retrieve.
2. *ID -* Enter or search for the ID of the record you want to retrieve.
### Get Records
Gets all the records in an object.
1. *Object Type -* Select from the drop down the type of record you want to retrieve.
2. *ID -* Enter or search for the ID of the record you want to retrieve.
### Get Records
Gets all the records in an object.
 1. *Object Type -* Select from the drop down the type of record you want to retrieve.
2. *Top N -* By clicking on the empty field next to “Top N” you can define the maximum number of values you want to retrieve.
3. *Add Filter -* Click Add Filter to define conditions that narrow down the data list and return only the relevant items. To learn more about using filters, [click here](/help/workflows/workflow-editor#add-filters).
### Create or Update Record
You can create a new record if it doesn’t already exist in the database. If the record is found, the activity will update it.
1. *Object Type -* Select from the drop down the type of record you want to retrieve.
2. *Top N -* By clicking on the empty field next to “Top N” you can define the maximum number of values you want to retrieve.
3. *Add Filter -* Click Add Filter to define conditions that narrow down the data list and return only the relevant items. To learn more about using filters, [click here](/help/workflows/workflow-editor#add-filters).
### Create or Update Record
You can create a new record if it doesn’t already exist in the database. If the record is found, the activity will update it.
 1. *Object Type -* Select from the drop down the type of record you want to Create/Update.
2. *ID -* Enter or search for the ID of the record you want to Create/Update.
3. *Add Field* - Click Add Field to add and populate additional fields for the selected activity. To learn more about managing activity data, [click here](/help/workflows/workflow-editor#add-fields).
### Initialize Objects Array
This activity initializes an object array in Netsuite, preparing it to store multiple structured data items based on the selected object types (Customer, Invoice, Product Item)
1. *Object Type -* Select from the drop down the type of record you want to Create/Update.
2. *ID -* Enter or search for the ID of the record you want to Create/Update.
3. *Add Field* - Click Add Field to add and populate additional fields for the selected activity. To learn more about managing activity data, [click here](/help/workflows/workflow-editor#add-fields).
### Initialize Objects Array
This activity initializes an object array in Netsuite, preparing it to store multiple structured data items based on the selected object types (Customer, Invoice, Product Item)
 1. *Name -* Enter the name of the variable that will hold the initialized object array. This name will be used throughout the workflow whenever you refer to this object array.
2. *Object Element Type -* This field defines the type of data the array will store. Options include: Customer, Invoice, Product Item and more. The selected type determines the structure of the array and its use in subsequent actions.
### Append Item Object To Array
You can add an item object to an existing array, allowing you to create, expand, and manipulate collections of objects efficiently.
1. *Name -* Enter the name of the variable that will hold the initialized object array. This name will be used throughout the workflow whenever you refer to this object array.
2. *Object Element Type -* This field defines the type of data the array will store. Options include: Customer, Invoice, Product Item and more. The selected type determines the structure of the array and its use in subsequent actions.
### Append Item Object To Array
You can add an item object to an existing array, allowing you to create, expand, and manipulate collections of objects efficiently.
 1. *Variable -* Choose from the dropdown an existing array variable in which you want to add the item object. This variable stores the collection of objects to which you’ll append the new item.
2. *Add Field* - Click Add Field to add and populate additional fields for the selected activity. To learn more about managing activity data, [click here](/help/workflows/workflow-editor#add-fields).
### Map Object Type Array
This activity is particularly useful when there is an array of data that needs to be translated into another structure. This activity is especially efficient when the array structure is fixed and doesn’t depend on specific conditions.
1. *Variable -* Choose from the dropdown an existing array variable in which you want to add the item object. This variable stores the collection of objects to which you’ll append the new item.
2. *Add Field* - Click Add Field to add and populate additional fields for the selected activity. To learn more about managing activity data, [click here](/help/workflows/workflow-editor#add-fields).
### Map Object Type Array
This activity is particularly useful when there is an array of data that needs to be translated into another structure. This activity is especially efficient when the array structure is fixed and doesn’t depend on specific conditions.
 1. *Date List -* Choose a data list that you’ve obtained from previous activities in your workflow. This data list typically contains an array of objects that you want to process and transform.
2. *Object Element Type -* You need to define the type of objects from the drop down that will be stored within the array.
3. *Add Field* - Click Add Field to add and populate additional fields for the selected activity. To learn more about managing activity data, [click here](/help/workflows/workflow-editor#add-fields).
This documentation is built and hosted on [Mintlify](https://mintlify.com), a developer documentation platform.
1. *Date List -* Choose a data list that you’ve obtained from previous activities in your workflow. This data list typically contains an array of objects that you want to process and transform.
2. *Object Element Type -* You need to define the type of objects from the drop down that will be stored within the array.
3. *Add Field* - Click Add Field to add and populate additional fields for the selected activity. To learn more about managing activity data, [click here](/help/workflows/workflow-editor#add-fields).
This documentation is built and hosted on [Mintlify](https://mintlify.com), a developer documentation platform.