> ## Documentation Index
> Fetch the complete documentation index at: https://docs.engini.ai/llms.txt
> Use this file to discover all available pages before exploring further.
# monday.com
Learn how to connect Engini to monday.com.
Using Engini’s monday.com activities, you can:
* create, update and get board items
* create, update and get board subitems
* listen to events on items, subitems and item updates
To get started with the monday app, create an account at [auth.monday.com/users/sign\_up](https://auth.monday.com/users/sign_up).
# Getting Started with monday.com
## Prerequisites
1. Active monday.com account.
2. Access to an active Monday.com access token.
# Connecting Engini to monday.com
## Retrieve your monday.com access token
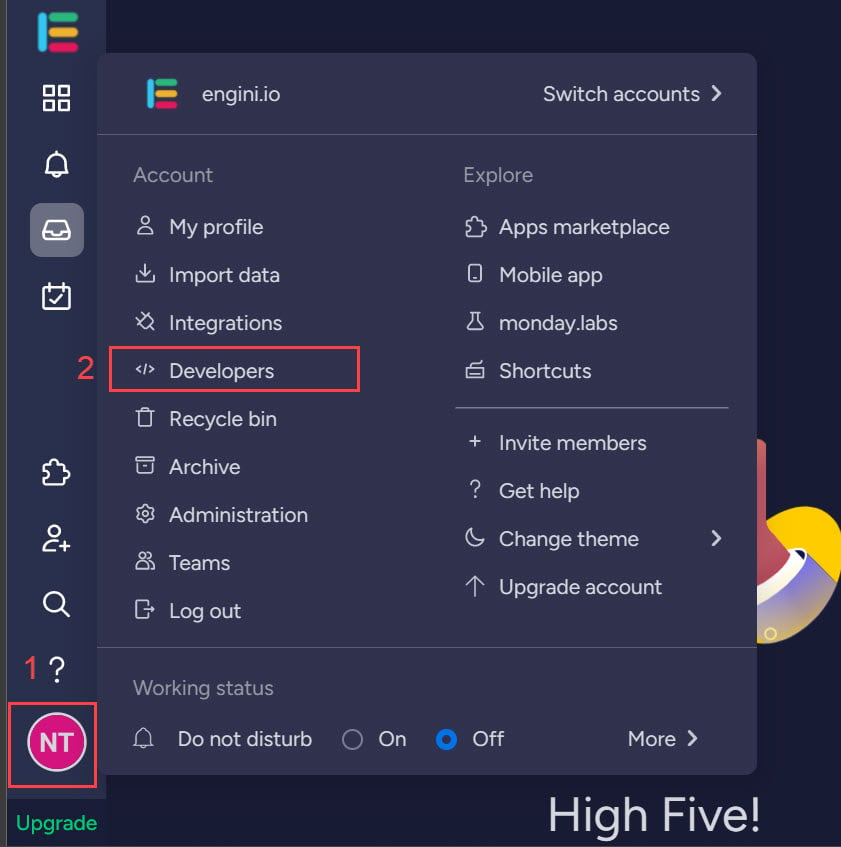 1. Navigate to your monday.com account and click on your profile at the bottom of the left sidebar.
2. In the opened menu, click on the “Developers” option. (**If you don’t have this option in your menu than you should contact your monady.com account Admin**).
1. Navigate to your monday.com account and click on your profile at the bottom of the left sidebar.
2. In the opened menu, click on the “Developers” option. (**If you don’t have this option in your menu than you should contact your monady.com account Admin**).
 3. In the developers page, click on the “Developer” option located at the topbar.
4. From the opened list, click on “My Access Tokens” option.
**Note** : If you already generated your access token before than you will be able to copy it or generate a new one. If you haven’t generated one before you will have the option to generate one. Copy the access token and save it as you will need it for adding the connection to your monday.com account in Engini.
## Add a connection to monday.com in Engini
1. Enter your Engini account at [https://app.engini.io.](https://engini.io/)
2. Navigate to Connections page by clicking on the Connections on the left sidebar or by clicking [here](https://app.engini.io/connections).
3. In the developers page, click on the “Developer” option located at the topbar.
4. From the opened list, click on “My Access Tokens” option.
**Note** : If you already generated your access token before than you will be able to copy it or generate a new one. If you haven’t generated one before you will have the option to generate one. Copy the access token and save it as you will need it for adding the connection to your monday.com account in Engini.
## Add a connection to monday.com in Engini
1. Enter your Engini account at [https://app.engini.io.](https://engini.io/)
2. Navigate to Connections page by clicking on the Connections on the left sidebar or by clicking [here](https://app.engini.io/connections).
 3. Click on the "New Integration" option located at the top bar.
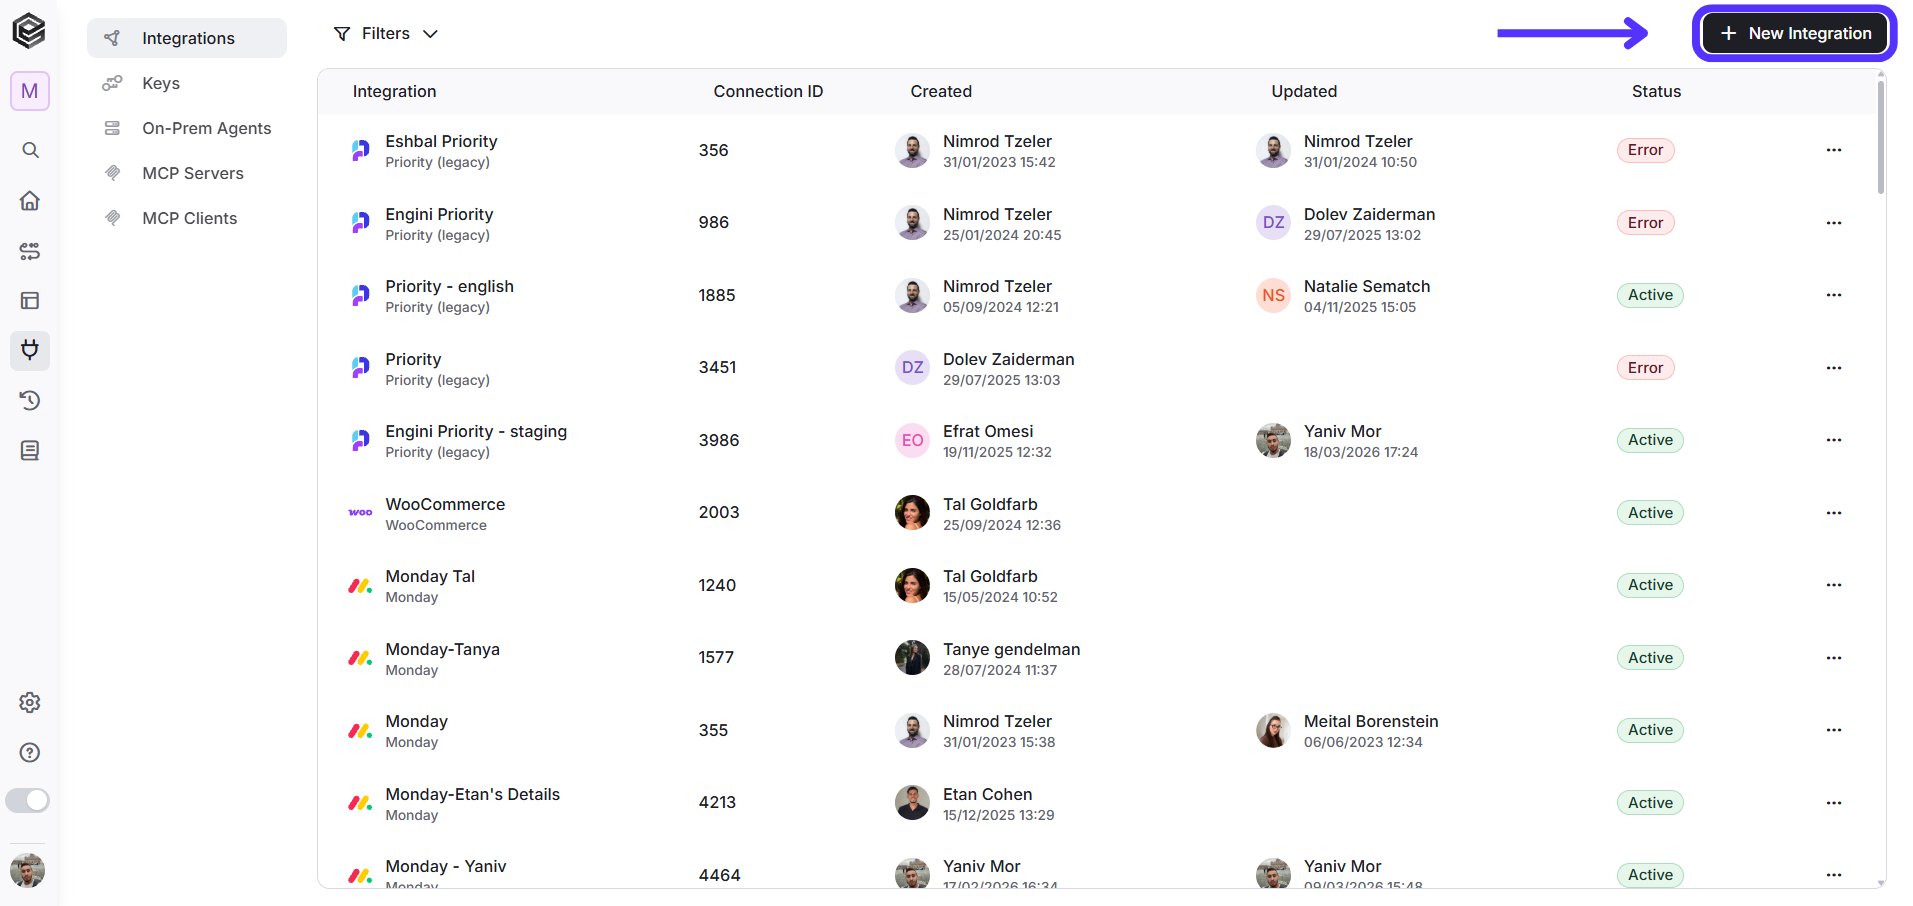 4. Choose monday.com option from the available applications.
 5. Enter the following details in the “New Integration” form and press Save:

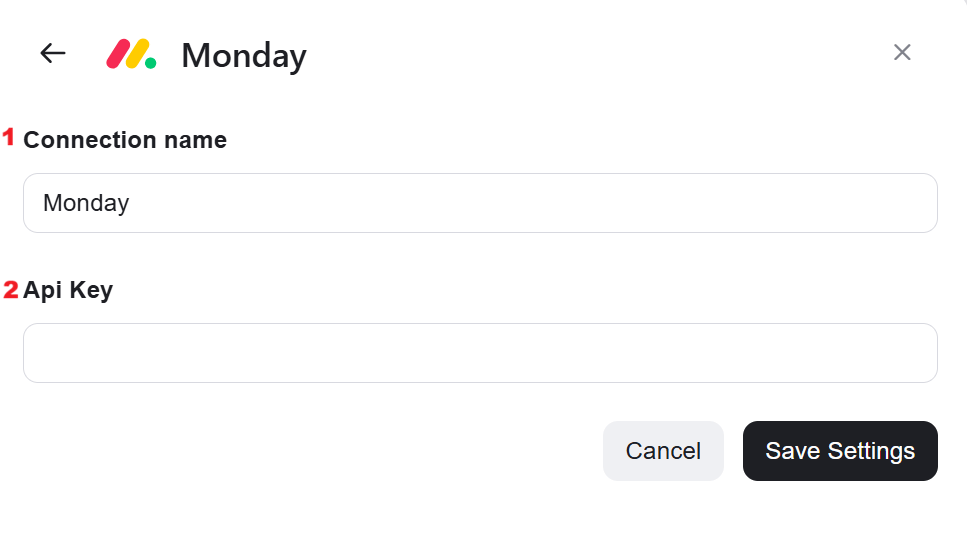 1. *Connection name -* Choose a siginficant name for the connection(e.g.,"Monday- Etan's details")
2. *API Key* - Enter the access token you obtained from monday.com.
3. *Save -* Click on the **Save Settings** button located at the bottom of the form.
6. Engini will now save this connection and all the boards you have access to with the provided access token.
**Note :** Every board created in monday.com after saving this connection won’t be shown in the board’s list in Engini activity blocks. In order to access them using Engini you will need to refresh your monday.com objects in Engini.
# Triggers
The trigger is executed automatically in response to a specific event, such as an item being created or updated.
Every workflow has to start with a trigger. You can use item, sub-item, item update triggers.
## Items
### Item Created
listen to a new item creation on Monday.
1. *Connection name -* Choose a siginficant name for the connection(e.g.,"Monday- Etan's details")
2. *API Key* - Enter the access token you obtained from monday.com.
3. *Save -* Click on the **Save Settings** button located at the bottom of the form.
6. Engini will now save this connection and all the boards you have access to with the provided access token.
**Note :** Every board created in monday.com after saving this connection won’t be shown in the board’s list in Engini activity blocks. In order to access them using Engini you will need to refresh your monday.com objects in Engini.
# Triggers
The trigger is executed automatically in response to a specific event, such as an item being created or updated.
Every workflow has to start with a trigger. You can use item, sub-item, item update triggers.
## Items
### Item Created
listen to a new item creation on Monday.
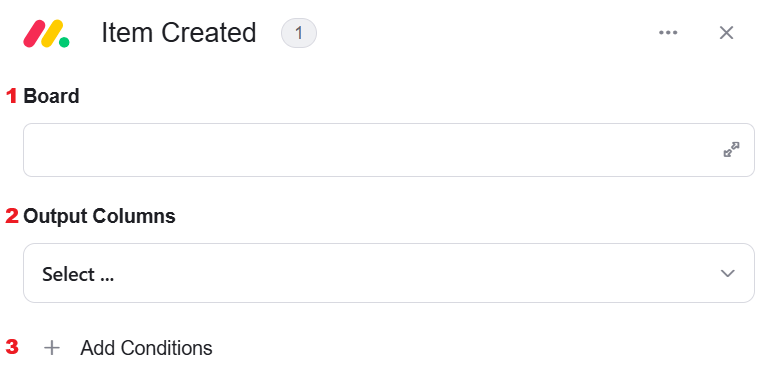 1. *Board*
* Click on the empty field and the tooltip will pop up showing all the boards that the user has accesses to.
1. *Board*
* Click on the empty field and the tooltip will pop up showing all the boards that the user has accesses to.
 * Choose from the list of boards in the tooltip the name of the board you want to listen to.
2. *Output Columns -* After selecting a board in the first field, this field displays all the available columns from that board. You can choose which columns should be returned in the output and filter the data accordingly.
3. *Add Conditions -* Click Add Conditions to define conditions that narrow down the data list and return only the relevant items. To learn more about using filters, [click here](/help/workflows/workflow-editor#add-conditions).
### Item Updated
Listen to an item’s update.
* Choose from the list of boards in the tooltip the name of the board you want to listen to.
2. *Output Columns -* After selecting a board in the first field, this field displays all the available columns from that board. You can choose which columns should be returned in the output and filter the data accordingly.
3. *Add Conditions -* Click Add Conditions to define conditions that narrow down the data list and return only the relevant items. To learn more about using filters, [click here](/help/workflows/workflow-editor#add-conditions).
### Item Updated
Listen to an item’s update.
 1. *Board*
* Click on the empty field and the tooltip will pop up showing all the boards that the user has accesses to.
* Choose from the list of boards in the tooltip the name of the board you want to listen to.
2. *Output Columns -* After selecting a board in the first field, this field displays all the available columns from that board. You can choose which columns should be returned in the output and filter the data accordingly.
3. *Columns to listen to:*
* Click on the “Select” button.
* Click on the field to open the drop down.
* Choose the column you want the trigger to listen to.
4. *Add Conditions -* Click Add Conditions to define conditions that narrow down the data list and return only the relevant items. To learn more about using filters, [click here](/help/workflows/workflow-editor#add-conditions).
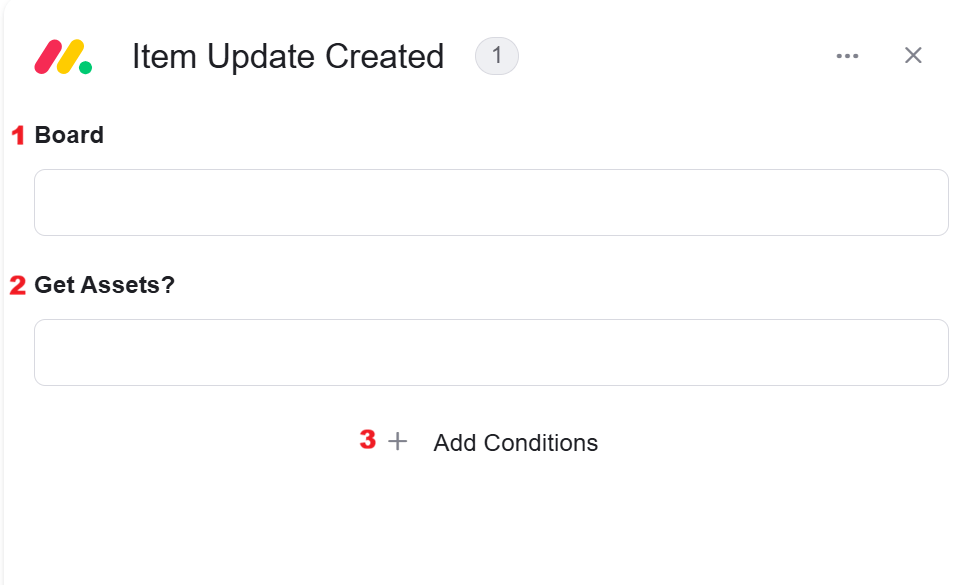
### Item Update Created
Listen to new updates created in the item’s update section.
1. *Board*
* Click on the empty field and the tooltip will pop up showing all the boards that the user has accesses to.
* Choose from the list of boards in the tooltip the name of the board you want to listen to.
2. *Output Columns -* After selecting a board in the first field, this field displays all the available columns from that board. You can choose which columns should be returned in the output and filter the data accordingly.
3. *Columns to listen to:*
* Click on the “Select” button.
* Click on the field to open the drop down.
* Choose the column you want the trigger to listen to.
4. *Add Conditions -* Click Add Conditions to define conditions that narrow down the data list and return only the relevant items. To learn more about using filters, [click here](/help/workflows/workflow-editor#add-conditions).
### Item Update Created
Listen to new updates created in the item’s update section.
 1. *Board*
* Click on the empty field and the tooltip will pop up showing all the boards that the user has accesses to.
1. *Board*
* Click on the empty field and the tooltip will pop up showing all the boards that the user has accesses to.
 * Choose from the list of boards in the tooltip the name of the board you want to listen to.
2. *Get Assets?* - Determines whether assets (such as files or attachments) related to the item update should also be retrieved. Set it to **true** to include the assets in the output, or **false** to return only the update information without the assets.
3. *Add Conditions -* Click Add Conditions to define conditions that narrow down the data list and return only the relevant items. To learn more about using filters, [click here](/help/workflows/workflow-editor#add-conditions).
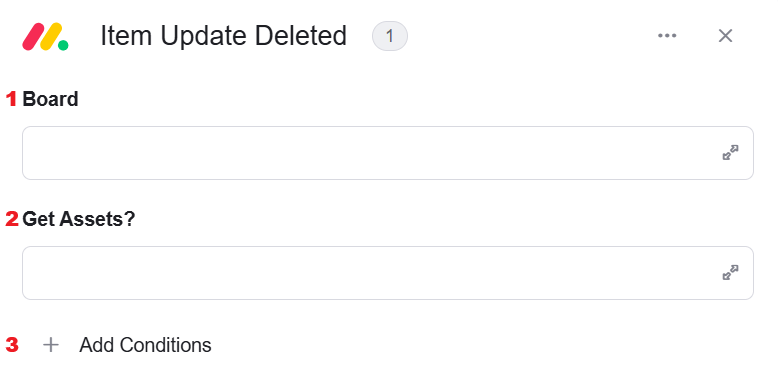
### Item Update Deleted
Listen to new updates deleted in the item’s update section.
* Choose from the list of boards in the tooltip the name of the board you want to listen to.
2. *Get Assets?* - Determines whether assets (such as files or attachments) related to the item update should also be retrieved. Set it to **true** to include the assets in the output, or **false** to return only the update information without the assets.
3. *Add Conditions -* Click Add Conditions to define conditions that narrow down the data list and return only the relevant items. To learn more about using filters, [click here](/help/workflows/workflow-editor#add-conditions).
### Item Update Deleted
Listen to new updates deleted in the item’s update section.
 1. *Board*
* Click on the empty field and the tooltip will pop up showing all the boards that the user has accesses to.
* Choose from the list of boards in the tooltip the name of the board you want to listen to.
2. *Get Assets?* - Determines whether assets (such as files or attachments) related to the item update should also be retrieved. Set it to **true** to include the assets in the output, or **false** to return only the update information without the assets.
3. *Add Conditions -* Click Add Conditions to define conditions that narrow down the data list and return only the relevant items. To learn more about using filters, [click here](/help/workflows/workflow-editor#add-conditions).
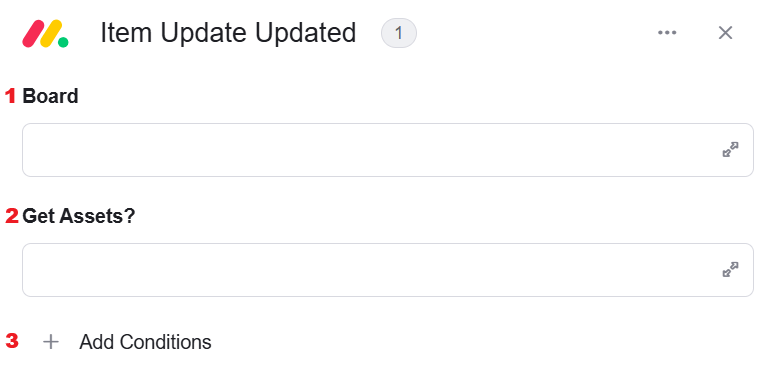
### Item Update Updated
Listen to new updates update in the item’s update section.
1. *Board*
* Click on the empty field and the tooltip will pop up showing all the boards that the user has accesses to.
* Choose from the list of boards in the tooltip the name of the board you want to listen to.
2. *Get Assets?* - Determines whether assets (such as files or attachments) related to the item update should also be retrieved. Set it to **true** to include the assets in the output, or **false** to return only the update information without the assets.
3. *Add Conditions -* Click Add Conditions to define conditions that narrow down the data list and return only the relevant items. To learn more about using filters, [click here](/help/workflows/workflow-editor#add-conditions).
### Item Update Updated
Listen to new updates update in the item’s update section.
 1. *Board*
* Click on the empty field and the tooltip will pop up showing all the boards that the user has accesses to.
* Choose from the list of boards in the tooltip the name of the board you want to listen to.
2. *Get Assets?* - Determines whether assets (such as files or attachments) related to the item update should also be retrieved. Set it to **true** to include the assets in the output, or **false** to return only the update information without the assets.
3. *Add Conditions -* Click Add Conditions to define conditions that narrow down the data list and return only the relevant items. To learn more about using filters, [click here](/help/workflows/workflow-editor#add-conditions).
### Item Deleted
Listen to an item that has been deleted.
1. *Board*
* Click on the empty field and the tooltip will pop up showing all the boards that the user has accesses to.
* Choose from the list of boards in the tooltip the name of the board you want to listen to.
2. *Get Assets?* - Determines whether assets (such as files or attachments) related to the item update should also be retrieved. Set it to **true** to include the assets in the output, or **false** to return only the update information without the assets.
3. *Add Conditions -* Click Add Conditions to define conditions that narrow down the data list and return only the relevant items. To learn more about using filters, [click here](/help/workflows/workflow-editor#add-conditions).
### Item Deleted
Listen to an item that has been deleted.
 1. *Board*
* Click on the empty field and the tooltip will pop up showing all the boards that the user has accesses to.
* Choose from the list of boards in the tooltip the name of the board you want to listen to.
2. *Output Columns -* After selecting a board in the first field, this field displays all the available columns from that board. You can choose which columns should be returned in the output and filter the data accordingly.
3. *Add Conditions -* Click Add Conditions to define conditions that narrow down the data list and return only the relevant items. To learn more about using filters, [click here](/help/workflows/workflow-editor#add-conditions).
## Subitems
### Subitem Created
Listens to a subitem creation.
1. *Board*
* Click on the empty field and the tooltip will pop up showing all the boards that the user has accesses to.
* Choose from the list of boards in the tooltip the name of the board you want to listen to.
2. *Output Columns -* After selecting a board in the first field, this field displays all the available columns from that board. You can choose which columns should be returned in the output and filter the data accordingly.
3. *Add Conditions -* Click Add Conditions to define conditions that narrow down the data list and return only the relevant items. To learn more about using filters, [click here](/help/workflows/workflow-editor#add-conditions).
## Subitems
### Subitem Created
Listens to a subitem creation.
 1. *Board*
* Click on the empty field and the tooltip will pop up showing all the boards that the user has accesses to.
* Choose from the list of boards in the tooltip the name of the board you want to listen to.
2. *Output Columns -* After selecting a board in the first field, this field displays all the available columns from that board. You can choose which columns should be returned in the output and filter the data accordingly.
3. *Add Conditions -* Click Add Conditions to define conditions that narrow down the data list and return only the relevant items. To learn more about using filters, [click here](/help/workflows/workflow-editor#add-conditions).
### Subitem Updated
Listens to a Subitem’s updates.
1. *Board*
* Click on the empty field and the tooltip will pop up showing all the boards that the user has accesses to.
* Choose from the list of boards in the tooltip the name of the board you want to listen to.
2. *Output Columns -* After selecting a board in the first field, this field displays all the available columns from that board. You can choose which columns should be returned in the output and filter the data accordingly.
3. *Add Conditions -* Click Add Conditions to define conditions that narrow down the data list and return only the relevant items. To learn more about using filters, [click here](/help/workflows/workflow-editor#add-conditions).
### Subitem Updated
Listens to a Subitem’s updates.
 1. *Board*
* Click on the empty field and the tooltip will pop up showing all the boards that the user has accesses to.
* Choose from the list of boards in the tooltip the name of the board you want to listen to.
2. *Output Columns -* After selecting a board in the first field, this field displays all the available columns from that board. You can choose which columns should be returned in the output and filter the data accordingly.
3. *Columns to listen to:*
* Click on the “Select” button.
* Click on the field to open the drop down.
* Choose the column you want the trigger to listen to.
4. *Add Conditions -* Click Add Conditions to define conditions that narrow down the data list and return only the relevant items. To learn more about using filters, [click here](/help/workflows/workflow-editor#add-conditions).
### SubItem Name Updates
Listens to a Subitem’s Name updates.
1. *Board*
* Click on the empty field and the tooltip will pop up showing all the boards that the user has accesses to.
* Choose from the list of boards in the tooltip the name of the board you want to listen to.
2. *Output Columns -* After selecting a board in the first field, this field displays all the available columns from that board. You can choose which columns should be returned in the output and filter the data accordingly.
3. *Columns to listen to:*
* Click on the “Select” button.
* Click on the field to open the drop down.
* Choose the column you want the trigger to listen to.
4. *Add Conditions -* Click Add Conditions to define conditions that narrow down the data list and return only the relevant items. To learn more about using filters, [click here](/help/workflows/workflow-editor#add-conditions).
### SubItem Name Updates
Listens to a Subitem’s Name updates.
 1. *Board*
* Click on the empty field and the tooltip will pop up showing all the boards that the user has accesses to.
* Choose from the list of boards in the tooltip the name of the board you want to listen to.
2. *Add Conditions -* Click Add Conditions to define conditions that narrow down the data list and return only the relevant items. To learn more about using filters, [click here](/help/workflows/workflow-editor#add-conditions).
### Subitem Deleted
Listens to a subitems deletion.
1. *Board*
* Click on the empty field and the tooltip will pop up showing all the boards that the user has accesses to.
* Choose from the list of boards in the tooltip the name of the board you want to listen to.
2. *Add Conditions -* Click Add Conditions to define conditions that narrow down the data list and return only the relevant items. To learn more about using filters, [click here](/help/workflows/workflow-editor#add-conditions).
### Subitem Deleted
Listens to a subitems deletion.
 1. *Board*
* Click on the empty field and the tooltip will pop up showing all the boards that the user has accesses to.
* Choose from the list of boards in the tooltip the name of the board you want to listen to.
2. *Output Columns -* After selecting a board in the first field, this field displays all the available columns from that board. You can choose which columns should be returned in the output and filter the data accordingly.
3. *Add Conditions -* Click Add Conditions to define conditions that narrow down the data list and return only the relevant items. To learn more about using filters, [click here](/help/workflows/workflow-editor#add-conditions).
# Actions
## Items
### Create Item
Creates a new item specified column values and returns its ID.
1. *Board*
* Click on the empty field and the tooltip will pop up showing all the boards that the user has accesses to.
* Choose from the list of boards in the tooltip the name of the board you want to listen to.
2. *Output Columns -* After selecting a board in the first field, this field displays all the available columns from that board. You can choose which columns should be returned in the output and filter the data accordingly.
3. *Add Conditions -* Click Add Conditions to define conditions that narrow down the data list and return only the relevant items. To learn more about using filters, [click here](/help/workflows/workflow-editor#add-conditions).
# Actions
## Items
### Create Item
Creates a new item specified column values and returns its ID.
 1. *Board*
* Click on the empty field and the tooltip will pop up showing all the boards that the user has accesses to.
* Choose from the list of boards in the tooltip the name of the board you want to create item in.
2. *Group*
* Click on the empty field and the tooltip will pop up showing all the groups in the selected board.|
1. *Board*
* Click on the empty field and the tooltip will pop up showing all the boards that the user has accesses to.
* Choose from the list of boards in the tooltip the name of the board you want to create item in.
2. *Group*
* Click on the empty field and the tooltip will pop up showing all the groups in the selected board.|
 * Select from the tooltip the name of the group in which you want to place the item in.
3. *Name -* Choose a significant name to the item.
4. *Output Fields -* Allows you to select which fields will be returned in the output. Only the selected fields will be included in the response.
5. *Add Field* - Click Add Field to add and populate additional fields for the selected activity. To learn more about managing activity data, [click here](/help/workflows/workflow-editor#add-fields).
### Get Item
Get an item from a list of items.
* Select from the tooltip the name of the group in which you want to place the item in.
3. *Name -* Choose a significant name to the item.
4. *Output Fields -* Allows you to select which fields will be returned in the output. Only the selected fields will be included in the response.
5. *Add Field* - Click Add Field to add and populate additional fields for the selected activity. To learn more about managing activity data, [click here](/help/workflows/workflow-editor#add-fields).
### Get Item
Get an item from a list of items.
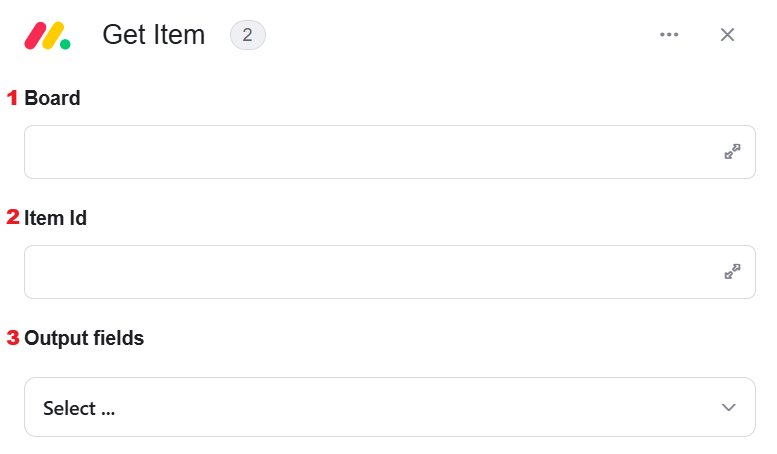 1. *Board*
* Click on the empty field and the tooltip will pop up showing all the boards that the user has accesses to.
* Choose from the list of boards in the tooltip the name of the board you want to get item from.
2. *Item Id*
* Static value – number / string. when using strings, you need to surround them with single quotes (‘).
* Property value from a previous activity (Using the tooltip that opens when clicking on the field).
* Note:You choose an ID and not a name.
3. *Output Fields -* Allows you to select which fields will be returned in the output. Only the selected fields will be included in the response.
### Get Items
Gets all the items that are in the selected group in the selected board.
1. *Board*
* Click on the empty field and the tooltip will pop up showing all the boards that the user has accesses to.
* Choose from the list of boards in the tooltip the name of the board you want to get item from.
2. *Item Id*
* Static value – number / string. when using strings, you need to surround them with single quotes (‘).
* Property value from a previous activity (Using the tooltip that opens when clicking on the field).
* Note:You choose an ID and not a name.
3. *Output Fields -* Allows you to select which fields will be returned in the output. Only the selected fields will be included in the response.
### Get Items
Gets all the items that are in the selected group in the selected board.
 1. *Board*
* Click on the empty field and the tooltip will pop up showing all the boards that the user has accesses to.
* Choose from the list of boards in the tooltip the name of the board you want to get items from.
2. *Group*
* Click on the empty field and the tooltip will pop up showing all the groups in the selected board.
* Select from the tooltip the name of the group in which you want to place the item in.
3. *Output Fields -* Allows you to select which fields will be returned in the output. Only the selected fields will be included in the response.
### Update Item
Edits an existing item’s attributes.
1. *Board*
* Click on the empty field and the tooltip will pop up showing all the boards that the user has accesses to.
* Choose from the list of boards in the tooltip the name of the board you want to get items from.
2. *Group*
* Click on the empty field and the tooltip will pop up showing all the groups in the selected board.
* Select from the tooltip the name of the group in which you want to place the item in.
3. *Output Fields -* Allows you to select which fields will be returned in the output. Only the selected fields will be included in the response.
### Update Item
Edits an existing item’s attributes.
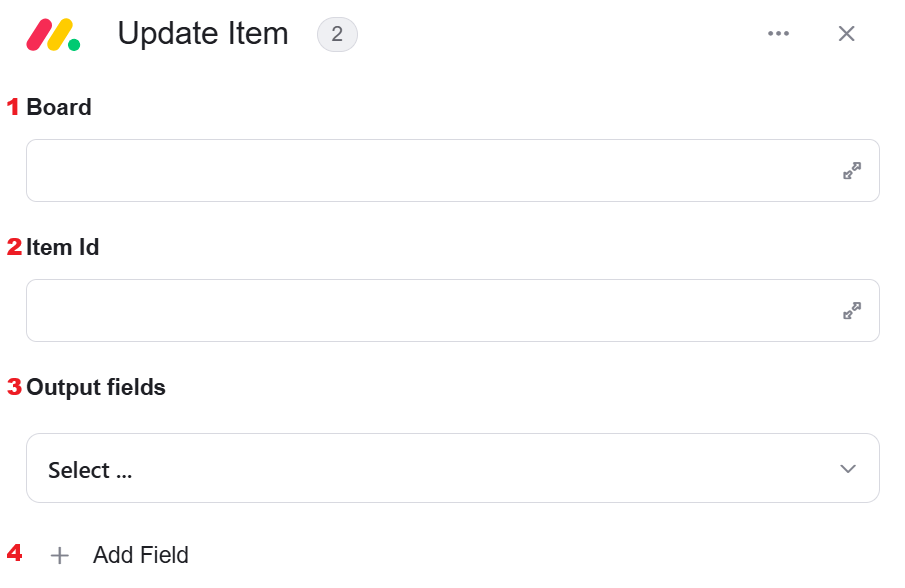 1. *Board*
* Click on the empty field and the tooltip will pop up showing all the boards that the user has accesses to.
* Choose from the list of boards in the tooltip the name of the board you want to update item in.
2. *Item Id*
* Select the item ID that is relevant. you can use:
* Static value – number / string. when using strings, you need to surround them with single quotes (‘).
* Property value from a previous activity (Using the tooltip that opens when clicking on the field).
3. *Output Fields -* Allows you to select which fields will be returned in the output. Only the selected fields will be included in the response.
4. *Add Field* - Click Add Field to add and populate additional fields for the selected activity. To learn more about managing activity data, [click here](/help/workflows/workflow-editor#add-fields).
### Create Item Update
Creating an update within an item.
1. *Board*
* Click on the empty field and the tooltip will pop up showing all the boards that the user has accesses to.
* Choose from the list of boards in the tooltip the name of the board you want to update item in.
2. *Item Id*
* Select the item ID that is relevant. you can use:
* Static value – number / string. when using strings, you need to surround them with single quotes (‘).
* Property value from a previous activity (Using the tooltip that opens when clicking on the field).
3. *Output Fields -* Allows you to select which fields will be returned in the output. Only the selected fields will be included in the response.
4. *Add Field* - Click Add Field to add and populate additional fields for the selected activity. To learn more about managing activity data, [click here](/help/workflows/workflow-editor#add-fields).
### Create Item Update
Creating an update within an item.
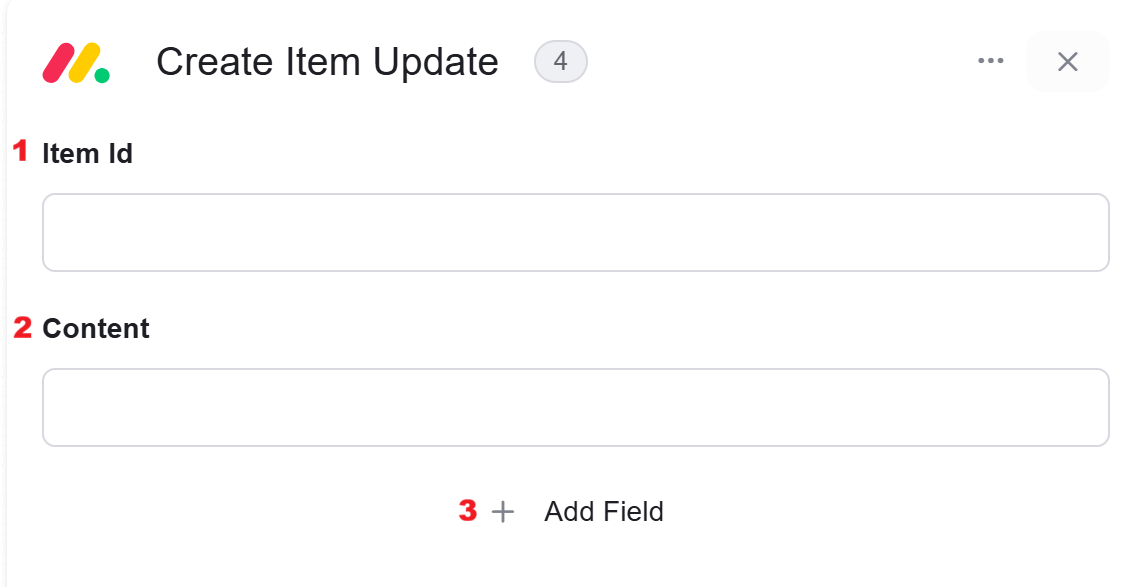 1. *Item ID*
* Select the item ID that is relevant. you can use:
* Static value – number / string. when using strings, you need to surround them with single quotes (‘).
* Property value from a previous activity (Using the tooltip that opens when clicking on the field).
2. *Content*
1. Click on the field to be shown the tooltip with all the options you can use.
2. You can populate the field in one of the following options:
* Static value – number / string. when using strings, you need to surround them with single quotes (‘).
* Property value from a previous activity (Using the tooltip that opens when clicking on the field).
* Expression – using [functions](/help/tools/enginis-functions) and/or Previous activity properties and/or static values (Using the tooltip that opens when clicking on the field).
3. *Add Field* - Click Add Field to add and populate additional fields for the selected activity. To learn more about managing activity data, [click here](/help/workflows/workflow-editor#add-fields).
### Add File to Item
Adds a file to an exists item.
1. *Item ID*
* Select the item ID that is relevant. you can use:
* Static value – number / string. when using strings, you need to surround them with single quotes (‘).
* Property value from a previous activity (Using the tooltip that opens when clicking on the field).
2. *Content*
1. Click on the field to be shown the tooltip with all the options you can use.
2. You can populate the field in one of the following options:
* Static value – number / string. when using strings, you need to surround them with single quotes (‘).
* Property value from a previous activity (Using the tooltip that opens when clicking on the field).
* Expression – using [functions](/help/tools/enginis-functions) and/or Previous activity properties and/or static values (Using the tooltip that opens when clicking on the field).
3. *Add Field* - Click Add Field to add and populate additional fields for the selected activity. To learn more about managing activity data, [click here](/help/workflows/workflow-editor#add-fields).
### Add File to Item
Adds a file to an exists item.
 1. *Board*
* Click on the empty field and the tooltip will pop up showing all the boards that the user has accesses to.
* Choose from the list of boards in the tooltip the name of the board you want to add file to item in.
2. *Item ID*
* Select the item ID that is relevant. you can use:
* Static value – number / string. when using strings, you need to surround them with single quotes (‘).
* Property value from a previous activity (Using the tooltip that opens when clicking on the field).
3. *File Name*
* Click on the field to be shown the tooltip with all the files names that can be added to a field.
* Choose from the list in the tooltip the name of the file you want to add.
4. *Add Field* - Click Add Field to add and populate additional fields for the selected activity. To learn more about managing activity data, [click here](/help/workflows/workflow-editor#add-fields).
### Clear Files Column
Clears all files from a specific files column in an item.
1. *Board*
* Click on the empty field and the tooltip will pop up showing all the boards that the user has accesses to.
* Choose from the list of boards in the tooltip the name of the board you want to add file to item in.
2. *Item ID*
* Select the item ID that is relevant. you can use:
* Static value – number / string. when using strings, you need to surround them with single quotes (‘).
* Property value from a previous activity (Using the tooltip that opens when clicking on the field).
3. *File Name*
* Click on the field to be shown the tooltip with all the files names that can be added to a field.
* Choose from the list in the tooltip the name of the file you want to add.
4. *Add Field* - Click Add Field to add and populate additional fields for the selected activity. To learn more about managing activity data, [click here](/help/workflows/workflow-editor#add-fields).
### Clear Files Column
Clears all files from a specific files column in an item.
 1. *Board*
* Click on the empty field and the tooltip will pop up showing all the boards that the user has accesses to.
* Choose from the list of boards in the tooltip the name of the board you want to add file to item in.
2. *Item Id*
* Select the item ID that is relevant. you can use:
* Static value – number / string. when using strings, you need to surround them with single quotes (‘).
* Property value from a previous activity (Using the tooltip that opens when clicking on the field).
3. *Files Column* - The files column from which all files will be removed.
### Get Item by Column Value
The activity searches for items based on predefined column values and returns data about these specific items.
1. *Board*
* Click on the empty field and the tooltip will pop up showing all the boards that the user has accesses to.
* Choose from the list of boards in the tooltip the name of the board you want to add file to item in.
2. *Item Id*
* Select the item ID that is relevant. you can use:
* Static value – number / string. when using strings, you need to surround them with single quotes (‘).
* Property value from a previous activity (Using the tooltip that opens when clicking on the field).
3. *Files Column* - The files column from which all files will be removed.
### Get Item by Column Value
The activity searches for items based on predefined column values and returns data about these specific items.
 1. *Board*
* Click on the empty field and the tooltip will pop up showing all the boards that the user has accesses to.
* Choose from the list of boards in the tooltip the name of the board you want to create item in.
2. *Output Fields -* Allows you to select which fields will be returned in the output. Only the selected fields will be included in the response.
3. *Add Filter -* Click Add Filter to define conditions that narrow down the data list and return only the relevant items. To learn more about using filters, [click here](/help/workflows/workflow-editor#add-filters).
### Move Item to group
Moving an item from one group on the board to another group on the board.
1. *Board*
* Click on the empty field and the tooltip will pop up showing all the boards that the user has accesses to.
* Choose from the list of boards in the tooltip the name of the board you want to create item in.
2. *Output Fields -* Allows you to select which fields will be returned in the output. Only the selected fields will be included in the response.
3. *Add Filter -* Click Add Filter to define conditions that narrow down the data list and return only the relevant items. To learn more about using filters, [click here](/help/workflows/workflow-editor#add-filters).
### Move Item to group
Moving an item from one group on the board to another group on the board.
 1. *Item’s Boards*
* Click on the empty field and the tooltip will pop up showing all the boards that the user has accesses to.
* Choose from the list of boards in the tooltip the name of the board you want to update item in.
2. *Move to Group*
* Click on the empty field and the tooltip will pop up showing all the groups in the selected board.
* Select from the tooltip the name of the group in which you want to place the item in.
3. *Item ID*
* Select the item ID that is relevant. you can use:
* Static value – number / string. when using strings, you need to surround them with single quotes (‘).
* Property value from a previous activity (Using the tooltip that opens when clicking on the field).
### Delete Item
Permanently deletes an item from your Monday board based on the specified Item ID.
1. *Item’s Boards*
* Click on the empty field and the tooltip will pop up showing all the boards that the user has accesses to.
* Choose from the list of boards in the tooltip the name of the board you want to update item in.
2. *Move to Group*
* Click on the empty field and the tooltip will pop up showing all the groups in the selected board.
* Select from the tooltip the name of the group in which you want to place the item in.
3. *Item ID*
* Select the item ID that is relevant. you can use:
* Static value – number / string. when using strings, you need to surround them with single quotes (‘).
* Property value from a previous activity (Using the tooltip that opens when clicking on the field).
### Delete Item
Permanently deletes an item from your Monday board based on the specified Item ID.
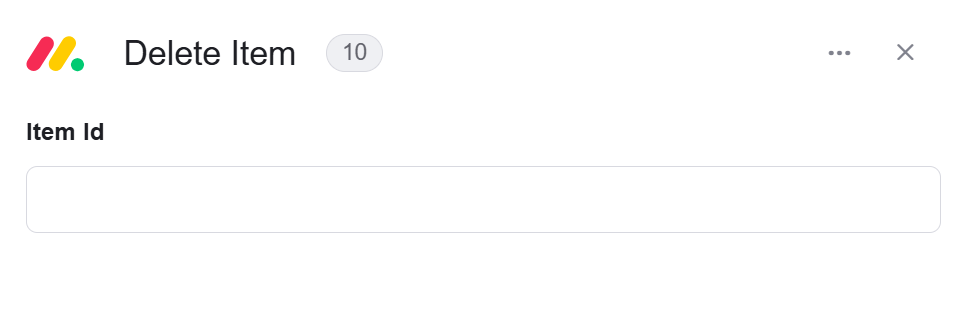 * *Item ID*
* Select the item ID that is relevant. you can use:
* Static value – number / string. when using strings, you need to surround them with single quotes (‘).
* Property value from a previous activity (Using the tooltip that opens when clicking on the field).
### Get Board List
Retrieves a list of available boards that can be used in the system.
* *Item ID*
* Select the item ID that is relevant. you can use:
* Static value – number / string. when using strings, you need to surround them with single quotes (‘).
* Property value from a previous activity (Using the tooltip that opens when clicking on the field).
### Get Board List
Retrieves a list of available boards that can be used in the system.
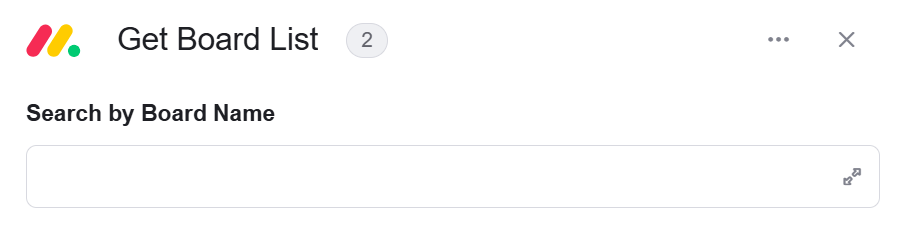 * *Search by Board Name* – Allows you to filter the results by entering a board name. Only boards that match the search text will be returned.
### Get Item Assets
Retrieves files associated with a specific item or related to a particular field of that item.
* *Search by Board Name* – Allows you to filter the results by entering a board name. Only boards that match the search text will be returned.
### Get Item Assets
Retrieves files associated with a specific item or related to a particular field of that item.
 1. *Board*
* Click on the empty field and the tooltip will pop up showing all the boards that the user has accesses to.
* Choose from the list of boards in the tooltip the name of the board you want to update item in.
2. *Item Id*
* Select the item ID that is relevant. you can use:
* Static value – number / string. when using strings, you need to surround them with single quotes (‘).
* Property value from a previous activity (Using the tooltip that opens when clicking on the field).
3. *Column field -* Retrieve files that are associated with a particular item or a particular column of the item. If is left blank, the files will be sourced from all fields.
1. *Board*
* Click on the empty field and the tooltip will pop up showing all the boards that the user has accesses to.
* Choose from the list of boards in the tooltip the name of the board you want to update item in.
2. *Item Id*
* Select the item ID that is relevant. you can use:
* Static value – number / string. when using strings, you need to surround them with single quotes (‘).
* Property value from a previous activity (Using the tooltip that opens when clicking on the field).
3. *Column field -* Retrieve files that are associated with a particular item or a particular column of the item. If is left blank, the files will be sourced from all fields.
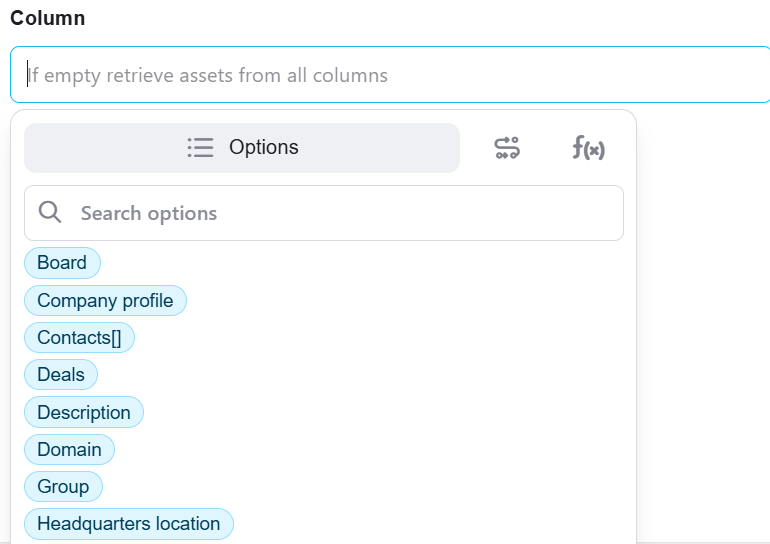 * Click on the empty field and the tooltip will pop up showing all the columns names that you can use.
* Choose from the list in the tooltip the name of the column you want to get the file from.
### Gey Item Updates
Retrieves the updates (activity, messages, or changes) associated with a specific item. Optionally, it can also include related assets such as attached files if requested.
* Click on the empty field and the tooltip will pop up showing all the columns names that you can use.
* Choose from the list in the tooltip the name of the column you want to get the file from.
### Gey Item Updates
Retrieves the updates (activity, messages, or changes) associated with a specific item. Optionally, it can also include related assets such as attached files if requested.
 1. *Item Id*
* Select the item ID that is relevant. you can use:
* Static value – number / string. when using strings, you need to surround them with single quotes (‘).
* Property value from a previous activity (Using the tooltip that opens when clicking on the field).
2. *Get Assets?* - Determines whether assets (such as files or attachments) related to the item update should also be retrieved. Set it to **true** to include the assets in the output, or **false** to return only the update information without the assets.
### Get Team
Retrieves information about a specific team.
1. *Item Id*
* Select the item ID that is relevant. you can use:
* Static value – number / string. when using strings, you need to surround them with single quotes (‘).
* Property value from a previous activity (Using the tooltip that opens when clicking on the field).
2. *Get Assets?* - Determines whether assets (such as files or attachments) related to the item update should also be retrieved. Set it to **true** to include the assets in the output, or **false** to return only the update information without the assets.
### Get Team
Retrieves information about a specific team.
 * *Team Id* - The unique ID of the team whose details you want to retrieve.
### Get Teams
Retrieves information about all the teams.
* *Team Id* - The unique ID of the team whose details you want to retrieve.
### Get Teams
Retrieves information about all the teams.
 ### Get User
Retrieves information about a specific user.
### Get User
Retrieves information about a specific user.
 * *User Id* - The unique ID of the user whose details you want to retrieve.
### Get Users
Retrieves information about all the users.
* *User Id* - The unique ID of the user whose details you want to retrieve.
### Get Users
Retrieves information about all the users.
 ### Describe Board Item Object
Retrieves the structure and available fields of an item object from the selected board. This helps understand which fields and properties can be used when working with items from that board.
### Describe Board Item Object
Retrieves the structure and available fields of an item object from the selected board. This helps understand which fields and properties can be used when working with items from that board.
 1. *Board Id*
* Click on the empty field and the tooltip will pop up showing all the boards that the user has accesses to.
* Choose from the list of boards in the tooltip the name of the board you want to update item in.
2. *Add Field* - Click Add Field to add and populate additional fields for the selected activity. To learn more about managing activity data, [click here](/help/workflows/workflow-editor#add-fields).
## Subitems
### Get Subitem
Get a specific subitem.
1. *Board Id*
* Click on the empty field and the tooltip will pop up showing all the boards that the user has accesses to.
* Choose from the list of boards in the tooltip the name of the board you want to update item in.
2. *Add Field* - Click Add Field to add and populate additional fields for the selected activity. To learn more about managing activity data, [click here](/help/workflows/workflow-editor#add-fields).
## Subitems
### Get Subitem
Get a specific subitem.
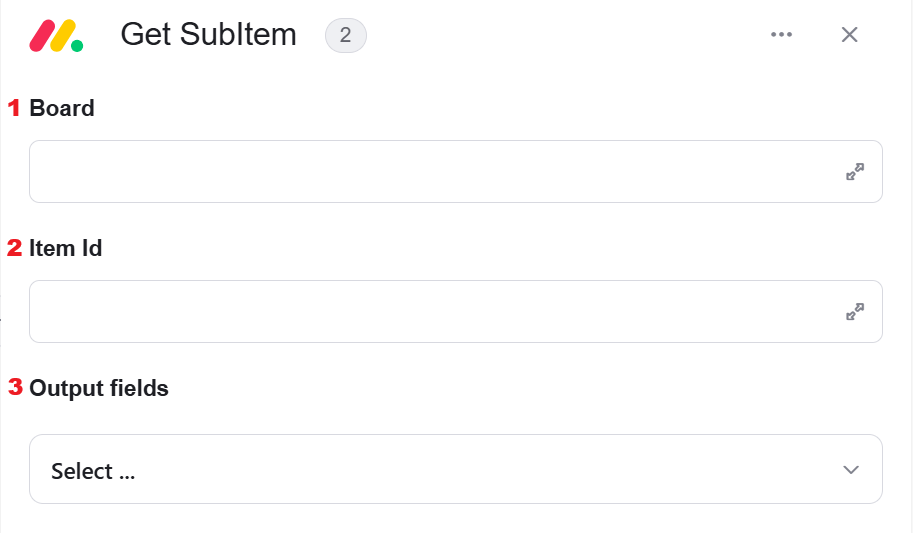 1. *Board*
* Click on the empty field and the tooltip will pop up showing all the boards that the user has accesses to.
* Choose from the list of boards in the tooltip the name of the board you want to update item in.
2. *Item ID*
* Select the item ID that is relevant. you can use:
* Static value – number / string. when using strings, you need to surround them with single quotes (‘).
* Property value from a previous activity (Using the tooltip that opens when clicking on the field).
3. *Output Fields -* Allows you to select which fields will be returned in the output. Only the selected fields will be included in the response.
### Create Subitem
Creates a new Subitem with specified column values and returns its ID.
1. *Board*
* Click on the empty field and the tooltip will pop up showing all the boards that the user has accesses to.
* Choose from the list of boards in the tooltip the name of the board you want to update item in.
2. *Item ID*
* Select the item ID that is relevant. you can use:
* Static value – number / string. when using strings, you need to surround them with single quotes (‘).
* Property value from a previous activity (Using the tooltip that opens when clicking on the field).
3. *Output Fields -* Allows you to select which fields will be returned in the output. Only the selected fields will be included in the response.
### Create Subitem
Creates a new Subitem with specified column values and returns its ID.
 1. *Board*
* Click on the empty field and the tooltip will pop up showing all the boards that the user has accesses to.
* Choose from the list of boards in the tooltip the name of the board you want to update item in.
2. *Parent item Id*
* Select the item ID that is relevant. you can use:
* Static value – number / string. when using strings, you need to surround them with single quotes (‘).
* Property value from a previous activity (Using the tooltip that opens when clicking on the field).
3. *Name -* Choose a significant name to the subitem.
* Select from the tooltip the name of the new item you create. you can use:
* Static value – number / string. when using strings, you need to surround them with single quotes (‘).
* Property value from a previous activity (Using the tooltip that opens when clicking on the field).
4. *Output fields -* Allows you to select which fields will be returned in the output. Only the selected fields will be included in the response.
5. *Add Field* - Click Add Field to add and populate additional fields for the selected activity. To learn more about managing activity data, [click here](/help/workflows/workflow-editor#add-fields).
### Update SubItem
Edits an existing subitem’s attributes.
1. *Board*
* Click on the empty field and the tooltip will pop up showing all the boards that the user has accesses to.
* Choose from the list of boards in the tooltip the name of the board you want to update item in.
2. *Parent item Id*
* Select the item ID that is relevant. you can use:
* Static value – number / string. when using strings, you need to surround them with single quotes (‘).
* Property value from a previous activity (Using the tooltip that opens when clicking on the field).
3. *Name -* Choose a significant name to the subitem.
* Select from the tooltip the name of the new item you create. you can use:
* Static value – number / string. when using strings, you need to surround them with single quotes (‘).
* Property value from a previous activity (Using the tooltip that opens when clicking on the field).
4. *Output fields -* Allows you to select which fields will be returned in the output. Only the selected fields will be included in the response.
5. *Add Field* - Click Add Field to add and populate additional fields for the selected activity. To learn more about managing activity data, [click here](/help/workflows/workflow-editor#add-fields).
### Update SubItem
Edits an existing subitem’s attributes.
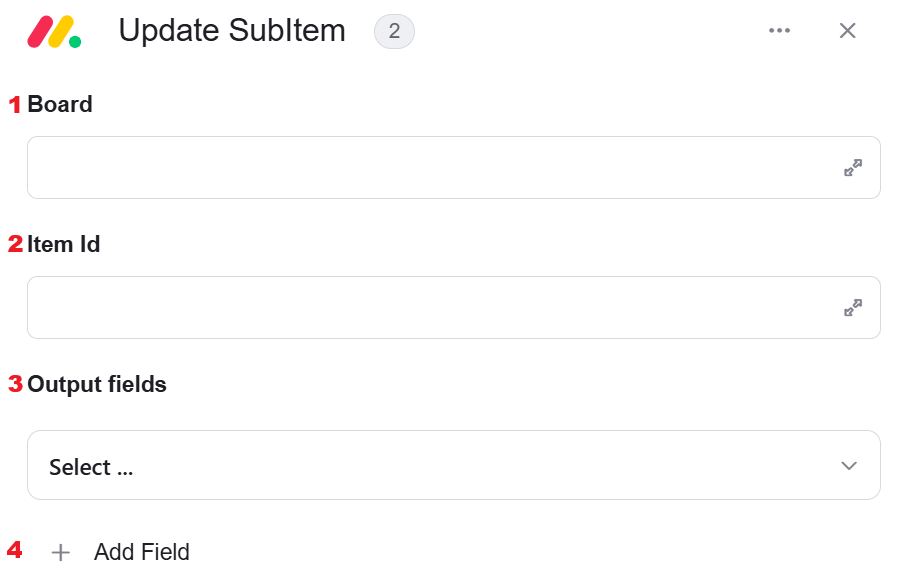 1. *Board*
* Click on the empty field and the tooltip will pop up showing all the boards that the user has accesses to.
* Choose from the list of boards in the tooltip the name of the board you want to update item in.
2. *Item ID*
* Select the item ID that is relevant. you can use:
* Static value – number / string. when using strings, you need to surround them with single quotes (‘).
* Property value from a previous activity (Using the tooltip that opens when clicking on the field).
3. *Output fields -* Allows you to select which fields will be returned in the output. Only the selected fields will be included in the response.
4. *Add Field* - Click Add Field to add and populate additional fields for the selected activity. To learn more about managing activity data, [click here](/help/workflows/workflow-editor#add-fields).
### Get Subitems
Retrieves multiple/all items that are selected from the board using a parent item.
1. *Board*
* Click on the empty field and the tooltip will pop up showing all the boards that the user has accesses to.
* Choose from the list of boards in the tooltip the name of the board you want to update item in.
2. *Item ID*
* Select the item ID that is relevant. you can use:
* Static value – number / string. when using strings, you need to surround them with single quotes (‘).
* Property value from a previous activity (Using the tooltip that opens when clicking on the field).
3. *Output fields -* Allows you to select which fields will be returned in the output. Only the selected fields will be included in the response.
4. *Add Field* - Click Add Field to add and populate additional fields for the selected activity. To learn more about managing activity data, [click here](/help/workflows/workflow-editor#add-fields).
### Get Subitems
Retrieves multiple/all items that are selected from the board using a parent item.
 1. *Board*
* Click on the empty field and the tooltip will pop up showing all the boards that the user has accesses to.
* Choose from the list of boards in the tooltip the name of the board you want to update item in.
2. *Parent Item ID*
1. Click on the field to be shown the tooltip with all the items ID you can use. Note that you choose an ID number and not a name.
2. select the Item ID to which you would like to add the Subitem (the item id of the subitem’s parent).
3. *Output Fields -* Allows you to select which fields will be returned in the output. Only the selected fields will be included in the response.
## Connect Board
### Initialize Connect Board Array
The activity “Initialize Connect Board Array” populates the name field with a default connect board name. If you have several connections to the board, it is recommended to change the default name.
1. *Board*
* Click on the empty field and the tooltip will pop up showing all the boards that the user has accesses to.
* Choose from the list of boards in the tooltip the name of the board you want to update item in.
2. *Parent Item ID*
1. Click on the field to be shown the tooltip with all the items ID you can use. Note that you choose an ID number and not a name.
2. select the Item ID to which you would like to add the Subitem (the item id of the subitem’s parent).
3. *Output Fields -* Allows you to select which fields will be returned in the output. Only the selected fields will be included in the response.
## Connect Board
### Initialize Connect Board Array
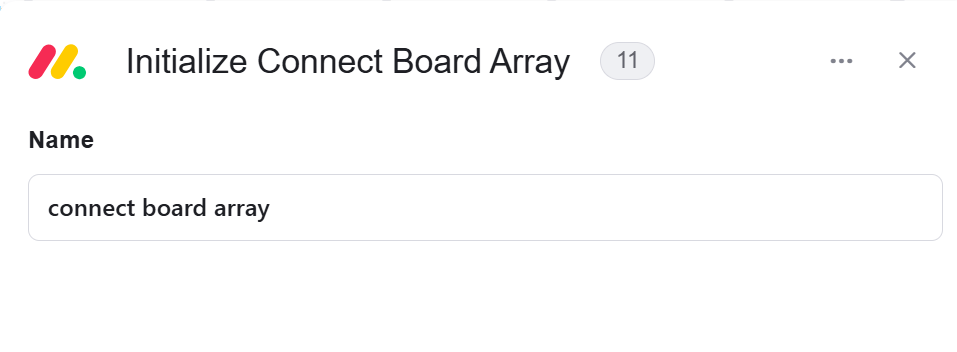
The activity “Initialize Connect Board Array” populates the name field with a default connect board name. If you have several connections to the board, it is recommended to change the default name.
 ### Append To Connect Board Array
This activity depends on the “Initialize Connect Board Array” activity.
First you have to initialize array, then you can append to the array.
### Append To Connect Board Array
This activity depends on the “Initialize Connect Board Array” activity.
First you have to initialize array, then you can append to the array.
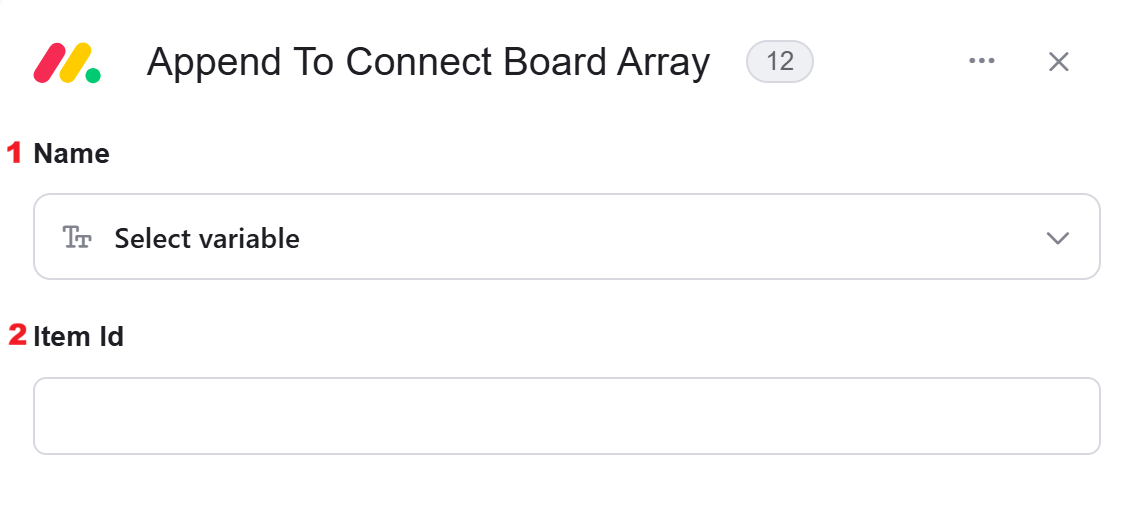 1. *Name -* Choose a significant name.
2. *Item Id*
1. Click on the empty field and the tooltip will pop up showing all the items ID you can use.
Note that you choose an ID and not a name.
2. Select the item ID that is relevant. you can use:
* Static value – number / string. when using strings, you need to surround them with single quotes (‘).
* Property value from a previous activity (Using the tooltip that opens when clicking on the field).
### Initialize Users\&Teams Array
The activity “Initialize Users\&Teams Array” populates the name field with a default Users\&Teams name. If you have several users ot teams , it is recommended to change the default name.
1. *Name -* Choose a significant name.
2. *Item Id*
1. Click on the empty field and the tooltip will pop up showing all the items ID you can use.
Note that you choose an ID and not a name.
2. Select the item ID that is relevant. you can use:
* Static value – number / string. when using strings, you need to surround them with single quotes (‘).
* Property value from a previous activity (Using the tooltip that opens when clicking on the field).
### Initialize Users\&Teams Array
The activity “Initialize Users\&Teams Array” populates the name field with a default Users\&Teams name. If you have several users ot teams , it is recommended to change the default name.
 ### Append To Users\&Teams Array
This activity depends on the “Initialize Users\&Teams Array” activity.
First you have to initialize array, then you can append to the array.
### Append To Users\&Teams Array
This activity depends on the “Initialize Users\&Teams Array” activity.
First you have to initialize array, then you can append to the array.
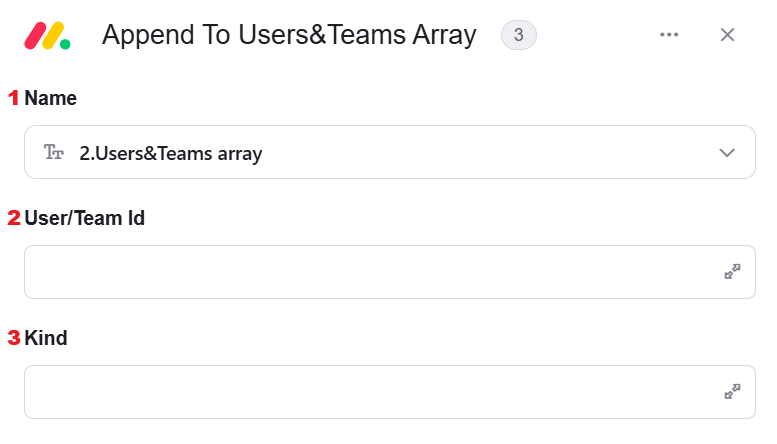 1. *Name -* Choose a significant name.
2. *User/Team Id* - The unique ID of the user or team that should be added to the Users & Teams array.
3. *Kind* - Defines whether the provided ID belongs to a **person** or a **team**. This tells the system how to treat the ID when adding it to the array.
## General Actions
### Send API Request
Sends a custom API request to Monday.com using a query. This allows you to retrieve or manipulate data that may not be available through the predefined actions by using Monday’s API directly.
1. *Name -* Choose a significant name.
2. *User/Team Id* - The unique ID of the user or team that should be added to the Users & Teams array.
3. *Kind* - Defines whether the provided ID belongs to a **person** or a **team**. This tells the system how to treat the ID when adding it to the array.
## General Actions
### Send API Request
Sends a custom API request to Monday.com using a query. This allows you to retrieve or manipulate data that may not be available through the predefined actions by using Monday’s API directly.
 * *Query* - The API query (usually a GraphQL query) that defines what data should be retrieved or what action should be performed in Monday.com.
## Column types referance
When creating or updating records in Engini, it’s crucial to ensure that the values you populate align with the expected format of each column type in Monday.com.
This section provides a detailed reference to help you correctly handle various column types:
* ***Date***
This column returns a date only by default. If you want to get or populate both the time and date, You need to go to the Monday.com column settings, click on ‘Customize Date Column’ and check the ‘Show time by default’ option. After making this change, delete the name of the board from the activity in Engini and select it again to refresh the current column settings.
* ***Timeline***
To work with a timeline column, you need to use two fields: Timeline From and Timeline To. These fields allow you to specify the start and end dates for the timeline.
* ***Status***
The status column is used to track the current state of an item. You can set or retrieve the status using predefined labels or values.
* ***Label/Dropdown***
This column allows for the selection of predefined options. You can populate this field by providing the appropriate label or value that matches the options available in the dropdown.
For more details on how to Populate dropdown field, [click here](/help/tutorials/populating-dropdown-field-on-mondaycom).
* ***Connect Board***
The connect board column links items across different boards. When working with this column, you should use the “Initialize Connect Board Array” and “Append to Connect Board Array” activities to manage the connections. The resulting array should be placed in the connect board column itself.
For more details on how to work with connect board columns, [click here](/help/apps/mondaycom#append-to-connect-board-array) .
* ***Number***
The number column is used for numeric values. When populating this field, ensure you provide a valid number format.
* ***Text***
The text column is designed for freeform text input. You can populate this field with any string value.
* ***People***
The people column is used to assign users to an item. You can populate this field with the user’s ID or select the user from the available options. In order to automatically update the People column by one or more, follow those steps:
* *Select the ‘Get Users’ activity*– This activity retrieves all users associated with your Monday account.
* *Select the ‘Initialize Users\&Teams Array’ activity* – This initializes an array where you can add user and team objects.
* *Select the ‘Sort & Filter’ activity* – Use this activity to filter the users array obtained from the ‘Get Users’ activity based on the ‘User ID’, ‘Name’, or any other relevant field.
* *Select the ‘Append To Users\&Teams Array’ activity* – Add the filtered user’s ID to the initialized array.
* *Select the ‘Create Item’ activity* – Specify the board, group, and name of the new item. Then, add the “Person” field and set it to the user array you created earlier.
* *Update the People column by more than one person:* If you wish to add more than one person, you can repeat this process within a loop, continuously adding users to the array.
* ***Link***
The link column allows you to add URLs to an item. When populating this field, ensure you provide a valid URL string. You can also combine URLs with other dynamic content from previous activities in the workflow by using expressions.
This documentation is built and hosted on [Mintlify](https://mintlify.com), a developer documentation platform.
* *Query* - The API query (usually a GraphQL query) that defines what data should be retrieved or what action should be performed in Monday.com.
## Column types referance
When creating or updating records in Engini, it’s crucial to ensure that the values you populate align with the expected format of each column type in Monday.com.
This section provides a detailed reference to help you correctly handle various column types:
* ***Date***
This column returns a date only by default. If you want to get or populate both the time and date, You need to go to the Monday.com column settings, click on ‘Customize Date Column’ and check the ‘Show time by default’ option. After making this change, delete the name of the board from the activity in Engini and select it again to refresh the current column settings.
* ***Timeline***
To work with a timeline column, you need to use two fields: Timeline From and Timeline To. These fields allow you to specify the start and end dates for the timeline.
* ***Status***
The status column is used to track the current state of an item. You can set or retrieve the status using predefined labels or values.
* ***Label/Dropdown***
This column allows for the selection of predefined options. You can populate this field by providing the appropriate label or value that matches the options available in the dropdown.
For more details on how to Populate dropdown field, [click here](/help/tutorials/populating-dropdown-field-on-mondaycom).
* ***Connect Board***
The connect board column links items across different boards. When working with this column, you should use the “Initialize Connect Board Array” and “Append to Connect Board Array” activities to manage the connections. The resulting array should be placed in the connect board column itself.
For more details on how to work with connect board columns, [click here](/help/apps/mondaycom#append-to-connect-board-array) .
* ***Number***
The number column is used for numeric values. When populating this field, ensure you provide a valid number format.
* ***Text***
The text column is designed for freeform text input. You can populate this field with any string value.
* ***People***
The people column is used to assign users to an item. You can populate this field with the user’s ID or select the user from the available options. In order to automatically update the People column by one or more, follow those steps:
* *Select the ‘Get Users’ activity*– This activity retrieves all users associated with your Monday account.
* *Select the ‘Initialize Users\&Teams Array’ activity* – This initializes an array where you can add user and team objects.
* *Select the ‘Sort & Filter’ activity* – Use this activity to filter the users array obtained from the ‘Get Users’ activity based on the ‘User ID’, ‘Name’, or any other relevant field.
* *Select the ‘Append To Users\&Teams Array’ activity* – Add the filtered user’s ID to the initialized array.
* *Select the ‘Create Item’ activity* – Specify the board, group, and name of the new item. Then, add the “Person” field and set it to the user array you created earlier.
* *Update the People column by more than one person:* If you wish to add more than one person, you can repeat this process within a loop, continuously adding users to the array.
* ***Link***
The link column allows you to add URLs to an item. When populating this field, ensure you provide a valid URL string. You can also combine URLs with other dynamic content from previous activities in the workflow by using expressions.
This documentation is built and hosted on [Mintlify](https://mintlify.com), a developer documentation platform.