> ## Documentation Index
> Fetch the complete documentation index at: https://docs.engini.ai/llms.txt
> Use this file to discover all available pages before exploring further.
# Azure OpenAI
Using Engini’s Azure OpenAI activities, you can: create, get and update records to manage and define databases.
## Getting Started with Azure OpenAI
### Prerequisites
* A Azure OpenAI account
* Azure OpenAI Key
## Connecting Engini to Azure OpenAI
To connect your Azure services (like OpenAI or Cognitive Services) to Engini, you will need an **API Key** and an **Endpoint**. Here is how to find them:
1. *Sign in to the Azure Portal -* Log in to your account at [portal.azure.com](https://portal.azure.com).
2. *Sign In to Microsoft -* Before you can access your resources, you must authenticate
 3. *Locate your Resource -* Once you are logged into the dashboard:
 * Use the **top search bar** to find your specific service (e.g., *"Azure OpenAI"* or *"Cognitive Services"*).
* Select your resource from the results list.
4. *Retrieve Keys and Endpoint -* In the left-hand sidebar, navigate to the **Resource Management** section.
* Click on **Keys and Endpoint**.
* Use the **top search bar** to find your specific service (e.g., *"Azure OpenAI"* or *"Cognitive Services"*).
* Select your resource from the results list.
4. *Retrieve Keys and Endpoint -* In the left-hand sidebar, navigate to the **Resource Management** section.
* Click on **Keys and Endpoint**.
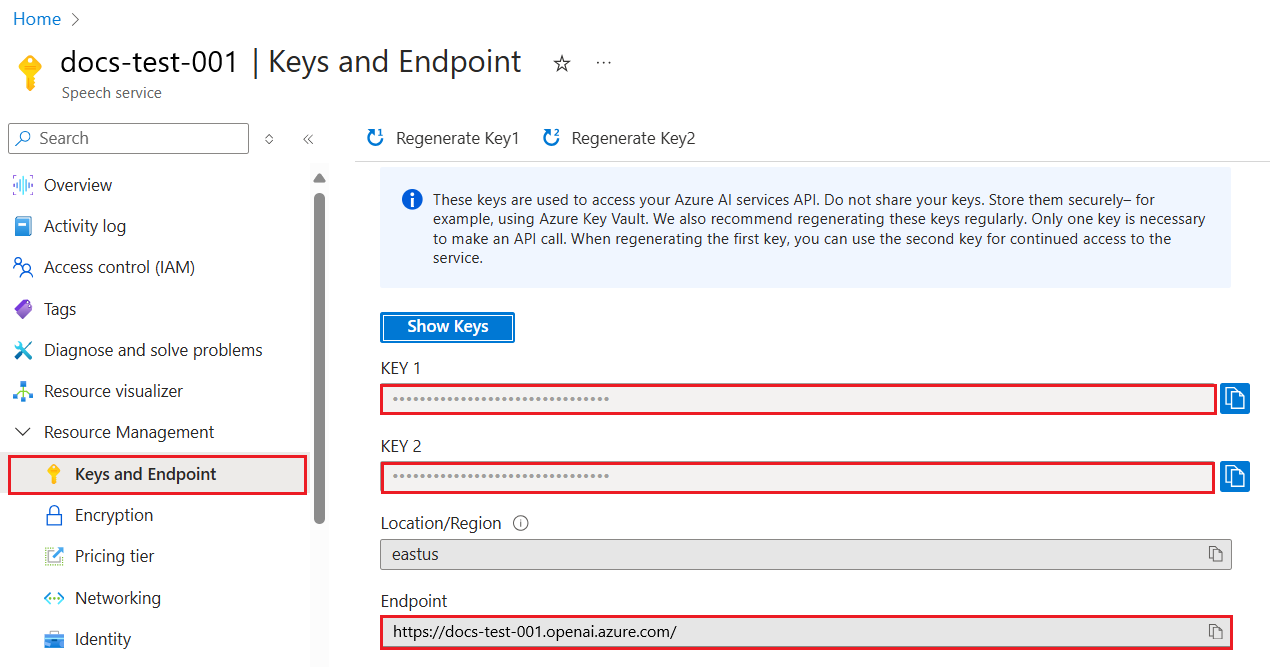 * *Copy your Key -* You will see **KEY 1** and **KEY 2**. Click the "Copy to clipboard" icon next to either one.
* *Copy your Endpoint -* Copy the URL listed under **Endpoint** (e.g., [https://your-name.openai.azure.com/](https://your-name.openai.azure.com/)).
### Add a connection to Azure OpenAI in Engini
1. Enter your Engini account at [https://app.engini.io](https://app.engini.io).
2. Navigate to Connections page by clicking on the Connections on the left sidebar or by clicking [here](https://app.engini.io/connections).
* *Copy your Key -* You will see **KEY 1** and **KEY 2**. Click the "Copy to clipboard" icon next to either one.
* *Copy your Endpoint -* Copy the URL listed under **Endpoint** (e.g., [https://your-name.openai.azure.com/](https://your-name.openai.azure.com/)).
### Add a connection to Azure OpenAI in Engini
1. Enter your Engini account at [https://app.engini.io](https://app.engini.io).
2. Navigate to Connections page by clicking on the Connections on the left sidebar or by clicking [here](https://app.engini.io/connections).
 3. Click on the "New Integration" option located at the top bar.
 4. Choose Azure OpenAI option from the available applications
 5. Enter the following details in the “New Integration” form and press Save:
 1. *Connection name -* Enter a unique and descriptive name for this connection. This name will help you identify and manage the connection in your Engini account. “Azure OpenAI” by default.
2. *Url -* Enter your Azure OpenAI URL here.
3. *Api Key -* Enter the access token you obtained from Azure OpenAI.
4. *Deployment Name -* This field requires the unique name of your Azure OpenAI deployment.
You can deploy different types of models, for example:
* *LLM models* - GPT models for text generation and chat
* *DALL·E 3* - for image generation
* *Whisper* - for speech-to-text transcription
Make sure the deployment name matches exactly (case-sensitive) the one configured in Azure.
5. *API Version -* This field requires the Azure OpenAI API version used by your deployment. Enter the exact API version string supported by your Azure OpenAI resource (for example: 2024-02-15-preview).
6. *Save Settings –* Saves the connection configuration and applies the selected settings.
**Note:** The Azure OpenAI API URL is deployment-specific. Each connection is tied to a single deployment name. If you want to use multiple deployments (for example, one for text generation and another for image generation), you must create a separate Azure OpenAI connection for each deployment.
1. *Connection name -* Enter a unique and descriptive name for this connection. This name will help you identify and manage the connection in your Engini account. “Azure OpenAI” by default.
2. *Url -* Enter your Azure OpenAI URL here.
3. *Api Key -* Enter the access token you obtained from Azure OpenAI.
4. *Deployment Name -* This field requires the unique name of your Azure OpenAI deployment.
You can deploy different types of models, for example:
* *LLM models* - GPT models for text generation and chat
* *DALL·E 3* - for image generation
* *Whisper* - for speech-to-text transcription
Make sure the deployment name matches exactly (case-sensitive) the one configured in Azure.
5. *API Version -* This field requires the Azure OpenAI API version used by your deployment. Enter the exact API version string supported by your Azure OpenAI resource (for example: 2024-02-15-preview).
6. *Save Settings –* Saves the connection configuration and applies the selected settings.
**Note:** The Azure OpenAI API URL is deployment-specific. Each connection is tied to a single deployment name. If you want to use multiple deployments (for example, one for text generation and another for image generation), you must create a separate Azure OpenAI connection for each deployment.
 ## Actions
### Create Transcription
This action provides a setup for defining which model deployment to use and the specific file data to be processed for transcription.
## Actions
### Create Transcription
This action provides a setup for defining which model deployment to use and the specific file data to be processed for transcription.
 1. *Add Field* - Click Add Field to add and populate additional fields for the selected activity. To learn more about managing activity data, [click here](/help/workflows/workflow-editor#add-fields).
2. *Filename -* A text field where you specify the name of the file being transcribed. This helps in identifying and organizing the output in relation to the source file.
3. *Content (Base64) -* This field requires the actual file content encoded in Base64 format. This allows the audio or document data to be transmitted as a text string for processing.
Note: For transcription tasks, you must use the **Whisper** model, as it is the only supported model for converting audio to text in this action.
### Create Translation
This action allows users to submit an audio or document file to be translated into English through a specific model deployment.
1. *Add Field* - Click Add Field to add and populate additional fields for the selected activity. To learn more about managing activity data, [click here](/help/workflows/workflow-editor#add-fields).
2. *Filename -* A text field where you specify the name of the file being transcribed. This helps in identifying and organizing the output in relation to the source file.
3. *Content (Base64) -* This field requires the actual file content encoded in Base64 format. This allows the audio or document data to be transmitted as a text string for processing.
Note: For transcription tasks, you must use the **Whisper** model, as it is the only supported model for converting audio to text in this action.
### Create Translation
This action allows users to submit an audio or document file to be translated into English through a specific model deployment.
 1. *Add Field* - Click Add Field to add and populate additional fields for the selected activity. To learn more about managing activity data, [click here](/help/workflows/workflow-editor#add-fields).
2. *Filename -* A text input where the user enters the name of the source file. This serves as a label to track and identify the specific content being processed.
3. *Content (Base64) -* This field is for the actual data of the file, converted into a Base64 string. This encoding ensures the file content is transmitted correctly as text for the AI to process.
Note: For translation tasks, the **Whisper** model is the exclusive requirement, as it is the only model supported for these specific audio translation operations.
### Create Chat Completion
This action is used to generate AI responses based on a provided conversational history or a set of instructions.
1. *Add Field* - Click Add Field to add and populate additional fields for the selected activity. To learn more about managing activity data, [click here](/help/workflows/workflow-editor#add-fields).
2. *Filename -* A text input where the user enters the name of the source file. This serves as a label to track and identify the specific content being processed.
3. *Content (Base64) -* This field is for the actual data of the file, converted into a Base64 string. This encoding ensures the file content is transmitted correctly as text for the AI to process.
Note: For translation tasks, the **Whisper** model is the exclusive requirement, as it is the only model supported for these specific audio translation operations.
### Create Chat Completion
This action is used to generate AI responses based on a provided conversational history or a set of instructions.
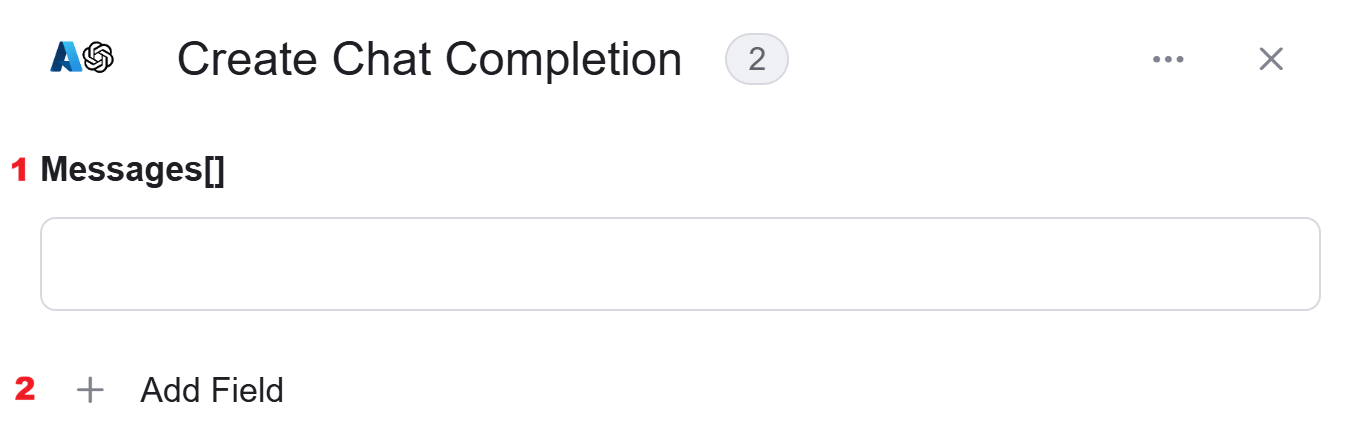 1. *Messages\[] -* This field accepts an **array of objects** (initialized from an object array) representing the conversation history. Each object typically includes a "role" (system, user, or assistant) and the "content" of the message to provide context for the AI's response.
2. *Add Field* - Click Add Field to add and populate additional fields for the selected activity. To learn more about managing activity data, [click here](/help/workflows/workflow-editor#add-fields).
Note: For chat completion, you should use large language models (LLMs) such as **GPT-4o**, **GPT-4 Turbo**, or **GPT-3.5 Turbo**.
### Generate Image
This action enables the creation of original images from textual descriptions by utilizing the DALL-E 3 model.
1. *Messages\[] -* This field accepts an **array of objects** (initialized from an object array) representing the conversation history. Each object typically includes a "role" (system, user, or assistant) and the "content" of the message to provide context for the AI's response.
2. *Add Field* - Click Add Field to add and populate additional fields for the selected activity. To learn more about managing activity data, [click here](/help/workflows/workflow-editor#add-fields).
Note: For chat completion, you should use large language models (LLMs) such as **GPT-4o**, **GPT-4 Turbo**, or **GPT-3.5 Turbo**.
### Generate Image
This action enables the creation of original images from textual descriptions by utilizing the DALL-E 3 model.
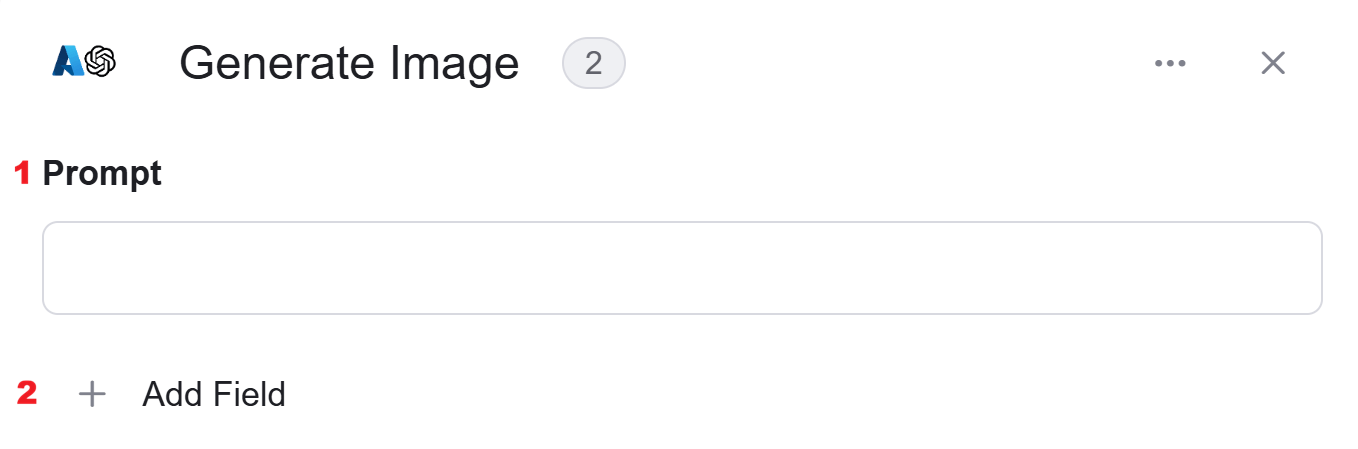 1. *Prompt -* A text area where you provide a detailed description of the image you want the AI to create. The more specific the instructions, the more accurate the generated visual output will be.
2. *Add Field* - Click Add Field to add and populate additional fields for the selected activity. To learn more about managing activity data, [click here](/help/workflows/workflow-editor#add-fields).
Note: To generate images, you must use the **DALL-E 3** model, as these are the specialized models for text-to-image tasks.
### Initialize Object Array
The Initialize object array allows users to define and initialize a structured array of objects that can be used as input for subsequent steps, such as conversational history in chat completions.
1. *Prompt -* A text area where you provide a detailed description of the image you want the AI to create. The more specific the instructions, the more accurate the generated visual output will be.
2. *Add Field* - Click Add Field to add and populate additional fields for the selected activity. To learn more about managing activity data, [click here](/help/workflows/workflow-editor#add-fields).
Note: To generate images, you must use the **DALL-E 3** model, as these are the specialized models for text-to-image tasks.
### Initialize Object Array
The Initialize object array allows users to define and initialize a structured array of objects that can be used as input for subsequent steps, such as conversational history in chat completions.
 1. *Variable Name -* This field is for entering a unique name for the array being created. This name acts as a reference variable that allows you to access this specific set of data later in your workflow.
2. *Object Element Type -* This dropdown menu allows you to select the specific schema or category for the objects within the array. It ensures that the data structured in the array follows the correct format required by the intended AI model.
3. *Add Field* - Click Add Field to add and populate additional fields for the selected activity. To learn more about managing activity data, [click here](/help/workflows/workflow-editor#add-fields).
### Append to Object Array
append to object array allows users to add a new data entry to an existing array that was previously created in the workflow, such as an array of chat messages.
1. *Variable Name -* This field is for entering a unique name for the array being created. This name acts as a reference variable that allows you to access this specific set of data later in your workflow.
2. *Object Element Type -* This dropdown menu allows you to select the specific schema or category for the objects within the array. It ensures that the data structured in the array follows the correct format required by the intended AI model.
3. *Add Field* - Click Add Field to add and populate additional fields for the selected activity. To learn more about managing activity data, [click here](/help/workflows/workflow-editor#add-fields).
### Append to Object Array
append to object array allows users to add a new data entry to an existing array that was previously created in the workflow, such as an array of chat messages.
 * *Variable -* This dropdown menu allows you to select a pre-existing array created by the [Initialize Object Array](/help/apps/azure-openai#initialize-object-array), once selected, the interface automatically generates input fields based on the specific object type (such as "Messages") to let you add new data to that array.
### Send API Request
This interface allows users to perform a Send API Request action within the Azure OpenAI Studio. It is used to manually configure and execute custom HTTP requests to specific Azure OpenAI endpoints for advanced integration or specialized tasks.
* *Variable -* This dropdown menu allows you to select a pre-existing array created by the [Initialize Object Array](/help/apps/azure-openai#initialize-object-array), once selected, the interface automatically generates input fields based on the specific object type (such as "Messages") to let you add new data to that array.
### Send API Request
This interface allows users to perform a Send API Request action within the Azure OpenAI Studio. It is used to manually configure and execute custom HTTP requests to specific Azure OpenAI endpoints for advanced integration or specialized tasks.
 1. *Base Url -* This field displays the primary endpoint address for your Azure OpenAI resource; the resource name is automatically fetched and populated from your connector settings, typically following the format https\://\{your-resource-name}.openai.azure.com.
2. *Relative Url -* This field is for entering the specific API path corresponding to the service you want to call, such as completions or embeddings.
3. *Method -* This dropdown specifies the HTTP verb for the request, with POST being the default for sending data payloads to the model.
4. *Body Type -* This indicates the format of the data being sent, pre-set to application/json to ensure compatibility with Azure OpenAI's API requirements.
5. *Body -* A text area where you enter the raw JSON payload containing the parameters and instructions for the API request.
6. *Add Headers -* A functional button to include necessary metadata with the request, such as your api-key for authentication.
7. *Add Queries -* An option to append specific query parameters to the URL to further refine the API call.
This documentation is built and hosted on [Mintlify](https://mintlify.com), a developer documentation platform.
1. *Base Url -* This field displays the primary endpoint address for your Azure OpenAI resource; the resource name is automatically fetched and populated from your connector settings, typically following the format https\://\{your-resource-name}.openai.azure.com.
2. *Relative Url -* This field is for entering the specific API path corresponding to the service you want to call, such as completions or embeddings.
3. *Method -* This dropdown specifies the HTTP verb for the request, with POST being the default for sending data payloads to the model.
4. *Body Type -* This indicates the format of the data being sent, pre-set to application/json to ensure compatibility with Azure OpenAI's API requirements.
5. *Body -* A text area where you enter the raw JSON payload containing the parameters and instructions for the API request.
6. *Add Headers -* A functional button to include necessary metadata with the request, such as your api-key for authentication.
7. *Add Queries -* An option to append specific query parameters to the URL to further refine the API call.
This documentation is built and hosted on [Mintlify](https://mintlify.com), a developer documentation platform.